1 Feature Summary
Oracle Retail Store Inventory Operations Cloud Services includes the following applications:
-
Oracle Retail Enterprise Inventory Cloud Service (EICS)
-
Oracle Retail Store Operations Cloud Service (SOCS)
This chapter describes the feature enhancements in this release.
Noteworthy Enhancements
This guide outlines the information you need to know about new or improved functionality in the Oracle Retail Store Inventory Operations Cloud Services update and describes any tasks you might need to perform for the update. Each section includes a brief description of the feature, the steps you need to take to enable or begin using the feature, any tips or considerations that you should keep in mind, and the resources available to help you.
Column Definitions
-
Feature: Provides a description of the feature being delivered.
-
Module Impacted: Identifies the module impacted associated with the feature, if any.
-
Scale: Identifies the size of the feature. Options are:
-
Small: These UI or process-based features are typically comprised of minor field, validation, or program changes. Therefore, the potential impact to users is minimal.
-
Medium: These UI or process-based features are typically comprised of field, validation, or program changes. Therefore, the potential impact to users is moderate.
-
Large: These UI or process-based features have more complex designs. Therefore, the potential impact to users is higher.
-
-
Delivered: Identifies whether the feature is Enabled or Disabled upon initial delivery.
- Customer Action Required: You must take action before these features can be used. These features are delivered disabled and you choose if and when to enable them.
Table 1-1 Noteworthy Enhancements
| Feature | Module Impacted | Scale | Delivered | Customer Action Required? |
|---|---|---|---|---|
|
SOCS |
Large |
No |
Yes Download app, configure, and deploy by third‑party MDM. In the case of using the Web Browser version, use the correct link. |
|
|
SOCS |
Small |
Yes |
Optionally change the timeout warning when generating the APK for MAF. | |
|
EICS |
Medium |
Yes |
No | |
| Report Updates |
EICS and SOCS |
Small |
Yes |
No. automatically applied. |
| Session Refresh |
EICS and SOCS |
Small | Yes | No. automatically applied. |
| User Inactivity Timeout |
EICS and SOCS |
Small | Yes | No. automatically applied, but may need updates based on IDCS settings. |
New Feature Descriptions
This section describes the new features.
Jet Mobile
With this release, SIOCS is adding a significant portion of those workflows that had not yet been converted to Jet Mobile. This release will include Transfer Receiving, RTV shipping, Store Orders, and Direct Store Deliveries.
In addition to those features already in MAF, Jet Mobile added several additional functions that should be evaluated for inclusion when rolling out. Most of these features are configurable:
- Return to Vendor (RTV) improvements:
- Creation of RTV document and ship directly from within the document.
- Shipment without container.
- Shipment with a single container or multiple containers.
- One screen (Item Detail) to ship both available and unavailable inventory together.
- One screen (Item Detail) where an item can be shipped for multiple reason codes (multiple reason codes can be added in the same screen).
- Edit Shipment/Container, Edit Custom Flexible Attributes (CFAs), and Info screen combined into one screen.
- Restrict over-shipping.
-
Direct Store Delivery (DSD) Improvements:
- Creation of on-the-fly DSD or delivery against Purchase Order (PO) with ASN without container.
- Introduction of scan and search contain, item, and transactions on list screens to find DSD.
- Create receipt flow on the delivery list is upgraded to support PO lookup and create on the fly PO based deliveries rather than coming through the Purchase order list flow.
- Simplified Info screen with read, edit, and CFA information instead of multiple screens.
- Improved receiving the entire DSD workflow to reduce accidental receiving without quantities.
- DSD list screen has PO information for easier receiving.
- Transfer receiving:
- Receive without container, when shipped without container.
- Changing Receiving mode, Display options moved to the top of the screen from the footer menu for easier access and visibility.
- Simplified Info screen with read, edit, and CFA information instead of multiple screens.
- Default damage remaining and default receive remaining moved to the top of the screen from the footer menu for easy access.
- Over receiving restrictions based on permission and source (store, warehouse, or finisher).
- Ability to adjust missing containers and receive them.
To easily evaluate the benefit of starting the Jet Mobile implementation, below is a table that lists which workflows exist in MAF, and which have so far been converted into Jet Mobile. Some dialogs only exist in Jet Mobile as part of the quick execution concepts.
| Function | MAF | Jet Mobile |
|---|---|---|
| Item Lookup | Yes | Yes |
| Inventory Adjustment | Yes | Yes |
| Stock Count (all) | Yes | Yes |
| ASN level Transfer receiving | Yes | Yes |
| Transfer Ship | Yes | Yes |
| DSD | Yes | Yes |
| Store Orders | Yes | Yes |
| RTV | Yes | Yes |
| Transfer Detail Receipt | Yes | Yes |
| Quick Container Receiving - DSD | No | Yes |
| Quick Container Receiving - Transfer | Yes | Yes |
| Customer Order Light | No | Yes |
| Store Orders Light | No | Yes |
| Item Maintenance | No | Yes |
| Quick Count | No | Yes |
| Transfer Request | Yes | Yes |
| Customer Order Full (bulk picking) | Yes | No |
| Item Basket | Yes | No |
| Ticketing | Yes | No |
| In Store Replenishment | Yes | No |
| Shopfloor /Backroom Management | Yes | No |
| RFID | Yes | No |
Store Orders (Jet Mobile)
Store Orders allows a store to request items to be ordered to the store or to review, modify, and approve orders created by an external ordering system. The items being requested may come from a supplier or a warehouse. The system allows a user to capture items and their quantities to be ordered as well as define restrictions for the store order. The inventory is sourced to the store based on the corporate replenishment setup. This can be either a delivery from a warehouse or a drop ship from the supplier. The actual sourcing, delivery timings, and final quantities remain a function of the replenishment system. Store Orders may be created manually on the mobile application. They may also come in from an external system and the user can enter quantities against the external order quantity. Features:
- Create a new store order
- View or edit an existing store order
- Delete an In Progress store order
- Submit and Approve a store order
- Copy a Completed store order
- Print Store Order Report
Store Orders Jet Mobile Screen Flow
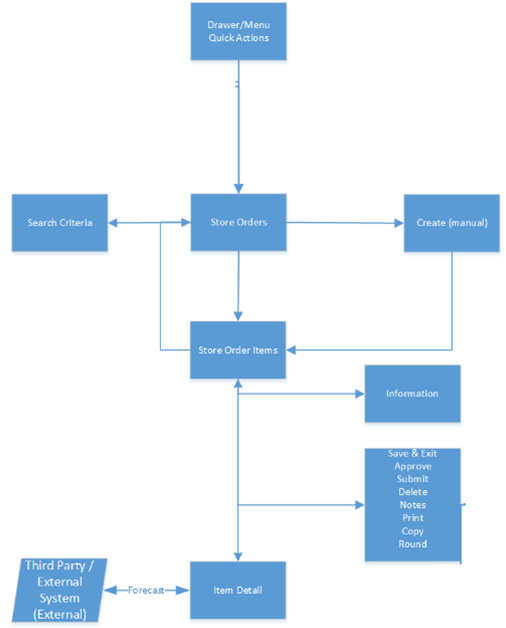
Store Orders are accessed within the Inventory Management menu in the drawer or by selecting Store Orders from Quick Actions. Selecting the Store Orders menu option takes you to the Store Orders screen. On this screen, you have the option to search for existing store order records. You can create a store order, edit, or view a store order. When creating, editing, or viewing a store order, you are first directed to the list of items on the Store Order Items screen. You can add, view, and edit the details of the items on the Item Detail screen. You can specify values for CFAs (Custom Flexible Attributes) set up for store order through the Information screen.
Store Orders Screen
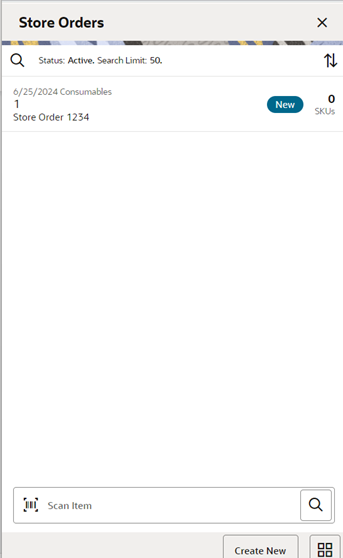
When navigating to Store Orders, the Store Orders (list) screen by default displays the Active status store orders which include the status of New, In Progress, and Submitted store orders. There is an orange triangle ‘!’ icon displayed for those store orders that have a requested date before today.
The Store Orders screen will contain store orders for the following origins:
- Manual: Store order was created manually in the system.
- External: The store order was created in an external system such as a merchandising or forecasting system.
- System: The store order was generated by the system from a scheduled store order product group.
You can use the search / magnifying glass to navigate to the Search Criteria (Store Orders) screen to enter search criteria for store orders. When scanning/entering an item in the scan bar, the system adds the item to the entered search criteria and narrows down the current list of store orders based upon the scanned/entered item.
Creating a new store order directs you to the Create Store Order popup to build a new store order. Selecting a store order from the list navigates you to the details for that existing store order (Store Order Items).
Search Criteria (Store Orders) Screen
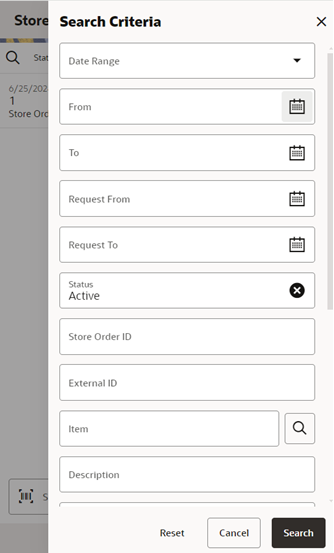
The DSD limit will be used to return a set number of records. This is defaulted based upon the Search Limit Default for Store Orders system admin setting.
Create Store Order Screen
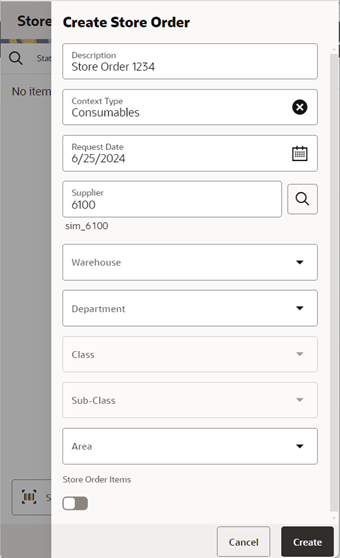
The Create Store Order screen is used when creating a new store order and is accessed when selecting Create from the Store Orders (list) screen. All store orders created on mobile will have an origin of manual. A user must have the Create Store Orders permissions to create a new store order.
Every newly created store order will have a system-generated unique store order ID. The user may also choose to give the store order a description. The description is an optional text field to describe the store order. An optional context can be assigned to the store order. The context types are populated at setup within the Code Info dialog on the desktop. The last field in the header is the Requested Date, when the store order is wanted by. Requested Date is required and must be greater than or equal to today. The Requested Date may have additional date validations later on in the store order process (when adding items or at time of approval) depending on if the item is a Store Order replenishment item.
Restrictions
The last piece of the create process is the restrictions section which is used to define what items the store order is restricted to, in other words, what items are allowed to be added to the store order. Restrictions are not required and can be hidden from use. If no restrictions are set, then no items will be restricted. Restrictions can be defined by one or more of the following:
- Supplier
- Warehouse
- Merchandise hierarchy
- Area
- Store Order replenishment items
More than one restriction can be defined for a store order.
Example: A restriction of Supplier 1212-Soda Supplier and Store Order Items of checked would mean that all added to the store order must be a Store Order item for Supplier 1212-Soda Supplier.
Both Supplier and Warehouse restrictions can be configured through the store options to be:
- Enabled and optional
- Enabled and required
- Not displayed if not used
Supplier has one additional store configuration, DSD Delivery Supplier for Store Order, to check:
- If it is set to No, no additional validation is needed and the supplier can be added as a restriction.
- If it is set to Yes, when adding the supplier as a restriction, the DSD Allowed Indicator on the supplier must be set to Yes in order to add the supplier. If the supplier indicator is set to No, then a store order cannot be created for that supplier.
An Area is set up on the desktop in the Area dialog. Areas can be used as restrictions on store orders if the store is configured to Yes for Enable Area for Store Orders.
Merchandise Hierarchy and Store Order Replenishment Items are always available to be selected for restrictions.
Note: Restrictions will already be set for store orders that are system or externally created.
Store Order Items Screen
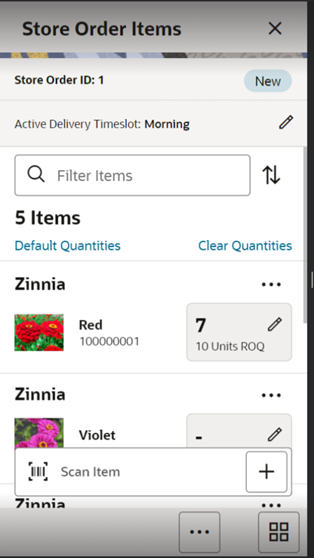
Initially, if the user is creating a new store order, this items screen will not have any items. When selecting an existing store order from the Store Orders (list) screen, this screen will be displayed with the items for the store order. Line items appear in a list and selecting a line item navigates to the Item Details of that item.
Fields will include, item, item description and item image depending on the user preference. The quantity for the item on the store order will display once a quantity has been added for the item. If the store order is from an External origin there will also be a Recommended Order Quantity (ROQ), representing the suggested quantity to be ordered.
Delivery Timeslot: Will be displayed if the store is configured for a delivery timeslot:
- The Delivery Timeslot at the header level will be used as a default at the item level for the Store Order (SO) items. Changing the timeslot at the header will only apply to newly added items on the store order.
- If no Delivery Timeslot is selected at the header, the item level will not have a timeslot defaulted.
- The Delivery Timeslots list will be populated from the Delivery Timeslot Admin screen on the desktop. The header selection list will have those delivery timeslots that the user has data permissions for.
The filter can be used to narrow down the list of items. Filtering can occur by item ID, description, delivery timeslot, and UOM.
Items can be removed by selecting Delete from the item overflow menu, item level ellipsis. Items that were on the store order from an External origin will have their store order quantity set to zero.
The ellipsis in the lower right hand corner accesses the footer menu which contains all of the functions that can be performed on the store order.
Default Quantities: The Default Quantities will update the store order quantities for all line items on the store order that do not have a quantity:
- For a manual and system created store orders, the quantity will default to the Last Requested Qty.
- For externally generated store orders, the quantity will default to the external store order qty.
Clear Quantities: Will set all quantities to blank.
Item Validations
- Selecting a line item navigates to the item details of that item.
- Scanning or entering an item in the scan bar will navigate the user per the User Preference, Scan Navigate. The user will either go to the Item Detail for the item or stay on the Store Order Items screen. The quantity may be updated depending on the scan mode.
- Items scanned will be restricted to those restrictions defined on create:
- Supplier: Restricts the store order to items only for that supplier.
- Warehouse: Restricts the store order to items only for that warehouse.
- Merchandise hierarchy: Restricts the store order to items only for that merchandise hierarchy.
- Area: Restricts the store order to items only defined for that area.
- Store Order replenishment items: When this restriction is checked the system restricts the store order to items that are only store order replenishment items.
- Store Order Allowed: There is a store re-orderable indicator that is sent on from merchandising (ItemLocVirt). This must be Yes for the item to be put on the store order. If it is set to No, the user will get an error and the item cannot be store ordered.
- If the item is a Store order (SO) replenishment item and it has a store order reject indicator set to Yes, the Request Date for the store order must be greater than or the Next Delivery Date for that item. If it is not, the item cannot be added to the store order.
Note: The SO replenishment method, store order reject indicator, and the next delivery date are defined in the merchandising system for the item and held in EICS on the item/store record.
- UINS or GS1 databar data (extended attributes) are not captured in Store Orders.
- Adding Items - System and External Store Orders.
If the store order is a system or external store order, unexpected items (those not originally on the external store order), can only be added if the store order has the Add Items indicator checked to Yes. If it is set to No, the user will only be able to enter/scan items and quantities against the items that are originally on the store order.
Quantity Validations
Rounding - see the Round menu option below.
Tolerances define how much the store order quantity can deviate from the external store order quantity.
Tolerances will be validated for items on externally created store orders. Tolerances come into the system from merchandising and are defined on the item/location. They can be set as a percentage or UOM, one will be sent, not both. Tolerances will be validated if they exist. A tolerance of 0, means that the store order quantity must match the external order quantity exactly, the quantity field will be defaulted to the external order quantity and disabled. Tolerance UOM: The system will take the external order quantity and add the Tolerance UOM to it to get the upper range, and subtract the Tolerance UOM to get the lower range. Only for SUOM, not applicable to cases.
Example:
External Order qty = 100 units. Tolerance UOM = 10. Entered User Quantity must be 90-110
For Tolerance %: The system will take the % value x the External Order Quantity to get the tolerance quantity. That tolerance quantity will be added to the external order quantity for the upper range and subtracted from the external order qty to get the lower range.
Example:
External Order qty = 100 units. Tolerance % = 7. Tolerance Qty = 7% x 100 = 7 units Entered User Quantity must be 93-107 units
Approve: Approves and completes the store order. The store order is set to Completed status.
- The user must have Approve Store Order permission.
- If the user has the Submit Store Orders permission set to Yes, the store order will require a submit first, thus the Approve button will not be available until the store order is in Submitted status. (assuming user also has Approve store order permission).
- If the user has the Submit Store Orders permission set to No, the Approve button will be available in the In Progress status as well as Submitted status (assuming user also has Approve store order permission).
- If the store order has the Case Pack Round indicator set, then the store order will require rounding. See Round menu option below.
- Tolerances on the store order quantity will be validated.
- The store order is published out.
Footer Menu
The footer menu is accessed from the ellipsis footer menu on the Store Order Items screen. The menu functions include the following:
Notes: Accesses the notes dialog to capture notes.
Print: Displays the common print dialog to print the store order report.
Info: Accesses the Information popup.
Cancel: Exits the store order; changes made in that session are not saved.
Delete: Marks the store order to Canceled status.
Copy: The copy function is only available for those store orders in a completed state which are in Approved or Canceled status. It takes the current store order, copies the items and quantities (not external quantities), and creates a new editable store order with a new ID. It references the copied store order's ID.
Refresh Cost: If the user has permission for cost to display in the store order, this button will go out and grab the latest costs for the items to be used in the Total Estimated Cost on the Store Order Info screen.
Note: This cost is only estimated and for viewing and general information. It is not communicated to external systems, and will not impact the final cost of the order. This is determined by the corporate ordering system where more specific criteria can be applied like location level cost or deals.
Round: Will round the item quantities on the store order up to the next multiple of the supplier case size. Example: Pack Size is 12. The user enters in a quantity of 20. Round will round up to 24:
- Available for store orders that are editable.
- System, External and manually created store orders
- Externally created store orders from RMFCS that are for a supplier (Purchase Order) will have the Case Pack Round indicator set to Yes, thus requiring the user to round the store order.
Cancel Submit: Will set the store order back to In Progress status:
- Will be available for store orders in Submitted status.
- The user must have Cancel Submit Store Orders permission to have this option.
Submit: Will set the store order to Submitted status which is still an editable state. Submit will perform all functionality of the approve option with the exception of integration that will not take place:
- Available for New and In Progress store orders.
- The user must have Submit Store Orders permission for the option to be available.
Save and Exit: Saves the store order In Progress status to be completed later and returns the user to where they came from:
- Saving a store order does not publish anything out; it simply saves it. The Save button can be used to implement a Save and Approval process.
- For manually created store orders, the quantity will be set to the last requested quantity from the most recent approved store order.
- For externally created store orders, the quantity will be set to the external quantity.
Item Detail Screen
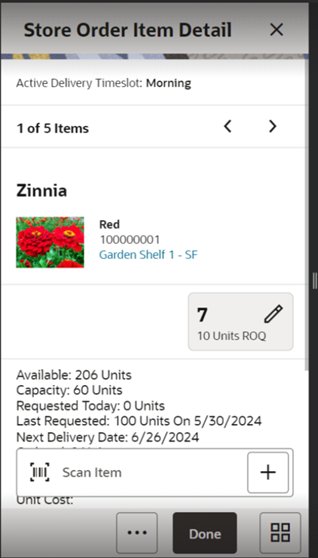
The Item Detail screen is used for selecting or scanning an item from the Store Order Items screen. Scanning or entering an item on this screen in the scan bar, updates the quantity per the scan mode and refreshes the Item Detail screen for the item and quantity scanned. The item rules and validations will be the same as that on the Store Order Items screen.
Last Scanned (Scanned Details): Displays the details that are from the barcode.
- GS1 - will display the barcode, GTIN, and the contents of the barcode such as price, UIN, and so on.
- Type 2 - will display the barcode and the price.
- All other barcodes - will display the barcode.
The user can page through existing the items on the store order using the arrows at the top.
The item information including item ID, description, and image (which is per user preference) displays in the header. The primary location is displayed that will navigate to the Item Locations screen.
The bottom portion of the screen contains various read-only fields about the item to assist in creating the store order.
The quantity can be edited and updated manually if permissions allow. For system and externally-generated store orders, the quantity for all items will be initially blank until the user enters or scans in a quantity for the items.
Additional fields include:
Delivery Timeslot: Will be displayed if the store is configured for delivery timeslots.
- If a Delivery Timeslot was selected at the header level of the store order, it will be used as a default at the item level. The user will be able to change the timeslot. Changing the timeslot at the header will only apply to newly added items on the store order.
- The Delivery Timeslots list will be populated from the Delivery Timeslot Admin screen on the desktop.
- The list will have those delivery timeslots that the user has data permissions for.
- Delivery Timeslot is only available for those items that are Store Order (SO) items.
- Delivery Timeslot is not required.
- When the store order is approved and published out, the Delivery Timeslot will only be sent on the message if the publish indicator is Yes.
ROQ: Recommended order quantity. If the order was from an external origin. This is the quantity that is suggested to order by the external system.
Available: Available stock on hand for the item at the user's store.
Shopfloor: Shopfloor inventory for the item at the user's store. Only displayed if store is configured to display shopfloor/backroom.
Backroom: Backroom inventory for the item at the user's store. Only displayed if store is configured to display shopfloor/backroom.
Capacity: The total summed up capacity for the item. Only displayed if store is configured to display sequence fields.
Note: Capacity is set up / defined through a third-party upload.
Requested Today: Sum of all requested quantities on all Approved store orders for today’s date for the item at the user's store.
Last Requested: The store order quantity for the last/most recent Approved store order for the item at the user's store. It will be displayed along with the Last Requested Date which is the approved date for the store order that has the last requested quantity.
Next Delivery Date: The next delivery date for the item at the user's store. This field is populated on the item location record from the merchandising system and only for Store Order (SO) replenishment type items.
Ordered: The total remaining ordered quantity for the item at the store. This is for transfers, allocations, and purchase orders.
Inbound: The total quantity approved to be sent to the user's store. This is for store to store transfers, warehouse, and finisher deliveries and RTV shipments.
Unit Cost: The country level unit cost for the item. Only displayed if the user has the proper permissions.
Price: Current price for the item
The Sales Data will appear at the bottom of the screen and allow a user to view two types of sales data: Sales History and Sales Forecast. A user must have permission to view Sales History (Display Sales History) as well as to view Sales Forecast (Display Sales Forecast):
- Sales History: Will display the past 4 weeks / 28 days (or less if 28 days do not exist) of Sales History for the item at the user's store. Sales History is pulled from sales within the system that are found in the Transaction History. This will display in a graph for the store and item with the sold quantity.
- Sales Forecast: Will display the next 4 weeks/28 days (or less if 28 does not exist) of future sales for the item at the user's store. Sales Forecast is retrieved by using a web service from an external system such as a forecasting app. This will display in a graph for the store and item with the forecasted quantity.
Done: Will return to the Store Order Items screen.
Quick Actions: Will bring up the Quick Action menu. The footer menu, ellipsis button, contains:
Delete: Will delete the item from the store order. If the item is part of an externally-created store order, it will prompt the user to set the quantity to zero.
Note: Tolerances are not validated at the time of deletion if an item has tolerances defined.
Configure Screen Layout: Brings up a popup where the user can configure the Item Detail screen.
Information Screen
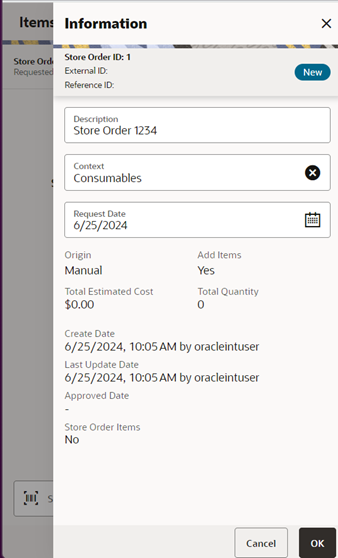
The Information screen is an informational popup that contains information about the header level of the store order. Editable fields require the user to have Edit Store Orders permissions.
Fields include:
ID: System-generated ID for the store order.
External ID: The ID from the external system for externally-created store orders.
Reference ID: ID associated to the store order that was copied.
Status: Status of the store order: New, In Progress, Submitted, Approved, and Canceled.
CFAs : The Flexible Attributes (CFAs) that have been set up for Store Orders in the desktop application will be displayed and lets you enter values for them. The CFAs that are set up as Required must have a value entered for it before approving the store order. Editable if the store order is still open and the user has the Edit Store Order CFA permission.
Description: Description of the store order. For system-generated store orders, this will be the description defined on the Product Group. This field is editable.
Context: The context type associated to the store order. This field is editable.
Requested Date: The requested date for the store order. This field is editable. If there are no store order items on the store order, the request date needs to be greater than or equal to today. If there are Store Order (SO) items that have a Store Order Reject indicator of Yes, the request date needs to be greater than the latest Next Delivery Date of the SO items on the store order. This gets validated also upon approval of the store order.
Origin: Where the store order originated: manual, system, or external.
Total Quantity: Total quantity of all items on the store order.
Total Estimated Cost: Total cost of all items on the store order. This field is only displayed if user has the proper permission.
Add Items: Has a value of Yes or No and defines if items can be added to the store order. For manually-created store orders, this is defaulted to Yes. For store orders that are from an external system, or system-generated, this may be set to Yes or No. Yes will mean that items can be added to the external store order, whereas No would be that items cannot be added and only the items originally on the store order can be ordered.
Product Group ID: For system-generated store orders, this will display the Product Group ID that the store order was generated from.
Product Group Description: For system-generated store orders, this will display the Product Group Description that the store order was generated from.
Restrictions: The restrictions that were defined for the store order:
- Supplier, warehouse, merchandise hierarchy, area, and store order items.
Create Date and Create User
Last Update Date and Last Update User
Approved Date and Approved User
Auto Approved Date: If the store order was auto-approved this field, will be displayed.
RTV and RTV Shipment (Jet Mobile)
The return's process in the mobile application supports the retailer with the reverse logistics flow. A reverse logistic flow means that inventory is shipped out of the store to a supplier or warehouse for redistribution or disposal. This particular workflow only supports shipping inventory back to the supplier.
Some examples around reverse logistics:
- Regulatory when product has to be destroyed because of recalls.
- Return of inventory to the vendor of items that are nearing their expiration date.
- Return inventory back to the supplier because of malfunctions or poor quality.
New and Updated Permissions
| Permission | Topic | Usage |
|---|---|---|
| Access RTV | RTV | With this permission, the user will have access to the RTV dialog and the RTV menu option will appear in the Drawer. |
| Allow Create Multiple Containers | RTV Shipment | With this permission, the user will be able to create more than one container during shipment. This is only available on Jet Mobile. |
| Allow Modify Default Container Method | RTV Shipment | With this permission, the user will be able to modify the shipping method (with container or without container). The Container option field will be editable for the user with this permission. This is only available on JET Mobile. |
RTV
Return to Vendor (RTV) can be a request from an external system or it is a return created by the store.
-
RTV
An RTV can be created by the store to return items to a vendor. The user adds the items to be returned with the quantity to be returned and approve the RTV. Once approved, the items can be shipped. This is the document the user will ship against.
-
RTV Request
A Return Request is a return to vendor that comes into the Store Inventory system from an external system. A Return Request is a request for items to be returned. You access the return request from the external system on the mobile application. The items, quantities requested to be returned, and reasons (for RTV) will be listed. Enter in the return quantity approved for the items. You can also reject the request if needed. The system can be configured to allow you to add items to the return request. The system allows for items to be removed on a return request that were not initially added during the session. After the session has been saved, the quantity for the item is set to zero, similar to original requested items. Once the request has been accepted, the items are shipped to the supplier.
Note: After approval, the RTV request or RTV will act the same way.
RTV Shipment
Shipments are the physical movement of the goods to the supplier. It can be created in the following ways:
- After accepting an RTV request from an external system, a shipment is created for the RTV request.
- After creating an RTV at the store and approving it, a shipment is created for the RTV.
- On the fly shipment.
The items, quantities to be returned, and reasons will be added to the shipment and it can be dispatched without first creating an RTV document or approving an RTV request.
When creating, editing, or viewing a shipment with containers, you are directed to the list of containers within the shipment on the Containers screen. Here, you can create a container, edit, or view a container. When creating, editing, or viewing a container, you are directed to the list of items in the container on the Container Items screen. You can add, view, and edit the details of the items on this screen as well as on the Item Detail screen.
When creating, editing, or viewing a shipment without containers, the user is directed to the RTV Shipment Items screen where the items to be shipped and their details can be added.
-
Submit
The shipment can be saved in In Progress status to continue edits later or it may be submitted or dispatched. Submitting is possible when the store setting Dispatch Validate is configured for Ship Submit. Submitting will set the shipment to a Submitted status and not allow for edits: there are no updates to inventory at this point. The only step possible will be to Cancel Submit or Dispatch. If the system is enabled to obtain the Fiscal Doc ID/E-way bill ID for the shipment, the process to request for the same starts once the shipment is submitted.
-
Dispatch
When the shipment is dispatched, the RTV reserved quantity for the store will decrease in addition to the stock on hand. If the system is enabled to incorporate Fiscal Doc ID/E-way bill ID as part of the shipping process, the shipment cannot be dispatched until the Fiscal Doc ID/E-way bill ID is available. The exception is when the user has the Allow dispatch without Fiscal Document ID security permission.
Features available:
- The user can accept or reject a return request from an external system through the mobile application. A shipment can be created after a request gets accepted.
- The user can initiate a return from the mobile application, approve it, and can then create a shipment to the supplier.
- The user can initiate a return from the mobile application by creating a shipment to the supplier.
- Shipments can be created, submitted and dispatched with or without containers.
- A single RTV shipment can support multiple containers or restrict to just one container.
- An RTV shipment can be tracked at the Container and Shipment levels.
- Container hierarchy limitations.
- Bill of Lading (BOL) includes container details.
- Support for multiple users working on different containers within the same shipment.
- Each item has one or more reason codes explaining the reason it is shipped back.
- BOL captures shipment purpose, tracking ID, shipment method, destination information, and container information.
- Authorization Return ID.
- Not after date facilitates the user to ship the shipment before the shipment is expired.
- Supplier-level RTV restrictions when creating an RTV.
- Printing reports and labels.
- Capturing values for CFAs for RTVs, Shipments, and Containers.
- Ship only when the Fiscal Document ID is available if the business process demands.
To create an RTV and an RTV shipment, a supplier must be identified for the return; this can be done by entering in the Supplier ID or using the widget to look up a supplier.
The Supplier must allow for returns. This is an indicator that is defined at the supplier level. The next validation will be to check the system setting DSD Delivery Supplier for RTV. This configuration (if set to Yes) requires that the supplier must also be a DSD Supplier (indicator on the supplier) in order to create the RTV. Lastly, if the system is configured to use Multiple Sets of Books, then the supplier is limited to the same supplier site as that of the store.
Items along with reasons can be added to the return. For Return to Vendors, the system allows a mix of available and unavailable inventory status items on the return; therefore, all reasons for the Return to Vendor type will be listed. All items on the return must be sourced by the supplier designated on the RTV. Authorization Number, which is required for certain suppliers, would need to be entered before dispatching.
Note: When leveraging sub-buckets, the RTV document / request will look at the total aggregate of unavailable quantity across sub-buckets to determine if enough unavailable exists. When shipping the RTV however, the system will look at the individual sub-buckets. So the reason code defined for the RTV shipment is more detailed than that of the RTV document.
Business CasesTwo business case examples are shown below.
Damage Item Process
Two customers return DVD players that are not working. The POS transaction identifies them as damaged. This automatically associates the items to an unavailable bucket in the Store Inventory system.
The retailer creates a return to vendor for two DVD players which were damaged. They will be sent back to the vendor with a reason of Damaged using unavailable inventory.
Recall Process
The Store Inventory system receives communication from the vendor requesting 100 units of chicken to be returned back to the supplier.
The store user will create the RTV shipment on the mobile application and enters the quantity to be returned; in this case, the store returns 99 units, packs the goods in a container, confirms the container, and dispatches the shipment.
RTV Screen Flow
The RTV and RTV shipment flows exist under the Shipping/Receiving menu. From the RTVs screen, the user can filter the records as needed. RTV requests, RTVs, and shipments are accessed from the RTVs screen.
RTV Mobile Screen Flow
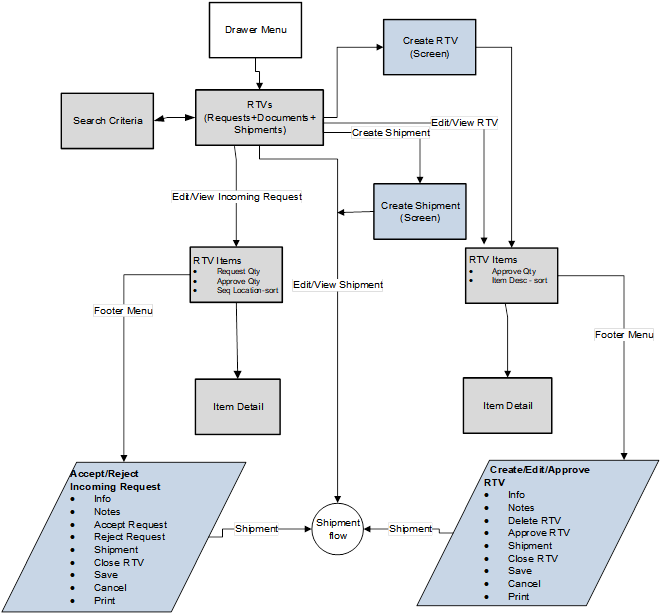
RTV Shipment Mobile Screen Flow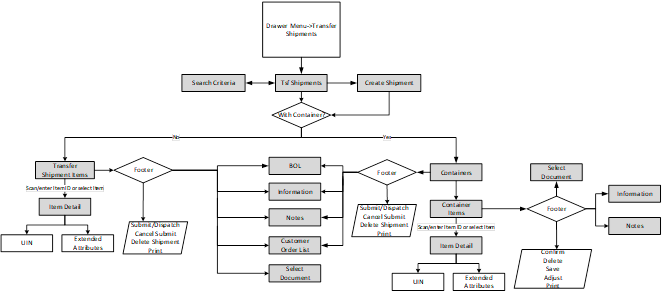
RTV and RTV Shipment Status Flow

The following screens are described below:
- RTVs
- RTV Search Criteria
- Create RTV
- RTV Items
- RTV Item Detail
- Info (RTV)
- Create Shipment
- Containers
- Shipment Info
- Bill of Lading
- Container Items
- RTV Shipment Items
- Item Detail
- Container Default Item
- Info (Container)
- Select Item
RTVs Screen
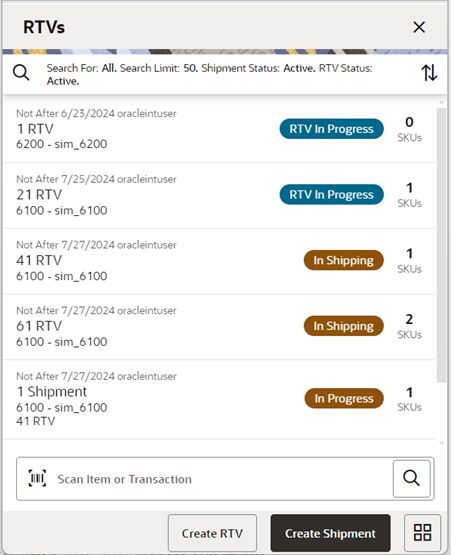
The RTVs screen displays a list of externally-generated RTV requests, store created RTV,s and RTV Shipments for the store the use has logged into. The RTVs screen is accessible by clicking RTV from within the Shipping and Receiving menu and also from the Quick Actions screen. The system defaults to all RTV requests, RTVs, and Shipments which are in Active status. The Active statuses for an RTV request/RTV are any of the following statuses:
- Requested
- Request In Progress
- RTV In Progress
- Approved
The Active statuses for an RTV Shipment are any of the following statuses:
- New
- In Progress
- Submitted
This screen gives a quick view of the list of requests/RTVs/shipments along with the details such as Not After Date, User, ID, status, supplier, External ID, status of the Fiscal Doc/E-way bill request (if the system is configured to use Fiscal Doc ID/E-way Bill ID), and so on.
A Search option is also available to further filter on the return and shipment records.
The user can get into the details of a request or an RTV or a shipment by tapping it. The user can also create a new RTV or a new shipment from this screen using the footer buttons and filter records from screen using the scan bar.
RTV Search Criteria Screen
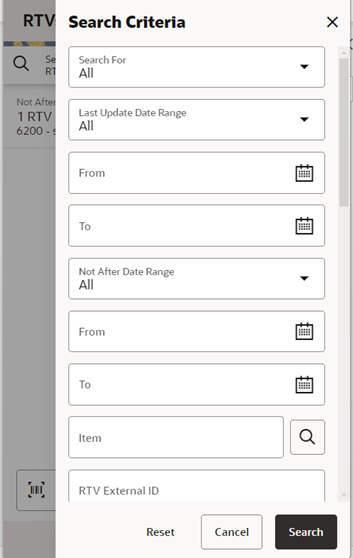
The Search Criteria screen is used to narrow down the list of RTV Requests/RTVs and Shipments displayed on the RTVs screen. You can access this dialog by tapping on the magnifying glasses on the RTVs screen. This screen has three sections:
- Common Criteria
- Shipment Specific Criteria
- RTV Specific Criteria
The list of criteria displayed is dependent on what you select in the Search for drop-down which has the options: All, RTVs, and Shipments.
If the user wants to search for RTVs (requests and RTVs), select RTVs from this drop-down list and the search criteria applied will be a Common search criteria AND RTV specific search criteria. In this scenario, the Shipment specific‑criteria would not be visible to you. If you want to search for shipments, select Shipment from this drop-down list and the search criteria applied would be (Common search criteria AND Shipment specific search criteria). In this scenario, the RTV specific criteria (RTV Status) will not be visible to you. If you want to search for both shipments and RTVs together, select All from the Search for drop-down list and the search criteria applied would be (Common search criteria AND Shipment specific search criteria) OR (Common search criteria AND RTV specific search criteria).
If the retailer has set up the system to use Fiscal Document/E-way bill for the RTV shipments, there will be additional criteria provided in the screen under Shipment Filters such as Fiscal Request ID, Fiscal Doc ID, and Fiscal Request Status.
- Common Criteria includes:
- Search For: RTVs, Shipments, and All
- Last Updated Date Range
- Not After Date Range
- Item
- RTV ID
- RTV External ID
- Supplier
- Authorization Code
- Reason
- User
- Search Limit
- RTV Specific Criteria:
- RTV status
- Shipment Specific:
- Shipment ID
- Shipment Status
- Container ID
- External Container ID
- Tracking ID
- Fiscal Doc ID
- Fiscal Request ID
- Fiscal Request Status
Create RTV Screen
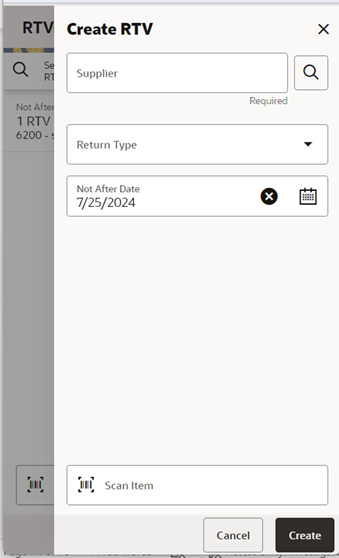
A store can create an RTV by clicking the Create RTV footer button in the RTVs screen.
The user should enter the ID of the supplier to which the items have to be returned. There is an option available to look up for the supplier if the ID is not known.
- First the Supplier must be configured for Returns Allowed.
- If the store parameter DSD Supplier for RTV must be set to Yes, then the DSD Indicator on the supplier must be Yes.
- Supplier must be in Active status.
- Multiple sets of books is enforced, meaning the supplier site for the supplier must be the same as that of the store.
The user can select the Return Type if needed (configured on the desktop). Not After Date field will need to be set if the store wants the items to be shipped by a specific date.
Once the RTV is created, the user will be taken to RTV Items screen to add the items and the quantity to be returned for each item. The RTV needs to be approved at the store for it to be shipped.
RTV Items Screen (Store Created RTV)
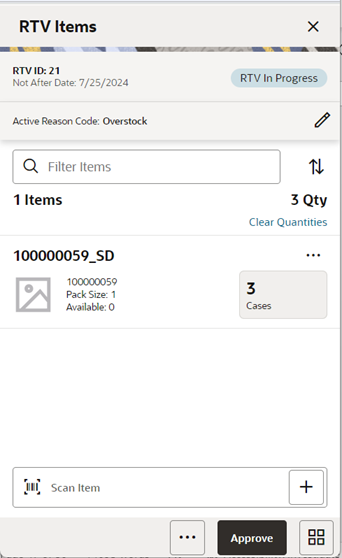
The user accesses this screen by selecting Create from the Create RTV screen or by opening an RTV in status RTV In Progress or Approved from the RTVs screen. While creating a new RTV, this screen enables you to specify items to be returned and enter a return quantity for each item. For an existing RTV, this screen displays the list of items present in the RTV and gives a summary of the various quantities of each item such as:
- Quantity - the approved quantity for the item across all reason codes.
- In Shipping quantity.
- Shipped quantity.
- Available quantity of the item at the source store (if the inventory to be returned has to come from Available Inventory).
- Unavailable quantity of the item at the source store (if the inventory of the item has to come from Unavailable inventory).
Note: When using sub buckets, unavailable inventory on an RTV is different from the RTV shipment. In the shipment, the reason code will look at specific sub buckets, while on the RTV, SIOCS will look at the total unavailable quantity.
Whether the screen is editable or not depends on your security permission and the status of the RTV, Not after date. The user must also have the return reason code data permissions for all items on the request. It is also possible to add items (belonging to the same supplier in the request) to be returned depending on the permissions set. Inactive/delete/discontinued status items can be added to the RTV. Items with Non-Inventory indicator set to Yes are also allowed to be in the RTV.
The item image for the line items is displayed per the configuration.
Line items appear in a list and selecting a line item navigates to the item details of that item. Scrolling in the list of items displays a filter. The filter can be used to narrow down the list of items. Filtering can occur by Item ID, Description, and Reason.
Scanning or entering an item in the scan bar navigates you to the Item Detail screen for that item. Approved Quantity may be updated depending on the scan mode. If the user scans a VPN, a validation is done to ensure that the VPN scanned belongs to the supplier associated to the delivery.
The user can sort the items based on various options such as Item ID and Item Description.
When adding items, the user has to select a reason code. For easier usability, a default reason code can be selected. This reason code will default when the item is added. Changing it will not change reason codes already associated to an existing item. The user will have to change the item level reason individually.
Footer Menu
The Footer menu is accessed from the ellipsis footer menu on the Request Items screen. The menu functions include the following:
- Info: Accesses the Info popup to enter CFAs and Authorization code, and view details of the RTV and so on.
- Notes: Accesses the notes dialog to capture notes.
- Save and Exit: Saves the RTV in RTV In Progress status to be completed later.
Saving an RTV does not publish any message nor does it reserve any inventory; it simply saves it.
- Shipment: This menu option will allow you to ship the items in the approved RTV or view the shipment details if they exist. Security exists to create, view, and edit the shipment:
- The shipment will be created with or without container.
- If the user has permission, Allow Modify Default Container Method, the user will be able to select/modify the container method. The container method is defaulted per the Create Vendor Shipment with Container by Default store configuration.
- The user navigates to the RTV Shipment
- Close RTV: This menu option will allow you to close the RTV. After closing an Approved RTV, for the items on return, reservation would be removed and will be moved to available or unavailable depending on where it was reserved from. A message is published to the merchandising system on the inventory reversal.
- Back: This menu option will allow you to leave the screen. This is available when the screen is in view-only mode.
- Cancel: Exits the screen; changes made in that session are not saved.
- Print: This option allows you to select formats and print various reports and container labels. The RTV report will be available on this screen. This option will always be available regardless of the return status.
Footer Button
Approve: Approves the quantities to be returned. The request moves to Approved status and the system will update the reserved inventory for the items to be returned.
RTV Items Screen (External Request)
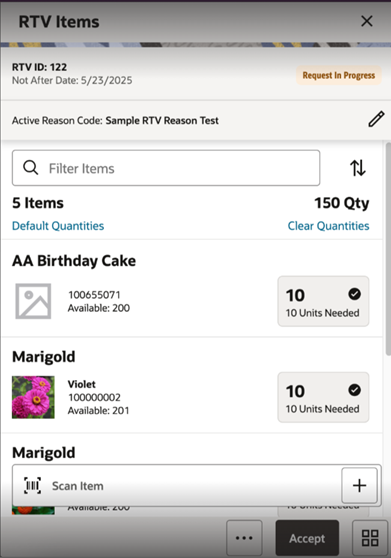
The Store Inventory system subscribes to RTV Requests from external systems. The request indicates to the store which items and quantities to send back to the vendor. The user accesses the screen by selecting a request from the RTVs screen. This screen displays the list of items present in the RTV request and gives a summary of the various quantities of each item such as:
- Quantity - the approved/accepted quantity.
- Requested quantity.
- In Shipping quantity.
- Shipped quantity.
- Available quantity of the item at the source store (if the inventory to be returned has to come from Available inventory).
- Unavailable quantity of the item at the source store (if the inventory of the item has to come from Unavailable inventory).
Note: When using sub buckets, unavailable inventory on an RTV is different from the RTV shipment. In the shipment the reason code will look at specific sub buckets, while on the RTV, SIOCS will look at the total unavailable quantity.
Whether the screen is editable or not depends on your security permission, status of the request, Not after date. The user must also have return reason code data permissions for all items on the request. They can also add items to the return depending on the permissions set, as long as these items are also supplied by the same supplier as the RTV request is created for. Inactive/delete/discontinued status items can be added to the RTV. Items with Non-Inventory indicator as Yes are also allowed to be in the request.
The item image for the line items is displayed per configuration.
Line items appear in a list and selecting a line item navigates to the item details of that item Scrolling in the list of items displays a filter. The filter can be used to narrow down the list of items. Filtering can occur by Item ID, Description and Reason.
Scanning or entering an item in the scan bar navigates you to the Item Detail screen for that item. Approved Quantity may be updated depending on the scan mode. If the user scans a VPN, a validation is done to ensure that the VPN scanned belongs to the supplier associated to the delivery.
The user can default the requested quantity to the Approved quantity field for all the items in the request and they can also sort the items based on various options such as Item ID and Item Description
When adding items, the user has to select a reason code. For easier usability, a default reason code can be selected. This reason code will default when the item is added. Changing it will not change reason codes already associated to an existing item. The user will have to change the item level reason individually.
Footer Menu
The Footer menu is accessed from the ellipsis footer menu on the Request Items screen. The menu functions include the following:
- Info: Accesses the Info popup. The user can enter values for the CFAs that are set up for RTV Requests, view Authorization Code, supplier, and so on.
- Notes: Accesses the notes dialog to capture notes.
- Save: Saves the request in Request In Progress status to be completed later.
- Saving a request does not publish any message nor does it reserve any inventory; it simply saves it.
- Reject: This option allows you to reject the request and move the request to Rejected status.
- Shipment: This menu option will allow you to ship the items in the approved request or view the shipment and container details if they exist. Security exists to create, view and edit the shipment:
- The shipment will be created with or without container.
- If the user has permission, Allow Modify Default Container Method, the user will be able to select/modify the container method. The container method is defaulted per the Create Vendor Shipment with Container by Default store configuration.
- The user navigates to the RTV Shipment.
- Close RTV: This menu option will allow you to close the RTV request. After closing an Approved RTV, for the items on return, reservation will be removed and will be moved to available or unavailable depending on where it was reserved from. A message is published to the merchandising system on the inventory reversal.
- Back: This menu option will allow you to leave the screen. This is available when the screen is in view-only mode.
- Cancel: Exits the screen; changes made in that session are not saved.
- Print: This option allows you to select formats and print various reports and container labels. The RTV report will be available on this screen. This option will always be available regardless of the return status.
Footer Button
Accept: Accepts and approves the quantities to be returned. The request moves to Approved status and the system will update the reserved inventory for the items to be returned.
Item Detail Screen (Store Created RTV)
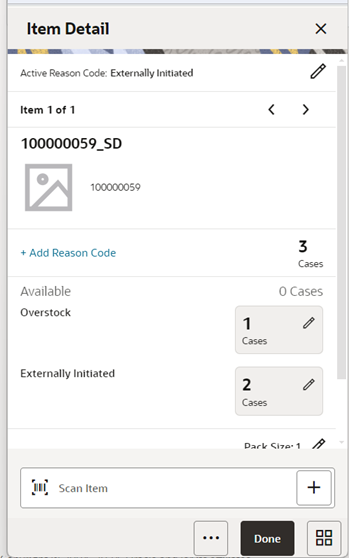
The Item Detail screen is used when selecting or scanning an item of an internally-created RTV from the RTV Items screen. Scanning or entering an item on this screen in the scan bar updates the return quantity per the scan mode and refreshes the Item Detail screen for the item and quantity scanned.
If the user scans a VPN, a validation is done to ensure that the VPN scanned belongs to the supplier associated to the delivery.
The approved quantity can be edited and updated manually if permissions allow. Items with Non-Inventory indicator as Yes are also allowed to be in the transaction and you can enter the approved quantity for these items.
Whether the screen is editable or not depends on your security permission, Status of the request, Not After Date. The user must also have the return reason code data permissions for all items on the request.
You can add additional items that are not part of the request, (belonging to the same supplier in the request), to be returned depending on the permissions set for him.
Since the request is created by an external system, most items will have a reason code (and correlated disposition) set.
You can also add additional multiple items (belonging to the same supplier) to be returned depending on the permissions set for the user. The user can return items from both Available bucket and Unavailable bucket in the same screen by selecting relevant reason codes. The reason codes decide from which bucket the item will be returned. An option is provided in the screen to change the reason code as well for newly added items.
The Footer menu, ellipsis button, has options to delete an item.
The user can page through existing items on the RTV using the arrows below the header.
Item Detail Screen (External Request)
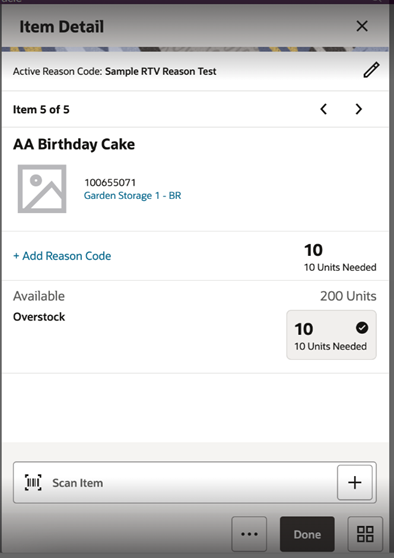
The Item Detail screen is used when selecting or scanning an item from the RTV Items screen in status Requested, Request In Progress, or an approved request. Scanning or entering an item on this screen in the scan bar updates the approved quantity per the scan mode and refreshes the Item Detail screen for the item and quantity scanned. If the user does not have the Allow Over Accepting security permission, approved Quantity cannot be greater than the requested Quantity.
If the user scans a VPN, a validation is done to ensure that the VPN scanned belongs to the supplier associated to the delivery.
The approved quantity can be edited and updated manually if permissions allow. Items with Non-Inventory indicator as Yes are also allowed to be in the transaction and you can enter the approved quantity for these items.
Whether the screen is editable or not depends on your security permission, Status of the request, Not After Date. The user must also have return reason code data permissions for all items on the request.
You can add additional items that are not part of the request, (belonging to the same supplier in the request), to be returned depending on the permissions set for him.
Since the request is created by an external system, most items will have a reason code (and correlated disposition) set.
You can also add additional multiple items (belonging to the same supplier) to be returned depending on the permissions set for the user. The user can return items from both the Available bucket and Unavailable bucket in the same screen by selecting relevant reason codes. The reason codes decide from which bucket the item will be returned. An option is provided in the screen to change the reason code as well for newly added items.
The Footer menu, ellipsis button, has options to delete an item.
The user can page through existing items on the RTV using the arrows below the header.
Info Screen

The Info screen is an informational popup that contains certain editable info and view-only info about the RTV.
Editable information includes CFAs, Not After Date (if internally-created RTV), Return Type (if internally-created RTV), and so on. The screen displays the list of CFAs that have been set up for RTV, in the desktop application and lets you enter values for them. The CFAs that are set up as Required must have a value entered for it before accepting the request. The value can be one of the following: Date, Text, Decimal, or Long depending on the data type set up for the CFAs, while creating them in the desktop application. An appropriate security permission is needed and the RTV must be in editable state for entering CFA values. To edit these fields, the RTV must be in editable status.
The read-only information in the header level of the RTV include:
- RTV ID
- RTV External ID (ID generated by the external system that has created the request), if available
- Status
- Not After Date
- Authorization Code
- Total SKUs
- Created Date and Create User
- Update Date and Update User
- Approval Date and Approval User
- Rejected Date and Rejected User
- Close Date and Close User
Create RTV Shipment Screen
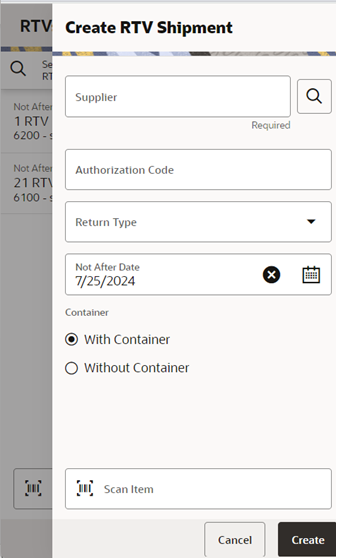
This screen enables you to create a new RTV shipment in order to send back items to a vendor without first creating an RTV.
Access the RTV Create Shipment popup by tapping the Create Shipment button on the RTVs screen.
Select the supplier through the Supplier Lookup option or you can enter the Supplier ID, if known.
- First, the Supplier must be configured for Returns Allowed.
- If the store parameter, DSD Supplier for RTV must be set to Yes, then the DSD Indicator on the supplier must be Yes.
- Supplier must be Active status.
- Multiple sets of books is enforced, meaning the org unit for the supplier must be the same as that of the store.
The Not After Date is defaulted from a parameter.
The Authorization Code can be entered while creating the shipment. If not, it can be entered later while dispatching the shipment.
Select a Return Type, that is, the reason for the return. This can be configured on the desktop to the business needs; some examples could be damaged goods, Invalid delivery, and Seasonal.
The shipment can be created with container or without any containers depending on the retailer’s business process. It will be defaulted by store configuration, Create Vendor Shipment with Container by Default. The user can change this option if the user has the Allow Modify Default Container Method permission.
When done, select Create to create the RTV shipment for the supplier.
Containers Screen

This screen is only accessible if an RTV shipment is created with containers.
The Containers screen displays the list of containers for a shipment or displays an empty list of containers if the shipment is new. The screen is accessed by opening a shipment from the RTVs screen or by creating a new shipment. This is the first screen displayed in a shipment flow. The screen can also be accessed by opening a shipment with containers from Recently Edited list or Open Transactions.
The details of a container such as ID (internal ID), Status, Tracking ID, Container ID, Total SKUs, Total Containers, and the Total Quantity are available in this screen.
You can identify a container by entering or scanning the Internal Container ID, SSCC ID, Tracking ID, or GS1 data bar. If the system finds the container, you will be navigated to the Container Items screen where the list of items inside the container are shown.
The filter present in this screen can be used to narrow down the list of containers. Filtering can occur by Container ID (Internal ID, SSCC ID), Tracking ID, and Status.
The ellipsis in the footer accesses the Footer menu which contains all of the functions that can be performed on a shipment.
Submit
The shipment can be saved to In Progress status to continue edits later or it may be set to Submitted or Dispatched. Submitting is possible when the store setting Dispatch Validate is configured for Ship Submit.
Submitting sets the shipment to a Submitted status and does not allow for edits; there are no updates to inventory at this point. You can only Cancel Submit or Dispatch.
If the system is enabled to obtain Fiscal Doc ID/E-way bill ID for the shipment, the process to request for the fiscal document starts once the shipment is submitted.
Dispatch
When the shipment is dispatched, the RTV reserved quantity for the source location will decrease in addition to the stock on hand. If no shipping quantities are identified, the transaction should be cancelled.
If the system is enabled to obtain Fiscal Doc ID/E-way bill ID as part of the shipping process, the shipment cannot be dispatched until the Fiscal Doc ID/E-way bill ID is available. The exception is when the user has Allow dispatch without Fiscal Document ID security permission.
Footer Menu
The menu functions include the following:
- Info: Accesses the Info popup where details can be added/updated/viewed.
- Notes: Accesses the notes dialog to capture notes.
- Cancel Submit: Reverses the Submit and moves the shipment back to In Progress.
- Delete: Marks the shipment to Canceled status. Must be New or In Progress status to delete. This will also cancel the approved RTV or approved RTV request.
- Back: Exits the shipment.
- External Printing: Displays the External Printing popup to select a printer for the pre-shipment notice and manifest documents.
- Print: This option allows you to select formats and print various reports and container labels. The RTV Shipment report and the BOL Detail report will be available on this screen. This option will always be available regardless of the shipment or container status.
- Save and Exit: Will save the RTV shipment
Footer Button
Create: Creates a new container in the shipment.
Submit: Submit performs validation for In Progress shipments and locks the shipment for additional edits. The shipment will be ready for dispatch. This menu option is only available when the store parameter RTV Shipment Dispatch Validate is set equal to Ship Submit. Validations to check if the mandatory CFAs, Fiscal Document related fields will happen here. The process to start obtaining Fiscal Document ID also happens at this point, if configured.
- Dispatch: Performs validation and dispatches the shipment. No further changes are allowed. The shipment is now ready to be physically shipped out of the store. Validations to check if the mandatory CFAs have been captured, Fiscal Document ID and so on, will happen here.
- Either Submit or Dispatch is displayed at a given point in time.
Shipment Info Screen
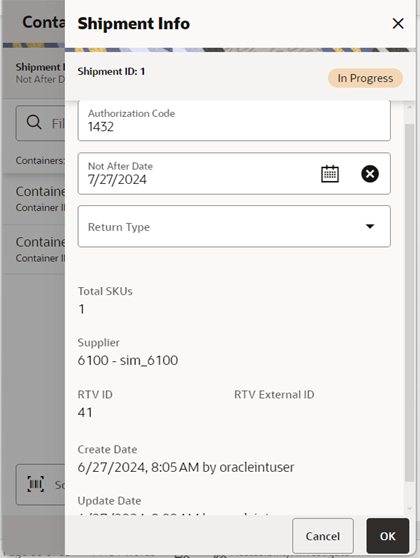
The Shipment Info screen is accessed by clicking the Shipment Info menu option in the Container screen footer menu. This screen lists view only details about the return shipment such as:
- Shipment ID
- Status
- Authorization Code
- Return Type
- Supplier
- RTV ID
- Total SKUs
- Create Date/User
- Update Date/User
- Submit Date/User
- Dispatch Date/User
- Fiscal Request ID, Fiscal Request Status, Reject Reason, Fiscal Doc ID, or Fiscal Doc Link, if the retailer has been using Fiscal Document ID/E-way bill ID in the shipment process.
- The screen displays the list of CFAs that have been set up for RTV shipment in the desktop application and lets you enter values for them. The CFAs that are set up as Required must have a value entered for it before dispatching the shipment. The value can be one of the following: Date, Text, Decimal, or Long depending on the data type set up for the CFAs, while creating them in the desktop application. Appropriate security permission is needed and the shipment must be in editable state for entering CFA values.
The user can specify Fiscal Document related details such as Vehicle Country, Number, Drive Name, and License Number if the retailer is using the E-way bill process.
Bill of Lading Screen
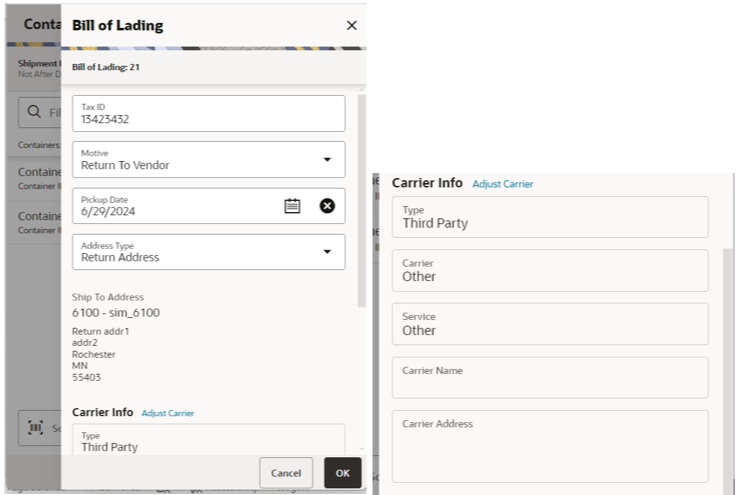
The Bill of Lading screen is used to enter details for the shipment including transportation details. Editable when the user has the Edit Shipment BOL permission.
Details will include: Motive, pickup date, ship to address, carrier type, carrier, carrier service, and carrier address.
The Carrier Type will be defaulted based on the transfer carrier table; however, you can modify this if necessary. For carrier types of Third Party, the Service will need to be selected.
The Carrier information will be locked down once the container has been confirmed. At that time, the Adjust Carrier button will be available to move the containers back to In Progress which will allow you to make changes to the carrier and other shipment details. Using this option will also move all containers back to in progress.
Container Items Screen
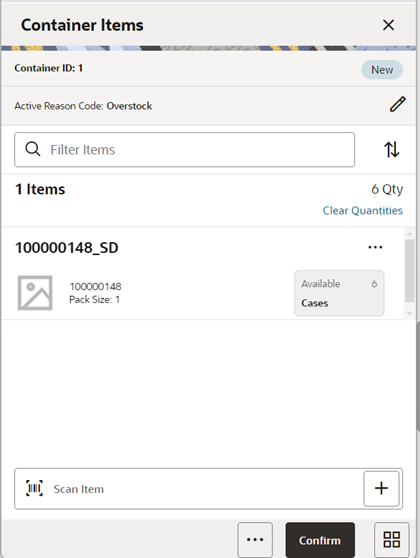
The Container Items screen can be reached once you tap a container from Containers screen or from opening a shipment with container from Open transactions/Recently Edited/Notifications screen. Many functions can be performed through this screen:
- Add items to a container with reason codes for each item. If the user scans a VPN, a validation is done to ensure that the VPN scanned belongs to the supplier associated to the delivery.
- The user can view the ship quantity entered for an item. The screen gives you an ability to view all the reason codes added (both available and unavailable) with the corresponding ship quantity, all in one place.
- The user will navigate to the Item Detail screen for the item scanned. If the item scanned is a UIN item, the user will navigate to the UIN tab within the Item Detail screen.
- Items and quantities can be defaulted from an approved RTV document if the shipment has been created for a document/request.
- Items with Non-Inventory Indicator as Yes are also allowed to be in the transaction and you can enter ship quantity for these items.
- Item can be added to the container manually which are not on the original RTV document (Add Unexpected Items to RTV Shipment permission). UOM is selected at the Mode bar of the screen and hence applies to all the items on the container. Toggling the UOM at the Mode bar will change the UOM and convert the quantity at the line item level.
- You may choose to add notes to the container.
- You can save, confirm, and delete a container from this screen.
- Hierarchy limitation for the container can be defined from this screen.
- The UIN icon is displayed if the item is a UIN required item with a Serial number or AGSN type.
- Unlike the reason code on the RTV, the reason code for items on the RTV shipment will impact sub buckets if sub buckets are used.
Footer Menu
The menu functions include the following:
- Info: Accesses the Info popup. Allows you to enter Container ID, weight, package size, tracking id, and so on. Also allows you enter values for the CFAs that are set up for RTV Shipment Containers.
- Notes: Accesses the notes dialog to capture notes.
- Default Item: Allows you to pull approved items from approved RTV documents to the shipment. This option is only available for shipments created for a return request. The user must have Default Items to RTV Shipment permission.
- Adjust: Allows you to move the container back to an editable state after it has been confirmed. The user needs the necessary permission to adjust a container.
- Save: This menu option will be available on the menu when the screen is in edit mode.
- Cancel: Exits the screen without saving the changes made, if any. This option will be available when the screen is in edit mode.
- Back: This allows you to exit the screen. This menu option will be available on the menu when the screen is view only.
-
Delete: This option will allow you to cancel the container. Reserved inventory is relieved appropriately and any RTV documents associated will set back the remaining quantities. Appropriate security permission is necessary to delete a container.
If the container contains UIN items, the UIN state should be set back to their previous state.
- Print: This option allows you to select formats and print various reports and container labels. The RTV Shipment Container report will be available on this screen. This option will always be available regardless of the shipment or container status.
Footer Button
Confirm: Allows you to complete the container with no further edits. Appropriate security permission is necessary to confirm a container. The status of the container moves to Completed status.
RTV Shipment Items Screen (without Container)
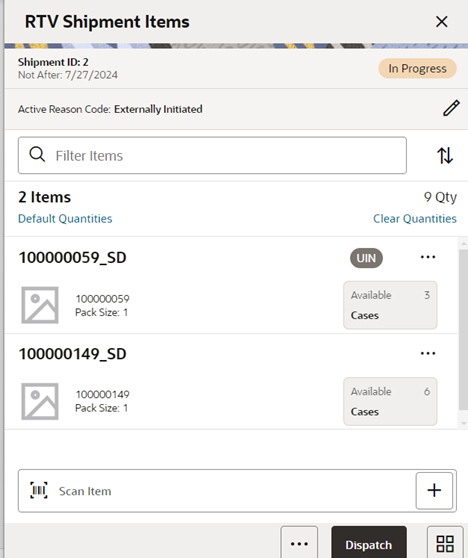
The RTV Shipment Items screen is used to add items within a shipment without container.
There are several functions you can perform on this screen. Some of the features include:
- Add items from RTV documents or add loose items.
- Submit/Dispatch the shipment.
The shipment can be created with or without referencing an RTV document.
When a shipment is created but not yet completed, the shipment will display a status of In Progress. The RTV reserved bucket will update the moment the shipment is saved for on the fly shipments. If the item is from a request/document, the reservation must have happened at the time of approval of the request/document. Any new additions or deletions of items and quantities will be updated to the approved document. It will also update the In Shipping quantity in the document. When the shipment is dispatched, the saved quantity in the transfer reserved bucket will be removed. This will keep the inventory accurate.
The item image for the line items is displayed per the configuration. Line items appear in a list and selecting a line item will navigate to the item details of the item. Scrolling in the list of items on the left will display a filter. The filter can be used to narrow down the list of items. Filtering can occur by Item ID, Description, and Reason Code:
- Add items to a container with reason codes for each item. If the user scans a VPN, a validation is done to ensure that the VPN scanned belongs to the supplier associated to the delivery.
- The user can view the ship quantity entered for an item. The screen gives you an ability to view all the reason codes added (both available and unavailable) with the corresponding ship quantity, all in one place.
- The user will navigate to the Item Detail screen for the item scanned. If the item scanned is a UIN item, the user will navigate to the UIN tab within the Item Detail screen.
- Items and quantities can be defaulted from an approved RTV document if the shipment has been created for a document/request.
- Items with Non-Inventory Indicator as Yes are also allowed in the transaction and you can enter ship quantity for these items.
- Item can be added to the container manually which are not on the original RTV document (Add Unexpected Items to RTV Shipment permission). UOM is selected at the Mode bar of the screen and hence applies to all the items on the container. Toggling the UOM at the Mode bar will change the UOM and convert the quantity at the line item level.
- Unlike the reason code on the RTV, the reason code for items on the RTV shipment will impact sub buckets if sub buckets are used.
Next to each item, the UIN icon will display if the UINs have been associated to the item.
The ellipsis in the lower right hand corner will access the footer menu which will contain all the functions that can be performed on a container.
Footer Menu
Info: Info will access the Info screen.
Shipment Info: Accesses the Shipment Info screen.
Notes: Accesses the notes common dialog to capture notes.
Save and Exit: Saves the shipment in In Progress status to be completed later and exits the screen. This option is only available when the screen is in edit mode.
Bill of Lading: This menu option will allow the user to view/enter the shipment information for the carrier and other details.
Close: This menu option will allow the user to close a shipment if the Not After Date has passed.
Cancel Submit: This menu option will move the shipment back to a state that allows edits.
External Printing: This menu option will allow the user to set the printer to use for the user session when automatically generating specific manifesting documents.
Print: Opens the print dialog and allows you to select formats and print various reports and container labels. The Transfer Shipment and BOL report will be available on this screen.
Delete: Marks the shipment to Canceled status. This option will only be available for shipments that are in a New or In Progress status.
Cancel: Exits the shipment and changes made in that session will not be saved. This screen is only available when the screen is in edit mode.
Back: Returns to the previous screen. This option is only available when the shipment is view only.
Footer Buttons
Submit: Submit will perform validations for In Progress shipments including excluded store validation and lock the shipment for additional edits. The shipment will be ready for dispatch. This menu option will only be available when the store parameter RTV Shipment Dispatch Validate is set equal to Ship Submit. Validations to check if the destination is a closed store for the sending store, mandatory check on CFAs, Context Type, and so on, will happen here. The process to start obtaining Fiscal Document ID also happens at this point, if configured.
Dispatch: Dispatch will perform validations including excluded store validation and post transactions to finalize the shipment and no further changes are allowed. Validations to check if the destination is a closed store for the sending store, mandatory check on CFAs, Context Type, Fiscal Document ID and so on, will happen here.
Item Detail Screen
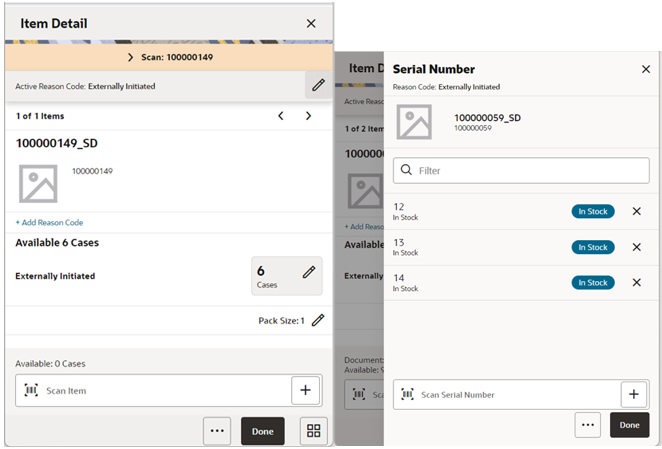
The Item Detail screen is used when selecting or scanning an item from the Container Items or RTV Shipment Items screen. Scanning or entering an item on this screen in the scan bar updates the quantity per the scan mode and refreshes the Item Detail screen for the item and quantity scanned. The quantity can be edited and updated manually if permissions allow. A user can over ship and ship more than what was on the RTV document/request if the user has the RTV Shipment Allow Over shipping permission.
If the user scans a VPN, a validation is done to ensure that the VPN scanned belongs to the supplier associated to the delivery. The user will navigate to the Item Detail screen for the item scanned. If the item scanned is a UIN item, the user will navigate to the UIN tab of the Item Detail screen.
If the same item has to be shipped from both available and unavailable buckets, using multiple reason codes/sub‑buckets, you can do it all from the same Item Detail screen.
Items with Non-Inventory indicator as Yes are also allowed in the transaction and you can enter the ship quantity for these items.
The item information includes the image that is system configured to display in the header. The screen contains information fields showing:
- Inventory Quantity
- Remaining Quantity
- Ship Quantity
- Reason Code
- Sub-Bucket (if sub-buckets are enabled, for unavailable inventory only) pertaining to the bucket stock is coming from.
- Displays the details of the last scanned barcode at the top of the screen.
Pack size can be edited from this screen.
The footer menu (ellipsis button) contains options to Edit pack size, View Locations, and Delete. Page through existing items in the Container view using the arrows on the top.
For UIN items, in order to add UIN details, the UIN screen is accessed by selecting the ship quantity field for the item from the Item Detail screen. It will navigate to the UIN screen to add and remove UINS for UIN items.
There is also an Extended Attributes link that enables the user to view/capture Extended Attributes for the item. If the item is not configured to capture extended attributes or there are no extended attributes captured, the list will be empty.
Info Screen (Container)
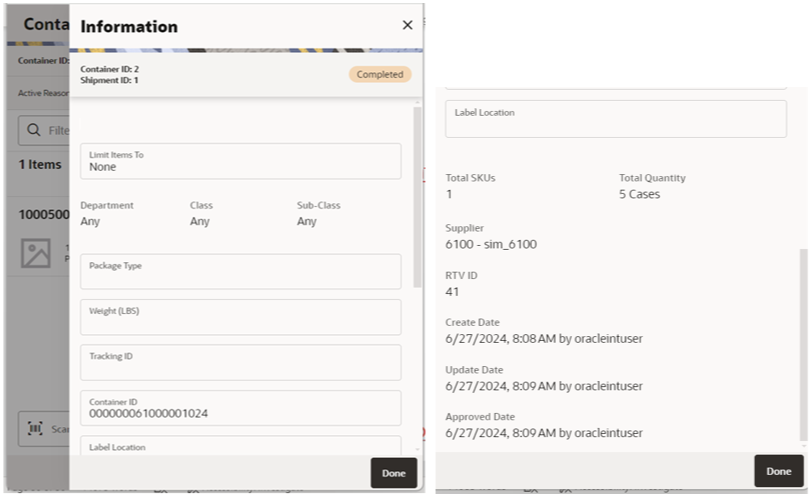
The Info screen appears when a user clicks the Info menu option on the Footer menu of Container Items/RTV Shipment Items screen. The Info (Container) is an informational screen containing certain read-only information about the header level of the container as well as enable the user to specify certain details such as CFAs.
Details include:
- Container ID
- Shipment ID
- RTV ID
- RTV External ID
- Status
- Supplier
- Container ID: Entry field for the number of the barcode on the container. If SSCC Shipping Label ID Generation is set to Manual, the user must enter a value. If it is set to Auto, the Container ID will be defaulted per the system‑generated ID, and the user can change it.
- Create Date/User
- Updated Date/User
- Approve Date/User
- Total SKUs
- Total Quantity: sum of the shipped quantity for this container
The screen enables you to enter CFAs, Package Type, Weight, Tracking ID, and container restriction by hierarchy. The inventory status and the container restriction by hierarchy are locked down once the first item has been added to the container.
- Limit Items to (Hierarchy Restriction)
- If you want to set up the container to restrict the container to hold the same type of items, they can set up the container to restrict by department, class, and subclass. You do not select the actual department, but rather set the hierarchy level you want to restrict by. When the first item is added to the container, the department, class, and/or subclass is set for the container based on the hierarchy the item is part of. The Container Detail screen will display the hierarchy that is locked in. Any items added subsequently must match the hierarchy of the first item. For example, if the restriction was set up to limit items to the same department and the first item added was for the Women's Department, only items that match the Women's Department can be added to the container, but it will not matter which class and subclass the item is in since the hierarchy level is set at Department.
- The hierarchy level is auto defaulted and can only be changed depending on the permission you have been given.
- If manifesting has been configured, the package type and weight may be required by the carrier selected for the shipment before you can confirm the container.
Processing
When a return document is saved or updated from the RTV shipment, the system moves the items from either Available or Unavailable (non-sellable) inventory, based on the inventory status, and moves it to the Reserved bucket within unavailable inventory. The Return to Vendors uses the RTV Reserved bucket. Upon dispatching of the return, the Reserved buckets will be relieved and the stock on hand will be decremented. If sub-buckets are turned on, the appropriate sub-bucket associated with the return reason will be updated when returning from unavailable inventory.
Note: It is only possible to ship one time against an RTV Document, so the RTV document will be completed, even if not everything is shipped on the RTV shipment. Closing the RTV will relieve all RTV reserved quantities, regardless of they were all shipped or not.
Example 1: Return to Vendor using Available Inventory
Item Lookup before:
Store A:
- Total SOH = 706
- Available SOH = 706
- Total Unavailable SOH = 0
- RTV Reserved = 0
- The user creates an RTV to move inventory from Store A to the Vendor using available inventory.
- The user enters a return quantity of 6 and clicks Approve.
- A quantity of 6 is placed into the reserved bucket in both the Store Inventory system and Merchandising. Merchandising is updated through sending a mod message.
- The retail ordering system takes into account the saved (reserved) quantity when replenishing the item through its regular ordering (auto-replenishment) process.
- Total SOH - Non sellable (Adjustment Unavailable Qty) - Transfer reserved quantity - RTV reserved quantity - Customer Reserved Qty = Available Quantity
Store A:
- Total SOH = 706
- Available SOH = 700
- Total Unavailable = 6
- RTV Reserved = 6
Note: Unavailable is a total of all sub-buckets.
- Modify Return Qty to 8 and click Dispatch.
Item Lookup:
- Total SOH = 698
- Available = 698
- Unavailable = 0
- Reserved Qty = 0
Example 2: Return to Vendor using Unavailable Inventory
Item Lookup before:

-
The user creates a shipment and enters a return quantity of 10 (unavailable) and clicks Save.

Note: The available quantity will still display as 700 on the UI and reports.
-
Modify Return Qty to 12 and click Dispatch.
Item Lookup:
- Total SOH = 788
- Available =700
- Unavailable = 88
- Nonsellable = 88; Sub-bucket: Trouble 63, Admin 25
- RTV Qty = 0
Transfer Receiving (Jet Mobile)
The receiving dialog allows users to receive store, warehouse, and external finisher deliveries. The mobile application enables the retailer to receive deliveries with containers and without containers. The deliveries can be for both available and unavailable inventory. The mobile application also supports misdirected containers or unexpected containers originally not listed on the delivery.
Transfer Receiving features:
- Receive by Advance Shipment Notice (ASN), container, item level, or automatically.
- Record damages during receiving.
- Blind receiving.
- Allows copying the expected quantity to received quantity for all items.
- Restrict Over receiving.
- Provides the option whether the delivery has to be received in the shop floor or back room.
- Prevents accidental receiving of containers without receiving any items.
- View details of the customer orders associated with the delivery.
- Manage container deliveries for another destination or creating an additional container.
- Multiple methods to scan and identify the container delivery (GS1, Container ID, and Tracking ID)
- Inventory updated immediately as containers are scanned and confirmed.
Mobile Features:
- Search for transfer receipts
- Create a new container
- View or edit an existing receipts or containers
- Capture values for CFAs for the delivery and containers
- Delete or cancel In Progress containers or receipts
- Confirm, mark damage, mark missing, or receive a container
Transfer Receiving Mobile Screen Flow
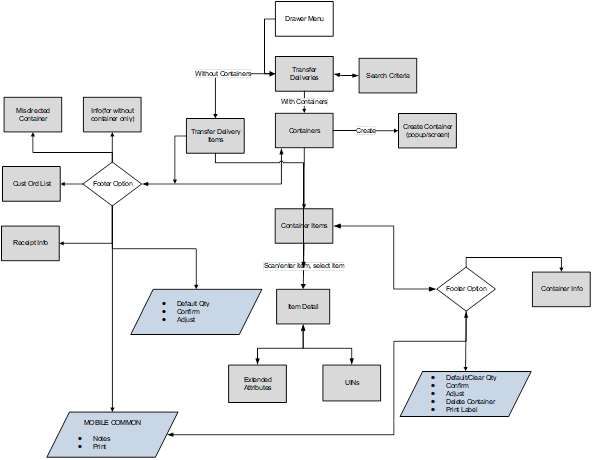
Transfer Receiving is accessed on mobile through the Shipping / Receiving menu within the drawer menu. It can also be accessed from Quick Actions screen or from an open transaction. Selecting the option will take you to the Transfer Deliveries screen. On this screen, you can search for delivery/receipt records which will be presented on the screen. You can edit or view a delivery/receipt.
For a delivery with containers, when editing or viewing a delivery/receipt, you will first be directed to the list of containers within the delivery/receipt on the Containers screen. You can create, edit, or view a container, capture values for CFAs. When creating, editing, or viewing a container, you are directed to the list of items in the container on the Container Items screen. You can add, view, and edit the details of the items. Transfer Receiving is accessed on mobile through the Shipping / Receiving menu within the drawer menu. It can also be accessed from Quick Actions screen or from an open transaction. Selecting the option will take you to the Transfer Deliveries screen. On this screen, you can search for delivery/receipt records which will be presented on the screen. You can edit or view a delivery/receipt.
For a delivery with containers, when editing or viewing a delivery/receipt, you will first be directed to the list of containers within the delivery/receipt on the Containers screen. You can create, edit, or view a container, and capture values for CFAs. When creating, editing, or viewing a container, you are directed to the list of items in the container on the Container Items screen. You can add, view, and edit the details of the items on the Item Detail screen. The Item Detail screen has tab for UINs if the system and/or item is configured. You can also capture values for CFAs that are set up for the containers.
For a delivery without containers, when editing or viewing a delivery/receipt, you will be directed to the list of items within the delivery/receipt on the Transfer Delivery Items screen.
New Permissions and Configuration
| Permission | Description |
|---|---|
| Allow Over Receiving Store to Store ASN | With this permission, the user will be able to over receive for a store to store ASN. |
| Allow Over Receiving Warehouse to Store ASN (Marked for future release) | With this permission, the user will be able to over receive for a warehouse to store ASN. |
| Allow Over Receiving Finisher to Store ASN (Marked for future release) | With this permission, the user will be able to over receive for a finisher to store ASN. |
Transfer Deliveries
Receive Transfer Screen
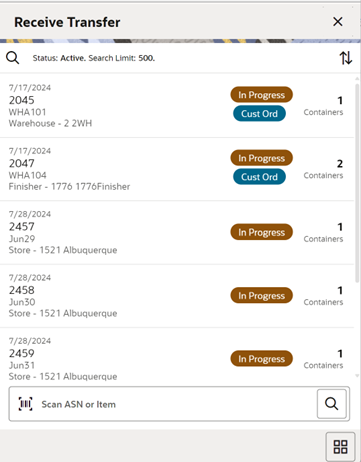
When navigating to Transfer Receiving, you go to the Receive Transfer screen with the default list being defined for Active receipts meaning New or In Progress status.
These deliveries are all populated through the system from an internal or external source (Warehouse or a Finisher). The ASN corresponds to the Shipment ASN for a store to store transfer.
Use the search criteria magnifying glasses to navigate to the transfer receipt search criteria screen to enter search criteria for transfer receipts.
You can also use the scan bar in the Transfer Deliveries screen to look up a delivery.
Selecting a receipt will direct you to the Containers screen and will display a list of containers, if the receipt has containers in it. If the receipt does not have containers, you will be directed to Transfer Delivery Items screen.
An estimated expected date will be populated if one exists in the ASN. When the delivery has been received, the receive date field will be updated. You can identify any container marked as missing or holding customer orders.
This screen allows you to identify if the transfer being received is for a customer order.
If an unexpected container arrives, search for the container using the misdirected container screen. Receiving notes may also be captured at the receipt and container level.
Search Criteria (Transfer Receiving) Screen
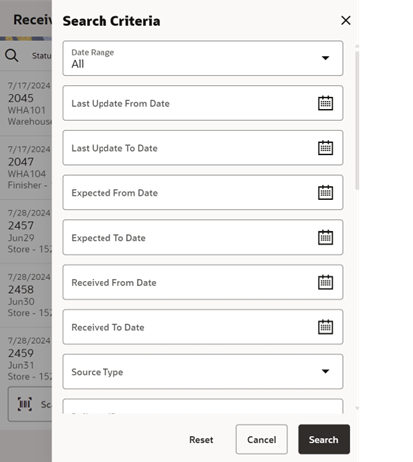
The Search Criteria screen is accessed by the magnifying glasses on the Transfer Deliveries screen. After applying the search criteria, the results will be listed on the Transfer Deliveries screen and the criteria applied will show. The fields available to search by include: expected date, received date, source type, source ID, source, delivery ID, ASN, item, status, container ID, document ID, customer order ID, fulfillment order ID, customer orders exist, context type, and context value. Transfer Deliveries can also be searched based on the Fiscal Doc ID/E-way Bill ID.
Containers Screen
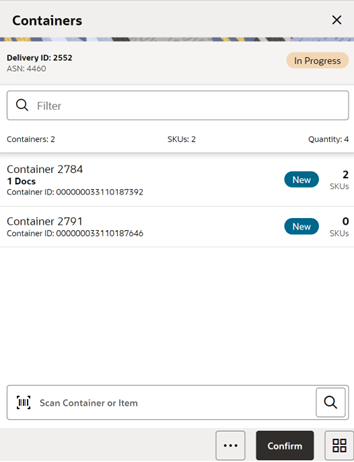
When selecting a receipt from the Receive Transfer screen, you go to the Containers screen with the list which will show Active containers on top. When scanning/entering a container ID in the scan bar, the system navigates you to the Container Items screen and displays the items currently in the selected container.
You can scan or enter the internal or external container IDs to find the matching containers in the receipt. The filter can be used to narrow down the list of containers. Filtering can occur by internal ID, container ID, and container status.
Containers can be received individually by selecting the container. Click Default Qty and, all items received quantity for each container is set to the expected quantity. Containers can only be received at a container level if they have not been received at the item level.
If the delivery has already been received and if the receipt date is within the system configured number of days allowed to adjust a receipt, it is possible to reopen the specific container on a receipt by clicking the container. Adjust the container from within the container dialog. The receipt can be saved as In Progress to complete receiving at a later time. Saving the receipt will not make any updates to the stock on hand.
Confirming the receipt will mark all containers, with received quantities, to Received. Stock on hand is updated when the status of the container changes to Received, either from within the receipt details or from within the Container. Any containers with no received quantities will be marked as Missing.
Several validation checks are performed:
- When none of the containers have been received, that is, all the items in all the containers have null received quantity:
- If the user has the security permission Confirm Empty Receipt, they will be prompted to ensure they would like to default 0-qauntities.
- If the user does not have the security permission Confirm Empty receipt, the user will not be able to confirm the delivery.
- If some containers have been received and there are some containers in New or In Progress status holding items without a received quantity, the system checks whether the user has the permission to Allow Default Zero at Confirmation:
- If the user has permission, the system will prompt the user whether to set the quantities to zero.
- If the user does not have permission, the user will not be able to confirm the delivery. At this point, the user will have to either save it for someone else with proper permission to confirm, or receive the items that are blank.
- The system checks whether there are any containers that are over received and if found, the system checks whether the user has the permission to over receive based on the Allow Over Receiving store to Store ASN permission (similar permissions are added for warehouse and finisher).
Footer Menu
Delivery Info: Info will access the Info (Receipt) screen.
Notes: The Notes option accesses the notes common dialog to capture notes.
Create: Creates a new container in the receipt.
Default Qty: Copies the expected quantity to the received quantity field for all containers on the delivery/receipt.
Misdirected Container: Accesses the Misdirected Container screen.
Back: Exits the receipt.
Print: Opens the print dialog and allows you to select formats and print various reports and container labels. The Transfer Receipt report is available on this screen.
Footer Button
Confirm: Confirm will set the receipt to a Received status.
Delivery Info Screen
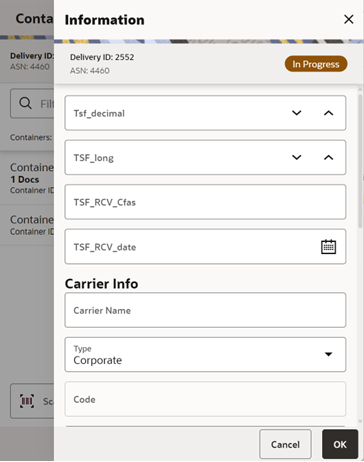
The Delivery Info is used to enter details for the delivery including transportation details. Details include: CFAs, Carrier Name, Carrier Type, Carrier Code, License Plate, Freight ID, Bill of Lading, and Delivery From Address. The screen also contains read-only information about the header level of the receipt. Details include: Source Type, Source, ID, ASN, Status, Expected Date, Create Date, Create User, Updated, Update User, Received, Received User, Fiscal Doc ID, QC Indicator, and Customer Orders if present.
Misdirected Container Screen
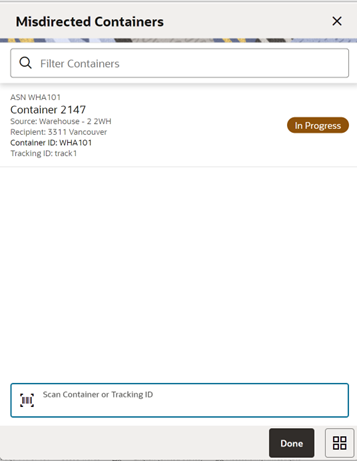
When selecting Misdirected Container from the Containers screen, you go to the Misdirected Container screen with the screen showing an empty list. When scanning/entering a container ID in the scan bar, the system will display matching containers available in the entire enterprise. Scan or enter the internal or external container IDs or Tracking ID to find the matching containers in the receipt.
When selecting a container within the list, you are taken to the Misdirected Items screen.
Misdirected Items Screen
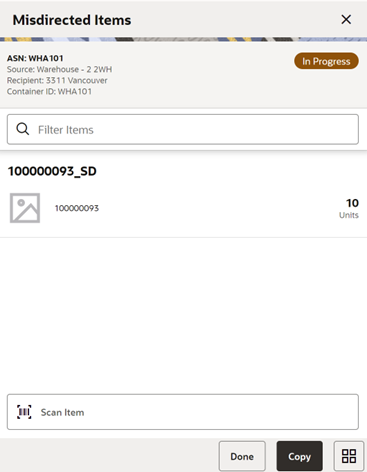
The Misdirected Items screen is used when selecting a container from the Misdirected Container screen. Details about the intended destination are displayed at the top of the screen. The details include: ID, Container Status, Source Type, Source, Destination Type, Destination, and Container ID. When scanning/entering an item in the scan bar, the system will update the filter bar and display the resulting item.
The filter can be used to narrow down the list of items. Filtering can occur by item ID and description.
The Copy button will copy all items from the container to a new container. A notification is sent to the original destination store to inform them the container intended for their location has been received in another location. The old container ID will be written into the reference container field for the newly created container and the old container will be moved to a Missing status.
Customer Orders Screen
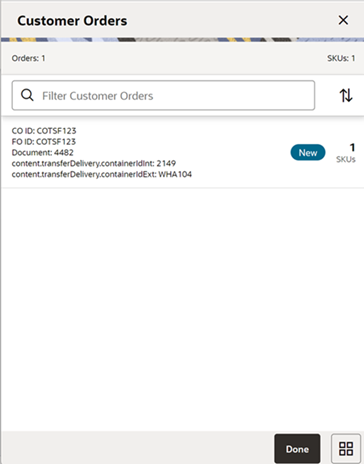
The screen is an informational screen that contains read-only information about the customer orders within the receipt. Details include: Customer Order/Fulfillment Order, Status, Internal and External container ID. It can be accessed from clicking the View Details link from the Delivery Info screen or from the Info screen.
Scrolling in the list of customer order/fulfillment orders on the left will display a filter. The filter can be used to narrow down the list of items. Filtering can occur by Customer Order ID, Fulfillment Order ID, Container ID, and Customer Order Status.
Container Items Screen

The Container Items screen is used when selecting a container to receive from the Containers screen.
This screen is used to work with the contents and details within the container. Information is populated from an Advanced Shipment Notice (ASN) and the user can mark the items as received or damaged. The items on the list are for the container. The item image for the line items is displayed per the configuration.
If the Non-Inventory indicator of the item is No, the SOH of the item is updated at the completion of the transaction.
If the Non-Inventory indicator of the item is Yes, the item can be added to the transaction however, the SOH will not be updated on confirmation of the receipt. Items can be scanned/ added to the transaction; you can enter/update quantity just like a normal (inventory enabled) item. All the processing rules and validations that apply to inventory enabled items would apply for non-inventoried items too except that the validations done on quantity against SOH will be ignored. On confirmation of the receipt, the SOH of the item will not be updated since the application does not preserve the inventory details of the items with Non-Inventory set as Yes.
When the screen is set to regular receiving mode, the header bar will display the number of SKUs, Receiving, and total expected quantity. Scanning/entering an item will update the received quantity. When the screen is set to damage receiving mode, the header bar will display the number of SKUs, Damages, and total expected quantity. Scanning/ entering an item will update the damaged quantity. Finally, when the screen is set to display only discrepancies, the number of discrepancies is displayed on the left.
Line items appear in a list and selecting a line item will navigate to the item details of the item. If an item has been changed in the current session, it will be indicated by a bar on the left of the item. The filter can be used to narrow down the list of items. Filtering can occur by Item ID, Description, Expected Qty, Received Qty, and Damaged Qty.
Scanning or entering an item in the scan bar will navigate the user to the Item Detail screen for the item. If the user scans the Item ID of a UIN item or if the user scans a UIN, the user will be taken to the UIN tab of the Item Detail screen.
Quantity may be updated, depending on the scan mode.
The following icons will be displayed next to the item: green circle with check indicates the item is not discrepant and the blue circle with an 'i' indicates the item is discrepant. A discrepant item is when the received quantity plus the damaged quantity does not equal the expected quantity. If configured, unexpected items may be added to the container.
The entire container may be marked as damaged and a reason for the damage from the Container Info screen. Additionally, the container can be marked to receive on the shopfloor directly.
Receive Transfer Delivery
When the delivery is being received, the status of the delivery/receipt will move to In Progress status at the receiving store. Press the Cancel button and the delivery/ receipt will remain as New. If configured for blind receiving, the expected inbound quantities will not display.
You may select Receiving Mode as Regular to receive items in good condition or change the Receiving mode to Damages and mark items as damaged if necessary.
When confirming a delivery, the status is updated to Received and inventory is updated. The merchandising system is also notified when a container is received. This provides an up-to-date view.
In addition, this screen also provides an option to the user to view all items or only damaged/discrepant/Not received/received items.
Finally, can also default received/damaged quantity with remaining quantity using Default Received Quantities/Default Damaged Quantities respectively. You can manually enter the received quantity using the Quantity popup.
When damaged items are received, the inventory for those items will be put into a Non-sellable Unavailable bucket. The total received is the sum of the received and the damaged quantities.
Receive Entire Delivery
If the system parameter Receive Entire Transfer is set to Yes, you cannot add or remove items from a delivery.
Managing Discrepancies
Deliveries can be received for over, short, or the exact quantity dispatched. Discrepancies are easily managed with the Display Only Discrepancies menu option. When selected, the expected qty will be compared with the received plus damaged qty and only the items with a discrepancy will display. Unexpected items added during the session will not show up on the discrepancy list since there is no expected quantity.
Store to Store transfer receipt overages will adjust the difference out of the sending store's stock on hand. There is not an inventory adjustment created for this overage but an e-mail notification will be generated and sent to the sending store.
Adjust Container
After the delivery has been received, it is possible for a user to adjust each container on the receipt. This will depend on the Number of Days received transfers can be adjusted system parameter. Select the Adjust button and the container moves back to In Progress. The entire container is reversed out and you will need to reconfirm. The full reversal will display in Transaction History.
Adjusting can only be done at the container level. The entire receipt cannot be adjusted at once. Once the original receipt has been confirmed, the inbound bucket will no longer see a change. In some cases, the container may be restricted from adjustments, such as when customer order reservations exist. If the container has been adjusted, a check box will be marked in the Container Info screen. The received quantity and damage quantity fields will be populated with the same value as when the container had been confirmed.
The ellipsis in the lower right hand corner will access the footer menu which will contain the functions that can be performed on a container.
Footer Menu
Info: Info will access the Info (Container) popup.
Notes: The Notes option accesses the notes common dialog to capture notes.
Save: Saves the container in In Progress status to be completed later. This option is only available when the screen is in edit mode.
When the container is saved, the UINs flagged as Received or Damaged and are not flagged to remove, the UIN status is updated to In Receiving:
- If a UIN is flagged for removal, the UIN will be deleted if the UIN has a status of Unconfirmed (this identifies the UIN as manually added).
- If a UIN is flagged for removal, the UIN receiving mode is removed if the UIN has any status other than Unconfirmed (this identifies the UIN as pre-existing from an ASN).
- If an item is flagged for removal, when you save the container and returns, the item will no longer exist in the container if it was added as an unexpected item during that session. After the item is saved, it cannot be deleted from the transaction. A delete will set the qty to 0.
- If a UIN was relocated from another store:
- The UIN status is updated from In Stock to In Receiving.
- A notification is generated and sent to the store the UIN was relocated from.
Delete: Marks the container to Canceled or Missing status. If the container is from an external system, the container will be marked as Missing, otherwise, it will be marked as Canceled. This option will only be available for containers that are in a New or In Progress status.
Cancel: Exits the container and changes made in that session will not be saved. This screen is only available when the screen is in edit mode.
Back: Returns to the previous screen. This option is only available when the container is view only.
Print: Opens the print dialog and allows you to select formats and print various reports and container labels. The Transfer Receiving Container report will be available on this screen. This option will always be available regardless of the receipt or container status.
Footer Button
Confirm: Moves the container in an In Progress status to Received.
If there are any containers that are over received and if found, the system checks whether the user has the permission to over receive based on the Allow Over Receiving <Source type> to Store ASN permission. If the user does not have this permission, the user cannot over receive.
Depending on Default to Shopfloor Receive setting, the item will be received in the shop floor or back room.
The Container status is updated to Received when there are no Damaged Quantities.
The Container status is updated to Damaged when there are one or more Damaged Quantities. Stock on hand gets updated. Total Stock on Hand and Available SOH will be incremented with the Received quantity. Total Stock on Hand and Unavailable SOH will be incremented with the Damaged quantity. If there is a customer order associated with the delivery and if reservation has to happen on receipt, the reservation happens for the customer order. The UINs that are received (non-damaged) will have the status updated to In stock at the store.
The UINs that are received as damaged will have the status updated to Unavailable at the store.
Adjust: Reopens a delivery in Completed status and moves it back to In Progress.
Transfer Delivery Items Screen (No Container)
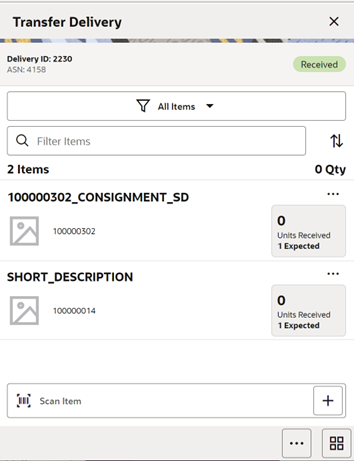
The screen is displayed when selecting a delivery/receipt from the Transfer Deliveries screen which do not have containers.
This screen is used to work with the contents and details within the delivery. Information is populated from an Advanced Shipment Notice (ASN) and you mark the items as received or damaged. The items on the list are for the delivery. The item image for the line items is displayed per the configuration.
If the Non-Inventory indicator of the item is No, the SOH of the item is updated at the completion of the transaction.
If the Non-Inventory indicator of the item is Yes, the item can be added to the transaction however, the SOH will not be updated on confirmation of the receipt. Items can be scanned/ added to the transaction; you can enter/update quantity just like a normal (inventory enabled) item. All the processing rules and validations that apply to inventory enabled items would apply for non-inventoried items too except that the validations done on quantity against SOH will be ignored. On confirmation of the receipt, the SOH of the item will not be updated since the application does not preserve the inventory details of the items with Non-Inventory set as Yes.
When the screen is set to regular receiving mode, the header bar will display the number of SKUs, Receiving, and total expected quantity. Scanning/entering an item will update the received quantity. When the screen is set to damage receiving mode, the header bar will display the number of SKUs, Damages, and total expected quantity. Scanning/ entering an item will update the damaged quantity. Finally, when the screen is set to display only discrepancies, the number of discrepancies is displayed on the left.
Line items appear in a list and selecting a line item will navigate to the item details of the item. If an item has been changed in the current session, it will be indicated by a bar on the left of the item. The filter can be used to narrow down the list of items. Filtering can occur by Item ID, Description, Expected Qty, Received Qty, and Damaged Qty.
Scanning or entering an item in the scan bar will navigate the user to the Item Detail screen for the item. If the user scans the Item ID of a UIN item or if the user scans a UIN, the user will be taken to the UIN tab of the Item Detail screen.
Quantity may be updated, depending on the scan mode.
The following icons will be displayed next to the item: green circle with check indicates the item is not discrepant and the blue circle with an ‘i’ indicates the item is discrepant. A discrepant item is when the received quantity plus the damaged quantity does not equal the expected quantity. If configured, unexpected items may be added to the container. A new transfer will be created for the unexpected items. There will only be one transfer created for the entire receipt.
The entire container may be marked as damaged and a reason for the damage from the Container Info screen. Additionally, the container can be marked to receive on the shopfloor directly.
Receive Transfer Delivery
When the delivery is being received, the status of the delivery/receipt will move to In Progress status at the receiving store. Press the Cancel button and the delivery/ receipt will remain as New. If configured for blind receiving, the expected inbound quantities will not display.
You may select Receiving Mode as Regular to receive items in good condition or change the Receiving mode to Damages and mark items as damaged if necessary.
When confirming a delivery, the status is updated to Received and inventory is updated. The merchandising system is also notified at the container level for the receipt. This provides an up to date view.
This screen also provides an option to the user to view all items or only damaged/discrepant/not received/received items.
You can also default received/damaged quantity with remaining quantity using Default Received Quantities/Default Damaged Quantities respectively. You can manually enter the received quantity using the Edit Quantity popup
When damaged items are received, the inventory for those items will be put into a Non-sellable Unavailable bucket. The total received is the sum of the received and the damaged quantities.
Managing Discrepancies
Deliveries can be received for over, short, or the exact quantity dispatched. Discrepancies are easily managed with the Display Only Discrepancies footer menu option. When selected, the expected qty will be compared with the received plus damaged qty and only the items with a discrepancy will display. Unexpected items added during the session will not show up on the discrepancy list since there is no expected quantity.
Store to Store transfer receipt overages will adjust the difference out of the sending store’s stock on hand. There is not an inventory adjustment created for this overage but an e-mail notification will be generated and sent to the sending store.
Adjust Delivery
After the delivery has been received, it is possible for a user to adjust the receipt. This will depend on the Number of Days received transfers can be adjusted system parameter. Select the Adjust button and the container moves back to In Progress. The entire container is reversed out and you will need to reconfirm. The full reversal will display in Transaction History.
In some cases, the delivery may be restricted from adjustments, such as when customer order reservations exist. If the delivery has been adjusted, a check box will be marked in the Info screen. The received quantity and damage quantity fields will be populated with the same value as when the delivery had been confirmed.
The ellipsis in the lower right hand corner will access the footer menu which will contain the functions that can be performed on a container.
Footer Menu
Delivery Info: Will access the Delivery Info screen.
Info: Info will access the Info (Container) screen.
Notes: The Notes option accesses the notes common dialog to capture notes.
Save: Saves the delivery in In Progress status to be completed later. This option is only available when the screen is in edit mode.
When the container is saved, the UINs flagged as Received or Damaged and not flagged to remove are updated to In Receiving:
- If a UIN is flagged for removal, the UIN will be deleted if the UIN has a status of Unconfirmed (this identifies the UIN as manually added).
- If a UIN is flagged for removal, the UIN receiving mode is removed if the UIN has any status other than Unconfirmed (this identifies the UIN as pre-existing from an ASN).
- If an item is flagged for removal, when you save the container and returns, the item will no longer exist in the container.
Note: Only unexpected items added can be removed.
- If a UIN was relocated from another store:
- The UIN status is updated from In Stock to In Receiving.
- A notification is generated and sent to the store the UIN was relocated from.
Cancel: Exits the delivery and changes made in that session will not be saved. This screen is only available when the screen is in edit mode.
Back: Returns to the previous screen. This option is only available when the screen is view only.
Print: Opens the print dialog and allows you to select formats and print various reports and container labels. The Transfer Receiving report will be available on this screen. This option will always be available regardless of the receipt status.
Footer Button
Confirm: Moves the container in an In Progress status to Received.
If there are any containers that are over received and if found, the system checks whether the user has the permission to over receive based on the Allow Over Receiving <Source type> to Store ASN permission. If the user does not have this permission, the user cannot over receive.
Depending on the Default to Shopfloor Receive setting, the item will be received in the shop floor or back room.
The Container status is updated to Received when there are no Damaged Quantities.
The Container status is updated to Damaged when there are one or more Damaged Quantities, Stock on hand gets updated. Total Stock on Hand and Available SOH will be incremented with the Received quantity. Total Stock on Hand and Unavailable SOH will be incremented with the Damaged quantity. If there is a customer order associated with the delivery and if reservation has to happen on receipt, the reservation happens for the customer order. The UINs that are received(non-damaged) will have the status updated to In stock at the store.
The UINs that are received as damaged will have the status updated to Unavailable at the store.
Adjust: Reopens a container in Completed status and moves it back to In Progress.
Item Detail Screen (Container)
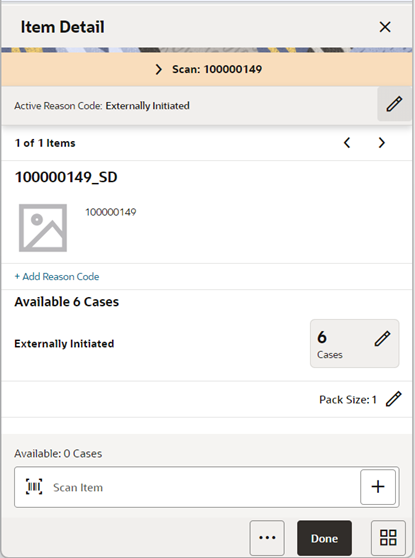
The Item Detail screen is used when selecting or scanning an item from the Container Items/Transfer Delivery Items screen. Scanning or entering an item on this screen in the scan bar will update the quantity per the scan mode and refresh the Item Detail screen for the item and quantity scanned. The quantity can be edited and updated manually if permissions allow. You can enter quantity for items with the Non Inventory indicator as Yes.
The item information, including the image, which is system configured to display in the header. The screen contains information fields of inventory qty, remaining qty, document qty, and reason code (for unavailable inventory only) pertaining to the bucket stock is coming from. Lastly, the details of the last scanned barcode will be displayed.
If the user scans the Item ID of a UIN item or scans a UIN, the user will be taken to the UIN tab within the Item Detail screen, for that item.
In the UIN tab, the system displays all the UINs for the selected item, if the UINs were part of the ASN. Otherwise, the screen will remain blank until UINs are scanned/entered for the item.
When entering the screen for the first time, the status will display the following:
- The UINs included on an incoming ASN will be displayed with a status of Shipped to Store.
- The UINs manually added will be displayed with a status of Unconfirmed, if they do not previously exist.
- The UINs manually added may have another status, if they already exist in the system.
When re-entering this tab after Save, the status will be updated to In Receiving for all UINs.
When the transaction is no longer editable, the screen will be in view-only mode.
You will not have the ability to change the Receiving Mode for the UIN.
There is also an Extended Attributes tab that enables the user to view/capture Extended Attributes for the item. If the item is not configured to capture extended attributes or there are no extended attributes captured, the list will be empty.
Info (Container) Popup
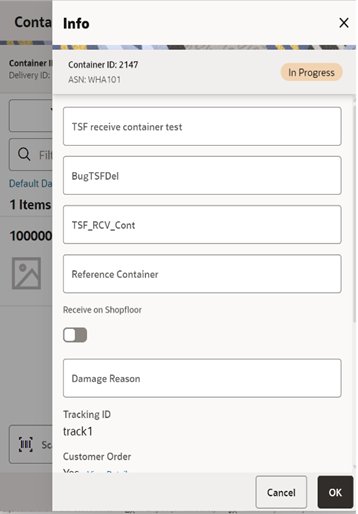
You navigate to this screen from the footer menu on the Container Items/Transfer Delivery Items screen. The screen is used to enter details including CFAs, transportation details, Reference Container, Receive on Shopfloor, and Damage Reason.
The reference container field is used to identify the original container ID and will be filled in when you have copied a container from the Misdirected Items screen. If the container was manually created, you can enter the original container ID here.
The screen also contains read-only information about the header level of the container. Details include: ID, container ID, reference, ASN, status, source type and source, expected date, create date, create user, update date, update user, receive date, receive user, SSCC, tracking ID, and Customer Order details.
The Receive on Shop Floor option requires a bit more information and should only be available when tracking inventory on the shopfloor or backroom. The default will be based on the store parameter <Source> Default to Shop floor Receiving. If set to Yes, the check box will default to marked. You are required to have the Receive Direct Delivery on Shop floor permissions to change the value. This indicates whether the delivery will default to receive inventory into the shop floor instead of automatically receiving into the back room or delivery bay. If this is set to receive on shop floor, the system increments the shop floor inventory bucket instead of the backroom or delivery bay bucket.
If a capacity is defined for the item and Receive Item Capacity is set to Yes, the maximum shop floor quantity will equal the capacity; otherwise, the shop floor will be updated to the entire receipt amount. If the capacity is used and if the receiving quantity is excess, the balance is incremented to delivery bay or back room depending on the Replenishment - Delivery Bay Inventory parameter. If Receive on Shopfloor is not set on the delivery, the system increments the back room or delivery bay bucket depending on the Replenishment - Delivery Bay Inventory parameter. If this parameter is Yes, the system will increment the delivery bay bucket instead of back room. Regardless, the stock on hand will be updated. The Receive on Shopfloor check box will only display for deliveries from a store or warehouse.
Direct Store Delivery (Jet Mobile)
A direct store delivery is a delivery in which the supplier drops off merchandise directly at the store. These deliveries, received directly at the store, can be against a planned delivery, an existing purchase order (PO) raised by the corporate or by the store, or a purchase order on the fly. The delivery supports containers coming in directly with Advance Shipment Notice (ASN) or the system will create a container when the ASN is loaded in the system. Even for receipts without ASN, the system will allow you to create containers. For the deliveries that are created on the fly either with reference to the PO or without PO, the retailers can manage the delivery with container or without containers.
The store can receive partial shipments, resulting in multiple deliveries against a single purchase order.
Features:
- Direct deliveries against a Purchase Order (PO) and with Advance Shipment Notice (ASN) from the supplier. This feature also supports containers coming directly from the source and allows you to create additional containers.
- Receive on shop floor directly or back room/delivery bay.
- Create direct delivery receipts against a PO and without ASN from the supplier. You can receive these deliveries with or without container and if it is with container, it supports delivery by creating one or more containers.
- Create Direct Delivery receipts without a PO with containers or without containers.
- Direct EXchange (DEX)/Nex type deliveries.
- Capture values for CFAs at the direct store delivery and containers level.
Store Delivery Jet Mobile Screen Flow
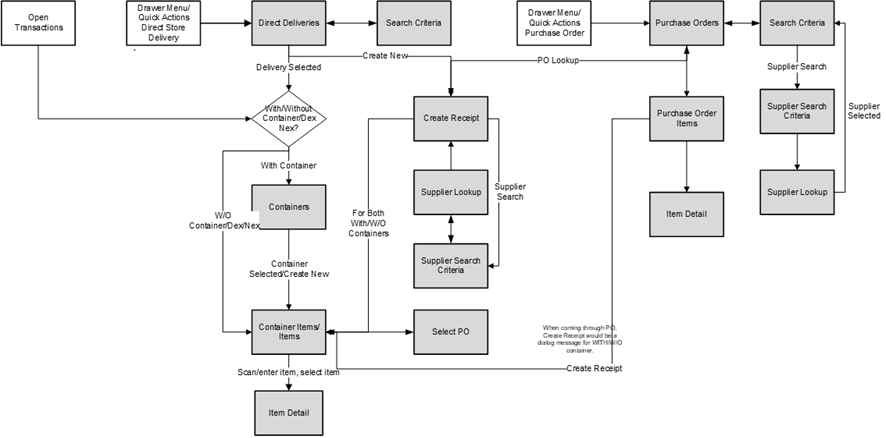
You can access DSD Receiving and Purchase Order options from the Shipping and Receiving menu, open transactions, or quick actions menu. The Direct Deliveries screen that appears after selecting DSD Receiving will by default list all the active deliveries. The active deliveries include the deliveries created on the fly by the store users, ASNs that came from the suppliers, and Dex-Nex based deliveries that are not yet completed.
The Create New option will take you to the Create Receipt screen where you can provide various criteria and create an on-the-fly receipt.
At this point the user has the option to select with or without container. If they select a delivery that is with container, they are navigated to the Containers screen that list the containers in the delivery.
If they select a delivery that is without container, they are navigated to the Delivery Items screen.
Note: Although without a container, the user does not go through the menu option of creating a container; the transaction will still behind the scenes nest the items in a container structure, generate a container ID, and so on. This is to allow the downstream process to continue to work, as well as allow for the generation of tracking ID numbers for the shipment if needed.
Through the footer menu, the user has access for additional options such as Delivery Info, Receipt Adjustments, Print, Notes, Default Quantity and so on from the Containers screen to perform various individual functions.
On the Container Items screen, the user can select the footer menu for various options such as Info, Default Regular Quantity, Clear Quantities, Adjust and so on to perform various individual functions.
On the Delivery Items footer menu, the user will find both the Delivery Info and Receipt Info to view the header level and the receipt level information.
On he Purchase Orders screen that appears after selecting Purchase Order, the user can view the purchase order details and create a receipt against a PO.
New Permissions and Configuration
New store configuration: Create Direct Delivery with Container by Default
- Values: Yes/No
- Default: Yes
- Topic: DSD Receiving
- Editable: Yes
- With Container (Yes)- If this is the default option set, the system will make this as a default selection on the create receipt screen when an on the fly receipt is created.
- Without Container (No)- If this is the default option set, the system will make this as a default selection on the create receipt screen when an on the fly receipt is created.
| Permission | Usage |
|---|---|
| Allow Modify Default Container Method | With this permission, the user can modify the default container method to create a receipt with or without containers. |
| Allow Create Multiple Containers |
The Create button/menu will not be available after the first container was created if the user does not have Allow Create Multiple Containers security permission.
|
Direct Deliveries Screen
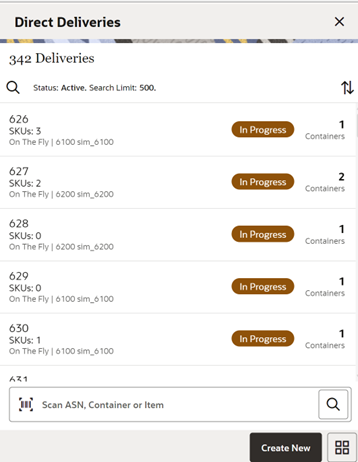
The Direct Deliveries screen is accessed when you select DSD Receiving from the Shipping and Receiving menu or quick actions.
The system by default shows all the active deliveries for you to do the detailed receiving. It includes all types of deliveries. If the supplier has sent an ASN, it is uploaded and listed here. You can select a delivery and do the detailed receiving. If the store has received a delivery through the DEX/Nex service, it will be listed here, and you can select to do the detailed receiving. If you have started the delivery process, it shows the delivery with the In-Progress status. You can select the In-Progress deliveries to continue the receiving. You can also select the completed deliveries to do the adjustment.
The deliveries created in the mobile application are shown with the type On the Fly.
The deliveries that have ASN from the source are shown with the type ASN.
The deliveries that are PO based and no ASN are shown with the type of PO.
The deliveries that are of DEX/Nex based are shown with the type DEX/Nex.
DSD Receipts that are affiliated with a customer order will be indicated with the text CO at the receipt level on this screen.
From the Direct Deliveries screen, you can do the following:
- Select the search criteria option which is shown with the magnifying glass to filter the list based on the given criteria. Selecting the search criteria option takes you to the Search Criteria screen which is described below.
- Select the Create New footer button to create an on-the-fly delivery. Upon selecting this option, you are taken to the Create Receipt screen to provide details to create a receipt.
- Select the delivery from the list and perform detailed receiving or edit the delivery. Upon selecting the delivery record from the list, the system takes you to the Containers screen if the delivery is created with containers, if not it takes you to the Delivery Items screen.
- On this screen, you can scan and ASN Id, Container ID, or Item to search a delivery.
Direct Deliveries Search Criteria Screen
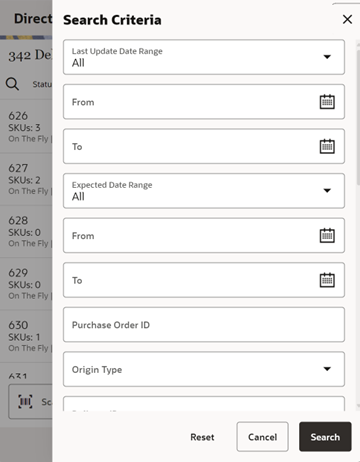
The Direct Deliveries Search Criteria screen is accessed by selecting the search criteria option from the Direct Deliveries screen. By default, the system lists the active deliveries; you can use this screen to search for deliveries on various other criteria. After applying the filter, you are returned to the Direct Deliveries screen with the deliveries displayed based on the entered criteria. You can filter on DSD Receipts that are for customer orders as well as search for receipts that are for a specific customer order or fulfillment orders. DSDs can also be searched based on Fiscal Doc ID/E-way Bill ID.
The originating type includes ASN, On the Fly, DEX/Nex, and PO.
Select the Include Item Packs switch option which is enabled only if the item is entered, to search for deliveries that include the pack item of the entered item.
Use the Reset button on this screen to reset all the filtering criteria to default values.
Create Receipt Screen (DSD)
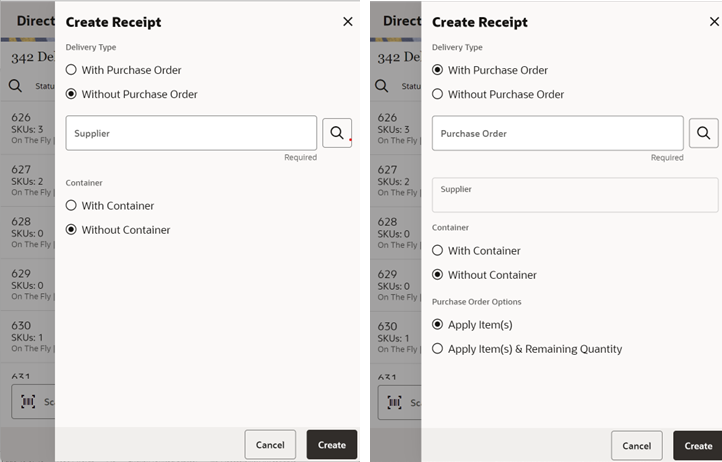
You can create a new on the fly direct delivery receipt by selecting the create new option on the Direct Deliveries screen.
For on the fly receipts without ASN, you can create deliveries with PO or without PO. When creating a receipt, you can select whether to create delivery with container or without containers.
You can use the supplier lookup to search the supplier.
In case of a PO, you can search the PO. Upon selecting the search option, the system will take you to the Purchase Orders screen that lists the active Purchase orders. You can refine search and select the PO to apply for the delivery.
Once you have selected the PO, you can select to apply items or apply items and remaining quantity.
When you apply items alone, the system will associate the delivery and apply the items that are in the selected Purchase order by defaulting the received quantity to zero and allowing the user to override with the actual received quantity.
When you apply items and remaining quantity, the system references the selected PO to the delivery and adds all items that have remaining quantity >0 and populate the received quantity with the PO remaining quantity.
After providing all the criteria to create the delivery, if you select the Create option, the system creates a delivery and navigates to Delivery Items; if without container is chosen or to Container Items if it is with container.
New PO deliveries can also be created with or without container. SIOCS can be configured to provide this option to a user, have it pre-defaulted, or hide it. This allows the retailer to configure the system based on needs since many supplier DSD deliveries on the fly happen without container delivery. Keep in mind that based on other settings such as single delivery per PO, not having containers can prevent multiple users from receiving against the same PO.
Note: Without container will still create a container in the backend, the user will not interact directly with a container screen or have to select a container.
Containers Screen
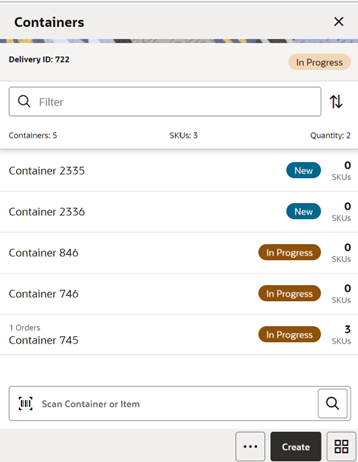
The Containers screen appears when you select a delivery from the Direct Deliveries screen. This screen appears only when you select a delivery that has one or more containers and is not a delivery without container.
If you are receiving a delivery with an ASN type of delivery, it shows the containers. Select the container to go to the Container Items screen to do the detailed item level receiving. You can also create a new container using Create Container which takes you to the Container Items screen to receive unexpected containers.
The Create option is only available if you have permission for the New and In-progress deliveries.
You can also optionally scan or enter the container id to do the detailed item level receiving for that container.
Tap the filter field and perform text-based searches on the containers to refine the search on what is listed.
On this screen, you can also perform other operations by selecting the respective option from the footer menu which can be accessed by selecting the ellipsis (...) from the bottom of the screen.
Footer Menu
Create: This menu is same as the Create button to create a new container.
Info: On this screen, it displays the delivery related information and allows you to view and invoice particulars, carrier, and CFAs.
Default Quantity: The default quantity option will help you to default the remaining expected quantity to the received quantity in the containers. The system will not default the quantities for the items that are processed earlier and contains a value including zero. This option is not available for the On-the-Fly delivery since there is no expected quantity. You can perform this process from this menu for all the containers in the current delivery with the New and In-Progress status. For specific containers, go into the detail, that is, Container Items screen:
- If the delivery is flagged for quality control, you cannot default the quantity and will be prompted with a message.
- Default Qty sets the status of the integrated UINs to In Receiving for the delivery.
- In addition, a validation check is performed to ensure the expected quantity matches the serial numbers for items; if that is not the case, you will not be allowed to receive all. If there are no UINs available for a UIN required item, the quantity is set to zero.
Confirm: Upon selecting this option, the system will confirm the delivery:
- This option can be accessed if you have permission, and the delivery is in New or In Progress status.
- When you confirm the delivery, the system does various processing before it confirms the delivery.
- The system will first check whether there are any containers in the delivery and if there is no container, the system prompts an error message.
- The system checks whether it is an empty receipt meaning there are no containers that have an item with received or damaged quantities. If it is an empty receipt, the system checks whether you are allowed to do an empty receipt and if allowed, it confirms the delivery and puts all the containers in missing status.
- The system does the validation on ASN over receiving and PO over receiving and displays the error if it meets the condition.
- Additionally, the system checks for the supplier discrepancies.
Print: Upon selecting this menu, the system opens the print dialog to print the report.
Reject: Select the Reject menu if the delivery has to be rejected. This will reject the delivery and move all the containers to canceled status and move the status of the delivery to Rejected. Rejection of a delivery is possible only for the deliveries that are in In-Progress or New status and it will not allow rejecting if there are any received or damaged containers in the delivery. This will also remove any UINs present in the delivery.
Delete: Select the Delete menu if the delivery has to be deleted. This will cancel the delivery and all the containers inside the delivery.
Receipt Adjustments: Select this menu to view any adjustments done by the external system for the delivery. See Receipt Adjustments.
Notes: Use this option to access the Notes dialog to enter any notes for the delivery.
On the title bar, you can see the Delivery ID and ASN Id if ASN based delivery and status of the delivery.
At the header level, the system displays the total number of containers, total SKUs present in the delivery, and the total quantity in the delivery.
Detail fields on this screen are as follows:
| Field | Description |
|---|---|
| ID | Unique container ID created by the system internally. |
| Status |
Current status of the container. Valid values shown are: New, In-Progress, Missing, Damaged, Submitted, and Received. |
| Customer Order | The DSD Receiving Containers has a customer order field at the container line level to indicate if the container is for a customer order. If all items in the container are for a customer order, it will be displayed as CO. If no items in the container are for a customer order, it will be blank. Lastly, if some items are for a customer order and some are not, it will be shown as CO Mix. |
| Container ID | Container ID that came in ASN from the external vendor system. |
| Number(X) of SKUs | Number of SKUs present in the container. |
| Number(X) of Orders | Total number of purchase orders the container is associated to. |
| Tracking ID | Tracking Id displayed if available. |
Delivery Rejections and Supplier Discrepancy Check
The system performs the discrepancy check based on the supplier level Supplier Delivery Exception Attribute. The attribute can indicate to:
- Allow Any Discrepancy
- Do Not Allow Any Discrepancies
- Allow Overages But Not Short Receipts
Discrepancy checking only happens for those deliveries that have an expected quantity; this includes DSD deliveries for PO deliveries with or without ASN. Deliveries on the fly do not check for any discrepancies.
Discrepancy checking is done at the container level against the expected quantity. For an ASN, this would be the expected quantity of the container, while for a delivery on the fly against an existing PO, it is the remaining quantity of the PO.
You can override the discrepancy check at the container level based on the Override supplier discrepancies security permission. Once a container is moved to Submitted or Received, no additional validation is performed.
Depending on the type of DSD and supplier settings, some containers will move to Submitted and require the whole delivery to be confirmed, while others will move to a Received status. The reason for this is transactional integrity. In certain regions, a DSD is fully accepted as accurate, otherwise it can be rejected. This is controlled through a supplier flag.
With an ASN, the received container can move to a Received status, which indicates that the Stock on Hand is updated and the merchandising system is notified that the container is received. The transaction will automatically move to Confirmed status when all containers are received.
Inventory is updated when the container is confirmed or when the delivery is confirmed in the case of no container receiving. When containers move to Submitted, they are not added to inventory yet, which will happen when all containers are submitted. When SIOCS inventory is updated, the merchandise system is also notified of the receipt, be it a container or an entire delivery.
PO deliveries without an ASN fall into a unique case. If there is a discrepancy check performed, the container will move to Submitted and require the delivery to be completed for any updates and integration. If on the other hand, the supplier does not require a discrepancy check or the supplier allows overage and it is a short receipt that is overridden, the container will be moved to a Received state, the Stock on Hand will be updated, and the merchandising system will be notified when it is confirmed. Manual closure of the delivery transaction is required in all cases because additional containers may need to be added.
The following Container States table describes the state the container moves into or when you are stopped when confirming a container with a discrepancy.
| Delivery Type | On the Fly/DEX/Nex | Without ASN | With ASN |
|---|---|---|---|
| Discrepancy check on carton confirm | No | Yes | Yes |
| Supplier Restricted, carton confirm status | Submitted | Submitted | Received |
| Supplier Restricted and No override discrepancy allowed | Submitted | Hard Stop | Hard Stop |
| Supplier Restricted and override discrepancy allowed | Submitted | Confirm Prompt Submitted | Confirm Prompt Received |
| Supplier Allow Overage, No override allowed and carton has short receiving | Submitted | Hard Stop | Hard Stop |
| Supplier Allow Overage, No override allowed and carton has short receiving | Submitted | Confirm Prompt Received | Confirm Prompt Received |
Delivery Info Screen
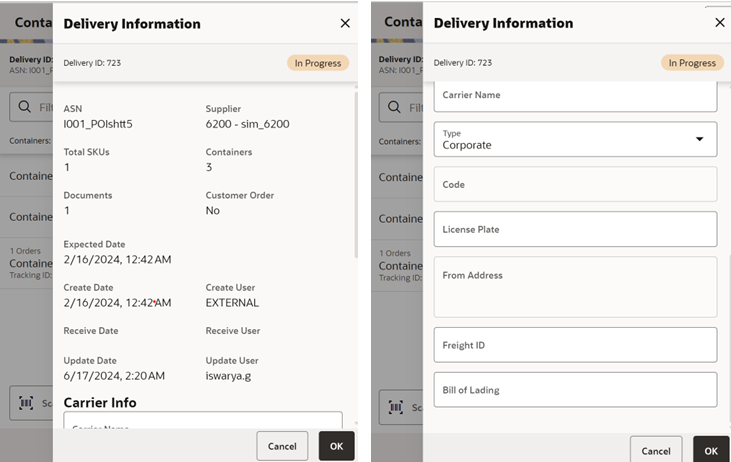
This screen is accessed from the Containers screen when you select the Info option from the footer menu.
This screen provides the delivery information and allows you to capture the invoice particulars, carrier details, license plate details, and custom flexible attributes if any.
On this screen, you can find information such as Delivery ID, which is internally created in the system, ASN, supplier, number of containers, status, create date, expected date, captured invoice particulars, carrier particulars, license plate, user details, custom flexible attributes if any, and so on. It may also include a field called Fiscal Doc ID. This field would be a placeholder for the government reference ID/E-way Bill ID for the delivery, if available.
If the delivery is associated to any customer order, you can select the View Details link on the customer order field which will take you to the Customer Orders screen to view the details.
You can find the below fields that are relevant to invoice and carrier particulars of the delivery.
| Field | Description |
|---|---|
| Invoice Number | This field is used to capture the supplier invoice number of the delivery received. This field will display depending on the configuration. |
| Invoice Date | This field is used to capture the invoice date. This field will display depending on the configuration. |
| Invoice Cost | This field is used to enter the invoice cost. This field will display depending on the configuration. It is only for information purpose and not integrated. |
| Carrier Info Name | This field holds the name of the carrier that delivers the products. This is a text entry field. |
| Type | This field holds the type of carrier, whether it is Corporate or Third Party. This is a drop-down list. |
| Code | This field holds the Standard Carrier Alpha Code if the carrier type is Third Party. This field is only available when Third Party is selected. This is a text field. |
| License Plate | This field holds the license plate from the Carrier's delivery vehicle. This is a text field. |
| From Address | This field holds the address where the delivery came from. This field is only available when Third Party is selected. This is a text field. |
| Freight ID | This field holds the industry standard freight codes. This is a text field. |
| Bill of Lading | This field holds the bill of lading identification number and will default if included on the ASN. This is a text field. |
This screen displays the list of CFAs that have been set up for the DSD-On the Fly, DSD-PO, DSD PO and ASN, and DSD Container in the system and allows the user to enter values for them.
CFAs need to be configured for each type of delivery and the container for the container items. The system displays the fields based on the setup for the type of delivery. The CFAs that are set up as Required must have a value entered for it before confirming the delivery or container (if configured at that level). The value can be one of the following: Date, Text, Decimal, or Long depending on the data type set up for the CFAs, while creating them in the desktop application. Appropriate security permission is needed, and the transaction must be in editable status for entering CFA values.
Note: For the CFAs that are mandatory, the validation does not happen on this screen. It validates only at the time of confirm and the user is directed to this screen again to capture the information.
Customer Orders Screen
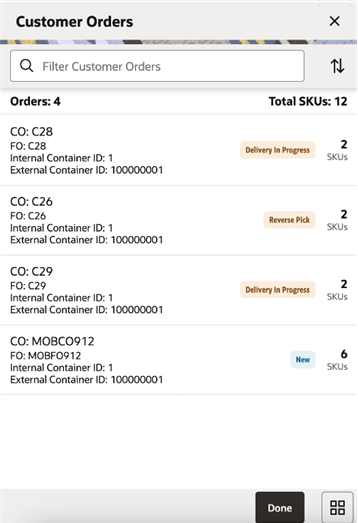
This screen appears when you select the View Details on the customer order field from the Delivery/Receipt and Container Information screens. It will display the customer order and fulfillment order IDs, along with the container ID, status, total number of orders and total SKUs. This screen is available only for ASN and PO based deliveries regardless of delivery status and not for on-the-fly deliveries.
Receipt Adjustments Screen
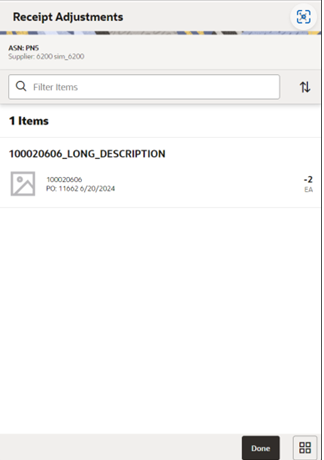
You can access this screen from the Containers screen by selecting the Receipt Adjustments footer menu option. This read-only screen displays the ASN and supplier information at the header level, and at detail level, it displays Purchase Order Number, Date, Item, Description, adjusted quantity, and its UOM for the external receiver adjustments that exists for the delivery. You can only access this screen when there are any adjustments created for the delivery from the external system. Store users internally adjusted deliveries in the system are not shown here.
Container/Delivery Items Screen
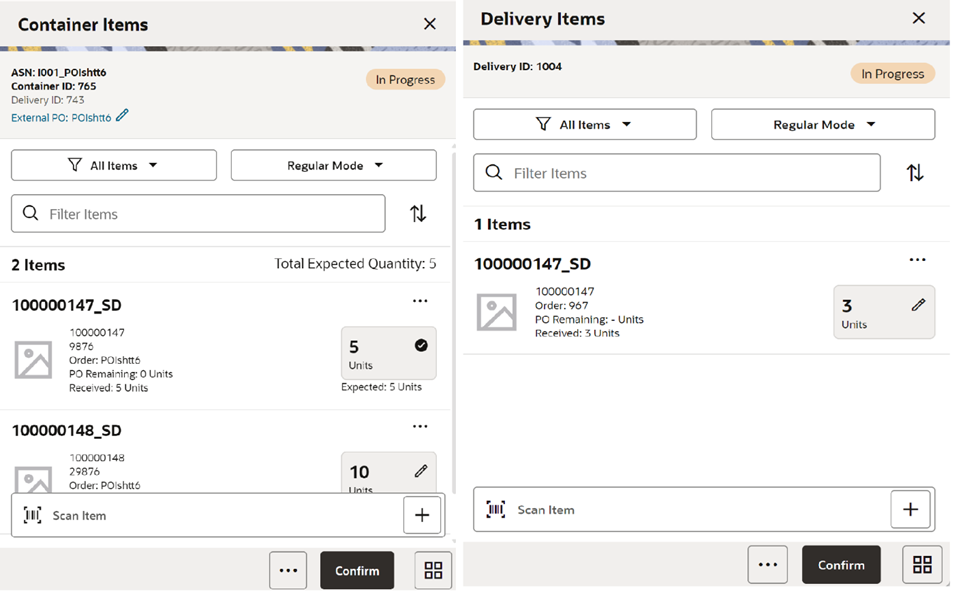
This section describes the two screens that provide a list of items: Container Items and Delivery Items. For an ASN based delivery, containers will always be available, while for DSDs against a PO or on the fly, a container could be optional.
You will land on this screen from multiple ways:
- When you select a container from the Containers screen.
- When you create a receipt using the create receipt screen.
- When you create a new container from the Containers screen.
- When a transaction is selected from the Open Transactions and that is without container.
Users must have the proper permissions assigned to access this screen for both creating a new container and editing an existing container.
For an ASN-based delivery, the items from the container are pre-loaded on the Container Items screen from the source. You can add items to the container if permissions are granted for over receiving and adding items. The user will navigate to the Item Detail screen for the item scanned. If the item scanned is a UIN item, the user will navigate to the UIN screen within the Item Detail screen.
For ASN-based deliveries, the user will need to select a PO when adding an unexpected item. Use the Select Purchase Order screen by tapping the Externa PO pencil to select the PO and add items from that PO.
If the user scans a VPN, a validation is done to verify that the VPN scanned belongs to the supplier associated to the delivery.
The users can edit the quantity of the items from this screen by selecting the pencil icon or + in the case of UIN items at the item level. Quantity will also be updated by the barcode qty upon entering the item or scanning the item.
If the item level quantity panel indicates a check mark, it means the item is fully received and you will not find the pencil icon, but you can still edit the item.
On this screen, you can also perform other operations by selecting the respective option from the footer menu which can be accessed by selecting the ellipsis (...) from the bottom of the screen.
You can filter the items displayed by selecting the filter display option (drop down). The system will show the selected display option and allow to edit the option. When you select the field, the system displays a popup to select the option. By default, the system will show all items. The system will refresh the <X> Items field based on the filter option selected. You are allowed to filter based on the below options:
-
All Items
Upon selecting this option, the system will reset any other option selected and display all the items in the container.
-
Damaged
Upon selecting this option, the system will filter and show only the items that have a damaged quantity. The list will include if the item contains received quantity and discrepant items if applicable.
-
Discrepant:
- Not available for on-the-fly type deliveries.
- Upon selecting this option, the system will filter items and show only the items that are discrepant.
- Discrepant items are determined when the Received + Damaged Quantity is not equal to the expected quantity of the item in the container.
- The discrepancy check will apply to all items, even those with an expected quantity of zero. When an item is added to a container, the Expected Qty will have a zero. The unexpected items will always be discrepant.
- If there are no discrepancies to display, the system will display an error message and no changes on the screen.
-
Received
Upon selecting this option, the system will filter items and show only those that have a received quantity and no damaged. The list will include discrepant items if applicable.
-
Not Received
Upon selecting this option, the system will filter items and show only that are not received. (Both Received and Damage Quantity is null)
-
Receiving Mode:
Receiving mode is displayed on the header to indicate whether the user is Receiving good units or Damaged units. You can change the mode by selecting the dropdown which will take the user to a popup to select the mode of receiving. The system sets the Receiving mode to Regular by default when the user gets into the Container items/Delivery Items screen. -
Damage Mode:
This menu option will allow you to scan/enter items and update the Damage Qty field:
- When this is selected, any item entered or scanned will update the damages quantity.
- This menu option is only available when all of the following conditions are met:
- The Container status is New or In Progress.
- This menu option will display when the user is in Regular Mode.
- The user has the Allow Receiving Damages permission.
- You will remain on this screen after selecting this mode
-
Regular Mode:
This menu option will allow the user to switch to scan/enter items and update the Received Qty field:
This menu option will only display when all the following conditions are met:
- The Container status is New or In Progress.
- When the screen is set to Receiving Damages.
- The user is required to have the Allow Receiving Damages permission to see this menu option. (Since this option is used to switch between recording damages and regular receiving, if the user is not able to record damages, this menu option would not be applicable and should never be made available.)
- The Receiving Mode will remain intact when navigating between the Container Items/Items and Item Details screens until the user changes the option.
- Regular Mode is the default mode when the user enters the Container Items screen.
- The Receiving Mode will set to the default that is Regular mode whenever the user enters the Container Items screen.
- You will remain on this screen after selecting this mode.
Footer Menu
- Info: You will find this option only in the case of Container Items. Select this option to access the Information screen to capture the container information.
- Delivery Info: You will find this option to display the header level information for the non-container based deliveries. This is same as described above in the Delivery Info.
- Receipt Info: You will find this option to display the receipt level which is same as container level information for the non-container-based deliveries. This is the same as described in the container information section.
- Note: Use this option to enter any notes for the delivery.
- Default Regular Qty: Default the expected quantity to the received quantity field. This menu option is only available in New or In-Progress status and you have the proper permissions:
If the expected quantity is zero (in the case of adding an unexpected item), the received quantity is updated to zero. If the delivery is flagged for quality control, you cannot default the quantity.
- Clear Qty: Clears the received quantity and damaged quantity fields for all items. This menu option is only available in New or In-Progress status.
- Adjust: This option allows the received container or delivery (without container) to be reopened for receiving. The system allows you to add items, delete items, modify the quantity, save, or confirm the delivery. All options are available as if the container was never received:
- The period at which you are allowed to adjust the deliveries from the time the receipt is confirmed is based on the parameter and you should also have security permissions to adjust the container. Once the container is moved back to In-Progress, you can work on it as if it was never received.
- It is not allowed to move a container or delivery without container back to In-Progress if UINs were received.
- Damage Remaining Qty: This menu option will allow you to update the Damaged Qty for all items where Expected - Received Qty is greater than zero:
- If you have not received any items, all items are marked as damaged.
- If you have received some items and the Expected - Received Qty is greater than zero, the Damaged Qty field is updated with the remaining quantity.
- This menu option is only available when the container status is in New or In-Progress.
- Confirm: Used to confirm the container or delivery. Upon selecting the confirmation, the system validates before confirming and prompt the user with warnings or validation issues.
- In the case of a no container delivery, the system checks whether the delivery is empty, that is, without having any items with either received or damaged quantity. You need proper permission to confirm the empty receipt. In essence, it will complete the entire delivery, so the same type of checks and validation are performed as a receipt with containers.
- If the delivery is a PO based, but with ASN, the system validates supplier discrepancies.
- If the delivery is a PO based, but without ASN, the system validates the PO over receiving indicators.
- The system checks whether the inventory needs to be received at the shop floor or back room based on the shop floor receiving setting.
- Save: Saves the container with current changes.
- Save and Exit : This option will save any changes made to the delivery and exit the screen. This is available only in the case of Delivery Items.
- Delete: Deletes the container.
- Cancel: Used to cancel any changes and go back to the Containers screen.
- Print: Opens the print dialog to print the report.
Container Info Information/Receipt Information Screen
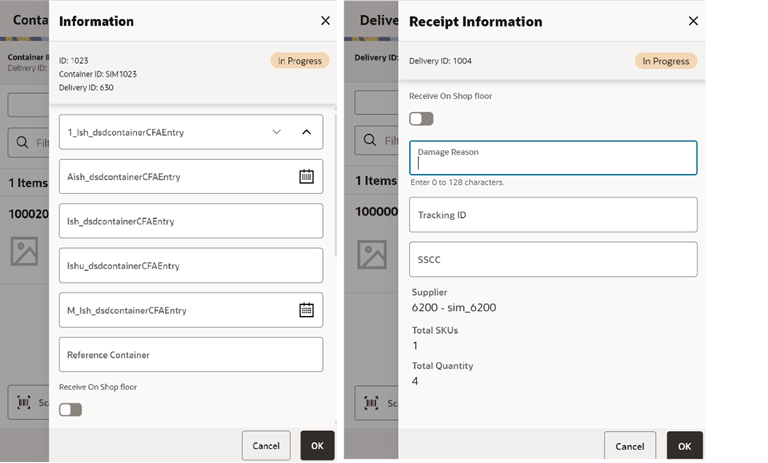
This screen is accessed from the Container Items/Delivery Items screen when you select the Info/Receipt Info option from the footer menu. This screen displays and captures the receipt/container information.
This screen is for the user to capture the container/receipt information such as reference container, to indicate whether the container is received at shop floor, damage reason, SSCC, and Tracking Id of the container.
- Reference Container: This field is used to capture a reference to a container that was not intended for the current location.
- Receive on Shop Floor: The default will be based on the store parameter Direct Delivery Default to Shop floor Receiving. If set to Yes, the switch will be set to receive at the shop floor.
- The user is required to have Receive Direct Delivery on Shop floor permissions to change the value. This indicates whether the delivery will default to receive inventory into the shop floor instead of automatically receiving into the back room or delivery bay.
- If this is set to receive on the shop floor, the system increments the shop floor inventory bucket instead of the backroom or delivery bay bucket. If a capacity is defined for the item and Direct Delivery Receive Item Capacity is set to Yes, the maximum shop floor quantity will equal the capacity; otherwise, the shop floor will be updated to the entire receipt amount. If the capacity is used and if the receiving quantity is in excess, the balance is incremented to delivery bay or back room depending on the Replenishment - Delivery Bay Inventory parameter.
- If receiving on the shop floor is not set on the delivery, the system increments the back room or delivery bay bucket depending on the Replenishment - Delivery Bay Inventory parameter. If this parameter is Yes, the system will increment the delivery bay bucket instead of back room. This will increase Stock On Hand as well.
- Damage Reason: Identifies the reason for damage on the container, when items in the container have been damaged during transport. This field is optional.
- SSCC: This field allows you to identify a GS1 bar code used with the container. There is no validation on this field and it is optional. This is the full 18-digit number.
- Tracking ID: This field allows you to enter a tracking id from the delivery service. This is a text field and is not validated. This is an optional field used to track information only.
This screen additionally displays the list of CFAs (custom flexible attributes) that have been set up for the DSD-On the Fly, DSD-PO, DSD PO and ASN, and DSD Container in the system and allows you enter values for them.
The CFAs need to be configured for each type of delivery and the container for the container items. The system displays the fields based on the setup for the type of delivery. The CFAs that are set up as Required must have a value entered for it before confirming. The value can be one of the following: Date, Text, Decimal, or Long depending on the data type set up for the CFAs, while creating them in the desktop application. Appropriate security permission is needed and the transaction must be in editable status for entering CFA values.
Below are the descriptions of the fields displayed.
| Field | Description |
|---|---|
| ID | Unique container ID created by the system internally. |
| Container ID | Container ID that came in ASN from the external vendor system. |
| Reference Container | This field is used to identify an ad hoc container. |
| ASN | Advance shipment number of this delivery. |
| Status | Current status of the container. |
| Supplier | This field shows the supplier id and the name of the supplier who delivered. |
| Customer Order | This indicates whether customer is associated. If a customer order is associated with all the items in the container, it will display <Yes> and if the container contains items with and without customer associated, it will display <Mix>. If there is no CO, it will display <No |
| Expected Date | Original expected date of the delivery. |
| Create Date | Date of creation of the container in the system. |
| Create User | The user who created the container. |
| Updated Date | The date on which the container was last updated. |
| Updated User | Person who updated the container last. |
| Received Date | The date on which the container was received. Shown only after if it is received. |
| Received User | Person who received the container. Shown only if it is received. |
| Total SKUs | Total number of items. |
| Ordered Qty | This field displays the total remaining ordered quantity. This appears only for the PO- based delivery. |
| Expected Qty | This field displays the total expected quantity. Unlike the Container Items screen at the individual item level, this is not depending on the permission. This appears only for ASN-based delivery. |
| Total Qty | This field displays the total received quantity including damaged. |
Receiving Item Detail Screen
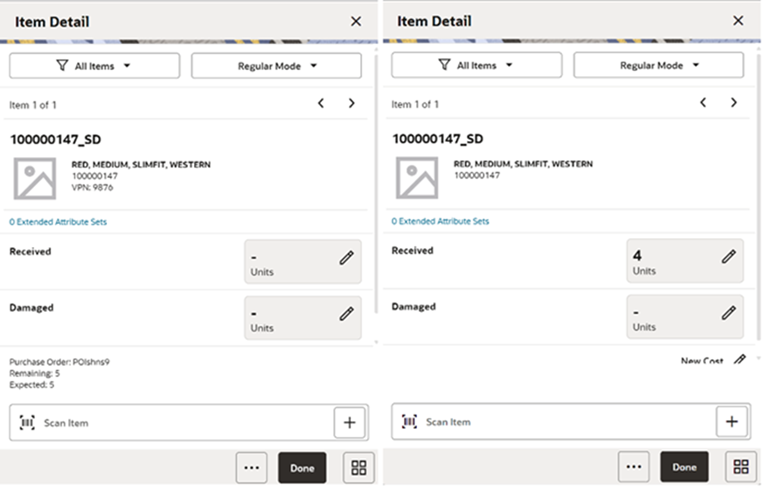
The Item Detail screen is accessed from the Container Items/Delivery Items screen when scanning an item that is already in the container or adding a new item to the container.
Scanning or entering an item on this screen in the scan bar updates the quantity per the scan mode and refreshes the Item Detail screen for the item and quantity scanned. If the item scanned is a UIN item, the user will directly navigate to the UIN tab within the Item Detail screen.
If the user scans a VPN, a validation is done to verify that the VPN scanned belongs to the supplier associated to the delivery.
You can edit the received or damaged quantity if it is in edit mode and if you have permissions.
The system displays the item information including the image and allows you to capture the quantity.
| Field | Description |
|---|---|
| Received |
This field shows the UOM based on the UOM mode. The value on this field is the received quantity. When this is editable, you can enter the quantity through a popup. The user needs permissions to edit the quantity. |
| Damaged |
This field shows the UOM based on the UOM mode. The value on this field is the damaged quantity. When this is editable, you can enter the quantity through a popup. The user needs permissions to edit the quantity. |
| Pack Size | This is the pack size of the item. This field is editable. |
| New Cost |
This field is populated with the item supplier cost in the case of on the fly deliveries. This field is displayed and editable for on the fly. You can enter the cost of the item at which the item is received from the supplier. This field is displayed only if it is configured to show. In general, if a PO was created by the merchandising system, the system does not allow the store user to edit the cost as it was defined by the external system. It will also not communicate any cost information to the merchandising system. If the delivery is on the fly, the system will use the cost based on item supplier country information. It is possible with the right permissions to edit this cost and the cost can be communicated to the external system. |
| Original Cost | This field is a read-only field and only for PO and ASN-based deliveries. |
| Purchase Order | PO assigned to the current item. |
| Expected | Expected quantity to be delivered from the ASN/PO. |
| Remaining | Balance quantity to be delivered in the order. |
| Last Scan | The details of the last scanned barcode. |
You can navigate through the existing items on the container using the two arrows on the top. On the top, the system displays the current item number position out of the total number of items.
You can filter the items displayed by selecting the filter display option (drop down). The system will show the selected display option and allow you to edit the option. When you select the field, the system displays a popup to select the option. By default, the system will show all items. You are allowed to filter based on the below options:
-
All Items
Upon selecting this option, the system will reset any other option selected and display all the items in the container.
-
Damaged
Upon selecting this option, the system will filter and show only the items that have a damaged quantity. The list will include if the item contains received quantity and discrepant items if applicable.
-
Discrepant:
- Not available for on-the-fly type deliveries.
- Upon selecting this option, the system will filter items and show only the items that are discrepant.
- Discrepant items are determined when the Received + Damaged Quantity is not equal to the expected quantity of the item in the container.
- The discrepancy check will apply to all items, even those with an expected quantity of zero. When an item is added to a container the Expected Qty will have a zero. The unexpected items will always be discrepant.
- If there are no discrepancies to display, the system will display an error message and no changes on the screen.
-
Received
Upon selecting this option, the system will filter items and show only that have received quantity and no damaged. The list will include discrepant items if applicable.
-
Not Received
Upon selecting this option, the system will filter items and show only that are not received. (Both Received and Damage Quantity are null)
- Receiving Mode: Receiving mode is displayed on the header to indicate whether it is Receiving or Damages. The user can change the mode by selecting the dropdown list which will take the user to a popup to select the mode of receiving. The system sets the Receiving mode to Regular by default when the user gets into the Container items/Delivery Items screen.
- Damage Mode: This menu option allows the user to scan/enter items and update the Damage Qty field:
- When this is selected, any item entered or scanned will update the damages quantity.
-
This menu option is only available when all of the following conditions are met:
- The Container status is New or In Progress.
- This menu option will display when the user is in Regular Mode.
- The user has the Allow Receiving Damages permission.
- You will remain on this screen after selecting this mode.
-
Regular Mode:
This menu option will allow the user to switch to scan/enter items and update the Received Qty field.
This menu option will only display when all the following conditions are met:
- The Container status is New or In Progress.
- When the screen is set to Receiving Damages.
- The user is required to have the Allow Receiving Damages permission to see this menu option. (Since this option is used to switch between recording damages and regular receiving, if the user is not able to record damages, this menu option would not be applicable and should never be made available.)
The Receiving Mode will remain intact when navigating between the Container Items/Items and Item Details screens until the user changes the option.
Regular Mode is the default mode when the user enters the Container Items screen.
The Receiving Mode will set to the default, that is, Regular mode whenever the user enters the Container Items screen.
You will remain on this screen after selecting this mode.
Over Receiving ValidationsWhen receiving a direct delivery, the user must have the proper permission to be able to over receive. The validation occurs as the item is scanned and the quantity is updated or when the quantity is manually updated. The permissions are:
- Allow ASN Over Receiving: When receiving against an ASN, the system will check if the received quantity is greater than the expected quantity (ASN quantity):
- If the user does not have this permission, the user will be given an error and must update the quantity.
- If the user does have this permission, then there will be no error and it is permitted to have a received quantity greater than the ASN.
- Allow PO Over Receiving: When receiving against a Purchase Order with or without an ASN, the system will check if the received quantity is greater than the expected quantity (PO remaining quantity).
- If the user does not have this permission, the user will be given an error and must update the quantity.
- If the user does have this permission, then there will be no error and it is permitted to have a received quantity greater than the PO remaining quantity.
Assuming the user has the proper permission to over receive (as stated above). When receiving, the user will be able to receive more than the expected quantity (ASN quantity / PO Remaining quantity) during the receiving process. Once confirming the container, the system will remove the over received quantities. There are two store configurations that are used:
- Direct Delivery Auto Remove Over Received Quantity: At confirmation of the container, any quantity received over the expected quantity will result in a prompt to the user and the overages will be removed by the system.
- Direct Delivery Auto Remove Damaged Quantity: At confirmation of the container, any damaged quantity received will result in a prompt to the user and all damaged quantities will be removed by the system.
Selecting a Purchase Order for a PO-Based Delivery
Select Purchase Order Screen
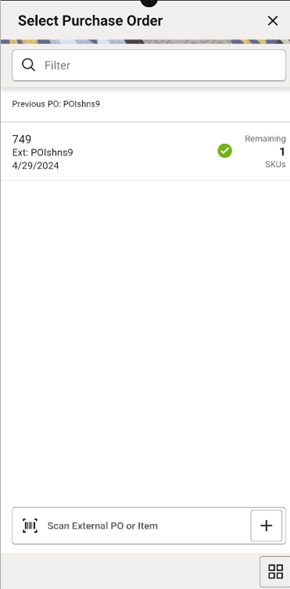
This screen can be reached through the Container Items screen by selecting the external PO pencil icon. This screen will show the purchase orders and, when you select the purchase order, you are prompted with a popup with the following options:
- Use Purchase Order: This menu option will set the PO document referenced in the container to the user selection. Any items added will be updated to the selected document:
- There will be validation to see if the item exists on the PO document, but the items are not automatically added to the container.
- This will be the option by default selected.
- Apply Item(s): This menu option will add all items from the selected PO document to the container without applying the remaining quantity to the received quantity and the system will default the received quantity to zero.
- Add Item(s) & Remaining Qty: This menu option will add all items along with their corresponding remaining quantity to the received quantity in the container.
Purchase Orders Screen
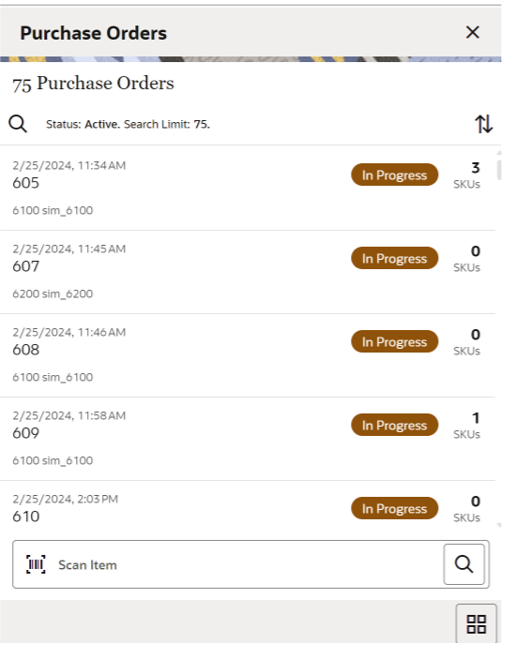
This screen is accessed when you select Purchase Orders from the Shipping / Receiving drawer menu.
Purchase Orders is a screen that allows you to view purchase orders placed to the suppliers to supply goods for your store. The default is to display the list of all active status that is, Approved and In-Progress purchase orders. Use the search criteria screen to filter out the records.
This screen provides the following header level information about the Purchase Order including the ID which is system internally generated, External ID, Supplier, Not Before Date if available, Create date of the PO, current status of the PO, total number of SKUs, and customer order id and fulfillment order id if customer order is associated with the PO.
On the List header, it shows the total number of purchase orders listed.
From the Purchase Orders, select a purchase order to go the Purchase Order Items screen to view the item details for the PO.
Purchase orders created internally in the system for on-the-fly deliveries are also shown in this list.
Purchase Orders Search Criteria Screen
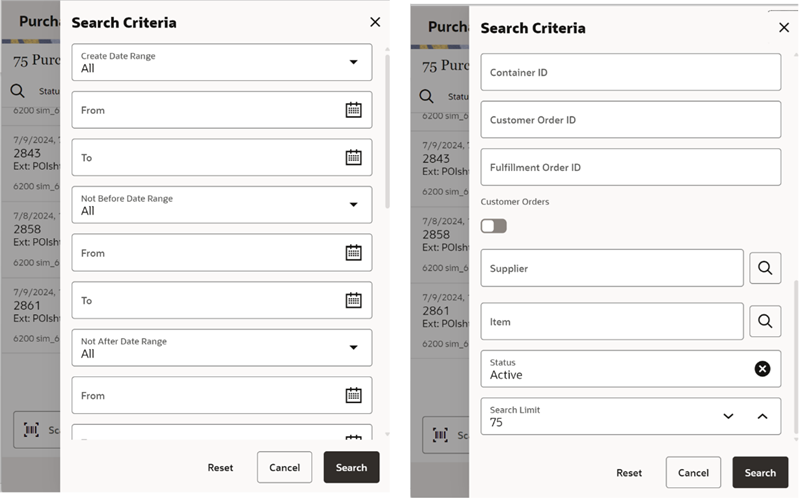
This is the Purchase Orders Search Criteria screen. It is accessed by tapping the search criteria option on the Purchase Orders.
You can filter the purchase orders with a variety of search criteria. After applying the criteria, you are returned to the Purchase Orders screen with the purchase orders displayed per the entered criteria.
Purchase Order Items Screen
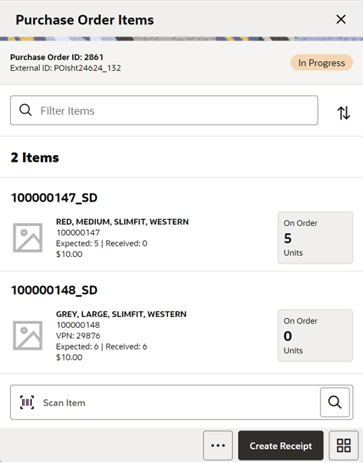
The Purchase Order Items screen is accessed when you select a purchase order record from the Purchase Orders screen.
The Purchase Order Items screen displays all the purchase order header information and item details for the selected purchase order. This screen is view-only for informational purposes.
On this screen, you can find item details such as item id, description, item image, VPN, UOM, on order quantity, expected quantity, received quantity, and so on.
You can access the footer menu and select the Info option to view the details of the PO as described below.
You can create a receipt from the Purchase Order Items screen by selecting Create Receipt which will navigate to the Create Receipt screen.
Purchase Order Items Create Receipt Screen
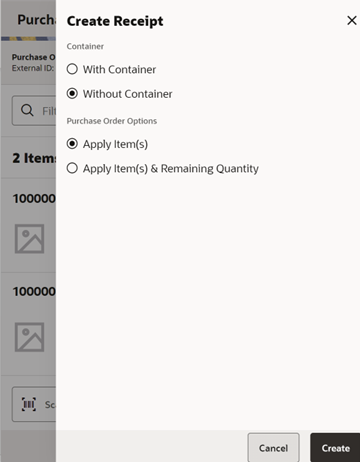
Details for this screen:
- Container:
- This option is displayed and editable only when the user has the permission to Allow modify default container method. If no permission, the system applies the default container method automatically to create.
- You are allowed to select to create a receipt either With Container or Without Container
- Default: The default value set here is based on the Default Container method for Direct Delivery store parameter.
-
Purchase Order Options:
-
Apply Item(s):
- This option will set the PO document referenced to the delivery.
- Any items added will be added/updated to the selected document.
- There will be validations to see if the item exists on the PO document.
- This will be the option by default selected.
- This option will add all items from the selected PO document to the delivery without applying remaining quantity to the received quantity and the system will default the received qty to NULL.
-
Apply Item(s) & Remaining Qty:
- This option will set the PO document referenced.
- This option will add all items along with their corresponding remaining quantity to the received quantity in the delivery.
- If the Remaining quantity is zero, the system will not include the items and default the quantity. However, the user can add items manually if there are any over receiving. For example, if there are 10 items out of which 5 are fully received in this PO, the system will not load the 5 fully received items but the user can manually add.
-
Purchase Order Information Screen
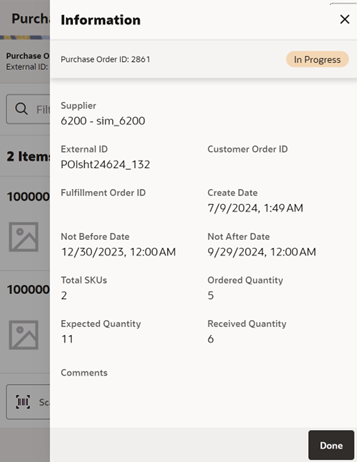
This view-only screen is accessed from the Info footer menu on the Purchase Order Items screen. On this screen, you can find information related to the Purchase Order.
This screen provides the following header level information about the Purchase Order including the ID which is system internally generated, External ID, Supplier, Not Before Date if available, Create date of the PO, current status of the PO, total number of SKUs, and customer order id and fulfillment order id if customer order is associated with the PO.
Mobile Application Framework (MAF) Timeout
Due to MAF technical limitations, the Windows version of MAF will freeze the client after 60 minutes. To create a better user experience, a warning for the user has been added that will prompt the user to log out before the 60 minutes are over. This timeout is by default set to 5 minutes.
The timeout can be changed when generating the APK from the MAA file in the ADF property configuration file.
The user will see the following message: “Your sessions is about to expire. Please save your work and logout”.
REST Services
Similar to prior releases, SIOCS has added new REST services. In this release, the following services have been added:
- Product Group - This service allows retailers to execute the same business functionality as the UI.
- Shipping - This service allows access to supporting data (such as reason codes) in order to do shipping functionality (such as vendor shipments).
- Vendor Shipments - This service allows retailers to execute the same business functionality the UI provides.
- Notifications - This service allows the retailer to send notifications into SIOCS.
-
User/role/store assignments - This REST service allows the user to insert, update, and delete user store role assignments. The REST service operation is based on the already existing spreadsheet upload. A new configuration is added to allow query tuning for cases where the server reads large numbers of users from IDCS.
The following table describes the new system option.
System Option Description Users Read Bulk Request Size The purpose of this parameter is to determine the search limit size for the query to IDCS that reads bulk users. Currently, this is used by the import user assignments using a spreadsheet and REST API.
Note:
These services are not meant for initial data load. Data seeding integration jobs exist for the initial data load. Some of these services can be used instead of their equivalent RIB messages, however RIB is still required until all RIB Payloads have been converted.Report Updates
Several reports have been updated with missing data and to support Jet Mobile specific functions.
| Report | Change |
|---|---|
| Inventory Adjustment | Display context field. |
| Direct Delivery Report | Display container information only if containers are used. |
| Transfer Shipment BOL Report | Replace container ID with shipment ID if no containers are used. |
| Transfer Shipment | Display container information only if containers are used. |
| Store Order | Add delivery timeslot to table. |
| RTV Shipment BOL | Replace container ID with shipment ID if no containers are used. |
| RTV Shipment | Display container information only if containers are used. |
| Transfer Receiving Exception | Display container information only if containers are used. |
| Transfer Delivery | Display container information only if containers are used. |
Technical Changes
This section describes the technical changes in this release.
General Updates
As with all updates for SIOCS, there are several technical changes that have been made:
- Various product improvements in batches, including purging item batch and direct integration.
- Continued enhancement around deployment and configurations.
Session Refresh
With this release, the SIOCS Jet screen will automatically refresh the OAuth2 token after a certain amount of time before the expiration.
The following table describes the system option.
| System Option | Description |
|---|---|
| OAuth2 Token Renewal Minutes |
The purpose of this parameter is to determine the Jet client (Mobile app) token renewal. In order to avoid the user logging out automatically after the token expires, the system will check this setting and renew the token before it expires. When the token has the number of minutes or less remaining that is equal to the set value, the client will renew the token. This may occur again and again while the session is still active. Example: if you set the value here as 10 Minutes, the system will renew the token 10 Minutes before it expires. Minimum Value=5 Minutes, Maximum Value=15 Minutes, and Default=10 Minutes. |
User Inactivity Timeout
In Jet and Jet Mobile, the user will be warned after idling too long and then be automatically logged out. This does not apply to MAF.
The following table describes the system options.
| System Option | Description |
|---|---|
| Inactivity Warning Minutes – Execution |
The purpose of this parameter is to determine the warning time to provide the warning to the user before the timeout occurs based on the timeout minutes setting when the application is inactive. User activity is measured by service calls and content module loading/unloading. Users must perform actions that call the server or open/close content for them to be considered active. A user cannot sit on a screen and open/close a date picker or drop-down list and remain active. When the timeout is reached, the system will automatically log out the user (Jet Mobile). Minimum Value=5 Minutes, Maximum Value=60 Minutes, and Default=10 Minutes. |
| Inactivity Warning Minutes – Operations |
The purpose of this parameter is to determine the warning time to provide the warning to the user before the timeout occurs based on the timeout minutes setting when the application is inactive. User activity is measured by service calls and content module loading/unloading. Users must perform actions that call the server or open/close content for them to be considered active. A user cannot sit on a screen and open/close a date picker or drop-down list and remain active. This setting is for the desktop application (EICS). When the timeout is reached, the system will automatically log out the user. Minimum Value=5 Minutes, Maximum Value=60 Minutes, and Default=10 Minutes. |
| Inactivity Timeout Minutes - Operations |
The purpose of this parameter is to determine the timeout and logout of the application automatically when the application is inactive. The system logs out the user automatically based on the timeout setting. The system gives a warning to the user before it times out based on the warning minutes setting. This setting is for the desktop application (EICS). Minimum Value=15 Minutes, Maximum Value=1440 Minutes (24 Hrs), and Default=30 Minutes. |
| Inactivity Timeout Minutes - Execution |
The purpose of this parameter is to determine the timeout and logout of the application automatically when the application is inactive. The system logs out the user automatically based on the timeout setting. The system gives a warning to the user before it times out based on the warning minutes setting. This setting is for the mobile applications (Jet Mobile). Minimum Value=15 Minutes, Maximum Value=1440 Minutes (24 Hrs). and Default=30 Minutes. |