1 Feature Summary
Oracle Retail Store Inventory Operations Cloud Services includes the following applications:
-
Oracle Retail Enterprise Inventory Cloud Service (EICS)
-
Oracle Retail Store Operations Cloud Service (SOCS)
This chapter describes the feature enhancements in this release.
Note:
Customer Action: Oracle recommends application login on both the Web Client and Mobile Client to ensure application stability.
Note:
Defect fixes from prior monthly Hot Fixes are also included in this 25.0.101.0 update.
Noteworthy Enhancements
This guide outlines the information you need to know about new or improved functionality in the Oracle Retail Store Inventory Operations Cloud Services update and describes any tasks you might need to perform for the update. Each section includes a brief description of the feature, the steps you need to take to enable or begin using the feature, any tips or considerations that you should keep in mind, and the resources available to help you.
Column Definitions
-
Feature: Provides a description of the feature being delivered.
-
Module Impacted: Identifies the module impacted associated with the feature, if any.
-
Scale: Identifies the size of the feature. Options are:
-
Small: These UI or process-based features are typically comprised of minor field, validation, or program changes. Therefore, the potential impact to users is minimal.
-
Medium: These UI or process-based features are typically comprised of field, validation, or program changes. Therefore, the potential impact to users is moderate.
-
Large: These UI or process-based features have more complex designs. Therefore, the potential impact to users is higher.
-
-
Delivered: Identifies whether the feature is Enabled or Disabled upon initial delivery.
- Customer Action Required: You must take action before these features can be used. These features are delivered disabled and you choose if and when to enable them.
Table 1-1 Noteworthy Enhancements
| Feature | Module Impacted | Scale | Delivered | Customer Action Required? |
|---|---|---|---|---|
|
SOCS |
Large |
No |
Yes Download app, configure, and deploy, by third‑party Mobile Device Management (MDM). In the case of using the Web Browser version, use the correct link. Several new features, permissions may need to be set up. See details below. |
|
|
SOCS |
Small |
Yes |
No | |
|
EICS |
Medium |
No |
Yes, create additional Product group. | |
| Store Shipping Network |
EICS |
Small |
Yes |
No |
| MPS Updates |
EICS |
Small | Yes | No |
| REST Services |
EICS |
Medium | Yes | No |
| Self Service Administration |
EICS |
Small | Yes | No, automatically enabled if configured. |
| Report Updates | EICS and SOCS | Small | Yes | No, automatically applied. |
| POM Templates | EICS | Small | Yes | No |
| MPS Updates | EICS | Small | Yes | No |
| Localization | EICS and SOCS | Small | Yes | No |
| Price History and Purging Parameters | EICS | Small | Yes | No |
New Feature Descriptions
This section describes the new features.
Jet Mobile
As part of our focus on Jet mobile, this document covers several new features and functions released for SIOCS on Jet Mobile. As in previous updates, this new version includes a significant number of new workflows and enhances the quality of live features. Some features have been released as part of hotfix patches, and as such are listed in this document again as a reference for those retailers who are more focused on quarterly updates.
Jet Mobile added several additional functions that should be evaluated for inclusion when rolling out. Most of these features are configurable:
- Common pieces:
- Shipping and Receiving: The external printer option that is used to set up a printer for fiscal shipping documentation or manifest documents will now have a permission to hide this menu option.
- Micros 500 support: As of this release SIOCS allows canning of items with the Micros 500 build in scanner.
- Camera support: When deploying the Jet Mobile client on an Android device, the user will now have the ability to use a camera. Note: This requires some configuration.
-
iOS support: In addition to Android and web browser support, this release also allows for iOS support. Retailers will have to build their own project.
Prerequisites:
- An Apple Developer account.
- An Apple MacBook is necessary to build a native iOS app.
- Latest version of the XCode development application (v 15.4+).
- An application Provisioning Profile of type ‘Enterprise’ obtained through the Apple Developer account is necessary to distribute an app internally.
- An application signing certificate, also obtained through the Apple Developer program.
- After XCode has been installed on the MacBook, the provisioning profile and certificate also need to be installed.
-
Multi-APK clients: To make supporting the new Jet Client easier, SIOCS will have a standard APK as before, but in addition will also have a versioned APK. This versioned APK will allow the retailer to deploy two clients at the same time on the Android device. For example, one old client can point to the production environment, while the new versioned client could be pointing to the stage environment. This enhancement was needed because Android does not allow the same client to exist with the exact same name.
-
Standard builds
Name: Oracle SOCS
AppId: oracle.retail.sim.mobile.client
-
Versioned builds
Name: SOCS<MajorVersion><PointVersionNumber><Hotfix/PatchNumber>
AppId: oracle.retail.sim.mobile.client.v<ShortVersionWithoutSeparators> for example Name: SOCS251010
AppId: oracle.retail.sim.mobile.client.v250101
-
- Android 12+ support: The latest APK client has additional permissions, BLUETOOTH_SCAN snd BLUETOOTH_CONNECT, added for ticket printing support.
-
Inventory Adjustments:
The Adjustment date is restricted now for all users, except if they have the Edit Inventory Adjustment Date Permission. Note: This was released in September 2024.
-
Transfer shipment:
When adding reason codes for unavailable inventory on transfer shipments, a new screen has been added that allows the user to toggle reason codes on/off which makes it easier to manage multiple reason codes on the transaction.
-
Return to Vendor:
- The creation of an ad hoc RTV shipment and RTV document were controlled by a single permission. This now has been changed to manage it through two permissions; one for the document and one for the shipment.
-
When adding reason codes for unavailable inventory on transfer shipment, a new screen has been added that allows the user to toggle reason codes on/off which makes it easier to manage multiple reason codes on the transaction.
- Store Orders and Purchase Orders
- Validation for the Requested Date has been updated. The Requested Date is required for internally created store orders and must be greater than or equal to today.
- Warehouse Inventory for the item at the warehouse will only be displayed when a restriction of ‘warehouse’ has been defined.
- Renamed the Display Unit cost for Direct Delivery to “Display Unit Cost for Direct Deliveries and Purchase Orders” and extend its functionality to the purchase order dialog.
- A new permission was added to allow access of Quick orders to be separate from access to store orders.
Permission Topic Usage Access Quick Orders (New) Store Orders With this permission, the user will be able to access and edit Quick Orders on Jet Mobile. Access Store Orders (existing) Store Orders With this permission, the user will be able to access and edit Store Orders on Jet Mobile.
This permission already exists to access on MAF.
*** Only for full flow, not for quick orders, per the January 2025 release.
-
Item Basket:
-
Item baskets are lists of items with a quantity. Item baskets have two ways of being created on the mobile client.
-
In the first way, it can be created as an investigative basket from dialogs such as item lookup or item maintenance, and basically indicates it is a basket of items that require someone to validate items.
- As a secondary usage, items baskets can be manually created on the handheld, and record an item and quantity. This in turn can be used by third-party systems. A good example of this process would be a POS system that pulls in a basket for line busting purposes. Since item baskets also do not validate if they are inventory or non-inventory items, some retailers use them to provide a list of non-inventory consignment items in the store to the vendor.
-
-
Ticket Printing:
- One of the latest dialogs added to the Jet Mobile application allows the user to scan an item and print a ticket. Two modes exist, one of them is a quick print mode where the item is scanned and printed to the hip printer. A manual print is also possible where the user can change variable such as price, country of origin, and number of tickets that require printing.
- Enhancements are made in the following areas:
- Ease of use: Easier to understand workflow with additional data points.
- Defaulting of print quantity based on the SOH, Available, and Facings in case of Labels and custom.
- Display of the system-defaulted values on ticket type, event, and format before start scanning. This helps the user to know what the defaulted values are before they start scanning.
- Extension of the date range to 7 days when printing range or specific future date.
-
Container Lookup:
The Container Lookup functionality provides users with the ability to inquire and view information about an incoming or outgoing container of various types of Store, Supplier, Warehouse, and Finisher. When selecting a container, the user will be brought to the container screens on the transfer shipment, delivery, DSD or RTV screen. This allows quick validation of the container and its content.
In addition, it is possible to look up containers from other stores in the case of wrongful delivery.
Jet Enabled Dialogs
To easily evaluate the benefit of starting the Jet Mobile implementation, the following table lists which workflows exist in MAF, and which have so far been converted into Jet Mobile. Some dialogs only exist in Jet Mobile as part of the quick execution concepts.
| Function | MAF | Jet Mobile |
|---|---|---|
| Item Lookup | Yes | Yes |
| Inventory Adjustment | Yes | Yes |
| Stock Count (all) | Yes | Yes |
| ASN level Transfer receiving | Yes | Yes |
| Transfer Ship | Yes | Yes |
| DSD | Yes | Yes |
| Store Orders | Yes | Yes |
| RTV | Yes | Yes |
| Transfer Detail Receipt | Yes | Yes |
| Quick Container Receiving - DSD | No | Yes |
| Quick Container Receiving - Transfer | Yes | Yes |
| Customer Order Light | No | Yes |
| Store Orders Light | No | Yes |
| Item Maintenance | No | Yes |
| Quick Count | No | Yes |
| Transfer Request | Yes | Yes |
| Container Lookup | Yes | Yes |
| Customer Order Full (bulk picking) | Yes | No |
| Item Basket | Yes | Yes |
| Ticketing | Yes | Yes |
| In Store Replenishment | Yes | No |
| Shopfloor /Backroom Management | Yes | No |
| RFID | Yes | No |
Common Components
Camera Support
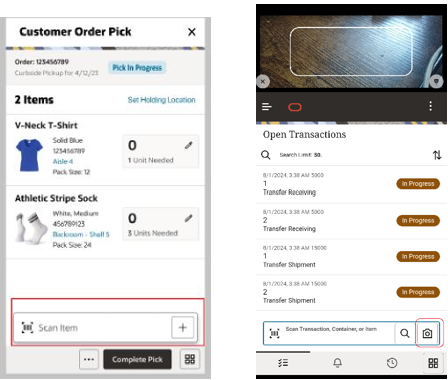
If the system configuration Enable Device Camera Barcode Scan is set to Yes and if a camera is detected on the device, the camera icon will be available. The camera icon will allow for scanning in the barcode using the camera on the device. The barcode will be parsed and processed the same as if the scanner was utilized.
The camera will auto scan the barcode every ‘x’ seconds, where ‘x’ is defined by the system admin setting, Device Camera Auto Scan Timer. Lastly, when the camera is open, it will auto close if the Device Camera Auto Close system setting is set to Yes. If it is set to No, the camera will stay open until closed by the user.
Inventory Adjustments
The Adjustment Date can be entered by the user if the user has the Edit Inventory Adjustment Date permission.
| Permission | Topic | Usage |
|---|---|---|
| Edit Inventory Adjustment Date | Inventory Adjustments | With this permission the adjustment date on the desktop and Jet Mobile will be editable. Without this permission, they will be view only. This is not applicable to MAF, as it is not editable there. |
Transfers
The selection of reason codes, especially when working with unavailable inventory, allows the user to select which reason codes they want to apply to the transaction. In addition, it displays by bucket how many quantities are available. This is especially important when using sub buckets so the user has an easier time evaluating which sub buckets should be added to the transaction.
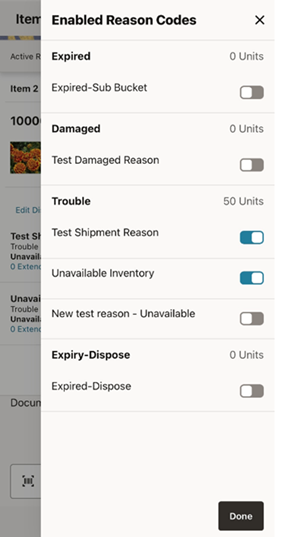
The Reason Codes screen appears when a user selects the Edit Displayed Reason Codes from the Item Detail screen. It shows the reason codes that are on the shipment and allows a user to add and remove reason codes.
Return to Vendor (RTV)
A new Permission will manage the creation of an AdHoc RTV shipment.
| Permission | Topic | Usage |
|---|---|---|
| Create AdHoc RTV Shipment | RTV Shipment | On Mobile, with this permission, the Create Shipment button on RTVs is available. Without this permission, the button is not available. |
A new Reason Codes selection screen was added. This screen allows easier selection and removal of reason codes.
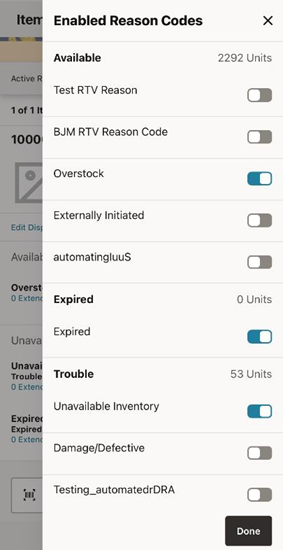
The Reason Codes screen appears when a user selects the Edit Displayed Reason Codes from the Item Detail screen. It shows the reason codes that are on the shipment and allows a user to add and remove reason codes.
Item Basket
Item basket allows retailers to scan a list of items. In addition, several dialogs allow the user to add an item to an investigative basket. This basket is intended at some point in time to be reviewed by a user to validate items that require inventory validation or other retailer specific actions. In addition, item baskets can also be used to build ad hoc stock counts, or define areas for certain functions such as customer order picking or quick store orders. Some of these basket features require the Jet desktop to set them up (such as Defining an area), while others only have MAF functionality enabled at this time (such as Ad hoc stock counts imports and bulk imports).
Item Basket Mobile Screen Flow
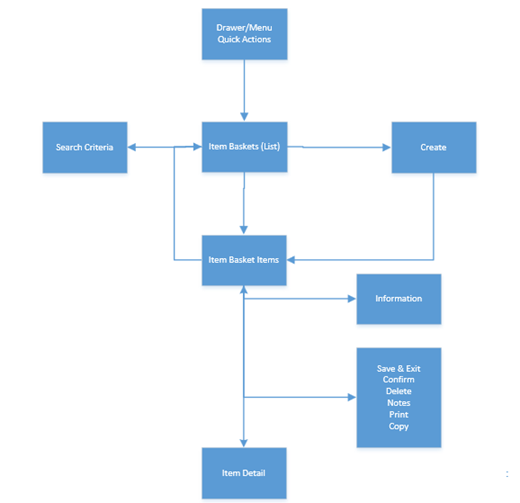
Item Basket is accessed through the Item Basket menu within the drawer or from Quick Actions. Selecting the menu option takes the user to the Item Baskets (List) screen. On this screen, the option is given to search for Item Basket records which will be presented on the Item Baskets (List) screen. From here, the user can edit or view an item basket, or create an item basket. In all cases, the user is directed to the list of items on the Item Basket Items screen. The user can select an existing item or scan/enter a new item directing the user to the Item Detail screen where functions allow the user to add, view, and edit the details of the items. The user can specify values for Custom Flexible Attributes (CFAs) that have been set up for the item basket within the Information screen. Lastly, additional functions include Notes, Print, Copy, Delete, Save, and Confirm.
Item Baskets Screen
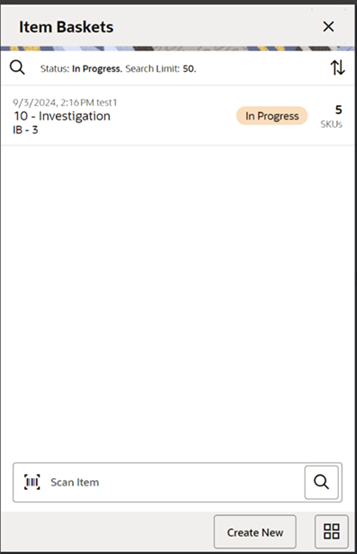
When navigating to Item Basket, the Item Baskets screen displays the In Progress item baskets as the default list. The list can be sorted by selecting the sort icon.
A search can be done by selecting the magnifying glass to navigate to the Search Criteria (Item Basket) screen to enter search criteria for item baskets. The user will return to the Item Baskets (list) screen with the search updated.
When scanning/ entering an item in the scan bar, the system adds the item to the entered search criteria and narrows down the current list of item baskets.
Creating a new item basket navigates the user to the Create Item Basket popup to enter in the header level information for the newly created basket. Selecting an item basket from the list directs the user to the details for that item basket.
Details on the list include: Last Update Date, User, ID, Type, Basket Description, Status, and Number of SKUs.
Search Criteria (Item Basket)
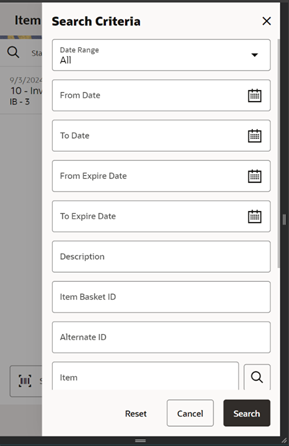
The Item Basket Search Criteria screen is accessed by the magnifying glass on the Item Baskets screen. After applying the search criteria, the results are listed on the Item Baskets screen and the criteria applied is shown.
Criteria include:
- Date Range - based on the Last Update Date
- From / To Date - based on the Last Update Date
- From Expiration / To Expiration
- Description
- Item Basket ID
- Alternate ID
- Item
- Type
- Status
- User - with a search and an Apply My User ID
- Search Limit - defaulted per the system configuration and can be updated
Create Item Basket
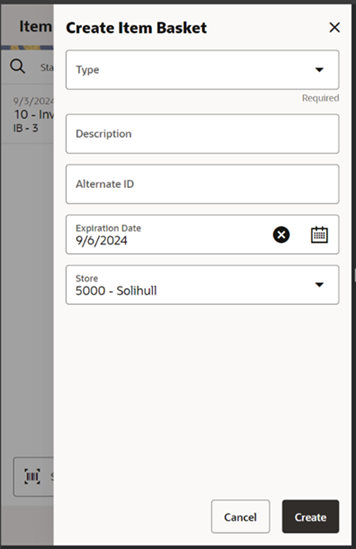
The Create Item Basket screen is used when creating a new item basket. It is accessed when selecting Create from the Item Basket List screen. All item baskets created on mobile will be static. A user must have the create permissions to create a new item basket.
- Type - type of item basket is required to be selected from the list. The type is populated from the list of item basket types defined in the Code Info dialog within the desktop application.
- Description - is an optional text field to describe the item basket.
- Alternate ID - is an optional field to hold an alternate ID given to the item basket by the user, different from that of the system-generated item basket ID.
- Expiration date - is an optional field for the expiration date. It is used to update item baskets to Canceled status when the expiration date has passed. This occurs through a batch process.
- Store - the store field is required and the options include the user's store or All Stores. All Stores is only available to users that have the proper permission; this option will allow for the creation of item baskets in which all stores would have access to use the item basket.
Item Basket Items
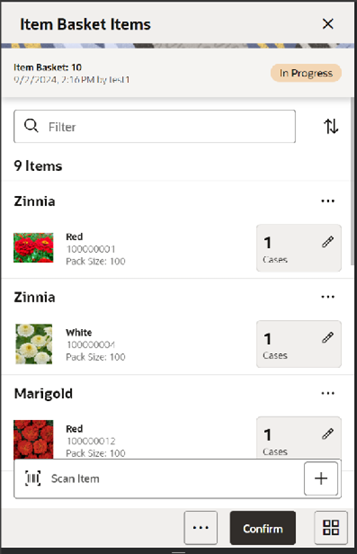
The Item Basket Items screen is where the details or line items for the item basket are displayed. When creating a new item basket, initially, this screen will not have any items.
The items screen is also displayed when selecting an existing item basket transaction from the Item Baskets (list) screen as well as from Open Transactions and Recently Edited. The items are listed for the item basket.
Line items appear in a list and selecting a line item navigates to the item details of that item. Scrolling in the list of items displays a filter. The filter can be used to narrow down the list of items. Filtering can occur by item ID, item description, and UOM.
Selecting a line item navigates to the item details of that item. Scanning or entering an item in the scan bar will navigate the user per the User Preference, Scan Navigate. The user will either go to the Item Detail for the item or stay on the Item Basket Items screen. The quantity may be updated depending on the scan mode.
The item image for the line items is displayed per user preference. Fields include Item ID, Description, quantity, UOM, and pack size.
All items are allowed on an item basket: any status, consignment/concession, non-inventory, and non-ranged. Non‑ranged items will be addressed at the time the item basket is being used.
Confirm: Confirms and completes the Item Basket setting it to Completed status.
Footer Menu
The footer menu is accessed from the ellipsis footer menu on the Item Basket Items screen. The menu functions include the following:
- Notes: Accesses the notes dialog to capture notes.
- Print: Displays the common print dialog to print the item basket report.
- Info: Accesses the Info popup.
- Cancel: Exits the item basket; changes made in that session are not saved.
- Delete: Marks the item basket to Canceled status. Item Basket must be in In Progress or Completed status.
- Copy: The copy function is only available for those item baskets in a Completed or Canceled status. It takes the current item basket, copies the items and quantities, and creates a new editable item basket with a new ID. It references the copied item basket's ID.
- Save and Exit: Saves the item basket in In Progress status to be completed later.
Item Detail
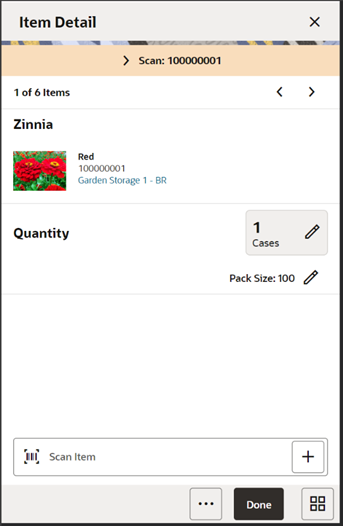
The Item Detail screen is navigated to by selecting an item from Item Basket Items or by entering/scanning an item based upon the Scan Navigate user preferences. Scanning or entering an item on this screen in the scan bar, updates the quantity per the scan mode and refreshes the Item Detail screen for the item and quantity scanned.
The header contains the Scan Details which will display the contents of the last entered or scanned barcode. It is purely informational. There is also paging, where you can page through existing items on the item basket using the arrows.
The item information including the image (which is the user preference) displays in the header along with Item ID, description, and location (primary). The location is only displayed if the Display Sequence Fields system setting is set to Yes. Selecting the location will display the Item Locations screen within Item Lookup.
The quantity is displayed with UOM and Pack Size (for cases) and can be edited and updated manually if permissions allow.
The footer menu, ellipsis button, contains a delete function which allows the item to be removed from the Item Basket.
Information Screen
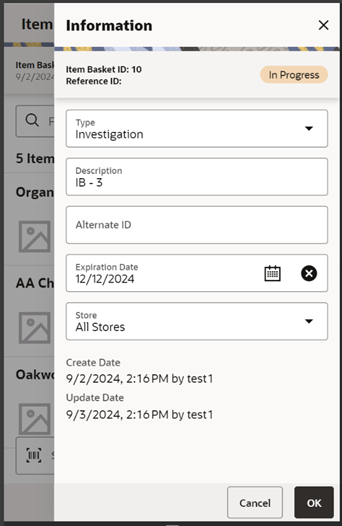
The Information screen contains header level information about the item basket. Information is accessed by selecting Info from within the footer menu of Item Basket Items.
Details include ID, status, reference ID, alternate ID, description, type, expiration date, store, create date/user, and last update date/user.
The CFAs that are set up as being required must have a value entered for it before confirming the item basket. The value can be one of the following: Date, Text, Decimal, Long depending on the data type set up for the CFAs defined during setup in the desktop application. Appropriate security permission is needed for entering CFA values.
Ticketing
Ticketing Dialog
The Ticketing dialog in the Jet Mobile allows users to print the item tickets and shelf edge labels. This dialog supports labels without any user intervention by presetting the values whereas in Manual the user can change certain ticket components before printing the ticket.
The basic objective in Auto mode is, you scan an item and the system determines whether there are any price events exist for the event type set for the specific date and tickets are generated whereas in Manual mode you scan an item and the system fetches all the price events for the effective on specific date or days range based on the setting and allows you to print tickets for one or more events.
Auto Print Item
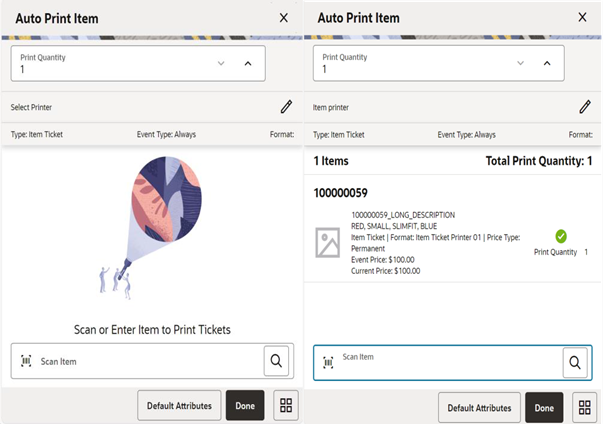
The Ticketing dialog in the Jet Mobile is accessed from the Print Item menu under the Inventory Management. By default when you enter into this dialog, it will be set to Auto Print. You can change the attributes and the mode using the Default Attributes option.
On the Auto Print screen, you can scan the items, and the system automatically submits the print request as and when you scan the items. The search option on the scan bar helps you to search the items using the lookup feature.
Default Settings
The system will set the below default values when you enter the screen and will remain until you change the values in the Default Attributes screen. The settings done in the Default Attributes will stay in the memory until the you exit the dialog and when you come back to the Print Item, the system will take the system default values.
Type
When you enter the screen, by default the system will set the type to print the item tickets, and you can change it using the default attributes.
Event Type
The system will by default set the event type based on the Print Item Events store parameter. You can change the event type to print using the Default Attributes screen.
The system determines what tickets need to be submitted by looking at the item meeting the configured event as described below:
- Always Print: This option will always print a ticket regardless if there is a price change.
- Clearance: Only print a ticket if on the specific date any clearance event is effective.
- Promotion: Only print a ticket if on the specific date any promotion event is effective.
- Regular or Clearance: Only print a ticket if on the specific date any Regular or Clearance event is getting effective.
- Regular: Only print a ticket if on the specific date any Regular event of getting effective.
- Any Price Event: Based on the date selected, if any price event goes into effect (clearance, promotion, or regular price) a ticket is generated. If there is no price event goes into effect, the system prints nothing.
Days Range
Auto print is meant for the specific date. When you enter the screen, the system by default assigns the current date to look for the events. You can change the date using the Default Attributes screen.
Format
The system determines the format for the item based on the following method:
-
The system determines the default format that is set on the Default Attributes screen.
-
If nothing is set on the Default Attributes screen, the system checks what is the event applied for the scanned item (Promotion, Clearance, and Regular) on the ticket and sees whether the corresponding format is available in the format assignment and if available, associates that to the ticket.
-
If the format assignment for the event is not set or if nothing is set in default attributes, the system does not generate the ticket. It displays the error message at the item level and does not print a ticket.
Printer
The system will assign the default printer based on the ticket print format configuration and allows you to change using the pencil icon. If the system could not find the default printer assigned, it will prompt you to select one.
Print Quantity
On this screen the print quantity is set to 1 when you enter the dialog and allows you to change the preset value. You can change the method; the preset value is calculated on the Default Attributes screen.
- If it is set to SOH, the system will prepopulate the value with the current SOH of the scanned item.
- In case of Shelf Label and if the user has set Facings, the system fetches the shelf label quantity defined in the sequence table to populate the print quantity field.
- If the setting is custom, the system will prepopulate it with the custom value defined in the Default Attributes screen.
- If it is set to Available, the system will default it to the current Available quantity.
- The system will default to 1 if the Available or SOH is not >0.
The system will allow you to change the print quantity value on the Auto Print Screen only when the setting on the default attributes screen for the print quantity is custom.
On each row, the system displays the Item Image if configured, Item Id, Description, print status, type, format assigned, price type, effective date, event price, current price, override price if any, quantity, and error if any.
The system generates the ticket after a valid scan and submits it to the assigned printer. If the system is not able to print the ticket for an item due to non-assignment of format or if no pricing is available, it will display an error at the item level and allow you to scan further items.
Manual Print Item
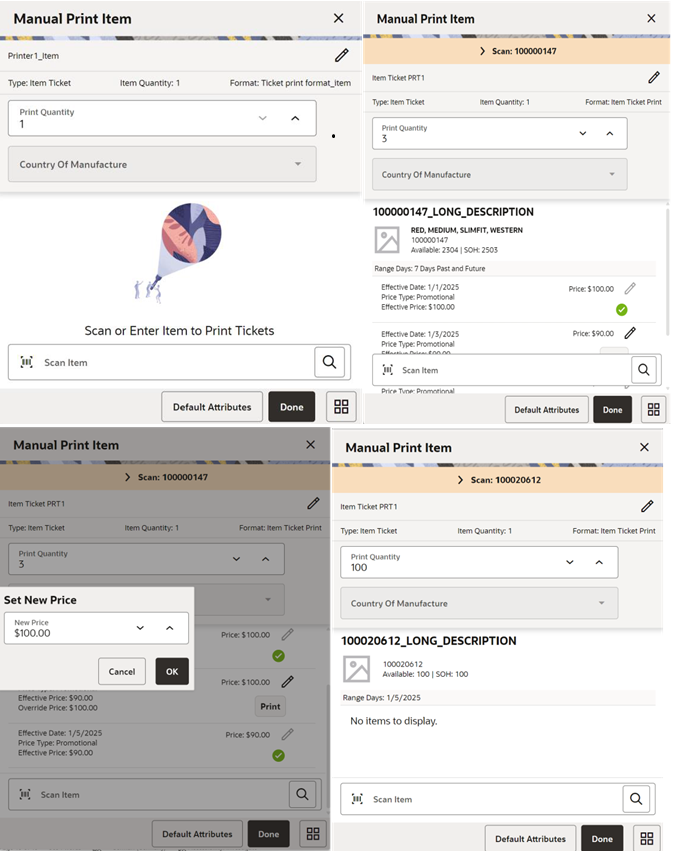
From the Auto Print Item, you can switch to the Manual Print by changing the mode on the Default Attributes screen.
On the Manual Print Item screen, after scanning the valid item, you are allowed to modify the print quantity, country of manufacturer, override price, and change the printer on the same screen.
The search option on the scan bar helps you to search the items using the lookup feature.
If there are more than one pricing record for the scanned item for the given days range, the system will display all the individual pricing records and allow you to select the print at every record level.
If there are no pricing records effective on the given date is available, the system will indicate no records to display.
Default Settings
Printer
The system will assign the default printer based on the ticket print format configuration and allow you to change using the pencil icon. If the system could not find the default printer assigned, it will prompt you to select one.
Print Quantity
The value will be prepopulated based on the Default Print Quantity setting in the Default Attributes screen and allow you to edit:
- If it is set to SOH, the system will prepopulate the value with the current SOH of the scanned item.
- In the case of Shelf Label and if the user has set Facings, the system fetches the shelf label quantity defined in the sequence table to populate the print quantity field.
- If the setting is custom, the system will prepopulate it with the custom value defined in the Default Attributes screen.
- If it is set to Available, the system will default it to the current Available quantity.
- The system will default to 1 if the Available or SOH is not >0.
Type
- This field indicates what is the ticket type. Based on what is set on default attributes screen. It could be Item Ticket or Shelf Label.
Format
The system determines the default format for the item based on the following logic:
- The system determines the default format what is set on the Default Attributes screen.
- If nothing is set on the Default Attributes screen, the system checks what is the event applied for the scanned item (Promotion, Clearance, and Regular) on the ticket and sees whether the corresponding format is available in the format assignment and if available, associate that to the ticket.
- If system could not find the assignment, it displays an error when you attempt to print.
Country of Manufacture
By default, the system fetches the country of manufacturer associated to the item and allows the user to edit.
- On selecting, the system shows the list of country of manufacture for the user to select.
- If the system is not able to find the country of manufacture associated to the item, this field is disabled.
Item Quantity
- This field will hold the quantity of the item that is printed on the ticket. This value is fetched if it is set on the default attributes screen. Shown only when a value exists.
Range Days
- This indicate the range days.
- Specific Date - It shows the specific date selected.
- Range - N Days Past and Future. (N is the number of days for range)
- Past - N Days Past.
- Future - N Days Future
SOH
- This shows the Stock on Hand of the scanned item.
Available
- The system displays the available quantity of the item.
In addition to the above fields, you can see the below fields at the individual pricing record level.
Price
- You can see the effective price on the field and edit (override) using the pencil icon if you have the allow override ticket price permission. The overridden price is shown on the override price.
Effective Date
- The system fetches the effective date and shows on the list for the user to select the print.
Price Type
- The system fetches the price type of the item effective based on the day of the print date.
- Values include Permanent, Promotional and Clearance.
After providing the inputs, you can select the print option to print the tickets or labels.
Default Attributes
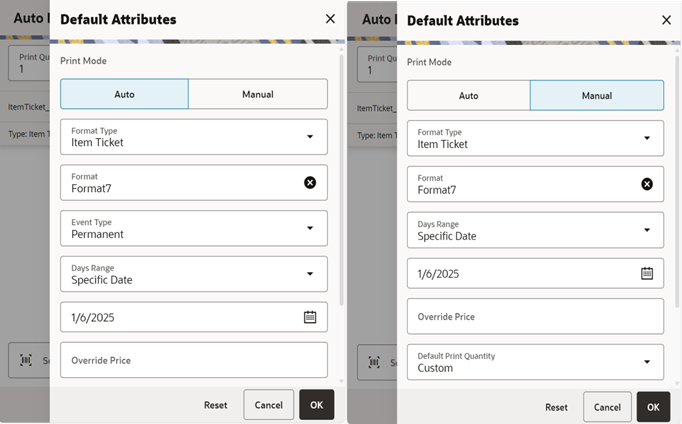
This screen enables you to switch the mode of printing and set the default attributes. You can access this screen from the Default Attributes button on the Auto Print Item or Manual Print Item screen.
Following are the list of fields for which you can set the default values to apply in Manual and Auto print.
Print Mode
- This allows to switch the mode. By default, the current mode you are working will be selected.
- For example if you are in Auto Print Item and you select the Default Attributes, the mode selected will be Auto; here you can either change the attributes for Auto or switch mode to Manual and set the attributes for manual print and select ok.
Format Type
- This allows to to select either Item Ticket or Shelf Label.
Format
- This will show the list of formats in the system based on the format type selected.
Default
- This will show the default format set on the Ticket Print Format.
Event Type
- Displayed only if you select the Auto mode.
- Values include Always, Promotion, Clearance, Permanent, Clearance or Permanent, and Any Price Event.
- Default - Picks up from the store parameter Item Print Events'
Days Range
-
The system allows a maximum of 7 days in the range.
Values:
- Specific Date (Date Widget)
- Range (Not available for Auto)
- Past (Not available for Auto)
- Future (Not available for Auto)
- Default-Specific
Number of future days from today
- Displayed only when Future is selected from Days range field.
- Default =1. 0 Indicates Today
-
The system prints the tickets for the events effective today and x days later.
Example: If you give 3 on 7/1/20. The system prints the tickets for the price events that are effective on 7/1/20, 7/2/20, 7/3/20 and 7/4/20.
- If you change the mode to auto, the system will hide this field.
Number of past days from today
- Displayed only when Past is selected from Days range field.
- Default =1. 0 Indicates today.
- If you change the mode to auto, the system will hide this field.
Number of days for range
- Displayed only when Range is selected from Days range field.
- Default =1. 0 indicates today.
-
The system prints the tickets for the price events effective that are x days prior, today and x days later.
Example: If the user gives say 3 on 7/1/2020. The system prints the tickets for the price event effective on 06/28/20, 06/29/20, 06/30/20, 07/01/20, 07/02/20, 07/03/20 and 07/04/20.
- If you change the mode to auto, the system will hide this field.
Override Price
- Editable in case the user has permission to override ticket price.
- If a value is given here, the system will take this as overridden price and apply this price when generating the ticket.
Default Print Quantity
- You can provide the default print quantity for printing the tickets/labels. The values are described below.
SOH
- This option is listed only in case of Item Ticket.
- If this is selected, the system will default the SOH of the item on the print quantity field on the Auto and Manual print item.
Available
- This option is listed only in case of Item Ticket.
- If this is selected, the system will default the Available SOH of the item on the print quantity field on the Auto and Manual print item.
Facings
- This option is listed only in case of Shelf Label and sequencing is turned on Store Parameter (Display Sequence Fields).
- The shelf label quantity defined in the sequence table is used to populate the print quantity field.
Custom
- If this is selected, the system will allow the user to set a custom value; that is prepopulated on the print quantity field on the Auto and Manual print item.
Item Quantity
- Default = 1
- This is displayed for the Manual Mode.
-
This captures the item quantity that need to be sent to the printer. Note: Item Quantity is different from Print Quantity. This is a placeholder to indicate the quantity of the item and that need to be printed on the ticket.
Select Printer
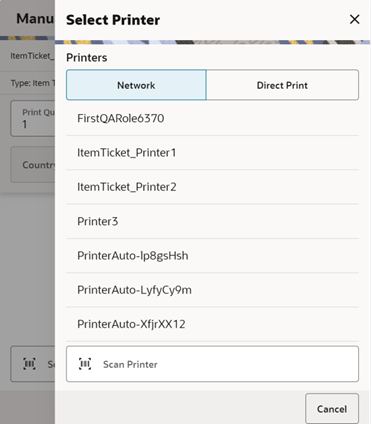
This screen appears when you select the pencil icon on the printer field to set the printer for ticket printing.
On this screen, you can filter the printers by Network or Direct Print.
Network printers are printers that are configured in the store.
Direct Print printers are printers such as Blue Tooth printers that are configured in the device.
On this screen. you can select or scan the barcode of the printer and submit the tickets for printing.
This screen is accessed from the Auto Print Item and Manual Print Item screens and the Print Tickets popup that appears when printing tickets from the container items screen.
This screen lists all the printers that are available in the system for the item tickets and label type.
The selected printer is displayed on the Auto Print Item and Manual Print Item screens for you to know to which printer the tickets/labels are submitted for printing.
Container Lookup
The Container Lookup functionality provides you with the ability to inquire and view information about an incoming or outgoing container of various types of Store, Supplier, Warehouse, and Finisher. This means, the container Lookup can be used for looking up containers for Transfers Shipping and Receiving, DSD Receiving, and RTV Shipment. The system allows you to do container lookup pertaining to your store where it is source or destination.
When you look up the container, the system provides all the required information of the container that is required in a read-only mode. Below is some of the information on container available.
- Container ID
- ASN Number
- Status (New, In Progress, Received, and so on)
- Receipt Date and Time
- From or To Location
- Number of Cases
- Damages
Container Lookup Screen Flow
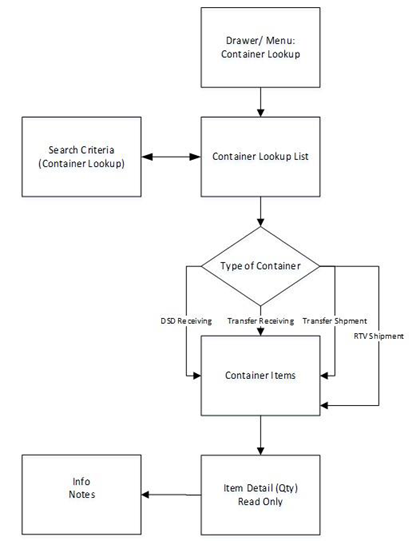
The Container Lookup dialog is accessed from the Container Lookup menu option within Lookups in the drawer menu.
Container Lookup Screen
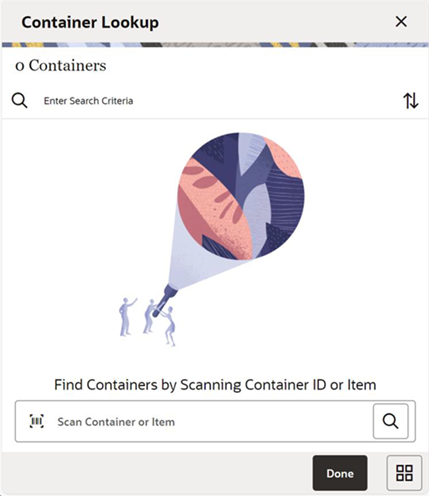
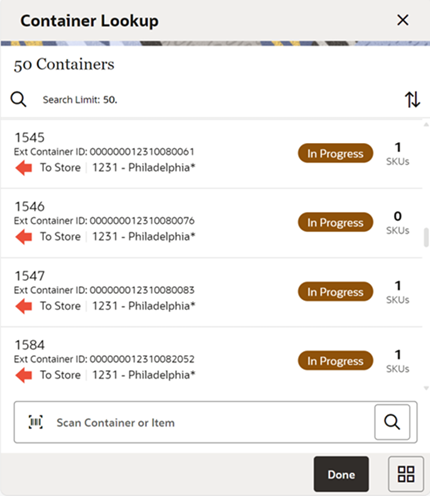
When you access the dialog using the Container Lookup menu, initially the system shows an empty list and allows you to scan or search the containers using the search criteria. The search criteria screen is accessed using the magnifying glass where you can search for containers by entering the search criteria. On the scan bar, you can also scan an Item or container (External ID (SSCC), Internal ID, or Tracking ID) and the system will produce the list of containers based on the item or container ID scanned or entered.
When a barcode is scanned, the system will first look for the match for the external container ID (SSCC) or internal container ID or tracking ID. If no match was found, then then system will use the barcode to look up the item and use the item to find the container.
The search will return ALL containers for ALL stores, but you can navigate to the next screen only if the user has permission to that store and that transaction.
Note: Deliveries and shipment transactions that are marked as without containers are excluded in the search and not listed here.
When scanning a container, the system will always return a list of containers on the list screen. It will not navigate to the details of the container even if only one result was found. A list is needed because the list provides details to the user about the source/destination locations.
Note: There are chances the shipment and receipt have same IDs. In this case, the system will show the results including both the containers and you can select.
On the list screen, the system displays the header level information of the container such as Container Id, External Container Id, Direction, Source, or Destination details, status, and the number of SKUs in the container. You can also sort the list using the sort option.
You can navigate to the respective container items/Items screen depending on the transaction by selecting the container from the list.
Container Search Criteria
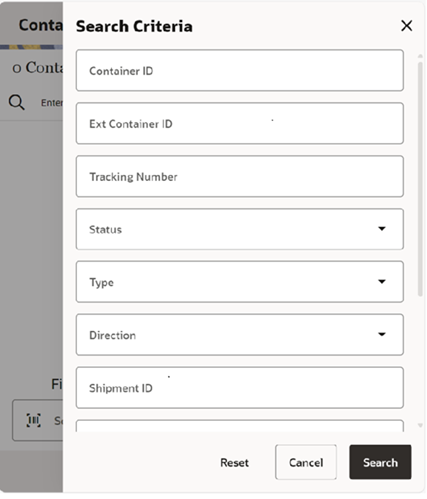
The Search Criteria screen is accessed when you select the magnifying glass on the container lookup screen. You can enter in various criteria that would help you to search for a container, such as Container ID, External Container Id, Tracking Number, Status, Type, Direction, Shipment ID, Delivery ID, ASN, and Item. The system returns the results on the Container Lookup screen.
Container Items (Transfer Receiving)
Container Lookup Item Detail (Transfer Receiving)
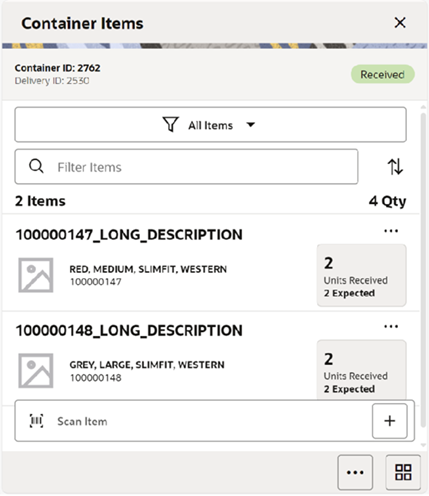
The Container Items screen is accessed after going into the details for a specific container. This screen which gives the list of items in the container is the same as the Container Items screen that you access from the transactions with the exception this is read only. The screen details vary depending on the type of transaction the container belongs to. For example, expected quantities for an outbound container will not be displayed. You can use the scan bar to scan an item to view the details.
From the footer menu of this screen, you can select, Print to print the report, Print Tickets to access the Print Ticket dialog, and Info to view the information about the transaction. Using the Print Tickets dialog, the user can submit the ticket printing to the external service for the selected container items.
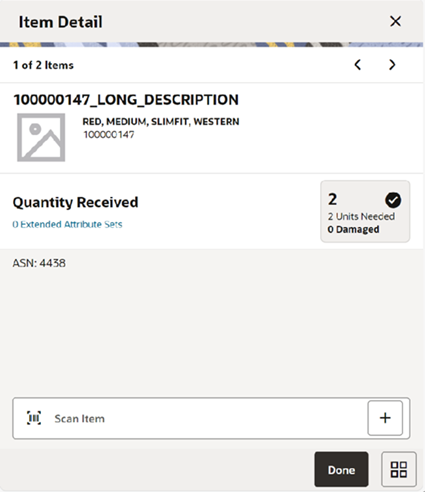
The Item Detail screen is accessed when you select an item from the Container Items screen after going into the item details of an item on the container. The screen content varies depending on the type of the transaction. On this screen, you can user the scan bar to go to a specific item or use the arrows to navigate to next or previous items.
Container Lookup Info (Transfer Receiving)
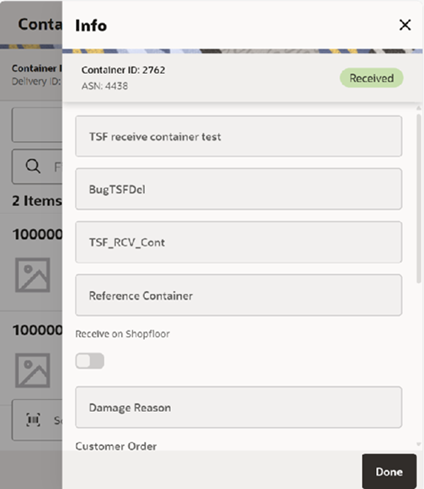
The Info screen is accessed after selecting the Info menu option from the footer menu of the Container Items screen. The screen varies depending on the type of transaction. For example, the above screen is for a transfer receiving. The Info screen in Container Lookup is the same as you see in the respective transaction dialog with the exception that this is read only here.
E*Waybill Support
SIOCS has added additional support for CFAs to be send to Fiscal Document Generator (FDG). This allows retailers to capture additional attributes that may need to be put on the E*Waybill that are not part of standard fields already captured by SIOCS.
This is executed through the standard existing CFA feature in SIOCS. The only modification is the integration through direct integration with FDG.
Auto Inventory Adjustments
When creating a product group to set Stock On Hand (SOH) to 0, the user has to select a reason code with an attached disposition. This disposition thus far has allowed to generate negative or positive adjustments based on the direction the inventory needs to take.
As an example:
Reason code – Reduce stock with a disposition of ATS -> Out would in the inventory adjustment dialog be used to reduce SOH. This works if the inventory is positive and it needs to be brought down to 0; however, if the inventory is negative, this reason code would generate a negative value to increase inventory from the negative position to zero.
In case SOH = 10, then the inventory adjustment with the above disposition would create the following record:
- Reduce stock for 10. This would imply 10-10 = 0.
In case SOH = -10, the inventory adjustment would look like this:
- Reduce stock for -10. This would imply: -10- (-10) = 0
Although a negative value inventory adjustment is not inherently wrong, a better solution is to only allow changes based on the disposition of the reason code selected. This does mean that for now, retailers will have to generate two product groups to ensure inventory will go to 0.
So in this example above, the retailer would have one product group moving inventory from a positive position to 0, with a disposition from ATS to Out and require a second product group to increase stock from a negative position to 0 using a reason code with a disposition of Out to ATS.
In summary:
- If the reason/disposition is to increase stock on hand, Out of Stock to Available, those items that have negative stock on hand will be adjusted up, to zero stock on hand.
- If the reason/disposition is to decease stock on hand, Available to Out of stock, those items with positive stock on hand will be adjusted to zero stock on hand.
Store Shipping Network
To prevent accidental override of store shipping network settings in case of bulk application, an additional error message has been added.
MPS Updates
MPS UI Changes
Several new fields have been added to the search criteria for MPS Staged Messages. In addition to what is existing, the following have been added: Store, From Date, To Date, and Description. This should facilitate finding any failed or non-processed messages.
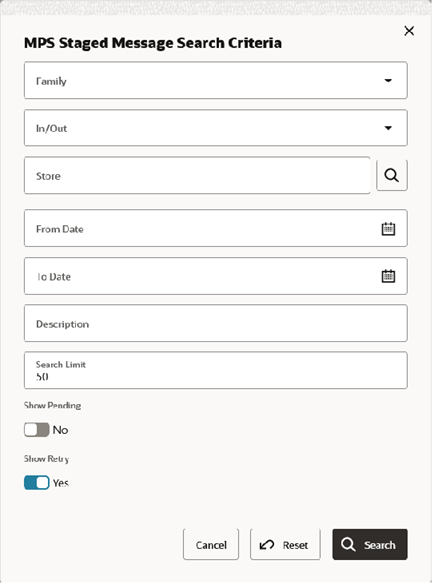
Successful Message Log
In order to enhance operations, a new table has been created: MPS_PROCESSED_LOG.
- When messages are successfully processed and if their work type configuration has purge processed disabled, then the message is inserted into the processed log table and deleted from the staged message table.
- Additional UI filters were added, including store.
- The Delete Selected option on the MPS Staged Message screen has been modified to delete the selected unprocessed message (Pending or Failed) from the MPS_STAGED_MESSAGE table.
This new table has been synced to the common Retail Data Store (RDS).
REST Services
Similar to prior releases, SIOCS has added new REST services. In this release, the following services have been added.
New Services with Fully Implemented Functionality
- Allocation
- Customer Order Status
- Fulfillment Order
- Item Basket
- Product Area
- Product Group Schedule
- Purchase Order
- RFID
- Shelf Adjustment
- Shelf Replenishment
- Shipment Manifest
- Shipment Notice
- Stock Count
- Store Order
- Transfer
- Transfer Delivery
- Transfer Status
- Vendor Delivery
- Vendor Return
New Outgoing Endpoints
These new end points require REST web service code to accept SIOCS data:
- Fulfillment Order Address
- Fulfillment Order Status
- Inventory Adjustment
Note:
These services are not meant for initial data load. Data seeding integration jobs exist for the initial data load. Some of these services can be used instead of their equivalent RIB messages; however, the RIB is still required until all RIB Payloads have been converted.Self Service Administration
A new activation field has been added to activate outbound services. This allows finer customer control in the case where defining the service information does not immediately imply that service needs to be turned on.
Report Updates
Several reports have been updated with missing data or incorrect data. In some cases, only the underlying view was updated to not impact existing customers. If retailers would like to leverage this new information, they will need to build a custom version of the base report.
| Report or View | Change |
|---|---|
| RTV Shipment and BOL | Added Authorization label |
| RTV Shipment | Added External ID |
| RTV Shipment BOL | Added dispatch user and date |
| Customer Order BOL | Added dispatch user and date |
| Transfer Ship BOL | Added dispatch user and date |
| DSD Receiving report | Added out of stock indicator |
| Transfer Shipment BOL | Display Dispatch user |
| All Reports | Added Notes field |
| Transfer Receiving | Update to Out of Stock indicator |
| Item Basket | New report added with full item basket details instead of just a tag with barcode |
POM Templates
To facilitate running jobs, SIOCS now provides a template on how to best run jobs.
- All mandatory batch jobs (purge jobs) have been categorized into five process categories.
- These processes have been pre-configured and enabled to run nightly at the end of business day.
Integration
- RESA integration using DirectDB has been enabled.
- New implementation of the File Transfer Wrapper service is being made available in this release:
- The File Transfer Wrapper Service offers the same functionality as the SIOCS File Transfer Integration Services with simplified service endpoints.
- The File Transfer Wrapper Service is disabled by default. Customers will need to refer to the File Transfer wrapper Service chapter in Oracle Retail Enterprise Inventory Cloud Service Administration Guide to enable the new File Transfer Wrapper service.
Localization
Improved localization to support the browser-based regional level whenever available. This will solve some of the number and date formatting issues where SIOCS now uses the locale of the browser.
Price History and Purging Parameters
Two new system parameters have been added.
The first system parameter, Search Price History by Date, will allow the retailer to better control the number of price records returned. If too many records are returned, this can slow down the screen performance, negatively impacting the user experience. Currently for existing retailers, this is set to False; however we recommend this be set to True.
The second system parameter, Purge Price History Maximum Rows per Execution, will control how many price records per store will be deleted per execution run. For example:
If the price purging batch is scheduled to run for all stores, it will run for the first five stores concurrently, then the next five stores, and so on. For each thread execution/store, it will fetch the maximum rows per execution (that is, 10,000) for that single store and commit the delete (as the regular price has an end_date date). One execution is done for the regular price/store and another execution for the clearance/promotion per store, so there will be a total of 20,000 maximum records per store that get deleted in each scheduled job execution. If there are 100 stores, then each scheduled job run will have 100 multiplied by 20,000 which is 2,000,000 maximum records per scheduled run.
Search Price History by Date
-
If the value is set to Yes (True), the price history records will be limited by searching the price history for records that have an effective date less than the current date minus the Days to Hold Price History parameter setting.
-
If the value is set to No (False), all available price history records for the specified store/ item will be displayed on the Price Events screen.
Purge Price History Maximum Rows per Execution
Purge Price History Maximum Rows per Execution controls the number of records deleted in the Cleanup Price History batch run; the execution is committed per store/price type.Technical Changes
This section describes the technical changes in this release.
RDS Integration Changes
The MPS_PROCESSED_LOG table is now synced to the common Retail Data Store (RDS).
GoldenGate DAS Integration Changes
In the integration of SIOCS Data Access Schema (DAS), the MPS_PROCESSED_LOG table has been added to the replication configuration. A Service Request (SR) needs to be submitted to obtain the new tables to be configured for replication in DAS.
For more information, see the following document on My Oracle Support: Doc ID 2991383.1.