1 Feature Summary
Oracle Retail Store Inventory Operations Cloud Services includes the following applications:
-
Oracle Retail Enterprise Inventory Cloud Service (EICS)
-
Oracle Retail Store Operations Cloud Service (SOCS)
This chapter describes the feature enhancements in this release.
Note:
Customer Action: Oracle recommends application login on both the Web Client and Mobile Client to ensure application stability.
Note:
Defect fixes from prior monthly Hot Fixes are also included in this 25.1.301.0 update.
Noteworthy Enhancements
This guide outlines the information you need to know about new or improved functionality in the Oracle Retail Store Inventory Operations Cloud Services update and describes any tasks you might need to perform for the update. Each section includes a brief description of the feature, the steps you need to take to enable or begin using the feature, any tips or considerations that you should keep in mind, and the resources available to help you.
Column Definitions
-
Feature: Provides a description of the feature being delivered.
-
Module Impacted: Identifies the module impacted associated with the feature, if any.
-
Scale: Identifies the size of the feature. Options are:
-
Small: These UI or process-based features are typically comprised of minor field, validation, or program changes. Therefore, the potential impact to users is minimal.
-
Medium: These UI or process-based features are typically comprised of field, validation, or program changes. Therefore, the potential impact to users is moderate.
-
Large: These UI or process-based features have more complex designs. Therefore, the potential impact to users is higher.
-
-
Delivered: Identifies whether the feature is Enabled or Disabled upon initial delivery.
- Customer Action Required: You must take action before these features can be used. These features are delivered disabled and you choose if and when to enable them.
Table 1-1 Noteworthy Enhancements
Feature | Module Impacted | Scale | Delivered | Customer Action Required? |
---|---|---|---|---|
SOCS |
Large |
Yes |
Yes Download app, configure, and deploy, by third‑party Mobile Device Management (MDM). In the case of using the Web Browser version, use the correct link. Several new features, permissions may need to be set up. See details below. |
|
EICS |
Small |
Yes |
Configuration and permission needed to turn on the feature. | |
Supply Chain Network - Warehouse |
EICS/Jet |
Medium | Yes | Configure warehouses if turning on this functionality. |
System and Store Administration | EICS | Medium | Yes | No |
Branding Customization | EICS and SOCS | Small | Yes | In the case of customizing branding, additional security roles need to be granted. |
REST Services | EICS | Medium | Yes | No |
Restrict Users from Assigning Themselves | EICS | Small | Yes | Restriction will automatically apply. May need to grant new permission. |
Custom Report Management | EICS and SOCS | Small | Yes | If using custom reports, configuration and data permission assignment are needed. |
Database, Retail Data Store (RDS), and Golden-Gate DAS Updates | RDS/DAS | Small | Yes | Needs to be reviewed for possible custom report impacts. |
New Feature Descriptions
This section describes the new features.
Note:
MAF will be deprecated at the end of 2025 and no released version will be available onwards from the January 2026 update.Jet Mobile
As part of our focus on Jet mobile, this ARN covers several new features and functions released for SIOCS on Jet Mobile. We are again adding a significant portion of new workflows and new quality of live features.
Jet Mobile added several additional functions that should be evaluated for inclusion when rolling out. Most of these features are configurable.
Unavailable Inventory Transfer Documents
The creation of unavailable inventory transfer documents will be controlled by a new permission. This permission will impact the Create Transfer Document screen.
Permission name: Create Unavailable Transfer Documents
- Yes: User can create available and unavailable transfer documents.
- No: User can create available, but not unavailable transfer documents.
- Default: No
Bluetooth External Scanner
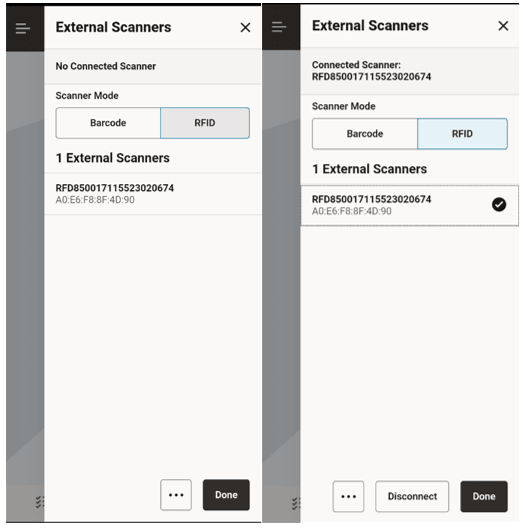
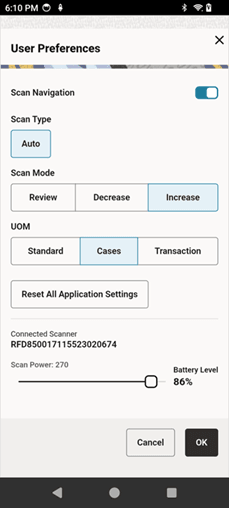
A new feature has been added that allows retailers to set up Zebra external scanners in case they use an Android device that does not have a built-in scanner. This dialog is accessible from the quick actions area.
External Scanners

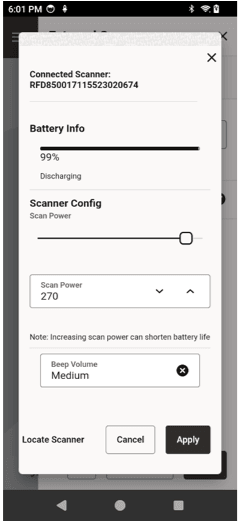
This dialog is used to plug in the Bluetooth scanner device to the SOCS application. When the user accesses this screen, the system detects the paired external devices and allows the user to connect to use in the application. If the device is already connected, the system indicates with a check mark against the listed device.
The user can select the device from the list to connect and if system is able to connect the device, the system prompts with a message while attempting to connect and when connected successfully.
If the device is already connected, the user can locate the device using the Locate scanner option which will result in producing a beep sound on the device.
The Disconnect option allows the user to disconnect the device.
This screen can be accessed from the Main menu or from quick actions.
Stock Count Quality of Live
Two changes have been added for Ad Hoc stock counts:
- A new delete option has been added to Ad Hoc stock counts.
- The Ad Hoc stock count displays the count quantity after completion.
For all counts, the following changes have also been incorporated:
- The phase of the stock count is called out on the Stock Count List screen.
- The Child Count Information screen displays the phase as count or re-count, and not as stock count.
During the stock count authorization phase, the user is able to view additional information:
- Count Quantity: View-only field which displays the count quantity in Re-count phase and Authorization phase. Displayed in Re-count phase provided the user has the View Count Quantity security permission.
- Re-count Quantity: View-only field which displays the re-count quantity. Displayed only in Authorization phase and only if the stock count went through re-count.
Flexible Stock Counts
This release adds a completely new dialog to Jet Mobile for the execution of Flexible stock counts. Flexible stock counts, also known as bin-based stock counting, allow a retailer to initiate a Unit or Unit and Amount stock count without the system pre-defining locations / bins and the items residing in there.
A flexible stock count is considered a method of counting. As such during the Product Group setup, a user will select for a Unit or Unit and Amount stock count flexible as the method of counting. All flexible counts are unguided by nature since they assume that there is no planned hierarchy within the store. Otherwise, a user would be counting by location.
The flexible stock count has also several configuration options. They can be generated as a bulk count, or ad hoc. In a bulk mode, the retailer will decide the number of locations they want to generate. Likely the retailer will then print tags in the store, based on the sequence ID of the locations.
The other option, ad hoc, allows a retailer to leverage pre-created tags with a barcode or number on them. These tags will traditionally be hung at a fixture, shelf, or endcap. The barcode will be scanned or manually entered into the system to create the location.
Optionally, the system can also be configured for a pre-count. This allows a user, when scanning the location tag or entering a bulk generated location for the first time, to enter the number of items located in that section. This pre‑count value is then validated against the user’s total item quantity in the location to ensure everything was properly scanned. This pre-count number is across all items in a location and as such has no correlation to how many item quantities are actually counted for the stock count.
After counting all locations and completing the count phase by pressing the Complete all button, the system will apply late sales and validate the counted quantities of all items against the snapshot and subsequently moved to re-count.
Re-count has a few additional options. It is possible to count all items again in a location, or only the discrepant items. The user will also have the optional ability to see what was previously counted. If items are counted for a second time, SIOCS’ algorithm will adjust the quantity properly by adjusting the possible delta between the previous location count and the current one.
After the re-count for all discrepant locations is finished, the system will move to the authorization phase on the EICS Jet desktop UI similar to all other counts. This is why during the product group setup time it is still important to select the stock count breakdown process appropriately.
Security Permissions
Permission | Topic | Usage |
---|---|---|
View Count Quantity | Stock Counts | With this permission, the user will be able to view count quantity in the Flexible stock count Location screen. |
Create Location | Stock Counts |
With this permission, the Quick Create button will be available for the user in the Flexible Stock Count screen if the store configuration Flexible Stock Count Location Creation is set to Manual. With this permission, the Bulk Create button will be available for the user in the Flexible Stock Count screen if the store configuration Flexible Stock Count Location Creation is set to Bulk. Without this permission, the Quick Create and Bulk Create buttons will not be available. |
Access Flexible Stock Count | Stock Count |
On Mobile, with this permission, the flexible stock counts (stock counts with counting method = Flexible) will be listed in the Stock Counts (List) screen. Without this permission, the flexible stock counts will not be displayed. |
Edit Flexible Stock Count | Stock Count |
On Mobile, with this permission, when the user selects a Flexible Stock Count in the Stock Count List screen, the Flexible Stock count screen will open in edit mode. Without this permission, the screen will open in view-only mode. |
Delete Flexible Stock Count | Stock Count |
On Mobile, with this permission, the user will be able to delete a Flexible Stock Count. Without this permission, the user will not be able to delete a flexible stock count. |
Access Flexible Stock Count Attribute | Access Flexible Stock Count Attribute |
On Mobile, with this permission, the Attribute screen of the Item Detail screen of a flexible stock count is displayed. Without this permission, the screen is not displayed. |
Edit Flexible Stock Count Attribute | Edit Flexible Stock Count Attribute |
On Mobile, with this permission, the Add Attributes button and Remove Attributes (trash can) on the Attributes screen of the Item Detail screen of a flexible stock count are displayed and enabled. Without this permission, the button and trash can are not displayed. |
Complete Stock Count | Complete Stock Count |
On Mobile, with this permission, the Complete menu option in the footer menu of the Stock Count Items and Stock Re-count Items screen is available. Without this permission, the menu option is not available. |
Edit Flexible Stock Count CFA | Stock Count |
On Mobile, with this permission, the user will be able to edit custom flexible attributes in the Information screen. Without this permission, the custom flexible attributes will be view only for the user. |
Edit Quantity Flexible Stock Count | Stock Count |
On Mobile, with this permission, the user will be able to update quantity for an item through the Quantity popup. Without this permission, the user will not have access to the Quantity popup. |
System Parameters
Set pre-count value for locations
Description: This parameter enables the user to set a pre-count value for locations in a flexible stock count scenario.
Topic: Stock Counts
Valid Values: Yes, No
Default: No
Yes: The user will be given an option to set a pre-count value for a location before starting the counting process.
No: The user need not set the pre-count value for a location.
Store Parameters
Flexible Stock Count Location Creation
Description: This parameter decides the type of location creation, Quick Create or Bulk Create.
Topic: Stock Counts
Valid Values: Manual, Bulk
Default: Manual
Manual: Quick Create option will be available as a means to create a single location.
Bulk: Bulk Create option will be available as a means to create locations in bulk.
Setup of a Flexible Stock Count
The set up of flexible stock counts is done by creating a product group with a new counting method of Flexible. The flexible counting method option will be available for users with the correct permissions.
When selecting flexible for the counting method, behind the scenes a stock count will still be generated with the items the retailer wants to have their users counted. A logical breakdown of the stock count will still happen for later authorization. However, location as a breakdown option will not be possible since location assumes that a plan‑o‑gram was already integrated and the nature of creating ad hoc locations for the count would contradict this concept.
Flexible Stock Count Search Screen
The search screen has two new fields, Type and Counting Method.
Type: Valid values are Unit, Unit and Amount, Adhoc, and Problem Line. Defaults to All.
Count Method: Valid values are Unguided, Guided, Third Party, and Flexible. The list of values displayed is dependent on the Type selected. Defaults to All. This dropdown is disabled for Type = Adhoc.

Flexible Stock Count Location (Location List) Screen

The user is directed to this screen when the user selects a Stock Count (with Counting Method = Flexible) from the Stock Count (Stock Count List) or from the Open Transactions screen. This screen lists the locations created so far. It is empty if the stock count is new. When the user enters the screen, the system sorts the locations by Location ID. Closed locations should be at the bottom and Active ones should be at the top and within the group. The sort is based on Location ID.
The user can filter the locations based on status (Active or Closed).
Selecting a location takes the user to the Item Detail screen and from there the user can select to go to the item list.
The user can search a location by scanning a location ID or by item. If the user scans an item to search for a location and if the system finds more than one result, the system prompts the user to select the item from the Select Scanned Item screen.
If the system finds one or more locations for the scanned item, the system prompts to select the location from the Select Location screen.
While the user can scan an item or a location and only once a location is found, the user is directed to the Item Detail screen of the first item.
The user must have the Edit Flexible Stock Count permission to open this screen in edit mode; otherwise, the screen will open as view only.
Footer Buttons:
Quick Create: This button, displayed only in Count phase, enables the user to create locations. The store parameter Flexible Stock Count Location Creation must be set to Manual and the user must have the Create Location security permission for this button to be available. When clicked, it takes the user to the Create Location screen.
Bulk Create: This button, displayed only in Count phase, enables the user to create locations in bulk. The store parameter Flexible Stock Count Location Creation must be set to Bulk and the user must have the Create Location security permission for this button to be available. When clicked, the Create Location popup is displayed where the user can enter the number of locations to create.
Footer Menu:
The footer menu has the following options.
Notes: Notes dialog is displayed.
Print: This opens the print dialog.
Info: Information (Stock Count Information) popup is displayed. This is a master stock count level information screen.
Snapshot: Selecting this option takes the snapshot for the whole stock count. This option is available only for Unit type of stock counts. If it is a Unit and Amount type of stock count, the snapshot should be taken by running a batch available in EICS.
Delete: This deletes the Stock Count that is under consideration and has not yet been authorized.
Complete All: This option allows the user to complete all the location counts. This option is allowed if the user has the Complete All Stock Count Children security permission. Upon selecting this option, the user is notified that the count will be moved to the next phase. This is a warning so that the user complete the count only after all the locations are created and counted. The system processes all the locations and completes the count. If the system is able to process all the location counts, it marks the locations and the master stock count as complete. The system shows the status bar to indicate the progress when the process is running. The count is moved to the re-count phase if discrepancies are found and the count is set for a re-count. If not, the count moves to the Authorize phase. The system sends the authorized quantities to the upstream system if there are no discrepancies found and if it is set to auto processing.
Note: If all locations are completed, it is still required to click Complete all button. This is to prevent a user from completing a location when not all locations have been tagged yet.
If the snapshot was not taken yet for a Unit and Amount count and if all locations have been completed, the status of the count will move to Pending instead of moving to the next phase. If the location is in count phase, the system runs the discrepancy algorithm and if needed, it moves the location to re-count, otherwise the count will be ready to Authorize.
Done: Takes the user to the Stock Counts (List) screen.
Create Location (Bulk)

This screen is displayed when the user clicks on Bulk Create Footer button. The user can specify the number of locations that need to be created. As part of this process, the retailer will usually print tickets to hang on fixture and shelves based on the locations generated here.
Create Location (Quick)

This screen is displayed when the user clicks the Quick Create Footer button. The user can enter/scan location ID/barcode to create a location. The user has to enter the pre-count value for the location if configured (Set Pre-count Value for Flexible Locations - system parameter).
In this process, shelves and fixtures are tagged with pre-created tags. This dialog records that tag number.
As part of this process, the user can also enter the Pre-count quantity. This quantity indicates how many items are located on the fixture or shelf the tag is adhered to.
Flexible Stock Count Location Screen

This is an Item List screen. The user can reach this screen by selecting the view full item list icon or View Full Item List option from the footer menu on the Item Detail screen. The screen opens in edit mode only when the user has Edit Flexible Stock Count permission and the location is not completed.
This screen shows the full list of items in the location along with the quantity counted. The default sort order is by Item ID, ascending.
In the Count phase, the screen is empty until the user starts counting items. The user can scan items to add them to the count. For unit counts, if the snapshot was not taken yet, while scanning the first item, a message is displayed to the user.
In case the system is configured with the pre-count quantity validation check, and a pre-count quantity has not been filled out (this can be due to bulk generation), the user can enter the pre-count number at this point in time.
In the re-count phase, the retailer can choose to count all items or only discrepant items using the store parameter - Flexible Re-count discrepant items only. If this parameter is set to Yes, discrepant items are pre-populated and are allowed to count. If this parameter is to No, all the items in the location are listed and can count all items. The user with View Count Quantity permission can view the quantity counted from the Count phase. Locations with no discrepant items will not be re-generated for the re-count.
The user can filter the items using the search criteria and can refine the search by the hierarchy or by Counted/UnCounted (in re-count phase only).
If the item has a UIN captured, it will have the UIN icon on the line item.
Selecting an item goes to the Item Detail for that item. If the item scanned/selected is an UIN item, the user navigates to the Serial Number popup screen to capture the Serial Numbers (UINs).
Footer Button Complete Count: This option is available only when the counting is in progress status. Upon selecting this option, the system will process the stock count. The validation on whether the total count quantity of the location matches the pre-count quantity happens here (only in count phase). For the items that had not been extracted as part of the count, if they do not qualify to be added to the count, they will be seen in Rejected Items screen in EICS. If the snapshot was not taken yet for a Unit and Amount count and if this is the last location to be completed, the status of the count moves to Pending instead of completing and move to the next phase. If the location is in count phase, the system runs the discrepancy algorithm and if needed, it moves the location to re-count, otherwise the count will be set up for Authorization.
Additional options are available on the footer menu.
Footer Menu:
Notes: Notes dialog is displayed.
Cancel: This discards changes to stock count / re-count and navigates the user to the Flexible Stock Count screen.
Save and Exit: This will save the changes made to the location count and navigate you to Flexible Stock Count screen
Delete: This allows the user to delete the location. This is possible only in count phase. The user must have the Delete Flexible Stock Count Location permission for this option to be available.
Snapshot: This option is visible only for Unit type stock count types. Upon selecting this option, the system take the snapshot. The option will not appear if the snapshot is already taken. This option is permission based.
Flexible Stock Count Item Detail

The user is directed to the Item Detail screen in multiple ways:
- When selecting a location or when scanning a valid location id on the Flexible Stock Count screen.
- After selecting a location from the Select Location screen when there are more location results for the search.
- After selecting or scanning a valid item on the Flexible Stock Count Location screen.
The user can go to the item list by selecting the Item List icon or selecting the option from the footer menu.
This screen helps the user to enter the count quantity for an item in the stock count. If stock count is not completed, the quantity field is editable, and the user can enter the value for the item counted. Upon selecting the quantity field, the system displays the Edit Quantity popup to enter the counted quantity. On this screen, the user is able to take the snapshot for the count.
Following is a detailed explanation on how Count Quantity works:
Count Quantity: Displays the count quantity of the item scanned. Enter the quantity using the Edit Quantity Popup that is triggered when clicking on the field. The count quantity also increases as the user scans the item.
- It will increment by 1 when the item is scanned in + scan mode.
- It will bottom out to 0 when using – scan mode.
- Value has to be 0 or positive, it cannot be negative.
- For UIN Serial Numbers (AGSN and non AGSN), the quantity field is disabled and the selecting the edit quantity takes the user to the Serial Number popup screen:
- The Edit Quantity icon will be a <pen>+, + to show that UINs are needed.
- Quantity gets updated per UINs being added / removed on the UIN panel.
- The system does not look for the Edit Quantity permission for the UIN items.
This will be a view-only screen if the stock count is completed and no further edits can be made, or the user has no edit permissions.
Last Scan: Shows the details of the last scanned barcode.
Footer Menu
View Full Item List: Upon selecting this menu, the user is navigated to the Item List.
Complete Count: This option is available only when the counting is in progress status. Upon selecting this option, the system processes the stock count. The validation on whether the total count quantity of the location matches the pre‑count quantity happens here (only in count phase). To improve the speed of scanning, no validation is done if an item is meant to be on the count or not is done. For items that are not meant to be on the count and do not qualify to be added to the count, they are found in the Rejected Items screen in EICS.
If a pre-count is setup, the system prompts the user for the pre-count value validation. If this is different from the originally pre-count entered, a warning message appears. The user has the option to continue with completing the location or go back and do some additional validation.
Save and Exit: This saves the child stock count and exits to the Child Stock Count List screen.
Cancel: This discards changes to stock count / re-count and navigate the user to the Flexible Stock Count screen.
Oracle Digital Assistant
The Oracle Retail Store Inventory Operations Cloud Service is integrated with the Oracle Digital Assistant. The Oracle Digital Assistant (ODA) is an AI-powered platform that enables users to interact with various business applications and services through natural conversations via chat interfaces. ODA is being used to bring together information, workflows, and assistance from multiple documentation sources into a single, unified experience.
With ODA, end users can:
- Get Answers Quickly: Ask questions and receive timely, accurate responses to common queries about applications, policies, or business processes.
- Personalized Experience: Receive tailored information and notifications based on the user role, preferences, and recent activity.
- Simple Interaction: Use natural language (typing or speaking) to communicate. ODA is designed to understand common phrases and conversational requests.
For the best experience, access the ODA window by clicking the conversation icon at the bottom of the screen, state the request or question clearly, and follow the prompts or suggestions as they appear. If ODA cannot resolve the request, consult the documentation or log a service request to get additional support.
ODA Permissions and System Configurations
Permission | Topic | Usage |
---|---|---|
Enable AI Digital Assistant | Admin |
With this permission, the AI Digital Assistant will be used throughout the application. Without this permission, the AI Digital Assistant will not be used throughout the application. |
Enable AI Digital Assistant | UI |
Yes: The AI Digital Assistant will be used throughout the application. No: The AI Digital Assistant will not be used throughout the application. Default: Yes |


ODA will be available on the desktop application. It is located in the lower right hand corner throughout the application by clicking on the ODA icon. The digital assistant accesses the GA documentation for its queries.
The system must be configured and a user must have permissions for the Digital Assistant to be available.
If there is an issue accessing ODA, customers are advised to log a service request (SR), so that Oracle can provide a resolution.
Supply Chain Network - Warehouse
In prior versions of the Supply Chain Network, SIOCS allowed retailers to restrict which stores a store could ship to outside of the standard Transfer zone concept. With this enhancement to the Supply Chain Network concept in SIOCS, warehouses are also allowed to be restricted.
REST Services have been added to control the relationship between which locations can ship to which location. Due to the high demand from retailers for these REST services need and the complexities, no UI has been added to support the restriction of which warehouses can ship to which stores. The data can only be integrated through the REST API.
Security Permissions
Permission | Topic | Usage |
---|---|---|
Access Warehouse Shipping Network | Admin | With this permission, the user will have access to the warehouse Shipping Network screen in EICS. |
Override Exclude Shipping Network - Warehouse | Transfer Shipment | With this permission, the user will be able to override the Shipping Network exclusion and will be able to dispatch to the warehouses that are not in the network. |
Impacts to the system:
Product Group
When creating a store order, only warehouses a store can receive from are allowed to be set up as part of the restriction.
Transfer Document and Transfer Shipment
In the case of store to warehouse transfers, a transfer can only be created if the destination warehouse is not excluded for return for the Source store. However, if the user has the Override Exclude Shipping Network - Warehouse security permission, the user can proceed with creating the transfer to an excluded warehouse. For a user without this permission, the warehouse dropdown values are limited to the warehouses that are not excluded. A store's warehouse shipping network is set up through web services.
For users with override permission, a validation is done on the Create button to confirm if the user wants to proceed with creating a transfer to an excluded store or a warehouse.
In the case where the transaction was created outside of SIOCS, transfer requests can be approved and shipments made despite the fact those warehouses are excluded.
System and Store Administration
For better tracking on who changes a system or store option, SIOCS\now displays the user who last updated a system or store option as well as the time when this happened.
System Administration
Store Administration
Store Administration Details

Branding Customization
The mobile and desktop applications come with a standard Oracle Branding Look and Feel. Clients can customize their own branding. This can be useful to brand for their company or specific environment. Customization can occur to the Global Header Bar which is the banner/bar at the top of the application as well as the home screen (splash screen).
Permissions
Permission | Topic | Usage |
---|---|---|
Access System Administration (existing) | Admin |
With this permission, the user has access to the System Administration dialog as well as the Global Area Configuration. Without this permission, the user will not have access to the System Administration dialog as well as the Global Area Configuration. |
Home screen background | UI |
Values: <URL>, <color>, or “none” Default: blank (no branding) <URL>: the URL associated to a background to be used on the home screen. Only http and https protocols are supported. <color>: Hex code for color for a background to be used on the home screen. “none”: There will be no custom background on the home screen, and the default Oracle one will be used. |
Home screen logo | UI |
Values: <URL>, <color>, or “none” Default: blank (no branding) <URL>: The URL associated to a logo to be used on the home screen. Only http and https protocols are supported. To ensure proper sizing and Scalable Vector Graphic (SVG) image should be used. <color>: Hex code for color for a background to be used on the home screen. "none": There will be no custom logo on the home screen, and the default Oracle one will be used. |
Default Desktop Branding

Default Mobile Branding

Example Desktop Customized Branding

Example Mobile Customized Branding

Global Area Configuration

The Global Header Bar can be configured using the Global Area Configuration screen. It is accessed using Admin>Configuration>Global Area Configuration. The user must have the Access System Administration permission to have access to this screen as well as must be assigned the PLATFORM_SERVICES_ADMINISTRATOR group since this screen uses services exposed by JRAF. For more information, see the Oracle Retail Enterprise Inventory Cloud Service Security Guide.
On this screen, the user can enter an Application Name, such as a company or environment name. It will appear on the desktop in the Global Header bar and at the top of the drawer/menu of the mobile. The color for the skinny bar on the top of the Global Header bar can be defined by a color hex code or selecting a color. Lastly, a log can be uploaded. It is best to use SVG (Scalar Vector Graphic) images for this.
The home screen for the desktop and mobile applications is the landing page when logging in to the application. It can also be accessed by selecting Home from the menu. It is configured using two system configurations.
The first configuration, Home screen background (URL or color or none), will be used to define the color/background that is displayed on the home screen. The second configuration, Home screen logo (URL or none) is used to display a customized logo on the home screen.
REST Services
Similar to prior releases, SIOCS added or updated some services. In this release, the following services have been updated:
- Allow product group schedule creation for the same day using a REST API.
Note:
Extraction will need to happen by using the product group extraction job for same day scheduling as a separate process.- Stock inventory lookup by specific style.
Note: These services are not meant for initial data load. Data seeding integration jobs exist for the initial data load. Some of these services can be used instead of their equivalent RIB messages.
With this release, all RIB messages have been converted over to REST. This means that as of now, RIB can be considered an optional component for SIOCS. Evaluating removing RIB does include a few considerations:
- SIOCS will need to be integrated through direct DB integration with MFCS.
- Warehouse Management integration will be leveraging REST services. Oracle Warehouse integration still requires RIB for base integration unless a custom solution is built out.
- Oracle Order Management System (OMS) integration also still requires RIB. This can also be circumvented through custom integration into the SIOCS REST services similar to how a third-party OMS would integrate.
- MFCS may still require RIB for its own purposes.
Restrict Users from Assigning Themselves
This release of SIOCS adds the ability to prevent users from assigning themselves roles for locations when they did not have those roles assigned to them in the first place. This was done by adding a new permission called Edit user for store with permission:
- If the user has the edit user permission active for their session, that will take priority.
- Otherwise, if the user is not logged in to a session with the edit user permission, or they do not have it anywhere, and they have the Edit user for store with permission, then these rules will apply.
-
If the session user has full permission (app role), they will have the regular edit user permission applied. The session user will be able to edit store and role assignments for users as usual, but their available stores will be more restricted. The session user will only be able to edit assignments for stores that the session user has a valid role assignment containing the Edit user for store with permission.
All locations where this permission is assigned will be available while those where the permission is not available will not be available to assign.
-
If the session user has the role assigned to all available stores (that is, a null store id on a user role assignment), they are allowed to edit all of their available stores.
This is similar to the regular edit user permission case.
-
If the session user is a super user (global store user), the same rules will apply.
The super user may still be limited in editing to the stores with the permission.
The user edit rules apply to the UI as well as the spreadsheet import.
Custom Report Management
This release is enhancing SIOCS further to support custom reports.
A new type of functional area called Miscellaneous is added to the Report Setup screens. This type of custom report allows multiple parameters to be identified and, in the reports area on the Jet Desktop, these reports can be displayed.
A main distinction between specific functional area reports and miscellaneous reports is that the specific functional area reports are driven by the transaction ID from that functional area. To automatically generate the report without user input, a fixed parameter standard is leveraged. The Miscellaneous reports however can have any number of parameters (such as Date ranges, item numbers, ID numbers, and so on) as a different pattern is used where the retailer has the ability to define what those parameters are.
Note:
After setting up the report, a data permission needs to be granted for that report to be accessible by a user.
The Report Setup screen is used to set up and maintain reports. Report Setup is accessed within the Operations menu.
Custom reports are manually added and removed on this screen.
Note:
Retailers will have a file of all of the base reports that will be installed on DIS. If a retailer wishes to have access to these reports, they need to be manually added in this Report Setup screenEach report has:
- Description: Used to describe the report.
- Functional Area: Used to determine where the report will be printed from.
A functional area of Miscellaneous will be available. These reports will not be associated to a specific functional area of the application, that is Inventory Adjustments. They will only be available within the Report dialog of the desktop.
- Report Location: The directory in which the report is stored.
- Sequence: Used to determine the display order of the reports within each functional area when printing. For example, if there are five reports with a functional area of Inventory Adjustments, then when printing from Inventory Adjustments, the five reports will be listed in order of the assigned sequence.
- Parameters: If a functional area of Miscellaneous was selected, the Parameters button will be displayed and optional parameters can be assigned as input parameters to the report.
The reports in this screen will be available throughout the application for printing based upon the assigned functional area. For example, a functional area of Inventory Adjustments means that the reports will show up in Inventory Adjustments. The reports will also be available in the Report dialog on EICS (Operations> Report).
Note:
Once a report is set up, the system will create a data permission for that report. A user must have that data permission assigned in order to have access to that report within the application.Parameters

The Parameters popup displays when selecting the Parameters button on the Report Setup screen. Here the user can define parameters that are needed to be passed in when downloading the report in the Report dialog on the desktop. Parameters are only available for reports for a Miscellaneous functional area.
Note:
See the Oracle Retail Store Inventory Operations Cloud Services Implementation Guide for more details on Reporting.Report Setup

The Report Setup screen is used to set up and maintain reports. Report Setup is accessed within the Operations menu.
This screen initially contains all existing base reports upon install. Custom reports are manually added and removed on this screen.
Each report has:
- Description: Used to describe the report. Only editable for custom added reports.
- Functional Area: Used to determine where the report will be printed from. Only editable for custom added reports.
- Report Location: The directory in which the report is stored. Only editable for custom added reports. The Oracle Retail Store Inventory Operations Cloud Service Implementation Guide will include details on defining this field.
- Sequence: Used to determine the display order of the reports within each functional area when printing. For example, if there are five reports with a functional area of Inventory Adjustments, when printing from Inventory Adjustments, the five reports will be listed in order of the assigned sequence.
The reports in this screen will be available throughout the application for printing based upon the assigned functional area. For example, a functional area of Inventory Adjustments, means that the reports will show up in Inventory Adjustments. The reports will also be available in the Report dialog on EICS (Operations > Report).
Several reports have been updated with missing data or incorrect data. In some cases, only the underlying view is updated to not impact existing customers. If retailers would like to leverage this new information, they need to build a custom version of the base report.
Technical Changes
This section describes the technical changes in this release.
General Updates
As with all updates for SIOCS, there are several technical changes that have been made:
- Various product improvements in batches, including purging item batch and direct integration.
- Continued enhancement around deployment and configurations.
- Integration using Direct DB:
- Direct DB outbound integration from SIOCS to MFCS has been optimized.
- SIOCS now directly writes to the common integration sim_rms table by skipping asynchronous hop.
- This change will improve stability and reduce steps in between the applications.
- IDCS Security:
- As part of our ongoing IDCS initiative, we are standardizing role assignments for the OPC application (RGBU_SIOCS_<ENV>) to include only the User Administrator (UA) and User Viewer (UV) roles.
- Please note that this change will not affect user access to the OPC application or its functionality.