1 Feature Summary
Oracle Retail Store Inventory Operations Cloud Services includes the following applications:
-
Oracle Retail Enterprise Inventory Cloud Service (EICS)
-
Oracle Retail Store Operations Cloud Service (SOCS)
This chapter describes the feature enhancements in this release.
Note:
Customer Action: Oracle recommends application login on both the Web Client and Mobile Client to ensure application stability.
Note:
Defect fixes from prior monthly Hot Fixes are also included in this 25.0.201.0 update.
Noteworthy Enhancements
This guide outlines the information you need to know about new or improved functionality in the Oracle Retail Store Inventory Operations Cloud Services update and describes any tasks you might need to perform for the update. Each section includes a brief description of the feature, the steps you need to take to enable or begin using the feature, any tips or considerations that you should keep in mind, and the resources available to help you.
Column Definitions
-
Feature: Provides a description of the feature being delivered.
-
Module Impacted: Identifies the module impacted associated with the feature, if any.
-
Scale: Identifies the size of the feature. Options are:
-
Small: These UI or process-based features are typically comprised of minor field, validation, or program changes. Therefore, the potential impact to users is minimal.
-
Medium: These UI or process-based features are typically comprised of field, validation, or program changes. Therefore, the potential impact to users is moderate.
-
Large: These UI or process-based features have more complex designs. Therefore, the potential impact to users is higher.
-
-
Delivered: Identifies whether the feature is Enabled or Disabled upon initial delivery.
- Customer Action Required: You must take action before these features can be used. These features are delivered disabled and you choose if and when to enable them.
Table 1-1 Noteworthy Enhancements
| Feature | Module Impacted | Scale | Delivered | Customer Action Required? |
|---|---|---|---|---|
|
SOCS |
Large |
No |
Yes Download app, configure, and deploy, by third‑party Mobile Device Management (MDM). In the case of using the Web Browser version, use the correct link. Several new features, permissions may need to be set up. See details below. |
|
|
EICS |
Small |
Yes |
No | |
| REST Services |
EICS |
Medium | Yes | No |
| POM Improvement | EICS | Small | Yes | No |
| MPS Apex Support | EICS | Small | Yes | No |
| Custom Report Management | EICS and SOCS | Small | Yes | No, automatically applied. |
| Barcode Parser | EICS and SOCS | Small | Yes | Yes, requires to be turned on if needed. |
| Integration | EICS | Small | Yes | Several actions need to be taken before this update can be applied. See the section for more specific requirements. |
New Feature Descriptions
This section describes the new features.
Jet Mobile
As part of our focus on Jet mobile, this document covers several new features and functions released for SIOCS on Jet Mobile. As in previous updates, this new version includes a significant number of new workflows and enhances the quality of live features. Some features have been released as part of hotfix patches, and as such are listed in this document again as a reference for those retailers who are more focused on quarterly updates.
Jet Mobile added several additional functions that should be evaluated for inclusion when rolling out. Most of these features are configurable:
- Common pieces:
Report printing has been updated to allow custom created reports to be available on the print area for PDF generation. The Oracle Retail Enterprise Inventory Cloud Service User Guide will include details about this feature. The list of applicable reports will be given based upon what was set up on the desktop (Report Setup) for that functional area.
- iOS Camera Support:
The camera has been improved to better support the camera picking up multiple barcodes. If the camera picks up multiple barcodes, it will put a box around those barcodes and the user can tab on the one they want to scan.
- Purchase Order Info:
The Info screen has been enhanced to display additional information. The bottom of the screen lists the deliveries that exist for the purchase order. All of the details about the delivery will be listed including: ID, ASN, number of SKUS, supplier, status. and number of containers. Tapping a delivery will navigate to either the Containers (list) or Delivery Items screens.
- Transfer, RTV, and Customer Order Management Bill of Lading (BOL):
Carrier and service information have been made into a data permission. This means that specific users based on their role will only see those carriers and services that are enabled for them. This allows better regional control of carriers and services as well as allows corporate to have specific methods of shipping that are not available for the store:
- The list of carriers displayed in the Carrier dropdown is controlled by the Shipment Carrier data permission. Only the carriers the user has permission to will be listed in the dropdown.
- The list of carrier services displayed in the Service dropdown is controlled by the Shipment Carrier Services data permission. Only the services the user has permission to will be listed in the dropdown.
- In case the user does not have a permission for a carrier/service, the data will be view only and cannot be changed by the user.
- Carrier and services can be overridden by the Manifesting system.
- Customer Order Ship Alone indicator:
- If any item in the customer order has the Customer Order Ship Alone indicator set to Yes, the system will not allow the user to deliver this item along with other items. Those items will need to be shipped alone.
- This indicator is set by the Order Management System (OMS) on the order.
- In Store Replenishment and Manage location inventory:
Two new dialogs have been added this update for Jet Mobile. The first one, In store replenishment, focuses on moving inventory based on a scanned list or an algorithm to the shopfloor. The other dialog, Manage location inventory, focuses on the movement of inventory between shopfloor, backroom and delivery bay. This is user initiated and executed.
In Store Replenishment
Replenishment Pick Lists Screen
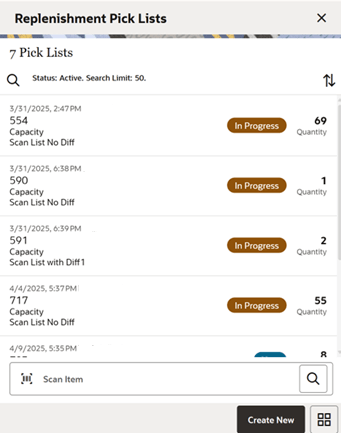
The Replenishment Pick Lists screen can be accessed from the In Store Replenishment menu. When you access this screen, the system will by default list the New and In Progress pick list.
The Replenishment Pick List screen allows you to create a new pick list by selecting the Create New button. You are taken to the Create Replenishment Pick screen upon selecting the Create New option on this screen if you have the proper permissions. All types of replenishment lists are displayed with the total quantity to pick. When you select a replenishment list, the system takes you to the Replenishment Pick Items screen.
You can filter the list by selecting the magnifying glass and providing the search criteria.
The following fields are shown in the list for you to identify the pick list:
- ID - The unique replenishment id created by the system.
- Total quantity in the pick list.
- Status of the pick.
- Pick Type.
Four types of in store replenishment methods can be defined here: Capacity, Display, Gap, and Sale.
- Updated User, Create Date, and the Description of the replenishment pick.
On this screen, you can scan the item or search the item using the standard item lookup feature to filter the pick lists that contains the searched item.
Replenishment Pick List Search Criteria Screen
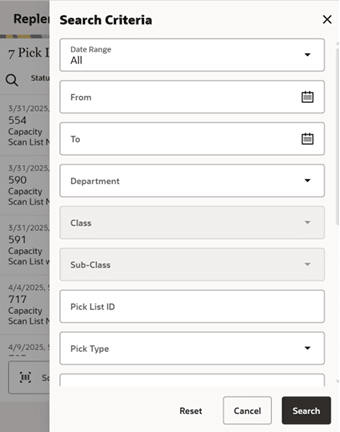
The Replenishment List Search Criteria screen can be accessed from selecting the magnifying glass on the Replenishment Pick Lists screen. This helps to limit the search through date, hierarchy, and various additional filters which includes search fields Pick List Id, Pick type, Product Group, Mode, Scan List, Item, Status, and so on.
Once done with applying the search criteria, you return to the Replenishment Lists screen with the results filtered based on the given criteria.
Create Replenishment Pick Screen
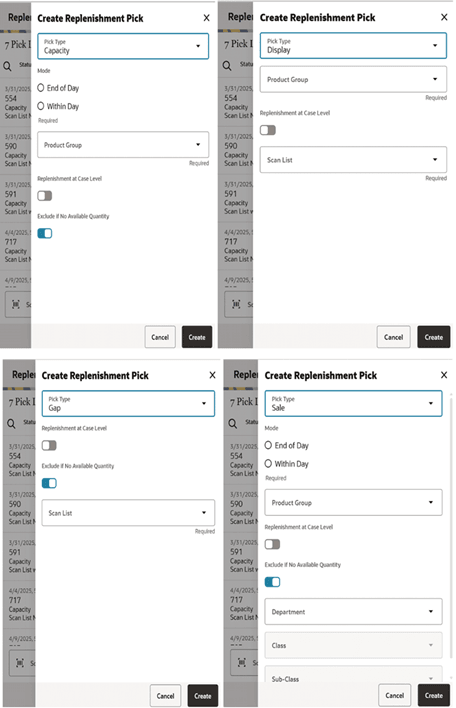
The Create Replenishment Pick screen is used to create a new shelf replenishment pick list based on various criteria specified by you. This screen is accessed by selecting the Create button on the Replenishment Pick List screen.
You can create four different types of shelf replenishment lists: Capacity, Sales, Display, and Gap replenishment lists. Based on the replenishment list type selected, some fields will display while others will not.
Replenishment List Types
Capacity (Algorithm Based on Stock Level Percentages)
Capacity-based replenishment is dependent on the capacity defined for an item in sequencing at the shop floor. A user can choose to replenish within the day or end of the day. The difference between the capacity quantity and the actual stock on the shop floor becomes the suggested quantity to replenish. If you choose to replenish the stock within the day, you also have an option to enter a quantity to replenish considering the manpower availability. If you choose to replenish at the end of the day, it is assumed that you will have sufficient manpower and be able to replenish the full deficit.
Capacity-based replenishment uses the difference of the shop floor capacity and the shop floor quantity to calculate the gross need of how many units need to move to the shop floor. This need is constrained by several factors, how many units are present in the back room and how many units do you actually have time to pick and move to the shop floor.
Capacity-based replenishment uses a specific algorithm to define the optimal method to replenish the shop floor quantity:
- The total capacity equals the sum of capacity for all shop floor locations.
- The Out of stock % equals the total capacity minus the shop floor quantity divided by the total capacity times 100.
Calculation:
- The Gross Need Units equals the total capacity minus the shop floor quantity.
- The item list is sorted in the order of percentage Out of stock.
- The Net Need calculation uses the total capacity, total max fill percentage, and the mode.
- The total available replenish quantity equals the back room plus the delivery bay stock. This step is only used when checking available stock on hand.
- The fill quantity equals the Net Need or the total available, whichever is smaller.
- The Within day fill creates a list until units replenished meet the within day fill quantity.
- The End of day fill creates a list with all items needing replenishment.
Sales Based
Sales-based replenishment uses a concept in which the shop floor is intact and accurate every morning. As units are sold, new units will take their place. Often if a unit is sold out, because of limited availability, a substitution will be used to replenish. When the substitute is sold, the substitute will be replenished. The advantage of this type of method is sequencing is not required since everything replenished is based on sold units.
A user can choose to replenish within the day or at the end of the day. If you choose to replenish within the day, they have an option to enter the quantity they have time to replenish. This replenishment quantity is restricted by the quantity entered by you and is pro-rated. If you choose to replenish at the end of the day, it assumes sufficient manpower will be able to replenish the suggested quantity.
This method is mostly used by fashion retailers who have not defined capacity and who have many items that are single size/color/style items. The method indicates to the user what was sold over a period of time, which allows the user to replenish like item with like item. It is often used in conjunction with substitution to allow them to keep the shop floor looking filled by substituting the sold unit with one that is in the back room.
Based on the Default to the Include Previous Day Sales parameter, the system determines whether to include the previous day sales or not for deriving the suggested quantity.
If the value set is Yes, the suggested pick quantity will consider any sales that occurred from the last time it picked (it could be previous day) until the current pick time.
For example:
Last Pick Time is April 30th 4.30 PM. 20 units to be picked and user picks only 15 (balance=5).
Sales occurred on April 30th after 4.30 PM until midnight is 10 quantities.
Sales occurred on May 1 after the midnight is say 15 quantities until the pick time May 1st 10:15 AM.
Now the Total Pick quantity is 5+10+15+=30.
If the value set is No, the suggested pick quantity is based on the sales that occurred for the current day minus any quantities already picked since start of the day (that is, midnight). At the start of each day, the last pick time will be reset.
For example: On May 1, the first replenishment pick generated at 10:15AM includes sales from midnight until 10:15AM. If a second replenishment pick is generated at 2:15PM, the system will use sales that occurred from midnight until 2:15PM minus what was picked by the first pick run.
Note:
This method is often used with the option to ignore available inventory. This allows out of stock items on the replenishment list to be submitted.Gap Scanning (Empty Shelf Scanning)
The Gap scanning method replenishment is the easiest method of all the various types of shelf replenishment. With this method, you scan the goods that need replenishment, and a replenishment list is created from the units scanned.
The system uses this replenishment list to move the goods from the back room to the shop floor based on back room availability. The reason to have a separate process between scanning and generating is that one user can create a list and another user can execute the shelf replenishment allowing for distribution of workload.
Since this process does not have a dependency with either sales or capacity, it gives an advantage to the retailer to move goods without any complex setup.
Display (Sales Floor/ Shop Floor)
The shelf replenishment method of Display stock replenishment is fully based on the idea that if a customer does not see the item on the shop floor, they do not know the item exists.
This method provides a way to reduce the inefficiency of receiving new styles in the back room, and not having full knowledge of what is displayed and what should be moved from the back room to the shop floor.
The generic process is you scan all display stock items, and then compare them against a product group with all the styles available for that department. You then identify what is the differentiator needed to be displayed on the floor; often this is color.
Because this type of method is often used in a fashion setting, it does not require sequencing or capacity at all. Capacity need is always one item per primary differentiator.
A product group is required to set up with all the items on a shelf. The following table is an example which shows six items with various colors and sizes. For the comparison between shop floor display and back room, all of the items need to be set up in the product group.
Next, a scan list needs to be created by scanning the items on display. For this example, you only have item 124 on the display shelf.
| Item ID | Diff 1 | Diff2 |
|---|---|---|
| 123 | Black | S |
| 124 | Black | M |
| 125 | Black | L |
| 234 | Red | S |
| 235 | Red | M |
| 236 | Red | L |
While creating the product group, you selected to sort by the color. Since the scanned item is black, the sorting is by color. The system will try to find a different color available in the back room. After the comparison between the two lists, the system tells you item 236 needs to be replenished.
Note:
The suggested red item to be replenished depends on available back room inventory and the sort of the second differentiator. If Diffs had been defined differently, such as L = 10, M = 08, and S = 06, item 234 would have been recommended instead for replenishment.Replenishment Pick Items Screen
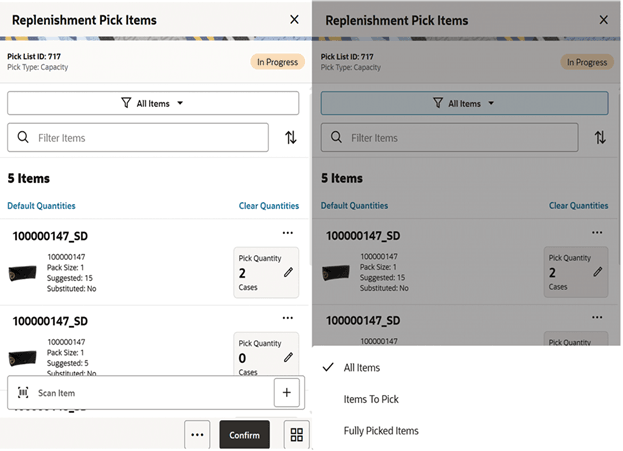
This screen is accessed by selecting a replenishment list from the Replenishment Pick List screen or when creating a new pick. You need proper permissions to reach this screen. Selecting an item from the pick items takes you to the Item Detail screen.
You can filter the list with the pre-defined searches by selecting the filter option. The filter menu provides the following ways to filter:
- All Items - Selecting this option displays all items irrespective of whether they were picked or not.
- Items to Pick - Selecting this option lists the partially picked or non-picked items (Actual pick qty = zero OR Actual pick qty < Suggested Pick Qty OR Actual pick qty = NULL) in the Replen Pick Items screen.
- Fully Picked Items - Selecting this option lists the fully picked items (Actual pick qty = Suggested Pick Qty) in the Replen Pick Items screen.
These searches also include Substitute Items. The substitute Items are always be grouped together with the original item.
If the search did not return any records, an empty list is displayed in the Replen Pick List screen.
The Default Quantities option on this screen allows you to default the suggested pick quantity to the actual pick quantity.
The Clear Quantities option will clear any quantities populated in the current session (before saving).
You can confirm the pick by selecting the Confirm button on the bottom or from the footer menu.
You can access the footer menu by selecting the ellipsis button and then perform various functions such as Notes, Print, viewing the Information of the pick, edit CFAs, confirm the pick, Save and Exit, cancel, and delete the pick.
Replenishment Pick Items Information Screen
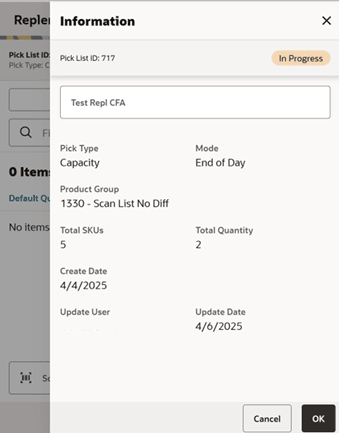
The Replenishment Information screen is accessed by selecting the info option from the Replenishment Pick Items screen.
This screen provides the information about the pick which includes the Pick List Id, Pick type, Product Group, hierarchy info, scan list, and so on.
This screen also displays the list of CFAs (flexible attributes) that have been set up for the Replenishment Pick List in the system and allows you to capture values for them. The fields displayed here are based on what is set up for the Replenishment Pick List. The CFAs that are set up as Required must have a value entered for it before confirming the scan list. The value can be one of the following: Date, Text, Decimal, Long depending on the data type set up for the CFAs, while creating them in the mobile application. Appropriate security permission is needed, and the pick list record must be in an editable state for entering CFA values.
Replenishment Pick Item Detail Screen
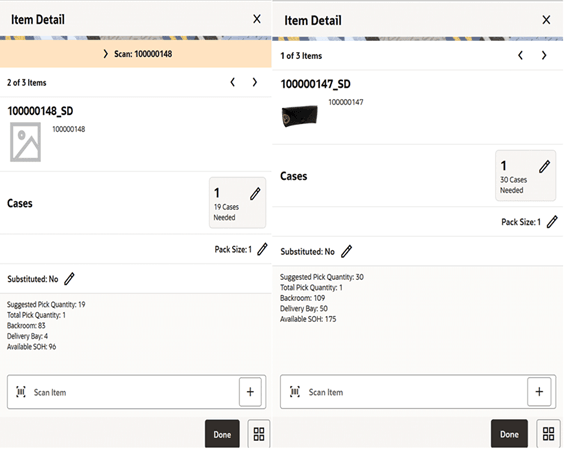
This Item Detail screen is accessed by selecting an item or when scanning an item from the Replenishment Pick Items screen.
You may also scan the same item or a different item from this screen. The information will be retained for the replenishment pick list you are currently working in, until you leave the replenishment pick list. Select Save from the Replenishment Pick Items screen to permanently save the item information. There is no Save on the Item Detail screen.
If you have used a pre-defined search in the Replenishment Pick Items, the Item Detail screen should be limited to only the items returned by the search.
Scanning or entering an item on this screen will refresh this screen for the item scanned/ entered.
The substituted field displays whether an item has substitute items associated with it and, if selected, it also allows you to navigate to the substitute items screen to add substitute items.
If you have scanned an item, the system displays the last scanned barcode.
Substitute Items Screen
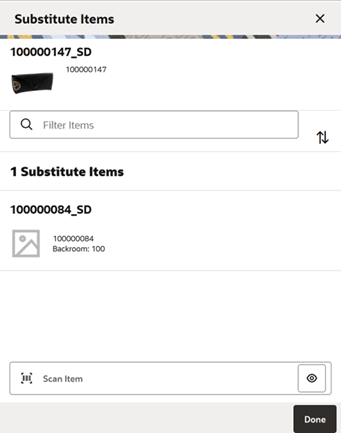
The Substitute Items screen is used to find a substitute item when the requested item has no inventory. The Substitute Items screen can be accessed from the Replenishment Pick Item Detail screen by selecting the Substituted pencil icon. Using item substitution helps maintain a better fill rate within different areas of the store. The substitutions can be recommended by corporate, or they can be ad hoc picked depending on system settings. Depending on security permissions, you can be restricted to just the corporate items or are free to select anything you want.
Receive on Shop Floor
The system allows you to indicate whether the inventory is received on the shop floor directly. The edit container screens in the DSD Receiving and Transfer Receiving dialogs support to receive inventory on the shop floor. You can select to Receive on the shop floor.
Manage Location Inventory
Inventory Movement Lists Screen
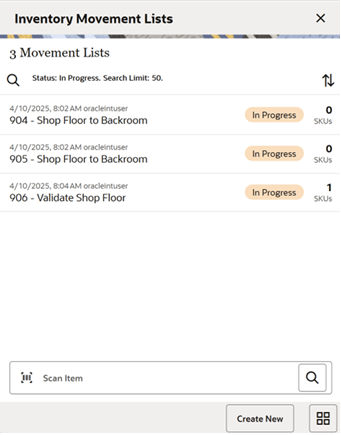
The Inventory Movement Lists screen lists the Inventory Movement lists that are In Progress.
You can access this screen by selecting the Manage Location Inventory menu from the In Store Replenishment menu which is available on the drawer menu.
The Manage Location Inventory dialog supports the following type of movements and those are listed here on this screen.
- Move to Backroom from Shop Floor
- Validate Shop floor, Balance Backroom
- Validate Backroom, Balance Shop Floor
- Move to Shop Floor from Delivery Bay
- Move to Backroom from Delivery Bay
On the list, you can find the Inventory movement ID, total number of items, current status, type, and the date for each movement.
The Create New button on this screen takes you to the Create Inventory Movement screen to create a new inventory movement list.
You can filter the list using the search criteria screen by selecting the magnifying glass.
On this screen, you can scan the item or search the item using the standard item lookup feature to filter the movement lists that contains the searched item.
Create Inventory Movement
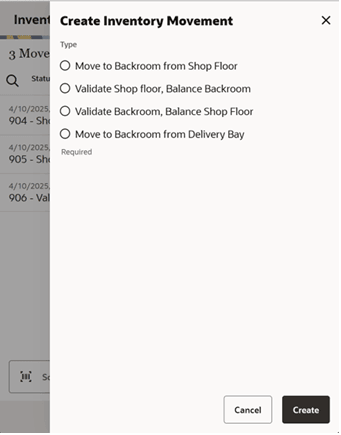
The Create Inventory Movement screen appears when you select the Create New option from the Inventory Movement Lists screen.
On this screen, you can select the movement type and select to Create a new list. Upon selecting Create, the system creates a new list and takes you to the Inventory Movement Items screen to add items.
You can create any of the following types of movement lists. The Inventory Movement type options shown here are based on the permissions you have:
- Move to Backroom from Shop Floor:
- This option is displayed only when the Display Shop Floor/Backroom Quantity is turned on.
- When the list is created, the quantities scanned will be moved from the shop floor to the Backroom.
- Validate Shop Floor, Balance Backroom:
- This option is displayed only when the Display Shop Floor/Backroom Quantity is turned on.
- When the list is created, the quantities scanned will update the current available quantity on the Shop floor and balance the backroom quantity.
Example: Item 1 has Backroom quantity=100, Shop Floor Quantity=3, SOH=103. Now the user creates a list with this type and scans a quantity of 10. After the updates, the Backroom quantity will be 93, Shop Floor Quantity=10, and SOH will remain 103.
- Validate Backroom, Balance Shop Floor:
- This option is displayed only when the Display Shop Floor/Backroom Quantity is turned on.
- When the list is created, the quantities scanned will update the current available SOH in the Backroom and balance the Shop Floor Quantity.
Example: Item 1 has Backroom quantity=100, Shop Floor Quantity=3, SOH=103. Now the user creates a list with this type and scans a quantity of 90. After the updates, the Backroom quantity will be 90, Shop Floor Quantity=13, and SOH will remain 103.
- Move to Shop Floor From Delivery Bay:
- This option is displayed only when the Allow Delivery Bay quantity to move to shop floor store parameter is set to Yes.
- Displayed only when the Replenishment - Delivery Bay Inventory store parameter is set to Yes.
- Displayed only when you have the Manage Delivery Bay permission.
- When this list is created, the quantities scanned will be moved from the delivery bay to Shop floor. The quantity scanned will be subtracted from the Delivery Bay and added to the Shopfloor.
- If this option is selected, the system will look for the capacity defined and if defined it will move the inventory to that extent and move the rest of the quantity to the Backroom. If delivery bay quantity is less than the defined quantity, the system will move all the quantities.
- Move to Backroom From Delivery Bay:
- Displayed only when the Replenishment - Delivery Bay Inventory store parameter is set to Yes.
- Displayed only when you have the Manage Delivery Bay permission.
- When the list is created, the quantities scanned will be moved from the delivery bay to the Backroom. The quantity scanned will be subtracted from the delivery bay and added to the Backroom inventory.
Inventory Movement Items
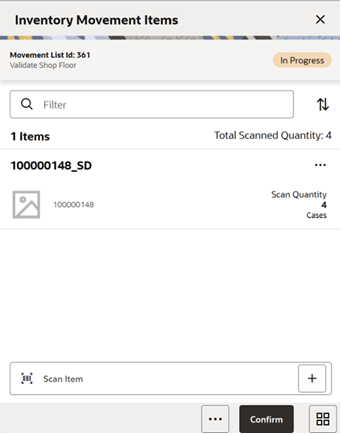
This screen is accessed by selecting an inventory movement list from the Inventory Movement Lists screen or when creating a new movement list. You need proper permissions to reach this screen. Selecting an item from here will take you to the Item Detail screen.
You can access the footer menu by selecting the ellipsis button and perform various functions such as viewing the information of the list, Notes, Confirm, Save and Exit, Cancel, and Delete.
The list displays the item id and description and the scan quantity.
You can delete an item from the list by selecting the Delete option from the item level menu.
On the scan bar, you can scan an item or use the standard item lookup feature to add an item to the list.
Upon confirming the list, the system performs the inventory movement based on the type you have selected and sets the list status to completed.
Inventory Movement Information Screen
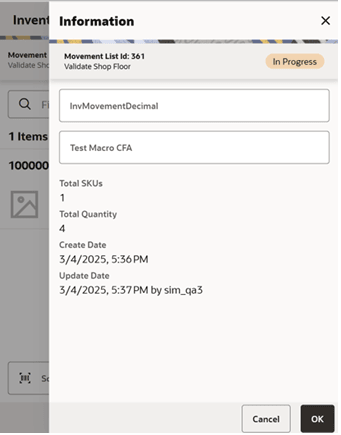
The Inventory Movement Information screen is accessed by selecting info option from the Inventory Movement Items screen.
This screen provides the information about the movement which includes the Movement List Id, status, type, SKUs, total quantity, create date, update date, and update user.
This screen also displays the list of CFAs (flexible attributes) that have been set up for Inventory Movement in the system and allows you to capture values for them. The fields displayed here are based on what is set up for the Inventory Movement. The CFAs that are set up as Required must have a value entered for it before confirming the scan list. The value can be one of the following: Date, Text, Decimal, Long, depending on the data type set up for the CFAs, while creating them in the mobile application. The appropriate security permission is needed, and the pick list record must be in editable state for entering CFA values.
Inventory Movement Detail Screen
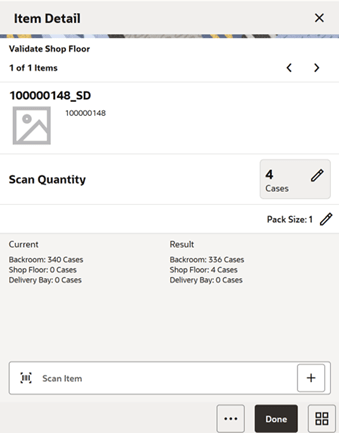
You are directed to the Item Detail screen upon selecting an item or when you scan or enter an item on the Inventory Movement Items screen.
You may also scan the same item or a different item from this screen. The information will be retained for the movement you are currently working in, until you leave. Select Save and Exit from the Inventory Movement items screen to permanently save the item information. There is no Save on the Item Detail screen.
Editable fields are displayed at the top with pencil icons and non-editable information fields are grouped at the bottom of the pane.
On the item detail screen, you will be able to see the current inventory position and the results after the inventory movement.
Scanning or entering an item on this screen will refresh this screen for the item scanned/ entered. At the bottom of the screen, the details of the last scanned barcode will be displayed.
The screen will be in edit mode when it is in the New status.
You need permission to edit the scan quantity using the edit pencil icon.
E*Waybill/NotaFiscal Support
SIOCS has added integration support for the generation of Purchase Order (PO) ASNs when receiving in Brazil. In Brazil, the Fiscal Document Generator (FDG)/Oracle Retail Merchandising Foundation Cloud Service (RMFCS) generates the ASN on behalf of the supplier in the database of RMFCS. Subsequently, this data is pulled over into SIOCS to execute the receiving process.
REST Services
Similar to prior releases, SIOCS has added new REST services. In this release, the following services have been added.
New Services with Fully Implemented Functionality
- Fulfillment Order Pick
- Fulfillment Order Reverse Pick
- Fulfillment Order
- Delivery
New Outgoing Endpoints
These new end points require REST web service code to accept SIOCS data:
- Stock Count Schedule
- Pre-shipment Notice
Some updates were also made for:
- Store Fulfillment Order
- Customer Order
- Item Inquiry
- Vendor Inquiry
Note:
These services are not meant for initial data load. Data seeding integration jobs exist for the initial data load. Some of these services can be used instead of their equivalent RIB messages; however, the RIB is still required until all RIB Payloads have been converted.POM Improvement
SIOCS has been improved to support the restart of batch jobs by Process Orchestration and Monitoring (POM).
Custom Report Management
With this release, SIOCS allows retailers to create and store custom reports in DIS, and makes them available in specific functional dialogs within SIOCS on the Jet Mobile client. This greater flexibility will allow a user who is working in, for example Return to Vendor and wants to print a custom report to put into the container, to generate this directly on the handheld by leveraging SIOCS’ report screen.
There is no change to the EICS JET report selection screen or in the look and feel of the Jet Mobile report screen.
Reports that are created have a fixed set of parameters that can be entered
Note:
This feature is only available on Jet Mobile, not MAF.Report Setup Screen
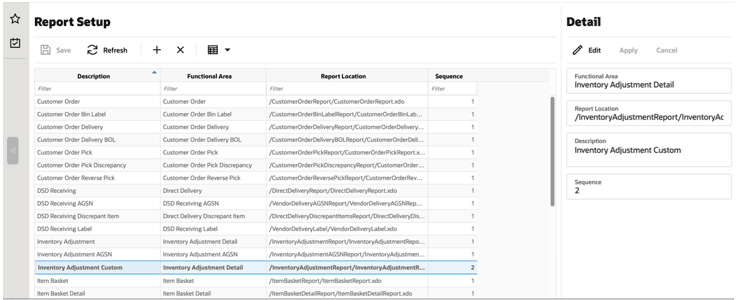
The Report Setup screen is used to set up and maintain reports. Report Setup is accessed within the Operations menu.
This screen initially contains all existing base reports upon install. Custom reports are manually added and removed on this screen.
Each report will have:
- Description - to describe the report. Only editable for custom added reports.
- Functional Area - used to determine where the report will be printed from. Only editable for custom added reports.
- Report Location - the directory in which the report is stored. Only editable for custom added reports. The Oracle Retail Store Inventory Operations Cloud Service Implementation Guide will include details on defining this field.
- Sequence - used to determine the display order of the reports within each functional area when printing. For example, if there are five reports with a functional area of Inventory Adjustments, then when printing from Inventory Adjustments, the five reports will be listed in order of the assigned sequence.
The reports in this screen will be available throughout the application for printing based upon the assigned functional area. For example, a functional area of Inventory Adjustments, means that the reports will show up in Inventory Adjustments. The reports will also be available in the Report dialog on EICS (Operations > Report).
Several reports have been updated with missing data or incorrect data. In some cases, only the underlying view was updated to not impact existing customers. If retailers would like to leverage this new information, they will need to build a custom version of the base report.
Barcode Parser
A new parser has been added to support 7-digit barcodes:
- TRIM-7 in the barcode processor screen will reduce the barcode by taking any barcode and reducing it to the last 7-digits.
- TRIM-7 should be considered as the last barcode parser in sequence of application.
Integration
When integrating messages from all the different integration methods SIOCS provides (REST, SOAP, Direct DB, and RIB), deadlocking problems were discovered in the MPS queueing for ASN and Transfers.
Also, some issues where processing was not consistent between different based on the which one of the four integration methods were taking place.
Resolution
REST, SOAP, and RIB now convert their information to Direct DB message and queue and insert in the MPS Direct DB message queue instead of the original queue (if applicable).
This means that the MPS thread management will manage the work family correctly for that data with no collisions and that only one set of integration logic is executed.
If the REST and SOAP was synchronous, it converts it to a single data object and executes the same business logic as the integration (if doing the same thing).
RIB actions when using ASNin/FufilOrd:
- Clear out any messages in flight.
- If you intend or need to activate the RIB queues for MPS Work Types ASNIn and FulfilOrd message queues, you must also activate the MPS Work Types DcsAsn and DcsCustomerOrder.
- Validate that the transfer document identification (or distro number) are numeric on the RIB Messages. The distro number on SODesc and ASnIn using the RIB will need to be fully numeric. If not, the system will not integrate after the update.
Direct Integration
As part of this work, the AsnShipmentDcsDeo and FulfillmentOrderDcsDeo payload were altered in a non-compatible fashion. Messages in the DcsAsn and DcsCustomerOrder MPS staged message table/queue must be fully processed before the update takes place.
Technical Changes
This section describes the technical changes in this release.