Upgrade Tech Stack for OUAW
This page details the tasks required to upgrade the services that are used to run Oracle Utilities Analytics Warehouse.
On this page:
Upgrade the Tech Stack for the Database Server
This section covers the instructions for the downloads, installations, and upgrades that can be performed on the Oracle Utilities Analytics Warehouse database server.
Notes:
- Before upgrading, back up the current environment and ensure you have a rollback plan.
- Make sure the same OS user installs all software, and that you replace all parameters enclosed in <> with valid values.
- While the table below includes some directory structures as examples, you can choose where to install the software. Make sure to keep track of all the home directories you create, as these will be used for OUAW installation.
|
Task |
Description |
|---|---|
|
Download and Upgrade the Java Development Kit |
|
|
Download and Upgrade Oracle Database Server Enterprise |
|
|
Download and apply Database Server Patch |
|
|
Download and install GoldenGate |
|
|
Download and install GoldenGate Monitor Agent |
GoldenGate Monitor Agent Installation Steps:
|
|
Apply patch for GoldenGate Monitor Agent |
|
|
GoldenGate Monitor Agent Configuration |
Edit the configuration template:
Create GoldenGate Monitoring Agent instance:
Create JAgent wallet:
|
|
Set Up Oracle GoldenGate |
|
|
Configure and Start GoldenGate JAgent |
Note: Perform the following steps in case rmiregistry services are not running. Use the same RMI Registry port that was used before upgrade.
|
Upgrade the Tech Stack for the Application Server
This section covers the instructions for the downloads, installations, and upgrades that can be performed on the Oracle Utilities Analytics Warehouse application server.
Notes:
- Before upgrading, back up the current environment and ensure you have a rollback plan.
- Make sure the same OS user installs all software, and that you replace all parameters enclosed in <> with valid values.
- While the table below includes some directory structures as examples, you can choose where to install the software. Make sure to keep track of all the home directories you create, as these will be used for OUAW installation.
|
Task |
Description |
|---|---|
|
Download and Upgrade the Java Development Kit |
|
|
Download and Upgrade the database client |
Download the Oracle Database Client 19C from Oracle Software Delivery Cloud and Upgrade Oracle Database Client to 19C. Note: This task is optional if both the OUAW application and database servers are installed on the same machine. See Install Oracle Database Client for more information. |
|
Download and install Oracle Fusion Middleware Infrastructure |
See Install Oracle Fusion Middleware Infrastructure for more information. |
|
Download and apply Oracle Fusion Middleware Infrastructure Patch |
Note: ORACLE_HOME is referred to as <FMW Home location>. |
|
Download and install Oracle Analytics Server (OAS) |
See Install Oracle Analytics Server for more information. |
|
Download and install Oracle Data Integrator (ODI) |
|
|
Download and apply the ODI patch |
|
Upgrade the Existing Domains and Repository (ODI, Apex, and OAS)
This section details how to upgrade the existing domains and the repository in accordance with the in-place upgrade domain strategy.
Note: Before upgrading a repository or domain activity, make sure you have a rollback plan in case it is necessary to revert your changes. Additionally, all domains should be in the "stopped" state before the upgrade.
ODI Repository and Domain In-Place Upgrades
For the ODI repository and domain in-place upgrades, follow the steps on Upgrading Oracle Data Integrator.
Note: Before starting the ODI admin and managed server, perform the following steps to avoid issues in the source configuration. See My Oracle Support doc ID: 2785415.1 for more information.
Modify the setDomainEnv.sh script for ODI agent connectivity
-
In the command shell, change the directory to ODI Domain Home.
Example: cd <odi_domain>/bin
-
Add the
-Dweblogic.oif.serialFilterScope=weblogicargument tosetDomainEnv.shimmediately below an existing JAVA_OPTIONS command.Example:
JAVA_OPTIONS="${JAVA_OPTIONS} -Dweblogic.oif.serialFilterScope=weblogic"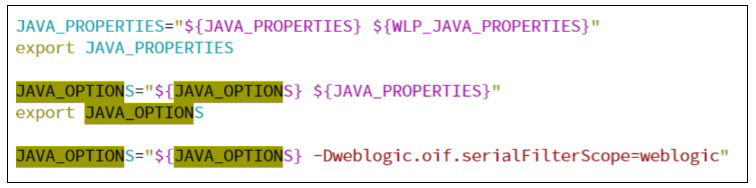
Modify the startweblogic.sh script for ODI agent connectivity
- Create a backup of the
startweblogic.shscript. - Open the
startweblogic.shscript in the editor. -
Add the following code after the pattern
# START WEBLOGIC.Copyexport CONFIG_JVM_ARGS="-Djava.security.egd=file:/dev/./urandom -Dweblogic.security.SSL.enableJSSE=true -Dweblogic.security.SSL.ignoreHostnameVerification=true -Dweblogic.security.TrustKeyStore=DemoTrust -Dweblogic.security.CustomTrustKeyStoreType=JKS" -
Insert the following code after the pattern
Djava.security.policy=${WLS_POLICY_FILE }:Copy-Djava.security.egd=file:/dev/./urandom -Dweblogic.security.SSL.enableJSSE=true -Dweblogic.security.SSL.ignoreHostnameVerification=true -Dweblogic.security.TrustKeyStore=DemoTrust -Dweblogic.security.CustomTrustKeyStoreType=JKSNote: Insert the code in all three places where the pattern appears.
Here is how the code looks before inserting the above code lines:
${JAVA_HOME}/bin/java ${JAVA_VM} ${MEM_ARGS} ${LAUNCH_ARGS} -Dweblogic.Name=${SERVER_NAME} -Djava.security.policy=${WLS_POLICY_FILE} ${JAVA_OPTIONS} ${PROXY_SETTINGS} ${SERVER_CLASS}Here is how the code should look after inserting the above code lines:
${JAVA_HOME}/bin/java ${JAVA_VM} ${MEM_ARGS} ${LAUNCH_ARGS} -Dweblogic.Name=${SERVER_NAME} -Djava.security.policy=${WLS_POLICY_FILE} -Djava.security.egd=file:/dev/./urandom-Dweblogic.security.SSL.enableJSSE=true -Dweblogic.security.SSL.ignoreHostnameVerification=true -Dweblogic.security.TrustKeyStore=DemoTrust -Dweblogic.security.CustomTrustKeyStoreType=JKS ${JAVA_OPTIONS} ${PROXY_SETTINGS} ${SERVER_CLASS}
OAS Repository and Domain In-Place Upgrades
For the OAS/OBIEE repository and the domain in-place upgrades, follow the steps on Upgrading Oracle Analytics Server.
Note: After upgrading to Oracle Analytics Server (OAS), the Cluster Controller (obiccs) may fail to start. Set Cluster Enabled tag to true if it was set to false in [DOMAIN_HOME]/config/fmwconfig/biconfig/OBICCS/bi-cluster-config.xml file. To solve the issue, follow the steps on document 2685095.1 on My Oracle Support.
Apex Domain In-Place Upgrade
The same steps that were used for upgrading the OAS domain will be used for the Apex domain in-place upgrade, with the exception of the step for Upgrading Product Schemas. Product schemas/RCU schema are not present in this Apex domain. See Upgrading Oracle Analytics Server for details.