Populating User-Defined Columns
The functionality of the dimensions and facts can be extended using user defined columns. ODI-based mapping and package are created to extend the columns, where ODI is used to define the custom package.
Use ODI to create the package for the following reasons:
• Schema names need not be hardcoded.
• Easier to deploy (execute in the appropriate context).
• Easy to deploy for multiple instances of the same source system.
This section includes the following:
Creating CM Mappings
This section describes the process of extending the CD_ACCT dimension using sample data.
Note: For this example, assume ‘CCB1’ to be the context defined for Oracle Utilities Customer Care and Billing source attached to Oracle Utilities Analytics Warehouse.
To create a CM procedure:
1. Login to the Oracle Data Integrator client.
2. On the Designer tab, navigate to Projects > User Customizations > <product_name> > Dimensions > Mapping.
In this example, ‘CCB’ is the product.
In this example, ‘CCB’ is the product.
3. Right-click Mapping and select New Mapping from the menu. 
4. In the New Mapping window, enter the name of UDX in the Name field.
For example: CM_CD_ACCT_UDX
For example: CM_CD_ACCT_UDX
5. Unselect the Create Empty Dataset checkbox. 
A new mapping “CM_CD_ACCT_UDX” is created.
6. Click the Logical tab to view the table structure.
7. From the Models section, drag and drop the UDX and replication tables in the designer pane.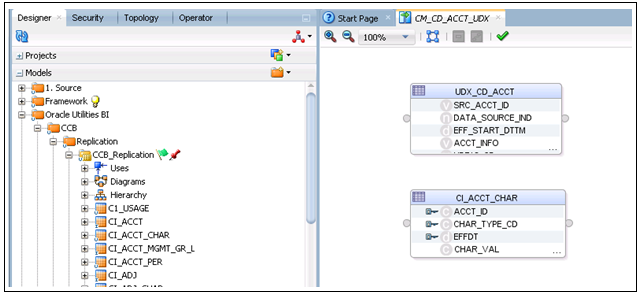
8. Join the UDX and replication table.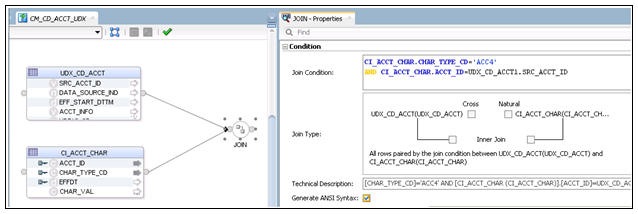
9. Drag and drop the UDX_CD_ACCT target data store.
Select UDX as the target table, and then select the appropriate key on the UDX table as defined in the CD_ACCT dimension. The logic to populate UDX should be taken care in the mapping accordingly.
Select UDX as the target table, and then select the appropriate key on the UDX table as defined in the CD_ACCT dimension. The logic to populate UDX should be taken care in the mapping accordingly.
10. On the Physical tab, select the optimization context.
11. Select the target table (UDX_CD_ACCT) and select IKM BI Direct Load from the Integration Knowledge Module drop-down list.
12. On the Options tab, set DML_OPERATION to UPDATE instead of MERGE.
13. Unselect the CREATE_TARG_TABLE option since the UDX table is already created. 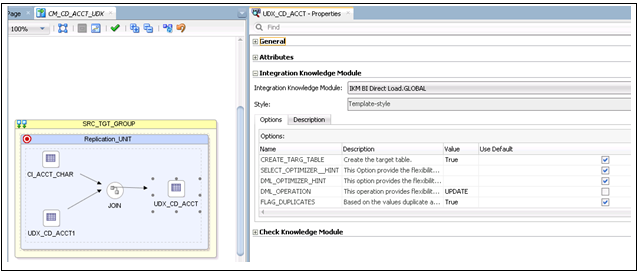
The custom mapping is successfully created. A custom package can be created using this mapping.
Creating CM Packages
To create a custom package for the existing custom mapping:
1. Login to the Oracle Data Integrator client.
2. Navigate to Designer > User Customizations > <product_name> > Dimension > Packages.
In this example, ‘CCB’ is the product name.
In this example, ‘CCB’ is the product name.
3. Right-click Packages and select New Package from the menu. 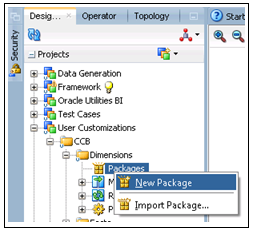
4. In the Package Editor window, enter the name of UDX in the Name field
For example: B1_PKG_CM_CD_ACCT_UDX
Important! Note that “B1” in the UDX name is taken as an example. Ensure the package name does not start with “B1”.
For example: B1_PKG_CM_CD_ACCT_UDX
Important! Note that “B1” in the UDX name is taken as an example. Ensure the package name does not start with “B1”.
5. Click the Diagram tab at the bottom of the editor.
6. From the Global Objects section, drag and drop the ‘B1_JOB_ID’ variable into the editor.
7. Change ‘B1_JOB_ID’ to declare the variable.
8. Drag and drop the CM mapping (existing mapping) into the editor and connect them in sequence.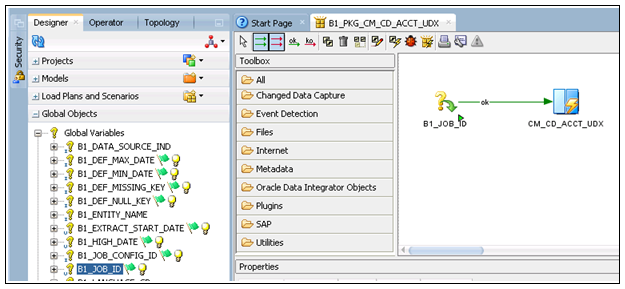
9. Click Save and close the package editor window.
10. Navigate to the Packages folder and expand it.
The new package is shown.
The new package is shown.
11. Right-click the package and select Generate Scenario.
12. Enter the scenario name and click OK.
13. Select the startup variables and click OK.
14. In the Projects section, navigate to User Customizations > CCB > Dimensions > Packages.
15. Expand the package created.
The scenario object created is shown.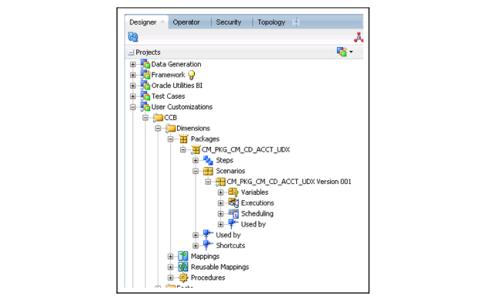
The scenario object created is shown.
Resetting Dimensions
Since the dimension is already loaded, reset it to the empty state before reloading it with customization in place.
To reset the dimensions:
1. Login to the Oracle Data Integrator client.
2. On the Designer tab, navigate to Load Plans and Scenarios > Framework > B1_RESET_ENTITY.
3. Right-click B1_RESET_ENTITY and select Execute.
4. On the Execution window, select CCB4 as the Context and then click OK.
5. On the Variable values window, enter ‘CD_ACCT’ as the entity name. Click OK.
6. Navigate to Oracle Utilities Analytics Warehouse Administration to verify that the entity has been disabled.
7. Connect to SQL Developer and query the dimension to verify that all rows except the default 0 and -99 records have been deleted.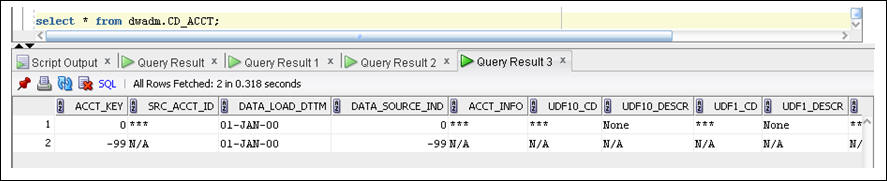
8. Click Save to save the configuration changes.
Configuring CM Scenarios
After resetting the dimension, configure the user extension procedure. Below are the steps to configure Account (CD_ACCT) dimension.
To configure the user extension procedure for the account dimension:
1. Login to Oracle Utilities Analytics Warehouse Administration.
2. On the ETL Configuration tab, click Job Configuration.
3. Enter CD_ACCT and click Go to filter the data.
4. Click the edit icon to edit the details for the product instance for which the UDX has to be populated. There are different jobs for the same entity for different product instances.
5. On the Maintain Job Configuration page, enter the Custom Package Name (example: B1_PKG_CM_CD_ACCT_UDX) in the User Exit Procedure field.
6. Ensure Active Flag is set to 'Yes'.
7. Click Save to save the configuration changes.
Monitoring Job Execution
Now that the job is configured for customization and activated, monitor the job execution using the Administration user interface or using SQL Developer.
To monitor the job execution from the Administration user interface:
1. Login to Oracle Utilities Analytics Warehouse Administration.
2. On the ETL Job Execution tab, enter “CD_ACCT” and click Go to filter the data.
To see the latest execution, sort by the session end date. 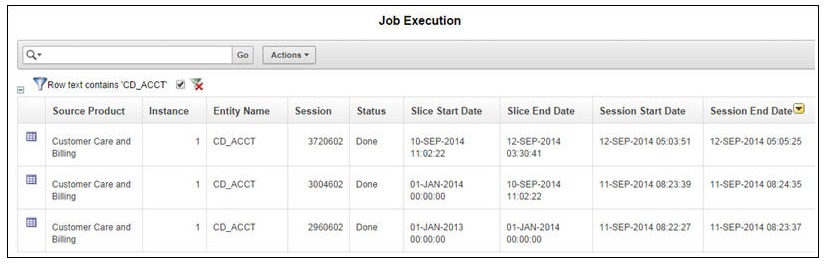
Alternatively, use SQL Developer to monitor the job execution:
1. Connect to the target database using SQL Developer.
2. Monitor the job executions for the account dimension using the below query:
select *
from mdadm.b1_jobs_vw
where entity_name = 'CD_ACCT';
Validating Data Load
To validate the data load into customized columns:
Note: The queries below are based on the illustrated example. They need to be modified as per the logic used in the UDX
1. Identify the rows in which ‘udf10_cd’ and ‘udf10_descr’ columns are populated. Run the below query:
select src_acct_id
, udf10_cd
, udf10_descr
from dwadm.CD_ACCT
where acct_key not in (0,-99)
and udf10_cd is not null;
2. Compare the data in the dimension with the data in the base table ‘ci_acct_char’. Run the below query:
select acct_id
, char_val
, srch_char_val
from ccb1rep.ci_acct_char
where char_type_cd = 'CI_VATCA' ;