Forms and Plugins
Use the plugins modify screen and data based on their type and status of target and parent object. They invoke the response for badge number input from Oracle Utilities Customer Cloud Service in the device verification plugin and retrieve the service points from Oracle Utilities Customer Cloud Service based on the search criteria by the crew in Oracle Field Service to create unrelated pickup activity using unrelated pickup activity plugin.
The Device Verification Plugin accepts badge number of the device and in response sends various parameters from Oracle Utilities Customer Cloud Service, such as unit of meter, time of use, read sequence, dials, and decimals and SH data if available after verifying the badge number in the Oracle Utilities Customer Cloud Service environment.
Crew populates the search criteria in the Unrelated Pickup Activity. The plugin fetches service points from Oracle Utilities Customer Cloud Service and displays this information in Oracle Field Service. Crew can select the service point that needs to create an unrelated pickup activity.
The Service history plugin tracks the service or maintenance performed on an asset. The crew can add/save/complete/delete the service history of a meter/item/equipment.
The Attachments plugin helps crew to upload any files that are related to the activity.
The Validate Completion plugin helps crew to validate the eligibility to the activity to complete.
OAuth Support
Starting 26.4 release, OAuth security mechanism support is added in the Oracle Field Service plugins. With this enhancement, customers can now configure OAuth authentication in their plugins, in addition to the existing Basic Authentication support. Both Basic Auth and OAuth mechanisms are supported. However, when both are configured for a plugin, OAuth will take priority over Basic Auth.
Note: Only client credentials security mechanism is supported in V26.4.
Oracle Field Service supports OAuth through applications in the following ways:
Example: OIC, ERP Fusion APIs
Accessing OFS REST APIs
If a plugin requires access to the Oracle Field Service API, the most straightforward approach is to request a JSON web token (access tokens) directly from Oracle Field Service using the application.
The following plugins use the Oracle Field Service APIs:
• Unrelated Pickup Resource Usage Plugin
To support the OAuth mechanism:
1. To add Oracle Field Service API, navigate to Configuration > Subsystems > Applications > Add Application.
2. From the Application Type drop-down list, select “Applications using REST/SOAP API”.
3. Enter the Application Name.
4. From the Authenticate and authorize Field Service APIs using this application drop-down list, select “Field Service API”.
5. Add the application to the plugin. From the ofs_oauth drop-down list, select the application and edit it.
Accessing OAuth Supported API/External API (OIC, ERP Fusion APIs)
If a plugin requires the accessing of external API (such as Oracle Integration Cloud), get the access token from the IDCS provider.
The following plugins use the Oracle Integration Cloud APIs:
• Device Verification Plugin
• Unrelated Pickup Plugin
To configure the application for accessing the Oracle Integration Cloud APIs:
1. To add the OAuth Client Credentials application, navigate to Configuration > Subsystems > Applications > Add Application.
2. From the Application Type drop-down list, select “Applications using REST/SOAP API”.
3. Enter the Application Name.
4. From the Authenticate and authorize Field Service APIs using this application drop-down list, select “OAuth Client Credentials”.
5. Configure an Identity Provider application that supports the OAuth Client Credentials flow.
6. Enter the following details:
• Resource URL
• Client ID
• Client Secret
• Scope
• Identity Provider endpoint
7. Add the application to the plugin using the Edit Plugin page.
Device Verification Plugin
To configure a Device Verification plugin:
1. Navigate to Configuration > Displays > Forms and Plugins.
2. Click the Import Plugins button to import the Device Verification plugin provided in the package.
3. In the Plugin Settings pane, do the following:
1. Enter the OIC username and password.
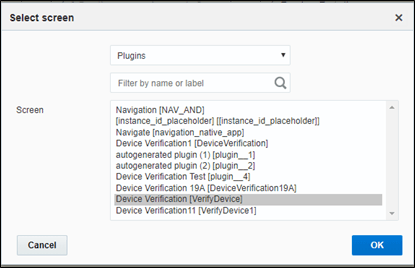
2. Select VerifyDevice in plugin XML file.
3. Select “HTML5” from the Type drop-down list.
4. Configure the following secure parameters before using the Device Verification plugin.
Parameter Name | Value | Comments |
|---|---|---|
oic_username | Username | Configure OIC user name |
oic_password | Password | Configure OIC password |
oic_int_url | https://oichostname:port/ic/api/integration/v2/flows/rest/project/OUTL-BA-CCS_OFSC/OUTL-BA-CCS_OFSC_DEVICE_VERIFY/1.0/ | Configure the OIC end point URL of Device Verification flow |

5. Make sure the Available Properties tab is populated with all the properties shown below.


6. Click Device Verification to configure the plugin.
7. On the User Type screen configurations, select Device Verification to connect it to the specific field on the UI in the Mobility page.
Crew could verify the existence of a device using the Device Verification feature where the search is based on Badge Number or Serial Number. Manufacturer and Model are part of Device Verification response from Oracle Utilities Customer Cloud Service and gets auto-populated in the respective fields.
To use this feature:
1. Select Install Meter Activity > New Meter Details.
2. Click Verify Device to view the existence of the device.
The Device Details page displays both Badge Number (mandatory) and Serial Number (optional).
If the device exists based on the search criteria, the New Meter Details page is displayed with auto populated details, including the register information sent by Oracle Utilities Customer Cloud Service.
Note: The Oracle Field Service mobile device application has the capability to search the meter badge number through barcode scanner. So that no need to enter meter badge number manually while doing the device verification.
Custom Activity Type Support
The Device Verification plugin supports custom activity types other than Meter Install and Meter Exchange.
To support custom activity type:
1. Login to Oracle Field Service.
2. Navigate to Configuration > Resources, Activities, Inventories > Properties.
3. Search for the “c2m_device_verify_act_types” property.
4. Click Modify.
5. Add the Enum entry.
6. Enter the Activity Type Label in the Index field and Device Type in the Value field.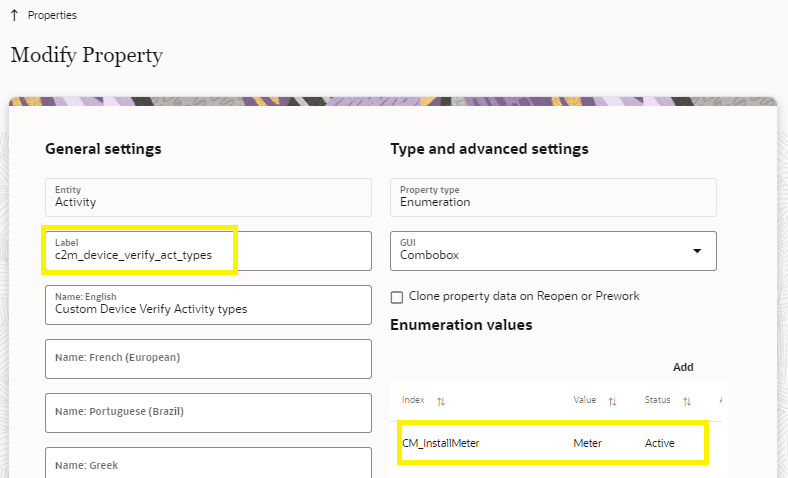
OAuth Configuration:
The Device Verification plugin supports OAuth authentication.
To support OAuth:
1. Configure the application with OAuth details. Refer to OAuth Support section.
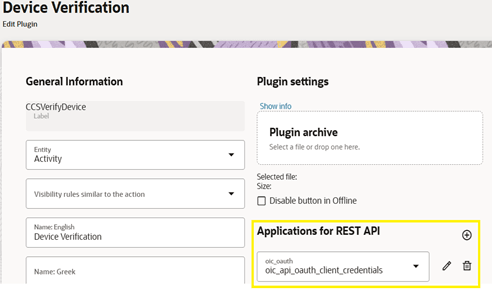
2. Navigate to Configuration > Form & Plugins > Device Verification.
3. In the Applications for REST API section, select the application configured.
Unrelated Pickup Activity
To configure an unrelated pickup activity:
1. On the Configuration page, navigate to Displays > Forms & Plugins.
2. Click the Import icon to import the Unrelated Pickup plugin provided in the package.
3. Select the unrelated pickup plugin and enter the following details:
Parameter Name | Value | Comments |
|---|---|---|
oic_int_url | https://oichost/ic/api/integration/v2/flows/rest/project/OUTL-BA-CCS_OFSC/OUTL-BA-CCS_OFSC_SP_QUERY/1.0/ | Configure the activated service point url. |
oic_username | User Name | Configure the OIC user name |
oic_password | Password | Configure the OIC password |
ofsc_username | OFS user name | Configure the OFS user name |
ofsc_password | OFS password | Configure the OFS Password |
ofsc_bucket | OFS Bucket External ID | Configure the OFS Bucket |
ofsc_api_url | OFS REST API url Example: https://api.etadirect.com | Configure the OFS REST API url |
latitude_format | Latitude format value Example: N2.7 | Configure the format of latitude |
longitude_format | Longitude format value Example: N3.7 | Configure the format of longitude |
Note: Username and password would be the client ID and client secret that can be retrieved from Oracle Field Service. 
4. Click Configuration and select the user type.
5. Navigate to the Screen Configuration tab.
6. Click Application screens to display the structure. Click Activity list. 
7. On the left pane, click Click to add and select the unrelated plugin.
8. On the right pane, add new visibility.
9. Make sure the Available Properties tab displays all the properties as shown below.
10. After the plugin is configured, select the XML file in the User Type Screen Configurations field to connect it to the specific field on the Mobility page.
OAuth Configuration
The Unrelated Pickup plugin supports OAuth authentication. To invoke Oracle Field Service or external APIs using OAuth
1. Configure the application with OAuth details of applications as mentioned in OAuth Support section.
2. Navigate to Configuration > Form & Plugins > Unrelated Pickup.
3. Select the above configured application in Applications for REST API section.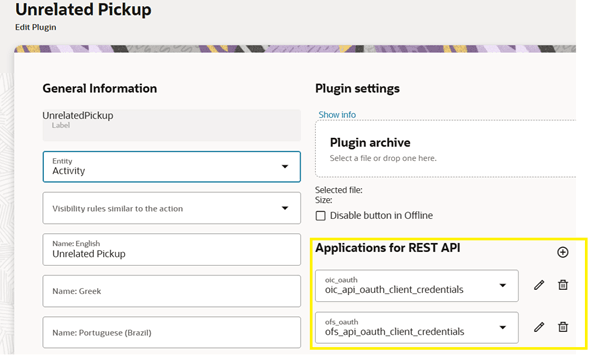
CORS Setup
As part of the unrelated pick up functionality, from the plugin, there is an invocation call to OFSC REST API which needs CORS setup.
To call OFSC REST API from the plugin, set up cross-origin resource sharing (CORS) in Oracle Field Service as follows:
1. Navigate to Configuration > Applications > Additional restrictions.
2. Select Allow Cross-origin resource sharing (CORS) from the following web domains and provide the Oracle Field Service domain.
3. If the domain details are unknown, enter an asterisk (*). For the actual Oracle Field Service domain contact the Oracle Field Service support team.
Crew can specify search criteria and send request to Oracle Utilities Customer Cloud Service for service points. From the retrieved service points, crew can select a service point and raise a service investigation activity. The search criteria includes address, city, postal code, latitude and longitude.
1. On the Mobility page, select Unrelated Pickup to use this feature.
2. On the Unrelated Pickup page search for service points.

3. Select the desired service point from the list and click Select.
4. Click Add Activity to create the activity.
After successful creation of the activity in Oracle Field Service, the corresponding activity is created in Oracle Utilities Customer Cloud Service.