Understanding Table Filtering
Creating and Using Global and Personal Filter
Tools with table data may be filtered using filter panes that allow you to access Global (system-wide) filters and create and rearrange your own (Personal) filters. You may also create shortcuts to your favorite filters. Filtering in Flex Operations is very similar to filtering in the Web Workspace (see Filtering Data Tables).
To use an existing filter, click the Filter icon ( ) in the upper left corner of the table title area or press Ctrl+Shift+F; the Filter pane will open.
The Filters pane has collapsible sections (folder icons that expand) that list filters by category: Favorites, Global, Shared, and Personal.
The filter pane will close once you click away from it; to keep it visible, click the pin icon ( ).
).Creating a New Personal Filter Folder Structure
To create a personal filter folder, right-click the Personal folder icon and select New Folder....
Creating a New Personal Filter
To create a personal filter, do the following:
1. Select the Personal folder that you want to add the filter to, right‑click, and select New Filter....
2. In the New Filter dialog box, enter the criteria for your filter.
• Name: Your new filter's name.
• Value: Becomes active when you select an operator that requires a value to match.
Note: See Filtering Data Tables for the operator.
3. Click Add to List to add the filter criteria to list below.
4. You can build more criteria and select whether they all should match or if any can match. Click And to have the filter only show data that matches all of the added filter criteria; click the Or to match a criterion.
Editing and Removing Filters
To edit a filter statement, select it from the list, make your changes, and click Replace.
Removing Filters
You can remove any of the added filter statements by selecting it in the list and clicking Remove. To remove all of the statements in the list, click Clear.
Temporarily Disabling a Filter
Filters may be temporarily disabled by clicking the Disable Filter button ( ) next to the filter name. The Filter Name will be updated with strikethrough text to indicate that it is not active. For example, if you’ve selected In Progress to be your filter, but then decide to disable it, the filter bar will indicate so. Click the No Filter button again to restore the filter.
Understanding Global Filter Modifications
Global filters can be modified by users with the appropriate permissions, just like personal filters. Any changes made to Global filters are immediately applied to all users in the system.
Understanding Shared Filters
Some tables in Flex Operations support Shared filters, which can be modified by users with the appropriate permissions. Similar to Global filters, any changes to Shared filters are immediately applied for all users in the system. This feature allows filters to be created and shared among users without altering the global filter structure. Additionally, managing Shared filters requires a different privilege than Global filters, so users can be authorized to modify Shared filters without having access to change Global filters.
Understanding Quick Filters
Quick Filters allow you to filter based on values in a column. To perform a quick filter, hover your mouse over a column heading and then click the filter button ( ) in the drop down toolbar. In the filter panel that opens, select items to filter or do a free text search of the text in the column using the Search box, which is focused immediately when the quick filter is opened, so you can just start typing immediately. Once you have filtered on a column, the filter icon (
 ) will be displayed in the column header and a quick filter breadcrumb will display the filter results and criteria.
) in the drop down toolbar. In the filter panel that opens, select items to filter or do a free text search of the text in the column using the Search box, which is focused immediately when the quick filter is opened, so you can just start typing immediately. Once you have filtered on a column, the filter icon () will be displayed in the column header and a quick filter breadcrumb will display the filter results and criteria. To temporarily disable a quick filter for a column you can click it in the filter breadcrumbs. To remove it click the "Restore the default settings for this filter" button ( ) which appears when hovering the filter breadcrumb item. To remove all quick filters, click the Reset All Column Filters button (). The current quick filters can be saved along with the current search folder filters as a new filter in the personal section, by clicking the Save the Current Filters button (
 ), then providing a name for the new filter. If a folder in the Personal filters section is selected, the new filter will be saved there, otherwise it will be saved in the root of the Personal section. The new filter will have a different icon (
 ) indicating that there are quick filters associated with it, and when that filter is selected in the tree, the table filtering will be changed to match that saved with the filter.
) which appears when hovering the filter breadcrumb item. To remove all quick filters, click the Reset All Column Filters button (). The current quick filters can be saved along with the current search folder filters as a new filter in the personal section, by clicking the Save the Current Filters button (), then providing a name for the new filter. If a folder in the Personal filters section is selected, the new filter will be saved there, otherwise it will be saved in the root of the Personal section. The new filter will have a different icon () indicating that there are quick filters associated with it, and when that filter is selected in the tree, the table filtering will be changed to match that saved with the filter.Example:
Filtering on the #Out column [1] for a value of 1 [2] with the Save the Current Filters button [3].
Note: Quick filtering is applied to all filtered views, but it is removed when you close the tool or log off.
Understanding the Filter Row
The quick filter functionality can also be accessed more easily by enabling the Filter Row by clicking the enable filter row icon ( ); step 1 in the image below. This adds a row beneath each column heading (step 2 in the image below).
Each "cell" in the filter row can be clicked to open the quick filter. When quick filters are applied, the current criteria and a button for resetting the quick filter will be shown in the filter row.
Auto Filtering
You can automatically apply a quick filter for the a value in a cell by right clicking a cell and choosing the Auto Filter option, or by clicking a cell then pressing the F key.
The final way to access this functionality is from within the quick filter panel. If a single row is selected in the table, the value from the selected row will be presented as a button beneath the search field.
Understanding Searching in Tables
You can search for data within most tables in Flex. This will usually filter the rows to show only those that match the typed text, but in some tables, such as the switching steps where filtering is undesirable, it will highlight the found matches. Once a search has been performed, the resulting matches can be stepped through. Any rows containing data that matches the criteria will dynamically highlight the matching text. The searching sequence is as follows: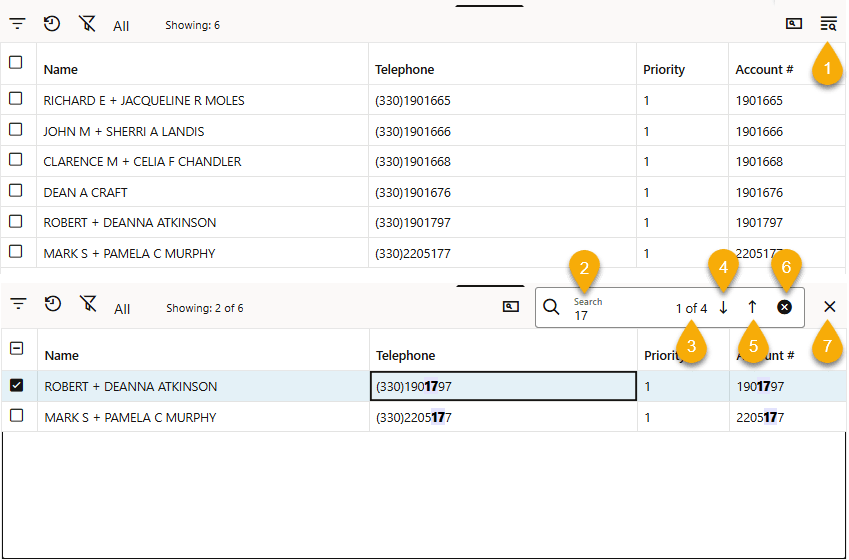
1. Find and highlight text in any table by clicking the Search icon ( ) in the column heading or by pressing Ctrl+F. The Search field will be displayed.
2. Enter your search criteria. As you type, the table will begin to highlight matches and, for most tables, hide any rows that do not contain the criteria.
3. The Search field will also display the number of matches.
4. The Next Match arrow allows you to move to the next match; you can also press Enter to move to the next match.
5. The Previous Match arrows allow you to move to the previous match you can also press Shift+Enter to move to the previous match.
6. To clear the text entered in the Search field, click the Clear button ( ).
).7. To close the Search field, click the Close button ( ) or press the escape key while the focus is in the Search field.
Selection and Filter History
The selection and filter history allows you to quickly return to previous filter states or row selections. The Recent Selections and Recent Filters are listed side‑by‑side with the most recent selections and filters added to the beginning of the lists.
Example
1. Recent Selection
2. Recent Filter of To Do & In Progress.
3. Newer Recent Filter that added Feeder 2414 to the To Do & In Progress filter.

When returning to previous row selections, the table will move to a view that shows just those rows, regardless of filtering. The previous view can be restored by clicking the Return to Normal View button ( ) on the toolbar.
Example
Recent selection from the example above selected.

Exporting Table Information
You can export the information displayed in tables in a variety of formats. To display the export options, right click on a table heading and select Export, then choose one of the following options:
Option | Meaning |
|---|---|
Copy (Default Action) | Performs the default copy to clipboard action. This is the same as pressing Ctrl+C. See Default Copy Action below for more information. |
Cells to Clipboard | Copies the cell data from the focused column and selected rows to the clipboard. |
Column to Clipboard | Copies the cell data from the focused column for all rows in the table to the clipboard. |
Rows to Clipboard | Copies the full row data for the selected rows to the clipboard. |
All Rows to Clipboard | Copies the full row data for all rows in the table to the clipboard. |
Rows to Clipboard (With Headings) | Same as "Rows to Clipboard" but the first row in the copied data will contain the column headings. |
All Rows to Clipboard (With Headings) | Same as "All Rows to Clipboard" but the first row in the copied data will contain the column headings. |
Rows as Comma Separated Values | Exports the selected rows, including column headings, as comma separated values in a CSV file. The CSV file is downloaded and displayed in your browser's download area. |
All Rows as Comma Separated Values | Exports all rows in the table, including column headings, as comma separated values in a CSV file. The CSV file is downloaded and displayed in your browser's download area. |
Note: CSV files can be opened in a spreadsheet application, such as Microsoft Office Excel.
Default Copy Action
When Copy (Default Action) is activated from the menu or by pressing Ctrl+C, the default copy action for the table is performed, and a panel will be shown at the bottom of the table with further options allowing quick access to the other copy actions. You can also change the default copy action by selecting Make Default before clicking the action you want to become the new default action.
Understanding Other Table Actions
Many tables provide right-click context menus for actions you may perform on the data (for example, viewing an event's information or location in the Map).
In addition, double-clicking a table row may bring up a different tool with related data.
Understanding Emailing in Flex Operations
You can email event call reports (as attachments) for selected events in the Events table by selecting Email Calls... from the Events tool's File menu. Emails are sent by Flex Operations to the email address associated with your user id.
Note: Administration users set up user profiles, which include ids and email addresses, in the <project>_ces_users table.
Understanding Printing in Flex Operations Tools
Printing Lists and Details
In the Events tool, select the events, select File, and then select Open Calls PDF.... A PDF containing the event call reports for the selected events opens in a new browser tab. Use the browser PDF viewer controls to print or save the PDF.
Print menu options are available for lists and detail forms. Selecting the Print... option from a window's File menu, opens a print preview dialog box that allows you to print the contents of the page.
Selecting the Print... option for a details page (for example, from Event or Switching Sheet Details) invokes a Print Options dialog box that allows you to select what to print.
• Print the current tab
• Print selected tabs
You can select the tabs to print from the list of tabs in the dialog box.
Click OK to open a print preview dialog box displaying the content that will be output.