Viewing Downstream/Connected Customers
Click the  Customer List... button to view a list of customers downstream of the selected device.
Customer List Options
The Customer List provides two options to view additional information about a selected customer.
Examining Network Devices, Assets, and Symbols
To find out more about an asset or symbol, select it and then click the Attributes button from the Selection Panel or from the top right of the Map toolbar. Once displayed, the attributes panel updates automatically whenever the Map selection changes.
By default, the attributes panel displays a filtered subset of device attributes with user-friendly names. Select Show Source Attributes to display the full set of raw attribute data.
Initially, only attributes included in the viewer Map data are shown. Select Load from Database to fetch the full set of attributes from the database.
Select Show these attributes in a popped out window to display the current attribute values in a separate window. This allows you to compare the attributes of multiple devices.
Using the Trace Feature
The Trace tab enables you to perform traces:
1. Click to select a network asset like a device or conductor.
2. In the Trace To box, select the trace stop class.
3. Choose the Direction to trace.
4. Choose the Phase(s) to trace.
5. Choose the Session:
• Current Session: Runs the trace in the active Map session. In normal Map use, this is the real-time session. When the Map is in Study mode, this is the active Study session.
• Nominal: Runs the trace in the nominal network session.
6. Click  to perform the trace.
After a trace has been performed, you can perform the following actions:
• Clear ( ) the trace as displayed on the Map
• Refresh ( ) the trace. Refresh uses the same Trace To, Direction, Phase(s), and Session values selected when the trace was created.
• Target ( ) the trace, to the Extent of the trace, or on the Start Point
• View ( )the Trace Results. Trace results are displayed in a panel, and for each result you can right-click to position on the object, or fetch calculated values.
A list of recent traces is displayed, and actions can be performed on each trace in the list. When you refresh a recent trace, Flex preserves the selected session for that trace. See Executing Traces for more information on trace options, including Current Session and Nominal session behavior.
Selecting and Interacting with Multiple Map Objects
There are three tools available for selecting multiple objects on the map, which can be accessed from the tool selector drop down on the Map toolbar ( ):
):1. Box Selection: When in this mode, you can define a rectangle which will select all objects that overlap with that rectangle. You can define the rectangle by clicking and holding the left mouse button then dragging the mouse, or by clicking or tapping once to define one corner, then clicking or tapping again to define the other, which can be easier to accomplish on a touch device.
Note: This mode can also be accessed by holding shift and then clicking and dragging with the left mouse button. This will suppress the standard panning behavior and perform a box select instead.
2. Circle Selection: When in this mode, you can define a circle which will select all objects that overlap with that circle, by clicking and holding the left mouse button in th center of the circle, then dragging out to increase the radius of the circle.
3. Polygon Selection: When in this mode you can define a polygon which will select all objects that overlap with that polygon. To define the polygon click once to define the start point, then add more points by repeated clicks of the mouse. To complete the definition of the polygon either double click to place a final point and close the polygon, or click the starting point of the polygon again. The start point has an empty circle around it which will show filled when hovered with the mouse, to indicate it will be activated when clicked and close the polygon.
Note that in all of the above multi select modes the resulting selection is updated in real‑time as the selection area is being defined.
In addition to the above tools individual items can be toggled in/out of the selection by holding the Ctrl key while clicking with the left mouse button.
Selection Results Panel
Once a multi-select has been completed the Selection Results panel will be shown to allow the user to explore the objects that were selected.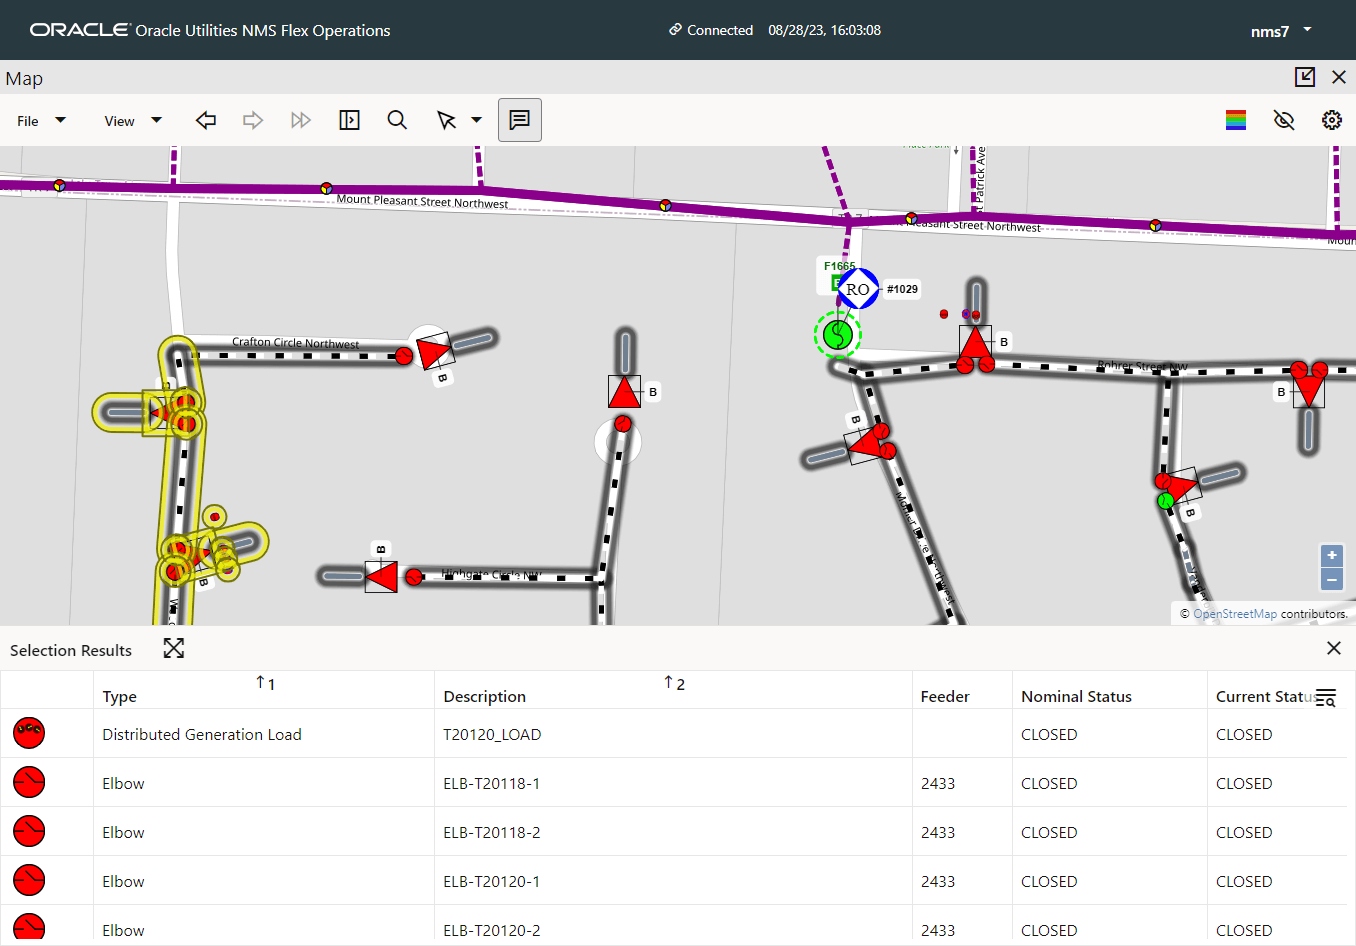
When an item in the list is clicked it will be selected, the map will move to zoom and center on the object, and the selection panel shown just as if it had been clicked in the map.
When an item in the list is double clicked all of the above will happen and the Selection Results panel will close.
If any item in the map is right clicked then the same menu will be shown as if you right clicked the object on the map, with the addition of a "View on Map and Close Panel" action indicating the default action which will occur on a double click (described above).
After selecting items in the list, if you wish to return to a view with all of the items in the list visible and selected in the map, press the "Position, zoom and select so that the full list is visible and selected" button on the title bar of the Selection Results panel.
Map Selection Filtering
When performing multi-selects of events or crews all of the events or crews in the resulting selection will be filtered in the Events and Crews tool, when map selection filtering is enabled (see Working with the Events and Crews Tool).