Entering Data Using Scripted Call Entry
Scripted Call Entry is an alternate, configured call-entry workflow that guides call takers through questions and allowed responses. It is intended to help inexperienced or occasional staff consistently record outage calls, especially during high-volume storm conditions. As users answer questions, the process can branch, collect required follow-up details, and populate the regular Call Entry fields for final review and submission.
Understanding the Scripted Call Entry Process
2. Click the Scripted Call Entry button.
3. Answer Guided Questions. Read the prompt and select the appropriate response or enter comments if requested.
Note: The available questions depend on your organization’s configuration.
As you move through the steps, the responses will populate in a list to the right of the question area.
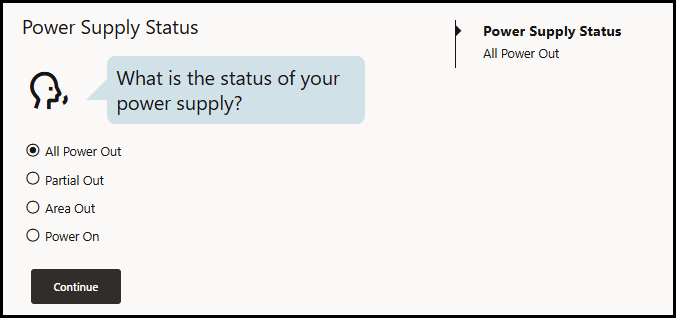
4. Click Continue to move to the next question.
Note: The next step can change based on your responses.
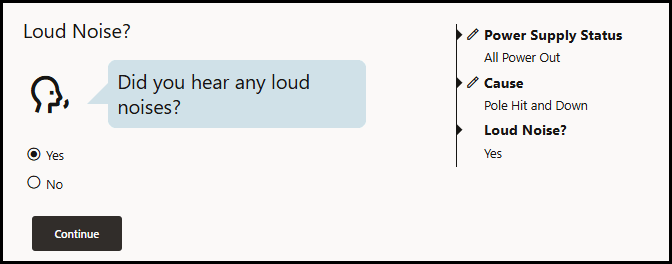
When you move to the next question, the completed responses will have an edit option to allow you to go back and revise the response. See Updating a Previous Response below. Use the completed-step summary to review the responses you have provided.
Updating a Previous Response
To change a previous response, click the Edit button ( ) beside a completed step. The guided process will go back to the step that you want to change. Depending on the change being made, the guided process may reset subsequent questions (that depended on that response) and then take you through that path; otherwise, you will be returned to where you were before clicking the edit button.
Request Follow Up
The Follow Up section allows you to add details for customer communications, appointments, and meetings with others involved in the event.
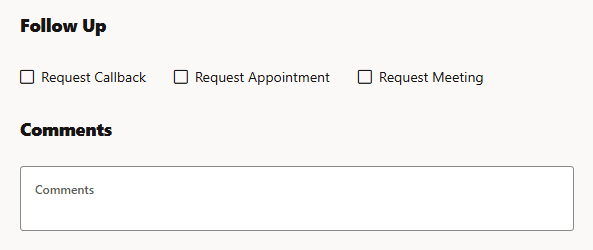
The section updates depending on whether one or more Follow Up types are selected.
• Request Callback: Provides options to enter the reason for the callback, the callback method, and the callback number or email address. Depending on your configuration, the Callback Reason field may have default values loaded when you select the checkbox or you may have to click in the field to expose the options. To remove an option from the field, click the close button ( ) to the right of the selected option.
 When the Callback Reason field is populated with one or more of the available options, the Callback Method field will have a drop-down list of options (for example, Text, Phone, or Email), and its value field will update with a prompt for the corresponding type of information to add (Callback Text Number, Callback Phone Number, or Callback Email).
• Request Appointment: Provides a drop‑down list for entering appointment details, such as Call Before Arriving or Arrive After, and a corresponding time range. See Callback Request for additional details.
• Request Meeting: Provides a drop-down list that allows you to indicate whether emergency or other personnel should be met on the scene.