Note:
- This tutorial requires access to Oracle Cloud. To sign up for a free account, see Get started with Oracle Cloud Infrastructure Free Tier.
- It uses example values for Oracle Cloud Infrastructure credentials, tenancy, and compartments. When completing your lab, substitute these values with ones specific to your cloud environment.
Publish custom metrics from Oracle Autonomous Database using Oracle Cloud Infrastructure Monitoring service
Introduction
Oracle Autonomous Database is revolutionizing how data is managed with the introduction of the world’s first “self-driving” database. Oracle Autonomous Database is powering critical business applications of enterprises, all over the world, as their primary data source.
Oracle Autonomous Database provides many important database related service metrics out of the box, thanks to its deep integration with Oracle Cloud Infrastructure (OCI) Monitoring service. That being said, many of our innovative customers want to take their observability journey a step further. These customers want to collect, publish, and analyze their own metrics about the application data stored in the Oracle Autonomous Database. We call these custom metrics and they are the metrics that applications can collect and post to OCI Monitoring service by a simple REST API provided by the OCI SDK.
This tutorial showcases how easily you can publish custom metrics from your Oracle Autonomous Database with only a few PL/SQL scripts and few clicks in the Oracle Cloud Console.
This tutorial uses an ecommerce shopping order database schema as an example to showcase how you can compute and collect metrics on data. You will see how you can periodically compute a metric representing count for each order status (fulfilled, accepted, rejected, and so on) for each order that the ecommerce application receives. And finally, you will publish these custom metrics to the Oracle Cloud Monitoring Service.
Prerequisites
- Access to an Oracle Cloud free tier or paid account.
-
Any type of Oracle Autonomous Database instance, shared or dedicated.
Note: For this tutorial, you use an Oracle Autonomous Database for an Oracle Autonomous Transaction Processing instance with just 1 OCPU and 1 TB of storage on shared infrastructure. You can create this using an Oracle Cloud free tier account.
- Basic PL/SQL familiarity.
- Oracle Cloud Console familiarity.
- You can use any of Oracle Database clients like SQL Developer or SQL*Plus. If you are new to Oracle Autonomous Transaction Processing, see Connecting to an Autonomous Database. For Oracle Autonomous Transaction Processing, see SQL Developer Web, available from the Oracle Cloud Console page for Oracle Autonomous Transaction Processing. There is no need for Oracle Wallet when using SQL Developer Web.
ADMINuser access to your Oracle Autonomous Transaction Processing instance.- Basic familiarity with Oracle Cloud concepts like the OCI Monitoring service, PostMetricData API for publishing custom metrics and dynamic groups and resource principles.
Solution at a Glance
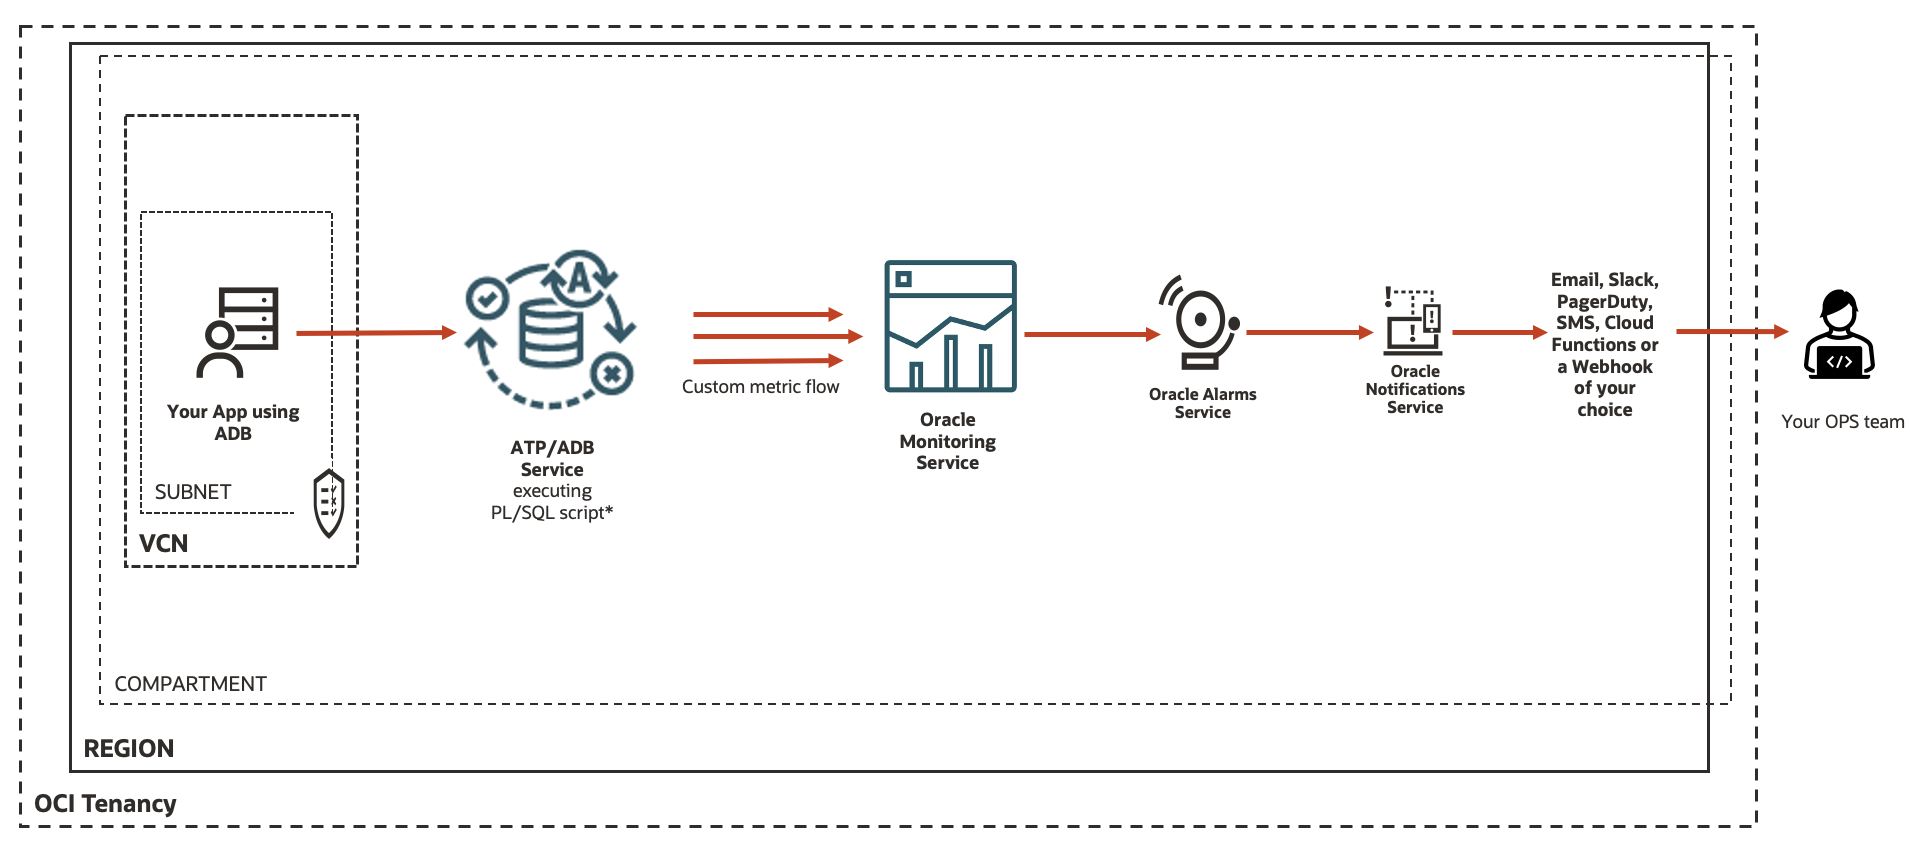
We will have a simple PL/SQL script deployed in our Oracle Autonomous Database instance, which is scheduled to run periodically to compute, collect, and post the custom metrics in the OCI Monitoring service.
Additionally, the Oracle Autonomous Database instance can have a private or public endpoint. The communication between Oracle Autonomous Database and the OCI Monitoring service takes place on the Oracle Cloud network, which is ultra-fast and highly available. No need to set up a service gateway.
In this tutorial, we will cover everything you need to know until you need to get the custom metrics from the Oracle Autonomous Database to the OCI Monitoring service.
Overview
- Create a dynamic group for your Oracle Autonomous Transaction Processing instance and authorize it to post metrics to the Oracle Cloud Infrastructure (OCI) Monitoring service with a policy.
- Create a new database user or schema with the requisite privileges in your Oracle Autonomous Transaction Processing instance or update existing database user or schema with the requisite privileges.
- Create a table named
SHOPPING_ORDERto store data for our example ecommerce application (you compute custom metrics on the customer orders stored in this table). - Define the PL/SQL script to populate random data for customer orders in the
SHOPPING_ORDERtable. - Define the PL/SQL script to compute, collect and buffer, and post the custom metrics in the OCI Monitoring service.
- Schedule and run scripts from step 4 and 5.
- Observe the published custom metrics on the Oracle Cloud Console.
In a production use case, you have your own application to populate the real-world data and updates. Hence, steps 3 and 4 won’t be needed in this case.
Steps
-
Create a dynamic group for your Oracle Autonomous Transaction Processing instance and authorize it to post metrics to the Oracle Cloud Infrastructure (OCI) Monitoring service with the policy.
-
Create a dynamic group named
adb_dgfor your Oracle Autonomous Transaction Processing instance (or instances), with the rule:ALL {resource.type = 'autonomousdatabase', resource.compartment.id = '<compartment OCID for your ADB instance>'}Alternatively, you can select a single Oracle Autonomous Transaction Processing instance instead of all the instances in the compartment:
ALL {resource.type = 'autonomousdatabase', resource.id = '<OCID for your ATP instance>'}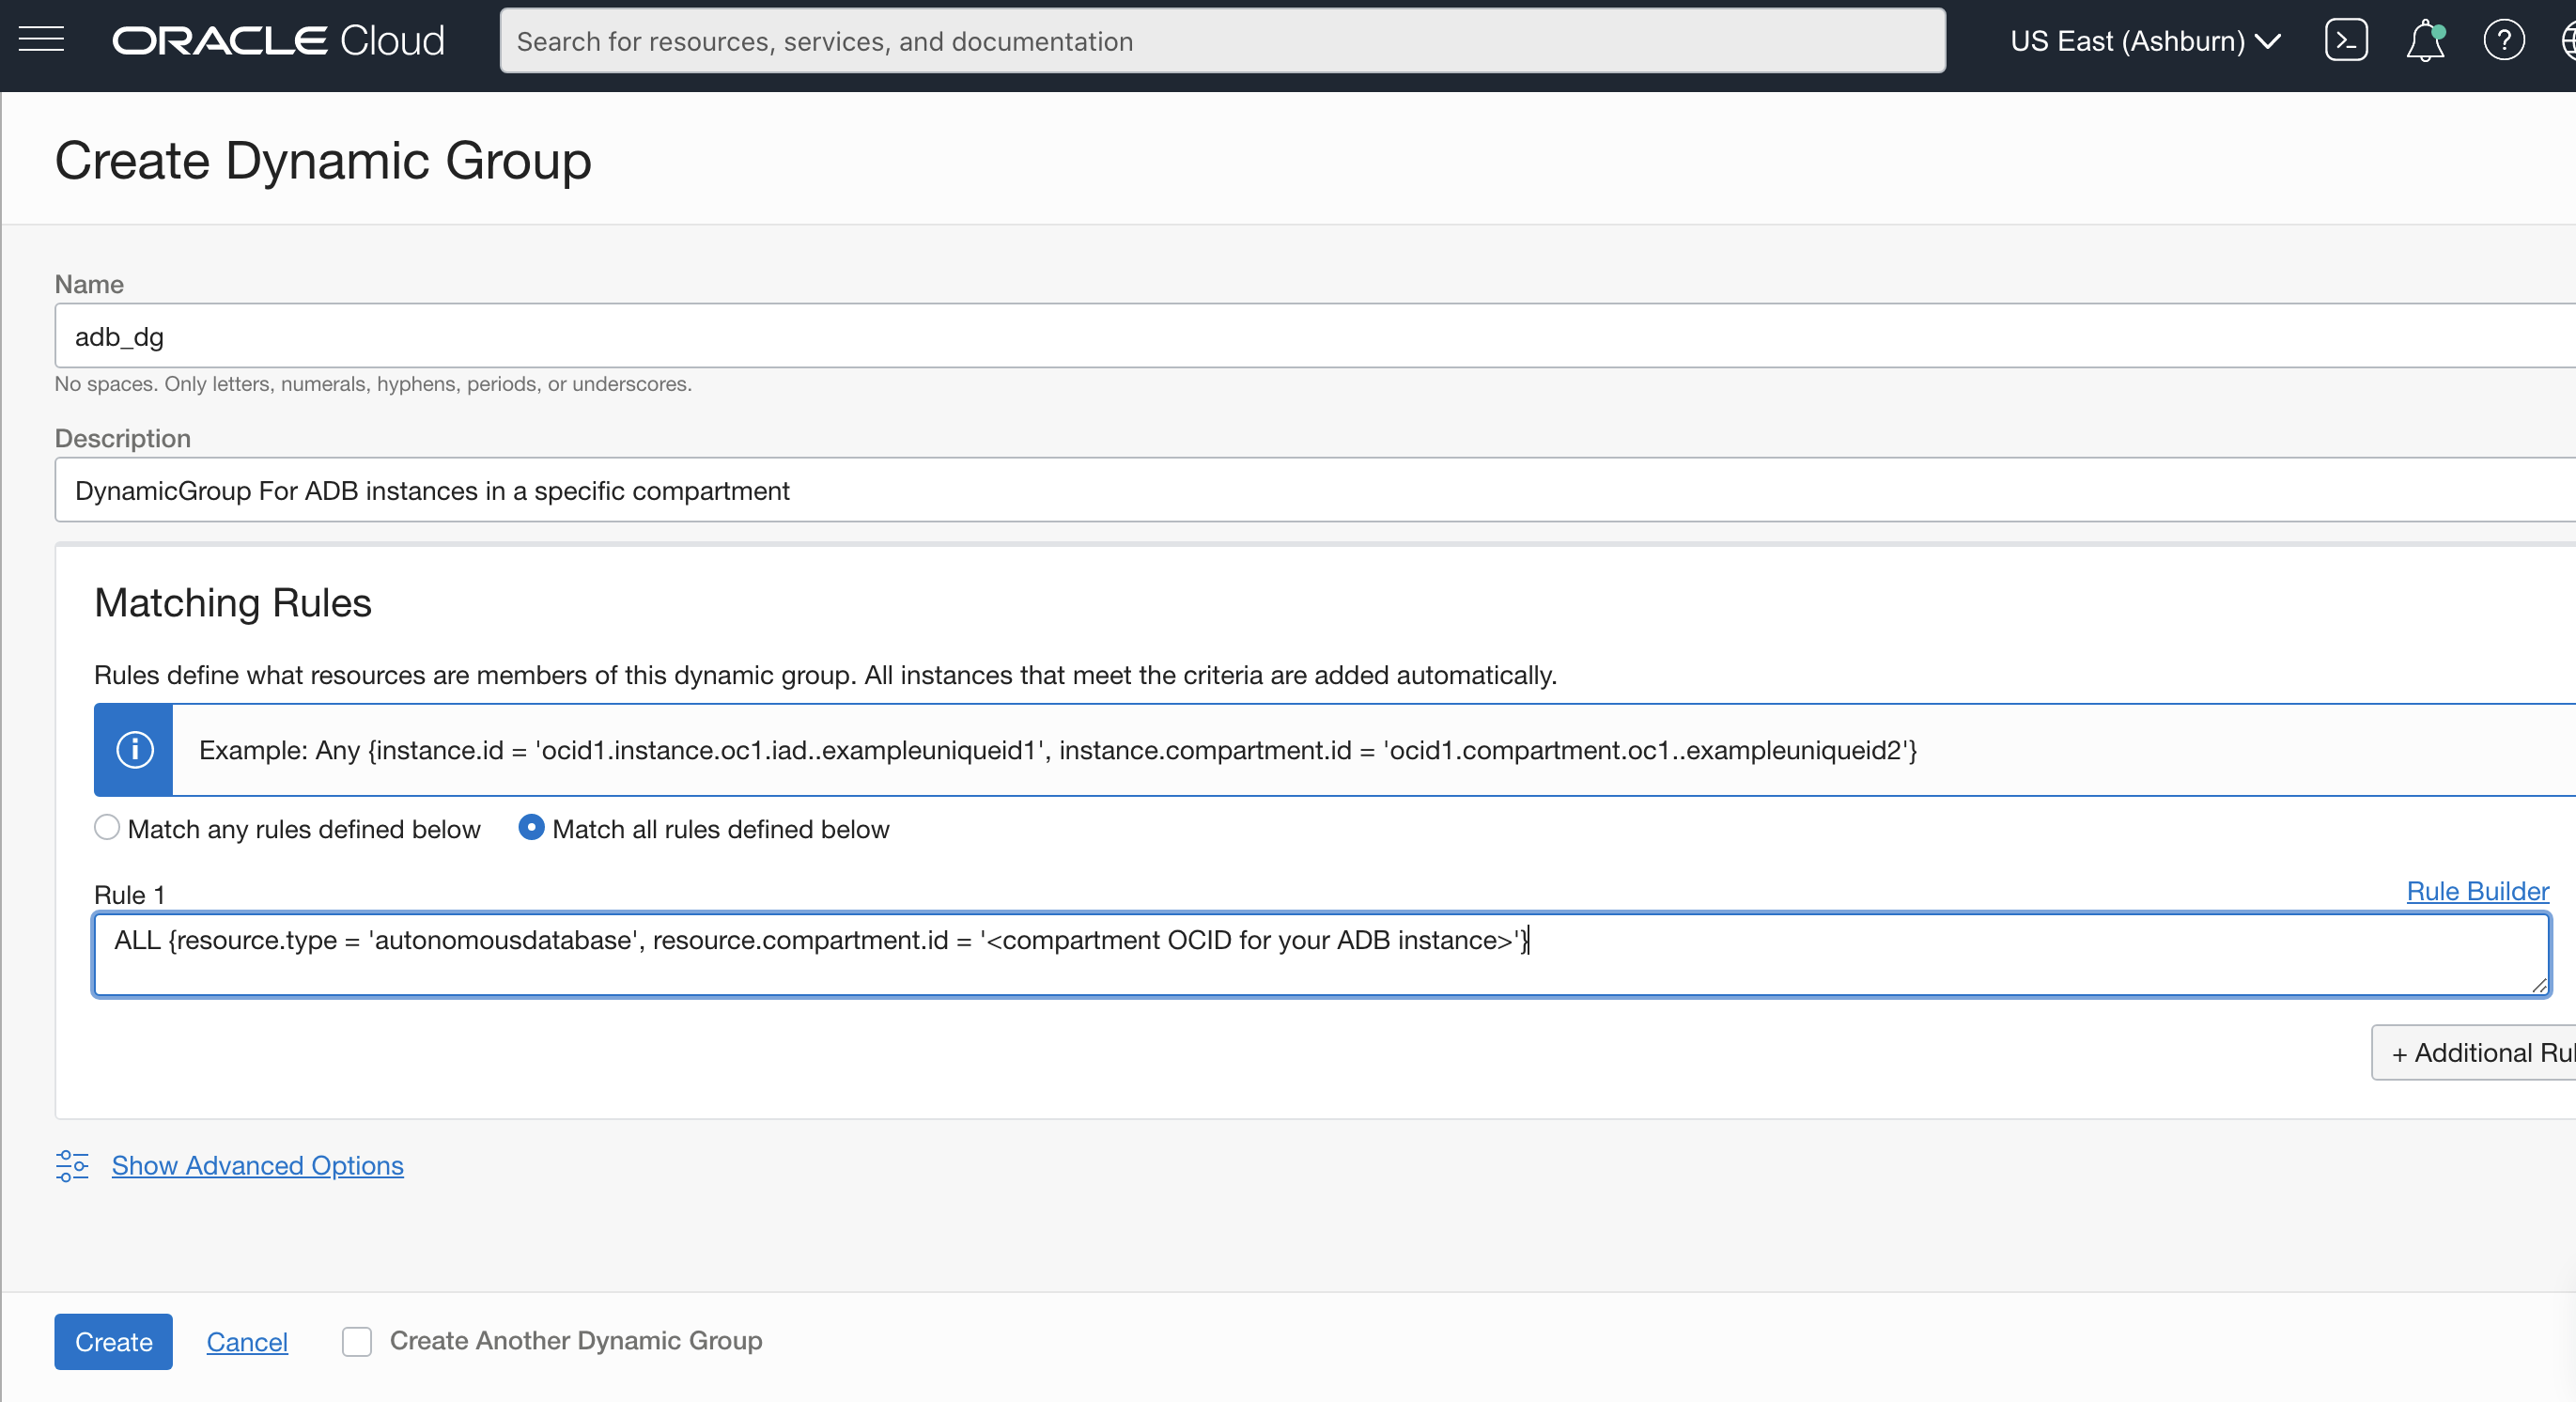
-
Create an Oracle Cloud Infrastructure Identity and Access Management (IAM) policy to authorize the dynamic group
adb_dgto post metrics to the OCI Monitoring service with a policy namedadb_dg_policyand with policy rulesAllow dynamic-group adb_dg to read metrics in compartment <Your Oracle Autonomous Transaction Processing compartment OCID>.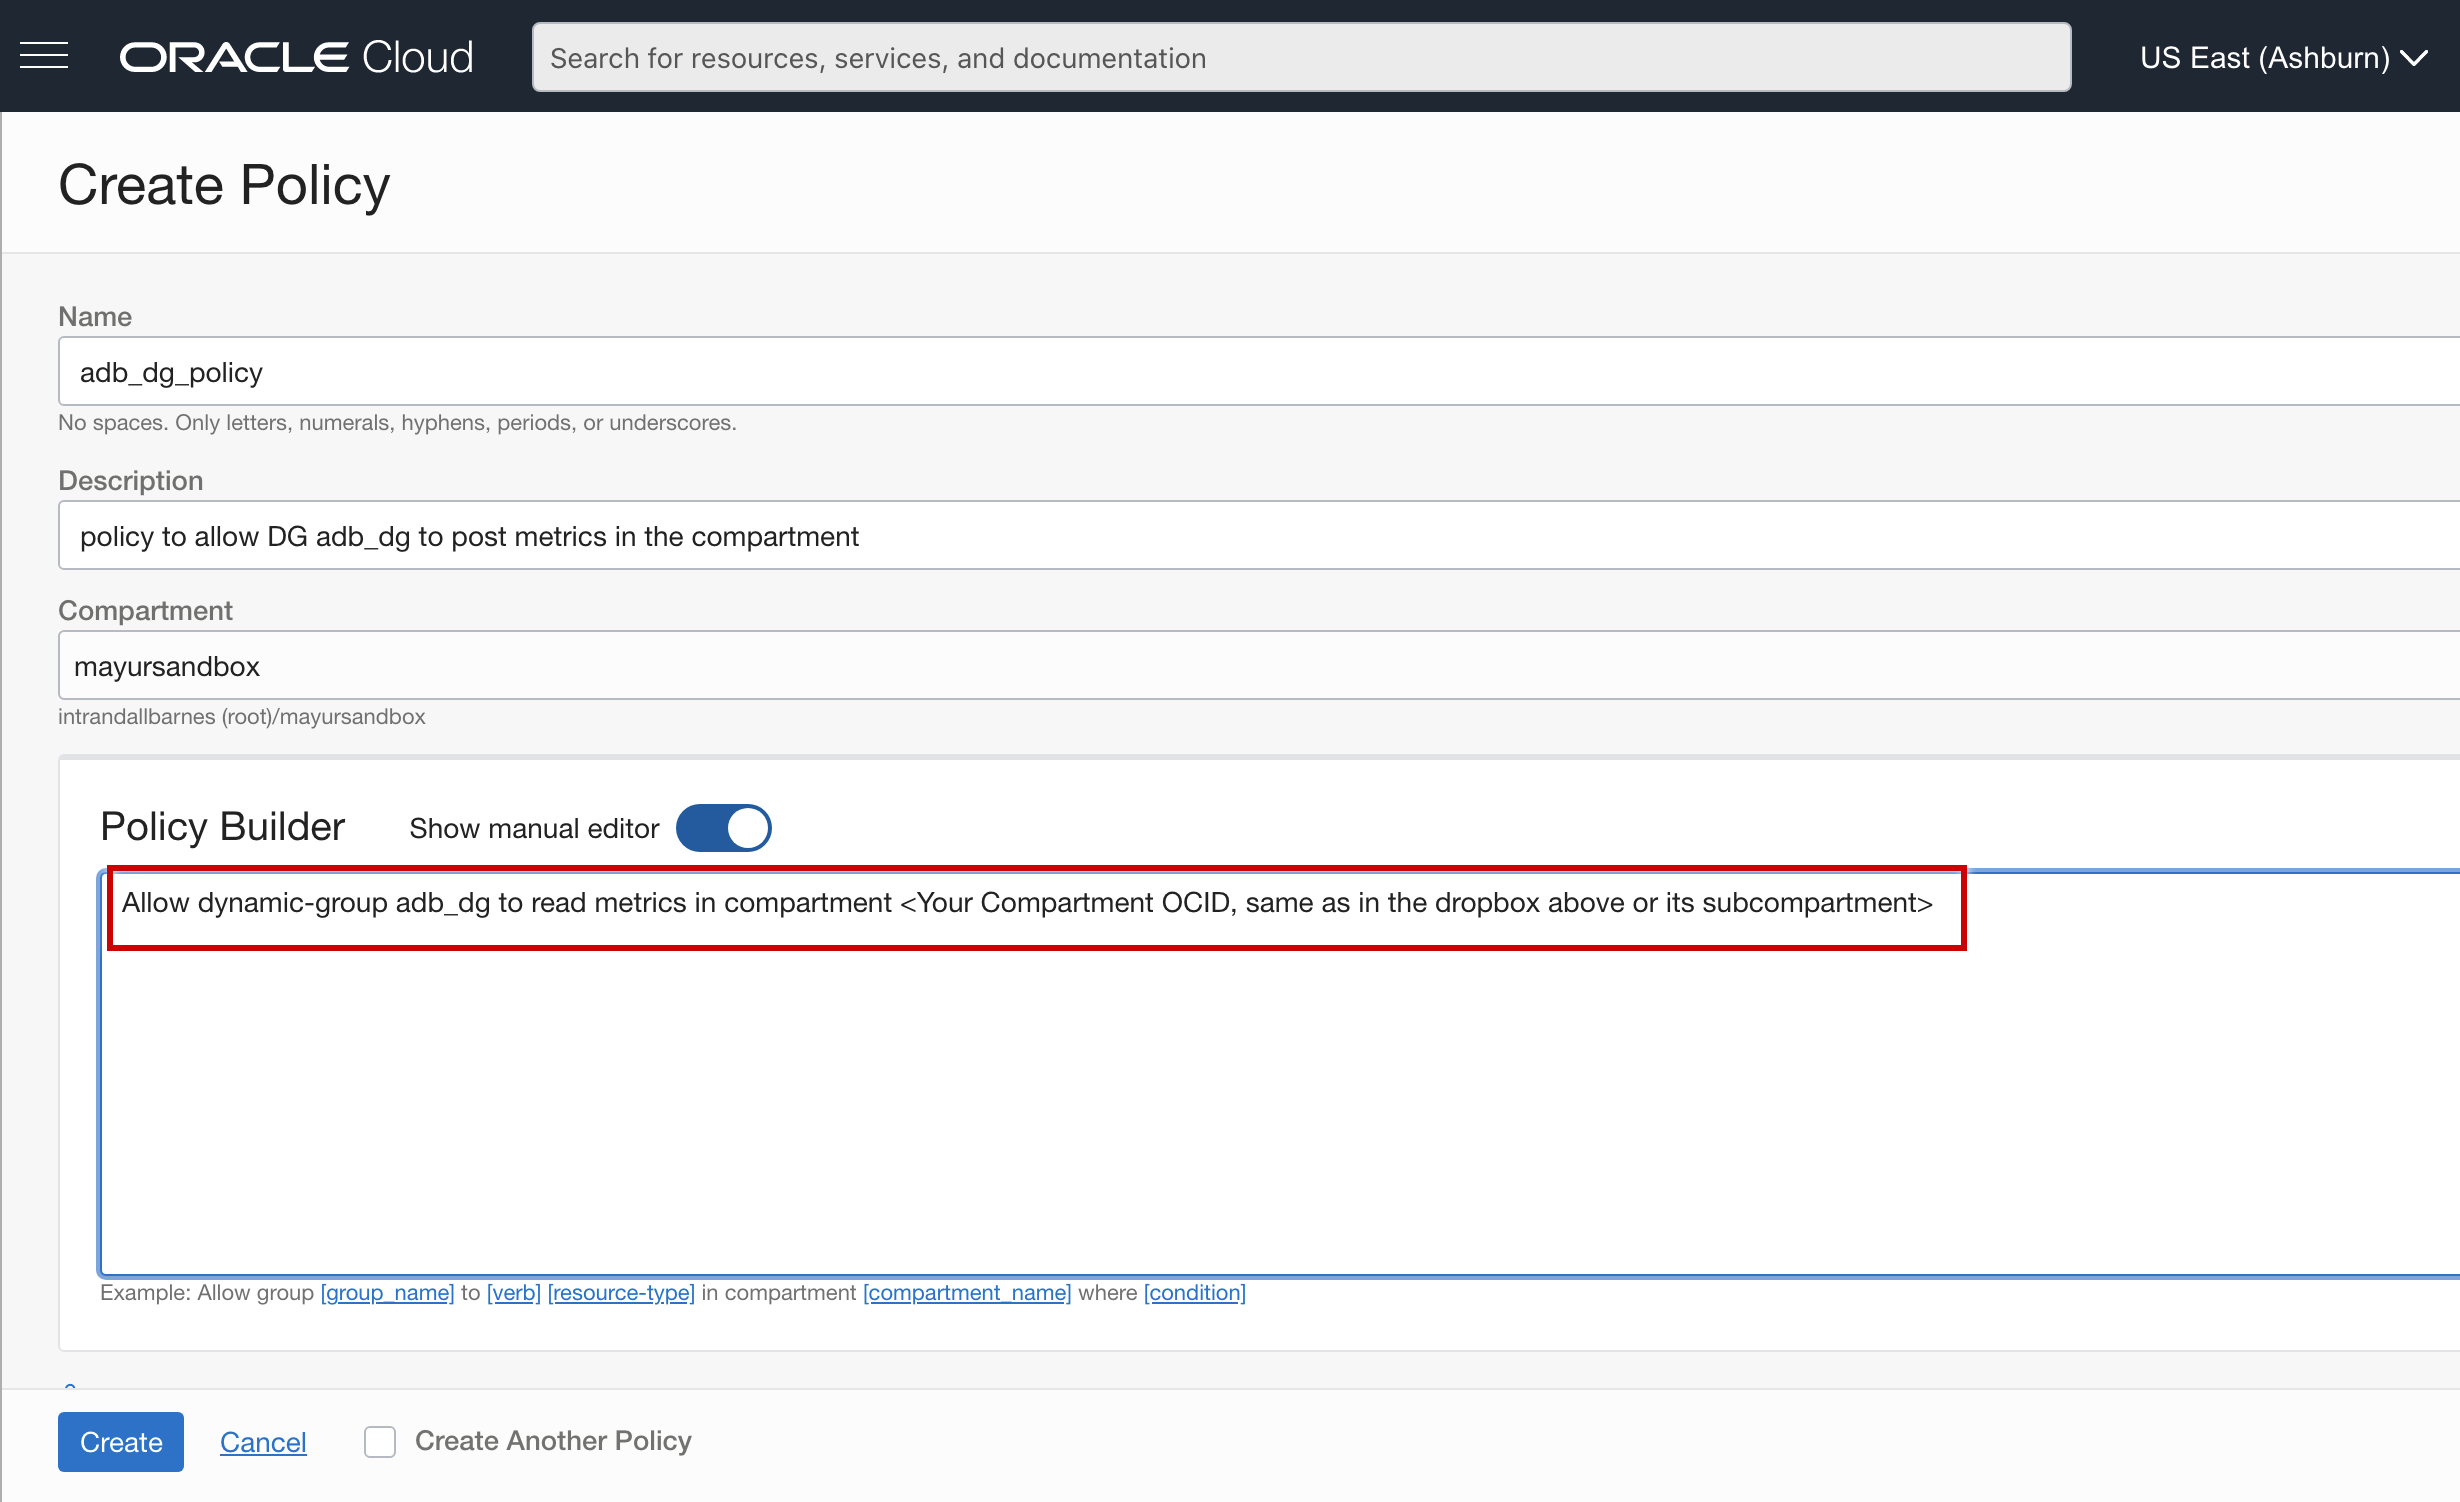
Now your Oracle Autonomous Transaction Processing service (covered by the definition of your dynamic group
adb_dg) is authorized to post metrics in the same compartment.You don’t have any Oracle Autonomous Transaction Processing database users authorized to publish metrics to the OCI Monitoring service yes. PL/SQL running on Oracle Autonomous Transaction Processing still can’t post any metrics to the OCI Monitoring service. You will do that in Step 3c.
-
-
Create a new database user or schema with the requisite privileges in your Oracle Autonomous Transaction Processing instance or update an existing database user or schema with the requisite privileges.
-
Create a database user or schema named
ECOMMERCE_USERin your Oracle Autonomous Transaction Processing instance. You can create this as an ADMIN user for every Oracle Autonomous Transaction Processing instance. You can skip this step if you choose to use an existing user.CREATE USER ECOMMERCE_USER IDENTIFIED BY "Password of your choice for this User";Note: Now we will refer to the user (or schema) as
ECOMMERCE_USERand the rest of the steps remain the same, whether you use an existing user or a newly created user. -
Grant requisite Oracle Database related privileges to the
ECOMMERCE_USER.GRANT CREATE TABLE, ALTER ANY INDEX, CREATE PROCEDURE, CREATE JOB, SELECT ANY TABLE, EXECUTE ANY PROCEDURE, UPDATE ANY TABLE, CREATE SESSION, UNLIMITED TABLESPACE, CONNECT, RESOURCE TO ECOMMERCE_USER; GRANT SELECT ON "SYS"."V_$PDBS" TO ECOMMERCE_USER; GRANT EXECUTE ON "C##CLOUD$SERVICE"."DBMS_CLOUD" to ECOMMERCE_USER; GRANT SELECT ON SYS.DBA_JOBS_RUNNING TO ECOMMERCE_USER; -
Enable Oracle Database credentials for the Oracle Cloud Resource Principal and give its access to db-user
ECOMMERCE_USER. This connects the dynamic groupadb_dgyou created in step 1 to the database userECOMMERCE_USER, giving the user the authorization to post metrics to the OCI Monitoring service. For more information, see Use Resource Principal to Access Oracle Cloud Infrastructure Resources.EXEC DBMS_CLOUD_ADMIN.ENABLE_RESOURCE_PRINCIPAL(username => 'ECOMMERCE_USER'); -
(Optional) Verify the operations you completed in the previous step.
Note: Once the Oracle Database credential for Oracle Cloud Resource Principal is enabled, it is always owned by the ADMIN user for Oracle Autonomous Database. You can verify this:
SELECT OWNER, CREDENTIAL_NAME FROM DBA_CREDENTIALS WHERE CREDENTIAL_NAME = 'OCI$RESOURCE_PRINCIPAL'  AND OWNER =  'ADMIN';

-- To check if any other user, here ECOMMERCE_USER has access DB credential(hence to OCI Resource Principal), you have to check *DBA_TAB_PRIVS* view, as follows.
SELECT * from DBA_TAB_PRIVS WHERE DBA_TAB_PRIVS.GRANTEE='ECOMMERCE_USER';
-
-
Create an example data table named
SHOPPING_ORDERto showcase the computation of metrics on a database table.The table schema is self-explanatory but note the
STATUScolumn:DROP TABLE SHOPPING_ORDER; CREATE TABLE SHOPPING_ORDER ( ID NUMBER GENERATED BY DEFAULT ON NULL AS IDENTITY PRIMARY KEY, CREATED_DATE TIMESTAMP(6) DEFAULT CURRENT_TIMESTAMP, DETAILS VARCHAR2(1000) DEFAULT NULL, LAST_UPDATED_DATE TIMESTAMP(6) DEFAULT CURRENT_TIMESTAMP, STATUS VARCHAR2(30 CHAR), TOTAL_CHARGES FLOAT DEFAULT 0.0, CUSTOMER_ID NUMBER(19) ) PARTITION BY LIST ( STATUS ) ( PARTITION ACCEPTED VALUES ( 'ACCEPTED' ), PARTITION PAYMENT_REJECTED VALUES ( 'PAYMENT_REJECTED' ), PARTITION SHIPPED VALUES ( 'SHIPPED' ), PARTITION ABORTED VALUES ( 'ABORTED' ), PARTITION OUT_FOR_DELIVERY VALUES ( 'OUT_FOR_DELIVERY' ), PARTITION ORDER_DROPPED_NO_INVENTORY VALUES ( 'ORDER_DROPPED_NO_INVENTORY' ), PARTITION PROCESSED VALUES ( 'PROCESSED' ), PARTITION NOT_FULLFILLED VALUES ( 'NOT_FULFILLED' ) ); / -- we move rows from one partition to another, hence we enable row movement for this partioned table ALTER TABLE SHOPPING_ORDER ENABLE ROW MOVEMENT;Each shopping order can have any of eight status values during its lifetime:
[ACCEPTED, PAYMENT_REJECTED, SHIPPED, ABORTED, OUT_FOR_DELIVERY, ORDER_DROPPED_NO_INVENTORY, PROCESSED, NOT_FULFILLED]. -
Read the following PL/SQL script; it populates data in the
SHOPPING_ORDERtable. Run it on the Oracle Database client of your choice.The script will first add the
TOTAL_ROWS_IN_SHOPPING_ORDERnumber of rows to theSHOPPING_ORDERtable with randomly generated order data. It will then update the data, changing theSTATUSvalues of eachSHOPPING_ORDERrow randomly.CREATE OR REPLACE PROCEDURE POPULATE_DATA_FEED IS ARR_STATUS_RANDOM_INDEX INTEGER; CUSTOMER_ID_RANDOM INTEGER; TYPE STATUS_ARRAY IS VARRAY(8) OF VARCHAR2(30); ARRAY STATUS_ARRAY := STATUS_ARRAY('ACCEPTED', 'PAYMENT_REJECTED', 'SHIPPED', 'ABORTED', 'OUT_FOR_DELIVERY', 'ORDER_DROPPED_NO_INVENTORY', 'PROCESSED', 'NOT_FULFILLED'); TOTAL_ROWS_IN_SHOPPING_ORDER INTEGER := 15000; TYPE ROWID_NT IS TABLE OF ROWID; ROWIDS ROWID_NT; BEGIN -- starting from scratch just be idempotent and have predictable execution time for this stored procedure -- deleting existing rows is optional DELETE SHOPPING_ORDER; -- insert data FOR COUNTER IN 1..TOTAL_ROWS_IN_SHOPPING_ORDER LOOP ARR_STATUS_RANDOM_INDEX := TRUNC(DBMS_RANDOM.VALUE(LOW => 1, HIGH => 9)); CUSTOMER_ID_RANDOM := TRUNC(DBMS_RANDOM.VALUE(LOW => 1, HIGH => 8000)); INSERT INTO SHOPPING_ORDER (STATUS,CUSTOMER_ID) VALUES (ARRAY(ARR_STATUS_RANDOM_INDEX),CUSTOMER_ID_RANDOM); COMMIT; END LOOP; DBMS_OUTPUT.PUT_LINE('DONE WITH INITIAL DATA LOAD'); -- keep on updating the same data FOR COUNTER IN 1..8000 LOOP --Get the rowids SELECT R BULK COLLECT INTO ROWIDS FROM (SELECT ROWID R FROM SHOPPING_ORDER SAMPLE ( 5 ) ORDER BY DBMS_RANDOM.VALUE) RNDM WHERE ROWNUM < TOTAL_ROWS_IN_SHOPPING_ORDER + 1; --update the table ARR_STATUS_RANDOM_INDEX := TRUNC(DBMS_RANDOM.VALUE(LOW => 1, HIGH => 9)); FOR I IN 1..ROWIDS.COUNT LOOP UPDATE SHOPPING_ORDER SET STATUS = ARRAY(ARR_STATUS_RANDOM_INDEX) WHERE ROWID = ROWIDS(I); COMMIT; END LOOP; --sleep in-between if you want to run script for longer duration --DBMS_SESSION.SLEEP(ROUND(dbms_random.value(low => 1, high => 2))); END LOOP; DBMS_OUTPUT.PUT_LINE('DONE WITH POPULATE_DATA_FEED'); EXECUTE IMMEDIATE 'ANALYZE TABLE SHOPPING_ORDER COMPUTE STATISTICS'; END; / -
Let us dive deep into the actual crux of this tutorial: the script that computes the custom metrics and publishes them to the OCI Monitoring service. Run it on the Oracle Datbase client of your choice. The script is idempotent to make sure you can play with it in multiple runs. Now, analyze the script piecemeal.
-
Create the
SHOPPING_ORDER_METRICS_TABLEtable and use it to collect and buffer computed metrics.Make sure your data tables are optimized for queries running the metrics computation. You do not want these queries to put too much load on your database, disturbing your production use cases.
DECLARE COUNT_VAR NUMBER := 0; BEGIN SELECT COUNT(*) INTO COUNT_VAR FROM ALL_TABLES WHERE TABLE_NAME = 'SHOPPING_ORDER_METRICS_TABLE'; IF COUNT_VAR > 0 THEN DBMS_OUTPUT.PUT_LINE('TABLE EXISTS ALREADY!'); ELSE -- table doesn't exist EXECUTE IMMEDIATE 'CREATE TABLE SHOPPING_ORDER_METRICS_TABLE( ID NUMBER GENERATED BY DEFAULT ON NULL AS IDENTITY PRIMARY KEY, CREATED_DATE TIMESTAMP(6) DEFAULT CURRENT_TIMESTAMP, STATUS VARCHAR2(30 CHAR), COUNT NUMBER)'; END IF; END; / -
Create a stored procedure that computes the metric: Count for number of orders by status values, at the time instance of this metrics collection.
The stored procedure then buffers the computed metrics in the buffer table
SHOPPING_ORDER_METRICS_TABLEthat you created in the previous step. Buffer to make sure that you can try to post the metrics again in the future if there is a temporary interruption when publishing them to the OCI Monitoring service.CREATE OR REPLACE PROCEDURE COMPUTE_AND_BUFFER_METRICS IS BEGIN -- compute simple metric for getting count order by order-status -- and store in buffer table SHOPPING_ORDER_METRICS_TABLE INSERT INTO SHOPPING_ORDER_METRICS_TABLE (STATUS, COUNT, CREATED_DATE) SELECT STATUS, COUNT(*), SYSTIMESTAMP AT TIME ZONE 'UTC' FROM SHOPPING_ORDER SO GROUP BY SO.STATUS; -- we buffer at most 1000 metric points, please configure as per your needs DELETE FROM SHOPPING_ORDER_METRICS_TABLE SOMT WHERE SOMT.ID NOT IN (SELECT ID FROM SHOPPING_ORDER_METRICS_TABLE ORDER BY CREATED_DATE FETCH FIRST 1000 ROWS ONLY); COMMIT; DBMS_OUTPUT.PUT_LINE('compute and buffering done @ ' || TO_CHAR(SYSTIMESTAMP)); END; /To limit the size of buffer table, trim it if its size exceeds 1,000 rows.
-
Use the PL/SQL function
PREPARE_JSON_OBJECT_FROM_METRIC_ROWSthat converts buffered metrics fromSHOPPING_ORDER_METRICS_TABLEinto JSON objects that PostMetricsData API expects in its request.Note:
- This function converts the
BATCH_SIZE_FOR_EACH_POSTnumber of the most recent metrics data points fromSHOPPING_ORDER_METRICS_TABLEintoOCI_METADATA_JSON_OBJ JSON_OBJECT_T. OCI_METADATA_JSON_OBJis a variable of PL/SQL inbuilt JSON datatypeJSON_OBJECT_T. We constructedOCI_METADATA_JSON_OBJwith the same JSON structure as outlined in PostMetricDataDetails, the request body for the PostMetricsData API.
CREATE OR REPLACE FUNCTION GET_METRIC_DATA_DETAILS_JSON_OBJ ( IN_ORDER_STATUS IN VARCHAR2, IN_METRIC_CMPT_ID IN VARCHAR2, IN_ADB_NAME IN VARCHAR2, IN_METRIC_VALUE IN NUMBER, IN_TS_METRIC_COLLECTION IN VARCHAR2 ) RETURN JSON_OBJECT_T IS METRIC_DATA_DETAILS JSON_OBJECT_T; MDD_METADATA JSON_OBJECT_T; MDD_DIMENSIONS JSON_OBJECT_T; ARR_MDD_DATAPOINT JSON_ARRAY_T; MDD_DATAPOINT JSON_OBJECT_T; BEGIN MDD_METADATA := JSON_OBJECT_T(); MDD_METADATA.PUT('unit', 'row_count'); -- metric unit is arbitrary, as per choice of developer MDD_DIMENSIONS := JSON_OBJECT_T(); MDD_DIMENSIONS.PUT('dbname', IN_ADB_NAME); MDD_DIMENSIONS.PUT('schema_name', SYS_CONTEXT('USERENV', 'CURRENT_SCHEMA')); MDD_DIMENSIONS.PUT('table_name', 'SHOPPING_ORDER'); MDD_DIMENSIONS.PUT('status_enum', IN_ORDER_STATUS); MDD_DATAPOINT := JSON_OBJECT_T(); MDD_DATAPOINT.PUT('timestamp', IN_TS_METRIC_COLLECTION); --timestamp value RFC3339 compliant MDD_DATAPOINT.PUT('value', IN_METRIC_VALUE); MDD_DATAPOINT.PUT('count', 1); ARR_MDD_DATAPOINT := JSON_ARRAY_T(); ARR_MDD_DATAPOINT.APPEND(MDD_DATAPOINT); METRIC_DATA_DETAILS := JSON_OBJECT_T(); METRIC_DATA_DETAILS.PUT('datapoints', ARR_MDD_DATAPOINT); METRIC_DATA_DETAILS.PUT('metadata', MDD_METADATA); METRIC_DATA_DETAILS.PUT('dimensions', MDD_DIMENSIONS); -- namespace, resourceGroup and name for the custom metric are arbitrary values, as per choice of developer METRIC_DATA_DETAILS.PUT('namespace', 'custom_metrics_from_adb'); METRIC_DATA_DETAILS.PUT('resourceGroup', 'ecommerece_adb'); METRIC_DATA_DETAILS.PUT('name', 'customer_orders_submitted'); -- since compartment OCID is fetched using ADB metadata, our custom metrics will land up in same compartment as our ADB METRIC_DATA_DETAILS.PUT('compartmentId', IN_METRIC_CMPT_ID); RETURN METRIC_DATA_DETAILS; END; / CREATE OR REPLACE FUNCTION PREPARE_JSON_OBJECT_FROM_METRIC_ROWS ( OCI_METADATA_JSON_OBJ JSON_OBJECT_T, BATCH_SIZE_FOR_EACH_POST NUMBER ) RETURN JSON_OBJECT_T IS OCI_POST_METRICS_BODY_JSON_OBJ JSON_OBJECT_T; ARR_METRIC_DATA JSON_ARRAY_T; METRIC_DATA_DETAILS JSON_OBJECT_T; BEGIN -- prepare JSON body for postmetrics api.. -- for details please refer https://docs.oracle.com/en-us/iaas/api/#/en/monitoring/20180401/datatypes/PostMetricDataDetails ARR_METRIC_DATA := JSON_ARRAY_T(); -- PostMetrics api has soft limit of 50 unique metric stream per call, hence we cap it at 50. -- For Production usecase where every metric data point is important, we can use chunking FOR METRIC_ROW IN (SELECT * FROM SHOPPING_ORDER_METRICS_TABLE ORDER BY CREATED_DATE DESC FETCH FIRST BATCH_SIZE_FOR_EACH_POST ROWS ONLY) LOOP --DBMS_OUTPUT.PUT_LINE('inside for loop ' || METRIC_ROW.STATUS ); METRIC_DATA_DETAILS := GET_METRIC_DATA_DETAILS_JSON_OBJ( METRIC_ROW.STATUS, OCI_METADATA_JSON_OBJ.GET_STRING('COMPARTMENT_OCID'), OCI_METADATA_JSON_OBJ.GET_STRING('DATABASE_NAME'), METRIC_ROW.COUNT, TO_CHAR(METRIC_ROW.CREATED_DATE, 'yyyy-mm-dd"T"hh24:mi:ss.ff3"Z"')); --DBMS_OUTPUT.PUT_LINE('METRIC_DATA_DETAILS '|| METRIC_DATA_DETAILS.to_clob); ARR_METRIC_DATA.APPEND(METRIC_DATA_DETAILS); END LOOP; DBMS_OUTPUT.PUT_LINE('done with for loop '); OCI_POST_METRICS_BODY_JSON_OBJ := JSON_OBJECT_T(); OCI_POST_METRICS_BODY_JSON_OBJ.PUT('metricData', ARR_METRIC_DATA); RETURN OCI_POST_METRICS_BODY_JSON_OBJ; END; / - This function converts the
-
Use the PL/SQL code to publish these converted metrics to the OCI Monitoring service using the PostMetricsData API.
Note: We achieve this with the PL/SQL function named
POST_METRICS_DATA_TO_OCIand the stored procedurePUBLISH_BUFFERED_METRICS_TO_OCI.CREATE OR REPLACE FUNCTION POST_METRICS_DATA_TO_OCI(OCI_POST_METRICS_BODY_JSON_OBJ JSON_OBJECT_T, ADB_REGION VARCHAR2) RETURN NUMBER IS RETRY_COUNT INTEGER := 0; MAX_RETRIES INTEGER := 3; RESP DBMS_CLOUD_TYPES.RESP; EXCEPTION_POSTING_METRICS EXCEPTION; SLEEP_IN_SECONDS INTEGER := 5; BEGIN FOR RETRY_COUNT in 1..MAX_RETRIES LOOP -- invoking REST endpoint for OCI Monitoring API -- for details please refer https://docs.oracle.com/en-us/iaas/api/#/en/monitoring/20180401/MetricData/PostMetricData RESP := DBMS_CLOUD.SEND_REQUEST(CREDENTIAL_NAME => 'OCI$RESOURCE_PRINCIPAL', URI => 'https://telemetry-ingestion.'|| ADB_REGION|| '.oraclecloud.com/20180401/metrics', METHOD =>DBMS_CLOUD.METHOD_POST, BODY => UTL_RAW.CAST_TO_RAW(OCI_POST_METRICS_BODY_JSON_OBJ.TO_STRING)); IF DBMS_CLOUD.GET_RESPONSE_STATUS_CODE(RESP) = 200 THEN -- when it is 200 from OCI Metrics API, all good DBMS_OUTPUT.PUT_LINE('POSTED METRICS SUCCESSFULLY TO OCI MONIOTRING'); RETURN 200; ELSIF DBMS_CLOUD.GET_RESPONSE_STATUS_CODE(RESP) = 429 THEN -- 429 is caused by throttling IF RETRY_COUNT < MAX_RETRIES THEN -- increase sleep time for each retry, doing exponential backoff DBMS_SESSION.SLEEP(POWER(SLEEP_IN_SECONDS, RETRY_COUNT+1)); DBMS_OUTPUT.PUT_LINE('RETRYING THE POSTMETRICS API CALL'); ELSE DBMS_OUTPUT.PUT_LINE('ABANDONING POSTMETRICS CALLS, AFTER 3 RETRIES, CAUSED BY THROTTLING, WILL BERETRIED IN NEXT SCHEDULED RUN'); RETURN 429; END IF; ELSE -- for any other http status code....1. log error, 2. raise exception and then quit posting metrics, as it is most probably a persistent error DBMS_OUTPUT.PUT_LINE('IRRECOVERABLE ERROR HAPPENED WHEN POSTING METRICS TO OCI MONITORING, PLEASE SEE CONSOLE FOR ERRORS'); -- Response Body in TEXT format DBMS_OUTPUT.put_line('Body: ' || '------------' || CHR(10) || DBMS_CLOUD.get_response_text(resp) || CHR(10)); -- Response Headers in JSON format DBMS_OUTPUT.put_line('Headers: ' || CHR(10) || '------------' || CHR(10) || DBMS_CLOUD.get_response_headers(resp).to_clob || CHR(10)); -- Response Status Code DBMS_OUTPUT.put_line('Status Code: ' || CHR(10) || '------------' || CHR(10) || DBMS_CLOUD.get_response_status_code(resp)); RETURN 500; END IF; END LOOP; END; / CREATE OR REPLACE PROCEDURE PUBLISH_BUFFERED_METRICS_TO_OCI IS OCI_METADATA_JSON_RESULT VARCHAR2(1000); OCI_METADATA_JSON_OBJ JSON_OBJECT_T; ADB_REGION VARCHAR2(25); OCI_POST_METRICS_BODY_JSON_OBJ JSON_OBJECT_T; TYPE ID_ARRAY IS VARRAY(50) OF NUMBER; ARRAY ID_ARRAY; TOTAL_METRICS_STREAM_CNT NUMBER; HTTP_CODE NUMBER; BATCH_SIZE_FOR_EACH_POST NUMBER:=8; -- not more than 50! as per PostMetricsData API docs BEGIN -- get the meta-data for this ADB Instance like its OCI compartmentId, region and DBName etc; as JSON in oci_metadata_json_result SELECT CLOUD_IDENTITY INTO OCI_METADATA_JSON_RESULT FROM V$PDBS; -- dbms_output.put_line(oci_metadata_json_result); -- convert the JSON string into PLSQL JSON native JSON datatype json_object_t variable named oci_metadata_json_result OCI_METADATA_JSON_OBJ := JSON_OBJECT_T.PARSE(OCI_METADATA_JSON_RESULT); WHILE(TRUE) LOOP SELECT COUNT(*) INTO TOTAL_METRICS_STREAM_CNT FROM SHOPPING_ORDER_METRICS_TABLE; IF(TOTAL_METRICS_STREAM_CNT < BATCH_SIZE_FOR_EACH_POST) THEN DBMS_OUTPUT.PUT_LINE('Only ' || TOTAL_METRICS_STREAM_CNT || ' metrics datapoints buffered(less than batch size' || BATCH_SIZE_FOR_EACH_POST || '), hence waiting for buffer to fill up'); EXIT; END IF; OCI_POST_METRICS_BODY_JSON_OBJ := PREPARE_JSON_OBJECT_FROM_METRIC_ROWS(OCI_METADATA_JSON_OBJ, BATCH_SIZE_FOR_EACH_POST); ADB_REGION := OCI_METADATA_JSON_OBJ.GET_STRING('REGION'); HTTP_CODE := POST_METRICS_DATA_TO_OCI(OCI_POST_METRICS_BODY_JSON_OBJ, ADB_REGION); IF(HTTP_CODE = 200) THEN DBMS_OUTPUT.PUT_LINE('Deleting the published metrics'); DELETE FROM SHOPPING_ORDER_METRICS_TABLE WHERE ID IN (SELECT ID FROM SHOPPING_ORDER_METRICS_TABLE ORDER BY CREATED_DATE DESC FETCH FIRST 50 ROWS ONLY); END IF; COMMIT; -- PostMetricData API has TPS rate limit of 50, just for safety -- Hence sleep for atleast seconds => (1/50) to avoid throttling -- DBMS_SESSION.SLEEP(seconds => (1/50)); END LOOP; END; /The function
POST_METRICS_DATA_TO_OCIinvokes the PostMetricsData API. As with every Oracle Cloud API, you need proper OCI IAM authorization to invoke it. You pass the same as follows, with the named parametercredential_name => 'OCI$RESOURCE_PRINCIPAL'.The database credential
OCI$RESOURCE_PRINCIPALis linked to the dynamic groupadb_dgthat you created in step 2 and theECOMMERCE_USERuser from step 3 already has access.Hence by chain of trust, this PL/SQL script executed by
ECOMMERCE_USERhas authorization to post the custom metrics to the OCI Monitoring service.RESP := DBMS_CLOUD.SEND_REQUEST(CREDENTIAL_NAME => 'OCI$RESOURCE_PRINCIPAL', URI => 'https://telemetry-ingestion.'|| ADB_REGION|| '.oraclecloud.com/20180401/metrics', METHOD =>DBMS_CLOUD.METHOD_POST, BODY => UTL_RAW.CAST_TO_RAW(OCI_POST_METRICS_BODY_JSON_OBJ.TO_STRING));dbms_cloud.send_requestis an inbuilt PL/SQL stored procedure that invokes any rest endpoint, preinstalled with every Oracle Autonomous Database. Here we use it to invoke the OCI Monitoring service REST API.The stored procedure
PUBLISH_BUFFERED_METRICS_TO_OCIposts all buffered metrics to the OCI Monitoring service using all the functions and procedures we have discussed so far. To be performant, it creates batches of sizeBATCH_SIZE_FOR_EACH_POSTof metric data-points for each PostMetricsData API invocation.
-
-
Schedule and run scripts from step 4 and 5. In steps 4 and 5, you defined stored procedures and functions in the Oracle Database but you have not yet executed them.
-
Run the script from step 4 to populate the data in the
SHOPPING_ORDERtable. The script will run for approximately 15 minutes on the Oracle Autonomouse Transaction Processing instance with 1 OCPU and 1 TB storage.-- we schedule the data feed to run immediately, asynchronously and only once! BEGIN DBMS_SCHEDULER.CREATE_JOB( JOB_NAME => 'POPULATE_DATA_FEED_JOB', JOB_TYPE => 'STORED_PROCEDURE', JOB_ACTION => 'POPULATE_DATA_FEED', ENABLED => TRUE, AUTO_DROP => TRUE, -- drop job after 1 run. COMMENTS => 'ONE-TIME JOB'); END; / -- just for our information SELECT STATUS,count(*) FROM SHOPPING_ORDER GROUP BY STATUS; -
The only thing remaining is the periodic execution of the PL/SQL script from step 5: computation and publishing to OCI Monitoring service.
We do it as follows with the PL/SQL built-in stored procedure
DBMS_SCHEDULER.CREATE_JOB.It creates the Oracle Database
SCHEDULED_JOBlasting for 20 minutes (1,200 seconds). It does custom metrics computation and publishes it every minute.For a production use case, configure it as per your needs.
BEGIN
    DBMS_SCHEDULER.CREATE_JOB(
                            JOB_NAME => 'POST_METRICS_TO_OCI_JOB',
                            JOB_TYPE   => 'PLSQL_BLOCK',
                            JOB_ACTION => 'BEGIN
                                            ECOMMERCE_USER.COMPUTE_AND_BUFFER_METRICS();
                                            ECOMMERCE_USER.PUBLISH_BUFFERED_METRICS_TO_OCI();
                                           END;',
                            START_DATE => SYSTIMESTAMP,                        -- start the first run immediately
                            REPEAT_INTERVAL => 'FREQ=SECONDLY;INTERVAL=60',    -- run this PLSQL_BLOCK every 60th second
                            END_DATE => SYSTIMESTAMP + INTERVAL '1200' SECOND, -- this schedule is only active
                            AUTO_DROP => TRUE,                                 -- delete the schedule after 1200 seconds, effectively after its last run
                            ENABLED => TRUE,                                   -- enable this schedule as soon as it is created
                            COMMENTS => 'JOB TO POST DB METRICS TO OCI MONITORING SERVICE, RUNS EVERY 10TH SECOND');
END;
/
-
-
Explore the published custom metrics on the Oracle Cloud Console.
-
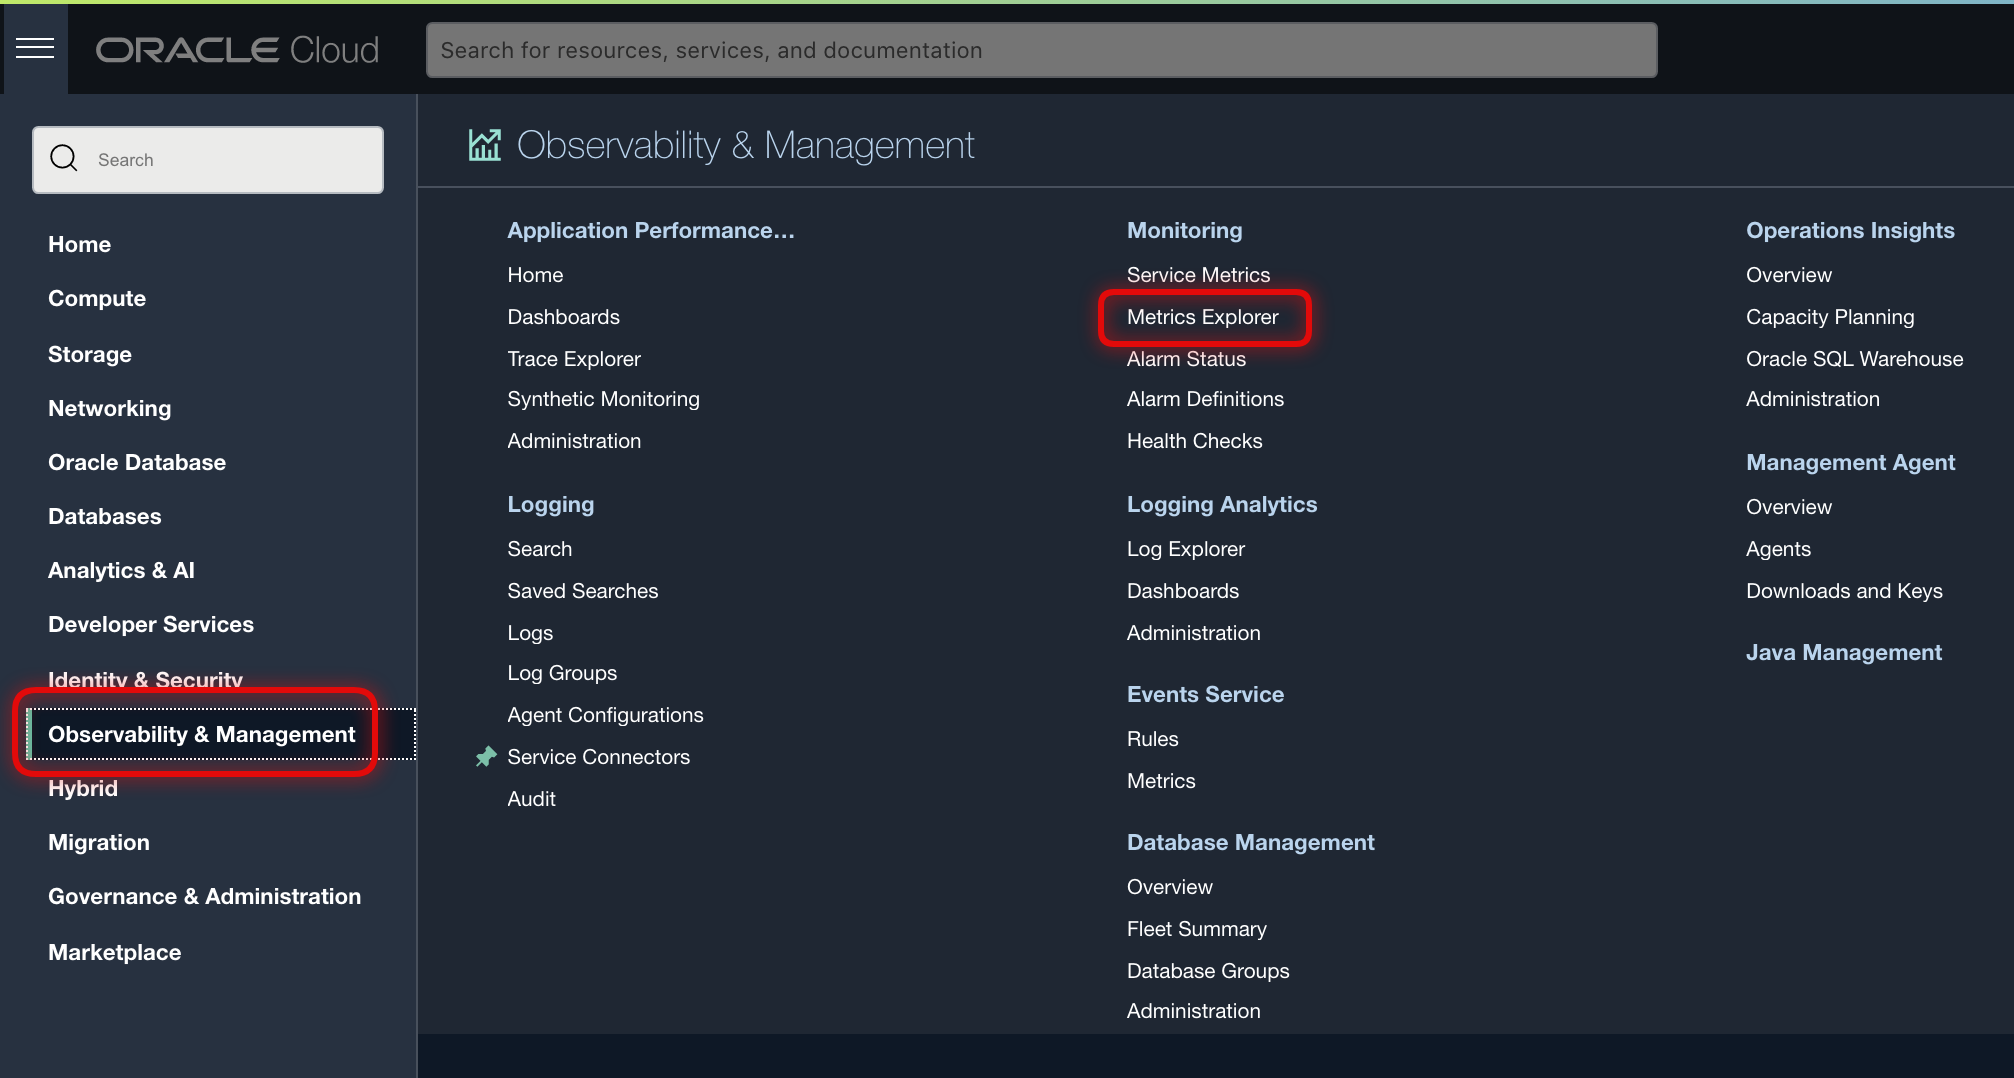
From the navigation menu, click Metrics Explorer.
-
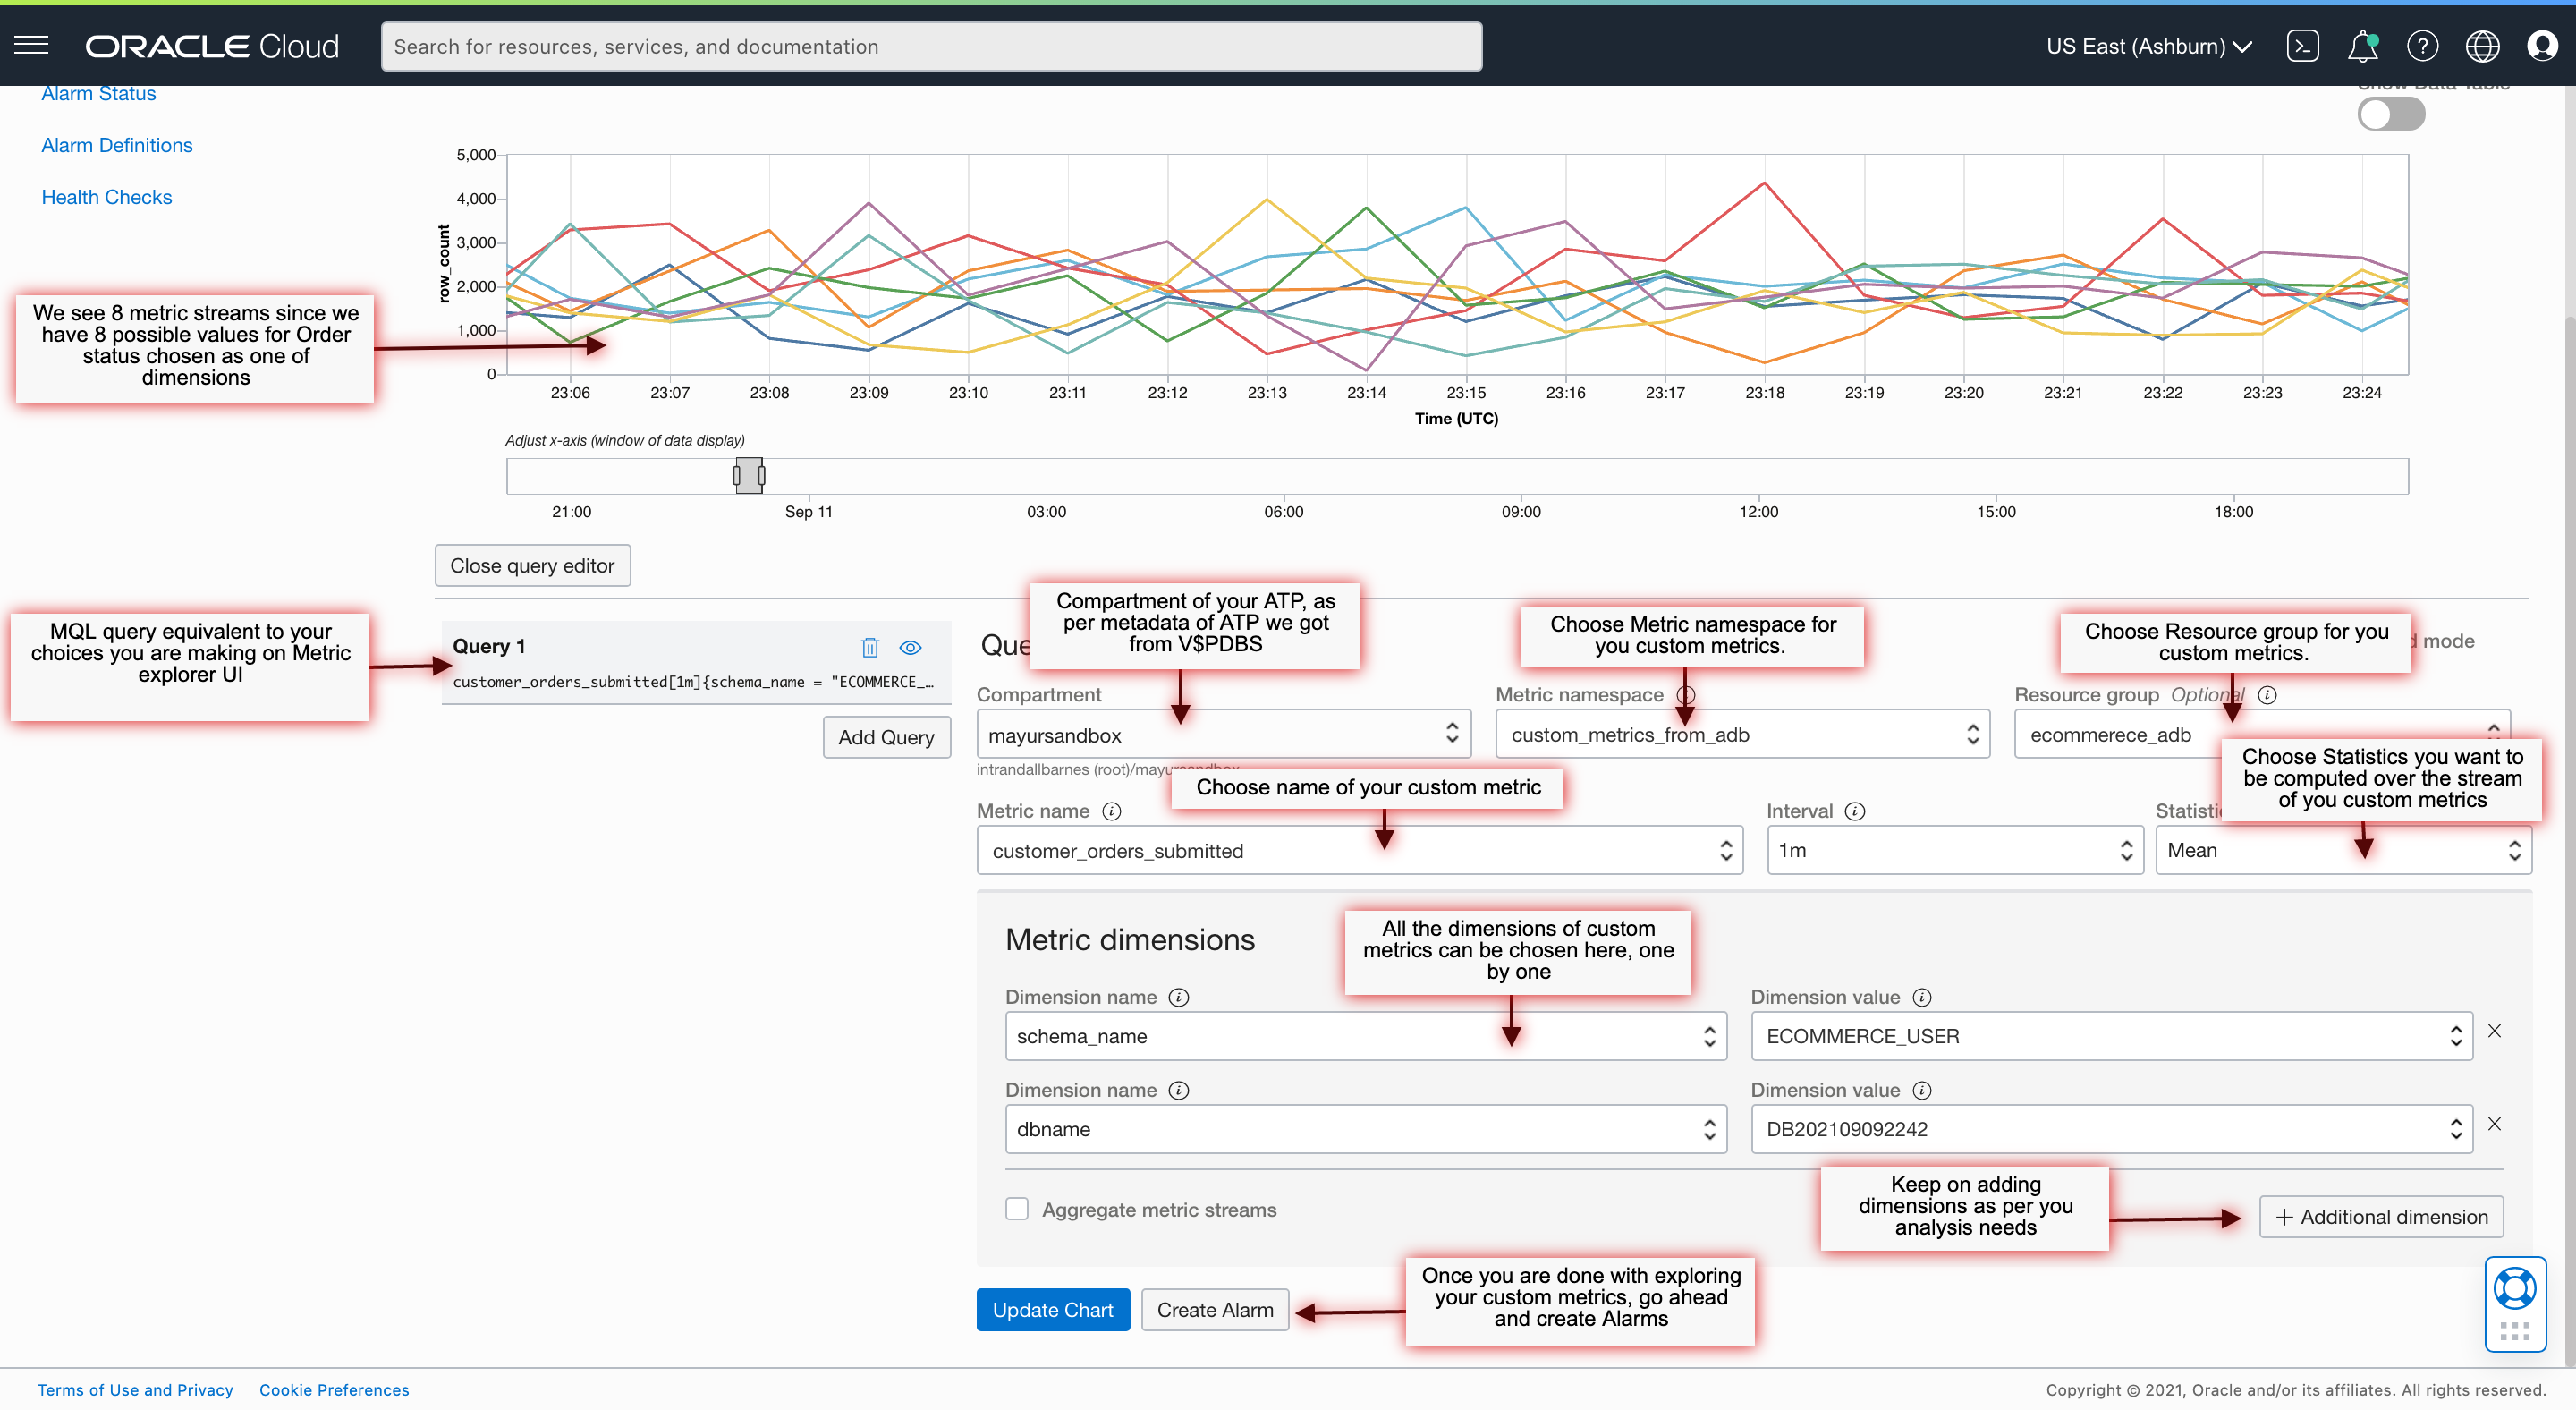
In Metrics Explorer, select the namespace as
custom_metrics_from_adb, resourceGroup asecommerece_adb, and metric name ascustomer_orders_submittedthat you have set for custom metrics.All the metadata and dimensions you set for the custom metrics are available.
You can construct MQL queries to analyze these metrics according to your needs and use case. Next you might want to set up Oracle Cloud Alarms on the metric stream to alert your operational team.
This automates the observability loop for the Oracle Autonomous Database metrics of your choice.
-
Conclusion
You learned how to emit custom metrics from Oracle Autonomous Database to the Oracle Cloud Infrastructure (OCI) Monitoring service with simple PL/SQL scripts using the OCI SDK for PL/SQL. Oracle Database is a ‘source of truth’ for many of business workflows so this is a very powerful functionality.
Custom metrics are first-class citizens of OCI Monitoring service, on par with native metrics. You can analyze them with the same powerful Metrics Query Language and set up Alarms on them to notify you whenever any event of interest or trouble occurs.
This gives you the ultimate ‘Single Pane of Glass’ view for all your metrics, be it generated OCI Service or custom metrics generated by your applications and databases.
Acknowledgements
- Author - Mayur Raleraskar, Solutions Architect
More Learning Resources
Explore other labs on docs.oracle.com/learn or access more free learning content on the Oracle Learning YouTube channel. Additionally, visit education.oracle.com/learning-explorer to become an Oracle Learning Explorer.
For product documentation, visit Oracle Help Center.
Publish custom metrics from Oracle Autonomous Database using Oracle Cloud Infrastructure Monitoring service
F47655-03
November 2021
Copyright © 2021, Oracle and/or its affiliates.