Note:
- This tutorial requires access to Oracle Cloud. To sign up for a free account, see Get started with Oracle Cloud Infrastructure Free Tier.
- It uses example values for Oracle Cloud Infrastructure credentials, tenancy, and compartments. When completing your lab, substitute these values with ones specific to your cloud environment.
Use Oracle Cloud API Gateway to create a secure Object Storage download service with function authentication
Introduction
Oracle Cloud Object Storage is a very cheap and effective way to store large or small files. Object Storage allows working in an Event-Driven architecture, making the process execution near to real-time. You can configure events in Object Storage to trigger events, and you can also create REST services to securely, quickly, and inexpensively write to or read files from Object Storage.
If you are interested in seeing how to implement an event-driven architecture, see Process large files in Autonomous Database and Kafka with Oracle Cloud Infrastructure Data Flow.
Architecture
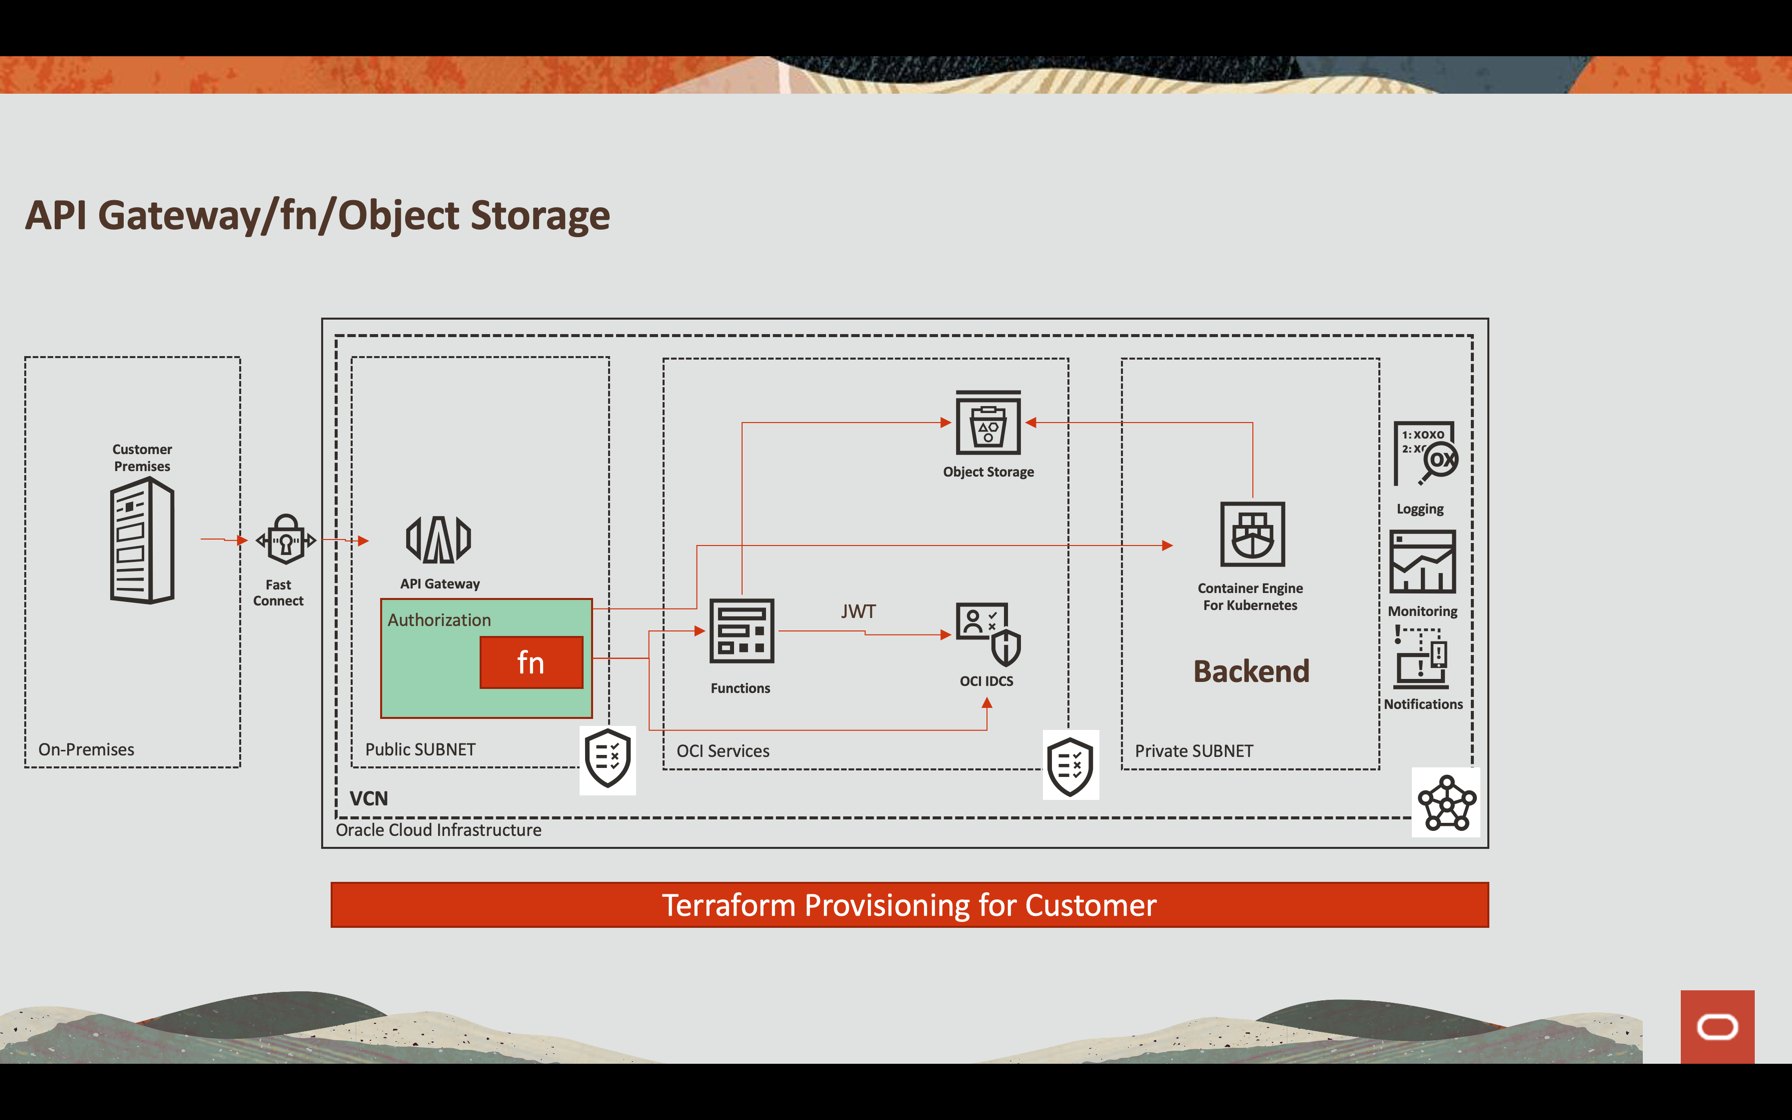
Oracle API Gateway Integration
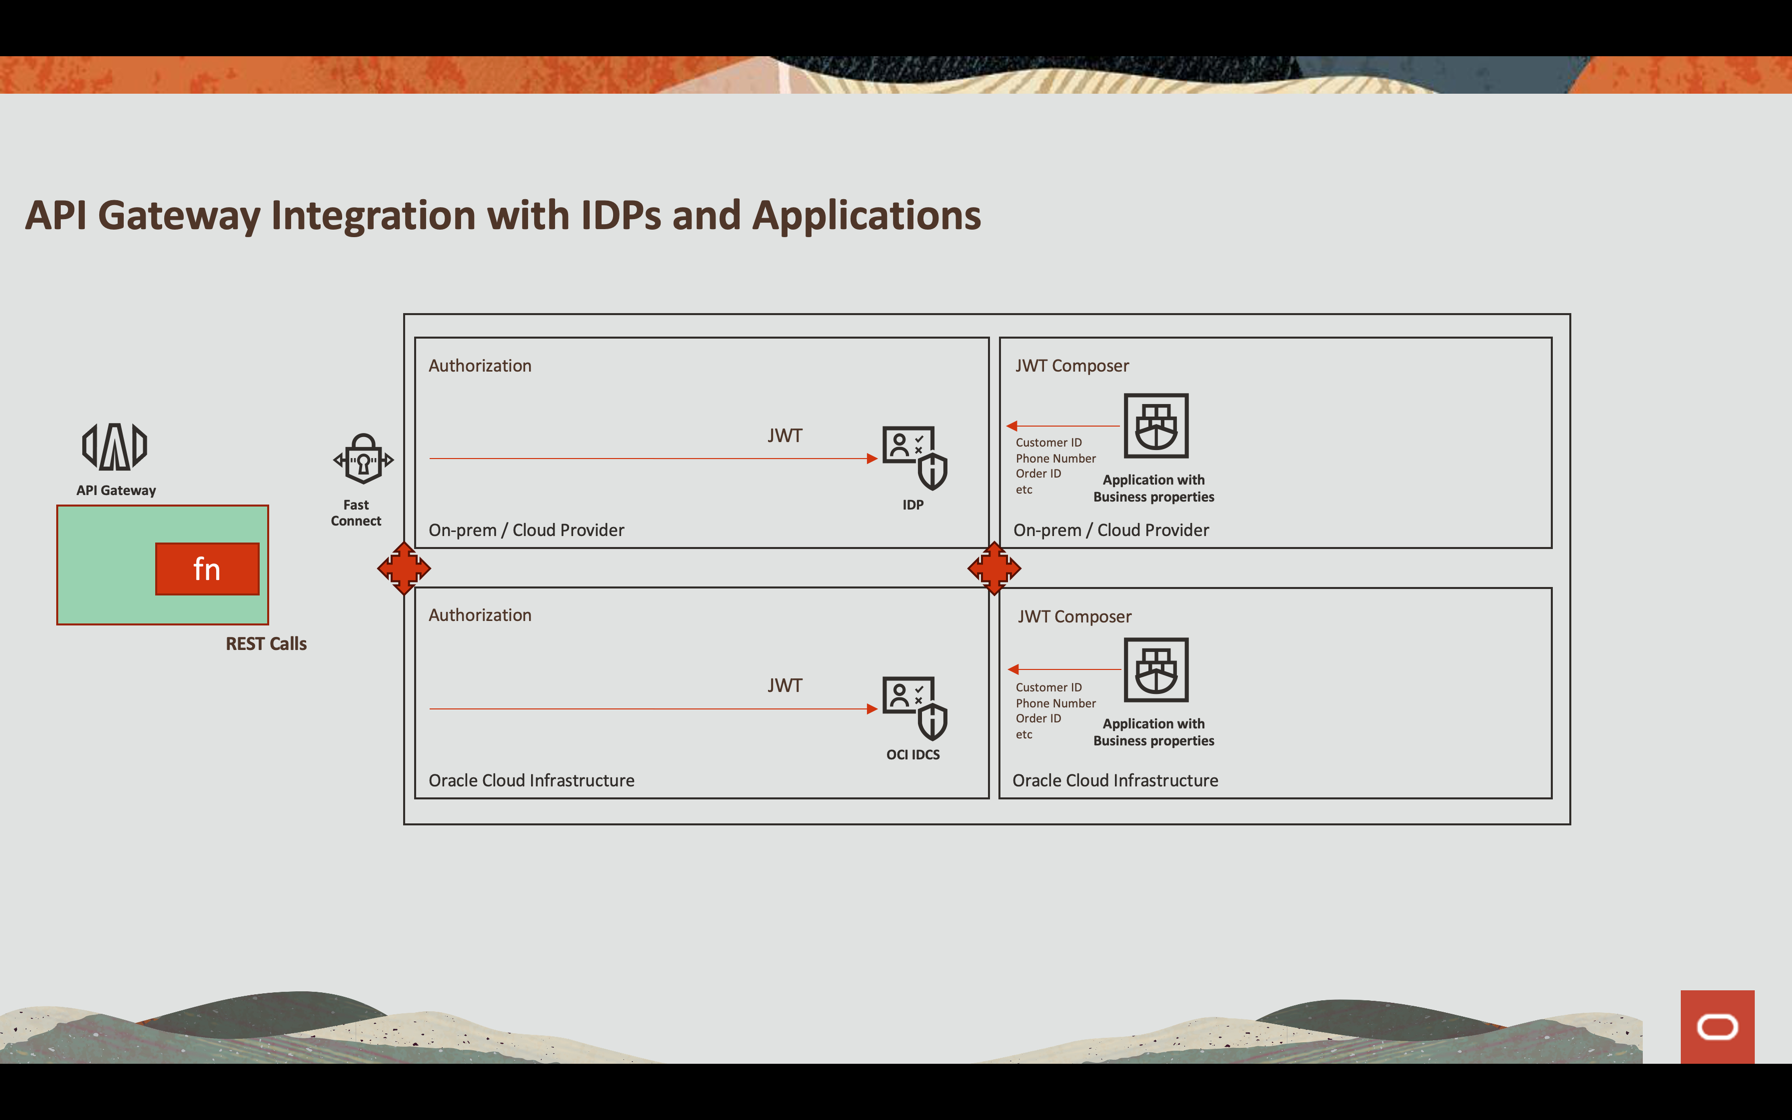
In this tutorial, we will show how to configure Oracle API Gateway to implement a REST service through a function that allows, in a flexible way, to authenticate a JWT token through an external Identity Provider or Oracle Cloud Infrastructure (OCI) itself (Oracle Identity Cloud Service). Regardless of the process, you can validate the JWT token (since an attribute can be part of the file name), use OCI services through its SDK and other customizable processes.
Objectives
- Expose an API REST service to download a file from Object Storage in a safe way
- Use OCI API Gateway authenticating with OCI Functions
- Return a pre-authenticated link with a 60 seconds limit time for download
- Configure an Observability setup to monitor the file write and read
Prerequisites
-
An OCI Object Storage bucket created and configured with policies you need to write and read files. See Object Storage Security.
-
An operational Oracle Cloud tenant: You can create a free Oracle Cloud account with US$ 300.00 for a month to try this tutorial. See Create a Free Oracle Cloud Account.
-
Oracle Cloud Command Line Interface (OCI CLI)) installed on your local machine: This is the link to install the OCI CLI.
-
OCI Functions and the Policies configured for development. This example is implemented in Python. For more information, see Functions QuickStart Guides.
-
An OCI API Gateway instance created and exposed to the Internet. See Creating Your First API Gateway In The Oracle Cloud.
-
Access to your Oracle Identity Cloud Service.
Task 1: Configure an application in Oracle Identity Cloud Service
You can configure any REST API External Identity Provider to work with JWT like Auth0 and Oracle Identity Cloud Service.
In this tutorial, we will work with Oracle Identity Cloud Service and call the authentication inside the function.
-
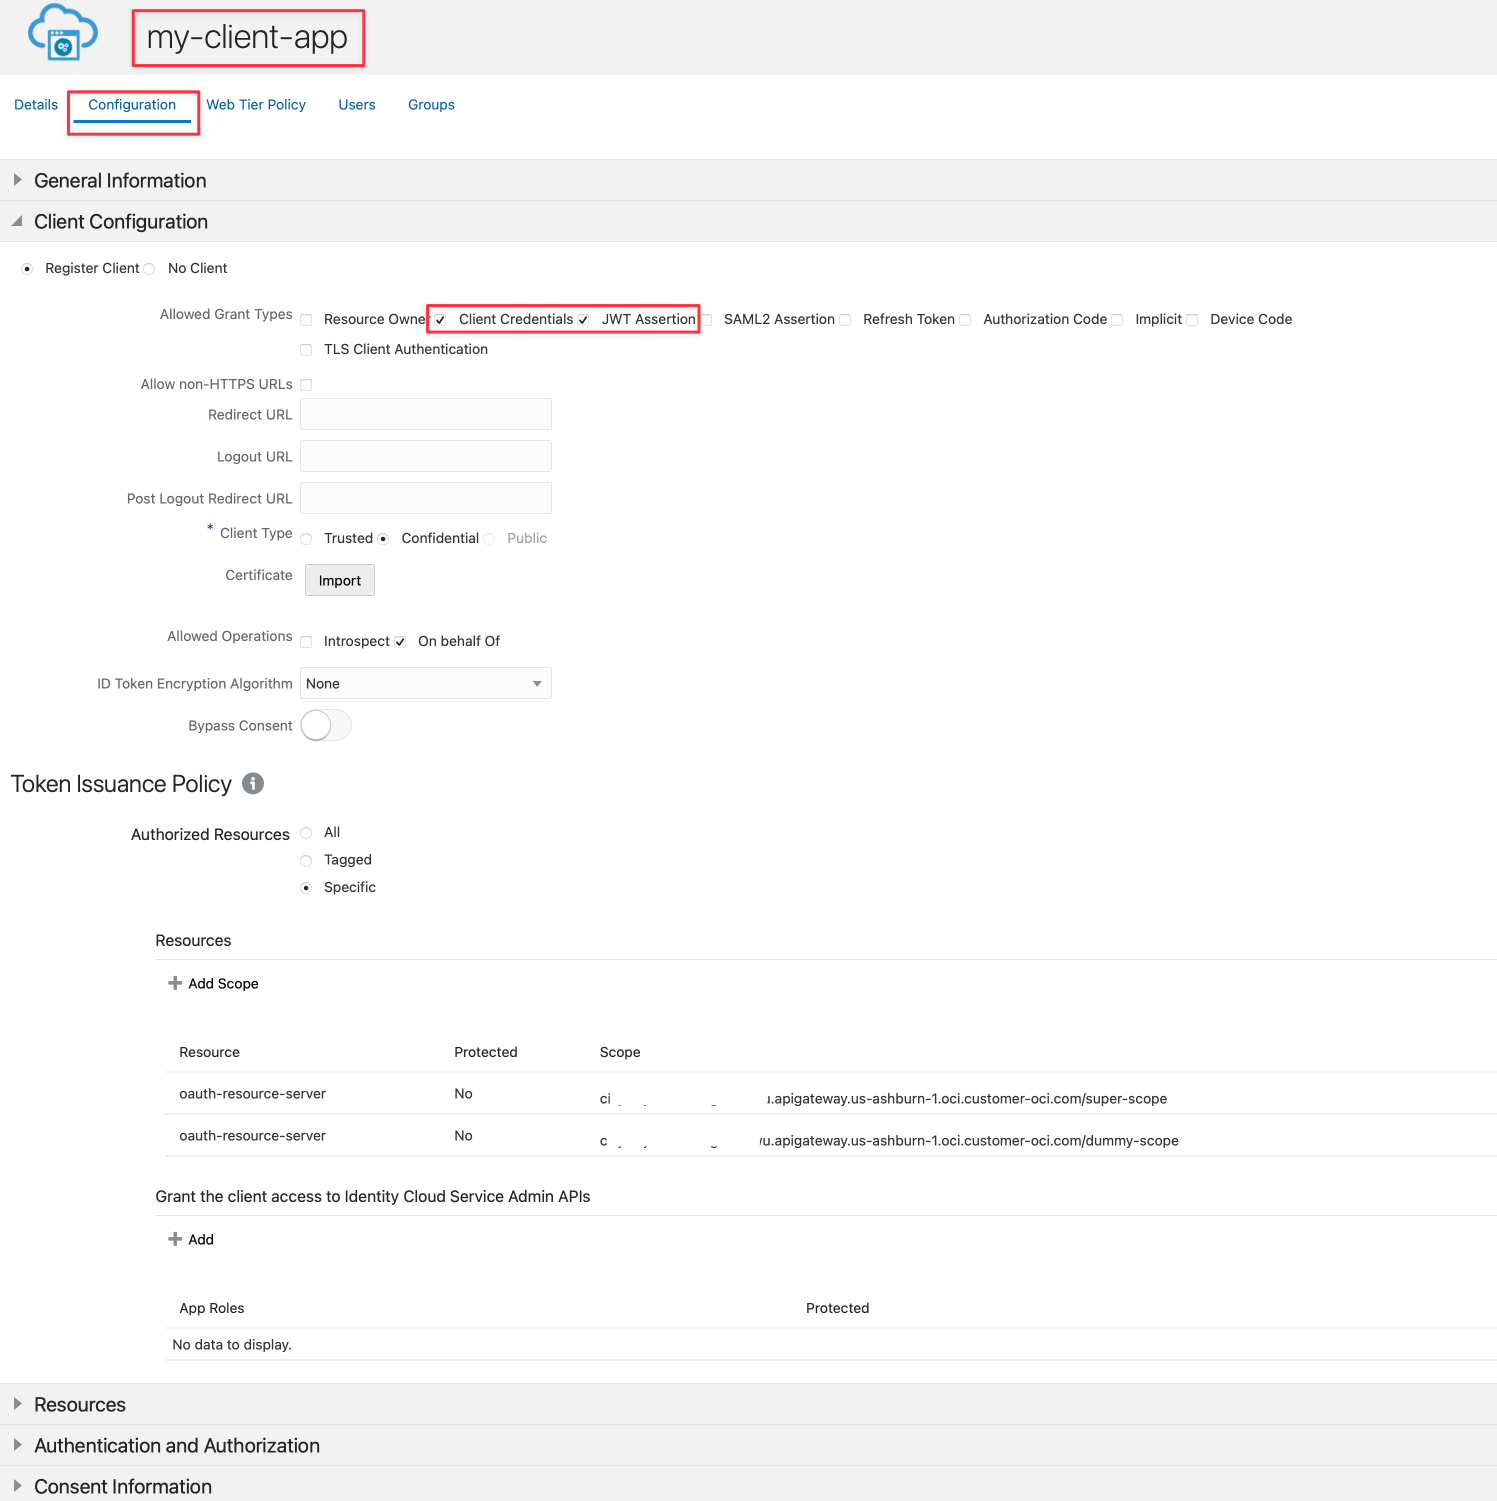
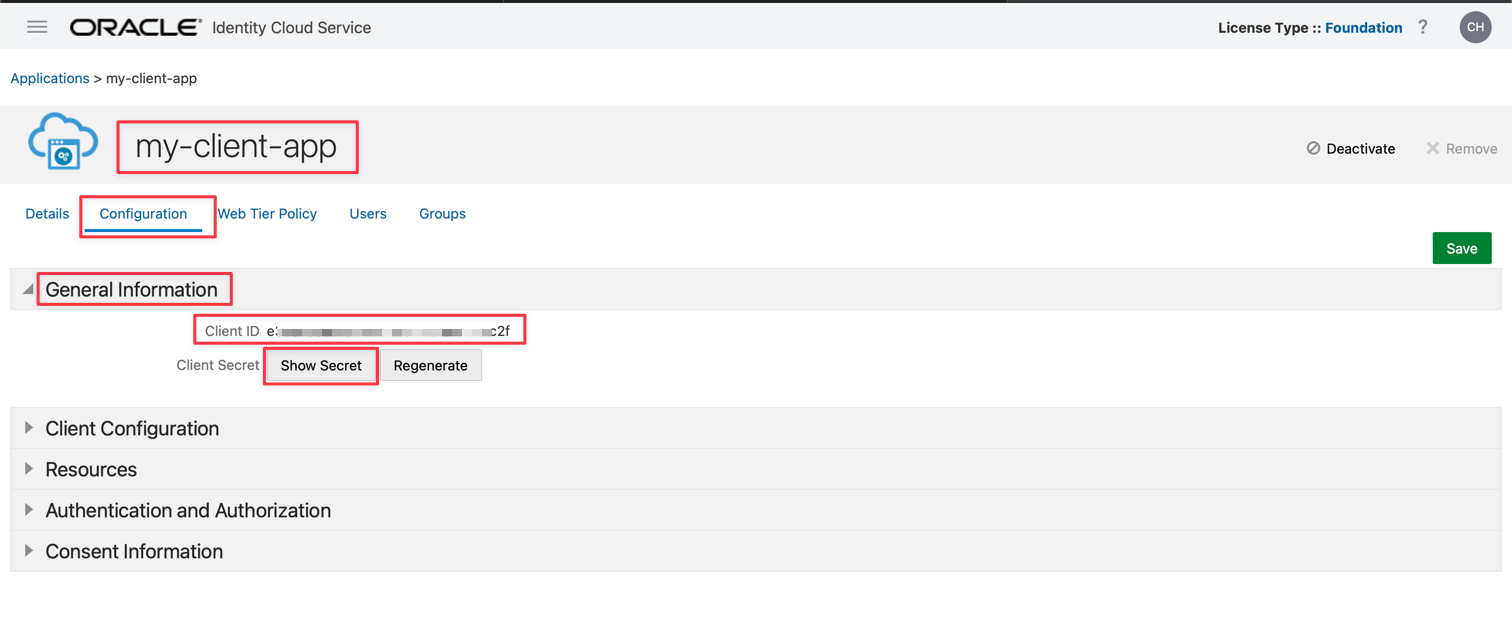
Create an Application in Oracle Identity Cloud Service, in this example, called my-client-app.
-
Select Client Credentials and JWT Assertion options.
-
For configuration details, see Protect APIs with API Gateway using Oracle Identity Cloud Service/IAM JWT with Scopes and Claims.
Note: This authentication example only reflects a hypothetical situation to identify the user and other information about the bucket. This may not reflect the best way to authenticate and authorize an application and is recommended to be evaluated against your company’s standards.
-
Save and activate your application. You can get the clientID and secretID to use in the next section.
Task 2: Review the code
This is the Python code used in an API Gateway deployment to authorize a pre-authenticate link to download a file in Object Storage.
You can download the Python code here: Python fn Project.
python
import io
import json
import logging
import datetime
import jwt
import requests
import base64
import oci

from datetime import timedelta
from fdk import response
from py_zipkin import Encoding #import Zipkin package
from py_zipkin.zipkin import zipkin_span #import Zipkin package
from transport import http_transport #import Zipkin transport

@zipkin_span(service_name='Status: Load File', span_name='statusGetFile')
def auth(ctx, data: io.BytesIO = None):
    auth_token = "invalid"
    token = "invalid"
    apiKey = "invalid"
    expiresAt = (datetime.datetime.utcnow() + timedelta(seconds=60)).replace(tzinfo=datetime.timezone.utc).astimezone().replace(microsecond=0).isoformat()

    config = oci.config.from_file("config")
    object_storage = oci.object_storage.ObjectStorageClient(config)
    namespace = object_storage.get_namespace().data

    try:
        auth_token = json.loads(data.getvalue())
        secretID = auth_token.get("secretID")
        clientID = auth_token.get("clientID")

        details = oci.object_storage.models.CreatePreauthenticatedRequestDetails(name="data", access_type="AnyObjectReadWrite", bucket_listing_action="ListObjects", time_expires=expiresAt)

        preauth = object_storage.create_preauthenticated_request(namespace_name=namespace, bucket_name="data", create_preauthenticated_request_details=details)
        preauthstr = str(preauth.data)

        auth = clientID + ":" + secretID
        auth_bytes = auth.encode("ascii")
        auth_base64_bytes = base64.b64encode(auth_bytes)
        auth_base64_message = auth_base64_bytes.decode("ascii")

        headers = {"Authorization": "Basic " + auth_base64_message, "Content-Type": "application/x-www-form-urlencoded"}

        scope = "cihxxxxxxxxxxxxxxxxxowu.apigateway.us-ashburn-1.oci.customer-oci.com/super-scope"
        grant_type = "client_credentials"

        body = {"scope": scope, "grant_type": grant_type}

        url_post = "https://Oracle Identity Cloud Service-4fxxxxxxxxxxxxxxxxxxxxxx9.identity.oraclecloud.com/oauth2/v1/token"
        post_response = requests.post(url_post, headers=headers, data=body)

        jwtTokenDecoded = jwt.decode(post_response.json()['access_token'], options={"verify_signature": False})

        return response.Response(
            ctx,
            status_code=200,
            response_data=json.dumps({"active": True, "principal": "foo", "scope": "bar", "clientId": "1234", "expiresAt": expiresAt, "context": {"username": "wally", "token":
post_response.json()['access_token'], "jwtTokenDecoded": jwtTokenDecoded, "objectID": preauthstr}})
        )

    except (Exception, ValueError) as ex:
        logging.getLogger().info('error parsing json payload: ' + str(ex))
        pass

    return response.Response(
        ctx,
        status_code=401,
        response_data=json.dumps({"active": False, "wwwAuthenticate": "API-key"})
    )

@zipkin_span(service_name='Status: Load File', span_name='statusGetFile')
def handler(ctx, data: io.BytesIO = None):
    with zipkin_span(
            service_name="Status: Load File", #You can change it as you need
            span_name="statusGetFile", #You can change it as you need
            transport_handler=http_transport, #zipkin transport, will use it to upload trace data to OCI APM
            encoding = Encoding.V2_JSON,
            binary_annotations = {"status":"Load File", "objectID":json.loads(data.getvalue()).get("objectID")}, #Custom tag
            sample_rate=100 # this is optional and can be used to set custom sample rates
    ):
        return auth(ctx, data)
Let’s analyze the code in parts to understand how to:
- Follow the processes in OCI Observability
- Configure a pre-authenticate link to download a file in the Object Storage
- Authenticate with an Identity Provider and obtain a JWT token
- Decode a JWT token and use the information in the process
- Return a success or fail status in the API Gateway deployment
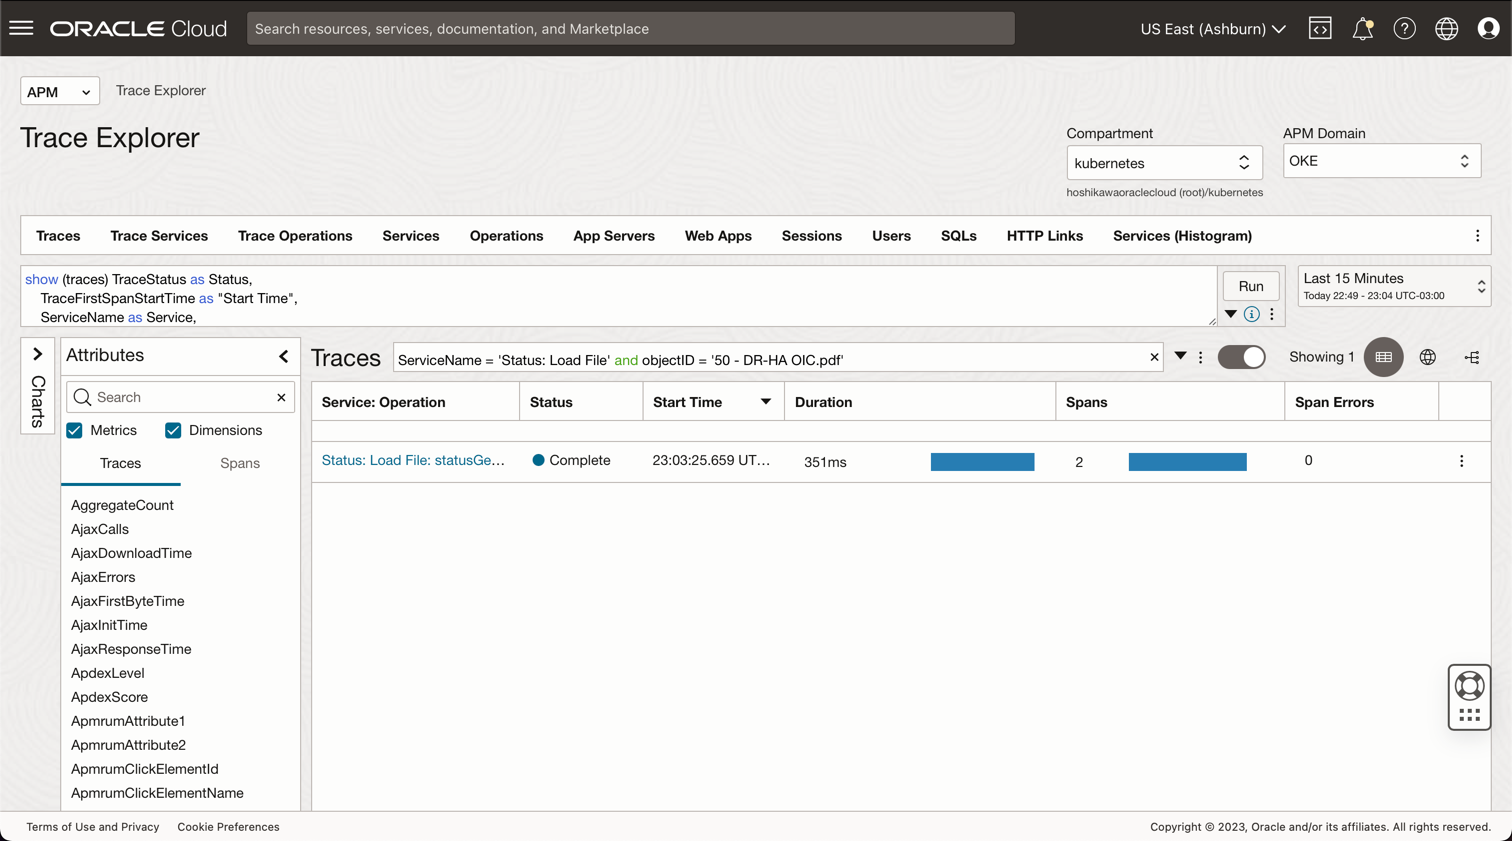
This part of the code saves a status position in OCI Observability. It uses Zipkin framework to publish into OCI APM Observability
python
@zipkin_span(service_name='Status: Load File', span_name='statusGetFile')
def handler(ctx, data: io.BytesIO = None):
    with zipkin_span(
            service_name="Status: Load File", #You can change it as you need
            span_name="statusGetFile", #You can change it as you need
            transport_handler=http_transport, #zipkin transport, will use it to upload trace data to OCI APM
            encoding = Encoding.V2_JSON,
            binary_annotations = {"status":"Load File", "objectID":json.loads(data.getvalue()).get("objectID")}, #Custom tag
            sample_rate=100 # this is optional and can be used to set custom sample rates
    ):
This is the OCI APM Console view for the code and you can find your files with queries like:
**ServiceName** = 'Status: Load File' and **objectID** = '50 - DR-HA OIC.pdf'
The next code stablishes an expiration date and time for the Object Storage file. A pre-authenticate will be generated and the attribute expiresAt will be used for this objective. timedelta add 60 seconds from the current time for downloading the file.
python
expiresAt = (datetime.datetime.utcnow() + timedelta(seconds=60)).replace(tzinfo=datetime.timezone.utc).astimezone().replace(microsecond=0).isoformat()
Now, we need to initialize the OCI Object Storage framework based on the credentials saved in the OCI CLI installation. The OCI CLI configuration uses the ~/.oci/config and the certificate .pem file. So you can install OCI CLI locally and configure a user to access the Object Storage (see the OCI documentation to install OCI CLI and the Object Storage policies in the Related Links section) and then, copy these 2 files into this fn project.
python
config = oci.config.from_file("config")
object_storage = oci.object_storage.ObjectStorageClient(config)
namespace = object_storage.get_namespace().data
The next step will get from the Body parameters values: secretID, clientID and objectID.
#secretID = the Oracle Identity Cloud Service secretID from the application created to validate the JWT Token
#clientID = the Oracle Identity Cloud Service clientID from the application created to validate the JWT Token
#objectID = the file name in the Object Storage
python
try:
    auth_token = json.loads(data.getvalue())
    secretID = auth_token.get("secretID")
    clientID = auth_token.get("clientID")
    objectID = auth_token.get("objectID")
The OCI SDK can support Object Storage for many services, like read and/or write a file, list content of a bucket and others. You can, for example, enable the consumer to list all the content of a bucket with a pre-authenticated URL will be generated in this part of code. The variable bucket_name contains the name of the bucket in the Object Storage created previously and time_expires represents the date and time expiration to download the file.
python
details = oci.object_storage.models.CreatePreauthenticatedRequestDetails(name="data", access_type="AnyObjectReadWrite", bucket_listing_action="ListObjects", time_expires=expiresAt)

preauth = object_storage.create_preauthenticated_request(namespace_name=namespace, bucket_name="data", create_preauthenticated_request_details=details)
preauthstr = str(preauth.data)
This part of code calls the Oracle Identity Cloud Service to validate clientID and secretID to obtain the JWT token. A JWT can be decoded into a JSON string, in this case, without signature, but the signature can be verified easily with a certificate.
python
auth = clientID + ":" + secretID
auth_bytes = auth.encode("ascii")
auth_base64_bytes = base64.b64encode(auth_bytes)
auth_base64_message = auth_base64_bytes.decode("ascii")

headers = {"Authorization": "Basic " + auth_base64_message, "Content-Type": "application/x-www-form-urlencoded"}

scope = "xxxxxxxxxxxxxxxxxxxx.apigateway.us-ashburn-1.oci.customer-oci.com/super-scope"
grant_type = "client_credentials"

body = {"scope": scope, "grant_type": grant_type}

url_post = "https://Oracle Identity Cloud Service-xxxxxxxxxxxxxxxxxxxxxxx.identity.oraclecloud.com/oauth2/v1/token"
post_response = requests.post(url_post, headers=headers, data=body)

jwtTokenDecoded = jwt.decode(post_response.json()['access_token'], options={"verify_signature": False})
This is the final part, where all the data will be returned with code 200. You can return all the information needed to your application and this part of the code validates the authentication, resulting in code 200 (authorized/success) or 401 (unauthorized).
python
    return response.Response(
        ctx,
        status_code=200,
        response_data=json.dumps({"active": True, "principal": "foo", "scope": "bar", "clientId": "1234", "expiresAt": expiresAt, "context": {"username": "wally", "token": post_response.json()['access_token'], "jwtTokenDecoded": jwtTokenDecoded, "objectID": preauthstr}})
    )

except (Exception, ValueError) as ex:
    logging.getLogger().info('error parsing json payload: ' + str(ex))
    pass

return response.Response(
    ctx,
    status_code=401,
    response_data=json.dumps({"active": False, "wwwAuthenticate": "API-key"})
)
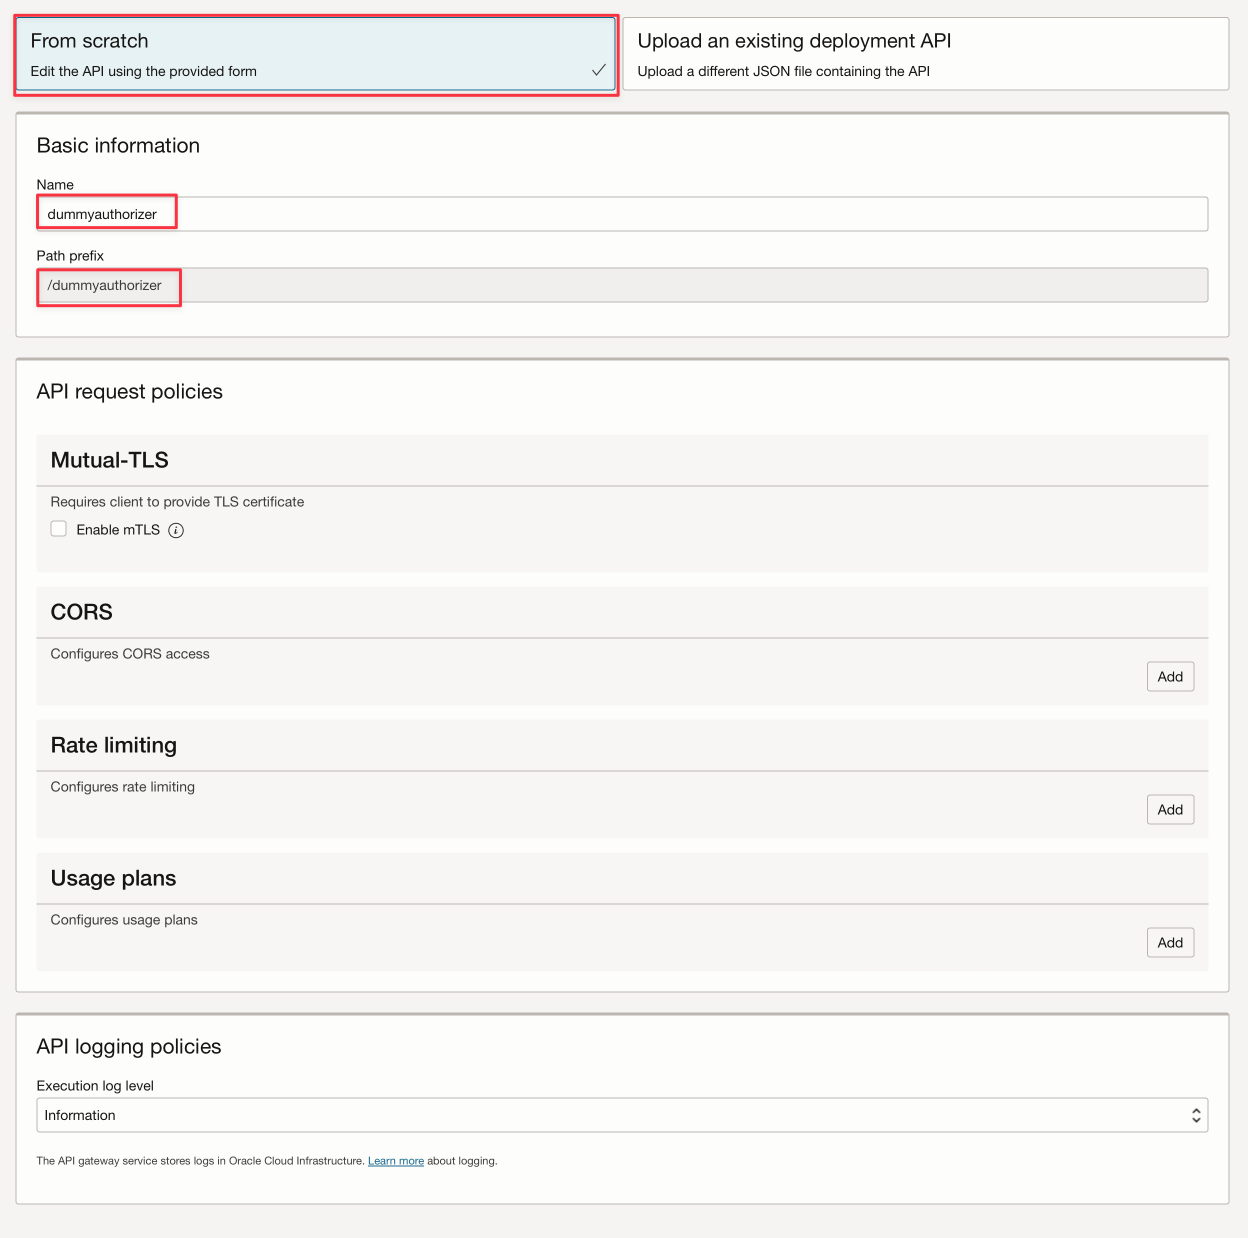
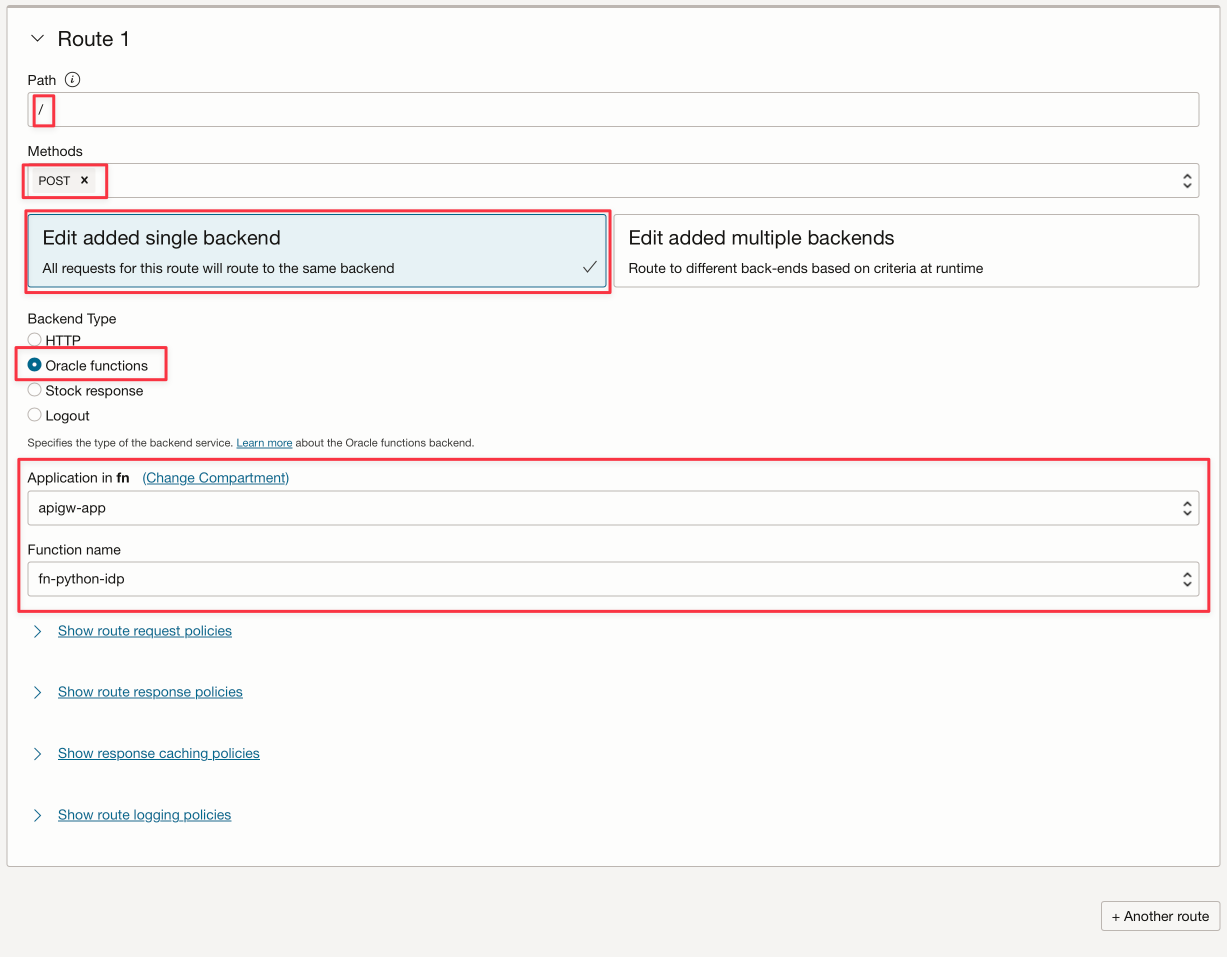
Task 3: Configure the OCI API Gateway to authenticate with fn
OCI API Gateway can deploy an API as an OCI function. As you saw previously, the code uses the body containing clientID, secretID and objectID information passed by API Gateway configuration. You can configure your deployment:

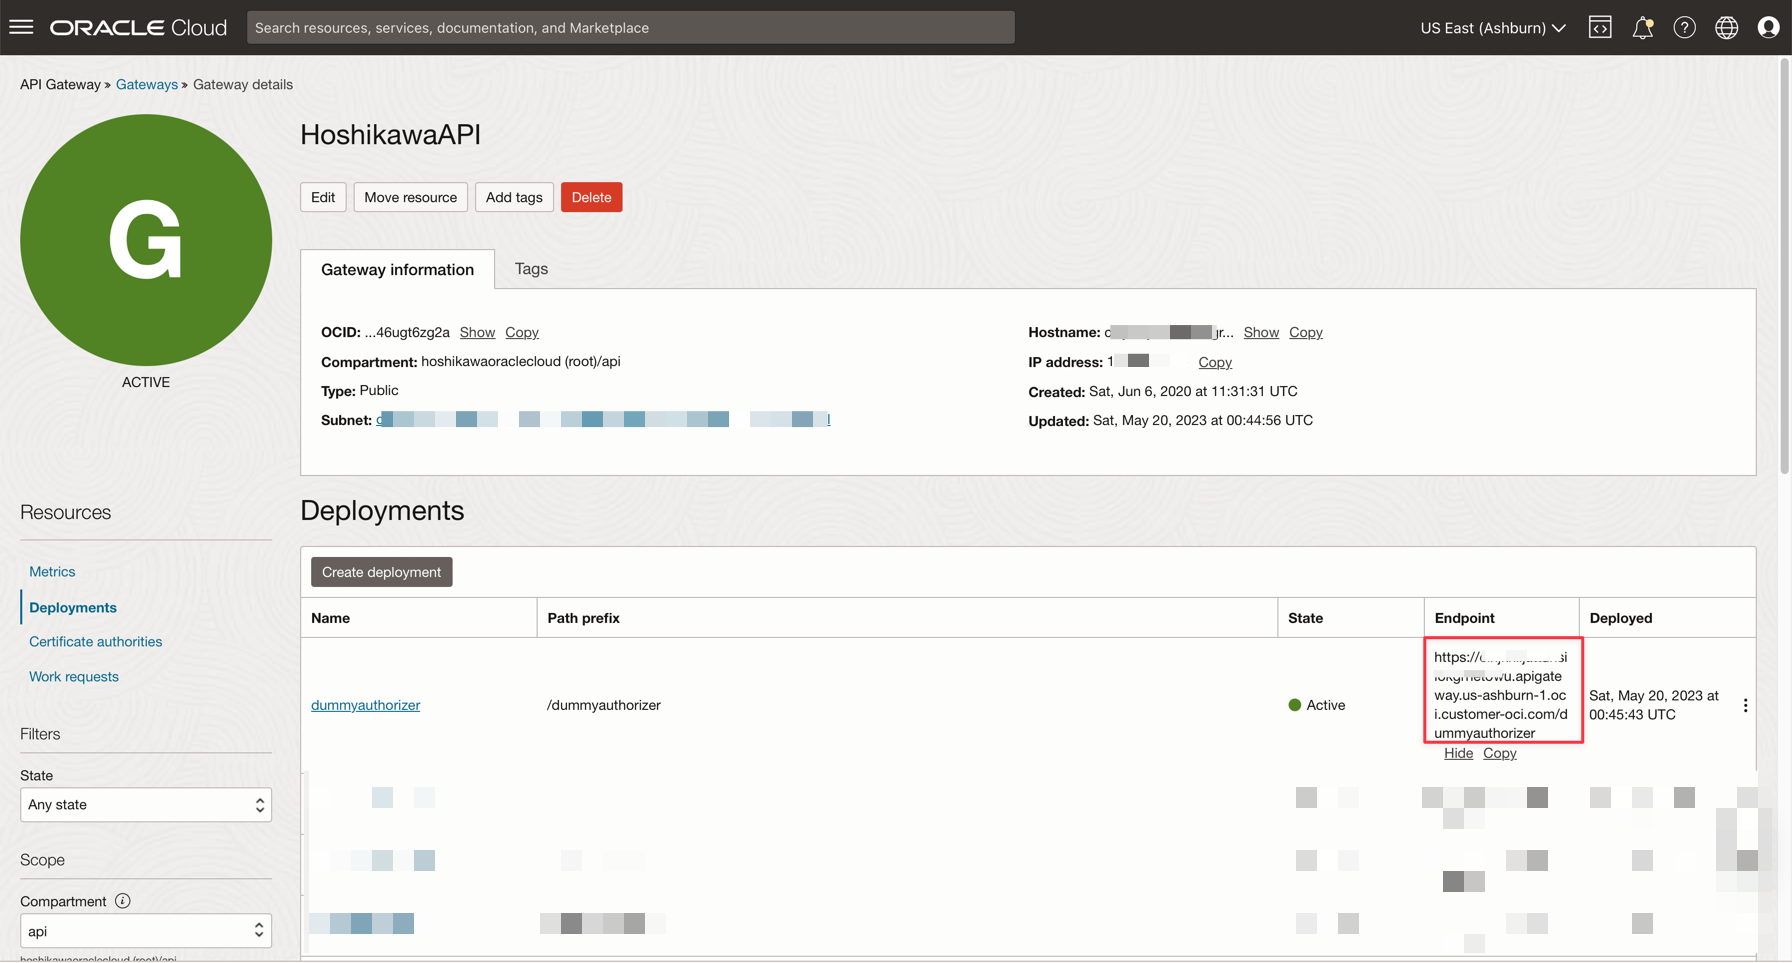
After saving your deployment, you can get the REST endpoint here. Remember that the complete endpoint for your Object Storage REST API service is this endpoint plus the “/” at the end (you declared / as your path previously).
Task 4: Test the API Gateway Deployment
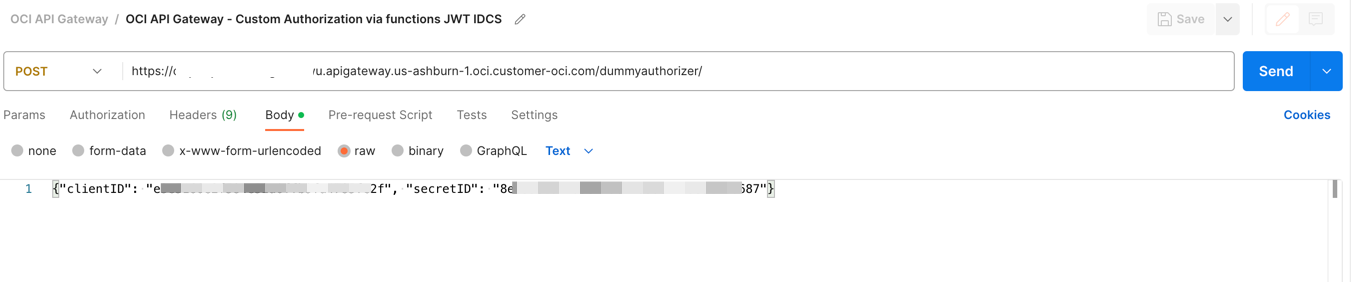
You can test the application with CURL or in Postman:
bash
curl --location 'https://xxxxxxxxxxxxxxxxxxx.apigateway.us-ashburn-1.oci.customer-oci.com/dummyauthorizer/' \
--header 'Content-Type: text/plain' \
--data '{"clientID": "e3exxxxxxxxxxxxxxxxxc2f", "secretID": "8exxxxxxx-fa5e-xxcf-8xxxc-xxxxxxxxxxx87", "objectID": "any-file.txt"}'
Note: The attribute
objectIDis used here just to illustrate the Observability and how to show status on the Trace Explorer in OCI Console.
If everything is OK, you can see the success code 200:
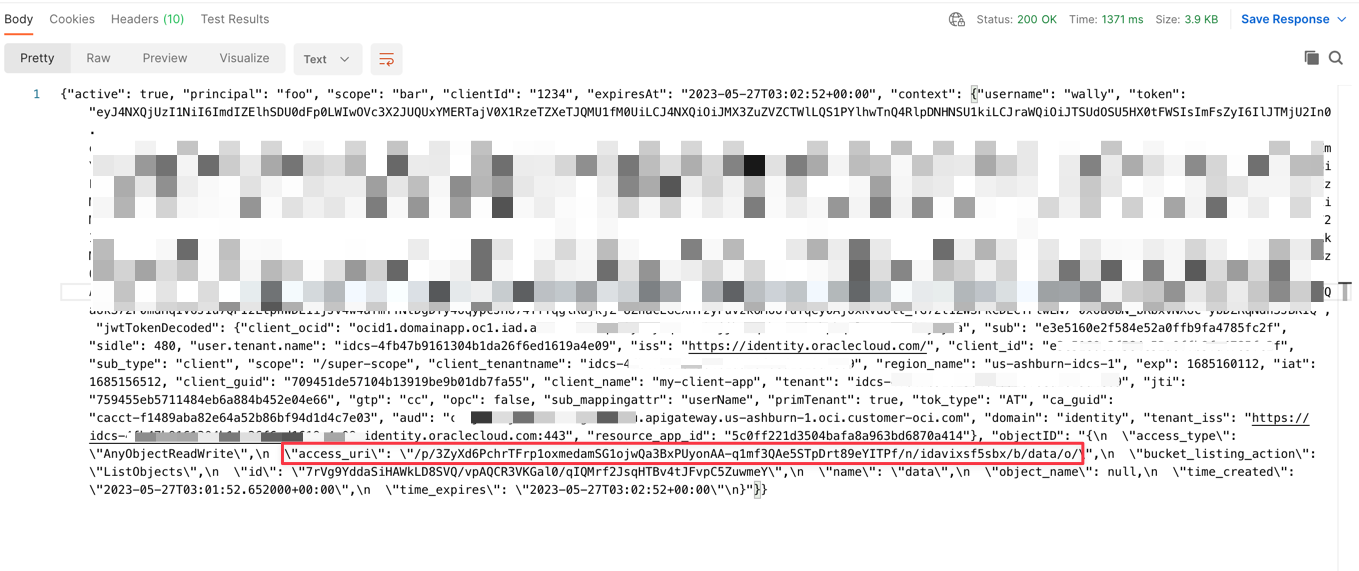
An URL for the pre-authenticated Object Storage will be generated and you can download the file for the next 60 seconds. You can download the file following the example here:
https://objectstorage.us-ashburn-1.oraclecloud.com + [access_uri]

or

https://objectstorage.us-ashburn-1.oraclecloud.com/p/eL5C0R0luN_cTNn-vUF7_Dx_z2N4w7IXemKr5y61cSRxZZPRXcR2Yj1dNCaJBDK8/n/idavixsf5sbx/b/data/o/calico.yaml
You can download, upload or view the bucket files with this command line:
- TO UPLOAD A FILE: `curl https://objectstorage.us-ashburn-1.oraclecloud.com/p/HoPudIF45Bj6J5-Qy3J1D9dOplLuKtECRFhvOTkKAtBjJXkOTDx0Pt8gXbOOEoRx/n/idavixsf5sbx/b/data/o/ --upload-file func.py`

- TO DOWNLOAD A FILE: `curl https://objectstorage.us-ashburn-1.oraclecloud.com/p/3ZyXd6PchrTFrp1oxmedamSG1ojwQa3BxPUyonAA-q1mf3QAe5STpDrt89eYITPf/n/idavixsf5sbx/b/data/o/func.py`

- TO LIST BUCKET: `curl https://objectstorage.us-ashburn-1.oraclecloud.com/p/ODVRMB71kD0SHWuoY4ojVd93nmIiy8u0zrxA56T7FBaohAgA7k8KOLAIlhxjcveE/n/idavixsf5sbx/b/data/o/``
Task 5: Configure Observability Dashboard
Basically, every OCI resource can show metrics in a dashboard and many events on these resources can trigger an action. In this demo, you can configure a dashboard to show how many files have been written or read on the Object Storage:
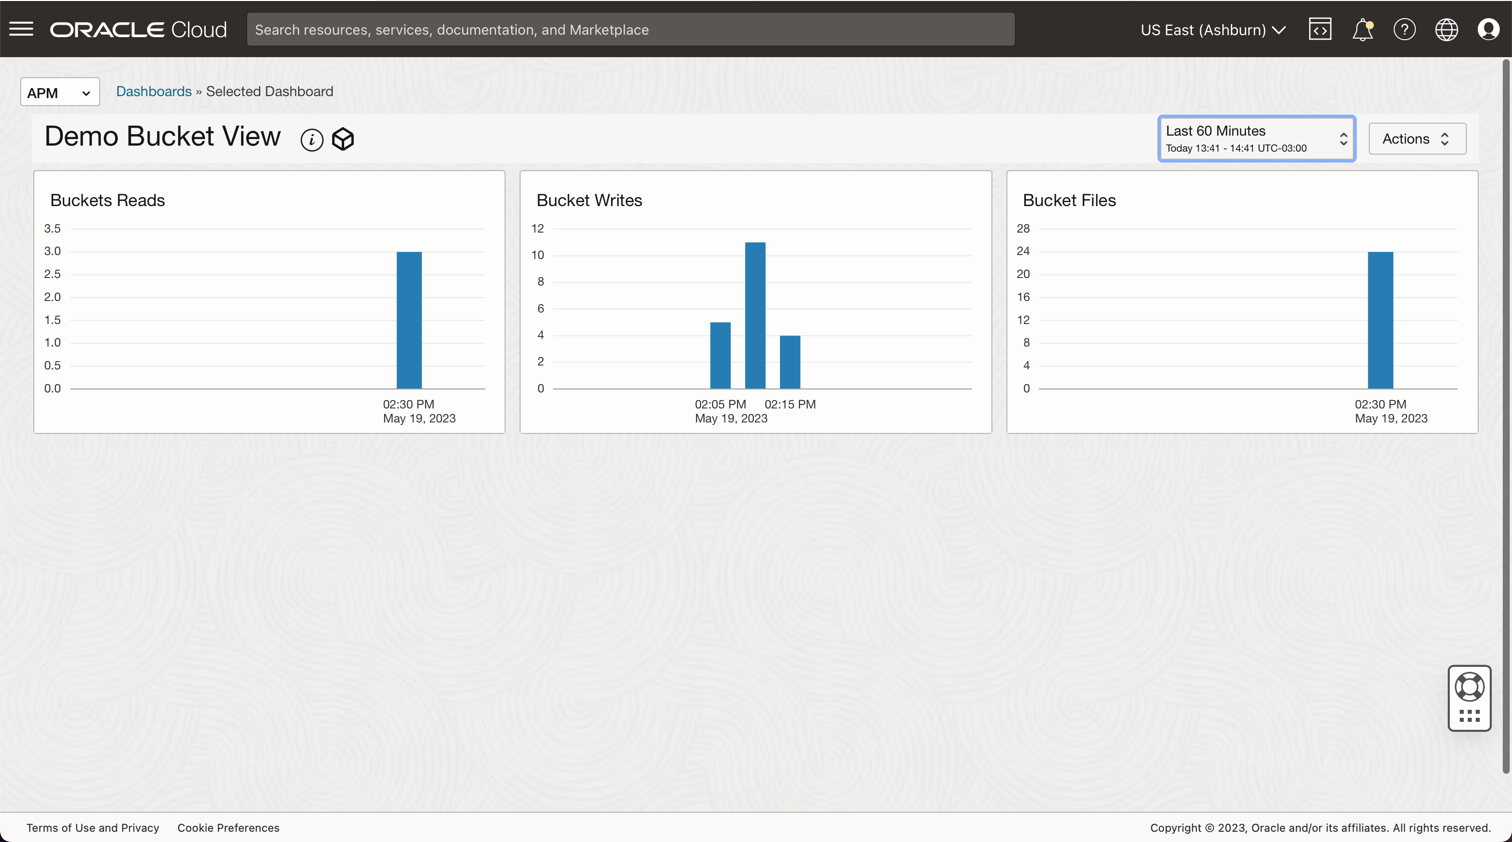
You can configure the dashboard query as follows:
- Bucket Files = ObjectCount[1d].groupby(resourceID).count()
- Bucket Writes = PutRequests[5m].grouping().count()
- Bucket Reads = GetRequests[5m].grouping().count()
Related Links
- Install the OCI CLI
- Object Storage Security
- Creating Your First API Gateway In The Oracle Cloud
- Functions QuickStart Guides
- Oracle Functions Samples
- Passing Tokens to Authorizer Functions to Add Authentication and Authorization to API Deployments
- Create a JWT Token in Java for Oracle Identity Cloud Service
- Object Storage Metrics
- Monitoring Query Language (MQL) Reference
- Protect APIs with API Gateway using Oracle Identity Cloud Service/IAM JWT with Scopes and Claims
- Process large files in Autonomous Database and Kafka with Oracle Cloud Infrastructure Data Flow
- Object Storage - Limits and Using Multipart Uploads
Acknowledgments
- Author - Cristiano Hoshikawa (Oracle LAD A-Team Solution Engineer)
More Learning Resources
Explore other labs on docs.oracle.com/learn or access more free learning content on the Oracle Learning YouTube channel. Additionally, visit education.oracle.com/learning-explorer to become an Oracle Learning Explorer.
For product documentation, visit Oracle Help Center.
Use Oracle Cloud API Gateway to create a secure Object Storage download service with function authentication
F84019-01
July 2023
Copyright © 2023, Oracle and/or its affiliates.