Note:
- This tutorial requires access to Oracle Cloud. To sign up for a free account, see Get started with Oracle Cloud Infrastructure Free Tier.
- It uses example values for Oracle Cloud Infrastructure credentials, tenancy, and compartments. When completing your lab, substitute these values with ones specific to your cloud environment.
Get started with Arm-based Kubernetes clusters in Oracle Cloud Infrastructure
This tutorial explains how to create Arm-based Kubernetes clusters that use the Ampere A1 compute platform in Oracle Cloud Infrastructure(OCI). You will also deploy the popular web container, Apache Tomcat on the kubernetes cluster. Using the methods in this tutorial, you can create application deployments that are seamlessly portable between the Arm-based kubernetes clusters and x86(Intel and AMD) based clusters.
Introduction
Objectives
In this tutorial, you will:
- Create a Kubernetes cluster (OKE) powered by the Ampere A1 compute.
- Deploy Apache Tomcat to the cluster.
- Create deployments that are seamlessly portable across x86 and Arm based kubernetes clusters.
- Deploy Java applications and micro services to the Tomcat web container.
What is the Ampere A1 Compute Platform
The Ampere A1 compute platform based on Ampere Altra CPUs represent a generational shift for enterprises and application developers that are building workloads that can scale from edge devices to cloud data centers. The unique design of this platform delivers consistent and predictable performance as there are no resource contention within a compute core and offers more isolation and security. This new class of compute shapes on Oracle Cloud Infrastructure provide an unmatched platform that combines power of the Altra CPUs with the security, scalability and eco-system of services on OCI.
Introducing the Arm Architecture to your Environment
When introducing the Arm architecture to your application development process, your development workflows stay the same in most cases. The tools and the process that you currently use will carry over seamlessly, and your development workstation setup will remain the same. The general exception to this is low-level system applications that target specific CPU features using highly specialized tools. In most cases, you might expect minor changes to the build or packaging steps in your workflow, to support the Arm architecture. Start by analyzing your existing workflow to identify if you have any platform-specific build or packaging steps.
- Platform-specific build steps can be compiler options, in the case of compiled languages like C/C++, Go, and Rust. In these cases, you typically add a build step to compile your application for Arm along with the x86 version of the application. If you’re using a bytecode language, Just-In-Time (JIT) compiled language, or an interpreted language such as Java, JavaScript, TypeScript, Python, or Ruby, then there are usually no compile-time flags or options. These languages don’t produce platform-specific executable binaries; instead, they use a platform-specific runtime, such as the Java or Node.js runtime for Arm, which runs the same source code across multiple platforms.
- Platform-specific packaging includes packaging your applications as Docker images, custom VM images, or platform-specific deployment artifacts. In these cases, you will want to amend your build process with an additional step to produce the application package that is Arm specific. In the case of container images, for example, you will want to have a version of your application image that is for deployment on an Arm system. Container image formats support multiple architectures, so that the container runtimes of each platform can simply fetch the appropriate image and run the application. See the Docker blog to learn more about multi-arch images and how to build them.
Create an Arm-based Kubernetes Cluster
Container Engine for Kubernetes is easy to start using, and combined with OCI Cloud Shell, you can have complete control without having to set up a local environment. To get started, you create a new Kubernetes cluster on OCI.
-
From the navigation menu in the Oracle Cloud Console, go to Developer Services and click Kubernetes Clusters.
-
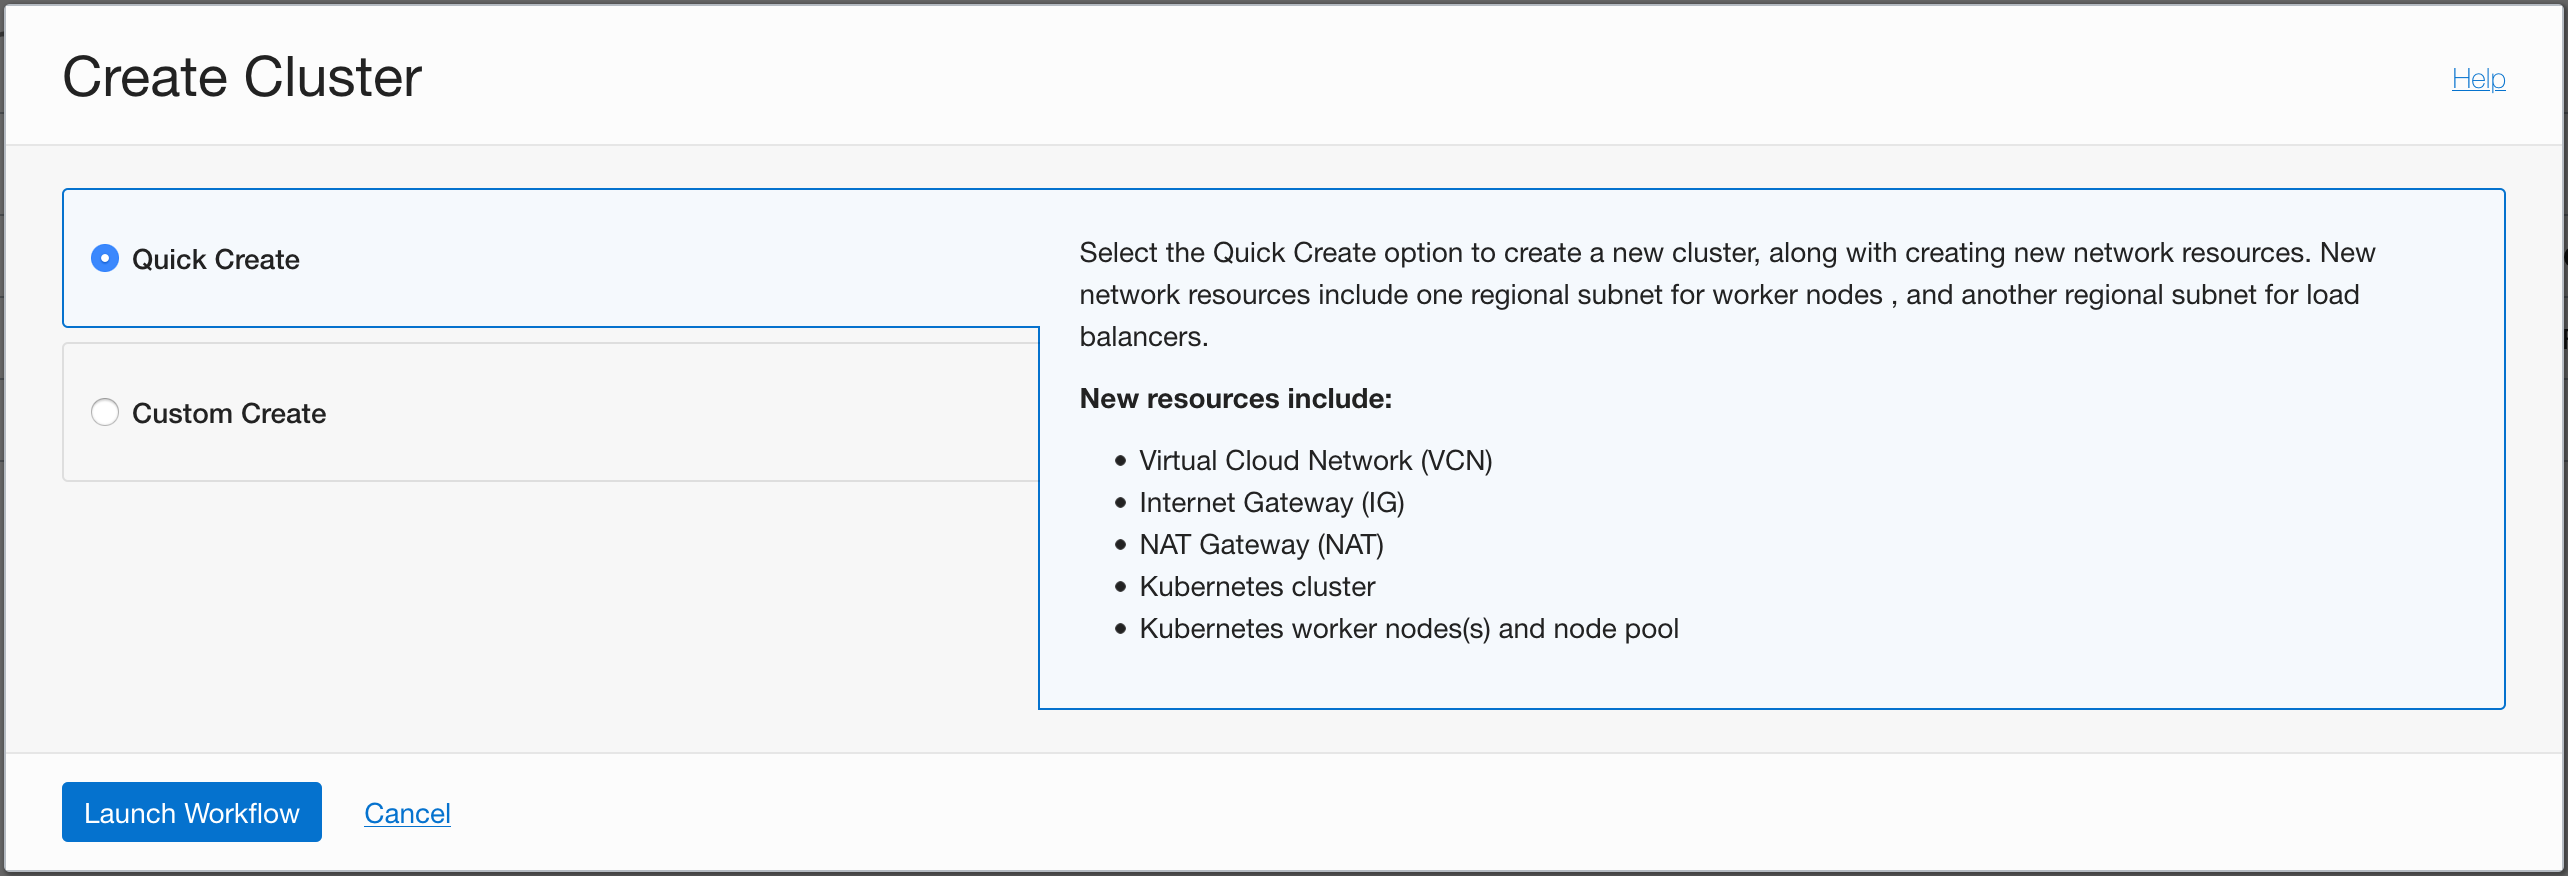
Click Create Cluster. You can use the Quick Create option to use default values or the Custom Create option to specify advanced settings. Here we use the Quick Create because the defaults that it chooses are a great start.
-
On the Create Cluster page, choose some basic configuration options, like the version of Kubernetes that you want to run and the number and shape of the nodes for your cluster. For this tutorial, choose the Ampere A1 shape for the nodes.
Note Choose the
VM.Standard.A1.Flexshape for the nodes as shown.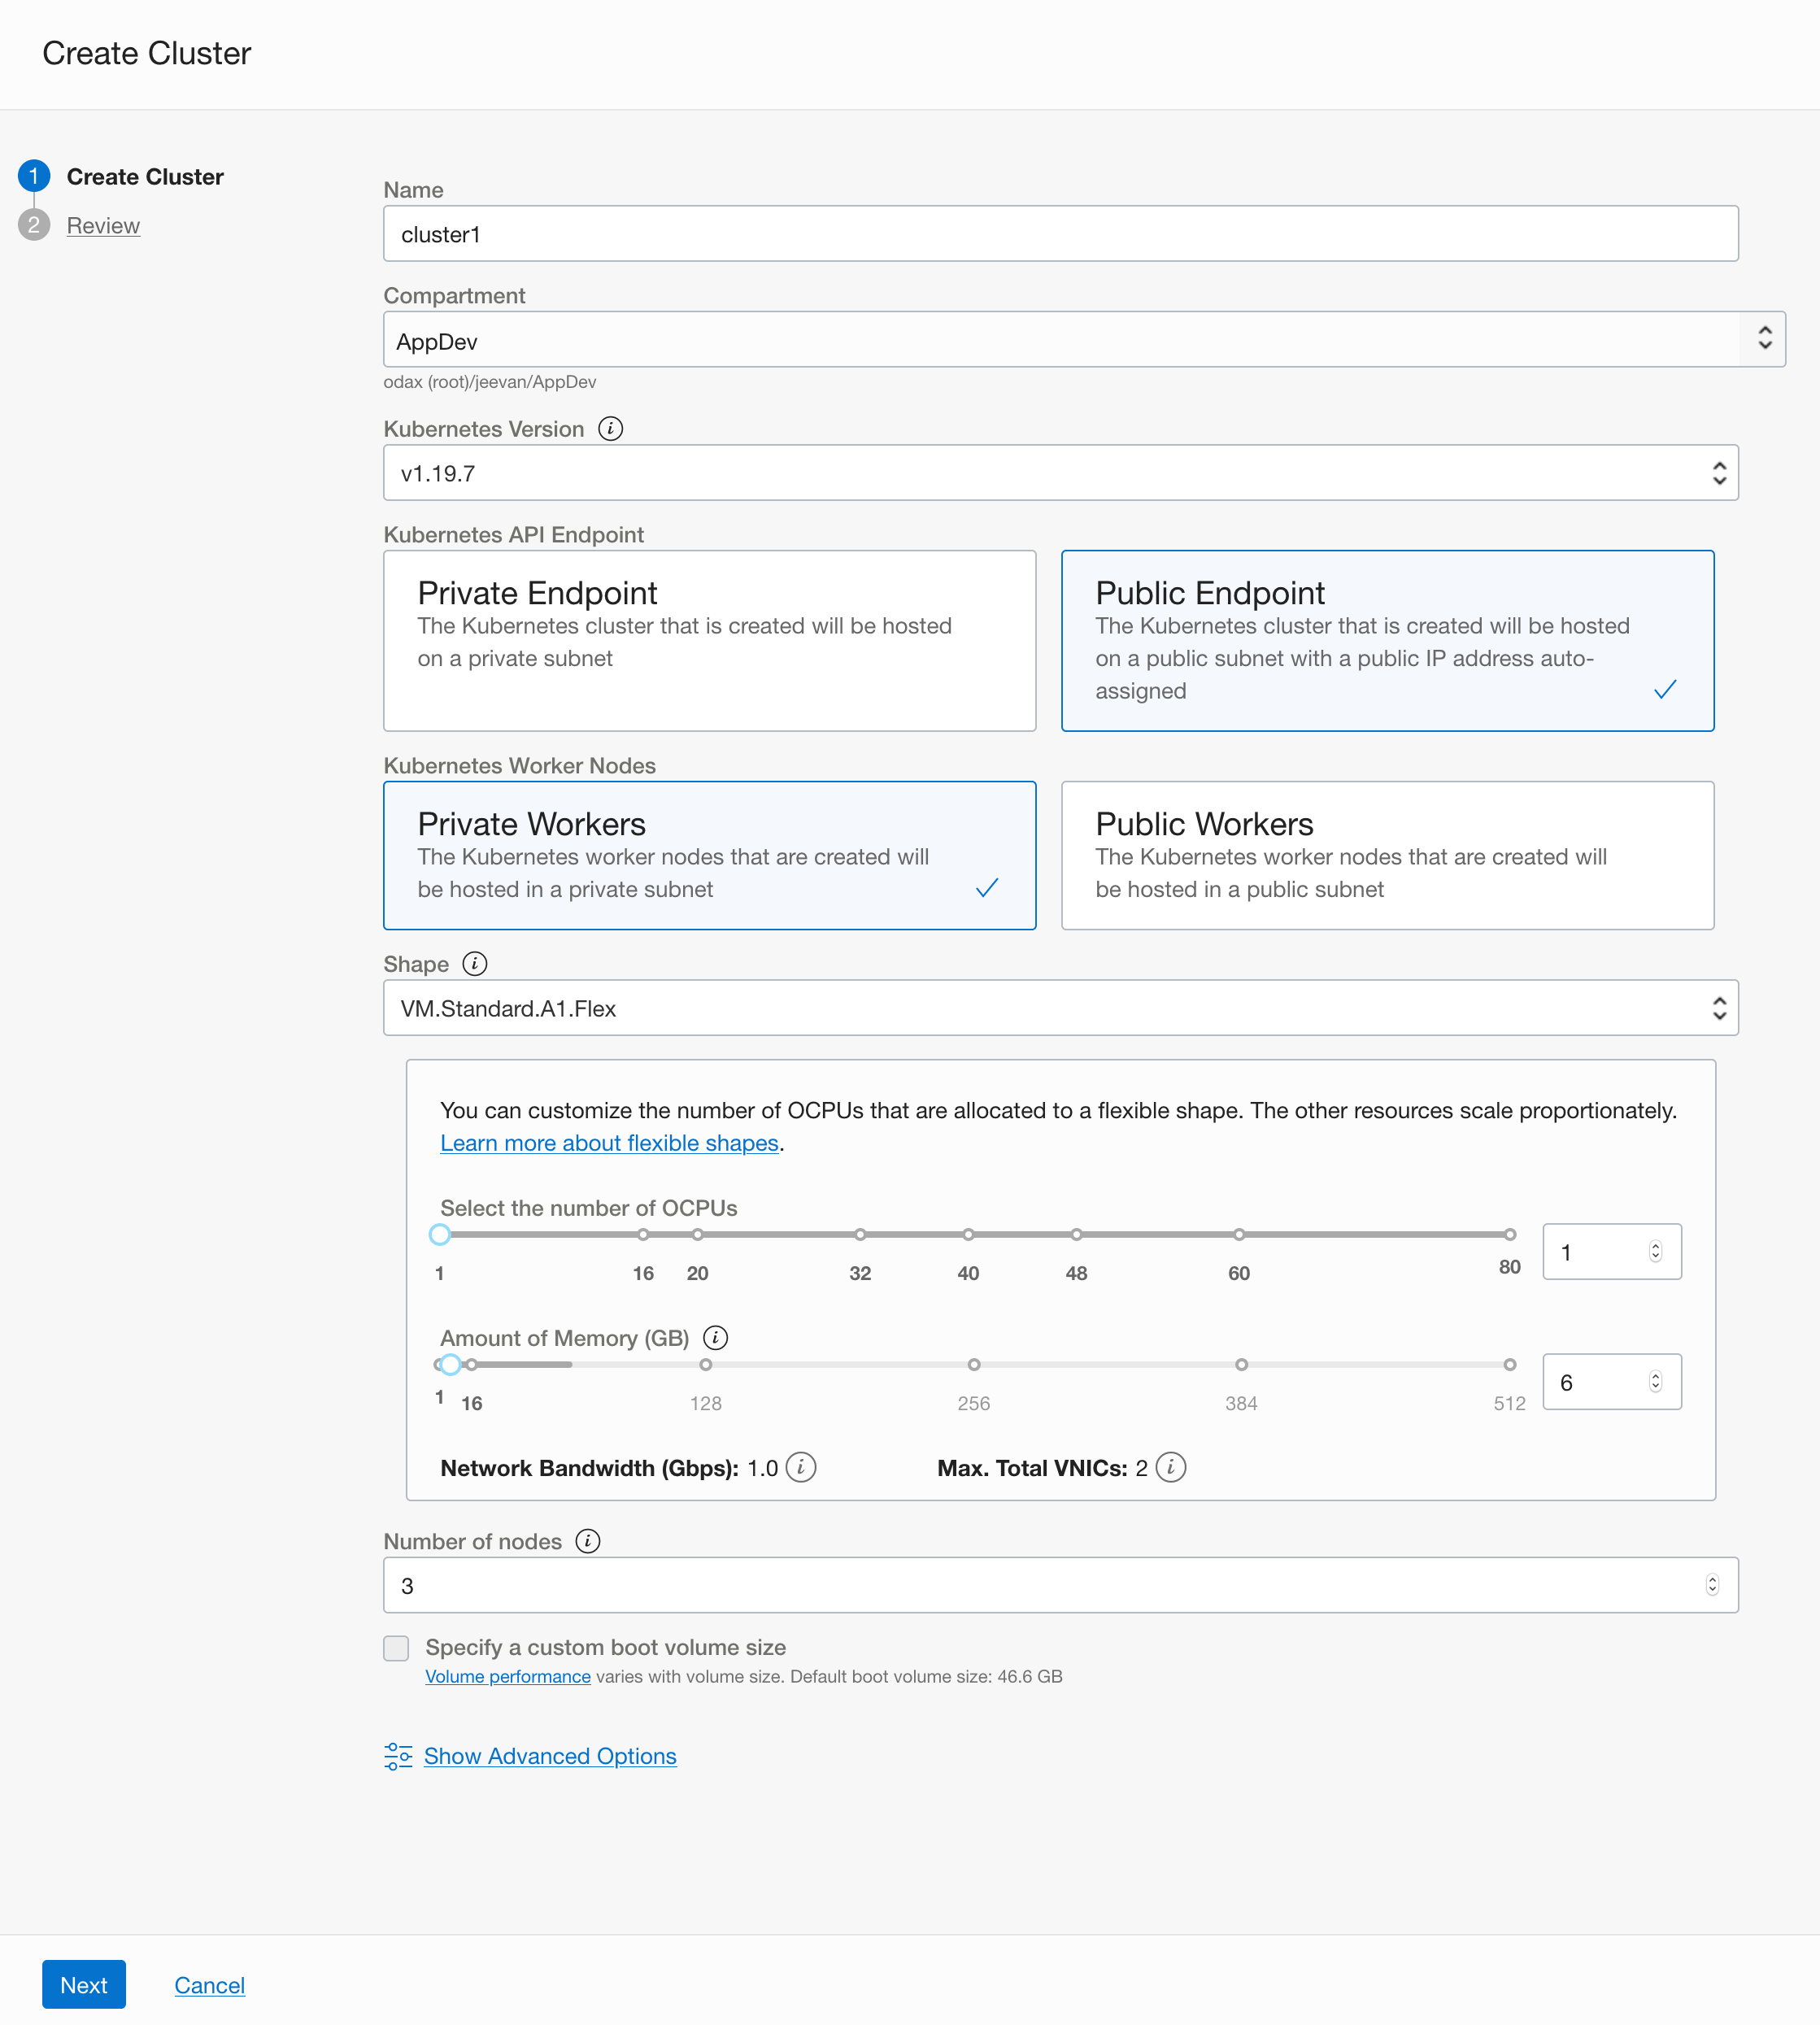 Description of illustration create workflow
You can also specify a name and compartment for the cluster. The visibility type indicates whether the nodes in the cluster are reachable from the internet, for example, over SSH. It’s more common to keep them on a private network and use bastion or jump hosts on the public network to provide access paths. Here we choose the default of keeping the nodes private.
-
Click Create Cluster and the workflow starts creating all the required required resources and the cluster itself.
After the supporting resources are created, the cluster details page is displayed. Within a few minutes, the cluster is created and activated.
-
After the cluster status is Active, click the Access Cluster button to see the ways to access the cluster.
-
Choose the Cloud Shell option. Cloud Shell is a full-featured, online terminal environment integrated with the Console. Cloud Shell has all the tools you need for interacting with your Kubernetes cluster and is the quickest way to get started without configuring a local development environment.
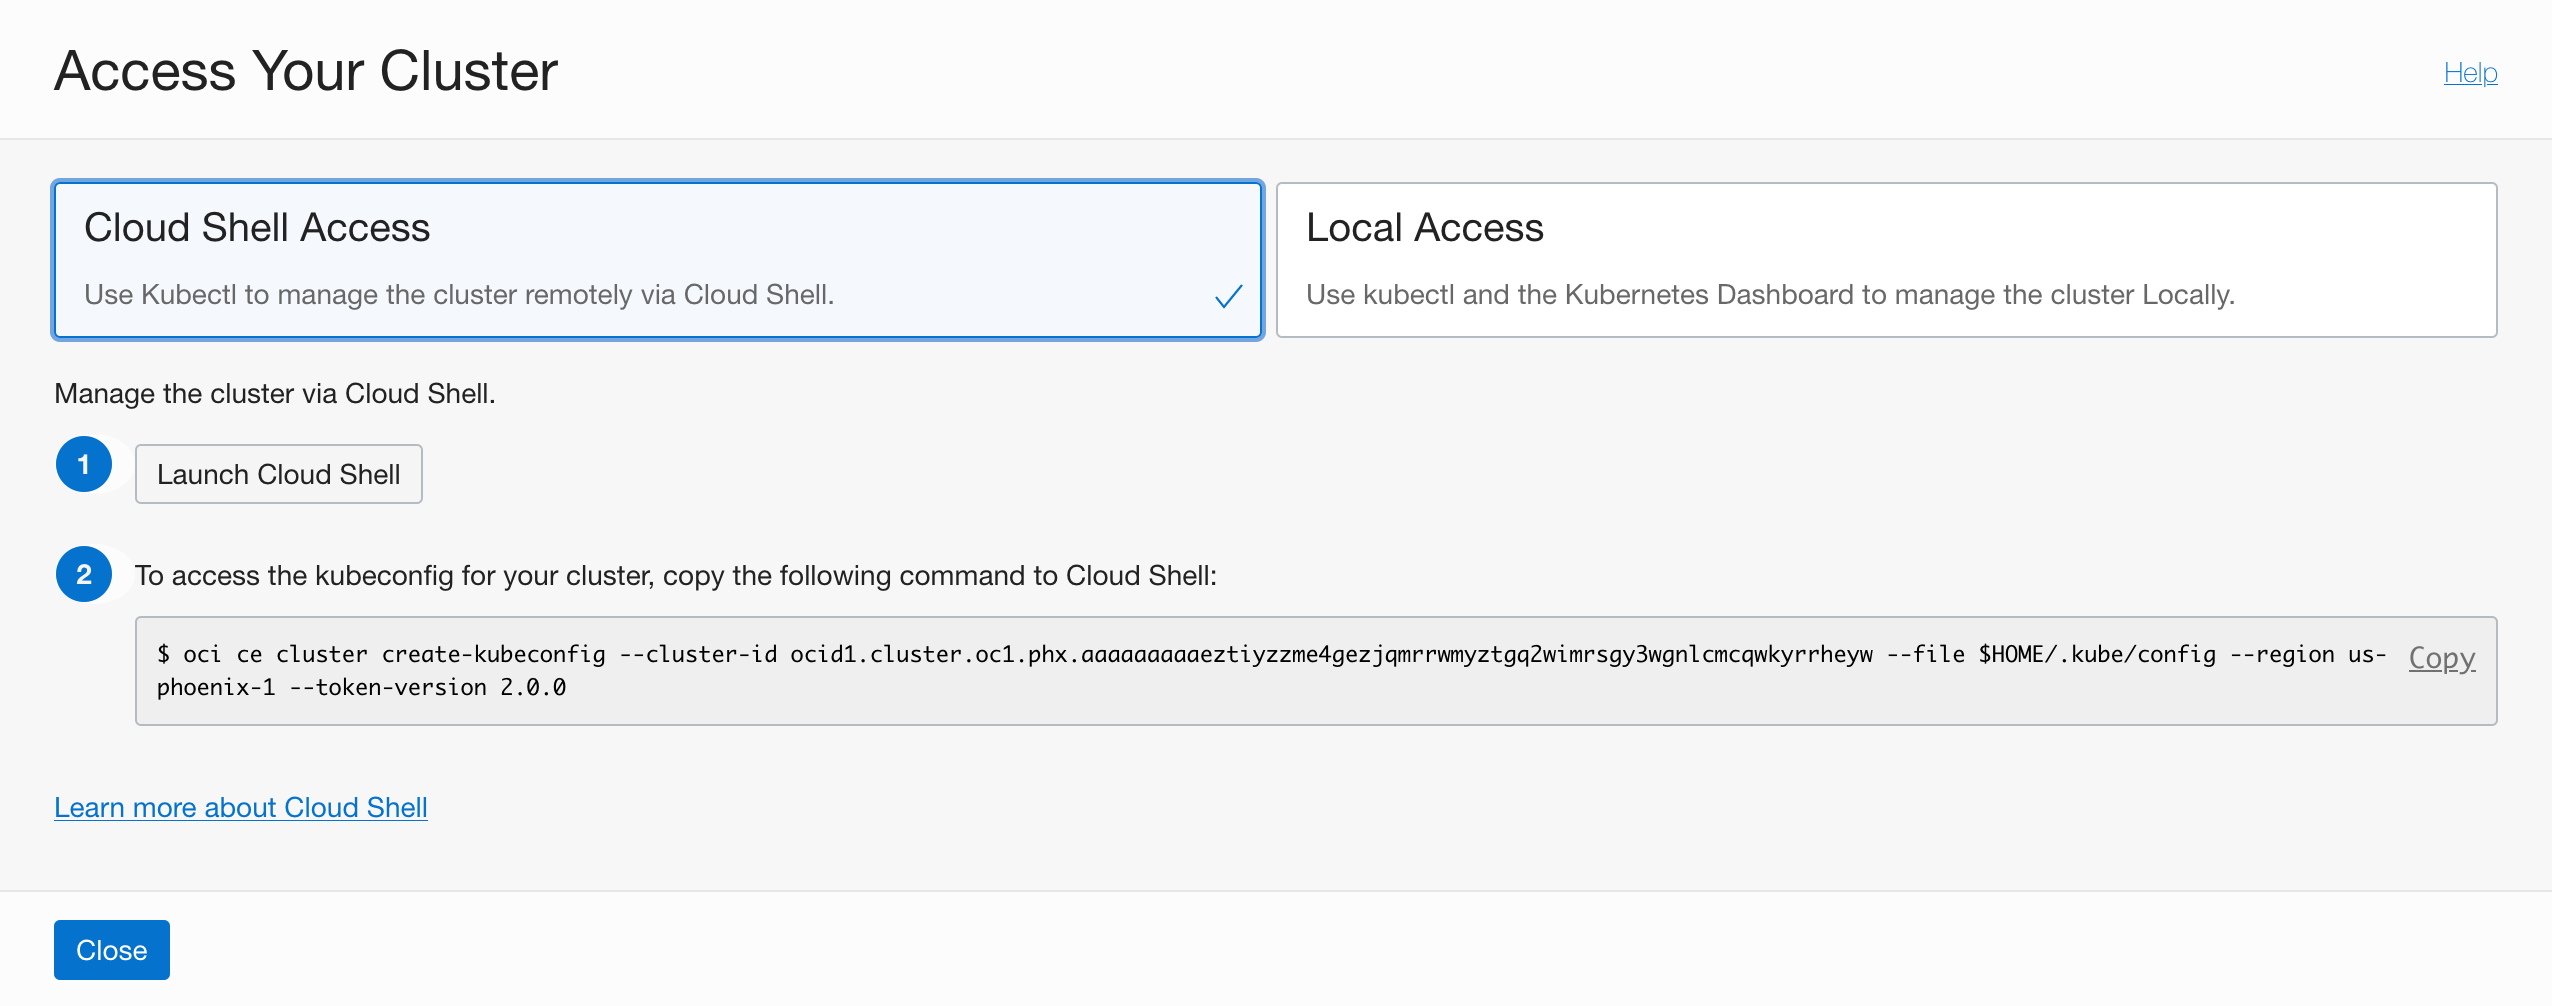 Description of illustration access cloudshell
You can launch Cloud Shell directly from the page. Note that access to Cloud Shell is also available on the top of the Console at all times, for quick access.
The page also include a command to run inside Cloud Shell. This command uses the OCI CLI to create the kubeconfig file. Kubernetes clients like
kubectlcan work with a configuration file that facilitates access to the cluster. Such a file is generally called a kubeconfig file. Typically, this configuration file resides in ~/.kube. A single configuration file can contain access configuration for multiple clusters.Note OCI CLI is already installed and configured for you in the Cloud Shell environment.
-
Launch Cloud Shell, and then copy the command and paste it in to Cloud Shell to run it. The standard command line client for Kubernetes is kubectl and it is preinstalled in the Cloud Shell environment.
Now, let’s check if we can interact with the cluster and see the cluster nodes.
-
Copy the following command to Cloud Shell and run it.
kubectl get nodes -o wideYou should see output similar to the following example, depending on the number of nodes in the cluster. Note the kernel version shows that we are running Oracle Linux for
aarch64(Arm 64-bit) architecture.NAME STATUS ROLES AGE VERSION INTERNAL-IP EXTERNAL-IP OS-IMAGE KERNEL-VERSION CONTAINER-RUNTIME 10.0.10.229 Ready node 3d7h v1.19.7 10.0.10.229 <none> Oracle Linux Server 7.9 5.4.17-2102.200.13.el7uek.aarch64 docker://19.3.11 10.0.10.29 Ready node 3d7h v1.19.7 10.0.10.29 <none> Oracle Linux Server 7.9 5.4.17-2102.200.13.el7uek.aarch64 docker://19.3.11 10.0.10.87 Ready node 3d7h v1.19.7 10.0.10.87 <none> Oracle Linux Server 7.9 5.4.17-2102.200.13.el7uek.aarch64 docker://19.3.11Now that you have a fully functioning Kubernetes cluster and have set up the tools to interact with it, you can deploy any kubernetes workload to it.
Seamless Deployments to your Kubernetes Clusters
You can now deploy containerized workloads to your Arm based kubernetes cluster. Container images are built for specific architectures. Container tools such as Docker or Buildah provide the methods to manage these images and their deployment seamlessly. In this example, you will deploy Apache Tomcat, the popular Java web container to the kubernetes cluster. The docker runtime will fetch the arm64v8 image when running on Arm and the amd64 image when running on x86 architectures. This enables us to create seamlessly portable kubernetes deployment manifests as long as we build the application images for both architectures.
Start by creating an architecture-neutral deployment manifest. The manifest should not refer to any architecture specific containers, as the container runtime is capable of detecting the correct architecture and pulling the appropriate image. To create the manifest, runs the commend below. It creates a new file named tomcat.yaml.
cat <<EOF > tomcat.yaml
apiVersion: apps/v1
kind: Deployment
metadata:
  name: tomcat
  labels:
    app: tomcat
spec:
  replicas: 3
  selector:
    matchLabels:
      app: tomcat
  template:
    metadata:
      labels:
        app: tomcat
    spec:
      containers:
        - name: tomcat
          image: tomcat:9
          ports:
            - containerPort: 8080
          volumeMounts:
            - name: app-volume
              mountPath: /usr/local/tomcat/webapps/
      volumes:
        - name: app-volume
          configMap:
            name: app-bundle
---
apiVersion: v1
kind: Service
metadata:
  name: tomcat
  labels:
    app: tomcat
spec:
  ports:
  - port: 80
    name: http
    targetPort: 8080
  selector:
    app: tomcat
  type: LoadBalancer
EOF
This manifest contains the following objects and actions :
- A deployment object with the name
tomcatand labelapp: tomcat. - The deployment has 3 replicas.
- The pods in the deployment have a single container -
tomcat:9. Note that the manifest does not specify the architecture, making it valid across all architectures. Docker will pull the image that supports the appropriate architecture at runtime. - A Volume object is created from a ConfigMap, and mounted in to the container. This ConfigMap will be created later, and will contain the application.
- The manifest also contains a Service object, and exposes the deployment over a LoadBalancer.
-
Download the sample application for Apache Tomcat and create it as a ConfigMap.
wget https://tomcat.apache.org/tomcat-9.0-doc/appdev/sample/sample.war
kubectl create configmap app-bundle --from-file sample.war
Note This method of mounting an application using a ConfigMap is for convenience only, and should not be used in production applications.
-
Deploy the manifest. This creates the kubernetes objects, including the Deployment and the Service. When creating the deployment the docker runtime will detect its running on teh arm architecture and automatically pick the Arm variant of the Apache Tomcat container. The Java application deployed on the container, is platform neutral and hence the same
.warfile can be deployed across all architectures.kubectl apply -f tomcat.yaml -
Check your deployment status
kubectl get deploy,svcYou should see output similar to the following
NAME                     READY   UP-TO-DATE   AVAILABLE   AGE
deployment.apps/tomcat   2/2     2            2           9s

NAME                 TYPE           CLUSTER-IP      EXTERNAL-IP       PORT(S)        AGE
service/kubernetes   ClusterIP      10.96.0.1       <none>            443/TCP        3d9h
service/tomcat       LoadBalancer   10.96.120.212   <pending>   80:32547/TCP         9s
This shows that Tomcat has been deployed successfully on our Arm based kubernetes cluster and is serving a Java web application. The deployment manifest we used is not tied to the architecture, and can be used for x86 as well as Arm based clusters.
-
You can optionally get detailed node level details by running
kubectl get nodes -o wide
kubectl describe node <node_name>
Detailed information about the node, including the architecture and the pods that are scheduled on that node are displayed.
When the external IP address for the LoadBalancer is available (this could take a couple of minutes) you can visit the deployment by pointing your web browser to
http://<your_loadbalancer_ip_address>/sample
Next Steps
Explore more workloads you can deploy on your Arm based kubernetes cluster by visiting the docker hub repository of the official arm64v8 images here
More Learning Resources
Explore other labs on docs.oracle.com/learn or access more free learning content on the Oracle Learning YouTube channel. Additionally, visit education.oracle.com/learning-explorer to become an Oracle Learning Explorer.
For product documentation, visit Oracle Help Center.
Get started with Arm-based Kubernetes clusters in Oracle Cloud Infrastructure
F43156-02
November 2021
Copyright © 2021, Oracle and/or its affiliates.