Note:
- This tutorial requires access to Oracle Cloud. To sign up for a free account, see Get started with Oracle Cloud Infrastructure Free Tier.
- It uses example values for Oracle Cloud Infrastructure credentials, tenancy, and compartments. When completing your lab, substitute these values with ones specific to your cloud environment.
Centralize Logs from Multiple Oracle Cloud Infrastructure Tenancies into a Central Oracle Cloud Infrastructure Tenancy Bucket
Introduction
There are some cases where you have to centralize all your logs in one place, even if they are from different tenancies. It could be due to industry regulations or company government policies; whatever your case could be, you can face different management concerns to achieve this.
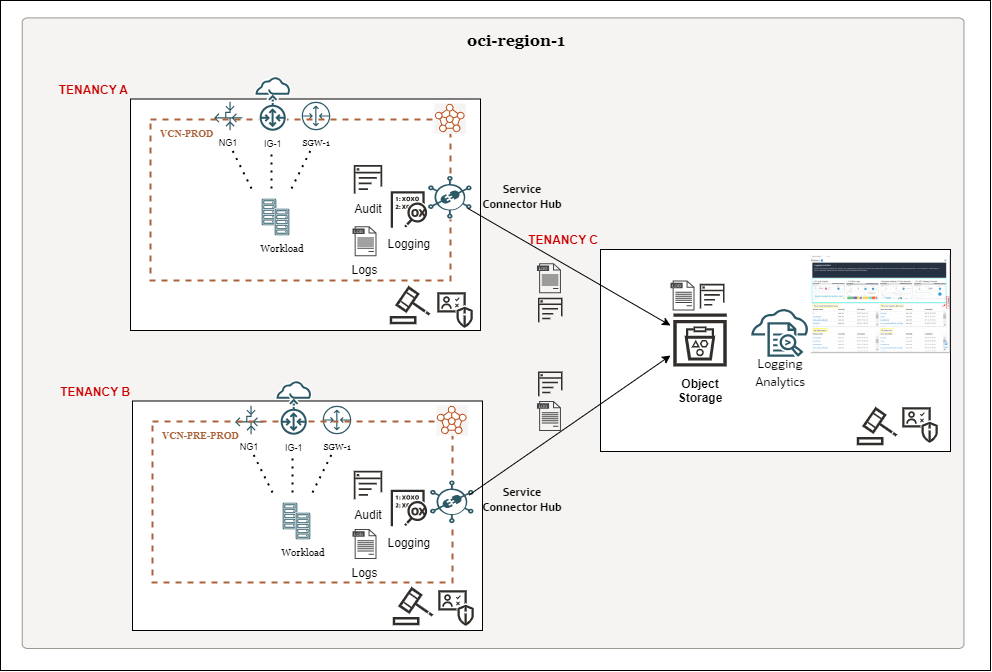
In this tutorial, we will centralize audit, service or custom logs generated in different Oracle Cloud Infrastructure (OCI) tenancies, under a central tenancy with archiving or visualization purposes, using OCI cross tenancy access and the OCI Connector Hub service.
Architecture Diagram

- Tenancy A: Source of logs in Region 1.
- Tenancy B: Source of logs in Region 1.
- Tenancy C: Destination of logs in Region 1.
Note: For this tutorial, all tenancies should be in the same region.
Objectives
-
Create policies in the destination tenancy.
-
Create policies in the source tenancy.
-
Deploy an OCI Connector Hub in the source tenancy.
Prerequisites
-
All the required service or custom logs (VCN, OCI API Gateway, OCI Object Storage, and so on) already enabled in the tenancy, this is out of scope of this tutorial. Tenancy audit logs are enabled by default.
-
OCI Object Storage bucket created in the destination tenancy.
-
Oracle Cloud Infrastructure Identity and Access Management (OCI IAM) user in each tenancy with enough privileges to deploy this tutorial, including permission to configure policies in the root compartment (requirement for cross-tenancy policy statements).
Task 1: Create Policies in the Destination Tenancy
The following OCI IAM policies will be configured in the destination tenancy (Tenancy C), where the OCI Object Storage bucket resides.
-
Retrieve the following information for Tenancy A.
- OCID
- Compartment OCID, where the OCI Connector Hub will be deployed.
-
Retrieve the following information for Tenancy C.
- Compartment name, where the bucket was created.
-
Create the following policies with the information collected in step 1 and 2.
-
Define the remote tenancy.
define tenancy SCTenancyA as <Tenancy A OCID>Note: Update
<Tenancy A OCID>with the information collected in step 1. -
Allow a service connector principal from the remote tenancy to read buckets in a local compartment.
admit any-user of tenancy SCTenancyA to read buckets in compartment <Tenancy C Compartment name> where all { request.principal.type='serviceconnector', request.principal.compartment.id='<Tenancy A Compartment OCID>' }Note: Update
<Tenancy C Compartment name>and<Tenancy A Compartment OCID>with the corresponding information. -
Allow a service connector principal from the remote tenancy to manage objects, restricted to object inspection and object creation actions, in a local bucket.
admit any-user of tenancy SCTenancyA to manage objects in compartment <Tenancy C Compartment name> where all { request.principal.type='serviceconnector', request.principal.compartment.id=’ <Tenancy A Compartment OCID>' , any {request.permission='OBJECT_CREATE', request.permission='OBJECT_INSPECT'}}Note:
- Update
<Tenancy C Compartment name>and<Tenancy A Compartment OCID>with the corresponding information. - All the resources are in the scope of a source or destination compartment. For more information about Endorse, Admit, and Define Statements, see Endorse, Admit, and Define Statements.
- Update
-
-
Log in to the OCI Console, navigate to Identity and Security and click Policies.
-
Make sure you are in the root compartment and click Create Policy.
-
Enter Name, Description and click Show manual editor.
-
Write the policies created in Task 1.3 and click Create.
The policies should look like:

Task 2: Create Policies in the Source Tenancy
The following OCI IAM policies must be configured in each source tenancy (Tenancy A and Tenancy B), where an OCI Connector Hub will be deployed. The OCI Connector Hub will collect and send the logs to the central repository.
-
Retrieve the following information for Tenancy A.
- Compartment OCID, where the OCI Connector Hub will be deployed.
-
Retrieve the following information for Tenancy C.
- OCID
-
Create the following policies with the information collected in step 1 and 2.
-
Define the remote tenancy.
Define tenancy OSTenancyC as <Tenancy C OCID>Note: Update
<Tenancy C OCID>with the corresponding information. -
Allow a service connector principal from the local tenancy to read buckets in a destination tenancy.
endorse any-user to read buckets in tenancy OSTenancyC where all {request.principal.type = 'serviceconnector', request.principal.compartment.id='<Tenancy A Compartment OCID>' }Note: Update
<Tenancy A Compartment OCID>with the corresponding information. -
Allow a service connector principal from the local tenancy to manage objects, restricted to object inspection and object creation actions, in the destination tenancy.
endorse any-user to manage objects in tenancy OSTenancyC where all {request.principal.type = 'serviceconnector', request.principal.compartment.id='<Tenancy A Compartment OCID>' , any {request.permission='OBJECT_CREATE', request.permission='OBJECT_INSPECT'}}Note:
- Update
<Tenancy A Compartment OCID>with the corresponding information. - All the resources are in the scope of a source or destination compartment. For more information about Endorse, Admit, and Define Statements, see Endorse, Admit, and Define Statements
- Update
-
-
Log in to the OCI Console, navigate to Identity and Security and click Policies.
-
Make sure you are in the root compartment and click Create Policy.
-
Enter Name, Description and click Show manual editor.
-
Enter the policies prepared in Task 2.3 and click Create.
The policies should look like:

Task 3: Deploy an OCI Connector Hub in the Source Tenancy
Deploy the OCI Connector Hub in the source tenancies (Tenancy A and Tenancy B), using OCI CLI.
Note: To create a connector that accesses resources in other tenancies, you must use the OCI SDK, CLI, or API.
-
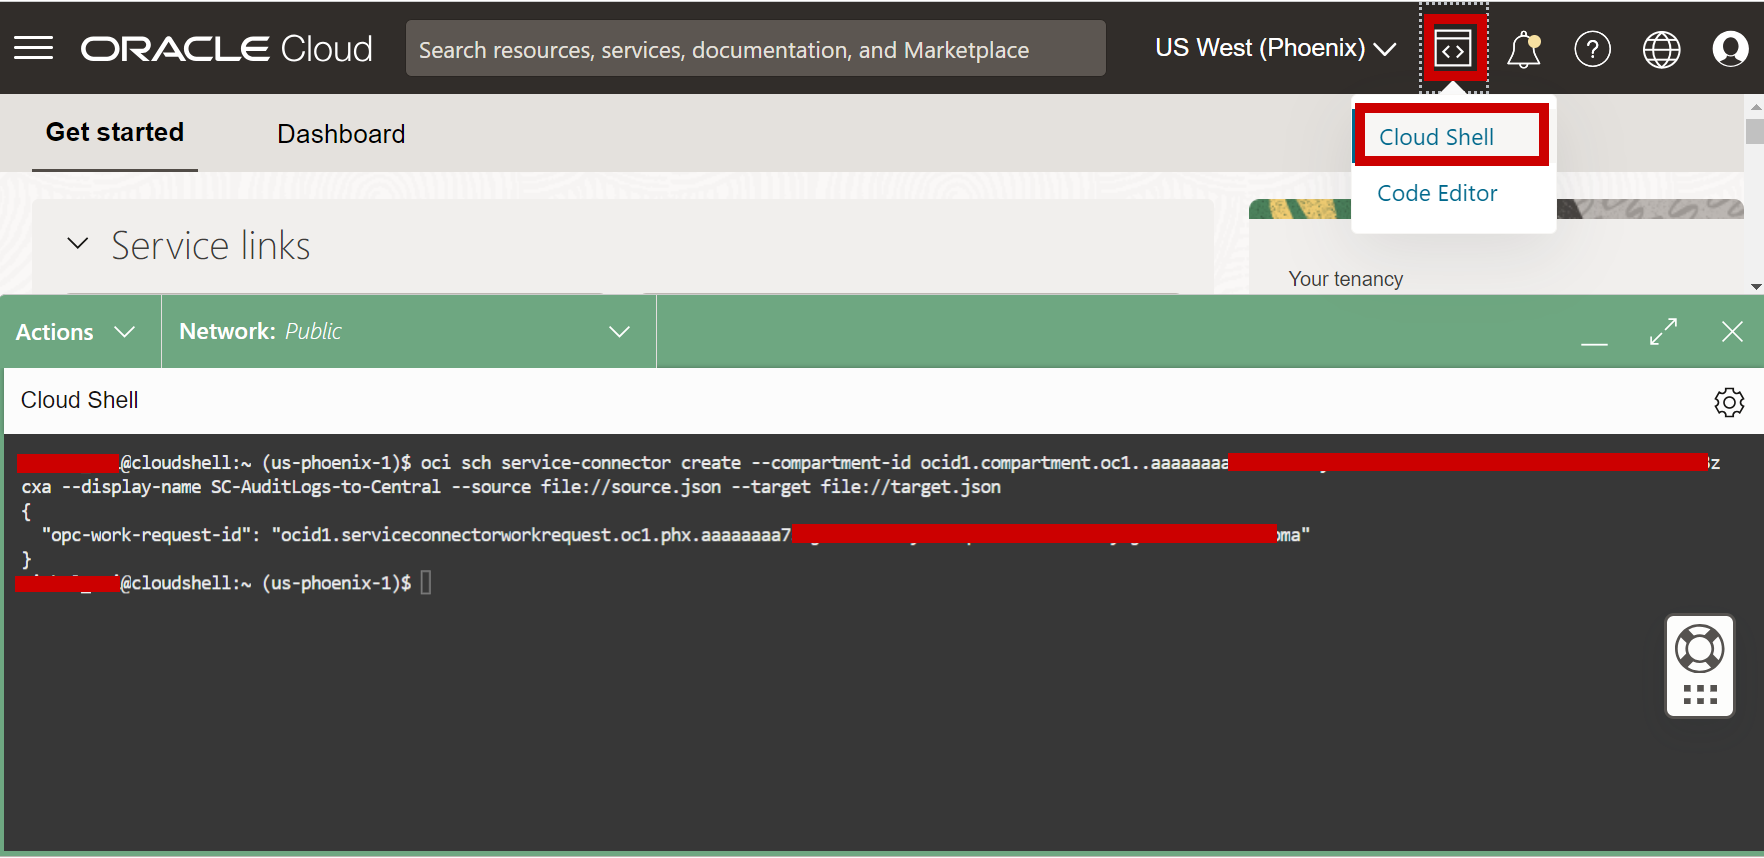
Connect to OCI CLI of the source tenancy (Tenancy A and Tenancy B). For this tutorial, we will use OCI Cloud Shell. For more information about how to use OCI Cloud Shell, see Using Cloud Shell.
-
Create two files with the following content, named
source.jsonandtarget.json.-
source.json: It will define the log source(s) from the source tenancy (Tenancy A or Tenancy B), where logs will be collected.Update the following parameters with your values in the sample code.
<Tenancy A OCID where Audit log resides><Tenancy A Compartment OCID where log group resides><Tenancy A Log Group OCID><Tenancy A _Log-ID OCID_>
{

"kind": "logging",

"logSources": [

					{

					"compartment-id": "_<Tenancy A OCID where Audit log resides>_",

					"log-group-id": "_Audit_Include_Subcompartment",

					"log-id": null

					},

					{

					"compartment-id": "_<Tenancy A Compartment OCID where log group resides>_",

					"log-group-id": _"<Tenancy A Log Group OCID>",_

					"log-id": "<Tenancy A _Log-ID OCID_>"

					}

				]

}
Note: The
source.jsonsample above has two log sources: The first will configure the OCI Connector Hub to collect audit logs from the root compartment and all sub-compartments. The second will configure the OCI Connector Hub to collect specific logs from a log group (defined bylog-idandlog-group-id), like a subnet log. You can add or remove log sources from this configuration, as needed. -
Target.json: It will define the bucket in the destination tenancy (Tenancy C), where logs will be archived.{ "kind": "objectStorage", "bucketName": "<Tenancy C bucket name>", "namespace": "<Tenancy C namespace where bucket was created>" }Note: You can obtain the bucket namespace from the bucket detail.
-
-
Run the following command.
oci sch service-connector create --compartment-id <Compartment OCID where SCH will be placed in Tenancy A> --display-name <Display name> --source file://Source.json --target file://Target.jsonNote:
source.jsonandtarget.jsonfiles have to be accessible.
-
Repeat step 1 to 3 for all other source tenancies as required. For additional OCI Connector Hub target options, you can consult the ObjectStorageTargetDetails Reference.
-
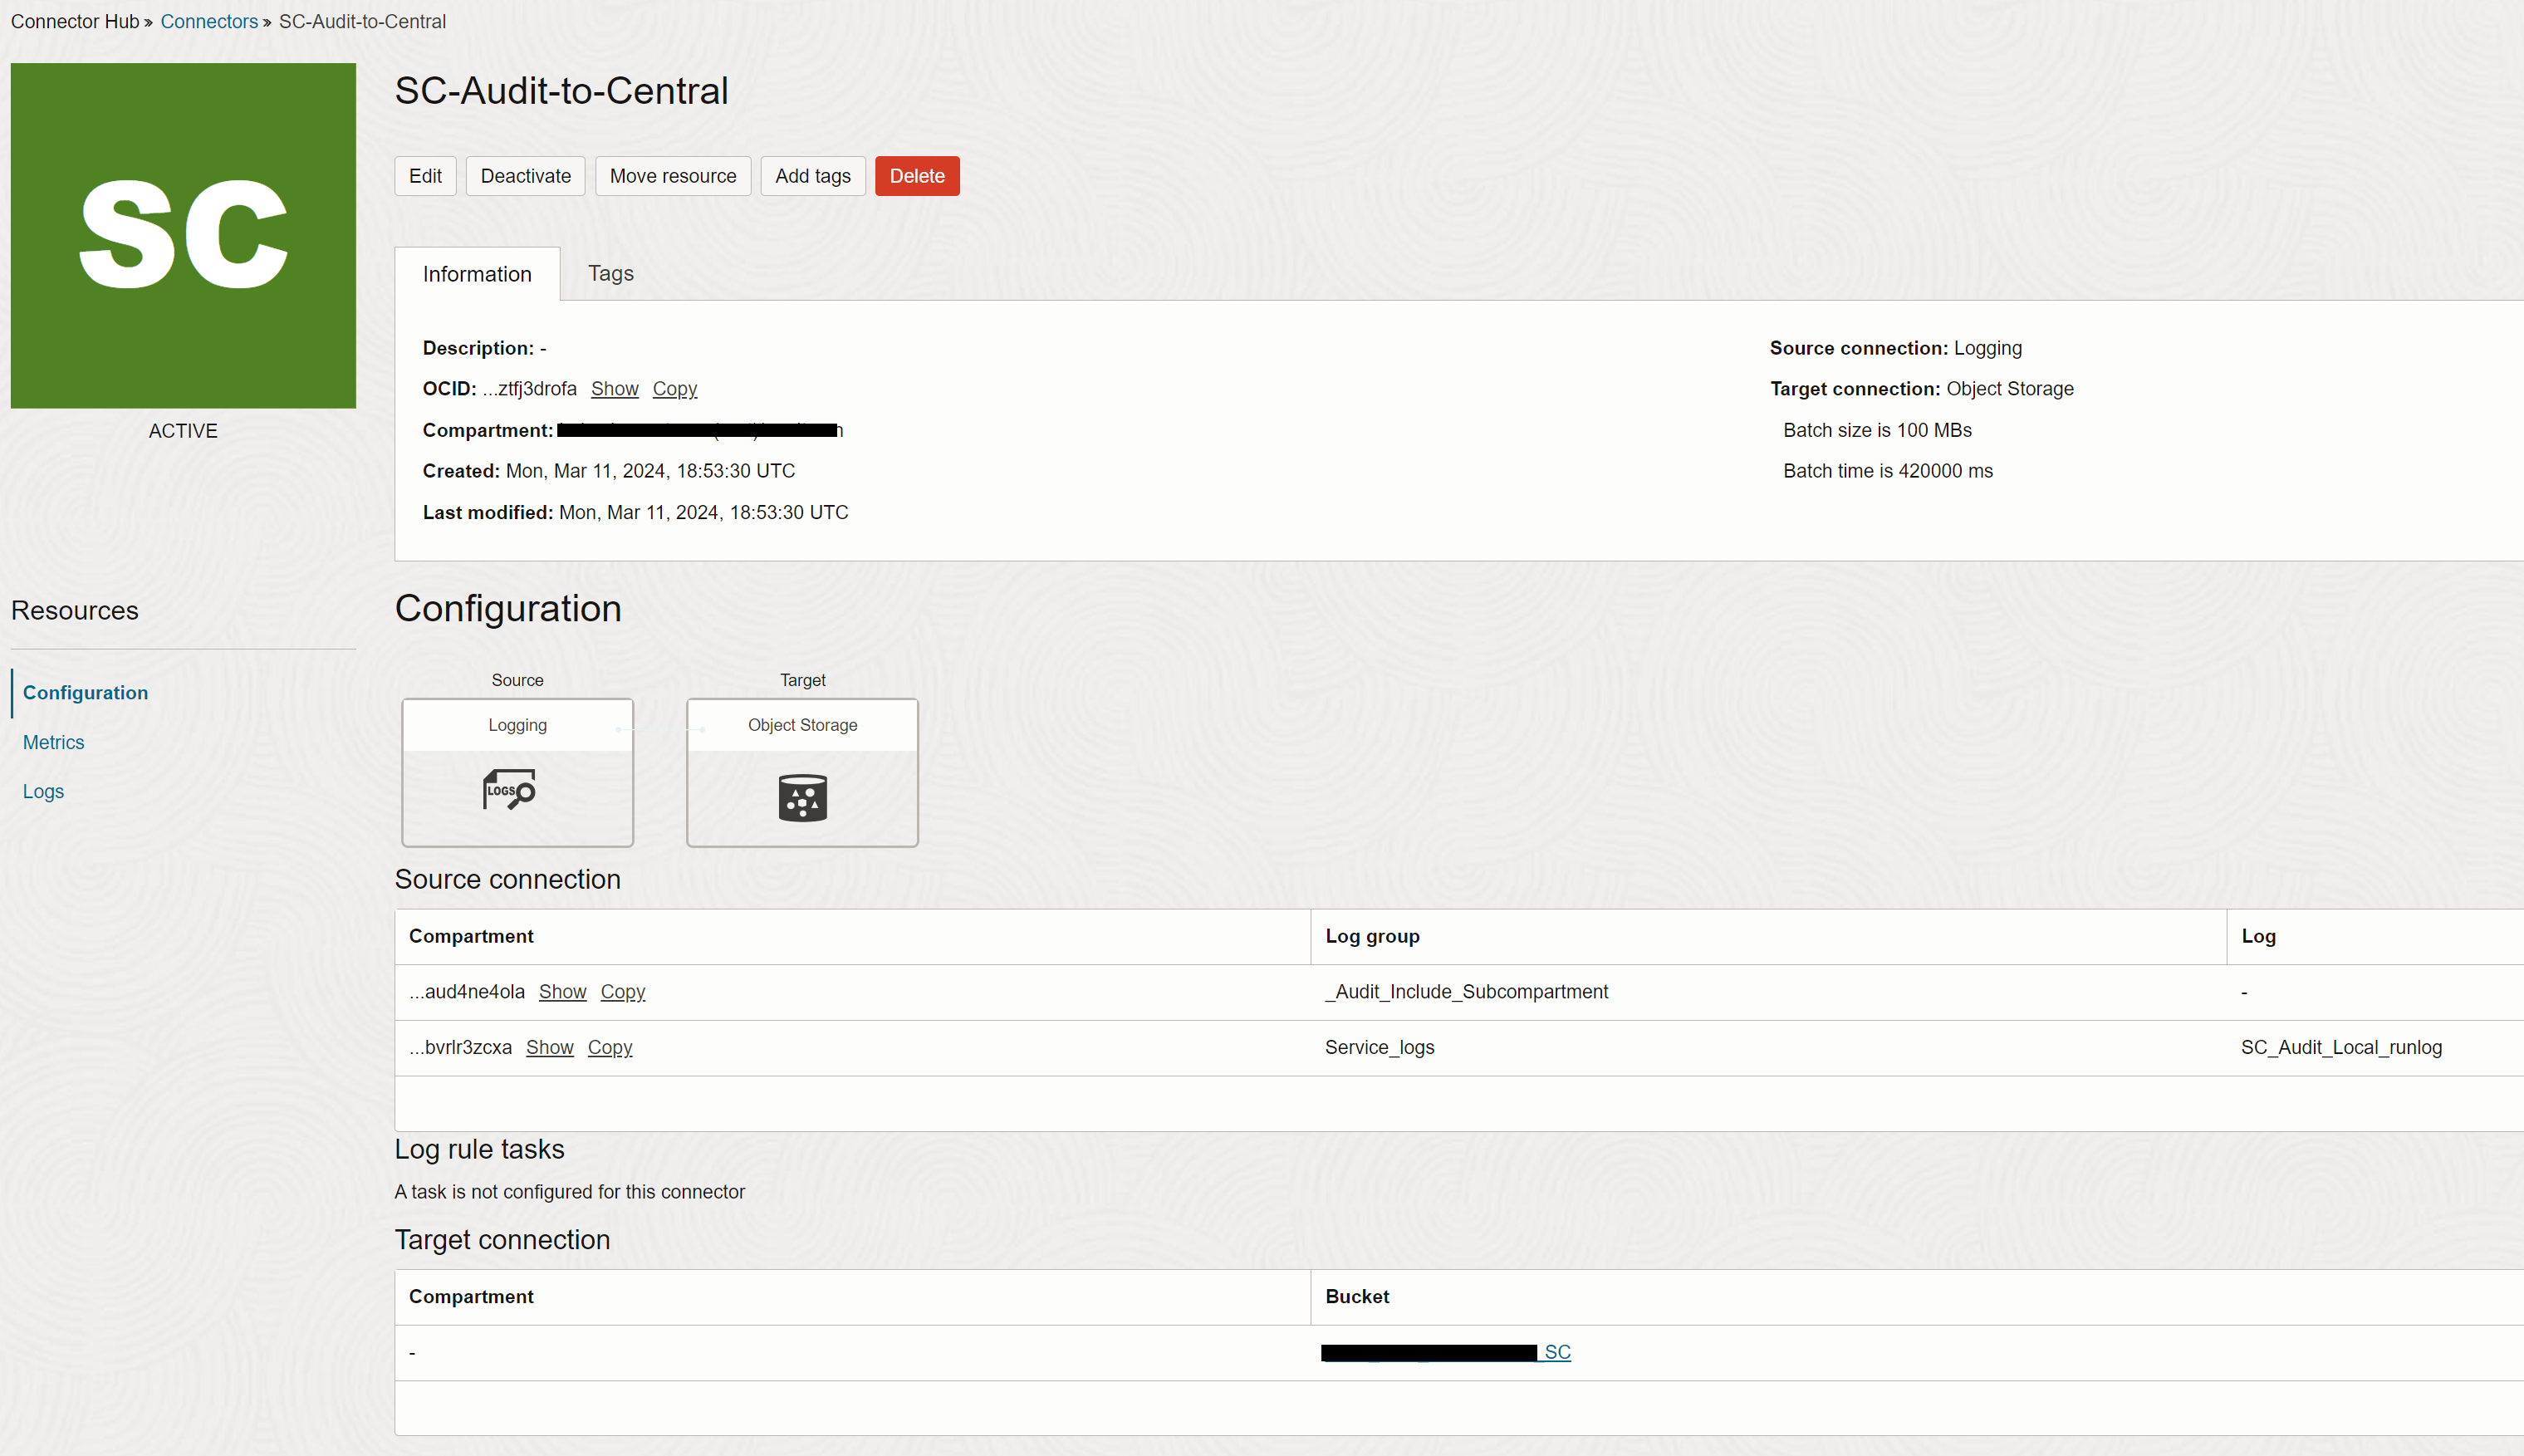
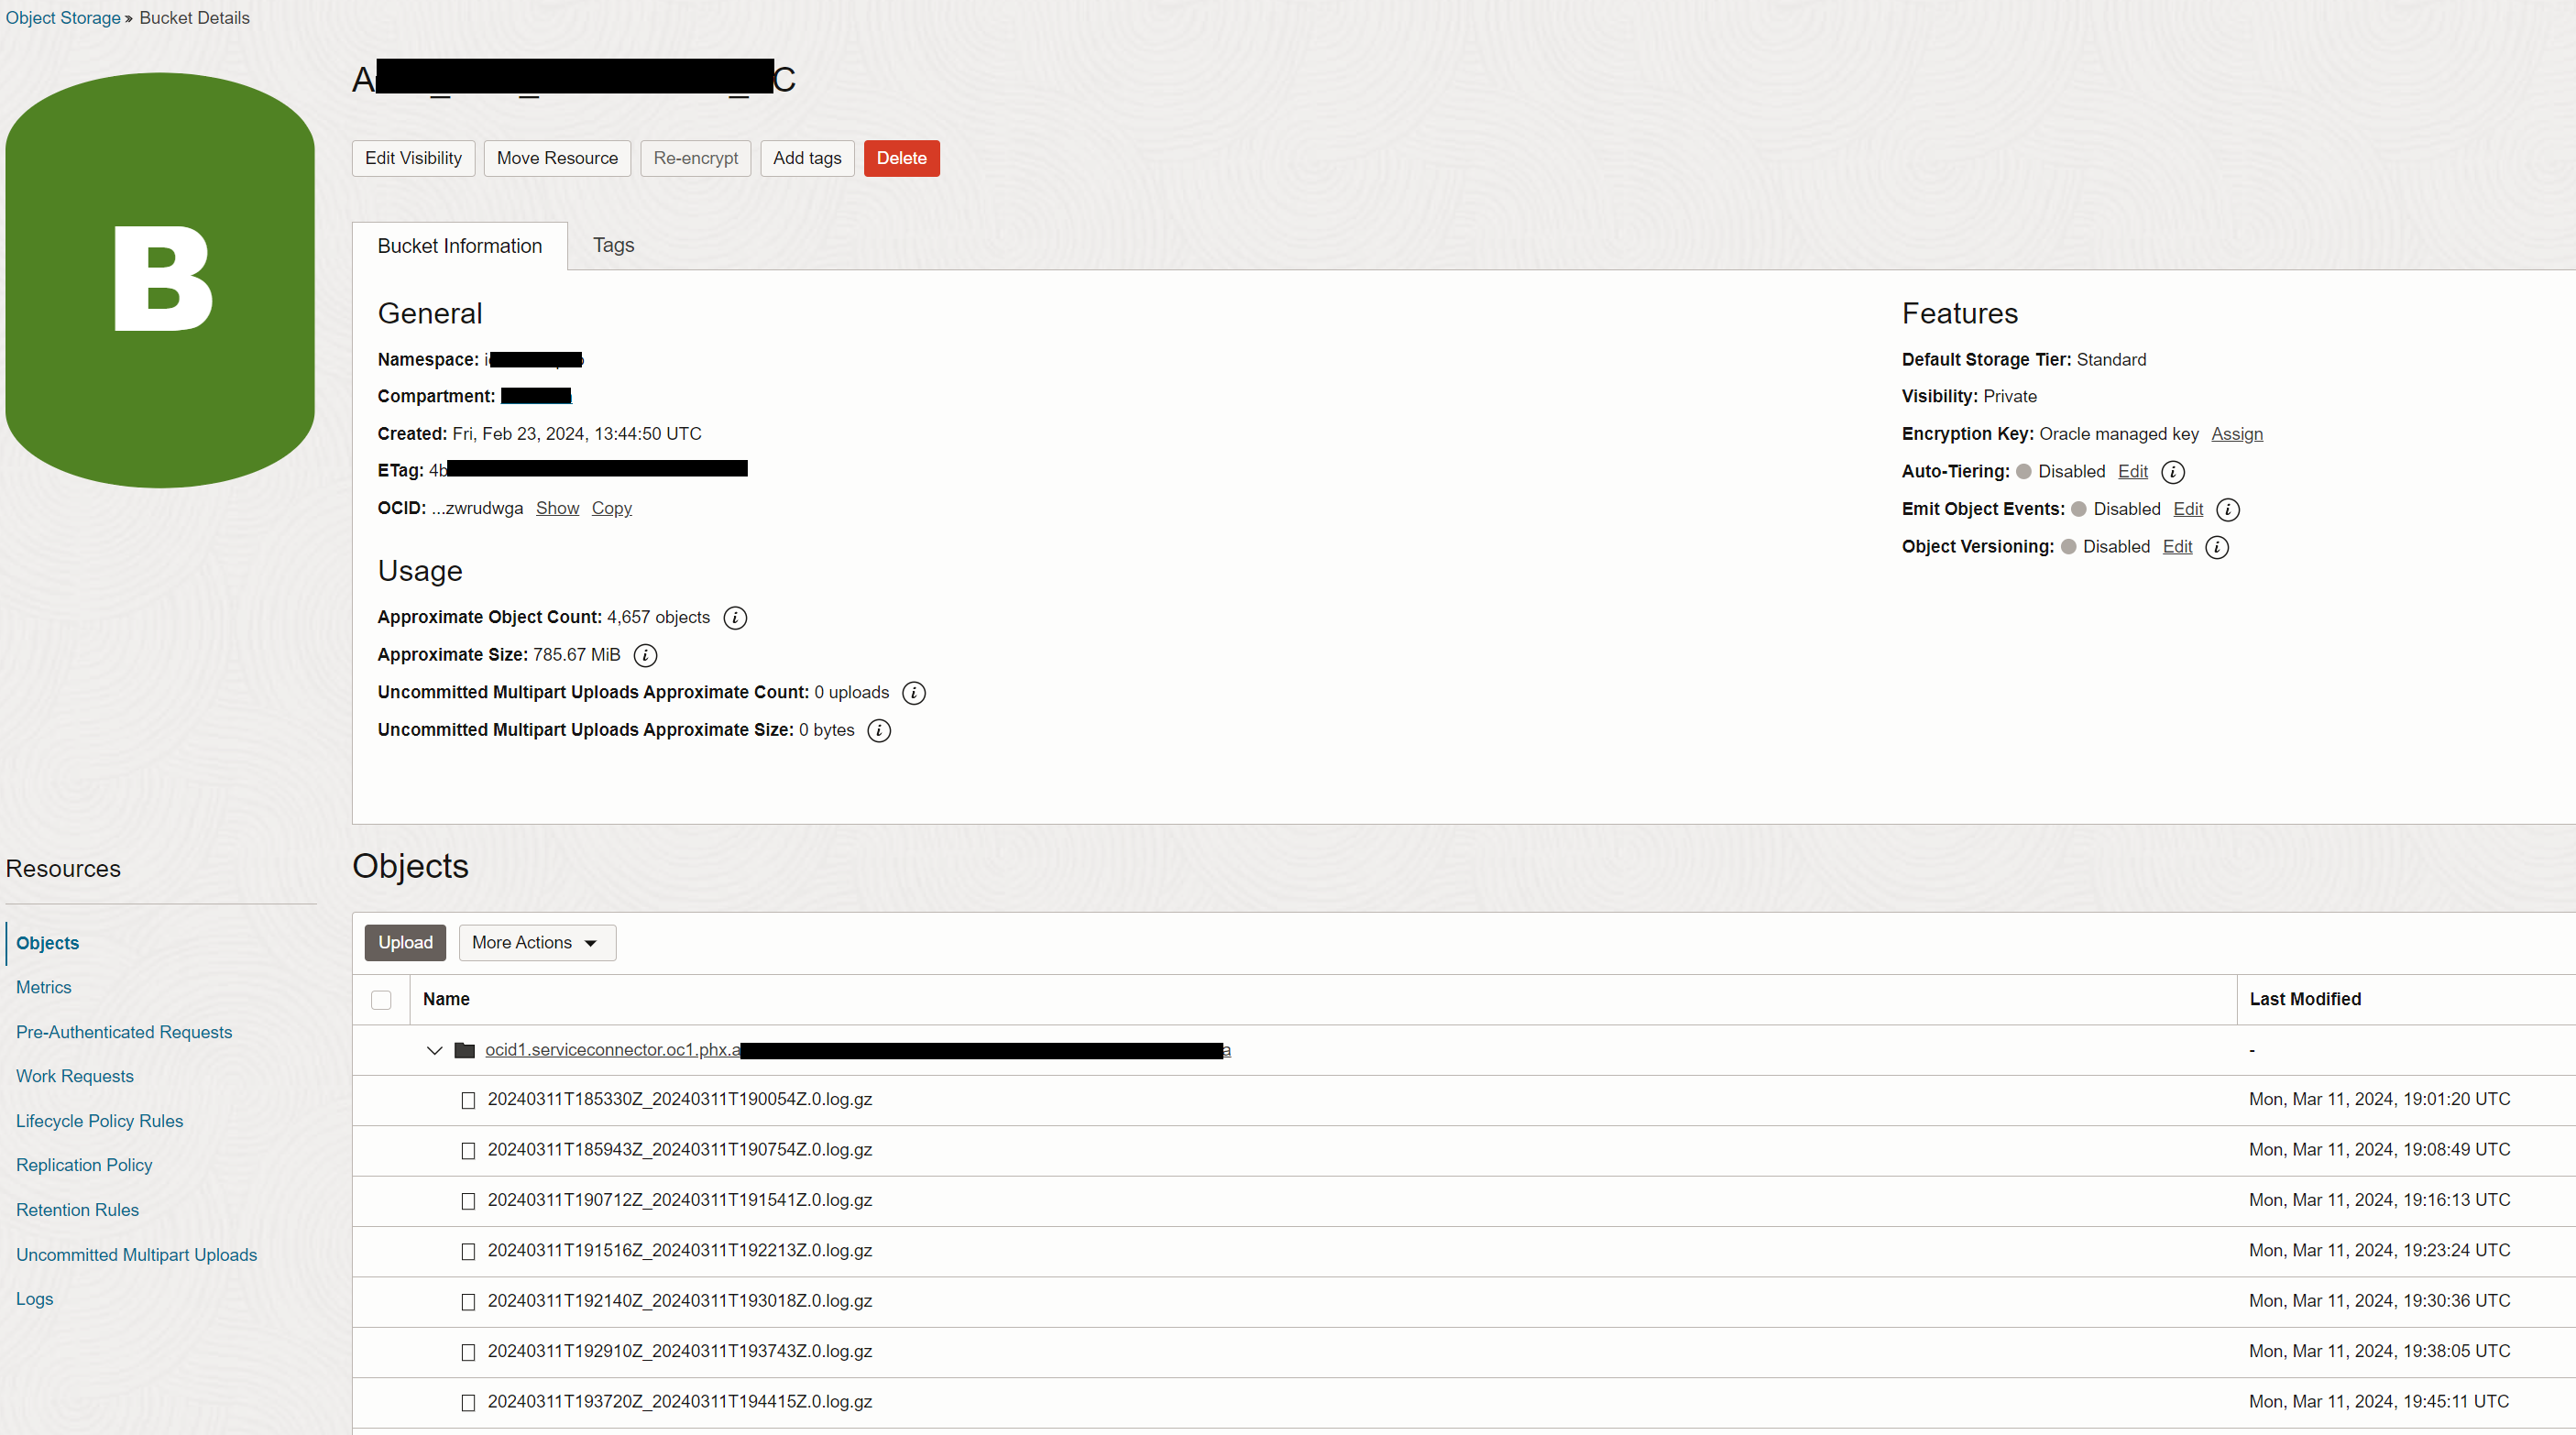
Check the results.
-
You will have an OCI Connector Hub created in the source tenancy with the defined sources and the destination bucket.

-
The destination bucket will contain an entry for each OCI Connector Hub.

-
Related Links
Acknowledgments
- Authors - Jaime Rojas (LAD A-Team Engineer), Michel Roitman (LAD A-Team Cloud Security Engineer)
More Learning Resources
Explore other labs on docs.oracle.com/learn or access more free learning content on the Oracle Learning YouTube channel. Additionally, visit education.oracle.com/learning-explorer to become an Oracle Learning Explorer.
For product documentation, visit Oracle Help Center.
Centralize Logs from Multiple Oracle Cloud Infrastructure Tenancies into a Central Oracle Cloud Infrastructure Tenancy Bucket
F96696-01
April 2024