Note:
- This tutorial requires access to Oracle Cloud. To sign up for a free account, see Get started with Oracle Cloud Infrastructure Free Tier.
- It uses example values for Oracle Cloud Infrastructure credentials, tenancy, and compartments. When completing your lab, substitute these values with ones specific to your cloud environment.
Deploy Oracle FLEXCUBE on OKE
Introduction
Oracle FLEXCUBE Universal Banking requires several steps to be performed before having an environment up and running. Being a Java Enterprise Edition (JEE) application, it includes a minimal software base to be installed, such as database and application server. For this example, Oracle WebLogic and Oracle Database are used as part of the technical stack. To enable a full up and running system, a standard deployment would follow these steps:
1. Install Oracle Database
2. Install Oracle Weblogic Fusion Middleware Infrastructure
3. Install Oracle FLEXCUBE database artifacts
4. Install Oracle FLEXCUBE application server artifacts
5. Configure initial setup
6. Tune database
7. Tune application
8. Personalize as per business needs
An application installer does the initial steps. The process is repeatable but it’s also time consuming which means that, depending on the complexity of the environment to be created, it may take several days to deploy the system. One way of improving this process is to automate most of it and that is where containerization strategies can benefit these types of architectures.
The first 7 steps listed before can be completely automated using containers, such as Docker images and a combination of tools to maintain and manage that. The data configured in the database becomes a replicable seed artifact and the application layer is transformed into an image already tuned and stored as a master copy. Oracle Cloud Infrastructure (OCI) then provides elements to replicate at anytime, a full environment based on that master copy of the system.
Note:
Can we deploy the database or potentially different data stores in independent containers?
Potentially yes, but for this tutorial, we have decided to keep it as a regular cloud database deployment with all data stores in the same schema and preserve any existing common practice at the database level.
The intention of this tutorial is not transforming the architecture into a microservices based architecture because that would require other structural changes which are not part of the scope. More information about Oracle database on Docker is available at: Oracle GitHub.
Objectives
- Deploy quickly a FLEXCUBE image manually
- Create a container FLEXCUBE image
- Create a DevOps build and deploy FLEXCUBE inside a Kubernetes cluster
Prerequisites
- An OKE cluster having a worker-node with at least:
- 8 OCPUs
- 64GB RAM
kubectlaccess to OKE cluster for local operations- A FLEXCUBE database backup in OCI Database (DBaaS)
- OKE VCN needs to access the DBaaS
- Permission and limit usage to create:
- Load-Balancers
- Block Volume Storage
- JDBC configuration for your FLEXCUBE backup:
- username
- password
- Oracle Database Endpoint (IP/Port)
- Knowledge of:
- WebLogic Administration and Tools usage: Use of
setWLSEnv.sh - Kubernetes basic administration
- Visual Builder or Jenkins Operation
- FLEXCUBE administration and configuration
- WebLogic Administration and Tools usage: Use of
Note:
To create an OKE cluster in your OCI tenant, see: Create your OKE cluster.
If you have already created the OKE cluster, verify if you have configured access to the cluster as described in the Download the Kubeconfig File topic.
For instructions about installing kubectl, see: Install kubectl
Task 1: Create a WebLogic Admin Server
Let’s begin with a simple WebLogic Admin Server POD in your Kubernetes cluster.
-
In the weblogic.zip file, you can find:
- README: Some links that helps you to create your OKE cluster if not already created
- secret.sh: A bash script that helps you to create the secret to access the Oracle Image Repository for using the WebLogic image
- weblogic.yaml: The YAML file to create an instance of WebLogic and service ports to access the admin server
Note: You need to assign the Oracle Image Repository and set your credentials (user/password) to obtain the WebLogic image. For more information, see: Oracle Image Repository
-
With your credentials in Oracle Image Repository (login/password), you need to edit the secret.sh script and add your credentials to the file. Execute this command to provide the secret in your OKE cluster. You cannot deploy WebLogic Container without this step.
sh secret.sh -
Now, we can proceed with the WebLogic deployment. You can adjust many parameters, but for this test, maintain the Port 7001 and the credentials to log-in on the WebLogic Admin Server.
weblogic.yaml
apiVersion: apps/v1 kind: Deployment metadata: name: weblogic-deployment spec: replicas: 1 selector: matchLabels: app: weblogic template: metadata: labels: app: weblogic spec: containers: - name: weblogic image: container-registry.oracle.com/middleware/weblogic:12.2.1.4 env: - name: DOMAIN_NAME value: "myDomain" - name: ADMIN_NAME value: "myadmin" - name: ADMIN_LISTEN_PORT value: "7001" - name: ADMIN_HOST value: "AdminContainer" - name: ADMINISTRATION_PORT_ENABLED value: "false" - name: ADMINISTRATION_PORT value: "9005" - name: MANAGED_SERVER_PORT value: "8001" - name: MANAGED_SERVER_NAME_BASE value: "MS" - name: CONFIGURED_MANAGED_SERVER_COUNT value: "2" - name: CLUSTER_NAME value: "cluster1" - name: CLUSTER_TYPE value: "DYNAMIC" - name: PRODUCTION_MODE value: "dev" - name: DOMAIN_HOST_VOLUME value: "/app/domains" - name: PROPERTIES_FILE_DIR value: "/u01/oracle/properties" - name: PROPERTIES_FILE value: "/u01/oracle/properties/domain.properties" command: [ "/bin/bash", "-c", "--" ] args: [ "mkdir /u01/oracle/properties; cd /u01/oracle/properties; echo 'username=weblogic' > domain.properties; echo 'password=weblogic123' >> domain.properties; cd /u01/oracle; ./createAndStartEmptyDomain.sh; while true; do sleep 30; done;" ] ports: - name: port9005 containerPort: 9005 imagePullSecrets: - name: oracledockersecret --- apiVersion: v1 kind: Service metadata: name: weblogic-service labels: app: weblogic spec: selector: app: weblogic ports: - port: 7001 targetPort: 7001 name: adminserver - port: 8001 targetPort: 8001 name: managedserver - port: 9005 targetPort: 9005 name: adminport type: LoadBalancer -
In your terminal, you can execute the
weblogic.yamlfile to deploy the admin server.kubectl apply -f weblogic.yaml -
You can see the services and load-balancers port to access your admin server. Execute this command:
kubectl get svc -
The following details are displayed:
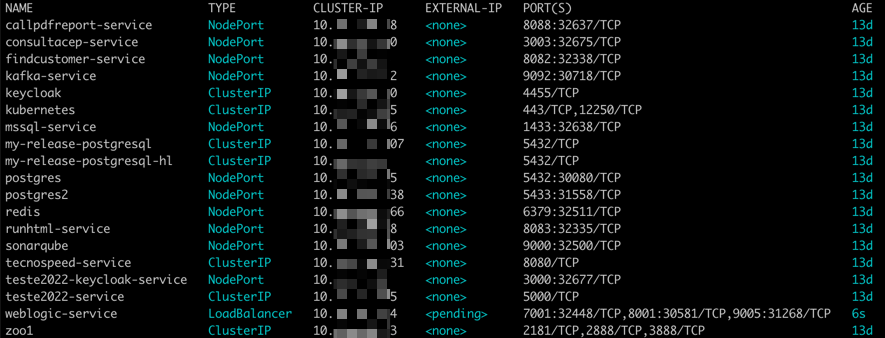
-
Note a pending value in your weblogic-service. It means that a load-balancer is not ready with a public IP. Wait a minute and then you can repeat the kubectl command to view the public IP.
-
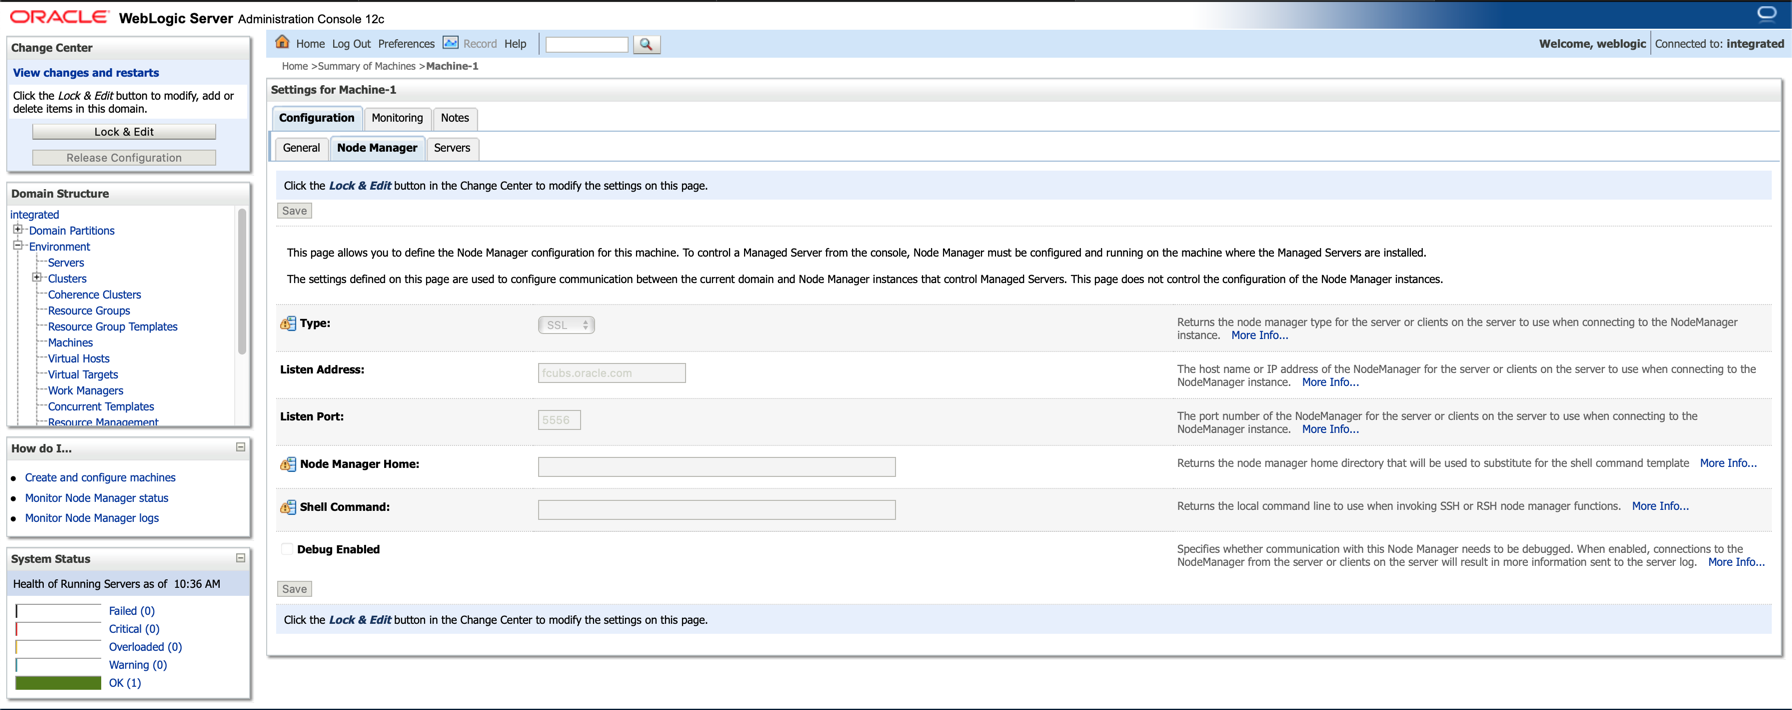
With a public IP address, open the following URL in your browser:
http://<Public IP>:7001/console -
You can now see the admin server. The user and password, as defined in your YAML file is:
user: weblogic password: weblogic123
Task 2: Obtain the database password in AES256 format
Check the FLEXCUBE database backup and obtain the database password in AES256 format.
-
Remember that you need the Oracle Database in the OCI DBaaS and restore your FLEXCUBE backup. After checking the restoration of a valid FLEXCUBE database backup, you need this information to access the FLEXCUBE database content:
- Endpoint (IP/Port)
- Username
- Password
-
You cannot use the password in text format, you need to convert your password into an AES256 format. The easiest way to convert your password into an AES256 format is using the WebLogic tool:
setWLSEnv.sh -
You can find this tool bash script in the WebLogic path:
./oracle/wlserver/server/bin -
To convert your password, you need to execute this commands like this:
cd ./oracle/wlserver/server/bin . ./setWLSEnv.sh java -Dweblogic.RootDirectory=../user_projects/domains/integrated weblogic.security.Encrypt <Database Password> -
After the execution of setWLSEnv.sh, you get a password in AES256 format like this example:
{AES256}7kfaltdnEBjKNq.......RIU0IcLOynq1ee8Ib8= -
Let’s use your newer WebLogic Admin Server POD to execute this command.
kubectl exec -it $(kubectl get pod -l app=weblogic -o jsonpath="{.items[0].metadata.name}") -- /bin/bash -
Wait until you can enter inside the container of your WebLogic server. Execute the following sequence of commands:
cd /u01/oracle/wlserver/server/bin . ./setWLSEnv.sh java -Dweblogic.RootDirectory=/u01/oracle/user_projects/domains/myDomain weblogic.security.Encrypt <Database Password> -
Replace
with your text Password. -
You can see the {AES256} password. Save this information for the next steps.
-
Execute this command to exit from the container:
exit. -
Now you can delete your WebLogic Admin Server. You need to delete it because of FLEXCUBE, it will use the port 7001 too.
kubectl delete -f weblogic.yaml
Task 3: Execute a manual deployment with kubectl
You can deploy the FLEXCUBE (fcubs) in your OKE cluster with the kubectl command. It can be done onn your local machine if you have configured access to the OKE cluster for kubectl command tool.
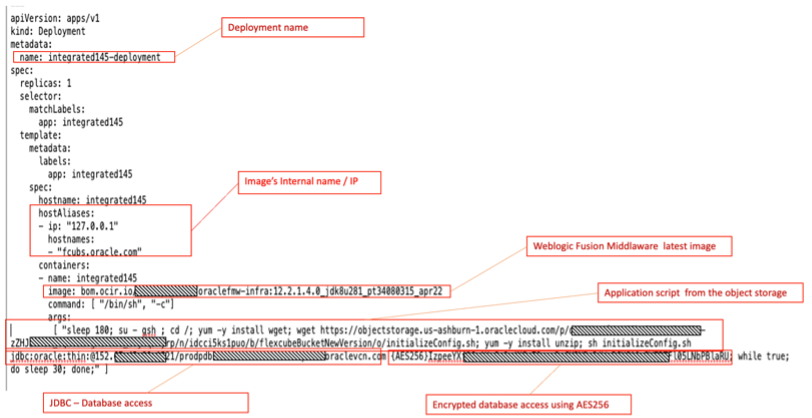
Let’s understand the integrated145.yaml file
The yaml file contains a few important parameters to create the pod: includes the deployment name, recognizes the internal IP/hostname, where to pick the image from WebLogic, the jdbc connection and the encrypted database access.
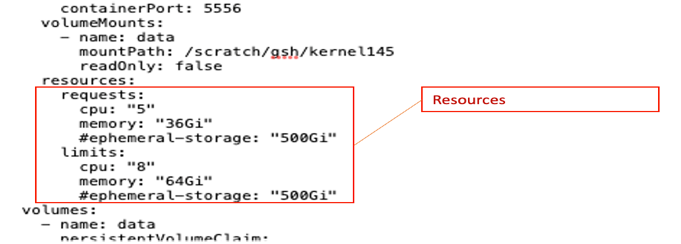
In the same yaml file, it is also defined the sizing expected by the pod, considering the number of resources required and up to the limit it can grow in case of increase of consumption.
The ports to be exposed are also defined in the yaml file, which enables personalized security. The application can be accessed by business user, WebLogic console by administrator, web services by developers, and so on.
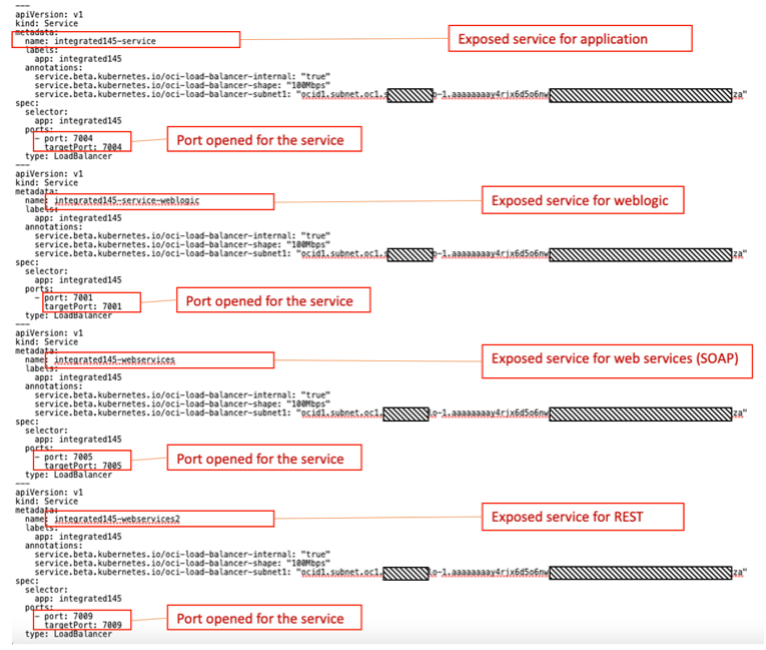
Note: In this scenario, we have created all services in the same POD. To scale, we have to scale it all. A good way to break a monolith would be to instantiate different pods using different ports being exposed in different WebLogic servers. Consequently, the pods can be scaled independently.
As an example, a web services POD heavily used in integrations could require and use 10 cores and scale whenever needed while the application (deployed in the other pod) will require only 2 cores and have a more “constant” behavior.
This is the integrated145.yaml file:
---
apiVersion: v1
kind: PersistentVolumeClaim
metadata:
  name: flexcubeclaim
spec:
  accessModes:
    - ReadWriteOnce
  storageClassName: oci-bv
  resources:
    requests:
      storage: 500Gi
---
apiVersion: apps/v1
kind: Deployment
metadata:
  name: integrated145-deployment
spec:
  replicas: 1
  selector:
    matchLabels:
      app: integrated145
  template:
    metadata:
      labels:
        app: integrated145
    spec:
      hostname: integrated145
      hostAliases:
      - ip: "127.0.0.1"
        hostnames:
        - "fcubs.oracle.com"
      containers:
      - name: integrated145
        image: gru.ocir.io/idvkxij5qkne/oraclefmw-infra:12.2.1.4.0_jdk8u281_pt34080315_apr22
        command: [ "/bin/sh", "-c"]
        args:
         [ "sleep 180; su - gsh ; cd /; yum -y install wget; wget https://objectstorage.us-ashburn-1.oraclecloud.com/p/dX80UuetlAvWOEbvQNMBv47H3ZPR-zZHJJmTsu_GQ66icfgFaPSSu_97j8q3Fyrp/n/idcci5ks1puo/b/flexcubeBucketNewVersion/o/initializeConfig.sh; yum -y install unzip; sh initializeConfig.sh jdbc:oracle:thin:@x.x.x.x:1521/prodpdb.sub0xxxxxxxxx0.arspvcn.oraclevcn.com {AES256}AgWyiXhc7aM112gNRUwBIWf5QpTpWMlI537LrIfPWjCcmwNCsynBxxg99; while true; do sleep 30; done;" ]
        ports:
        - name: port7001
          containerPort: 7001
        - name: port7002
          containerPort: 7002
        - name: port7003
          containerPort: 7003
        - name: port7004
          containerPort: 7004
        - name: port7005
          containerPort: 7005
        - name: port7006
          containerPort: 7006
        - name: port7007
          containerPort: 7007
        - name: port7008
          containerPort: 7008
        - name: port7009
          containerPort: 7009
        - name: port7010
          containerPort: 7010
        - name: port7011
          containerPort: 7011
        - name: port7012
          containerPort: 7012
        - name: port7013
          containerPort: 7013
        - name: port7014
          containerPort: 7014
        - name: port7015
          containerPort: 7015
        - name: port7016
          containerPort: 7016
        - name: port7017
          containerPort: 7017
        - name: port7018
          containerPort: 7018
        - name: port7019
          containerPort: 7019
        - name: port7020
          containerPort: 7020
        - name: port5556
          containerPort: 5556
#        livenessProbe:
#          httpGet:
#            path: /console
#            port: 7001
#          initialDelaySeconds: 3000
#          timeoutSeconds: 30
#          periodSeconds: 300
#          failureThreshold: 3
        volumeMounts:
          - name: data
            mountPath: /scratch/gsh/kernel145
            readOnly: false
        resources:
          requests:
            cpu: "5"
            memory: "36Gi"
            #ephemeral-storage: "500Gi"
          limits:
            cpu: "8"
            memory: "64Gi"
            #ephemeral-storage: "500Gi"
#      restartPolicy: Always
      volumes:
        - name: data
          persistentVolumeClaim:
            claimName: flexcubeclaim
      imagePullSecrets:
      - name: ocirsecret
---
apiVersion: v1
kind: Service
metadata:
  name: integrated145-service
  labels:
    app: integrated145
#  annotations:
#    service.beta.kubernetes.io/oci-load-balancer-internal: "true"
#    service.beta.kubernetes.io/oci-load-balancer-shape: "100Mbps"
#    service.beta.kubernetes.io/oci-load-balancer-subnet1: "ocid1.subnet.oc1.sa-saopaulo-1.aaaaaaa.........................zjyrza"
spec:
  selector:
    app: integrated145
  ports:
    - port: 7004
      targetPort: 7004
  type: LoadBalancer
---
apiVersion: v1
kind: Service
metadata:
  name: integrated145-service-weblogic
  labels:
    app: integrated145
#  annotations:
#    service.beta.kubernetes.io/oci-load-balancer-internal: "true"
#    service.beta.kubernetes.io/oci-load-balancer-shape: "100Mbps"
#    service.beta.kubernetes.io/oci-load-balancer-subnet1: "ocid1.subnet.oc1.sa-saopaulo-1.aaaaaaa.........................zjyrza"
spec:
  selector:
    app: integrated145
  ports:
    - port: 7001
      targetPort: 7001
  type: LoadBalancer
---
apiVersion: v1
kind: Service
metadata:
  name:  or Jenkins
  labels:
    app: integrated145
#  annotations:
#    service.beta.kubernetes.io/oci-load-balancer-internal: "true"
#    service.beta.kubernetes.io/oci-load-balancer-shape: "100Mbps"
#    service.beta.kubernetes.io/oci-load-balancer-subnet1: "ocid1.subnet.oc1.sa-saopaulo-1.aaaaaaa.........................zjyrza"
spec:
  selector:
    app: integrated145
  ports:
    - port: 7005
      targetPort: 7005
  type: LoadBalancer
---
apiVersion: v1
kind: Service
metadata:
  name: integrated145-webservices2
  labels:
    app: integrated145
#  annotations:
#    service.beta.kubernetes.io/oci-load-balancer-internal: "true"
#    service.beta.kubernetes.io/oci-load-balancer-shape: "100Mbps"
#    service.beta.kubernetes.io/oci-load-balancer-subnet1: "ocid1.subnet.oc1.sa-saopaulo-1.aaaaaaa.........................zjyrza"
spec:
  selector:
    app: integrated145
  ports:
    - port: 7009
      targetPort: 7009
  type: LoadBalancer
Note: Resilience - The FLEXCUBE deployment is resilient, so if the WebLogic or FLEXCUBE falls down, the Kubernetes cluster will load and execute again. The responsible for this is the livenessprobe inside the integrated145.yaml file. Uncomment the following lines if you want to activate a check in your container.
#        livenessProbe:
#          httpGet:
#            path: /console
#            port: 7001
#          initialDelaySeconds: 3000
#          timeoutSeconds: 30
#          periodSeconds: 300
#          failureThreshold: 3
.
.
.
#      restartPolicy: Always
Let’s understand some script files
Some files are required for:
- Deploying the FLEXCUBE structure inside the Fusion image
- Configuring JDBC datasources to access the FLEXCUBE database
- Configuring other parameters necessary to make FLEXCUBE up and running
FLEXCUBE-Package.zip
This package is a zip file. It contains all the scripts necessary to configure and run the FLEXCUBE instance. The content of this package is in the scripts.zip folder. This package contains:
-
initializeConfig.sh: The main file that runs all other scripts to configure and run FLEXCUBE
-
domainsDetails.properties: The base file that will be changed by the
initializeConfig.shscript -
config.xml: The base file that will be changed by the
initializeConfig.shscript -
flexcube.sh: Script to download the FLEXCUBE v14.5 structure inside the POD
-
JDBCReplace.sh: Script to replace all JDBC datasources with the FLEXCUBE database endpoint (IP/Port), flexcube database username and password (AES256 format)
-
JDBCList: The file containing all XML files related with the application datasources. It will be used by JDBCReplace.sh
-
ExecuteWebLogic.sh: Script to run WebLogic Domain Server, Node Manager and start applications (with StartApps.sh and StartApps.py)
-
StartApps.sh: Script to run the WLST
StartApps.pyscript -
StartApps.py: Script that runs the FLEXCUBE applications
Note: The extra-scripts.zip folder contains some more scripts that will be useful for additional tasks. It’s not a part of the core for this tutorial.
Prepare the YAML file
In this step, you need to configure the integrated145.yaml file. This YAML file is responsible to deploy the application, the access to the application through a load-balancer and create a storage to persistence. The configuration is basically to put the database information into the YAML file.
-
Find this line in integrated145.yaml file:

-
Scroll and find the following line:
sh initializeConfig.sh jdbc:oracle:thin:@x.x.x.x:1521/prodpdb.sub0xxxxxxxxx0.arspvcn.oraclevcn.com -
Change x.x.x.x:1521/prodpdb.sub0xxxxxxxxx0.arspvcn.oraclevcn.com with your DBaaS endpoint.
-
Scroll and find the following line:
{AES256}AgWyiXhc7aM112gNRUwBIWf5QpTpWMlI537LrIfPWjCcmwNCsynBxxg99 -
Change the {AES256} value with your password generated in the previous step.
Execute the integrated145.yaml file
-
After everything is configured, execute the YAML file:
kubectl apply -f integrated145.yaml -
The process of creating the FLEXCUBE structure, configuration and turning the server and application UP could takes approximately 15 minutes. After this, execute the following command to view the services and load-balancers port:
kubectl get svcYou can see the Load Balancers Public IPs in creation time. Wait until all the Public IPs are visible.
NAME TYPE CLUSTER-IP EXTERNAL-IP PORT(S) AGE integrated145-service LoadBalancer 10.x.x.x 210.x.x.x 7004:30868/TCP 200d integrated145-service-weblogic LoadBalancer 10.x.x.x 210.x.x.x 7001:32071/TCP 200d integrated145-webservices LoadBalancer 10.x.x.x 210.x.x.x 7005:30415/TCP 200d integrated145-webservices2 LoadBalancer 10.x.x.x 210.x.x.x 7009:30759/TCP 200d Note: In the
integrated145.yamlfile, you can see in the Service section, the annotations is commented. This annotation creates the load-balancer in private mode and your application will be more secure, but you must create a Bastion to access these applications.# annotations: # service.beta.kubernetes.io/oci-load-balancer-internal: "true" # service.beta.kubernetes.io/oci-load-balancer-shape: "100Mbps" # service.beta.kubernetes.io/oci-load-balancer-subnet1: "ocid1.subnet.oc1.sa-saopaulo-1.aaaaaa.............jyrza"-
Replace the subnet1 with your Private Subnet OCID. If you choose to use FLEXCUBE in a Private Subnet, create a compute VM as a Bastion.
-
You can establish a SSH tunnel to access your endpoints like this:
ssh -i PrivateKey.pem -L 7001:<integrated145-service-weblogic Private IP>:7001 opc@<Bastion Public IP>ssh -i PrivateKey.pem -L 7004:<integrated145-service Private IP>:7004 opc@<Bastion Public IP>ssh -i PrivateKey.pem -L 7005:<integrated145-webservices Private IP>:7004 opc@<Bastion Public IP>And access with your local browser using the following URLs:
-
http://localhost:7001/console
-
https://localhost:7004/FCJNeoWeb
-
http://localhost:7005/FCUBSAccService/FCUBSAccService?WSDL
-
-
-
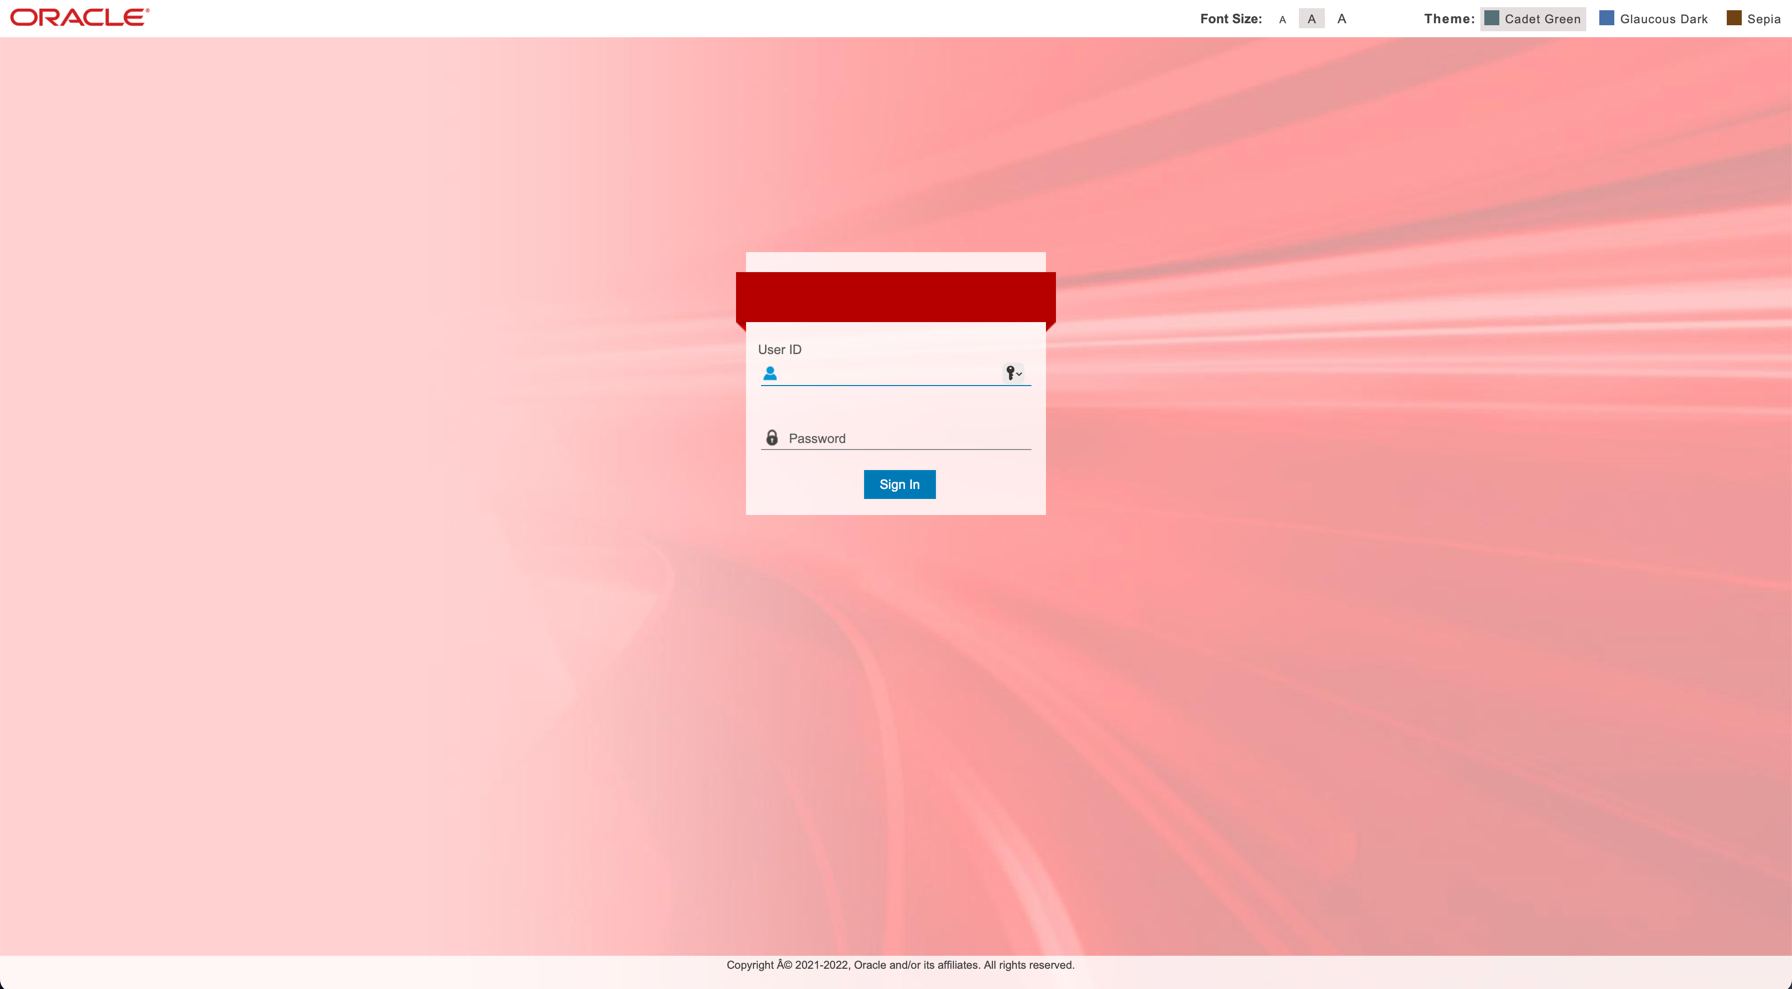
After the IPs are visible, you can test your application. Open your browser and type:
-
For the WebLogic Admin Server:
http://<integrated145-service-weblogic IP>:7001/console -
For the REST Service:
https://<integrated145-service IP>:7004/FCJNeoWeb -
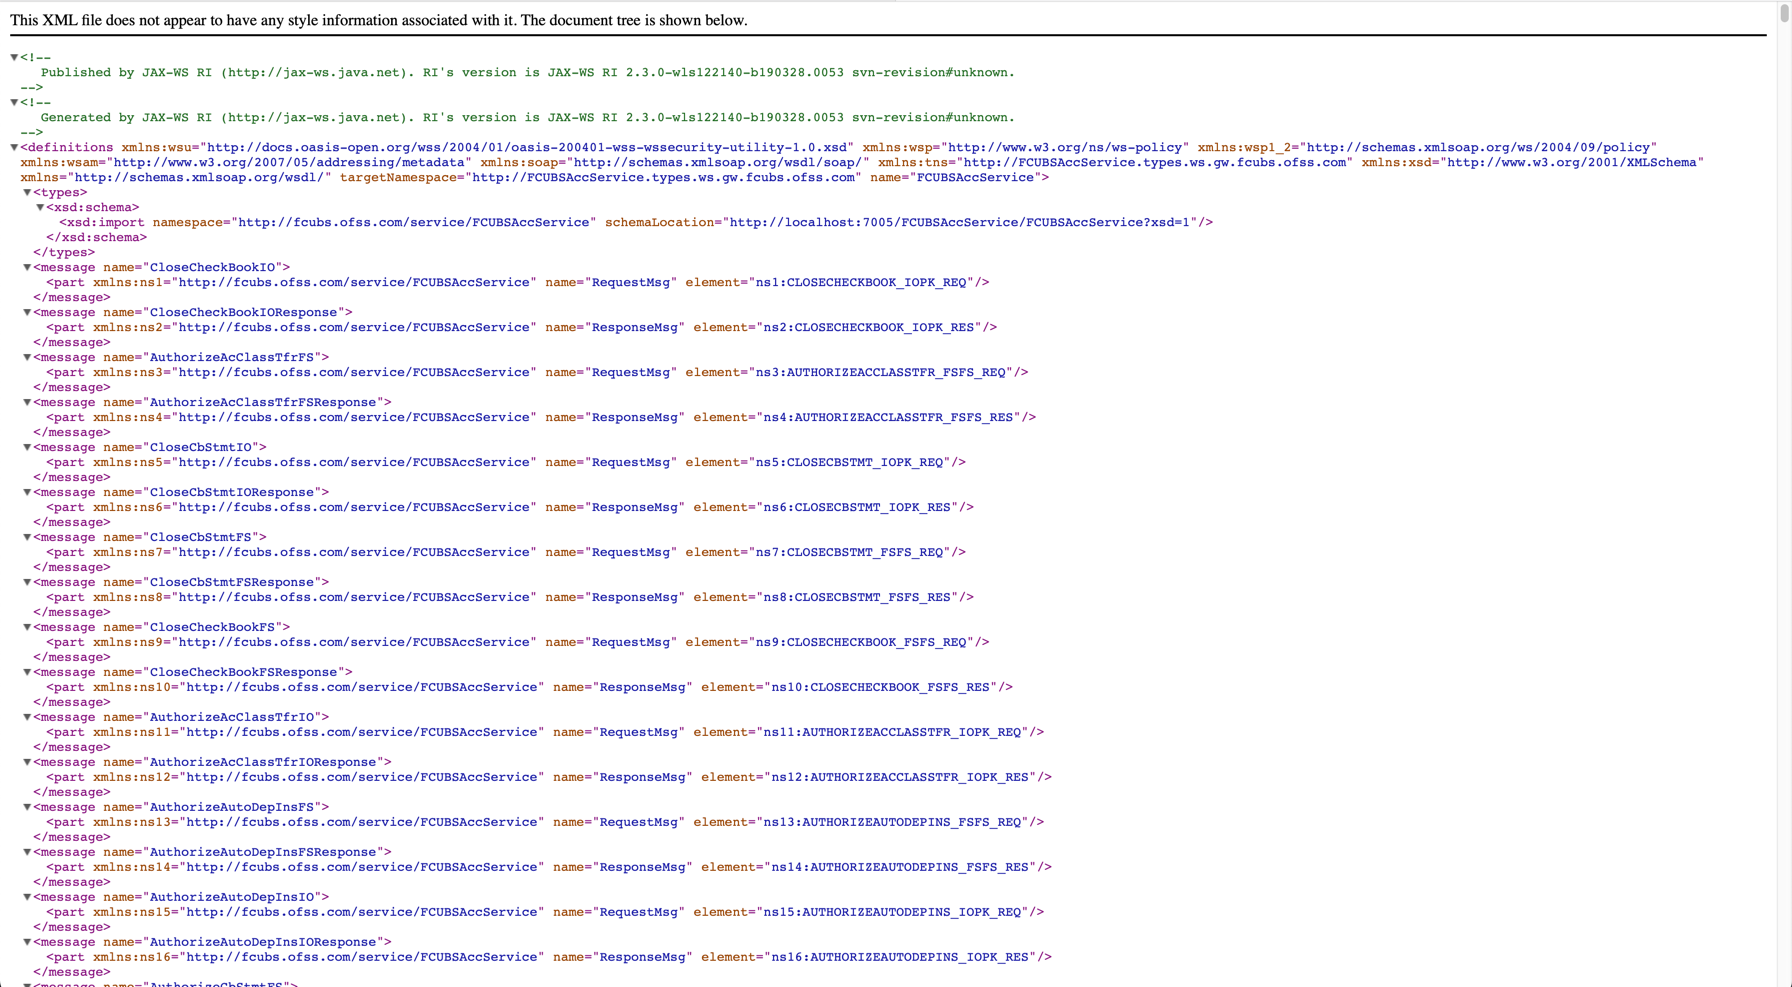
For the SOAP Service:
http://<integrated145-webservices>:7005/FCUBSAccService/FCUBSAccService?WSDLhttp://<integrated145-webservices>:7009
-
FLEXCUBE Application on Port 7004
SOAP Service on Port 7005
Task 4: Automate the FLEXCUBE deployment
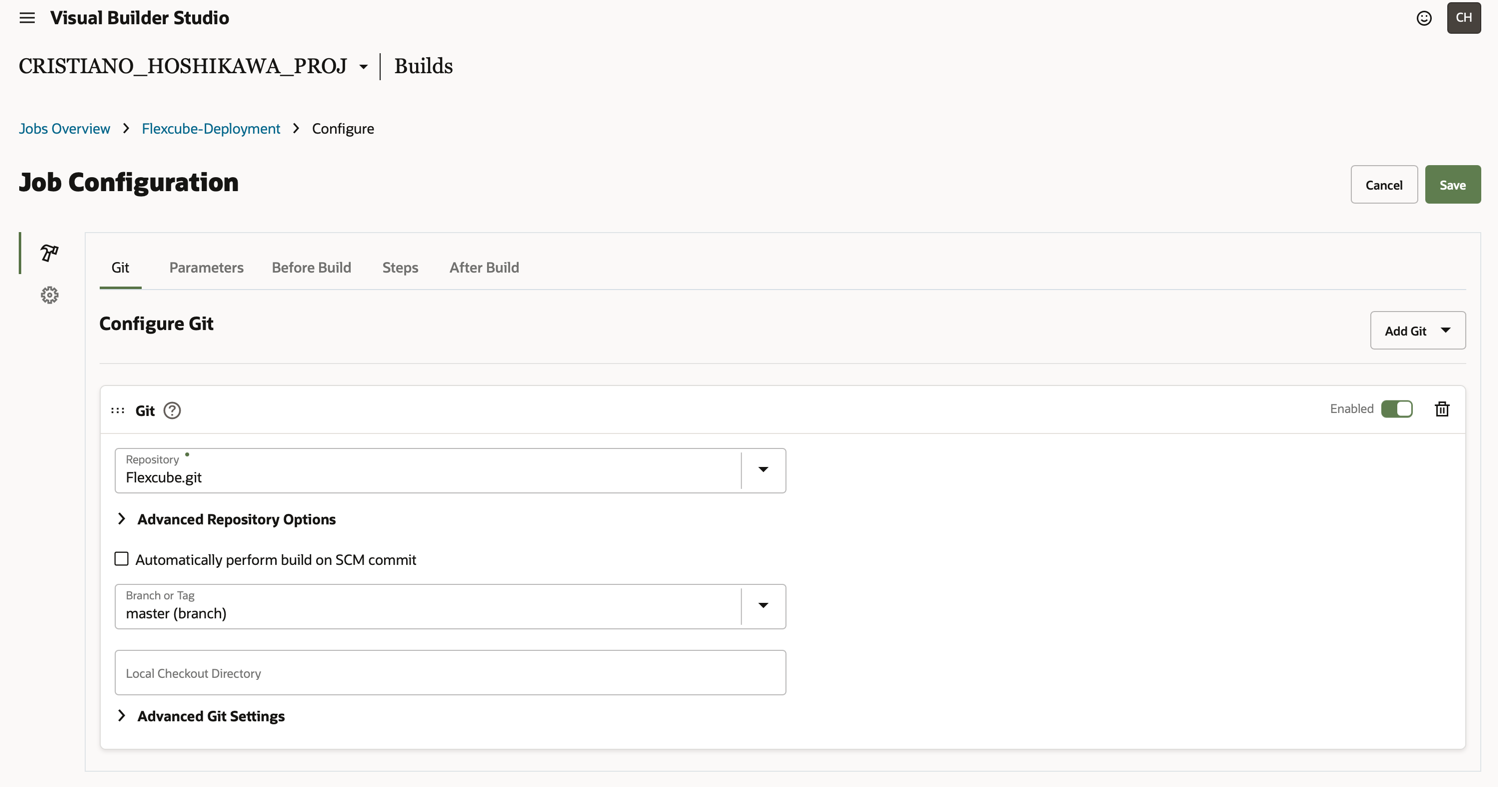
Let’s do this task with Visual Builder Studio. This tool is part of OCI and is similar to Jenkins. So, if you use Jenkins, you can configure CI/CD with minor adjustments.
-
Create your Appointment for the FLEXCUBE Git project. You must configure the FLEXCUBE Git project in your Visual Builder Studio (or Jenkins) configuration.
-
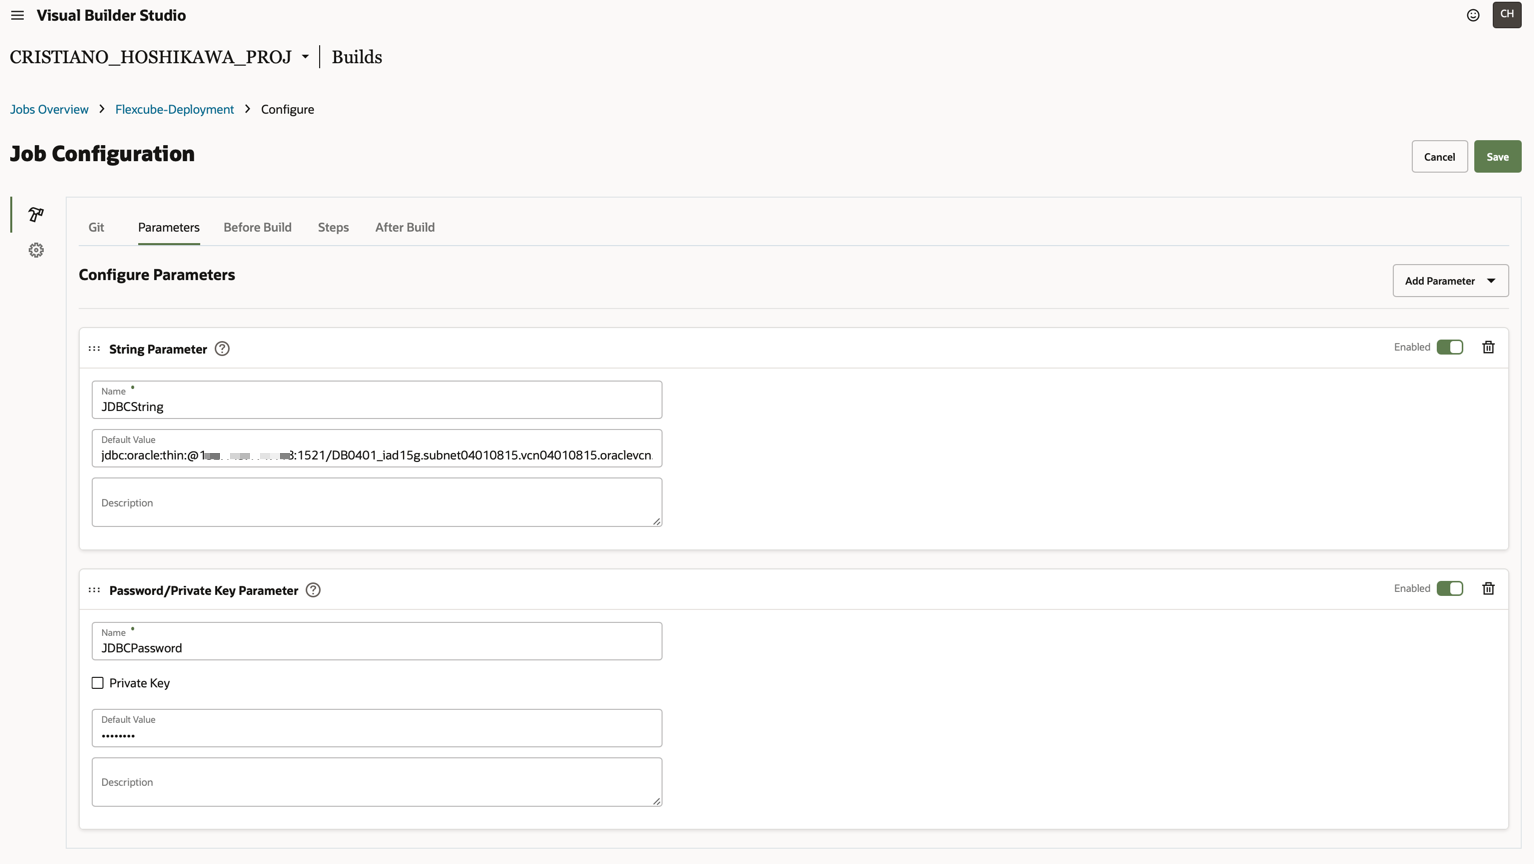
Create two variables in the pipeline.
-
JDBCString: Contains the JDBC String. Example:jdbc:oracle:thin:@x.x.x.x:1521/prodpdb.sub0xxxxxxxxx0.arspvcn.oraclevcn.com -
JDBCPassword: Contains an AES256 password format. Example:{AES256}AgWyiXhc7aM112gNRUwBIWf5QpTpWMlI537LrIfPWjCcmwNCsynBxxg99
In Visual Builder, you can create the variables like this:
-
-
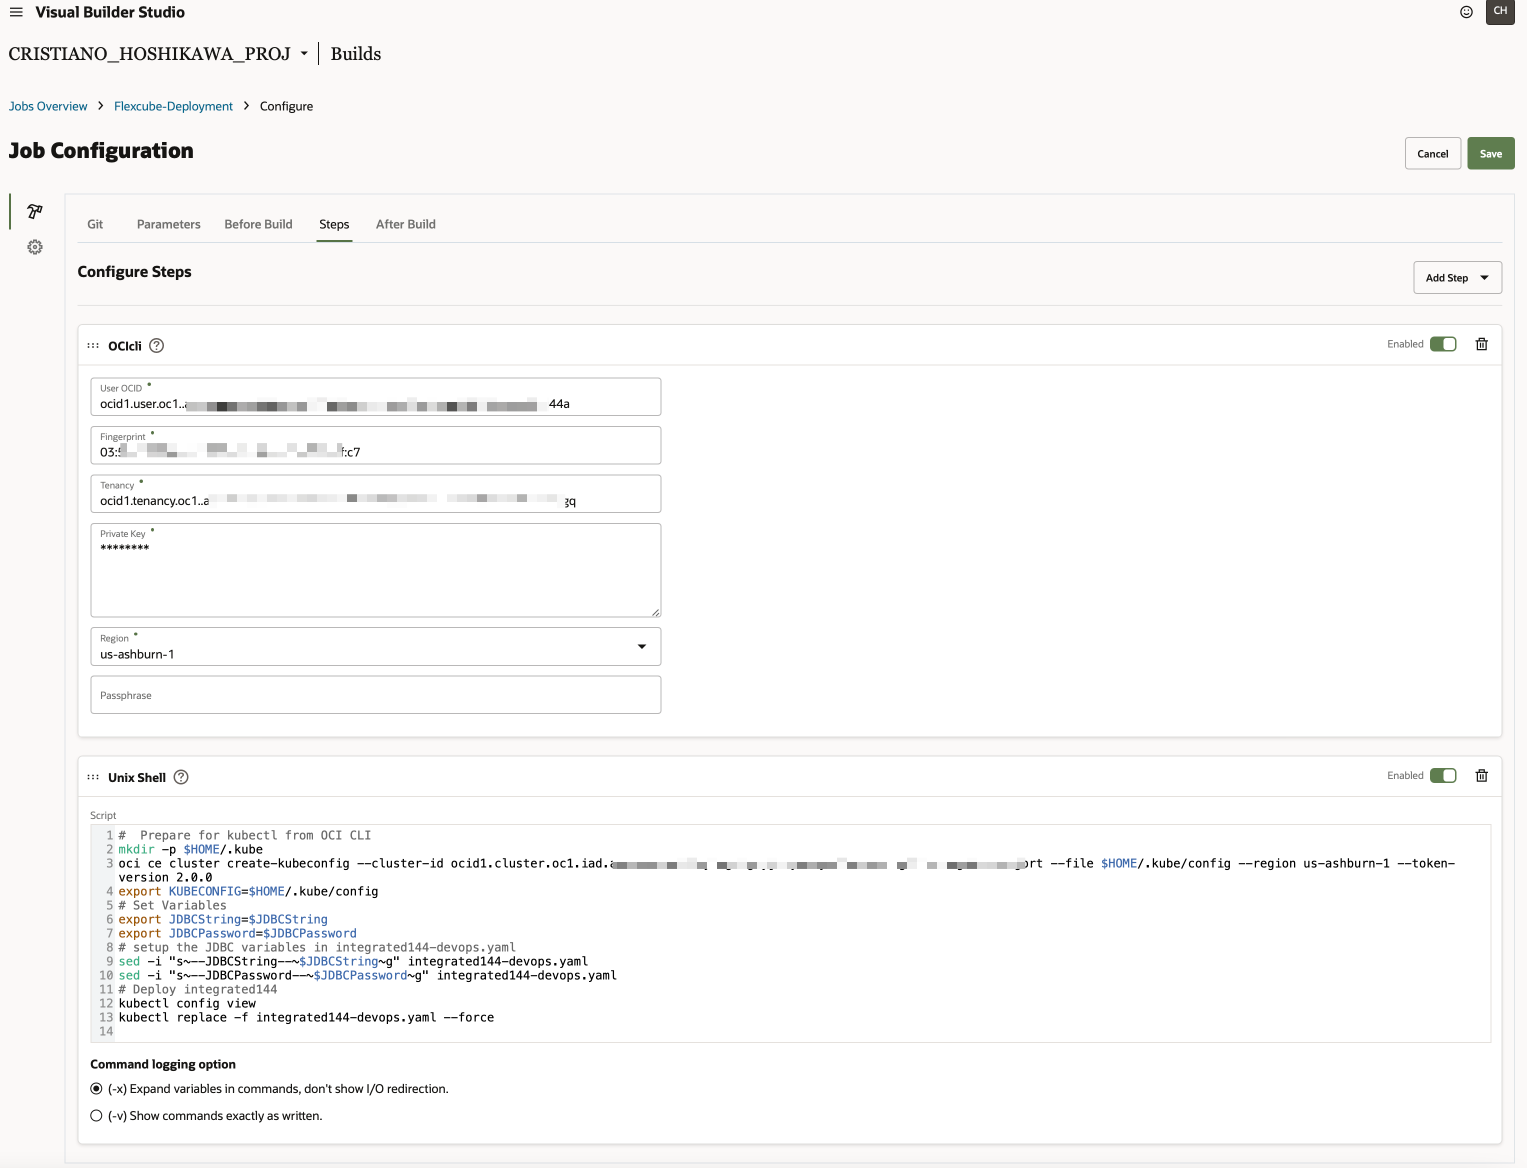
Create the following two steps in the pipeline: OCI CLI Step: Needed to create the connection with the tenant of your OKE cluster and UNIX Shell Step: Needed to execute the process of deployment.
-
On the Job Configuration in Visual Builder Studio, click Add New and select OCICli. You need to put the OCI parameters to authorize the Visual Builder Studio to operate with your tenancy and OKE cluster.
- User OCID
- Finger Print: Configure access to OCI CLI and upload a public key
- Tenancy OCID
- Private Key: The private key pair of your uploaded public key in Fingerprint
- Region: The region of your OKE cluster
- Passphrase: If you have a password in your private key
-
Click Add New and select UNIX Shell. Add this script in the box:
# Prepare for kubectl from OCI CLI mkdir -p $HOME/.kube oci ce cluster create-kubeconfig --cluster-id <OCID of your OKE Cluster> --file $HOME/.kube/config --region us-ashburn-1 --token-version 2.0.0 export KUBECONFIG=$HOME/.kube/config # Set Variables export JDBCString=$JDBCString export JDBCPassword=$JDBCPassword # setup the JDBC variables in integrated145-devops.yaml sed -i "s~--JDBCString--~$JDBCString~g" ./files/scripts/integrated145-devops.yaml sed -i "s~--JDBCPassword--~$JDBCPassword~g" ./files/scripts/integrated145-devops.yaml # Deploy integrated145 kubectl config view kubectl replace -f ./files/scripts/integrated145-devops.yaml --forceNote: Obtain the OKE OCID in your tenant and add the line “oci ce cluster…”. The integrated145-devops.yaml file is similar to the integrated145.yaml file, but prepared for the CI/CD.
In Visual Builder Studio, the following details are displayed:
-
-
Start your pipeline and wait for the deployment. You can list the services available with the following command:
kubectl get svcNAME TYPE CLUSTER-IP EXTERNAL-IP PORT(S) AGE integrated145-service LoadBalancer 10.x.x.x 210.x.x.x 7004:30868/TCP 200d integrated145-service-weblogic LoadBalancer 10.x.x.x 210.x.x.x 7001:32071/TCP 200d integrated145-webservices LoadBalancer 10.x.x.x 210.x.x.x 7005:30415/TCP 200d integrated145-webservices2 LoadBalancer 10.x.x.x 210.x.x.x 7009:30759/TCP 200d
Task 5: Update database tables to configure your FLEXCUBE instance
-
After FLEXCUBE has been activated on your Kubernetes cluster and you need to integrate with other FSGBU applications, you need to do some UPDATEs on the database. You must change the following tables to point to the correct endpoints of your FLEXCUBE instance:
TableName Change PMTM_EXT_NOTIF_SYSTEM REST_URL CSTM_PROP_MASTER SERVICE_URL IFTM_EXT_PAYSYS_DETAIL WSDL_URLS for OBLM IFTM_EXTERNAL_SERVICE_DETAILS REST_IP PMTM_EXTERNAL_ACC_SYSTEM RS_URL for OBVAM PMTM_ECA_SYSTEM RS_URL for OBVAM STTM_HOST_DSN Contains Schema details which is used for REPORTS only and can be ignored -
If you change the hostname of your configuration, you must also update the container hostname for the following tables:
TableName CSTM_EXTERNAL_SERVER_DETAILS PMTM_EXCHANGE_RATE_SYSTEM PMTM_FILE_ENV_SYSTEM PMTM_QUEUE_PROFILE PMTM_SANCTION_SYSTEM PROPERTIES IFTM_TF_EXT_SERVICE_DETAILS GETH_BLOCK_EXT_SYS_DETAIL GETM_BLOCK_EXT_SYS_DETAIL CSTB_NGUI_REGISTRY IFTM_TF_EXT_PAYSYS_DETAIL IFTM_TR_EXT_SERVICE_DETAILS OLTM_INTEGRATION_DETAILS IFTM_TR_EXT_PAYSYS_DETAIL IFTM_INTEGRATION_DETAILS IFTM_TF_EXT_SERVICE_DETAILS
Task 6: Delete the FLEXCUBE deployment
-
To delete the deployment, execute this command on your terminal:
kubectl delete -f integrated145.yaml
Related Links
Acknowledgments
- Authors - Cristiano Hoshikawa (LAD A-Team Solution Engineer), Eduardo Farah (Master Principal Sales Consultant & Banking Architect)
More Learning Resources
Explore other labs on docs.oracle.com/learn or access more free learning content on the Oracle Learning YouTube channel. Additionally, visit education.oracle.com/learning-explorer to become an Oracle Learning Explorer.
For product documentation, visit Oracle Help Center.
Deploy Oracle FLEXCUBE on OKE
F77599-01
February 2023
Copyright © 2023, Oracle and/or its affiliates.