Configure AWS Key Management Service (KMS) to store TDE Master Encryption Key for Exadata Database Service on Dedicated Infrastructure on Oracle Database@AWS

Introduction

This guide explains how to integrate AWS Key Management Service (KMS) with Oracle Exadata Database Service on Dedicated Infrastructure, part of Oracle Database@AWS. With this integration, organizations can centrally manage Transparent Data Encryption (TDE) master keys using AWS KMS.

Key benefits

Objectives

Prerequisites

Task 1: Verify and Configure OCI Identity Domain

  1. In the AWS Console, select Settings in Oracle Database@AWS page. Confirm the OCI Identity Domain Status is Available.

    The screenshot shows the Oracle Database@AWS → Settings page in the AWS console, focused on configuring an OCI identity domain for integrations. The Status is highlighted as Available, indicating the identity domain connection is set up and active. It also displays the OCI identity domain ID and the OCI identity domain URL, which are used to enable AWS integrations (like associating IAM service roles) for VM clusters. A Remove button is available to detach this identity domain configuration from the account.

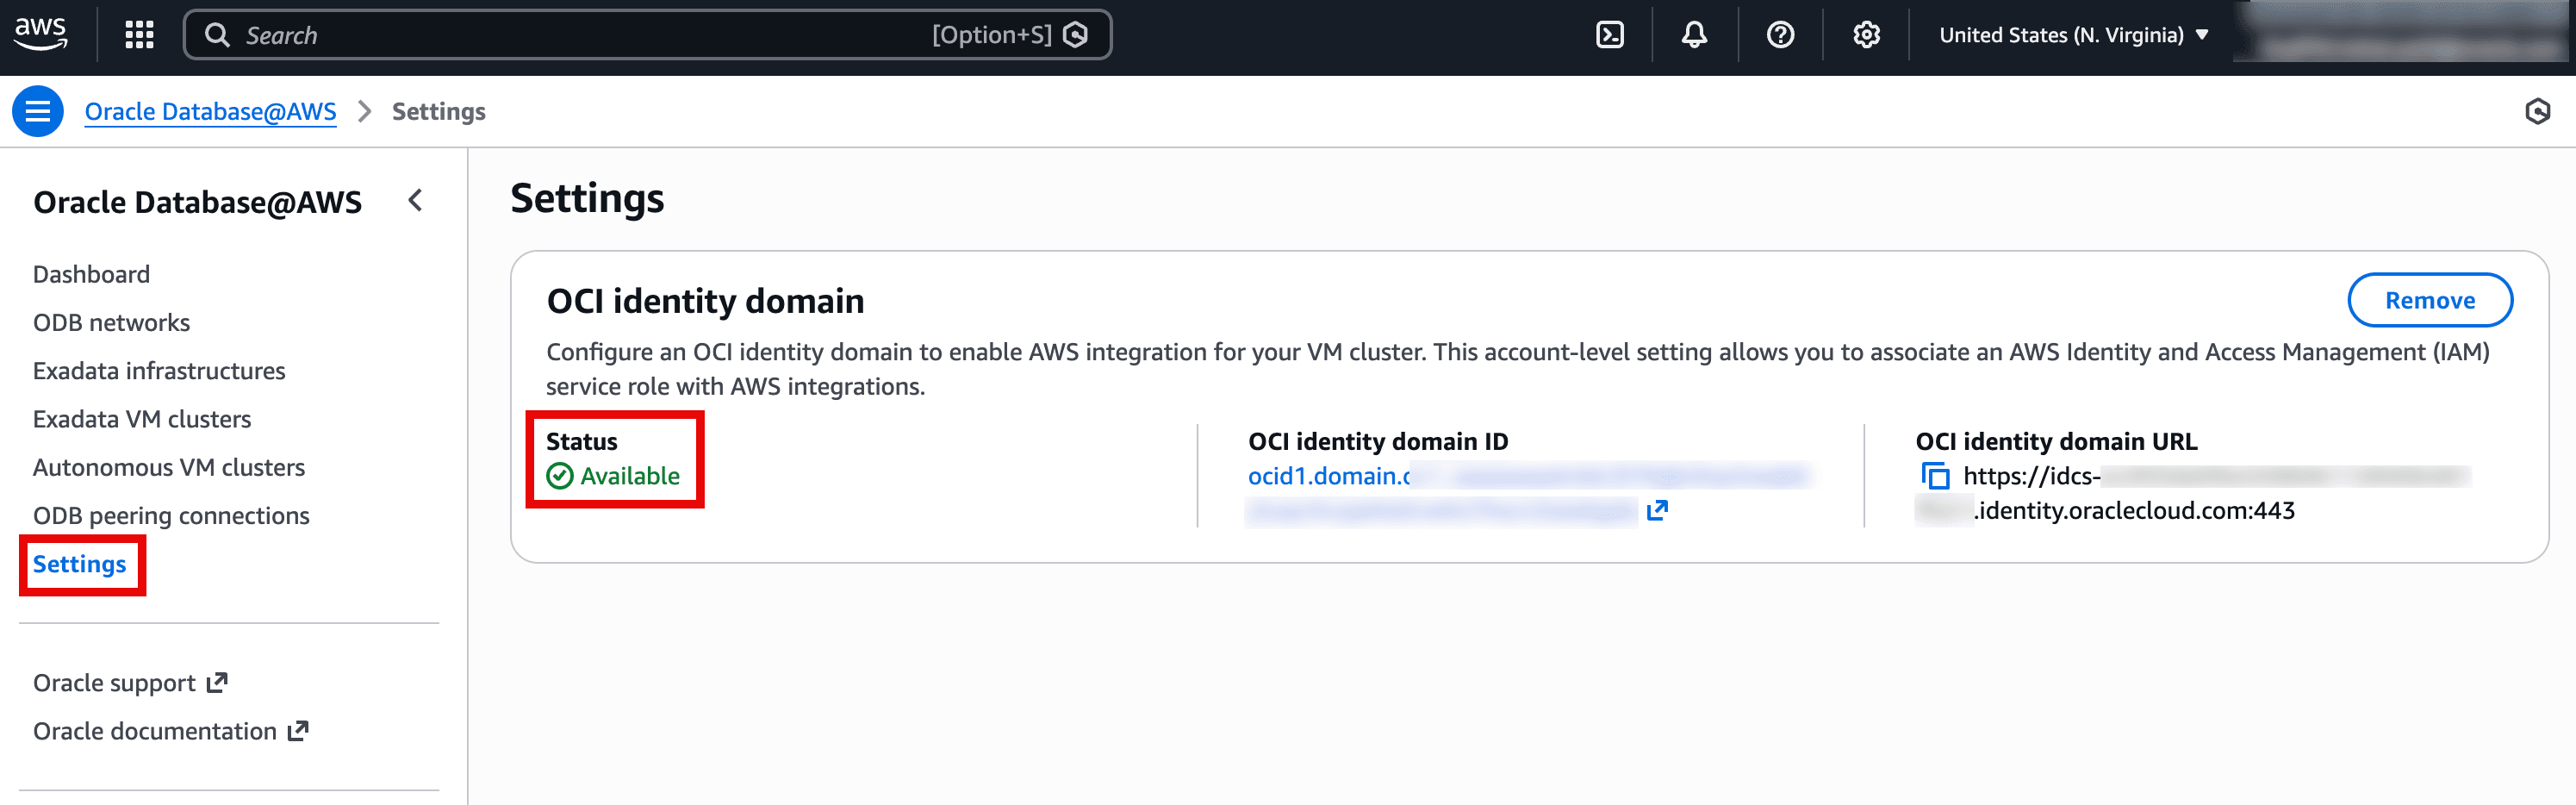
    Description of the illustration verify-oci-identity-domain.png

Task 2: Enable Security Token Service and AWS KMS in ODB Network

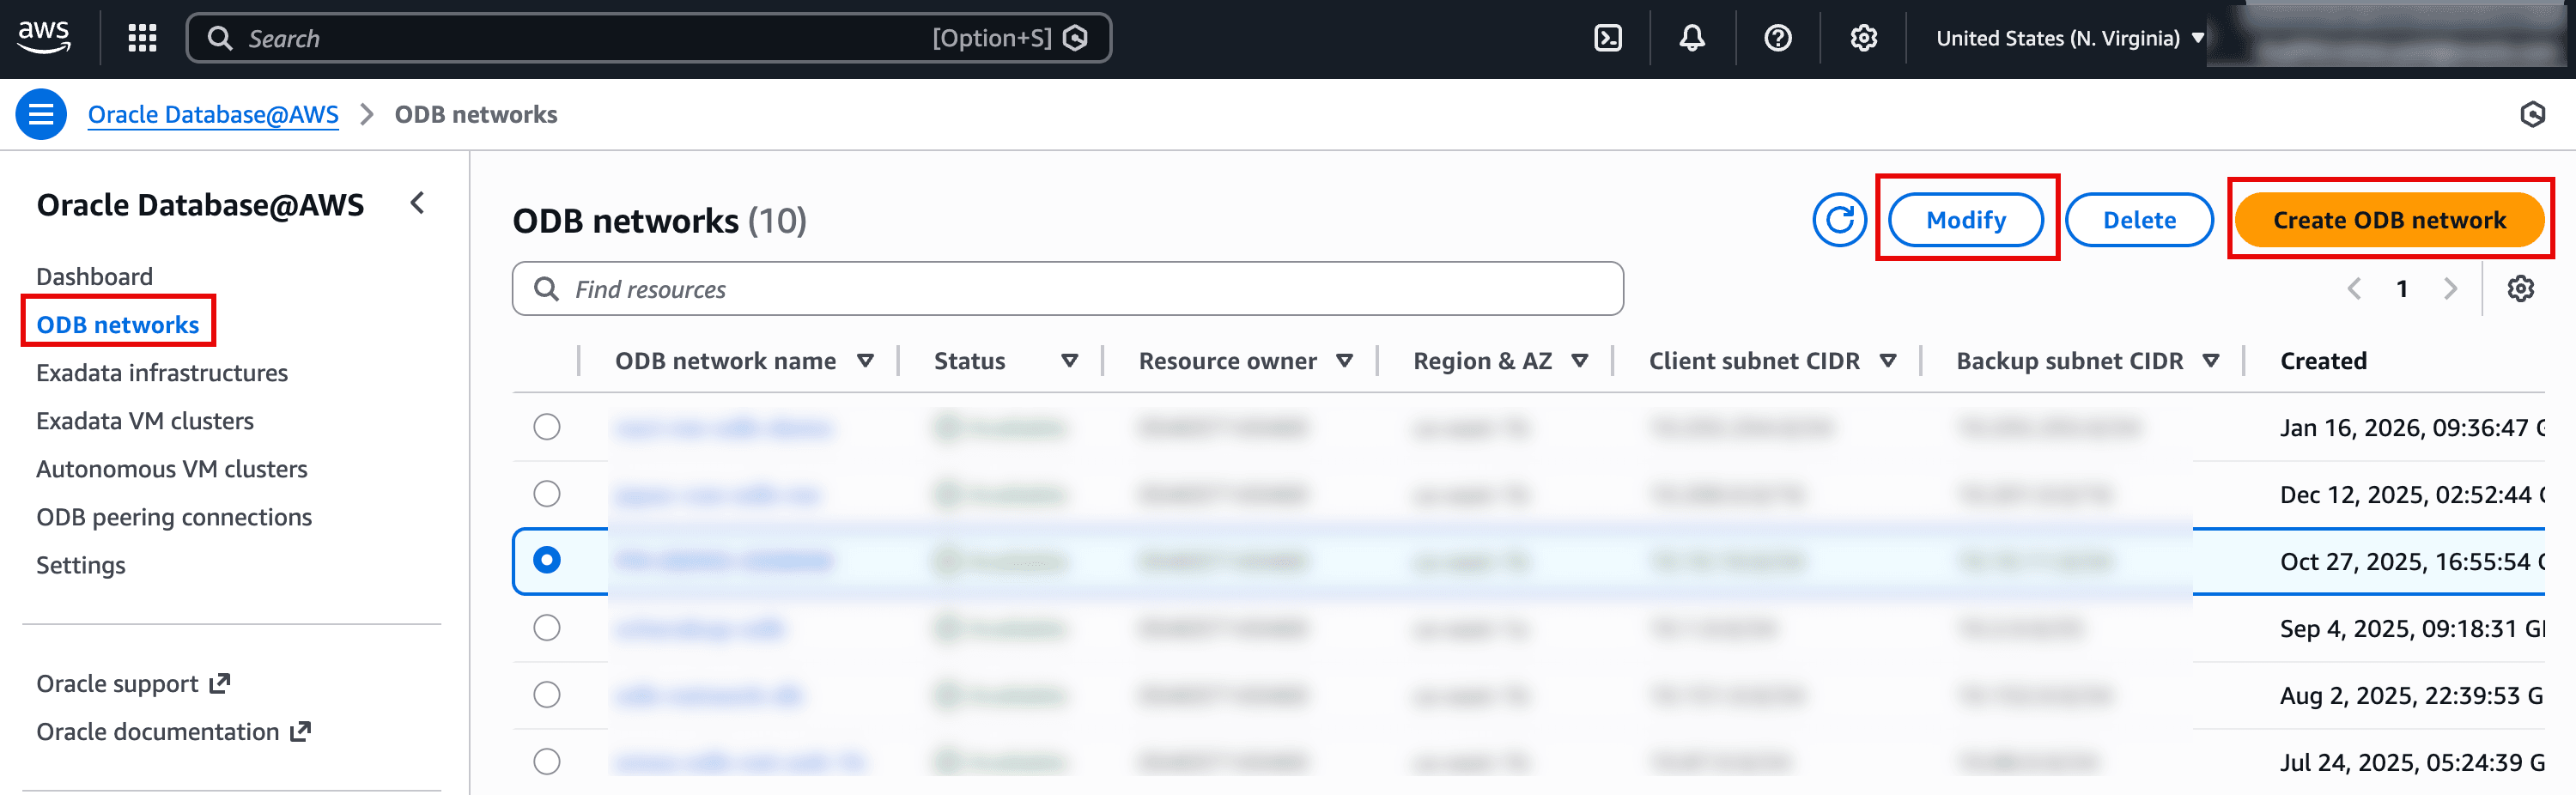
  1. In the AWS Console, select ODB Networks in Oracle Database@AWS page. Either modify an existing ODB Network or create a new one.
    The screenshot shows the Oracle Database@AWS console on the ODB networks page, where a list of ODB networks is displayed in a table. The left navigation highlights ODB networks, indicating you’re managing network resources for Oracle Database@AWS. At the top right, the Modify button is highlighted for editing the selected network, and Create ODB network is highlighted for provisioning a new network. The table includes details such as status, region/AZ, client and backup subnet CIDRs, and creation time for each network.

    Description of the illustration Select-ODB-Network.png

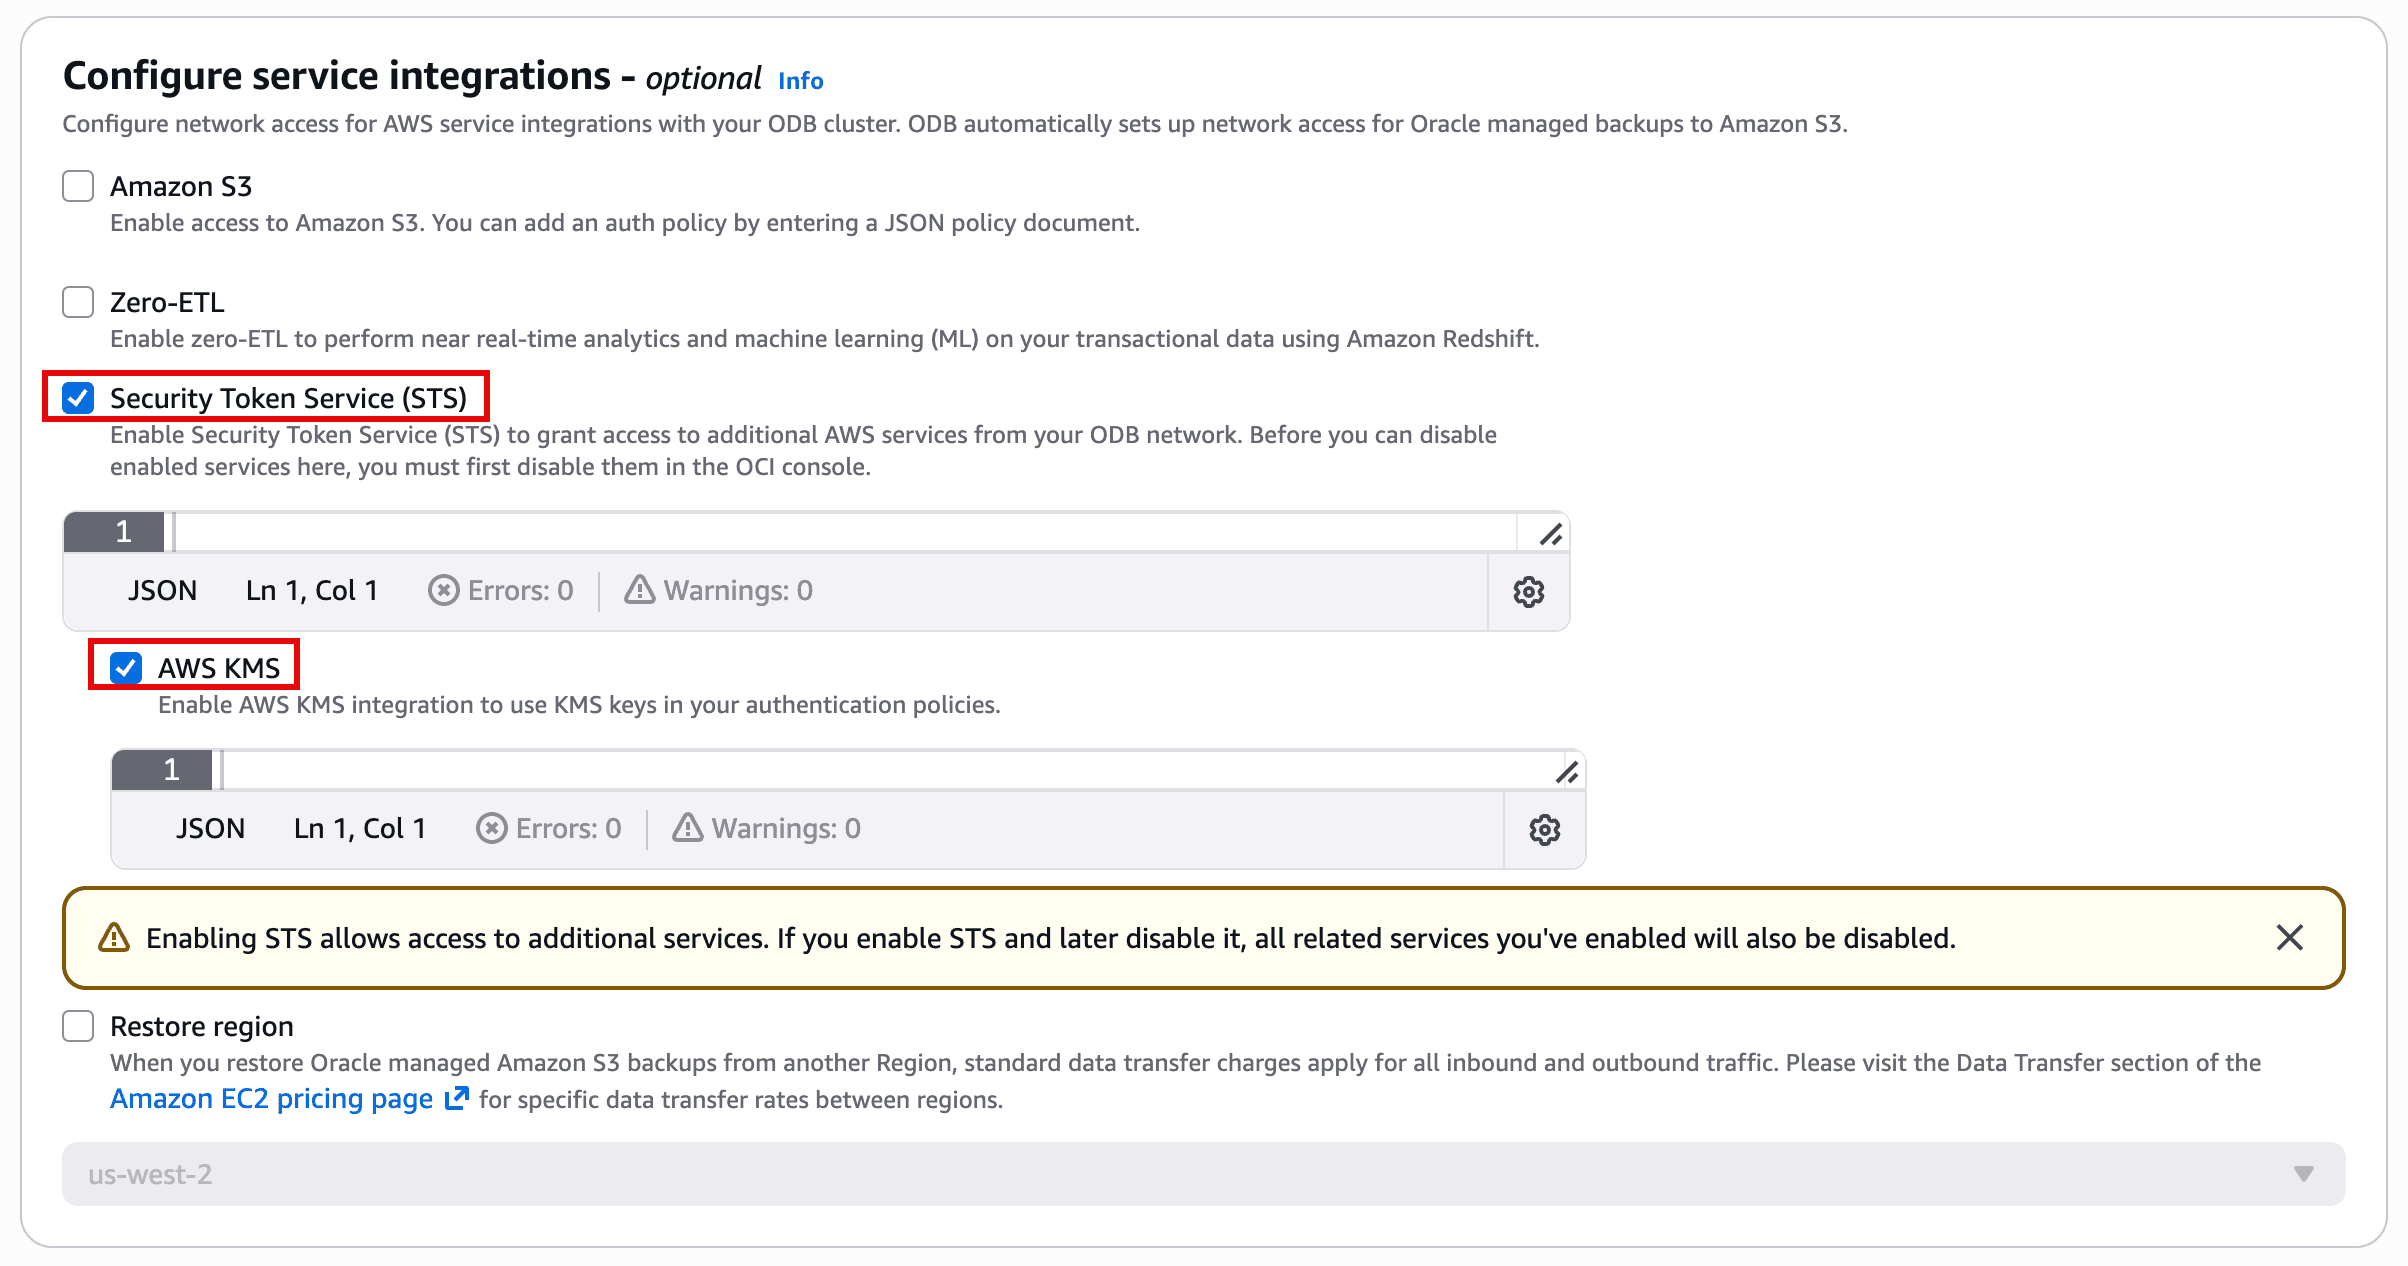
  2. Under Configure service integrations, enable Security Token Service (STS) and AWS KMS options to allow the VM cluster to communicate securely with AWS KMS.

    The image shows a “Configure service integrations” section (optional) where you can enable AWS integrations for an Oracle Database@AWS/ODB network. The checkboxes for Security Token Service (STS) and AWS KMS are selected, with JSON policy input areas beneath them for defining access rules. A warning notes that enabling STS allows access to additional services, and if STS is later disabled, any dependent enabled services will also be disabled. Other optional integrations like Amazon S3, Zero-ETL, and a Restore region setting are also listed.

    Description of the illustration Modify-ODB-Network.png

Task 3: Configure AWS Identity Provider (OIDC) and IAM Role

  1. In the AWS Console, select Exadata VM clusters in Oracle Database@AWS page. Select the Exadata VM Cluster for which you want to enable AWS KMS Key Management.

    The image shows the AWS console for Oracle Database@AWS on the Exadata VM clusters list page. In the table, the VM cluster pm-demo-exadb-vmcluster is highlighted and its status is Available, with columns showing details like VM count, total OCPUs, and memory. The left navigation also highlights Exadata VM clusters, indicating you’re in the cluster management section. From here you can select a cluster to view/manage it or click Create VM cluster to provision a new one.

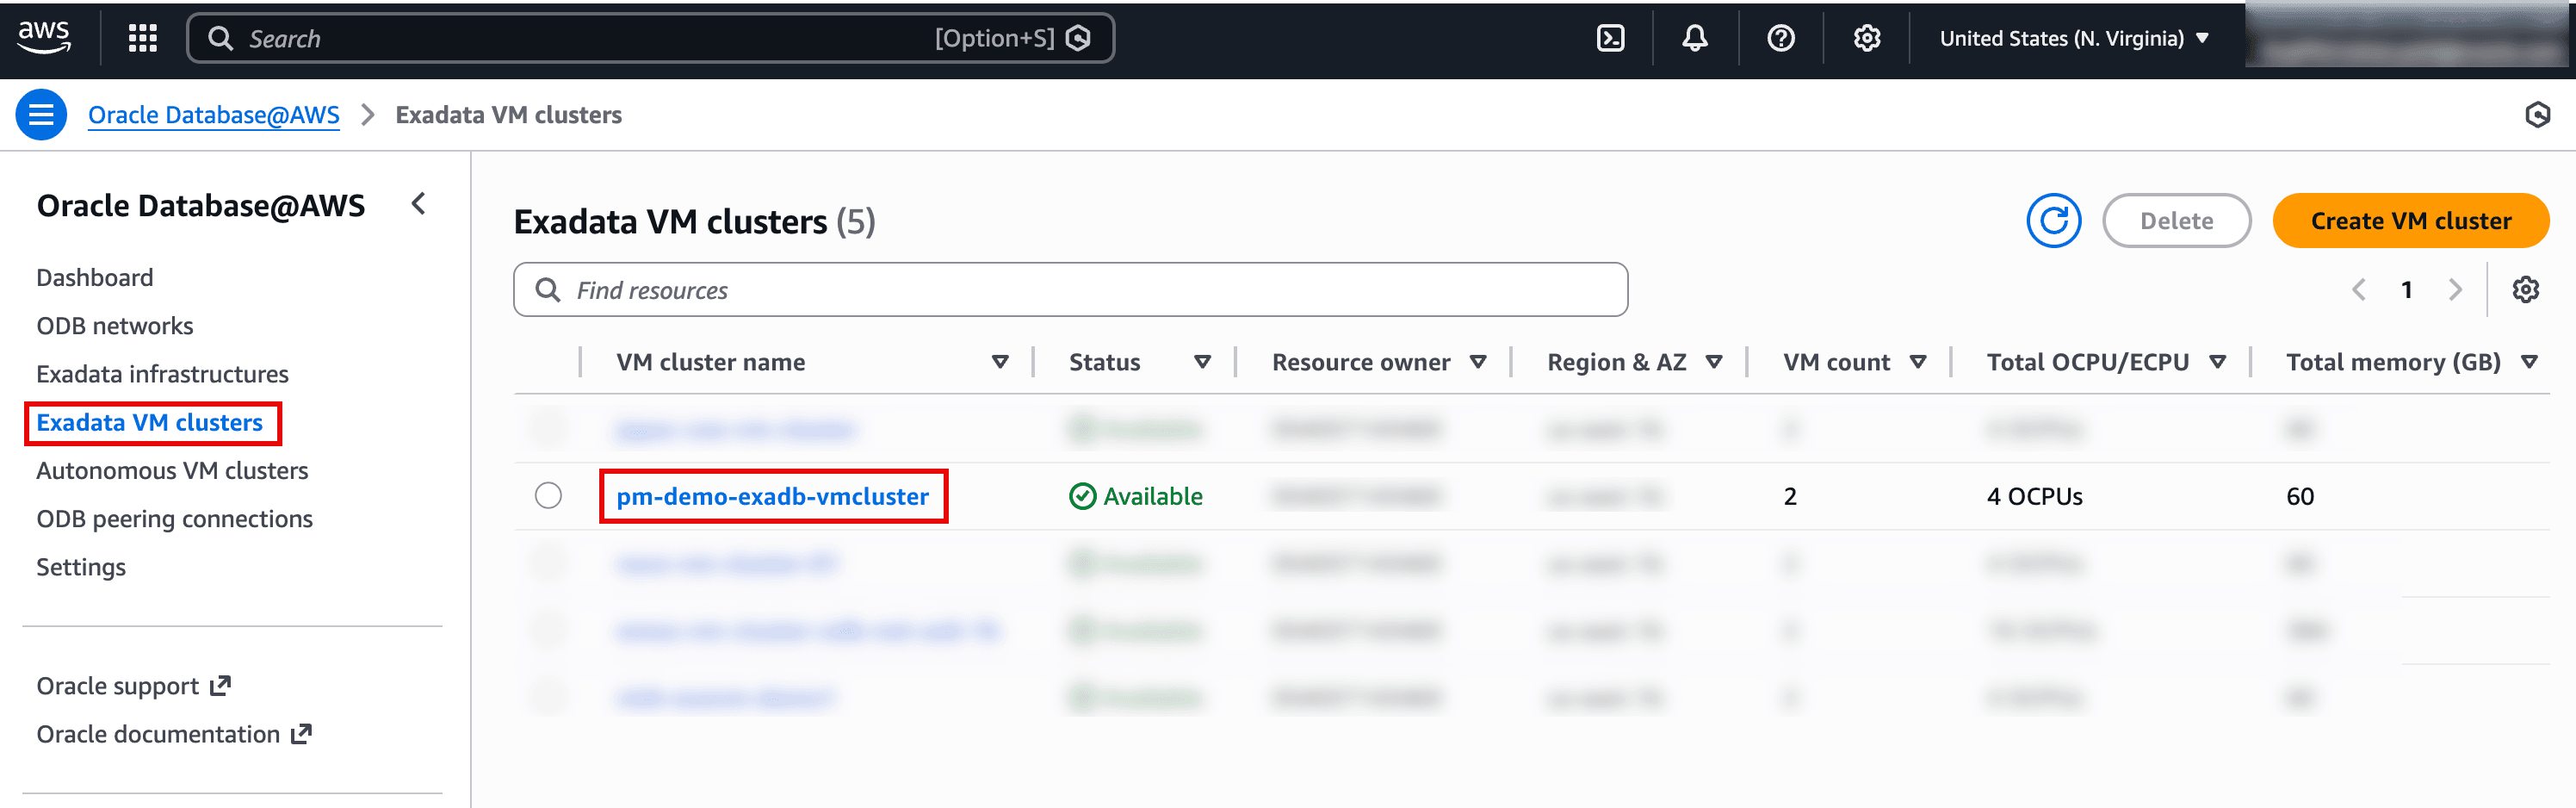
    Description of the illustration Select-Exadata-VM-Cluster.png

  2. From the Exadata VM Cluster’s details page, go to the IAM service roles tab and select the CloudFormation link to open the AWS Quick Create Stack page.

    The image shows the AWS console page for an Oracle Database@AWS Exadata VM cluster (“pm-demo-exadb-vmcluster”), with the IAM service roles tab highlighted. In this section, you can associate or disassociate an IAM role used for AWS integrations, and there’s a link to CloudFormation templates to help create the required service roles. The table at the bottom lists a service role ARN whose status is Connected, and it’s associated with the AWS KMS for TDE integration. Overall, it’s confirming that the VM cluster has an IAM role wired up to use AWS KMS for database encryption key management.

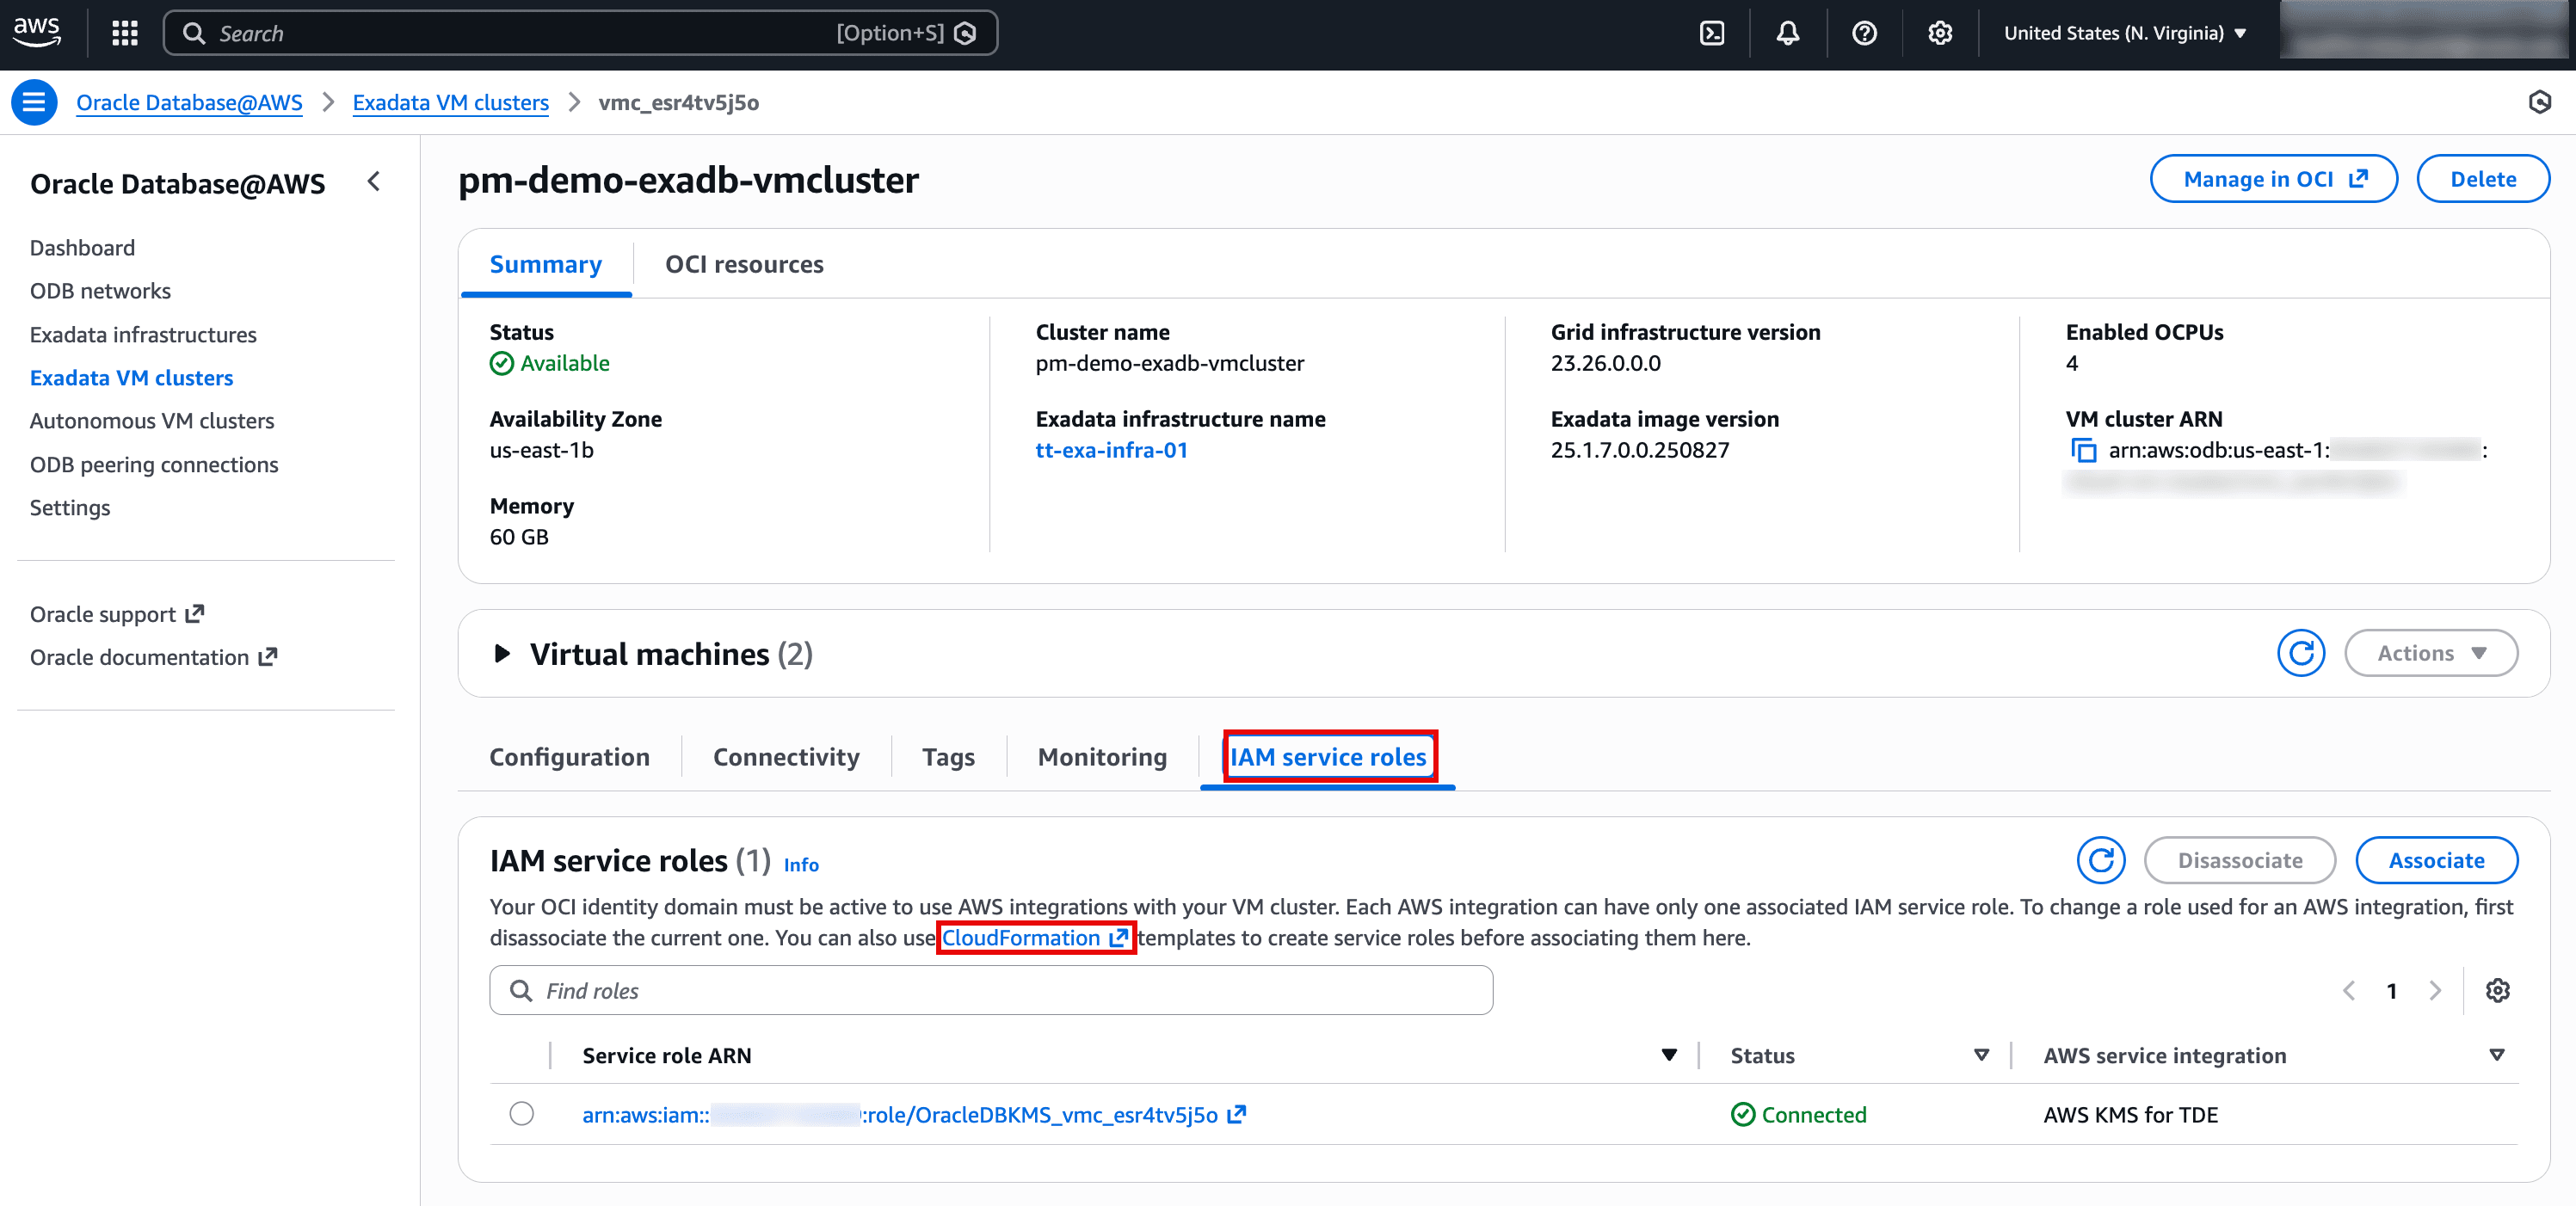
    Description of the illustration Click-CloudFormation-link.png

  3. If this is the first time you are creating OpenID Connect Provider then leave OIDCProviderArn blank to create a new OIDC provider. For subsequent executions, provide the existing OIDCProviderArn. Existing OpenID Connect provider details including ARN can be found by going to IAM page and then click Identity providers.

    This screenshot shows the AWS CloudFormation “Quick create stack” page where you provide parameters for a template. It includes the OCI Identity Domain URL and a highlighted field for OIDCProviderArn, which is the ARN of an existing IAM OIDC provider (used instead of creating a new one). Additional parameters below (like ResourceOcid and RoleName) help scope the trust relationship and name the IAM role that will be created for the integration. Overall, it’s configuring the identity/trust setup needed for Oracle Database multicloud access (e.g., AWS KMS integration) via OIDC.

    Description of the illustration OIDC-Provider-ARN.png

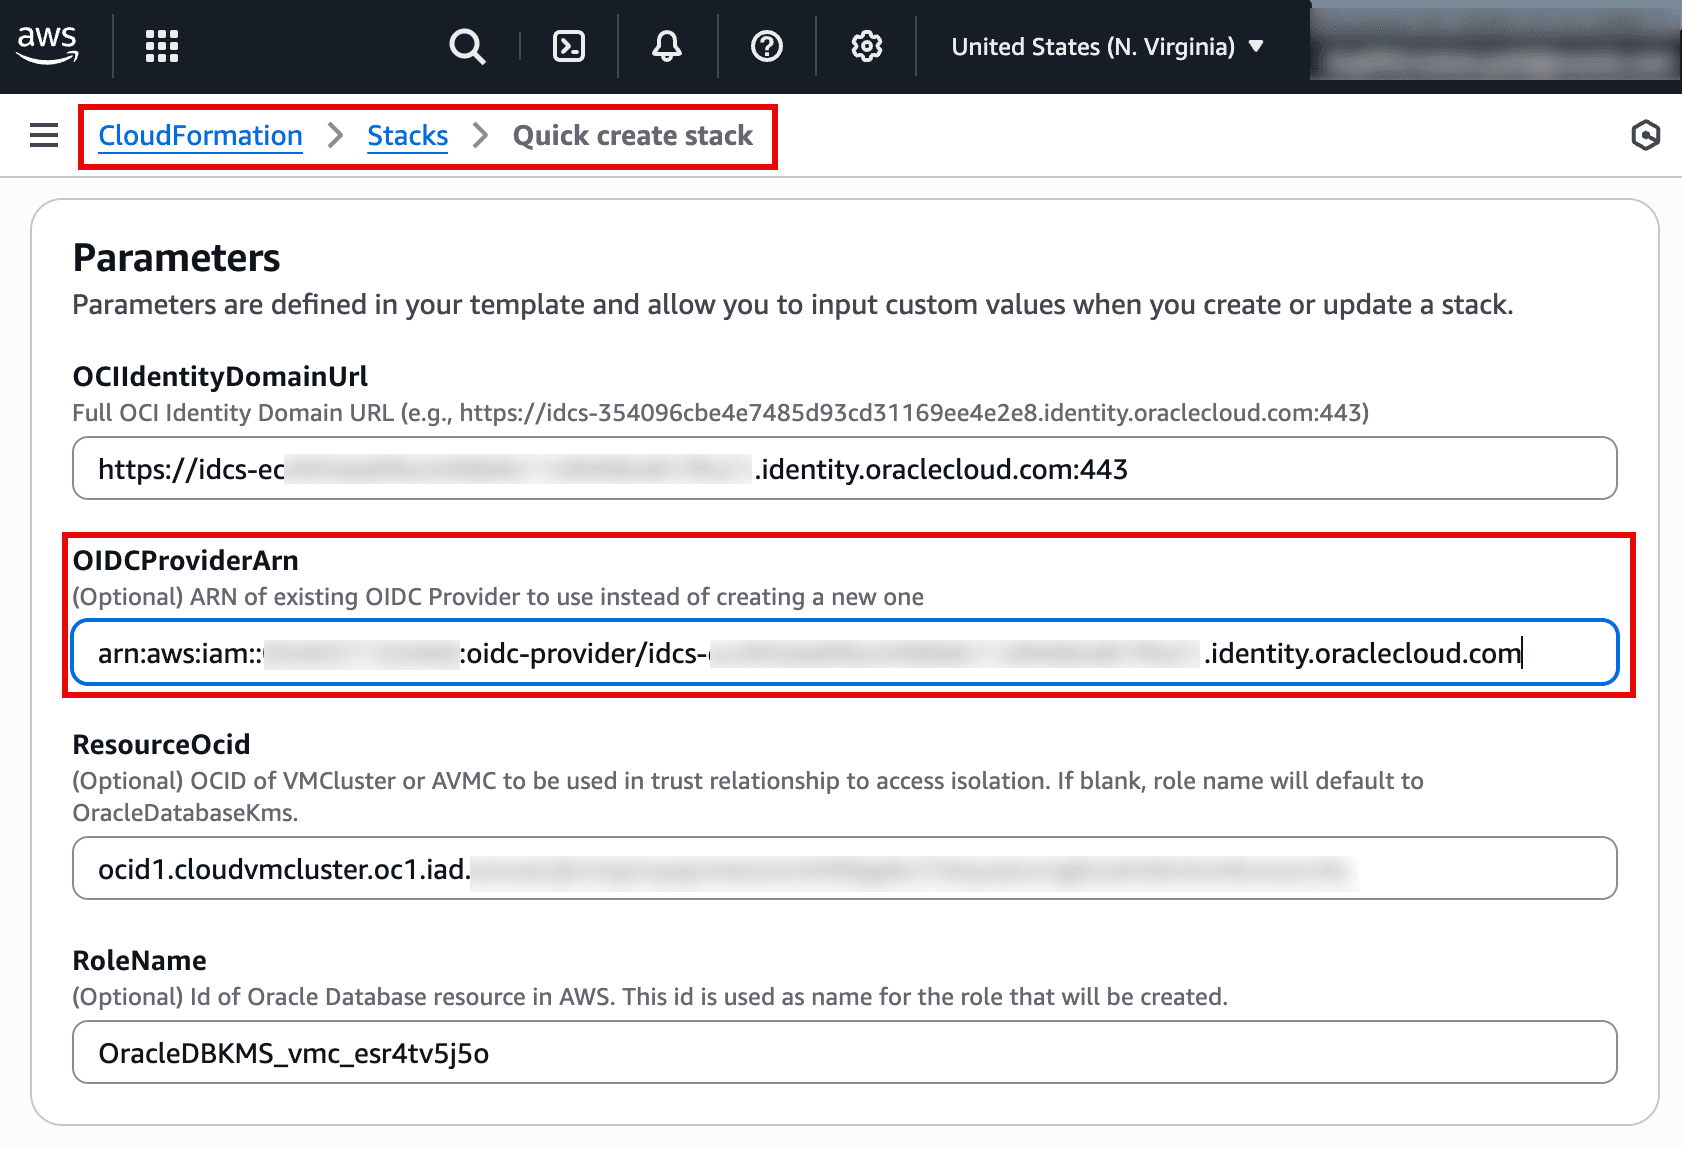
  4. Proceed to create the stack. Once completed, find the details of resources created such as OIDC provider and IAM role. Click on the link under Physical ID for WebIdentityRole resource.

    The screenshot is from AWS CloudFormation showing the Resources tab for a stack named OCIIdentityProvider. It lists two created resources: an IAM OIDC provider (logical ID ODBOIDCProvider) and an IAM role (logical ID WebIdentityRole). Both resources show a status of CREATE_COMPLETE, indicating the stack successfully provisioned the identity provider and role needed for web-identity/OIDC-based access. This setup is typically used to let an external identity system assume an AWS role securely without long-lived credentials.

    Description of the illustration CloudFormation-Resources.png

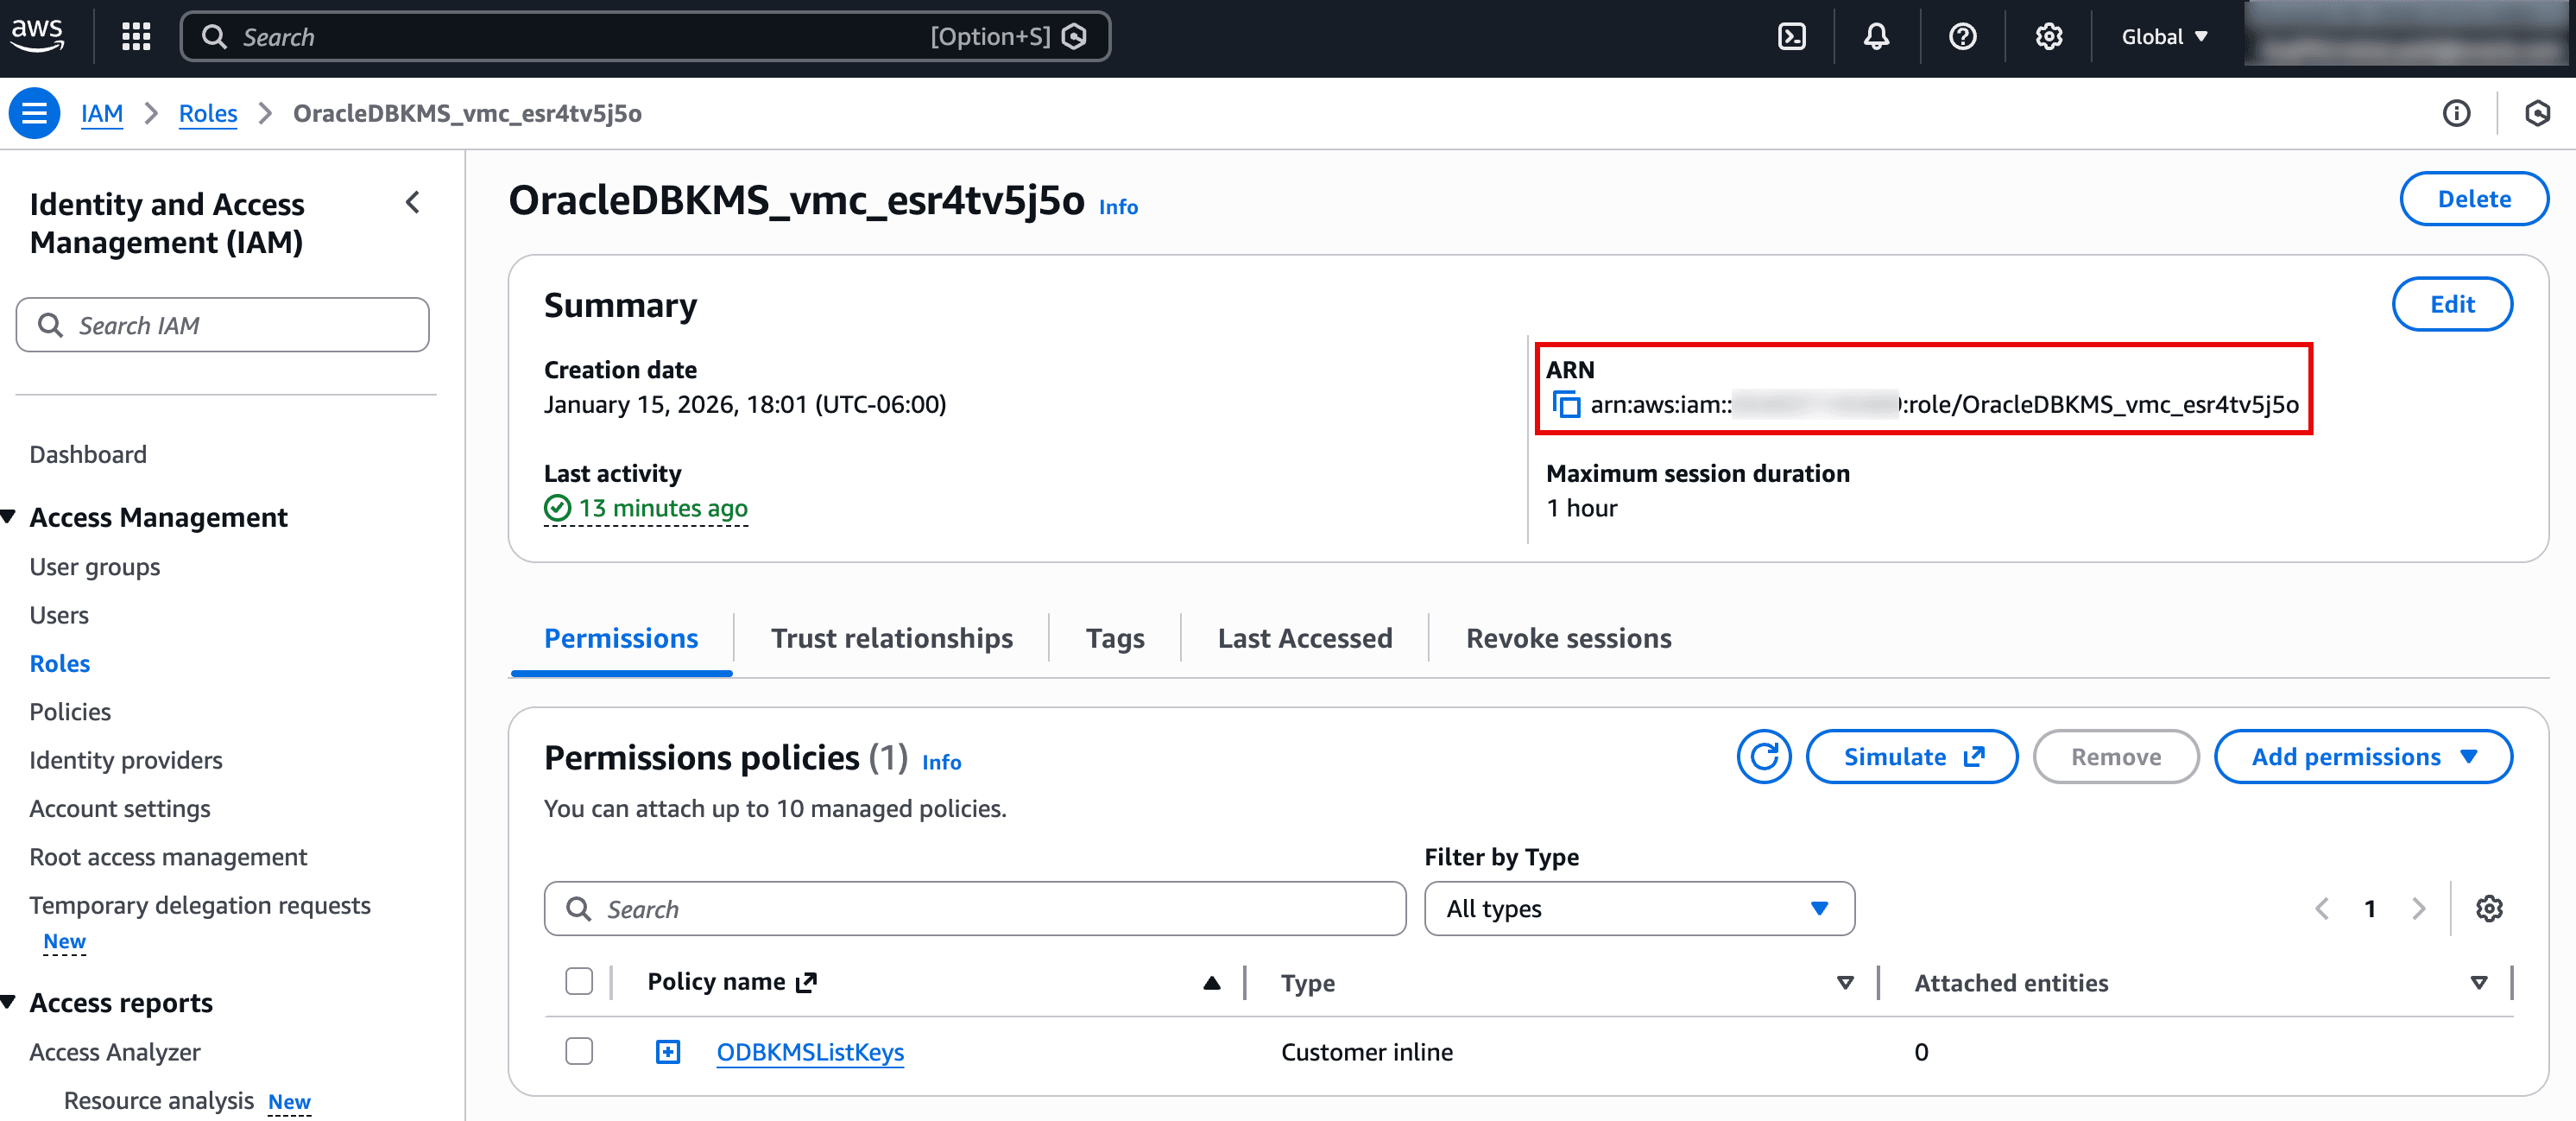
  5. Copy the ARN of the created IAM role for next step.

    The screenshot shows the AWS IAM Role details page for a role named OracleDBKMS_vmc_esr4tv5j5o. The highlighted section displays the role’s ARN, which is the identifier you copy when associating this role with services (for example, enabling Oracle Database@AWS to access AWS KMS). The page also shows recent role activity and the role’s maximum session duration. In the Permissions policies section, an inline policy (e.g., ODB KMS ListKeys) is attached to define what the role is allowed to do.

    Description of the illustration IAM-Role-ARN.png

Task 4: Associate IAM Role to Exadata VM Cluster

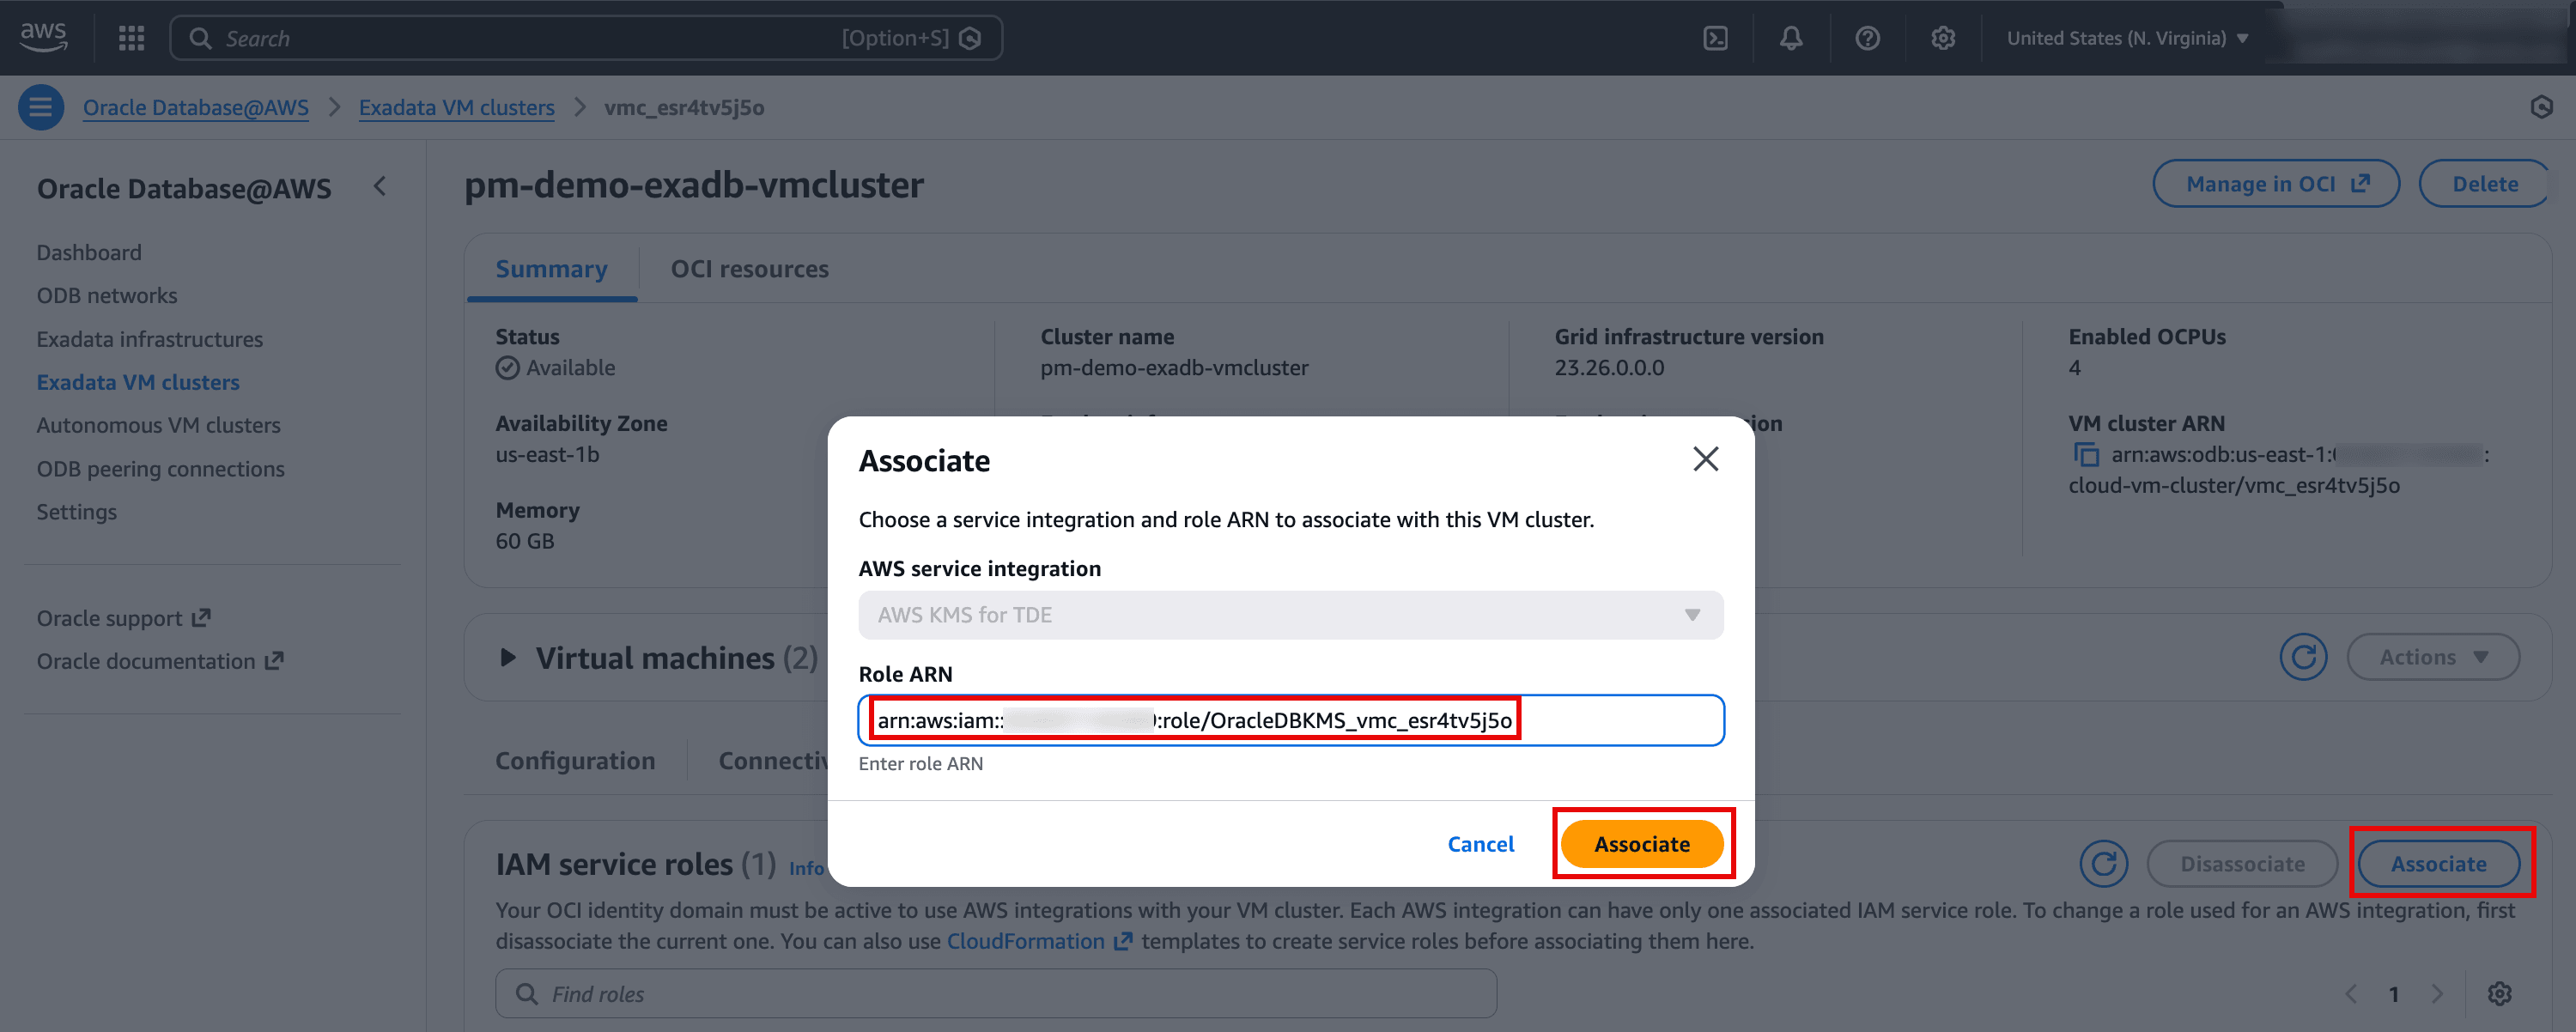
  1. In the AWS Console, navigate to Oracle Database@AWS page and click on Exadata VM clusters. Select your Exadata VM Cluster to open its details page. Go to the IAM service roles tab and click Associate. Paste the ARN of IAM service role copied in previous step and click Associate.

    The screenshot shows the AWS console for Oracle Database@AWS on an Exadata VM cluster, with an Associate dialog open. In this dialog you’re selecting an AWS service integration (shown as AWS KMS for TDE) and entering the IAM Role ARN that the VM cluster will use to access KMS. The Role ARN field and the Associate button are highlighted, indicating the next step is to confirm the association. In the background, the VM cluster details page shows the cluster is Available and includes the option to manage it in OCI.

    Description of the illustration Associate-IAM-Service-Role.png

  2. Once IAM role is associated to the Exadata VM Cluster, it will show status as Connected.

    The image shows the IAM service roles tab for an Oracle Database@AWS VM cluster, where AWS integrations are managed via IAM roles. A single service role ARN is listed and its status is Connected, meaning the role is currently associated and in use. The AWS service integration column indicates this role is for AWS KMS for TDE, enabling the database to use AWS KMS for Transparent Data Encryption key operations. Buttons on the right allow you to Associate a role or Disassociate the current one.

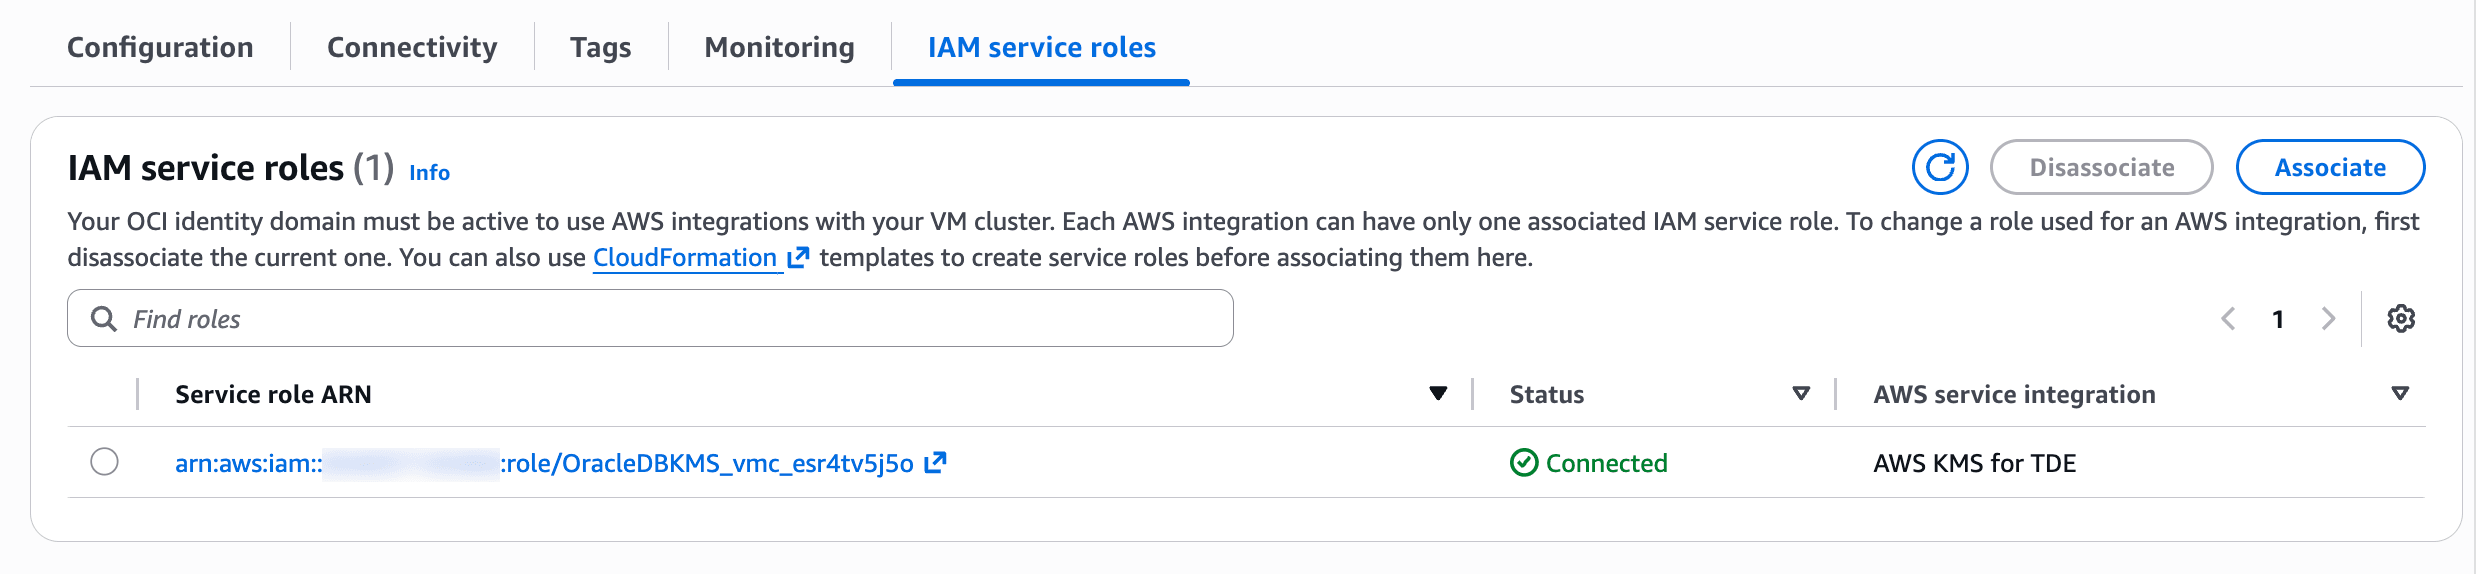
    Description of the illustration Connected-IAM-Service-Role.png

Task 5: Create a Customer Managed Key in AWS KMS

  1. In the AWS Console, go to Key Management Service (KMS) and then click Customer managed keys. Click Create key. Choose below options and click Next.

    Key type: Symmetric
    Key usage: Encrypt and decrypt
    (Optional) Key material origin: Choose KMS-recommended or AWS CloudHSM key store

    This screenshot shows Step 1: Configure key in the AWS KMS Create key wizard. The selections indicate a symmetric key intended to encrypt and decrypt data. In Advanced options, the key material origin is set to KMS (AWS-managed key material creation) and the key is configured as a single-Region key (not replicated to other regions). The Next button will proceed to adding labels and setting permissions/policy.

    Description of the illustration Create-CMK-Configure.png

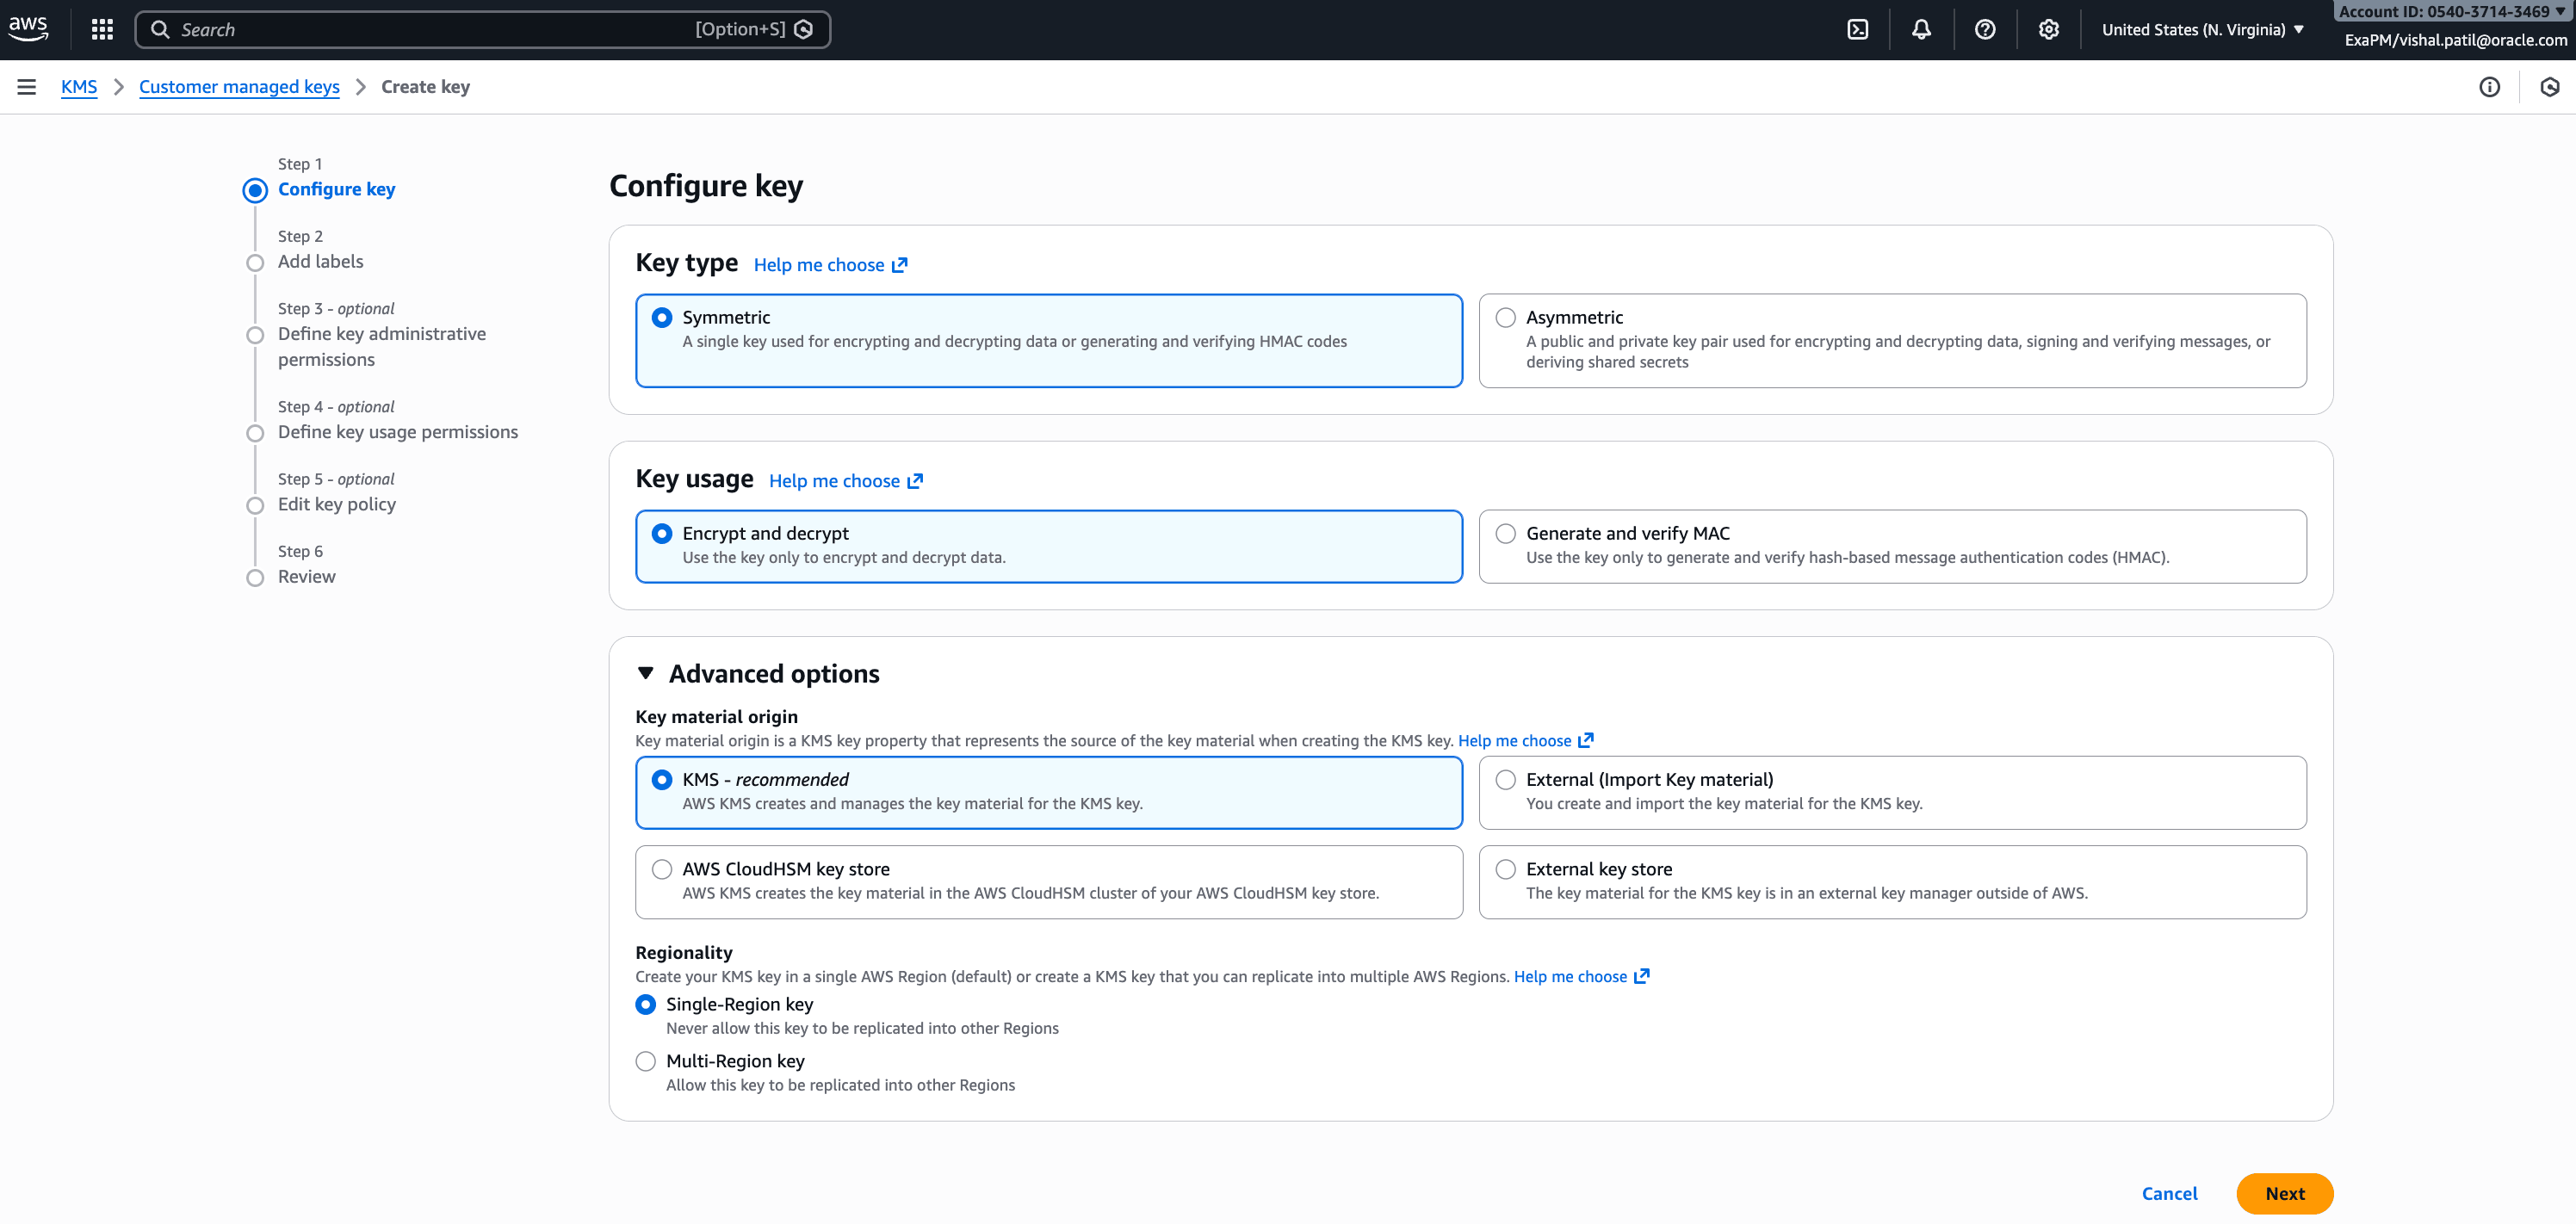
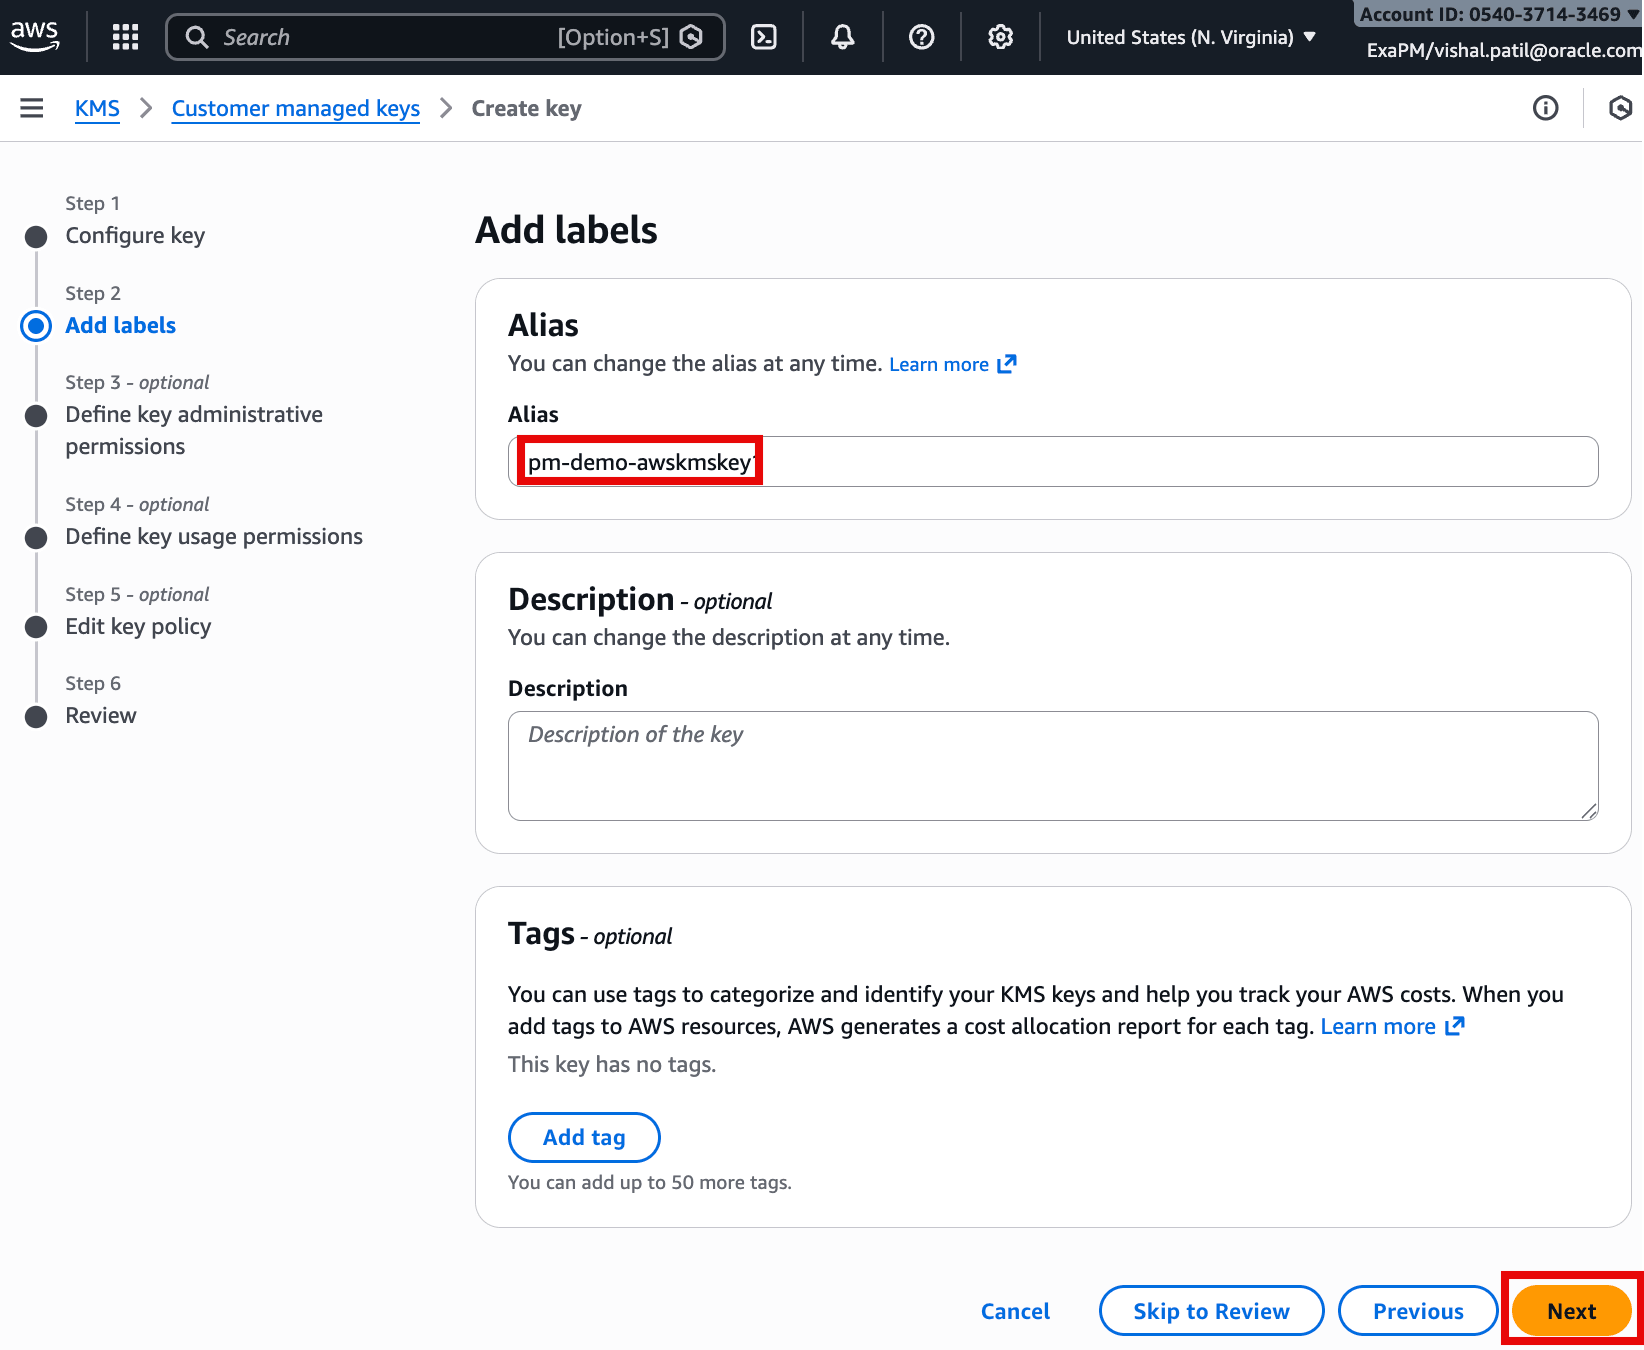
  2. On the next screen add labels such as Alias, Description (optional), and Tags (optional). Then click Next.

    This screenshot is from the AWS KMS “Create key” wizard at Step 2: Add labels. The highlighted field shows the alias being set to pm-demo-awskmskey, which will be the friendly name used to reference the new customer-managed key. Optional sections for Description and Tags are available to document and categorize the key. The Next button (highlighted) continues to the remaining steps such as permissions, key policy, and review.

    Description of the illustration CMK-Add-Labels.png

  3. Under Define key administrative permissions, select the IAM role created using CloudFormation in previous task. Then click Next.

    This screenshot is from the AWS KMS Create key wizard at Step 3 (optional): Define key administrative permissions. It shows the Key administrators list, where the IAM role OracleDBKMS_vmc_esr4tv5j5o is selected to administer the key. The checkbox under Key deletion is enabled, allowing key administrators to delete the key. The Next button will continue to defining key usage permissions and the key policy.

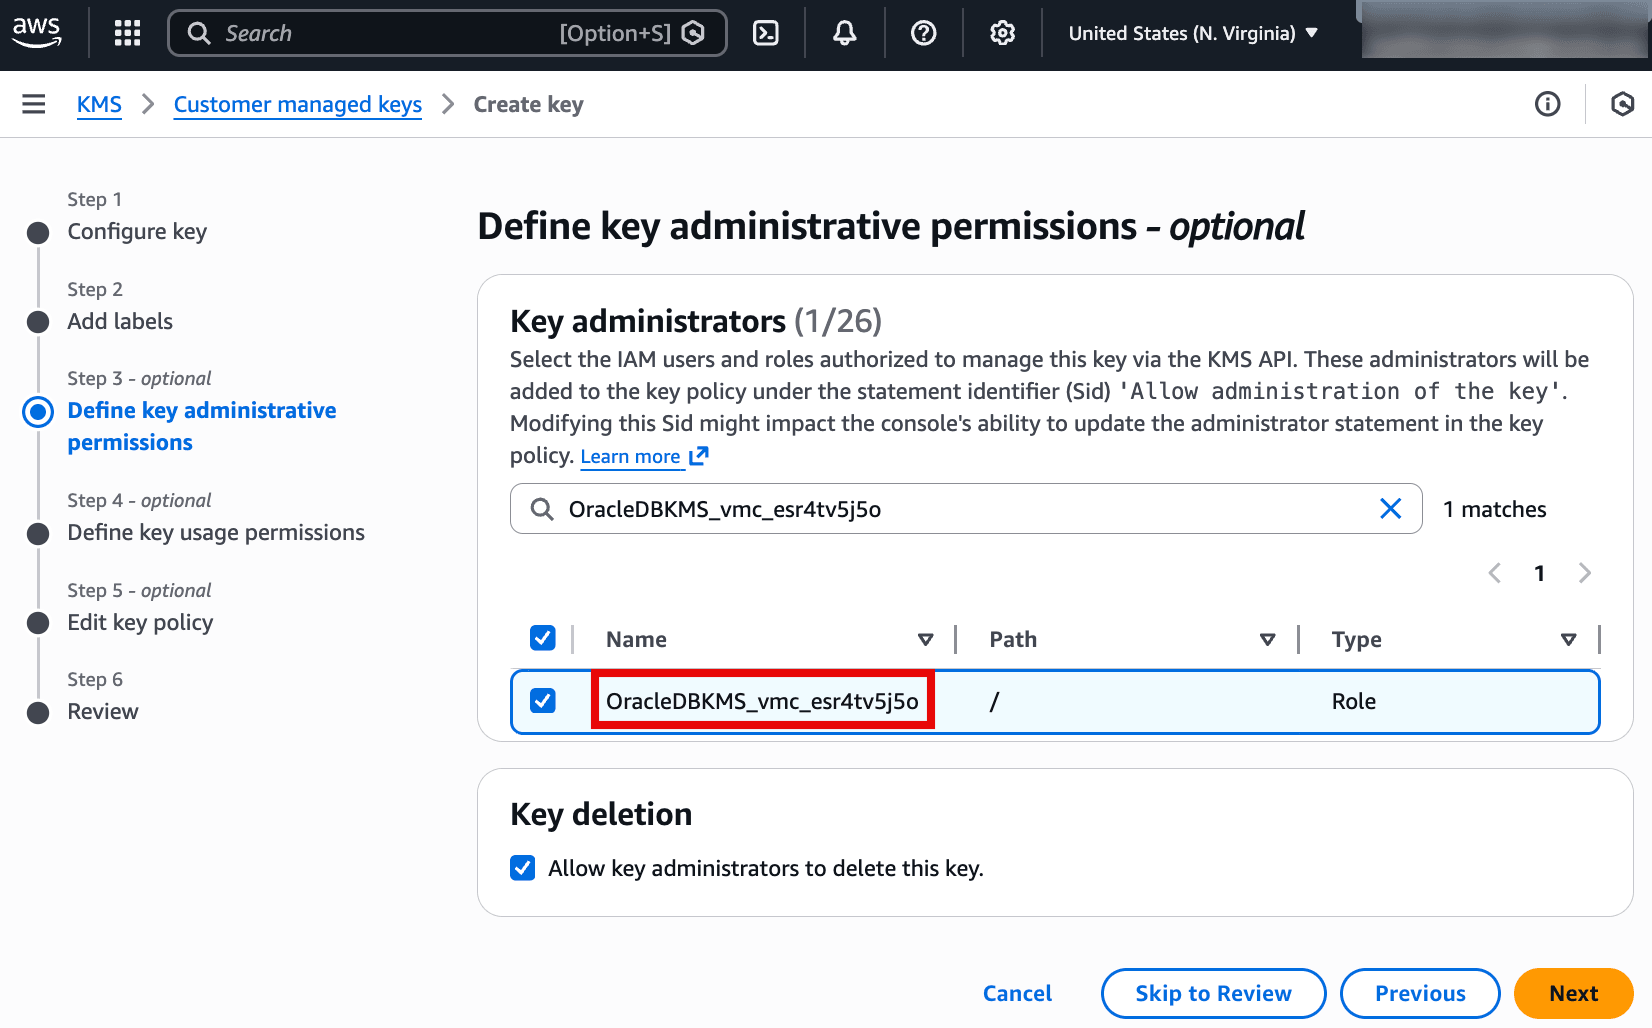
    Description of the illustration Define-Key-Administrators.png

  4. Under Define key usage permissions, select the relevant IAM roles. Then click Next.

    This screenshot is from the AWS KMS Create key wizard at Step 4 (optional): Define key usage permissions. It shows the Key users section where the IAM role OracleDBKMS_vmc_esr4tv5j5o is selected, meaning this role is allowed to use the key for cryptographic operations (such as encrypt/decrypt). There’s also an Other AWS accounts section to optionally grant key usage to additional accounts. The Next button proceeds to editing the key policy and final review.

    Description of the illustration Define-Key-Users.png

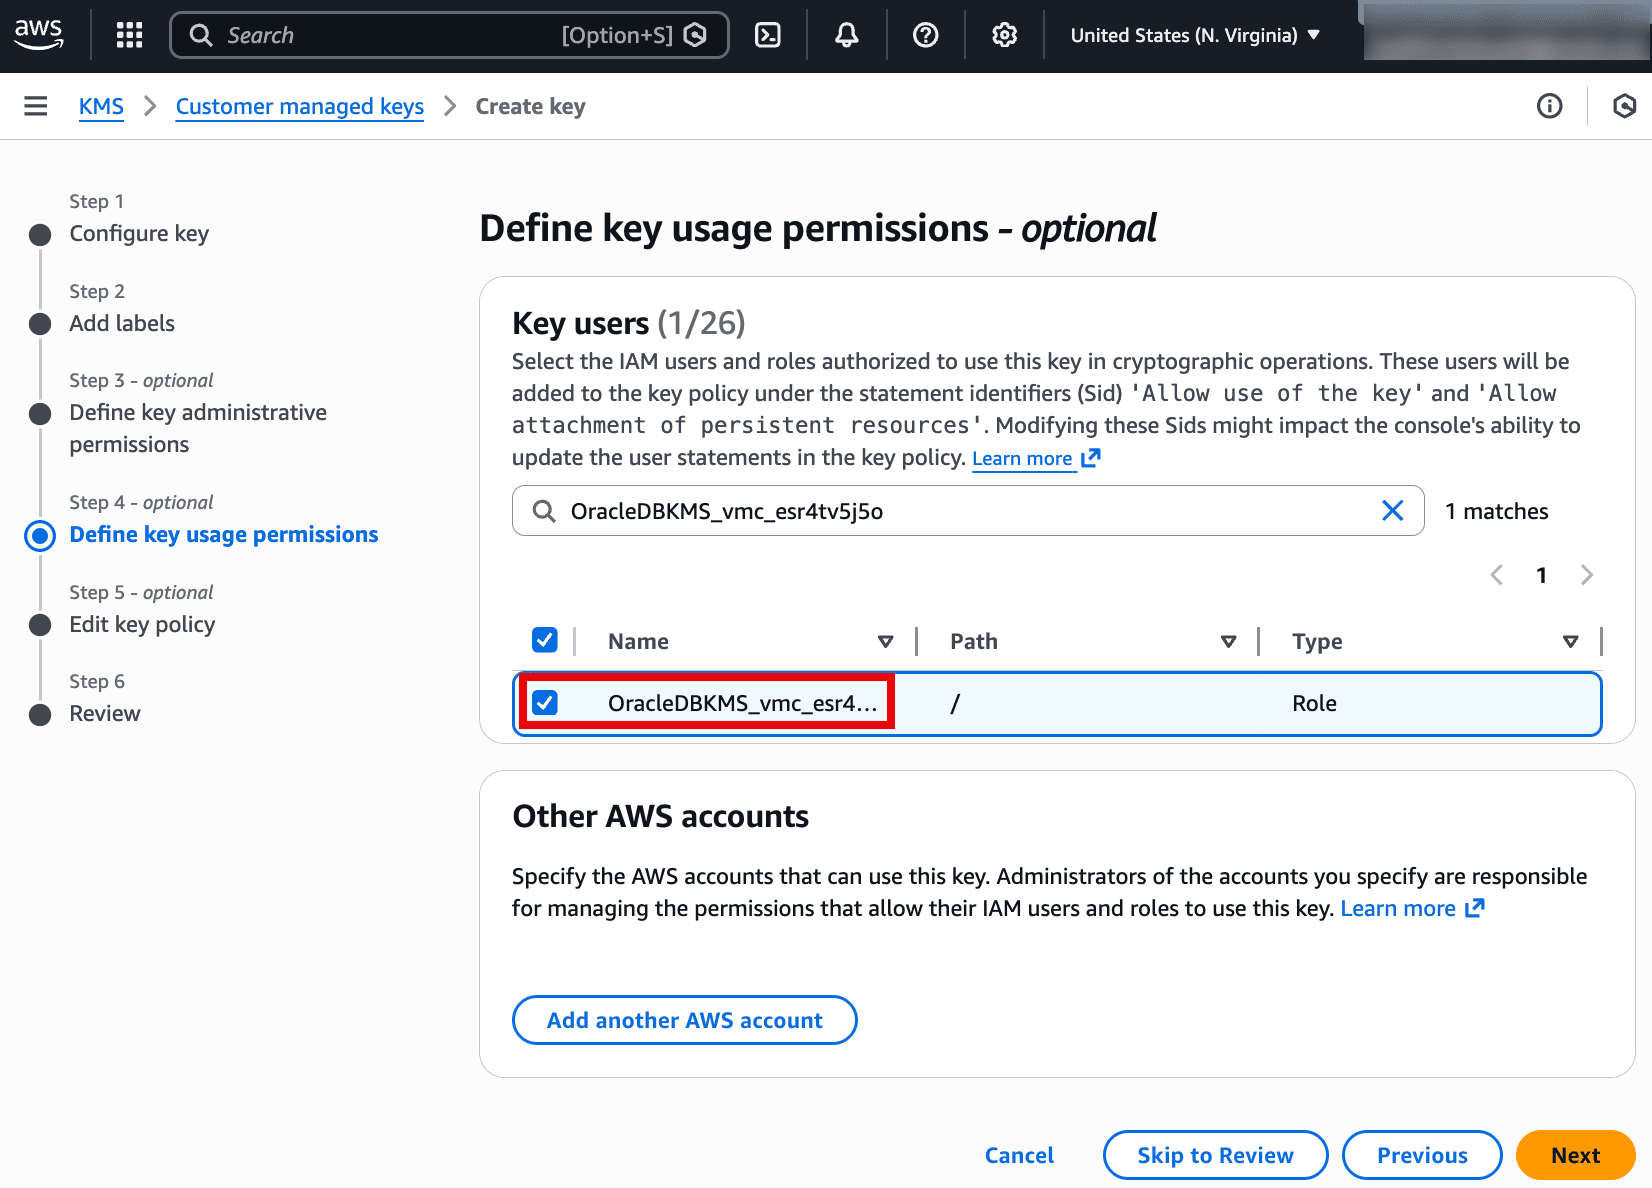
  5. On the next screen review key policy. Click Next.

  6. Click Finish to create the key, noting the alias and key details.

Task 6: Register AWS KMS key in OCI

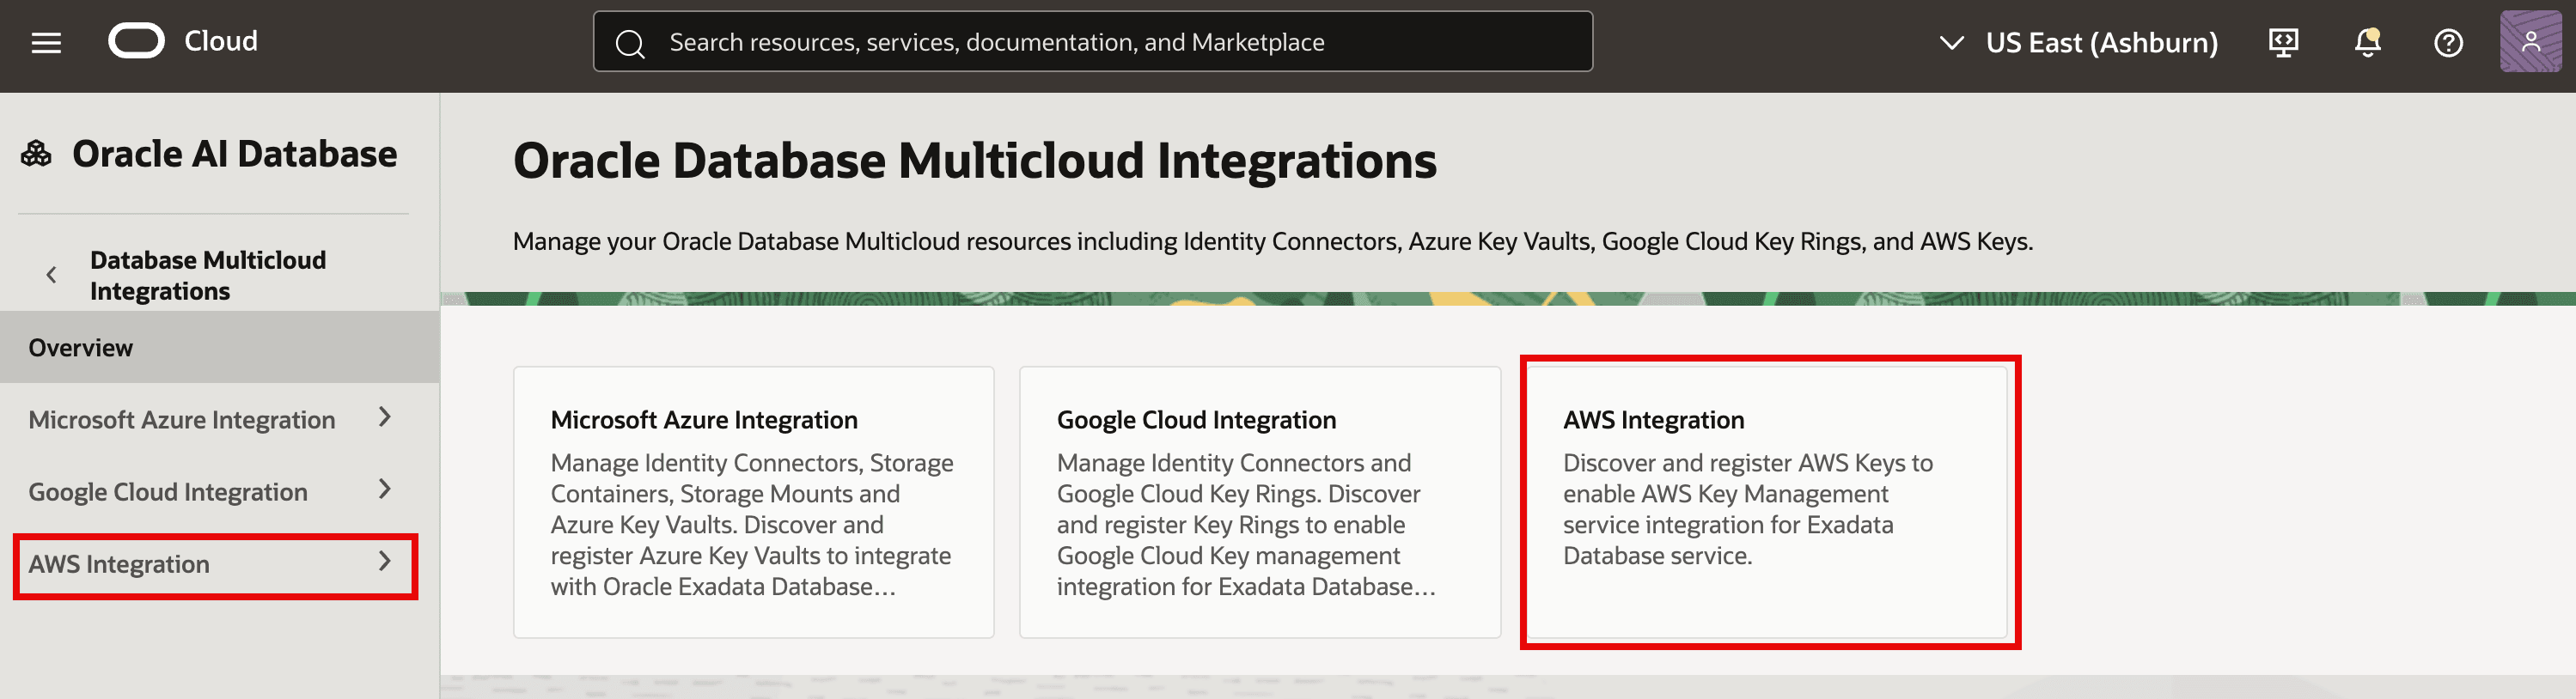
  1. In the OCI Console, from menu navigate to Oracle AI Database and then click Database Multicloud Integrations. Click on AWS Integration.

    The image shows the OCI console page for Oracle Database Multicloud Integrations within Oracle AI Database. In the left navigation and the main tiles, AWS Integration is highlighted, indicating the area used to manage AWS-related multicloud setup. This section is where you can discover and register AWS KMS keys (and related identity connectors) to enable AWS key management integration for Oracle Exadata Database service. It also shows parallel options for Microsoft Azure and Google Cloud integrations.

    Description of the illustration OCI-AWS-Integration.png

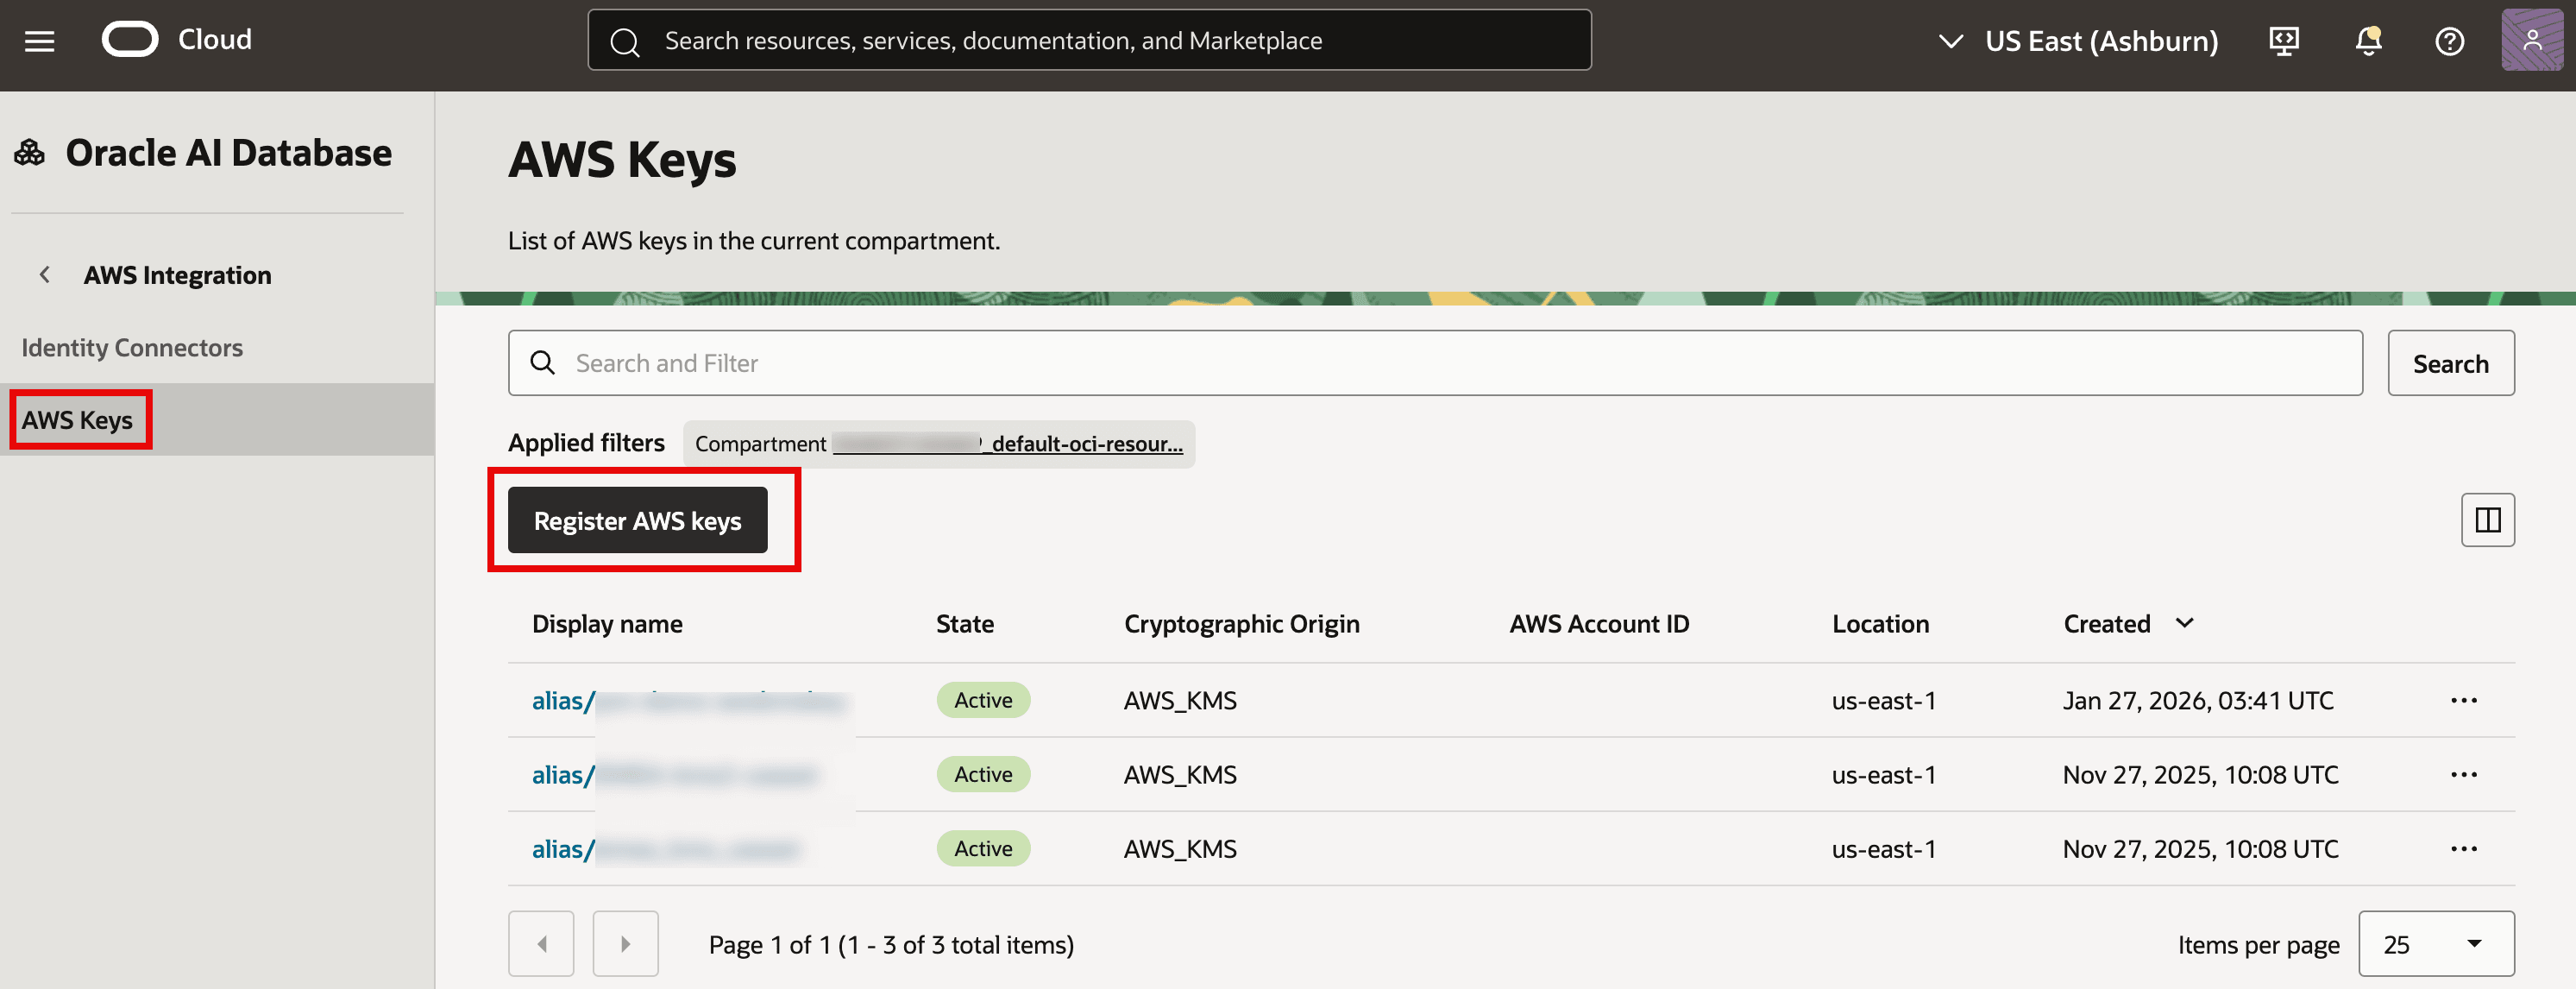
  2. Click AWS Keys and then click on Register AWS keys.

    The image shows the OCI console under Oracle AI Database → AWS Integration → AWS Keys, listing AWS KMS keys that have been registered in the selected compartment. A Register AWS keys button (highlighted) is available to discover and add more AWS keys for use with Oracle Database multicloud features. The table displays each key’s alias/display name, state (e.g., Active), cryptographic origin (AWS_KMS), AWS account, region (e.g., us-east-1), and creation time. This page is essentially the inventory of AWS keys that OCI can reference for encryption/key management.

    Description of the illustration Registered-AWS-Keys.png

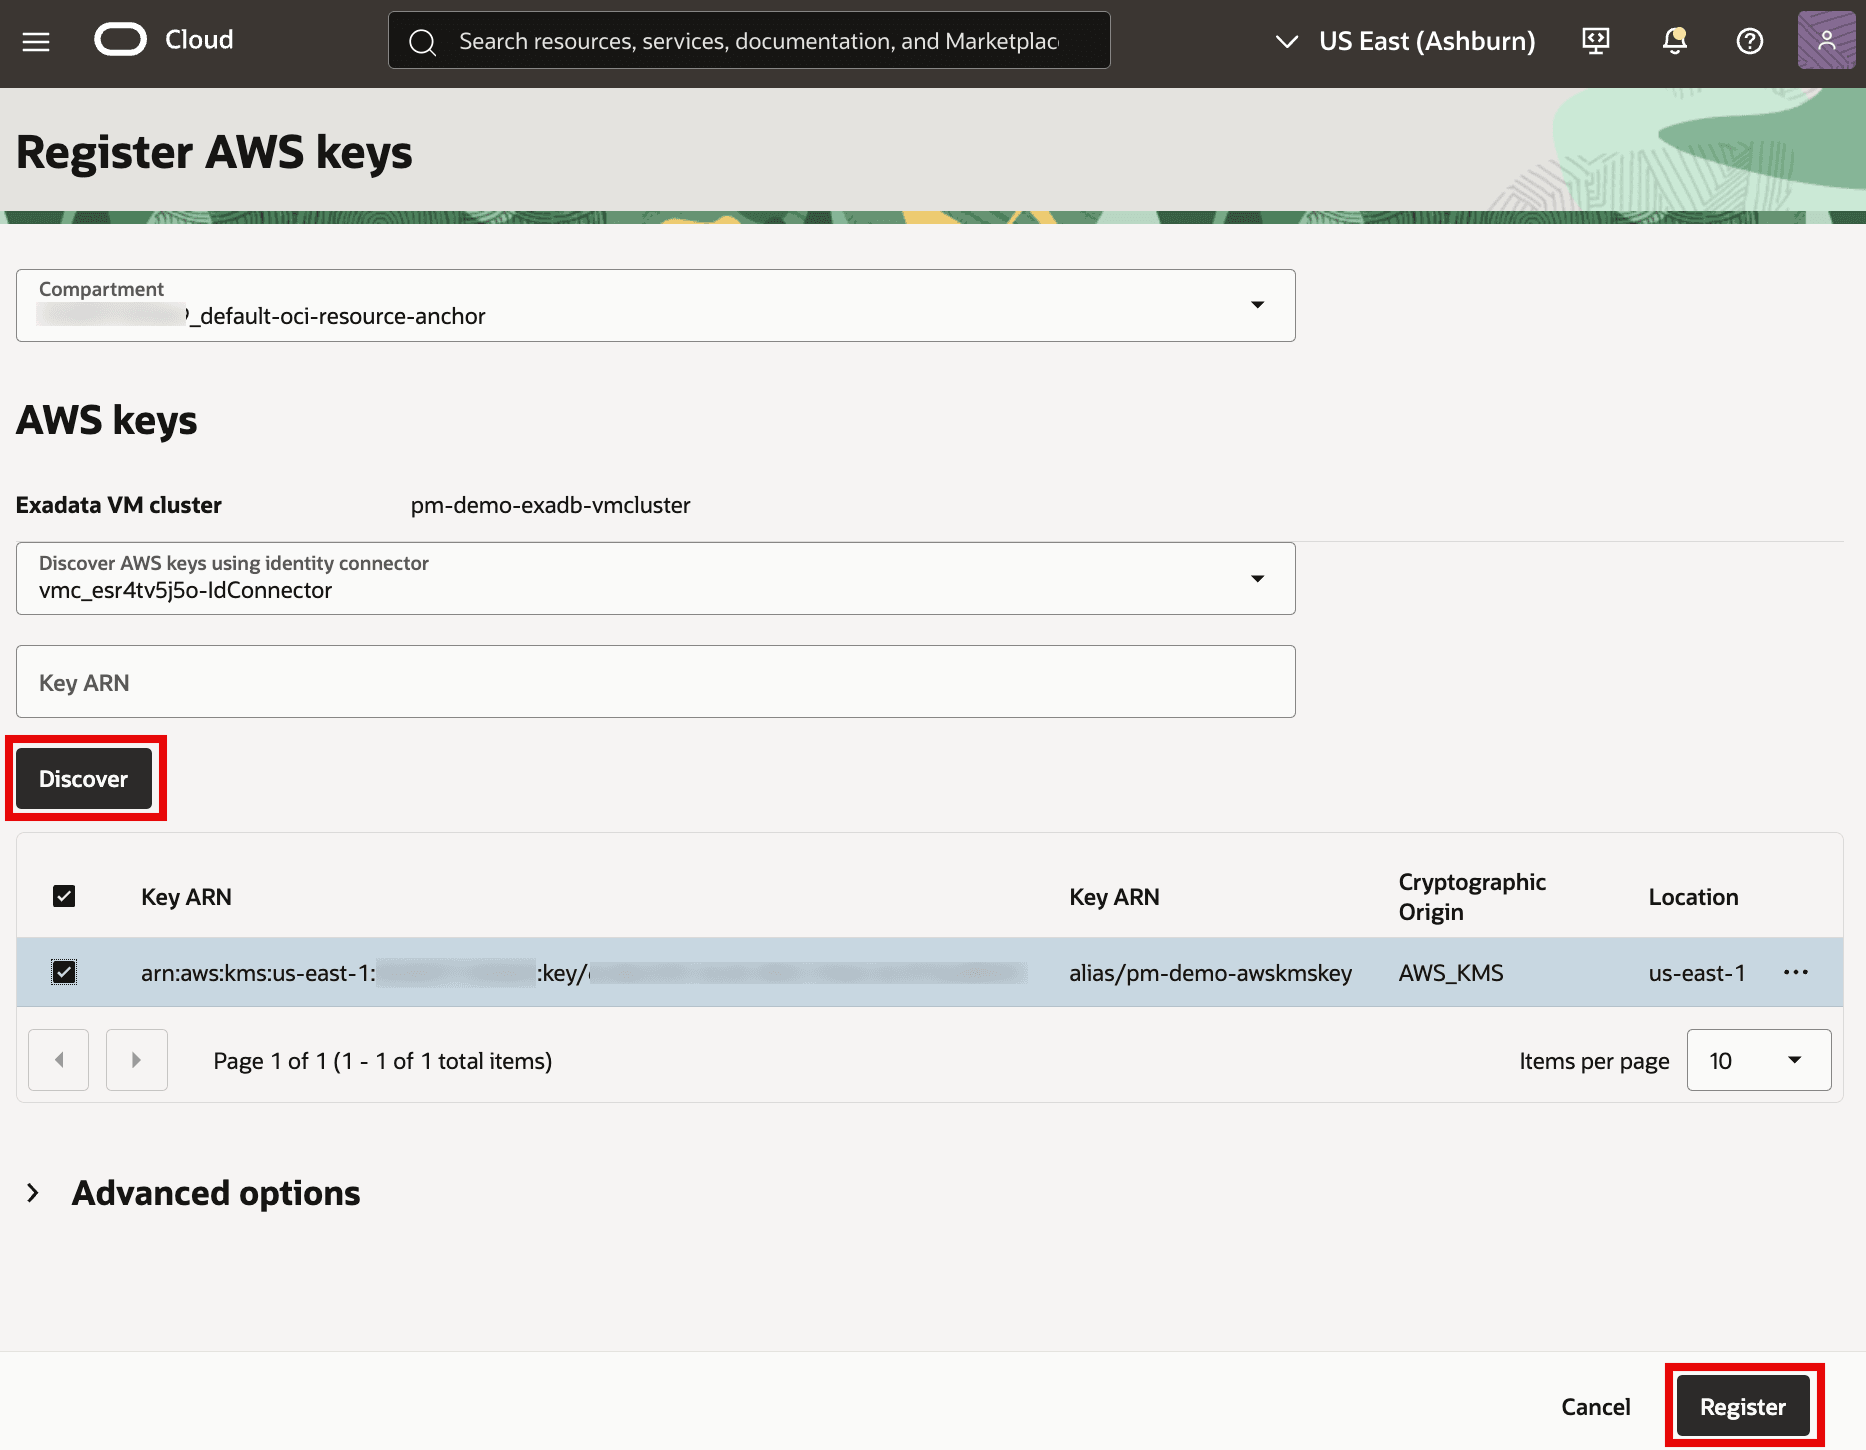
  3. To discover AWS Keys to register, select the compartment and identity connector, and (optionally) provide the Key ARN. Click Discover. Once discovered select the Key you want to register and then click Register to make the key available for database encryption in OCI.

    The image shows an OCI console page titled “Register AWS keys” used to register an AWS KMS key for an Exadata VM cluster (pm-demo-exadb-vmcluster). You can discover available AWS keys via an identity connector, which then populates a list of keys including the alias alias/pm-demo-awskmskey and its region/location. After selecting the desired key from the table, you click Register (highlighted) to make that key available for OCI-managed encryption/key management workflows. This step ensures only authorized, discovered keys can be selected later when configuring database encryption.

    Description of the illustration Discover-AWS-Key.png

Task 7: Enable AWS Key Management for the Exadata VM Cluster

  1. In the OCI Console, from the menu, navigate to Oracle AI Database and then click on Oracle Exadata Database Service on Dedicated Infrastructure. In the Exadata VM Clusters page, click on your Exadata VM Cluster. On the VM Cluster information tab, click Enable next to AWS Key Management.

    The image shows the OCI console page for an Exadata VM cluster (“pm-demo-exadb-vmcluster”) with the Multicloud information section visible. The highlighted row indicates AWS key management is currently Disabled, and there’s an Enable button to turn it on. It also lists the subscription type as Amazon Web Services and shows the associated identity connector used for AWS integration. Enabling AWS key management is a prerequisite for using AWS KMS customer-managed keys for features like TDE encryption.

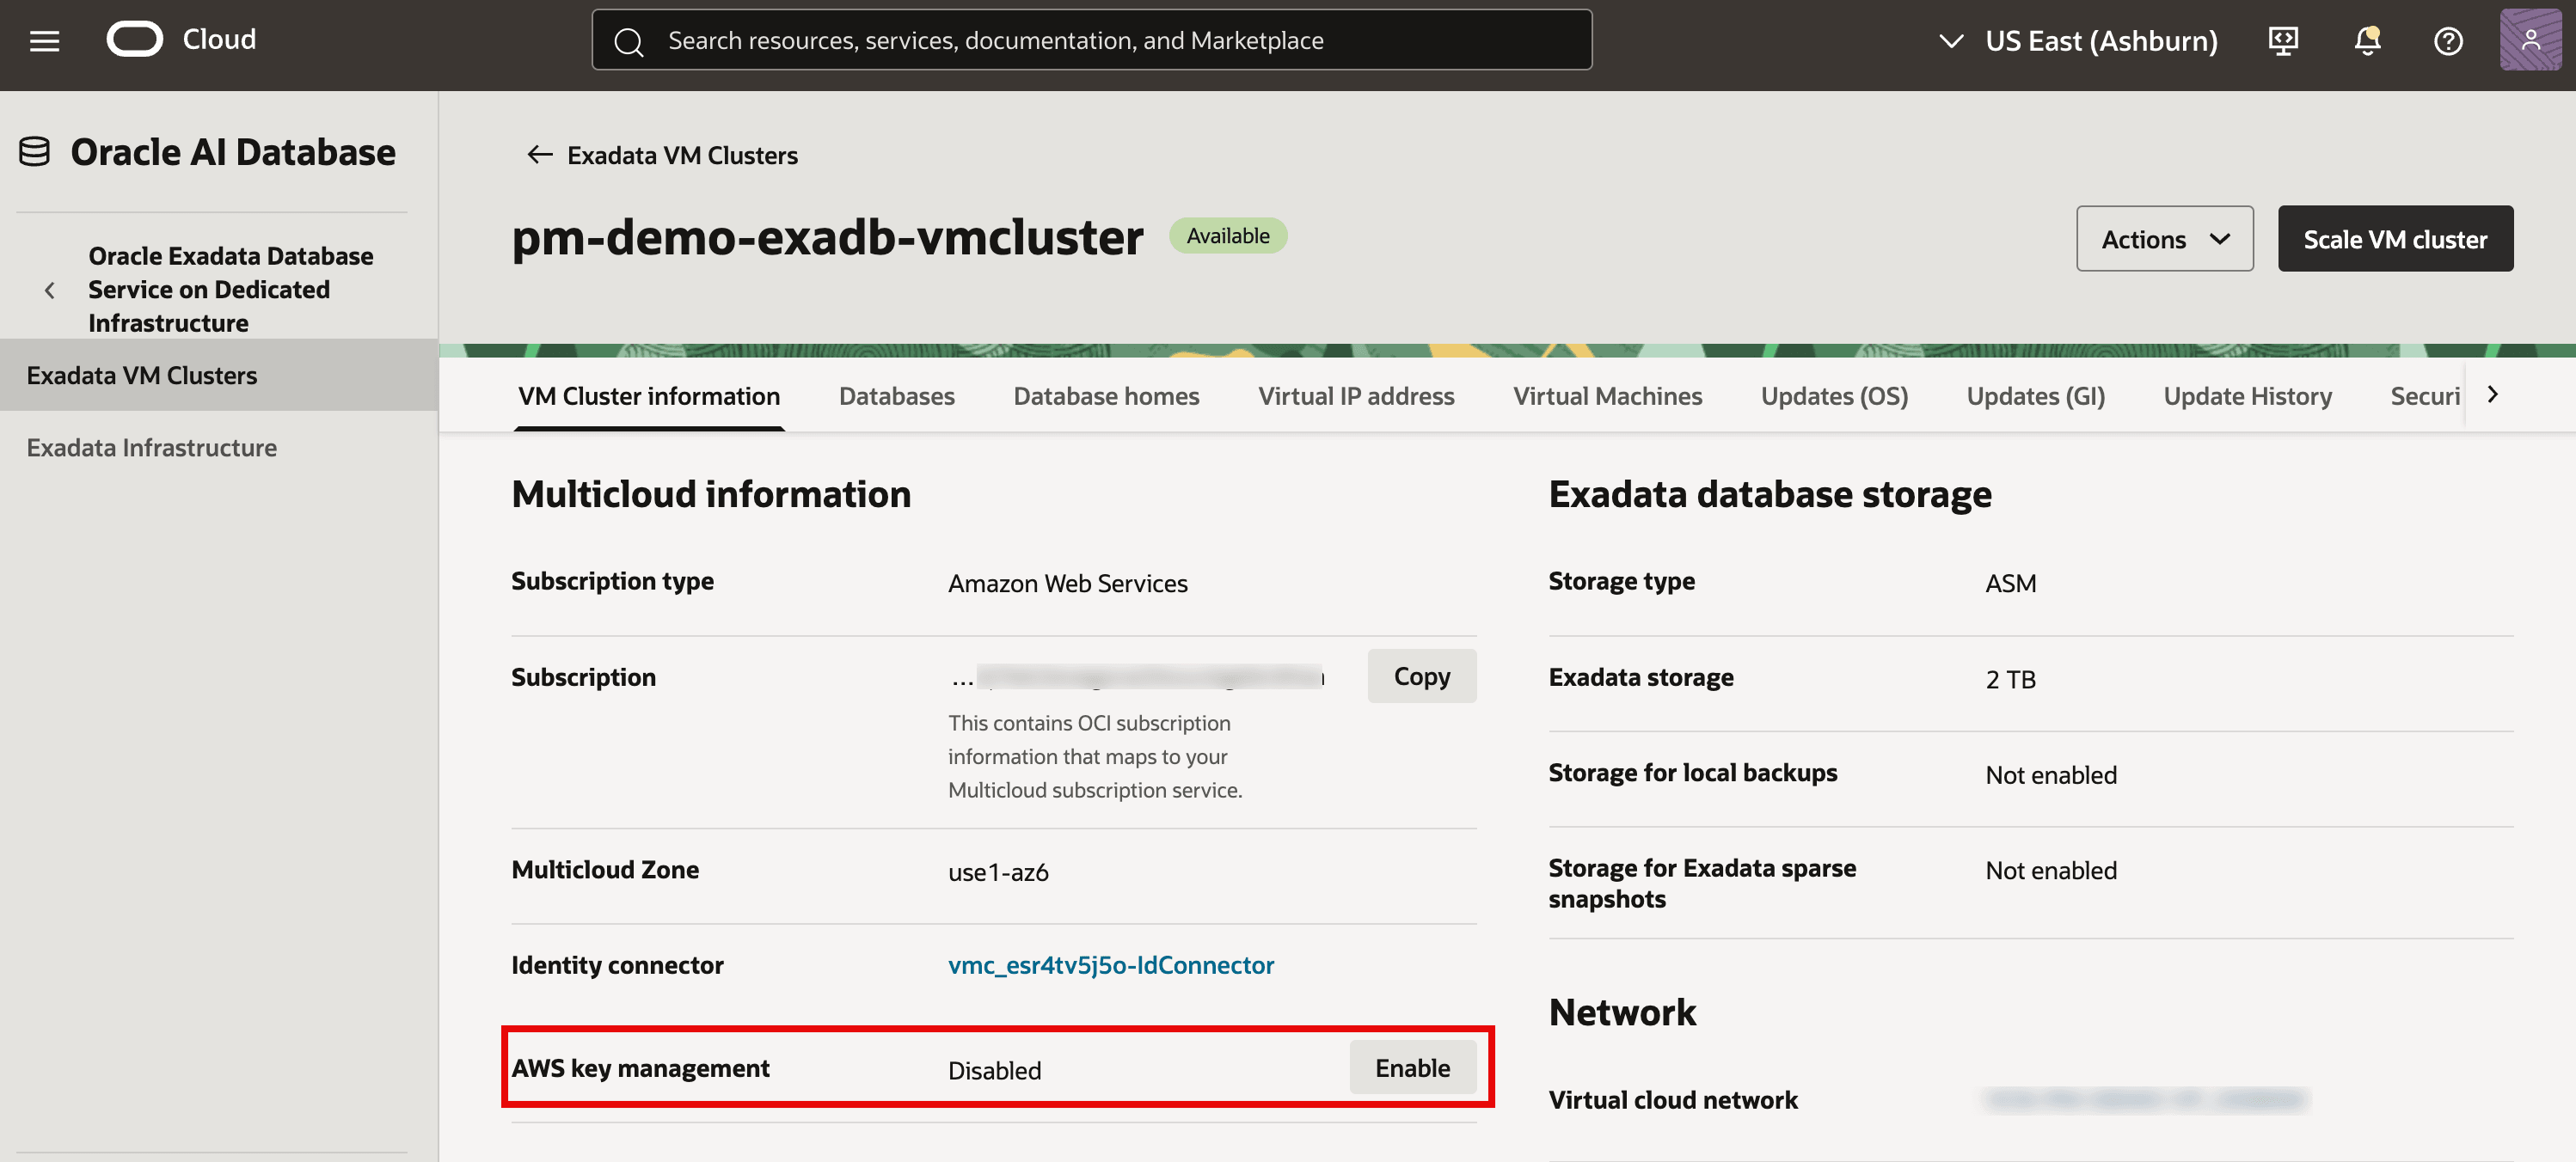
    Description of the illustration OCI-Enable-AWS-KMS.png

    Important: Once AWS KMS is enabled for the cluster, only Oracle Wallet or AWS KMS are supported options for Key Management during new database creation on that VM Cluster.

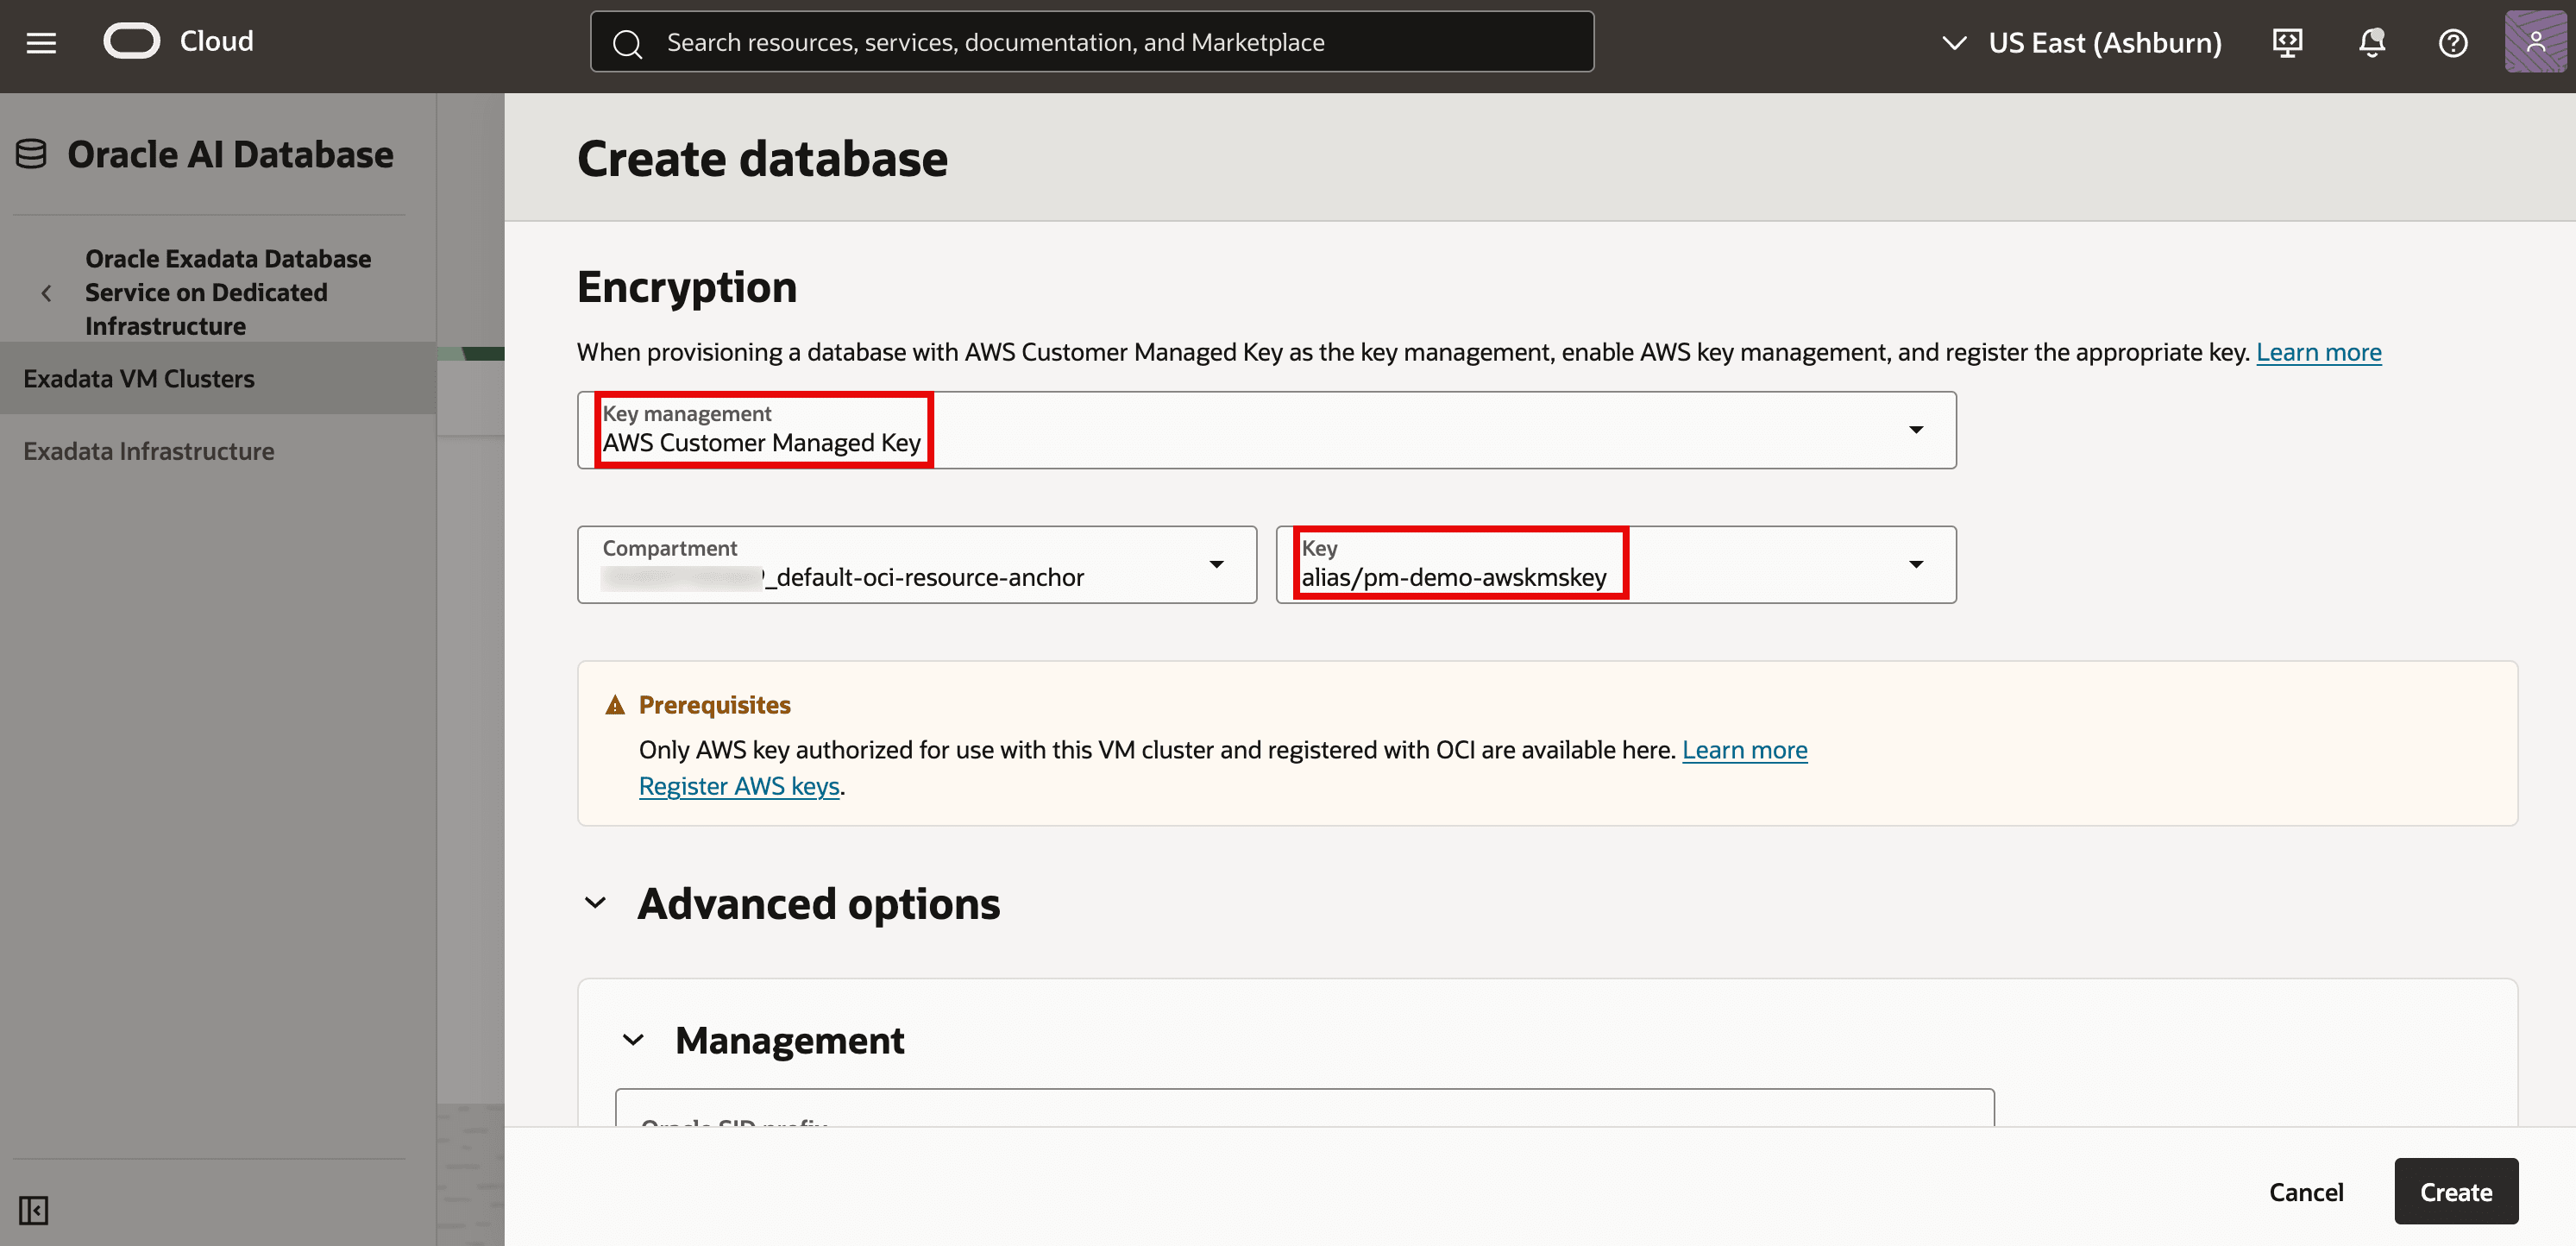
Task 8: Store TDE Master Encryption Key of your databases in AWS KMS

Option 1: Use AWS KMS to store TDE Master Encryption Key during New Database Creation

  1. In the OCI Console, while creating a new database on Exadata VM Cluster where AWS Key Management is enabled, navigate to Encryption section. You will see both Oracle Wallet and AWS Customer Managed Key options in the drop-down for Key management, select AWS Customer Managed Key, select your compartment, and select the AWS KMS key alias registered in OCI.

    The screenshot shows the Create database page in the Oracle Cloud console, focused on the Encryption section. It has Key management set to AWS Customer Managed Key, and the selected AWS KMS key alias is alias/pm-demo-awskmskey (both highlighted). A prerequisites note indicates only AWS keys that are authorized for the VM cluster and registered with OCI can be chosen. At the bottom-right, the Create button would provision the database using these encryption settings.

    Description of the illustration AWS-KMS-New-DB.png

Option 2: Change TDE Master Encryption Key Management from Oracle Wallet to AWS KMS for existing databases

  1. In the OCI Console, go to your Exadata VM Cluster where AWS Key Management is enabled. Then click on Databases tab. Select the database, and in the Database information tab verify Key management is set to Oracle Wallet under Encryption section. Click the Change button.

    The image shows an Encryption settings section where Key management is currently set to Oracle Wallet (highlighted). On the right, a Change button (also highlighted) indicates you can switch the key management method. This is essentially the control point for changing how the database’s encryption keys are stored and managed.

    Description of the illustration AWS-KMS-Existing-DB.png

  2. In the Key management drop-down, choose AWS Customer Managed Key, and select the appropriate Compartment and Key. Click Save changes to complete the transition.

    The image shows a “Change key management” screen where the database’s encryption key management is set to AWS Customer Managed Key. A warning indicates there may be a brief period of database unavailability while the key management configuration is updated. The highlighted field shows the selected AWS KMS key alias (alias/pm-demo-awskmskey) and a compartment selector, with a Save changes button to apply the update. It also notes prerequisites: only AWS keys authorized for the VM cluster and registered with OCI can be selected.

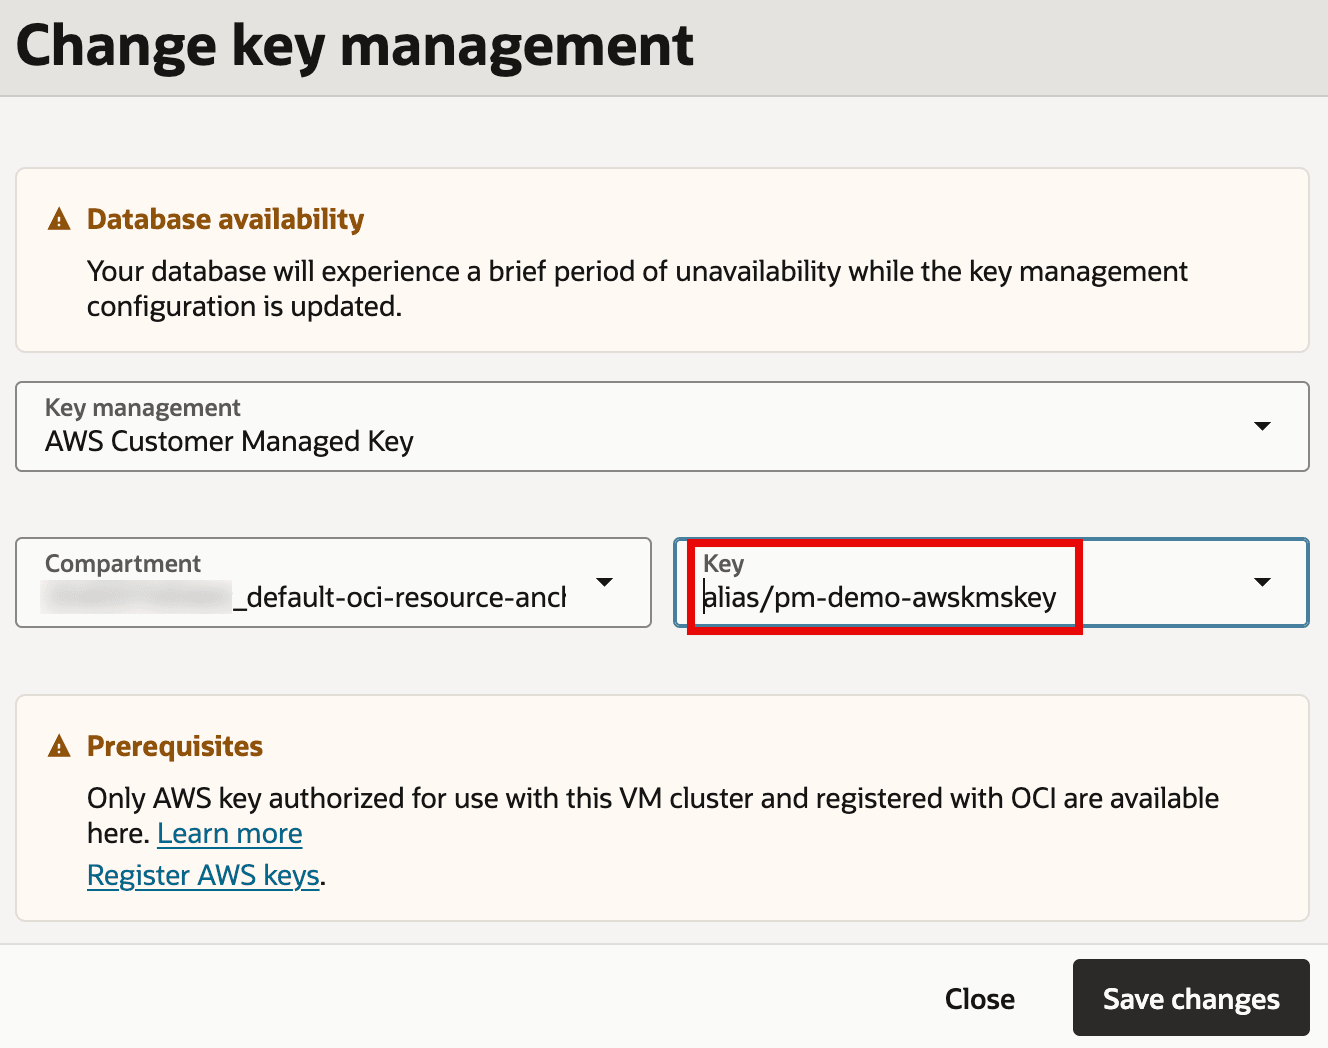
    Description of the illustration AWS-KMS-Existing-DB-Select-Key.png

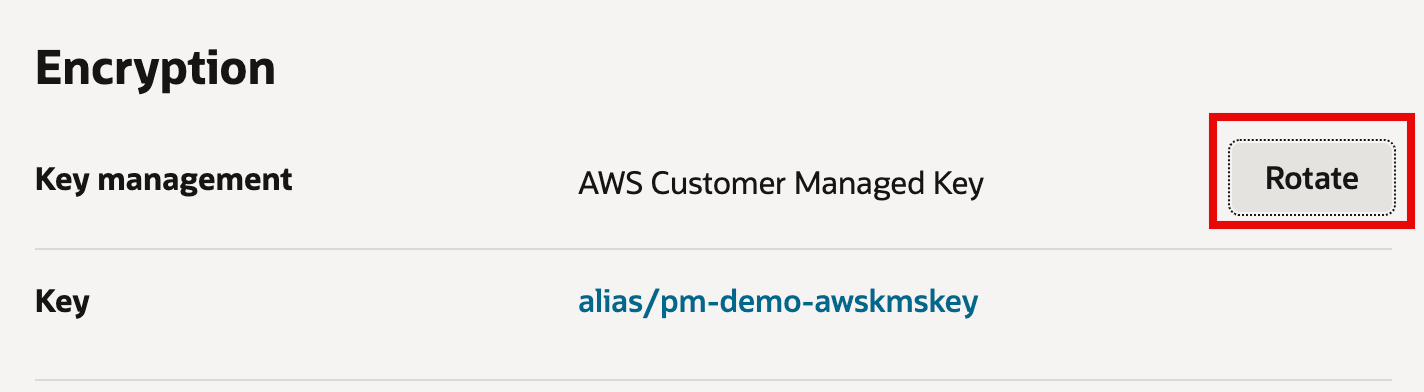
Additional Operational Task: Rotate the AWS KMS key of a Container Database (CDB)

  1. In the database details for container database, with Key Management set as AWS, click Rotate and confirm. Rotating the AWS KMS key generates a new encryption context for the same key.

    The image shows an “Encryption” configuration screen where key management is set to an AWS Customer Managed Key. It lists the specific KMS key alias being used: alias/pm-demo-awskmskey. The Rotate button on the right (highlighted in red) indicates you can rotate the encryption key as part of key lifecycle/security best practices.

    Description of the illustration Rotate-CDB-Key.png

Additional Operational Task: Rotate the AWS KMS key of a Pluggable Database (PDB)

  1. In the database details for pluggable database, with Key management set as AWS Customer Managed Key, click Rotate and confirm. Rotating the AWS KMS key generates a new encryption context for the same key.

    The image shows an “Encryption” settings section where key management is set to an AWS Customer Managed Key. It indicates the specific KMS key being used via the alias alias/pm-demo-awskmskey. On the right, a Rotate button (highlighted in red) is available to rotate that customer-managed encryption key, which is a common best practice for key lifecycle management.

    Description of the illustration Rotate-PDB-Key.png

Acknowledgments

More Learning Resources

Explore other labs on docs.oracle.com/learn or access more free learning content on the Oracle Learning YouTube channel. Additionally, visit education.oracle.com/learning-explorer to become an Oracle Learning Explorer.

For product documentation, visit Oracle Help Center.