Note:
- This tutorial requires access to Oracle Cloud. To sign up for a free account, see Get started with Oracle Cloud Infrastructure Free Tier.
- It uses example values for Oracle Cloud Infrastructure credentials, tenancy, and compartments. When completing your lab, substitute these values with ones specific to your cloud environment.
Automate Recovery Operations for Single Instance Oracle PeopleSoft application with OCI Full Stack Disaster Recovery
Introduction
Oracle Cloud Infrastructure (OCI) Full Stack Disaster Recovery orchestrates the transition of compute, database, and applications between OCI regions from around the globe with a single click. Customers can automate the steps needed to recover one or more business systems without redesigning or rearchitecting existing infrastructure, databases, or applications and without needing specialized management or conversion servers.
Objectives
To automate Disaster Recovery Switchover and Failover operations of Oracle Peoplesoft application using OCI Full Stack Disaster Recovery. The following steps will be covered in this tutorial.
- Create and associate Disaster Recovery protection groups (DRPG)
- Add members to primary and standby DRPG
- Create switchover plan in the standby DRPG
- Customize the switchover plan with various user defined plan groups
- Execute prechecks and run switchover plan
- Create failover plan in the standby DRPG
- Customize the failover plan with various user defined plan groups
- Execute prechecks and run failover plan
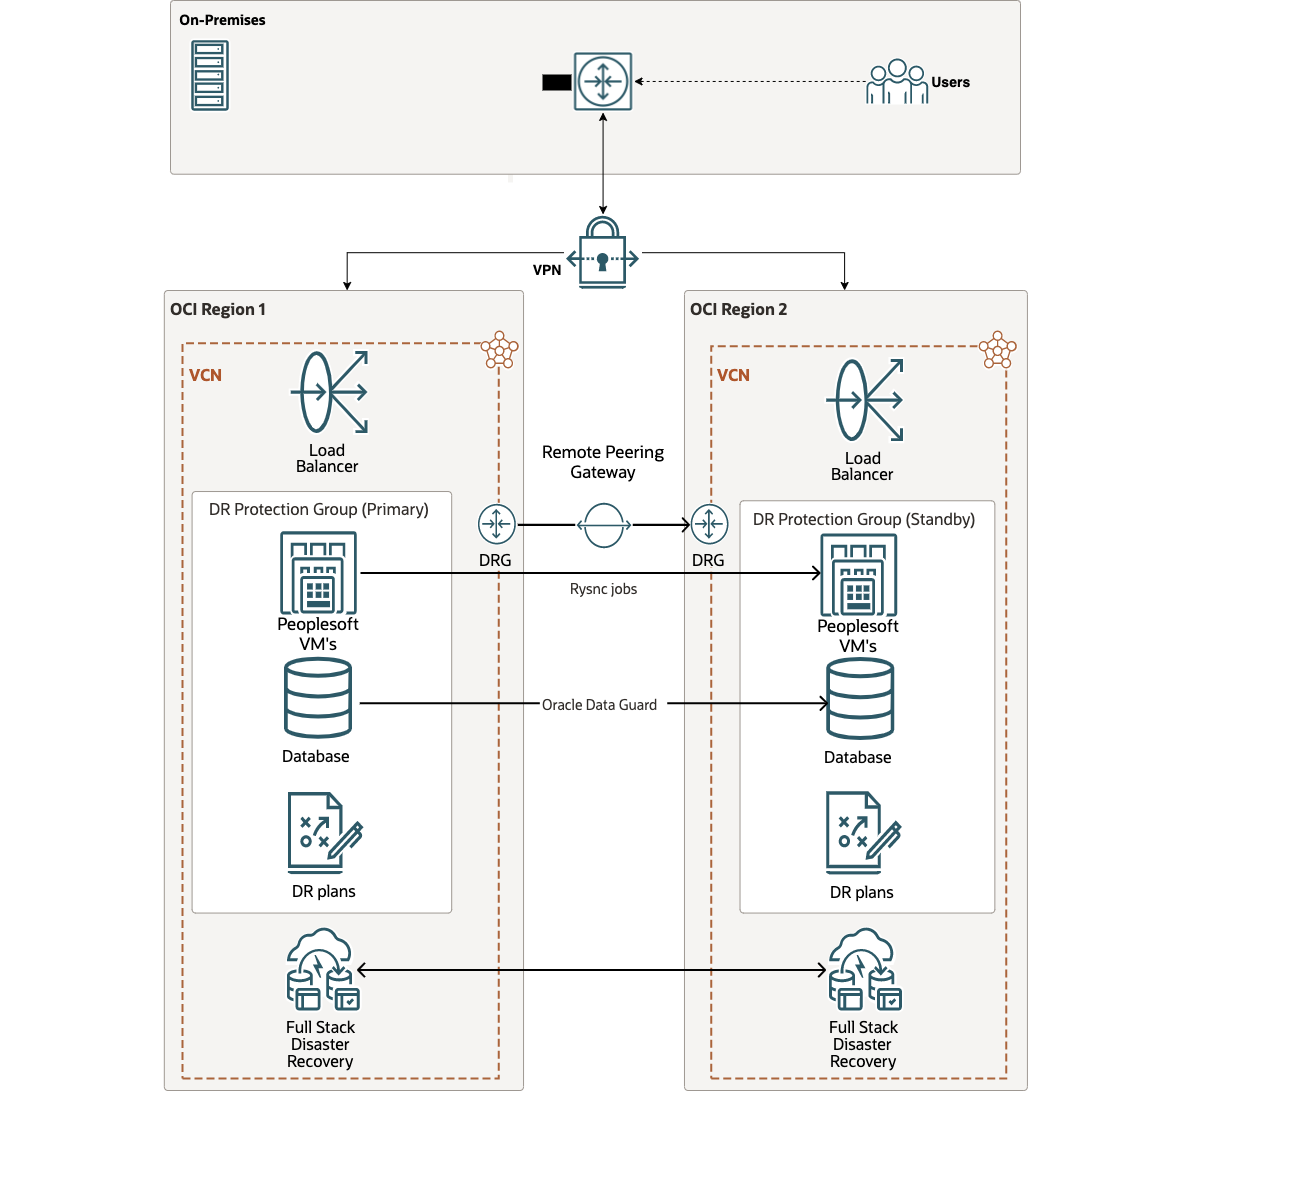
Deployment Architecture
Prerequisites
- To orchestrate the Full Stack Disaster Recovery for Single Instance Oracle PeopleSoft, we assume that you already have Single Instance Oracle PeopleSoft Production and Disaster Recovery deployed on OCI. If not, follow the below documentation to deploy PeopleSoft application in OCI with Production and Disaster Recovery setup:
-
Technical paper - Disaster Recovery Configuration for PeopleSoft in Oracle Cloud
-
Watch these videos for more details:
-
- Create Primary DB system using Oracle Base DB Service.Create Standby DB system and Data Guard association using the cloud automation available in the Base DB Service.
- Create OCI Vaults in the Primary region and Standby region and create secrets for the sys password for both primary and Standby database DB Secrets.
- Administrator privileges or Configure the required OCI IAM policies for Full Stack Disaster Recovery as outlined here: Configuring Identity and Access Management (IAM) policies to use Full Stack Disaster Recovery and Policies for Full Stack Disaster Recovery.
- Prepare and configure both primary and standby Oracle PeopleSoft application VM’s to run remote scripts as outlined here: Running Commands on an Instance.
- Create Object Storage bucket in the Primary region and Standby region to store Disaster Recovery operation logs: Object Storage
Implementation
For this tutorial, we have provisioned single instance Oracle PeopleSoft application VM using cloud manager and Base DB VM systems as below in Ashburn and Phoenix regions respectively. In this tutorial, we have used rsync jobs to replicate configuration changes between primary and standby regions for Oracle PeopleSoft application.
Refer to the sample scripts Full Stack Disaster Recovery Oracle PeopleSoft Scripts for reference or use your own scripts.
| Resources | Primary Region - Ashburn(IAD) |
|---|---|
| Oracle PeopleSoft App Server | hcm92-fsdr-app |
| Oracle PeopleSoft Web Server | hcm92-fsdr-web |
| Oracle PeopleSoft Process Scheduler (Linux) | hcm92-fsdr-prcs-linux |
| Oracle PeopleSoft Process Scheduler (Windows) | hcm92-fsdr-prcs-win |
| Elastic Search and Kibana Server | hcm92-fsdr-elk |
| Oracle Base Database | HCM92CDB (HCM92CDB_cm8_iad) |
| Resources | Standby Region - Phoenix(PHX) |
|---|---|
| Oracle PeopleSoft App Server | hcm92-fsdr-app |
| Oracle PeopleSoft Web Server | hcm92-fsdr-web |
| Oracle PeopleSoft Process Scheduler (Linux) | hcm92-fsdr-prcs-linux |
| Oracle PeopleSoft Process Scheduler (Windows) | hcm92-fsdr-prcs-win |
| Elastic Search and Kibana Server | hcm92-fsdr-elk |
| Oracle Base Database | HCM92CDB (HCM92CDB_jw2_phx) |
Task 1: Create and associate Disaster Recovery protection groups (DRPG)
-
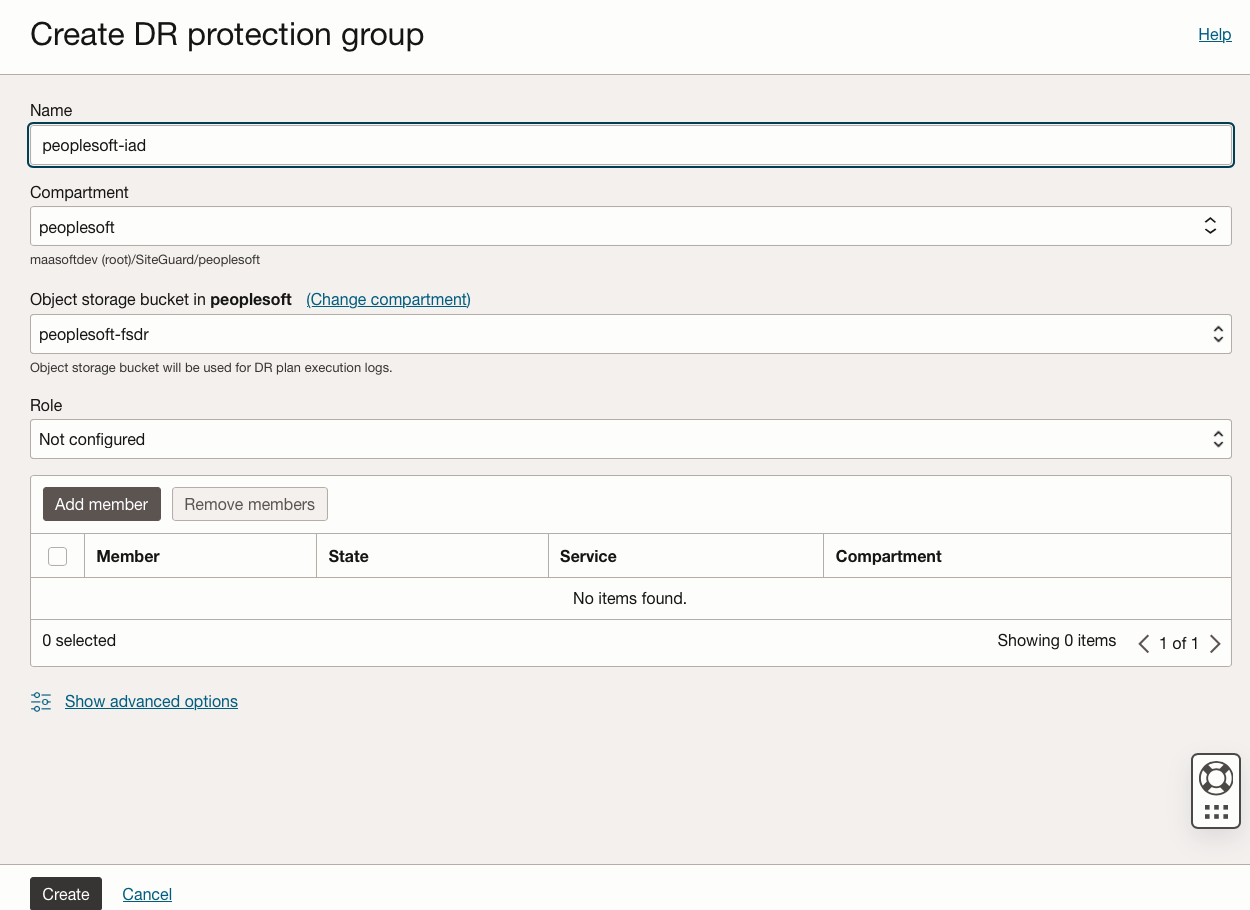
In the Primary region (Ashburn) from the Hamburger menu, go to Migration & Disaster Recovery, Disaster Recovery, Disaster Recovery Protection group, Create Disaster Recovery protection group.
-
In the Standby region (Phoenix) from the Hamburger menu, go to Migration & Disaster Recovery, Disaster Recovery, Disaster Recovery Protection group, Create Disaster Recovery protection group.
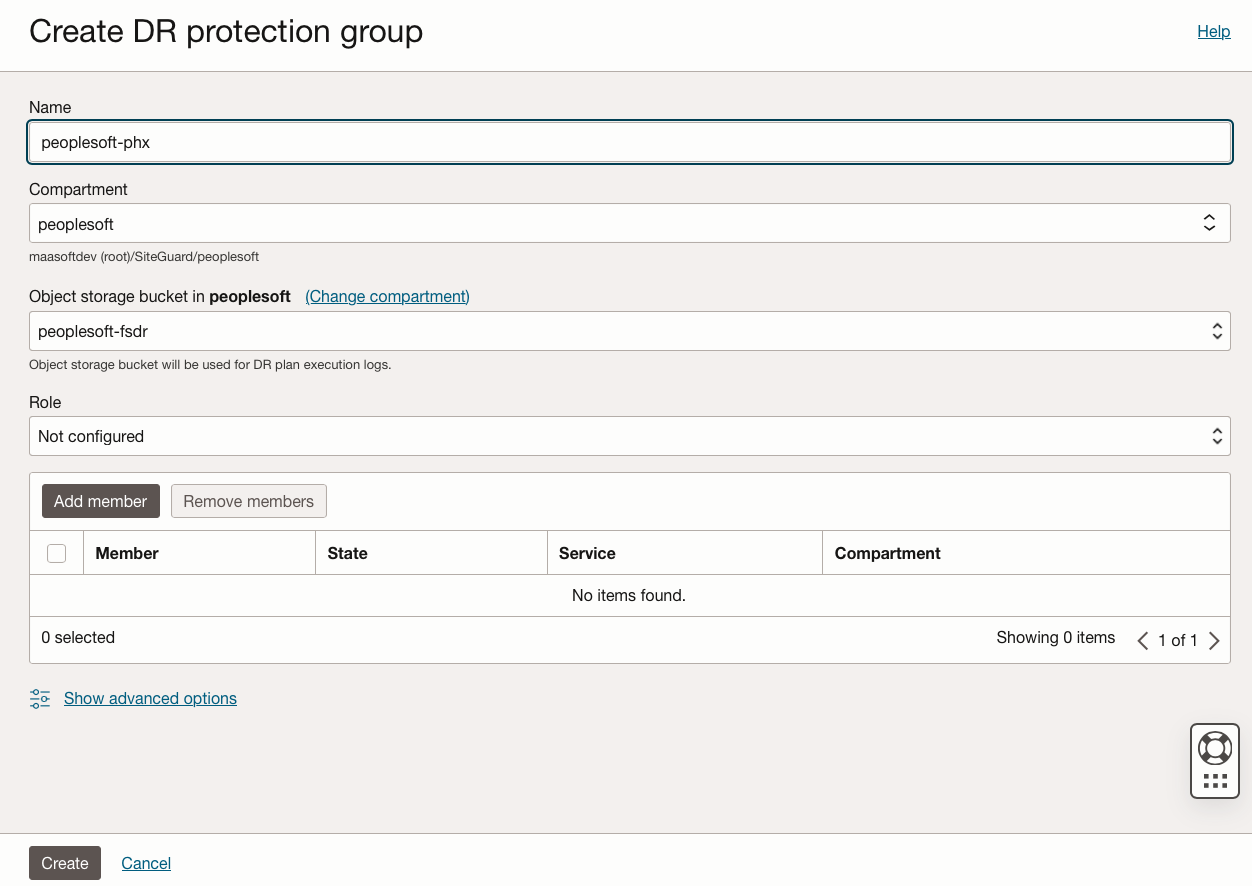
Note: For this tutorial example, we choose Ashburn as Primary region and Phoenix as Standby region.
-
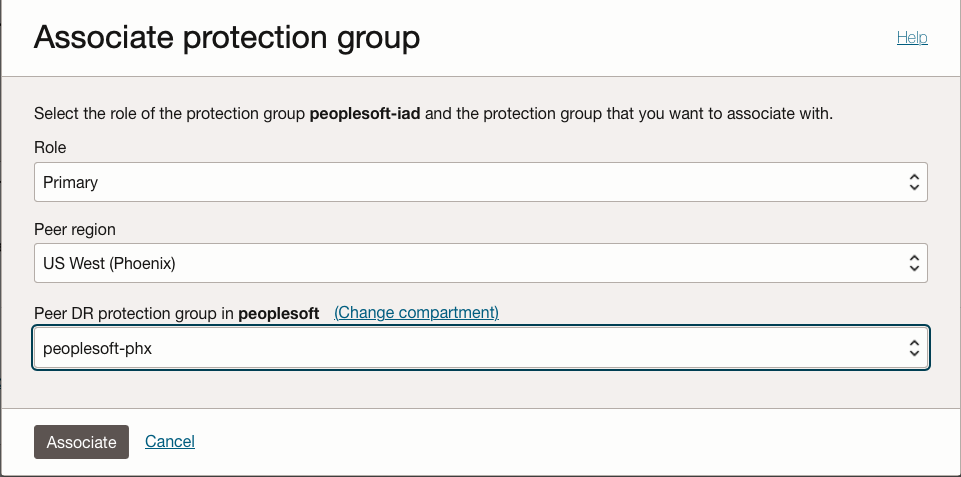
In Primary region (Ashburn), select the peoplesoft-iad DRPG and click Associate. Select the Role as Primary, Peer Region US West (Phoenix), Peer Disaster Recovery Protection group peoplesoft-phx and click Associate.
Note: Verify the role of
peoplesoft-iadas Primary andpeoplesoft-phxas Standby.
Task 2: Add Members to Primary and Standby DRPG
-
In Primary Disaster Recovery Protection group peoplesoft-iad, select Members, add all the five compute VM’s (hcm92-fsdr-app, hcm92-fsdr-web,hcm92-fsdr-prcs-linux,hcm92-fsdr-prcs-win,hcm92-fsdr-elk) and database (HCM92CDB (HCM92CDB_cm8_iad)) as members.

Note: While adding compute as member, select Non-Moving Instance in the compute instance type, as we have active-passive setup for the Oracle PeopleSoft VM’s.
-
In Standby Disaster Recovery Protection group peoplesoft-phx, select Members, add all the five compute VM’s (hcm92-fsdr-app, hcm92-fsdr-web,hcm92-fsdr-prcs-linux,hcm92-fsdr-prcs-win,hcm92-fsdr-elk) and database (HCM92CDB (HCM92CDB_jw2_phx)) as members.

Note: While adding compute as members, select Non-Moving Instance in the compute instance type, as we have active-passive setup for the Oracle PeopleSoft VM’s.
Task 3: Create switchover plan in the standby DRPG (Phoenix)
Switchover Plan – A type of Disaster Recovery plan that performs a planned transition of services from the primary Disaster Recovery protection group to the standby Disaster Recovery protection group.
-
Create switchover plan in standby DRPG peoplesoft-phx.
-
Select Plans and click Create plan.
-
Provide name as peoplesoft-switchover-ashburn-phoenix and choose plan type as Switchover (planned).
-
Click Create.
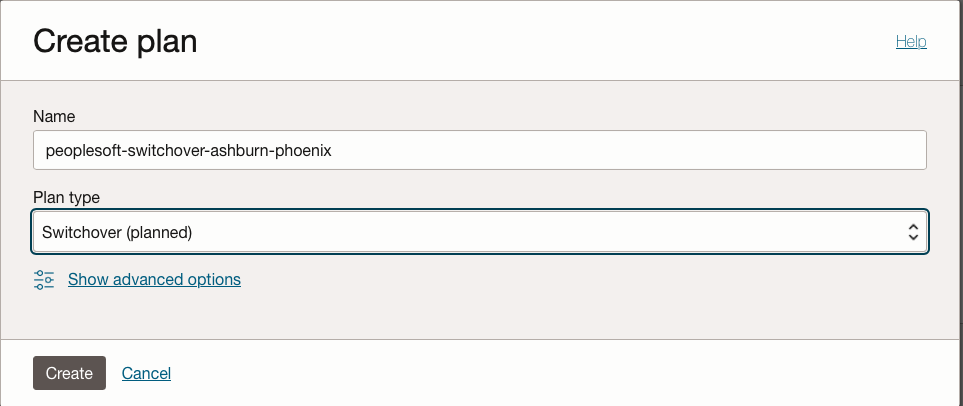
Note: Make sure to create the switchover plan from the Standby DRPG (Phoenix).
Task 4: Customize the switchover plan with various user defined plan groups
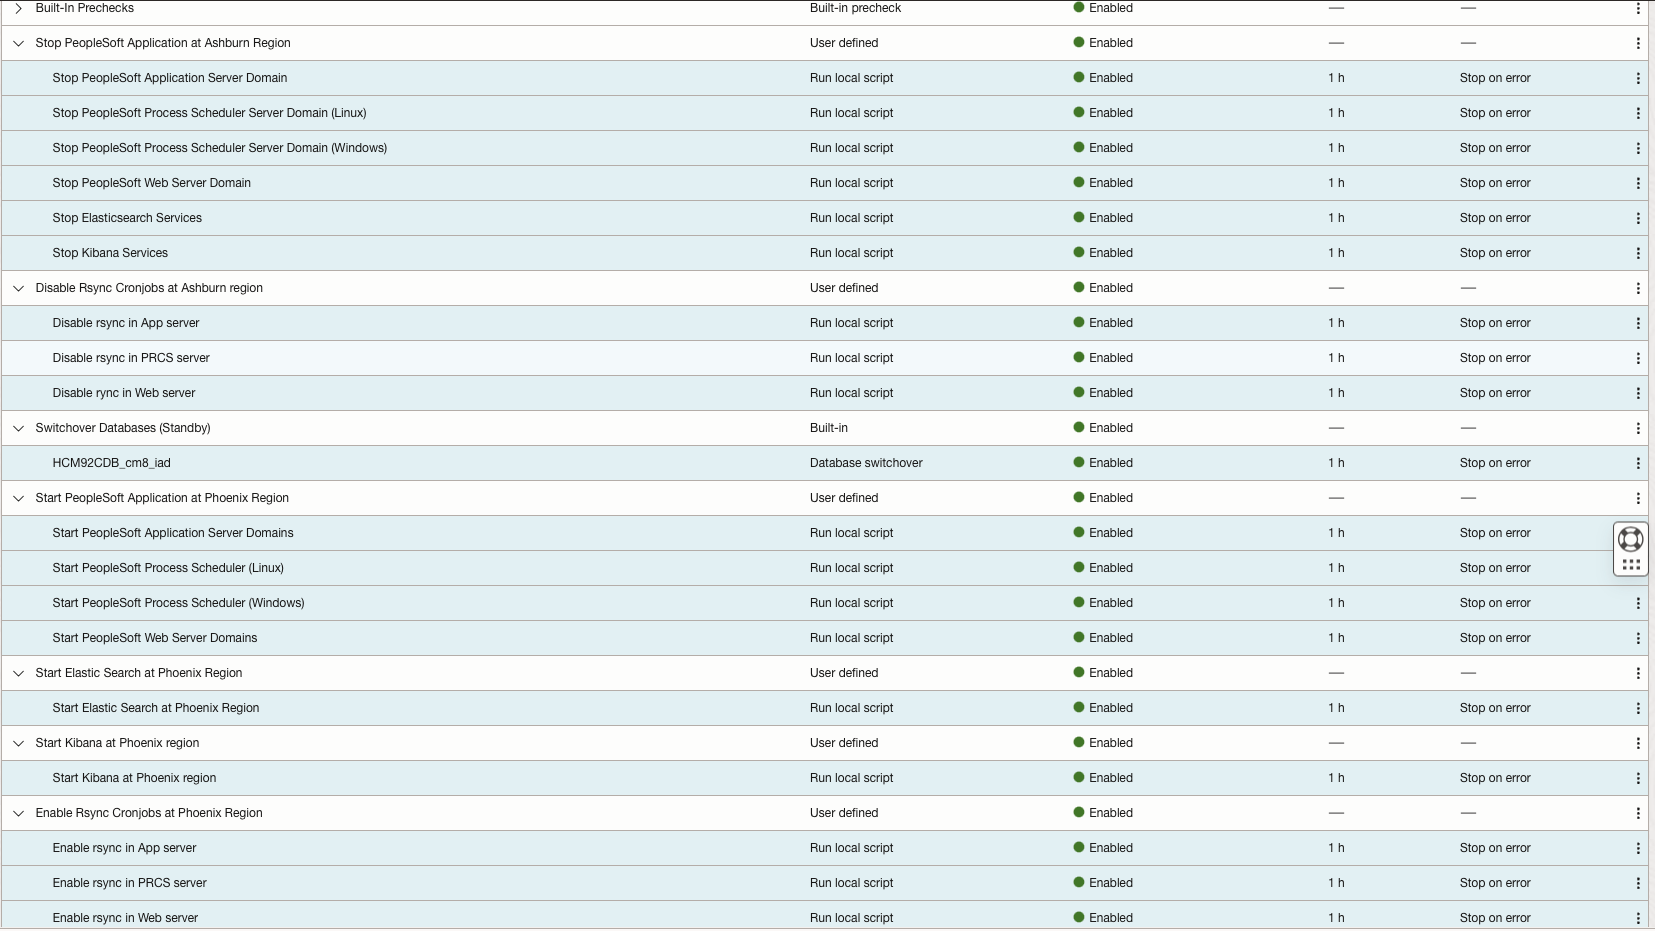
As we have added Database (Base DB) and Compute (Non-Moving Instance) as members in both the Disaster Recovery protection groups, the switchover plan will have Built-in prechecks and Switchover Database plangroups. We need to customize the switchover plan with additional user defined plan groups.

Typical workflow for Disaster Recovery switchover is as follows
-
Stop PeopleSoft Application at Ashburn Regionplan group will have steps to stop Oracle PeopleSoft application, Process scheduler (Linux and Windows), Web Server, Elastic Search and Kibana services in Ashburn region. -
Disable Rsync Cronjobs at Ashburn regionplan group will have step to disable rsync jobs in app, process scheduler and web servers in Ashburn region. -
Switchover Databaseplan group to switchover the database. Phoenix will become primary database and Ashburn will become standby database. -
Start PeopleSoft Application at Phoenix Regionplan group will have steps to start Oracle PeopleSoft application, Process scheduler (Linux and Windows), Web Server in Phoenix region. -
Start Elastic Search at Phoenix Regionplan group will have step to start Elastic Search in Phoenix region. -
Start Kibana at Phoenix Regionplan group will have step to start Kibana in Phoenix region. -
Enable Rsync Cronjobs at Phoenix regionplan group will have step to enable rsync jobs in app, process scheduler and web servers in Phoenix region.Note: Plan group for Switchover of DB (Step 3) will be auto generated in the switchover plan and we need to create custom group for 1,2,4,5,6 and 7. For this setup, we don’t have DNS changes, you can create a user defined group for DNS changes based on your requirements.
Create the mentioned six user defined plan groups
-
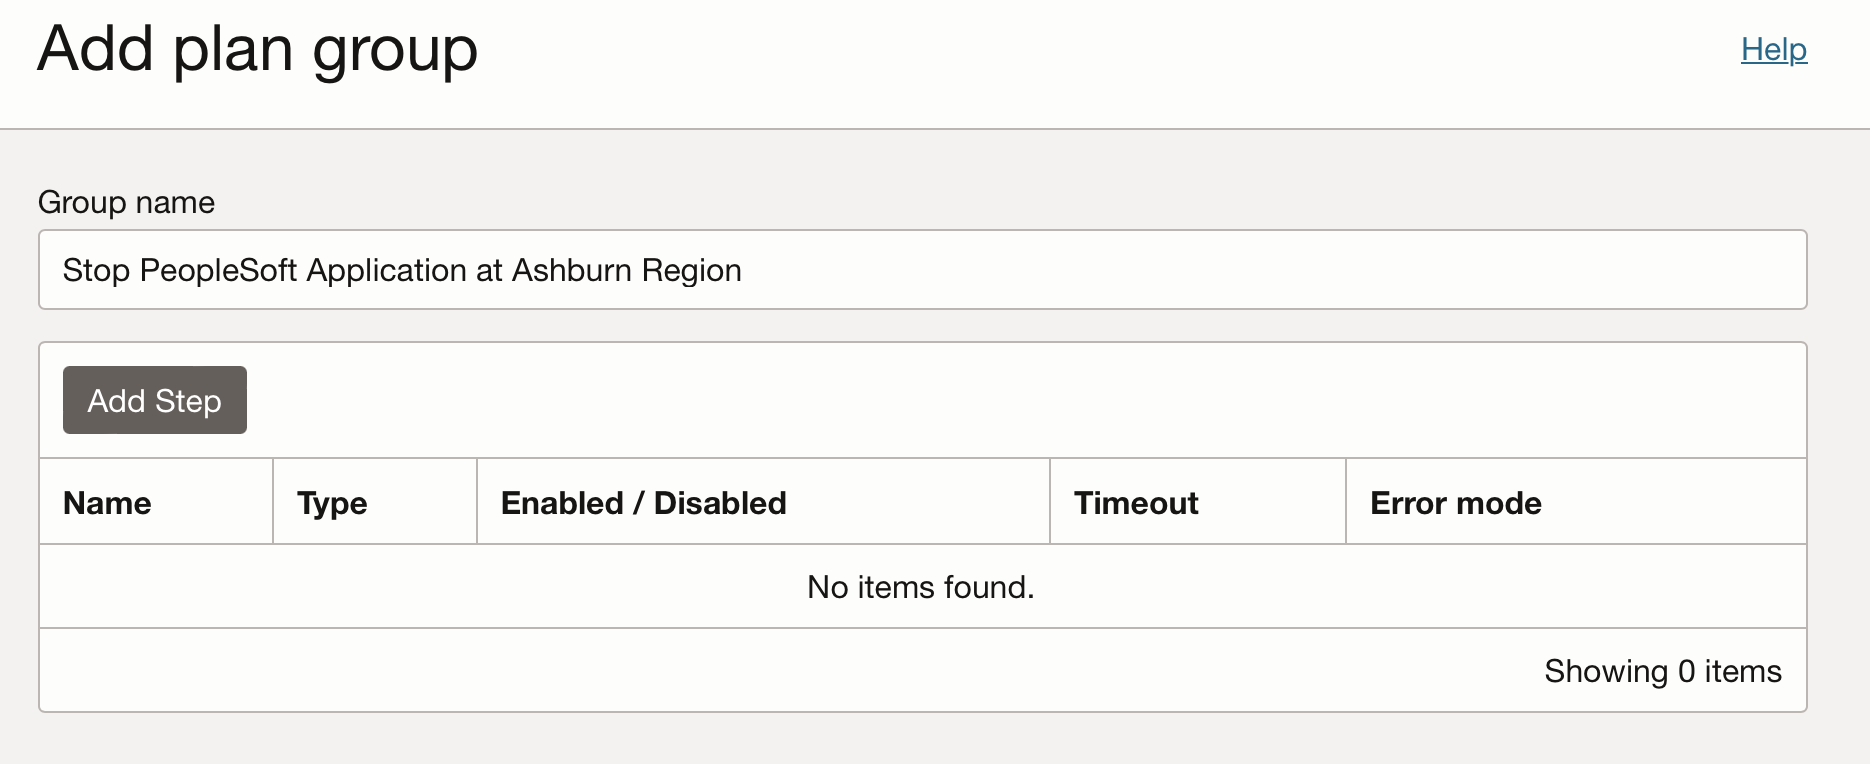
Under Plan Groups, click Add group, to create custom plan group to Stop PeopleSoft Application in Ashburn region. Provide Group name as Stop PeopleSoft Application at Ashburn Region.
-
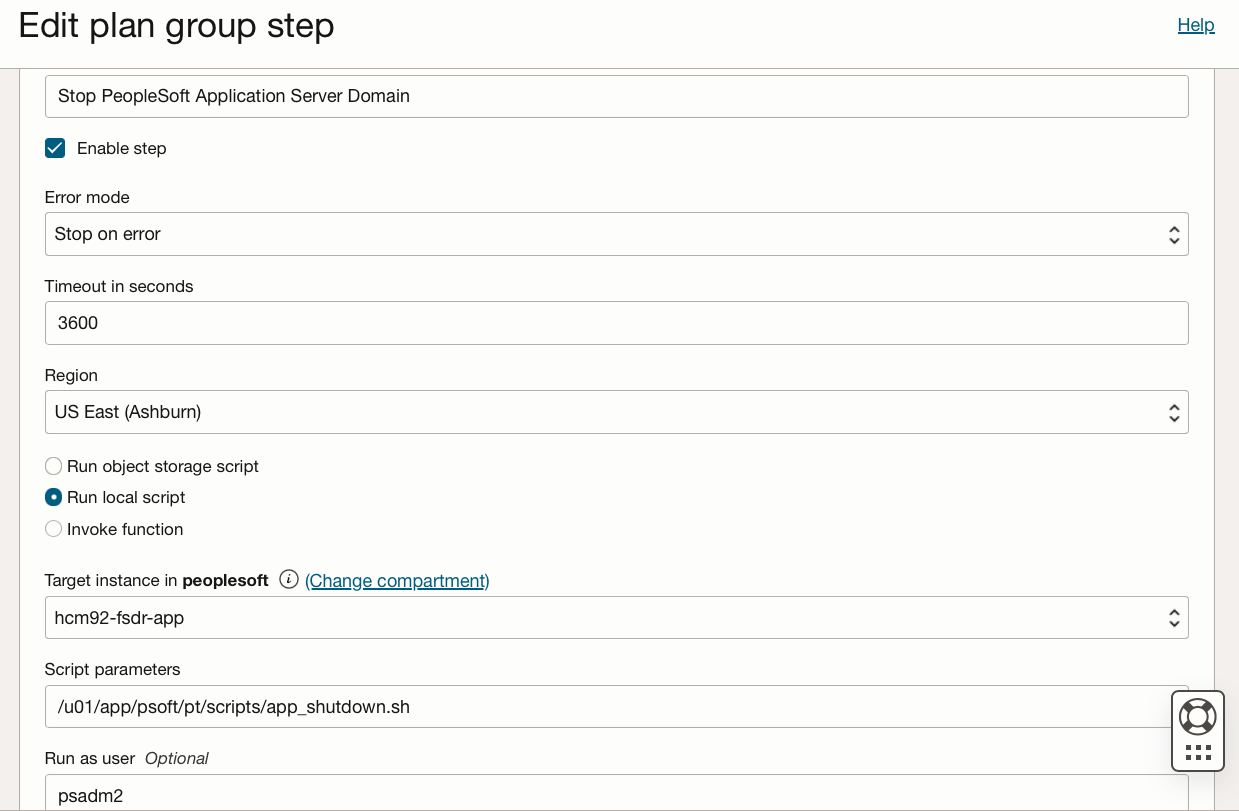
Click Add Step and add details as below. We will be adding six steps in the plan group.
-
Make sure to choose region as Ashburn, target instance as
hcm92-fsdr-app. Select the Run local script option with script location. Script needs to be run as psadm2 user. -
Provide the script
app_shutdown.shdetails with script location. The script will shutdown Oracle PeopleSoft application server domain in IAD region. -
Click Add Step and verify the added step.
-
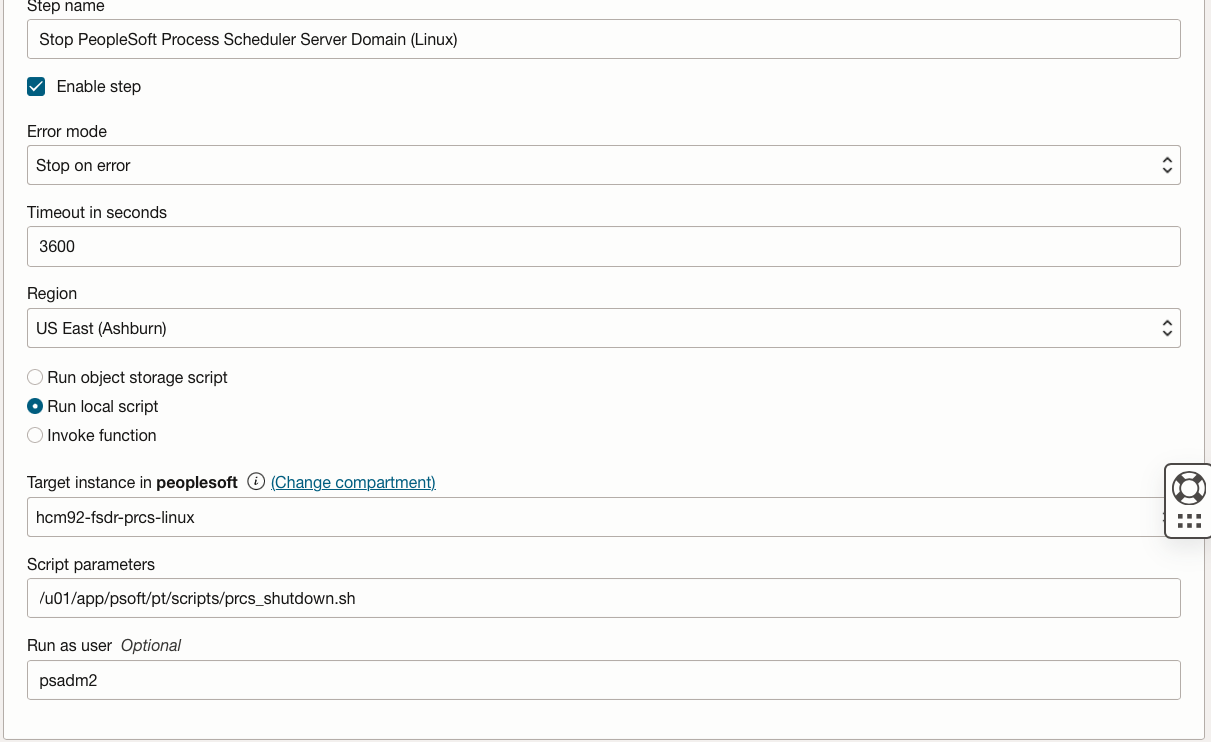
Click Add Step and add details as below.
-
Make sure to choose region as Ashburn, target instance as
hcm92-fsdr-prcs-linux. Select the Run local script option with script location. Script needs to be run as psadm2 user. -
Provide the script
prcs_shutdown.shdetails with script location. The script will shutdown PeopleSoft Process Scheduler domain in Linux in IAD region. -
Click Add Step and verify the added step.
-
Click Add Step and add details as below.
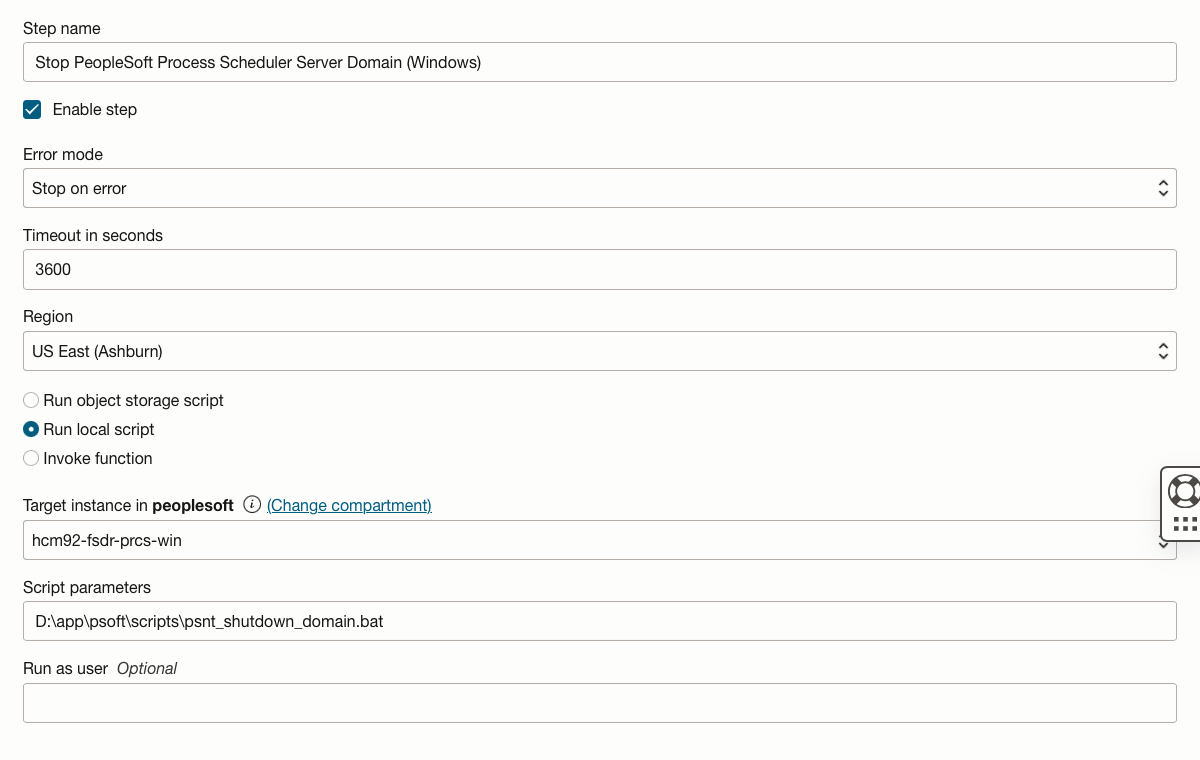
-
Make sure to choose region as Ashburn, target instance as
hcm92-fsdr-prcs-win. Select the Run local script option with script location. Leave the Run as User field blank. -
Provide the script
psnt_shutdown_domain.batdetails with script location. The script will shutdown PeopleSoft Process Scheduler domain in Windows]in IAD region. -
Click Add Step and verify the added step.
-
Click Add Step and add details as below.
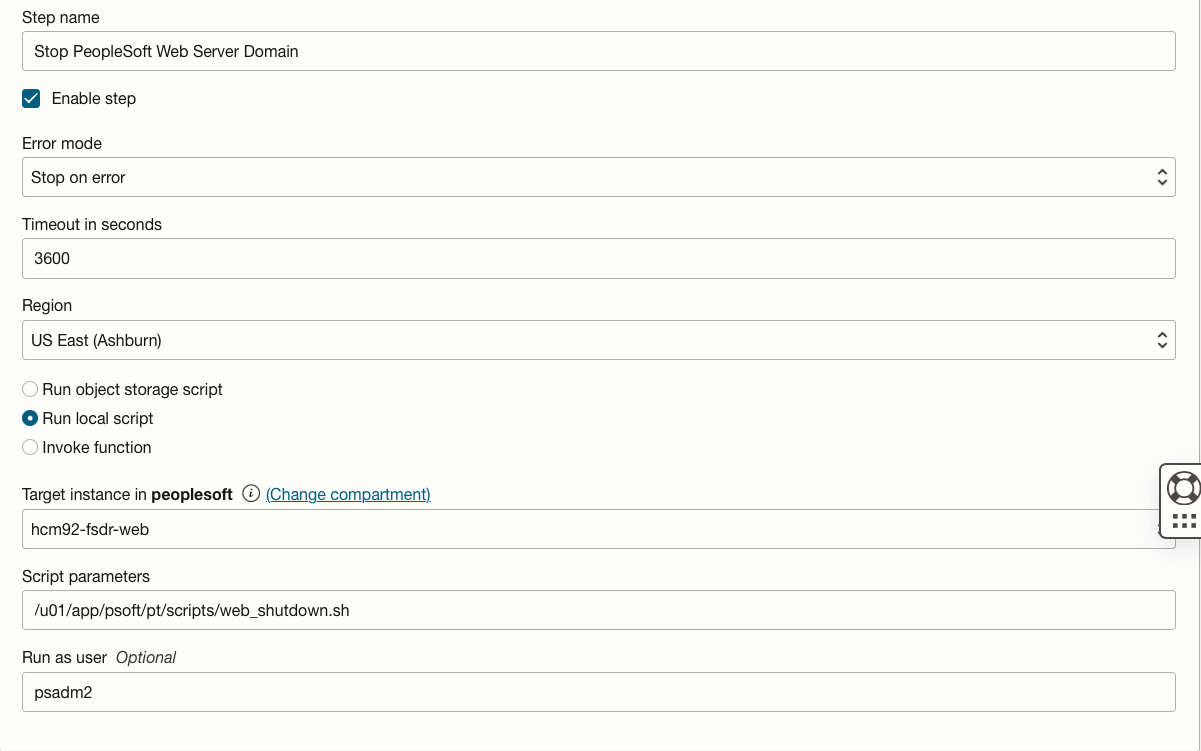
-
Make sure to choose region as Ashburn, target instance as
hcm92-fsdr-web. Select the Run local script option with script location. Script needs to be run as psadm2 user. -
Provide the script
web_shutdown.shdetails with script location. The script will shutdown PeopleSoft Web Server domain in IAD region. -
Click Add Step and verify the added step.
-
Click Add Step and add details as below.
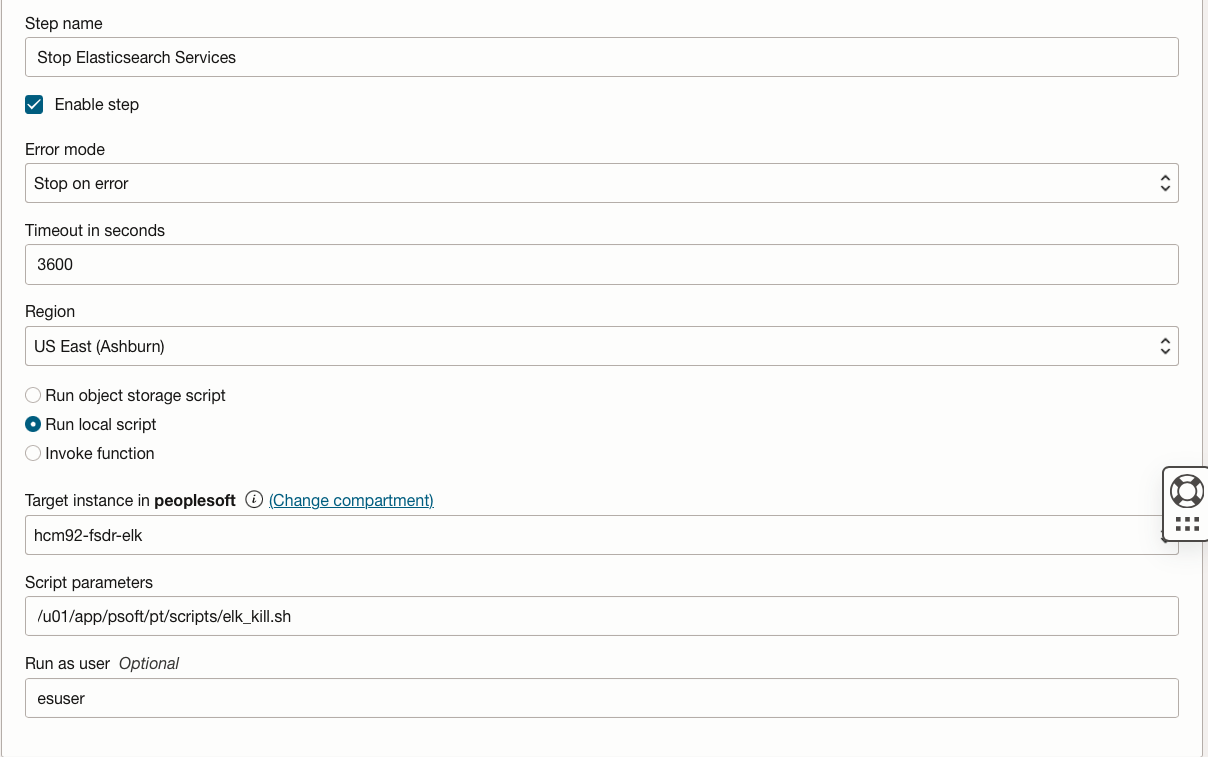
-
Make sure to choose region as Ashburn, target instance as
hcm92-fsdr-elk. Select the Run local script option with script location. Script needs to be run as esuser user. -
Provide the script
elk_kill.shdetails with script location. The script will stop Elastic Search services in IAD region. -
Click Add Step and verify the added step.
-
Click Add Step and add details as below.
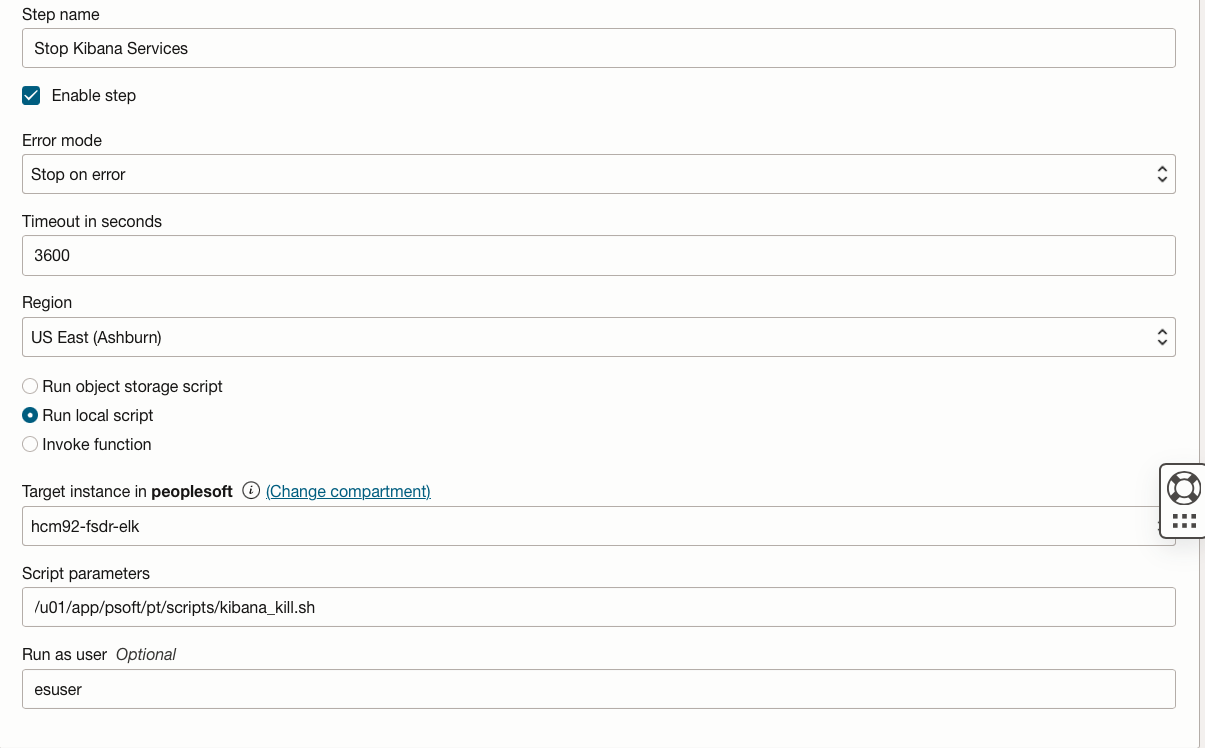
-
Make sure to choose region as Ashburn, target instance as
hcm92-fsdr-elk. Select the Run local script option with script location. Script needs to be run as esuser user. -
Provide the script
kibana_kill.shdetails with script location. The script will stop Kibana services in IAD region. -
Click Add Step and verify the added step.
-
Verify all the six steps are added and click Add. You should be able to see Stop PeopleSoft Application at Ashburn Region plan group created with six steps.

-
-
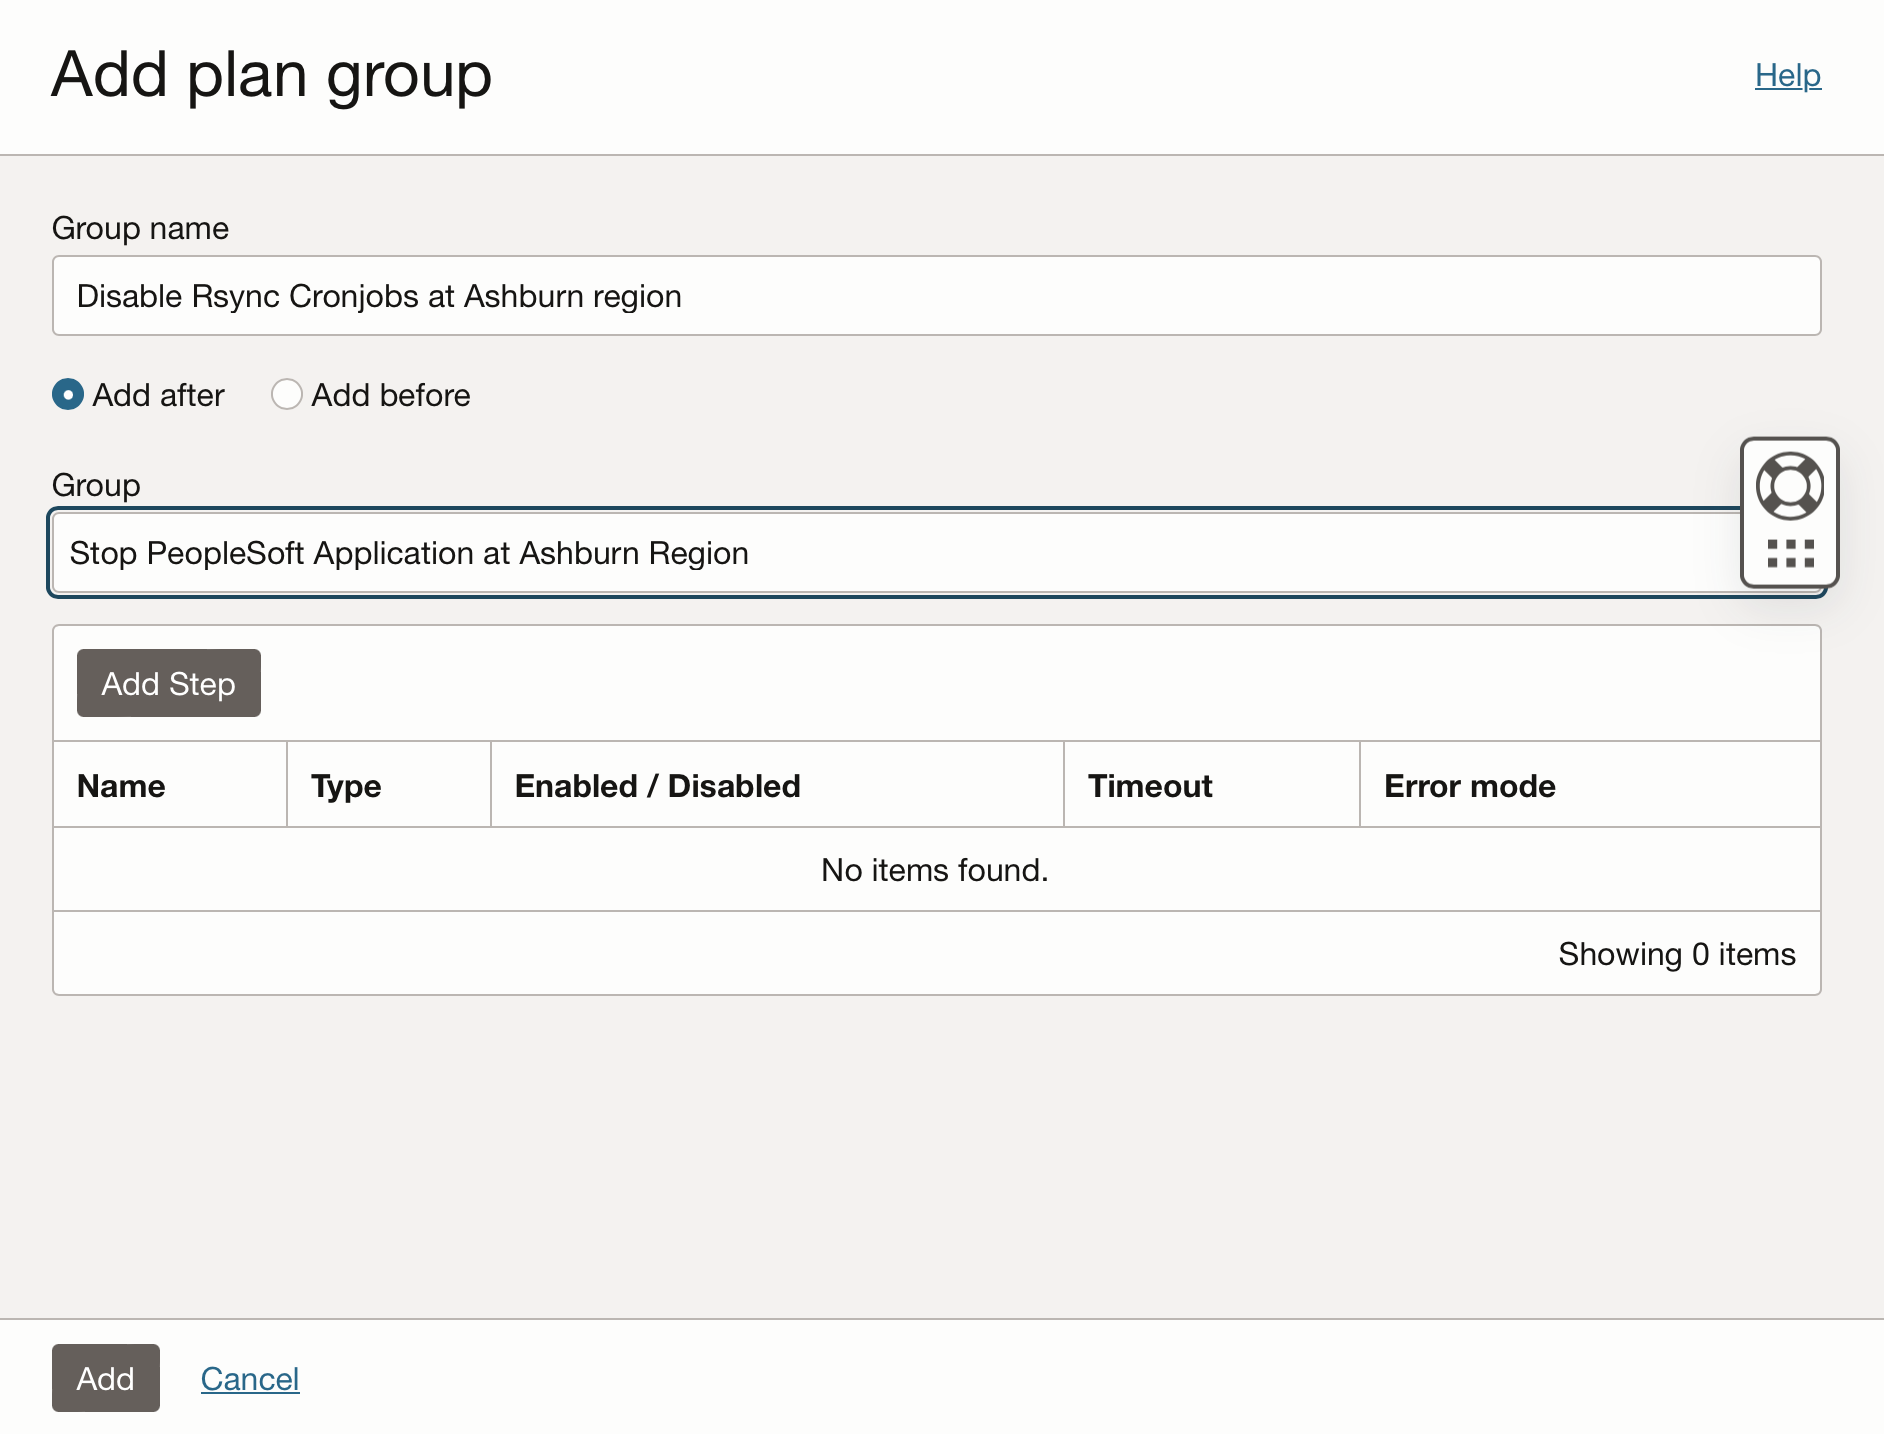
Under Plan Groups, click Add group, to create custom plan group to disable rsync cronjobs at Ashburn region. Provide Group name as Disable Rsync Cronjobs at Ashburn region. Select Add after, group Stop PeopleSoft Application at Ashburn Region
-
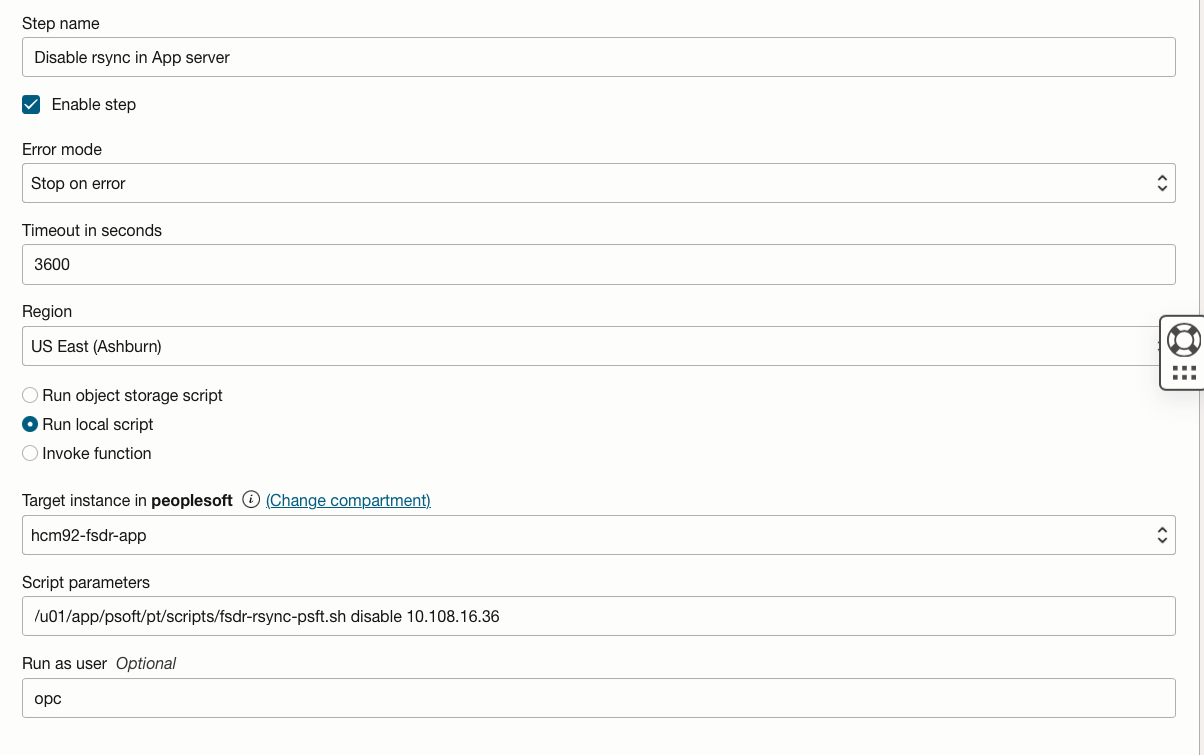
Click Add Step and add details as below. We will be adding three steps in the plan group.
-
Make sure to choose region as Ashburn, target instance as
hcm92-fsdr-app. Select the Run local script option with script location. Script needs to be run as opc user. -
Provide the script
fsdr-rsync-psft.shdetails with script location, use disable option and provide the private ip ofhcm92-fsdr-app. The script will disable rsync cron jobs for PeopleSoft application and customization files and folders. -
Click Add Step and verify the added step.
-
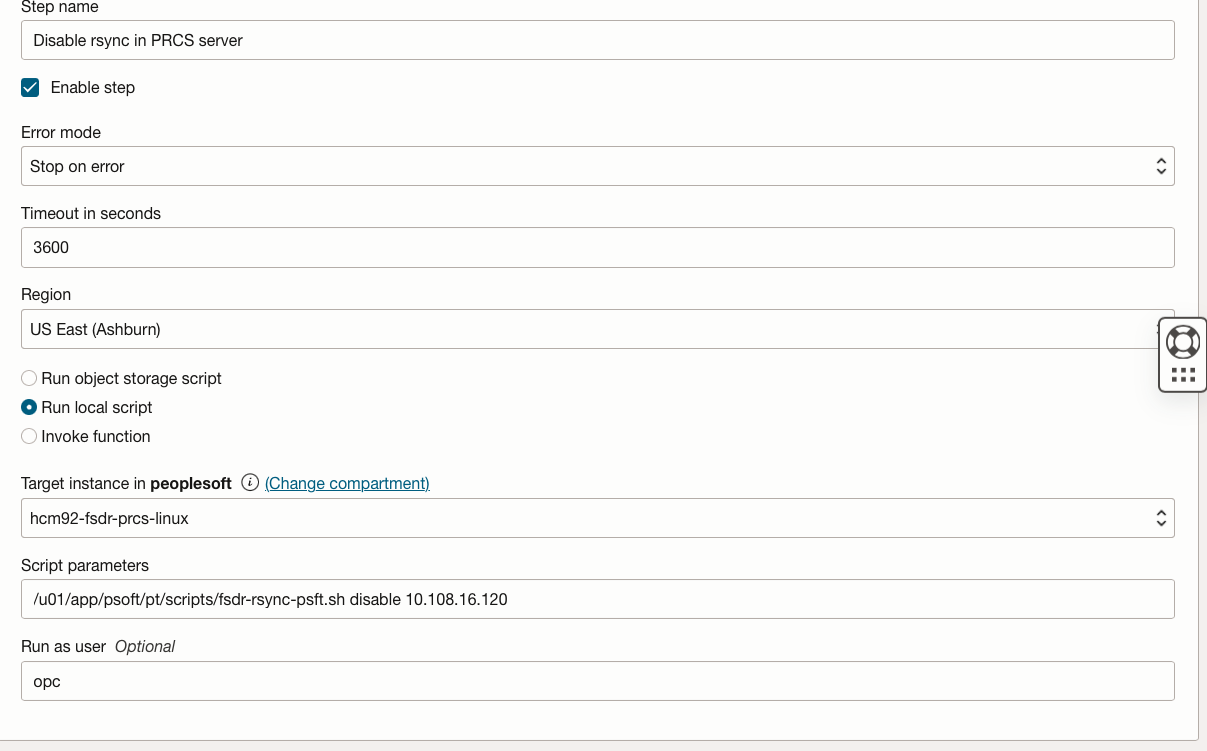
Click Add Step and add details as below.
-
Make sure to choose region as Ashburn, target instance as
hcm92-fsdr-prcs-linux. Select the Run local script option with script location. Script needs to be run as opc user. -
Provide the script
fsdr-rsync-psft.shdetails with script location, use disable option and provide the private ip ofhcm92-fsdr-prcs-linux. The script will disable rsync cron jobs for PeopleSoft application and customization files and folders. -
Click Add Step and verify the added step.
-
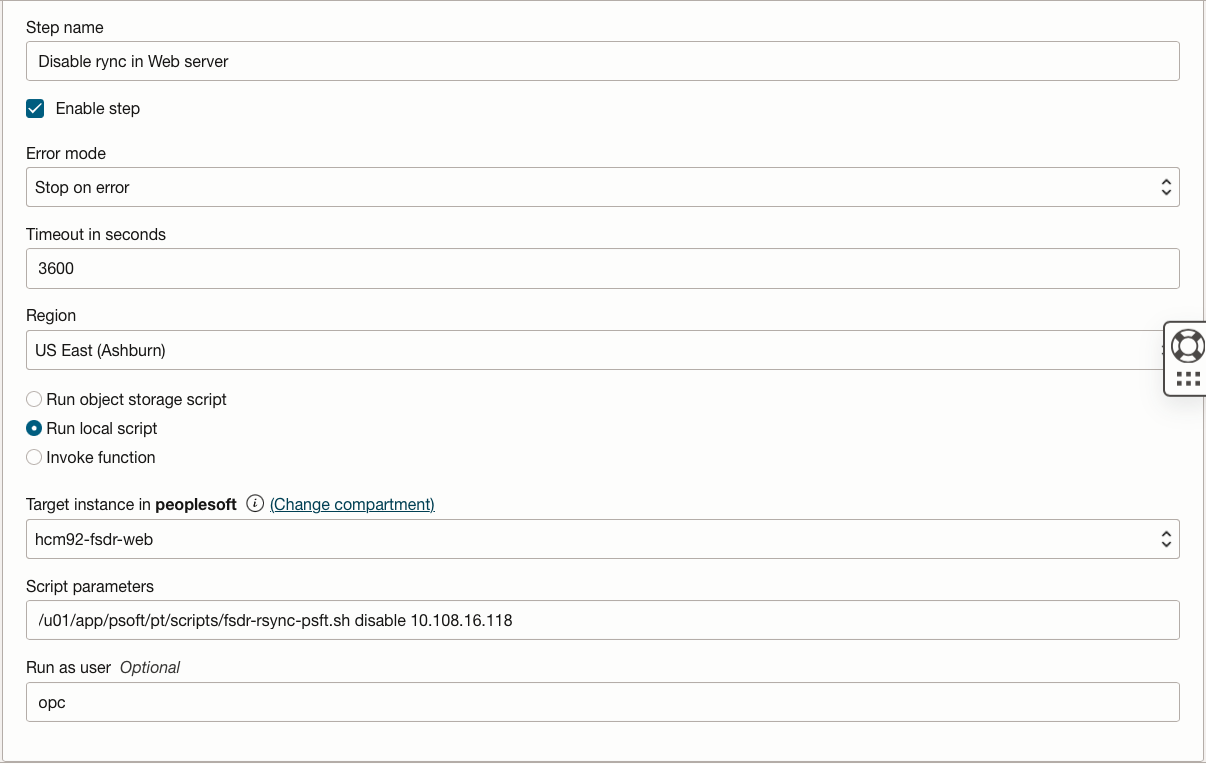
Click Add Step and add details as below.
-
Make sure to choose region as Ashburn, target instance as
hcm92-fsdr-web. Select the Run local script option with script location. Script needs to be run as opc user. -
Provide the script
fsdr-rsync-psft.shdetails with script location, use disable option and provide the private ip ofhcm92-fsdr-web. The script will disable rsync cron jobs for PeopleSoft application and customization files and folders. -
Click Add Step and verify the added step.
-
Verify all the three steps are added and click Add. You should be able to see Disable Rsync Cronjobs at Ashburn region plan group created with three steps.

-
-
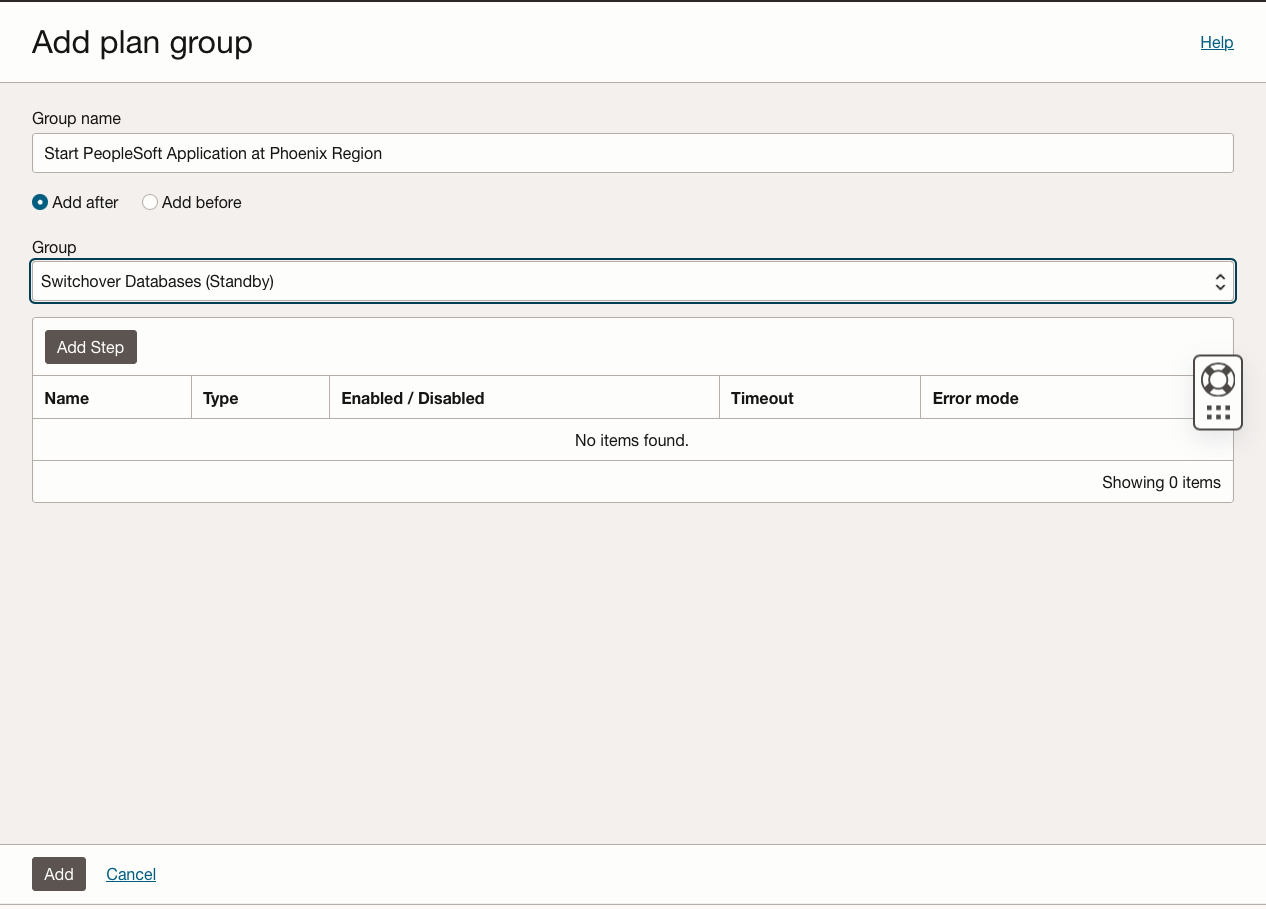
Under Plan Groups, click Add group, to create custom plan group to Start PeopleSoft Application at Phoenix Region. Provide Group name as Start PeopleSoft Application at Phoenix Region. Select Add after, group Switchover Databases (Standby)
-
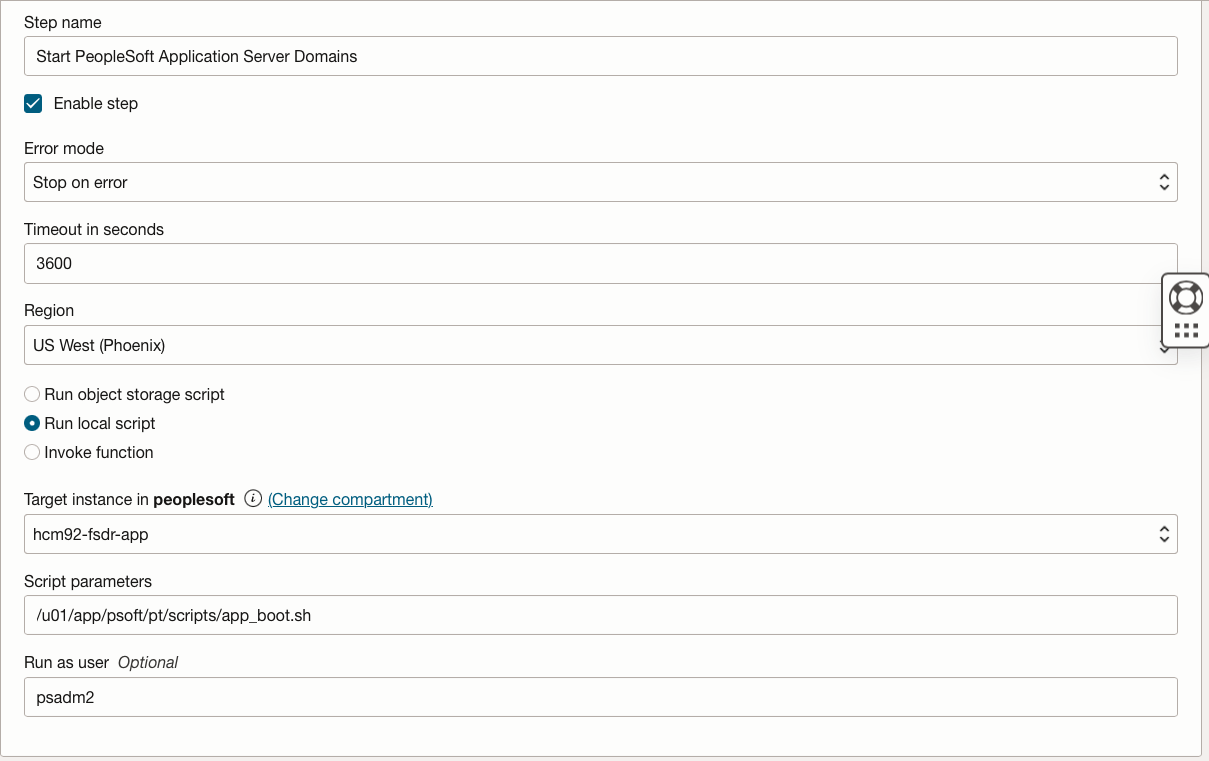
Click Add Step and add details as below. We will be adding four steps in the plan group.
-
Make sure to choose region as Phoenix, target instance as
hcm92-fsdr-app. Select the Run local script option with script location. Script needs to be run as psadm2 user. -
Provide the script
app_boot.shdetails with script location. The script will startup PeopleSoft Application Server domain in PHX region. -
Click Add Step and verify the added step.
-
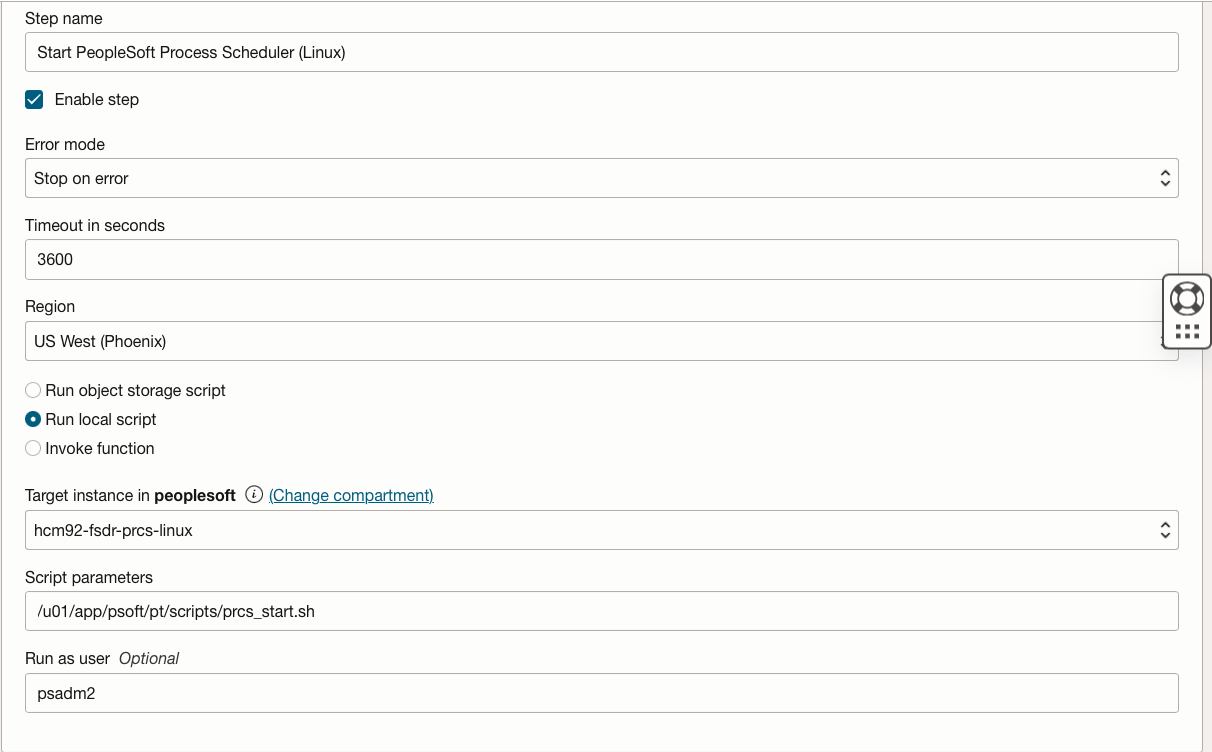
Click Add Step and add details as below.
-
Make sure to choose region as Phoenix, target instance as
hcm92-fsdr-prcs-linux. Select the Run local script option with script location. Script needs to be run as psadm2 user. -
Provide the script
prcs_start.shdetails with script location. The script will startup PeopleSoft Process Scheduler domain in Linux in PHX region. -
Click Add Step and verify the added step.
-
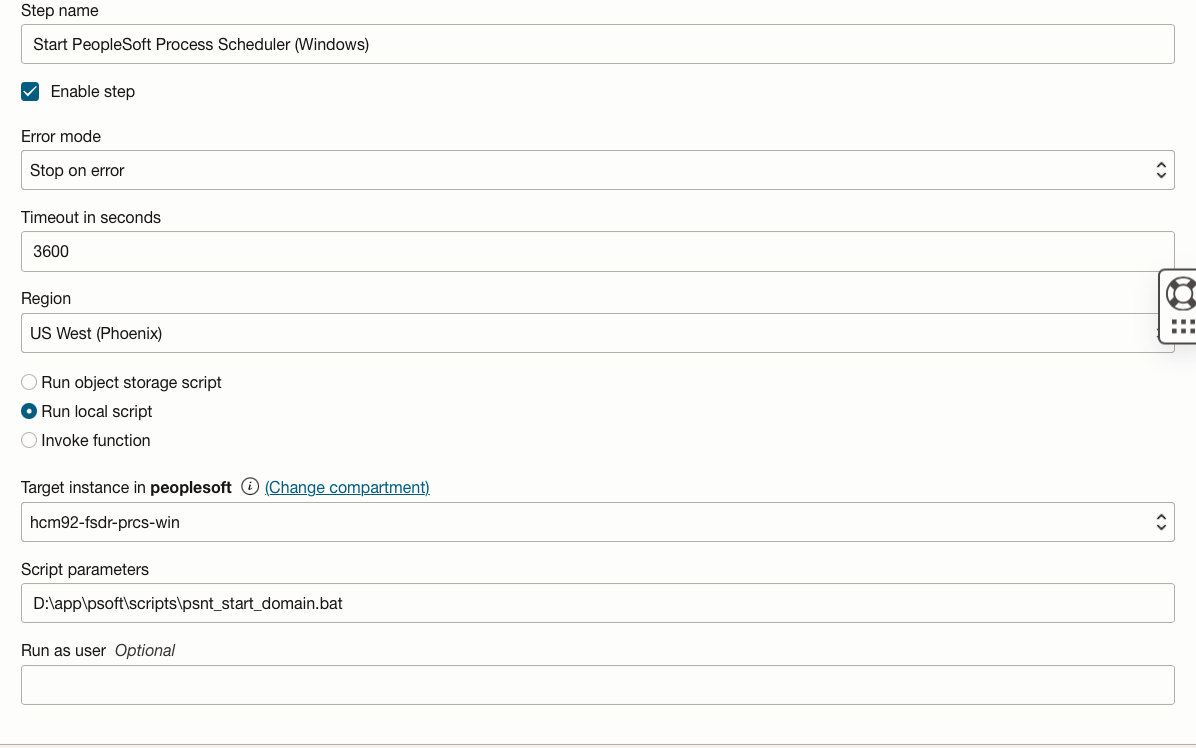
Click Add Step and add details as below.
-
Make sure to choose region as Phoenix, target instance as
hcm92-fsdr-prcs-win. Select the Run local script option with script location. Leave the Run as User field blank. -
Provide the script
psnt_start_domain.batdetails with script location. The script will startup PeopleSoft Process Scheduler domain in Windows in Phoenix region. -
Click Add Step and verify the added step.
-
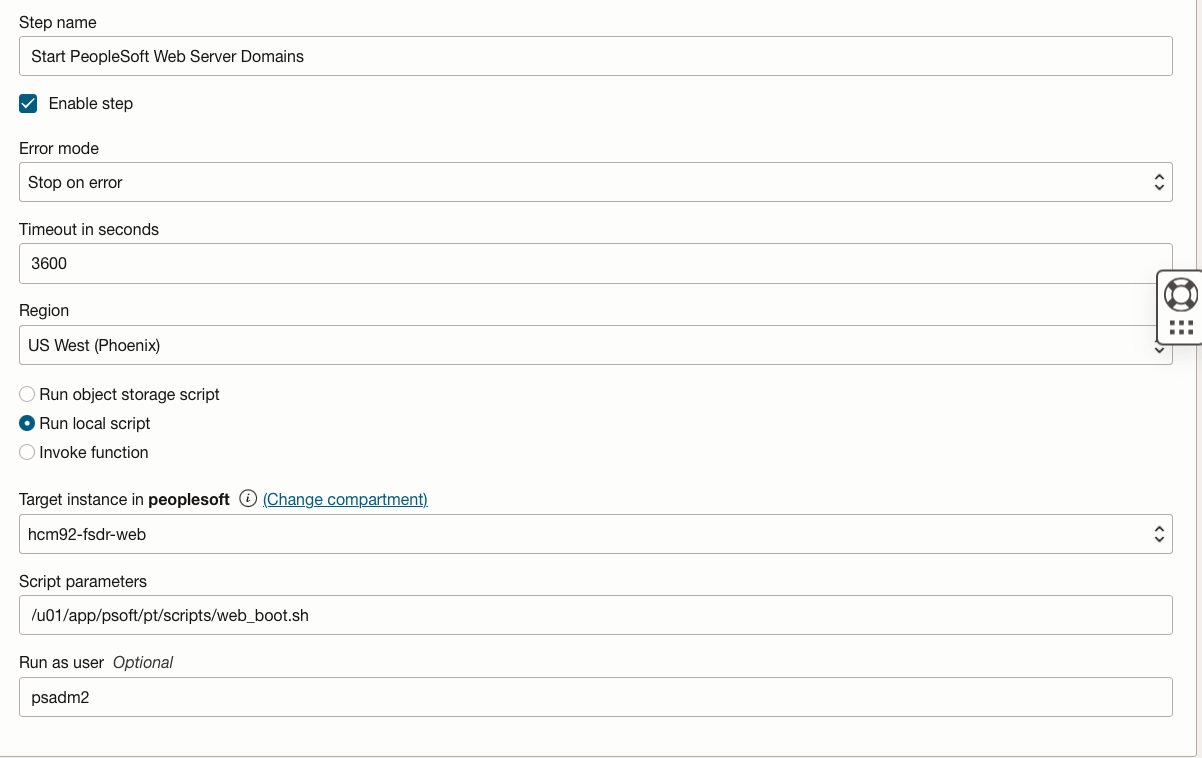
Click Add Step and add details as below.
-
Make sure to choose region as Phoenix, target instance as
hcm92-fsdr-web. Select the Run local script option with script location. Script needs to be run as psadm2 user. -
Provide the script
web_boot.shdetails with script location. The script will start the PeopleSoft Web Server domain in PHX region. -
Click Add Step and verify the added step.
-
Verify all the four steps are added and click Add. You should be able to see Start PeopleSoft Application at Phoenix Region plan group created with four steps.

-
-
Under Plan Groups, click Add group, to create custom plan group to Start Elastic Search at Phoenix Region. Provide Group name as Start Elastic Search at Phoenix Region. Select Add after, group Start PeopleSoft Application at Phoenix Region
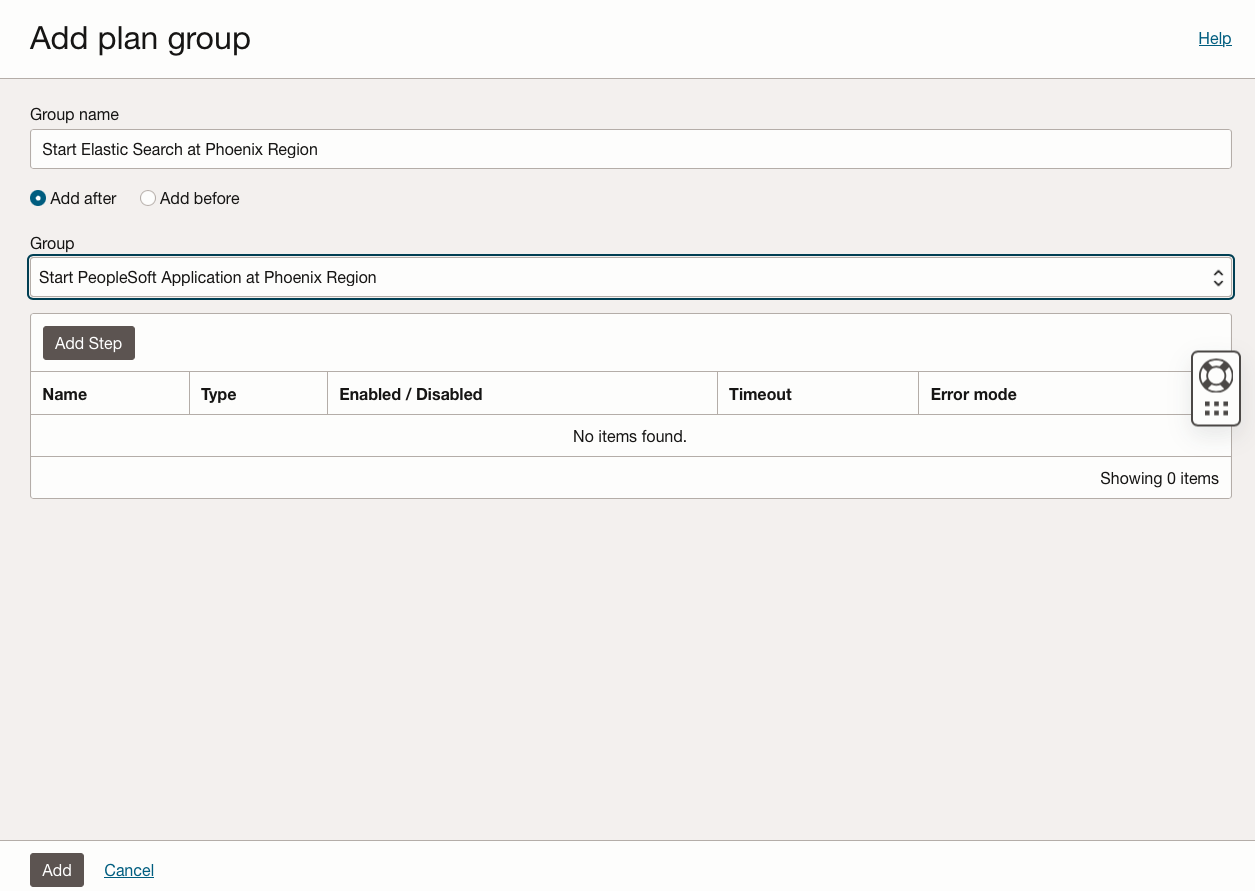
-
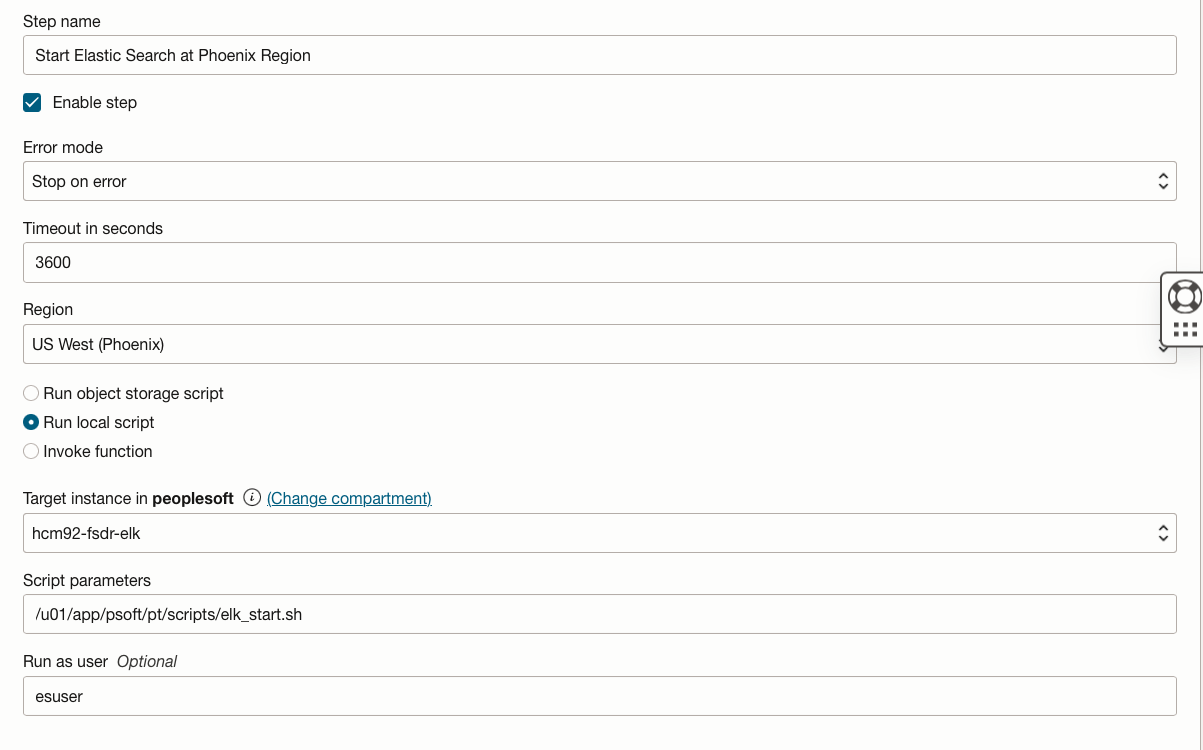
Click Add Step and add details as below. We will be adding one step in the plan group.
-
Make sure to choose region as Phoenix, target instance as
hcm92-fsdr-elk. Select the Run local script option with script location. Script needs to be run as esuser user. -
Provide the script
elk_start.shdetails with script location. The script will start Elastic Search services in PHX region. -
Click Add Step and verify the added step.
-
Verify the single step is added and click Add. You should be able to see Start Elastic Search at Phoenix Region plan group created with singe step.

-
-
Under Plan Groups, click Add group, to create custom plan group to Start Kibana at Phoenix Region. Provide Group name as Start Kibana at Phoenix Region. Select Add after, group Start Elastic Search at Phoenix Region.
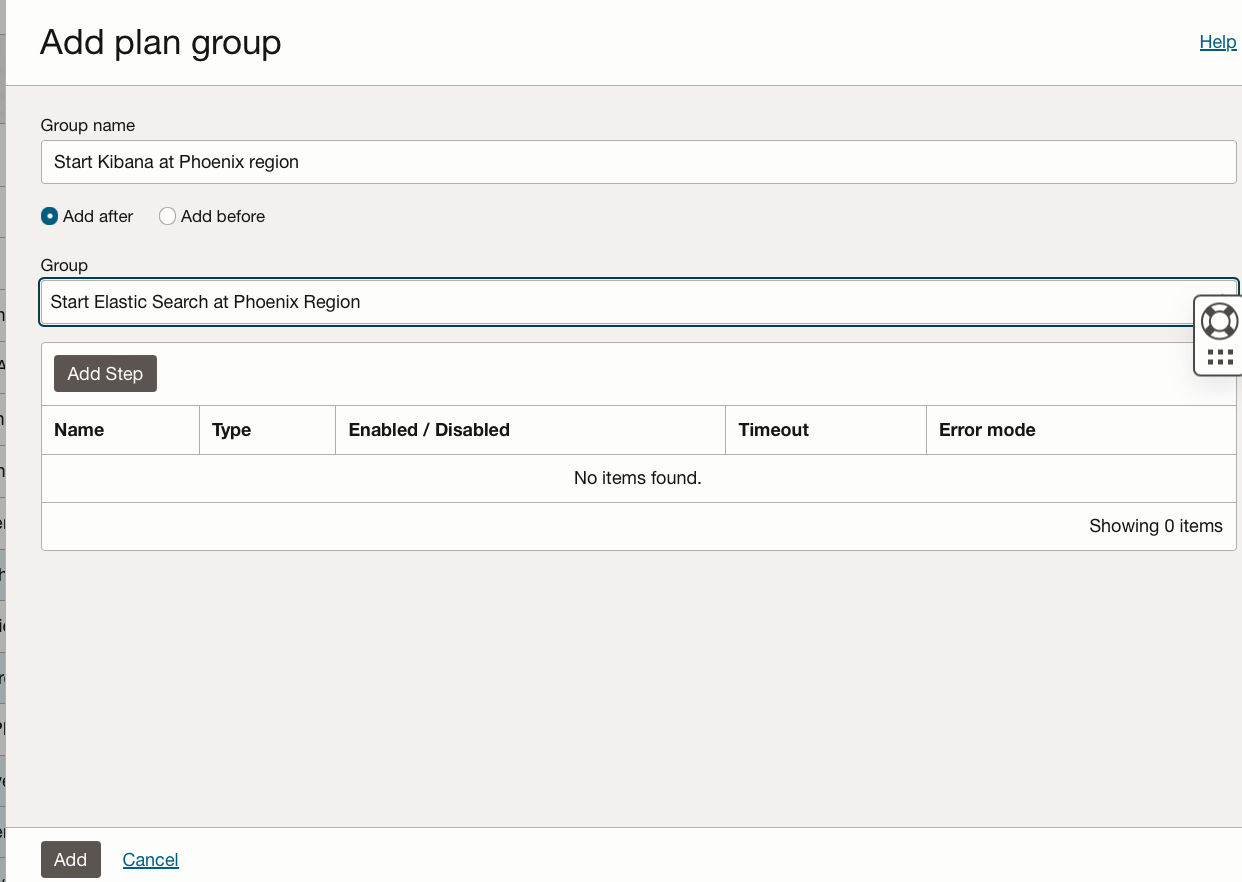
-
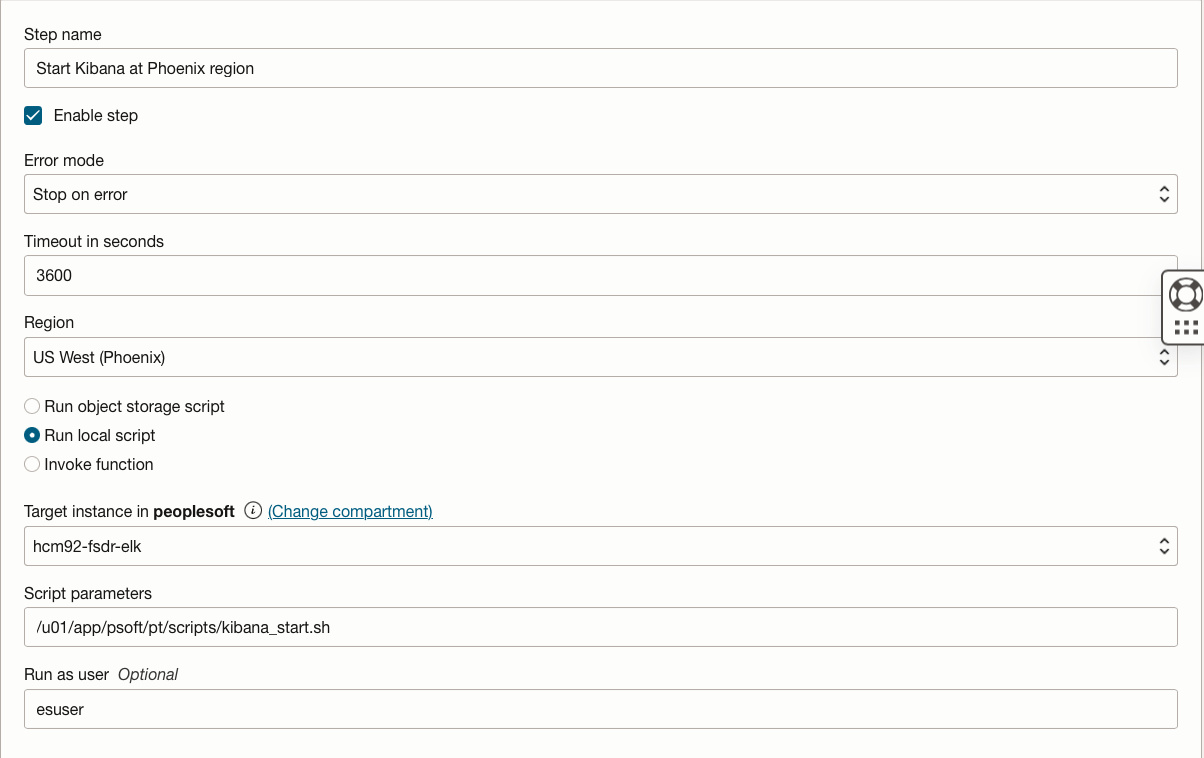
Click Add Step and add details as below. We will be adding one step in the plan group.
-
Make sure to choose region as Phoenix, target instance as
hcm92-fsdr-elk. Select the Run local script option with script location. Script needs to be run as esuser user. -
Provide the script
kibana_start.shdetails with script location. The script will start Kibana services in PHX region. -
Click Add Step and verify the added step.
-
Verify the single step is added and click Add. You should be able to see Start Kibana at Phoenix Region plan group created with single step.

-
-
Under Plan Groups, click Add group, to create custom plan group to enable rsync cronjobs at Phoenix region. Provide Group name as Enable Rsync Cronjobs at Phoenix Region. Select Add after, group Start Kibana at Phoenix region.

-
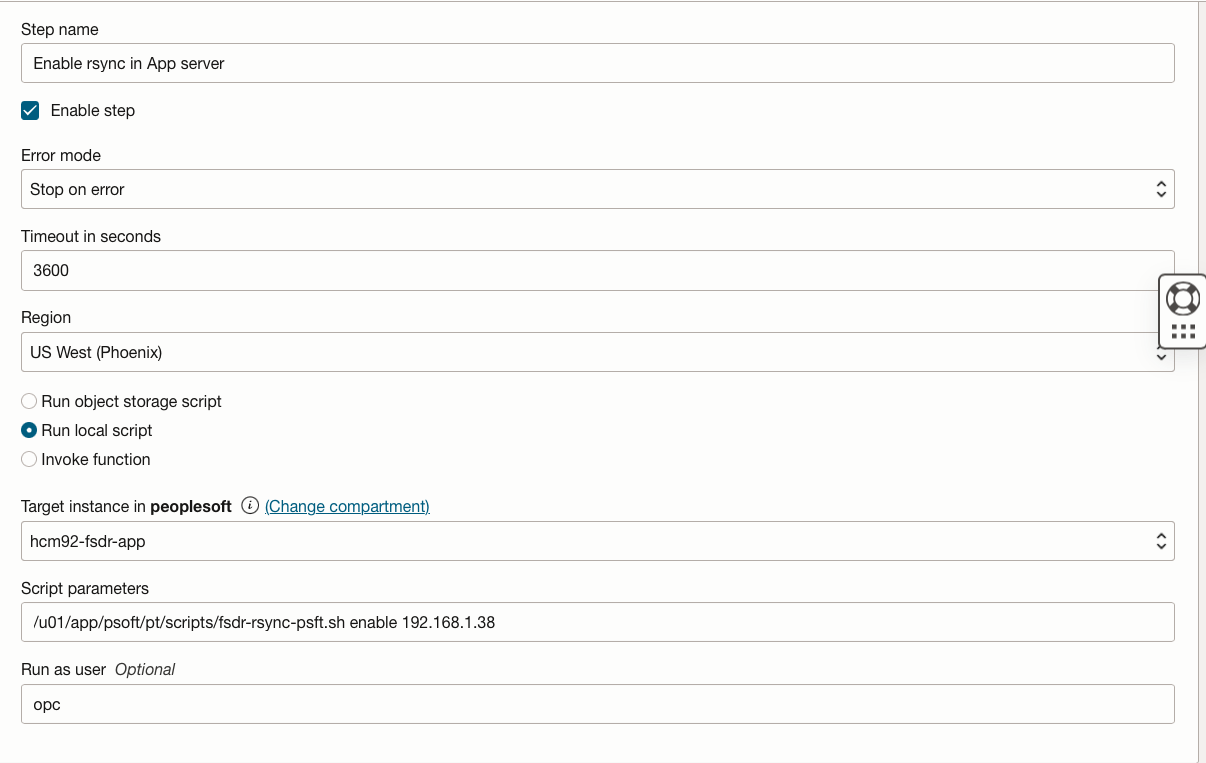
Click Add Step and add details as below. We will be adding three steps in the plan group.
-
Make sure to choose region as Phoenix, target instance as
hcm92-fsdr-app. Select the Run local script option with script location. Script needs to be run as opc user. -
Provide the script
fsdr-rsync-psft.shdetails with script location, use enable option and provide the private ip ofhcm92-fsdr-app. The script will enable rsync cron jobs for PeopleSoft application and customization files and folders. -
Click Add Step and verify the added step.
-
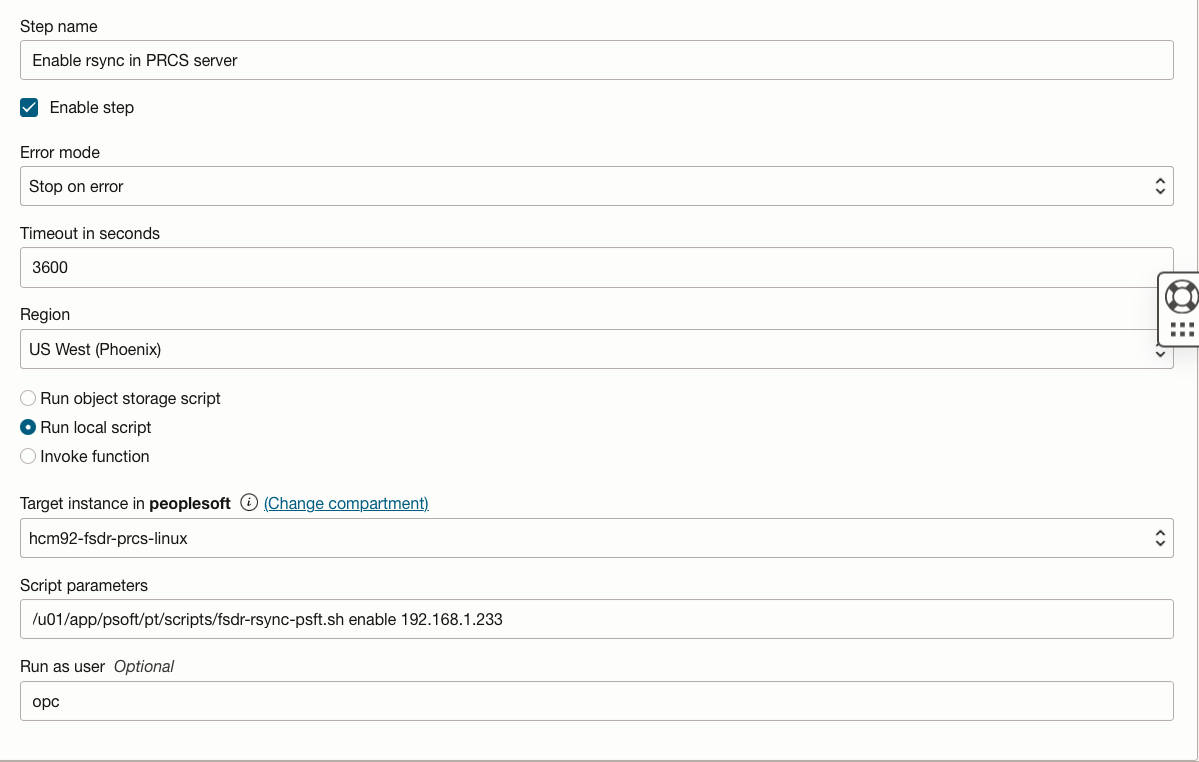
Click Add Step and add details as below.
-
Make sure to choose region as Phoenix, target instance as
hcm92-fsdr-prcs-linux. Select the Run local script option with script location. Script needs to be run as opc user. -
Provide the script
fsdr-rsync-psft.shdetails with script location, use enable option and provide the private ip ofhcm92-fsdr-prcs-linux. The script will enable rsync cron jobs for PeopleSoft application and customization files and folders. -
Click Add Step and verify the added step.
-
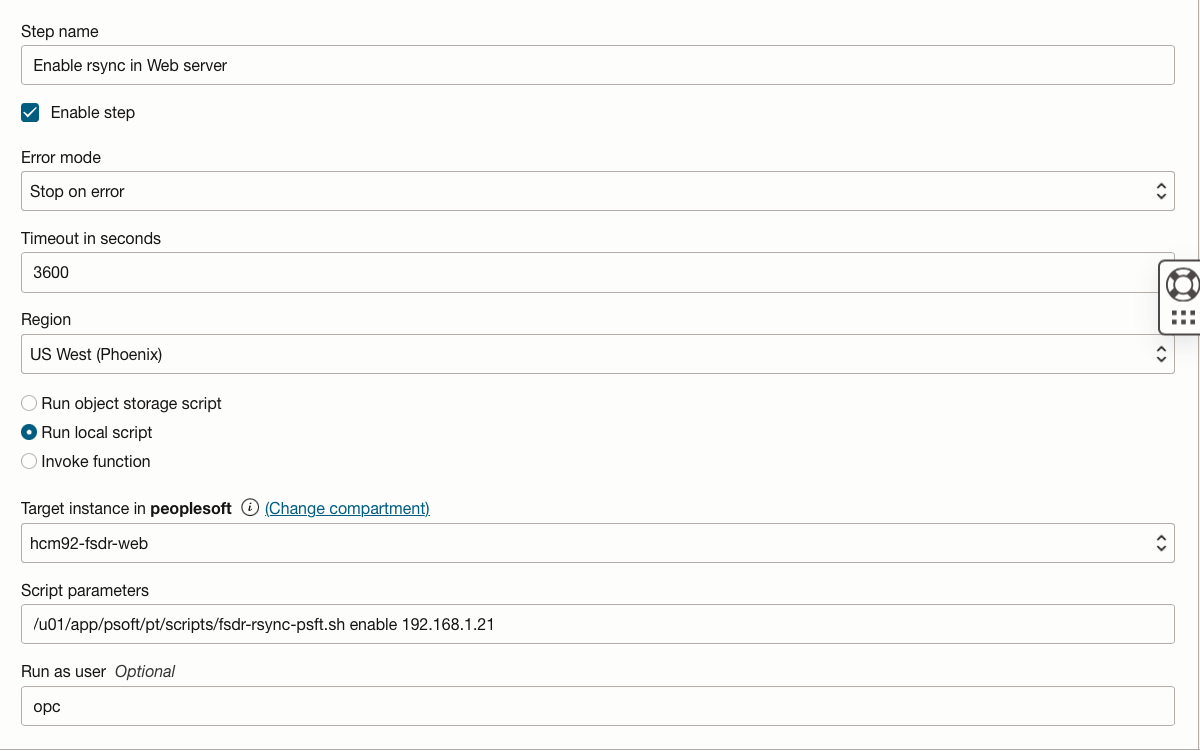
Click Add Step and add details as below.
-
Make sure to choose region as Phoenix, target instance as
hcm92-fsdr-web. Select the Run local script option with script location. Script needs to be run as opc user. -
Provide the script
fsdr-rsync-psft.shdetails with script location, use enable option and provide the private ip ofhcm92-fsdr-web. The script will enable rsync cron jobs for PeopleSoft application and customization files and folders. -
Click Add Step and verify the added step.
-
Verify all the three steps are added and click Add. You should be able to see Enable Rsync Cronjobs at Phoenix region plan group created with three steps.

-
-
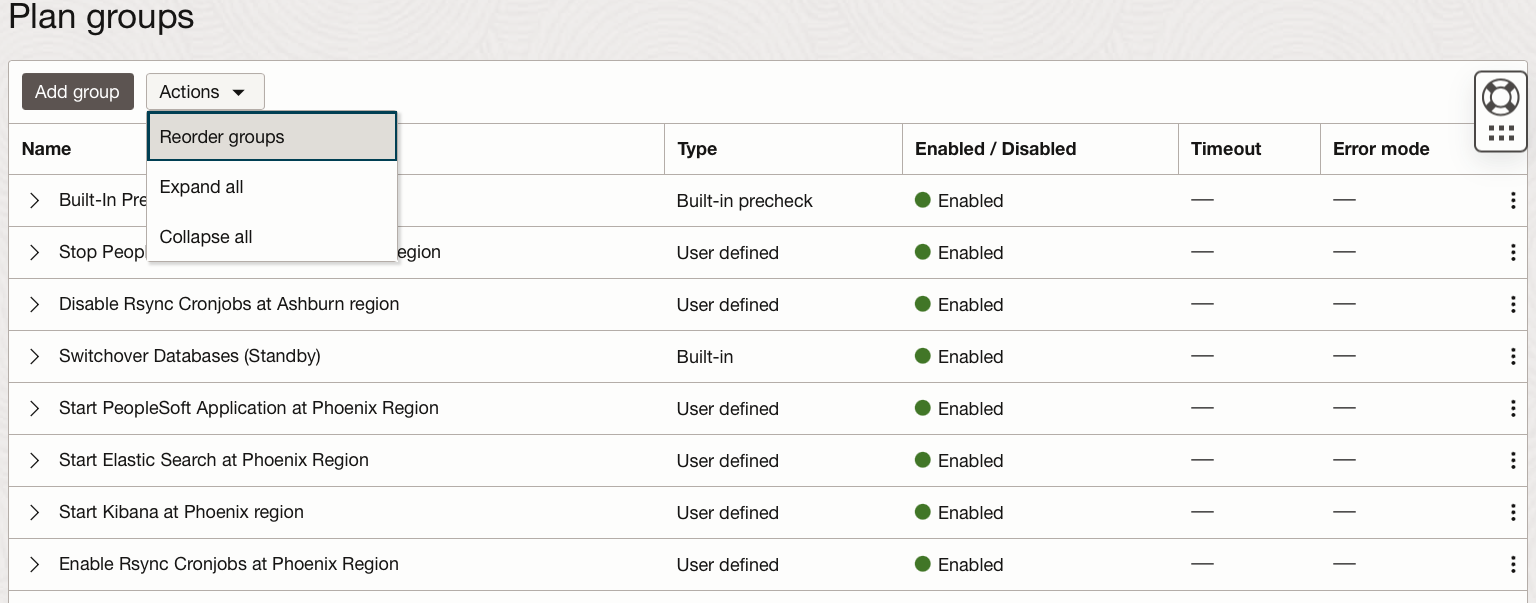
Since we created the user-defined group in a specific order, reordering of plan groups might not be required. If required use the Reorder Groups option in the plan to order switchover plan groups in the right sequence.
Task 5: Execute prechecks and run switchover plan
The Run Prechecks option performs a quick validation of all steps in a Disaster Recovery plan and the members associated with the steps.
-
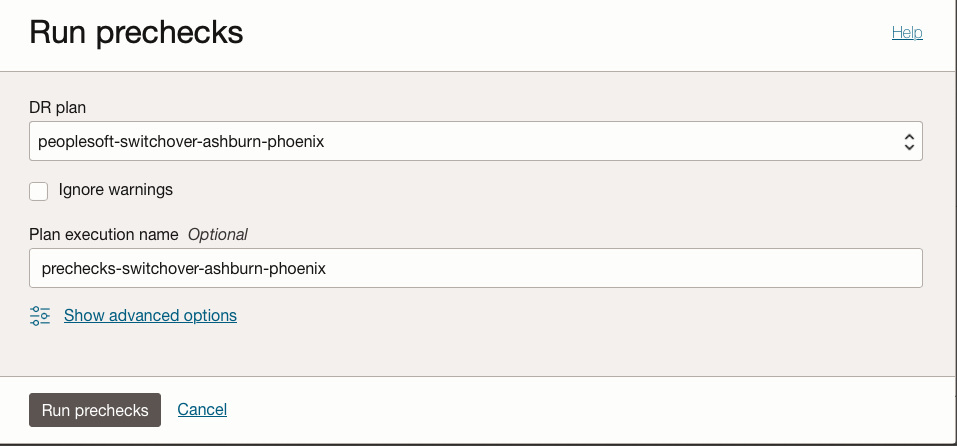
From the switchover plan peoplesoft-switchover-ashburn-phoenix, click Run Prechecks to launch the Run Prechecks dialog.
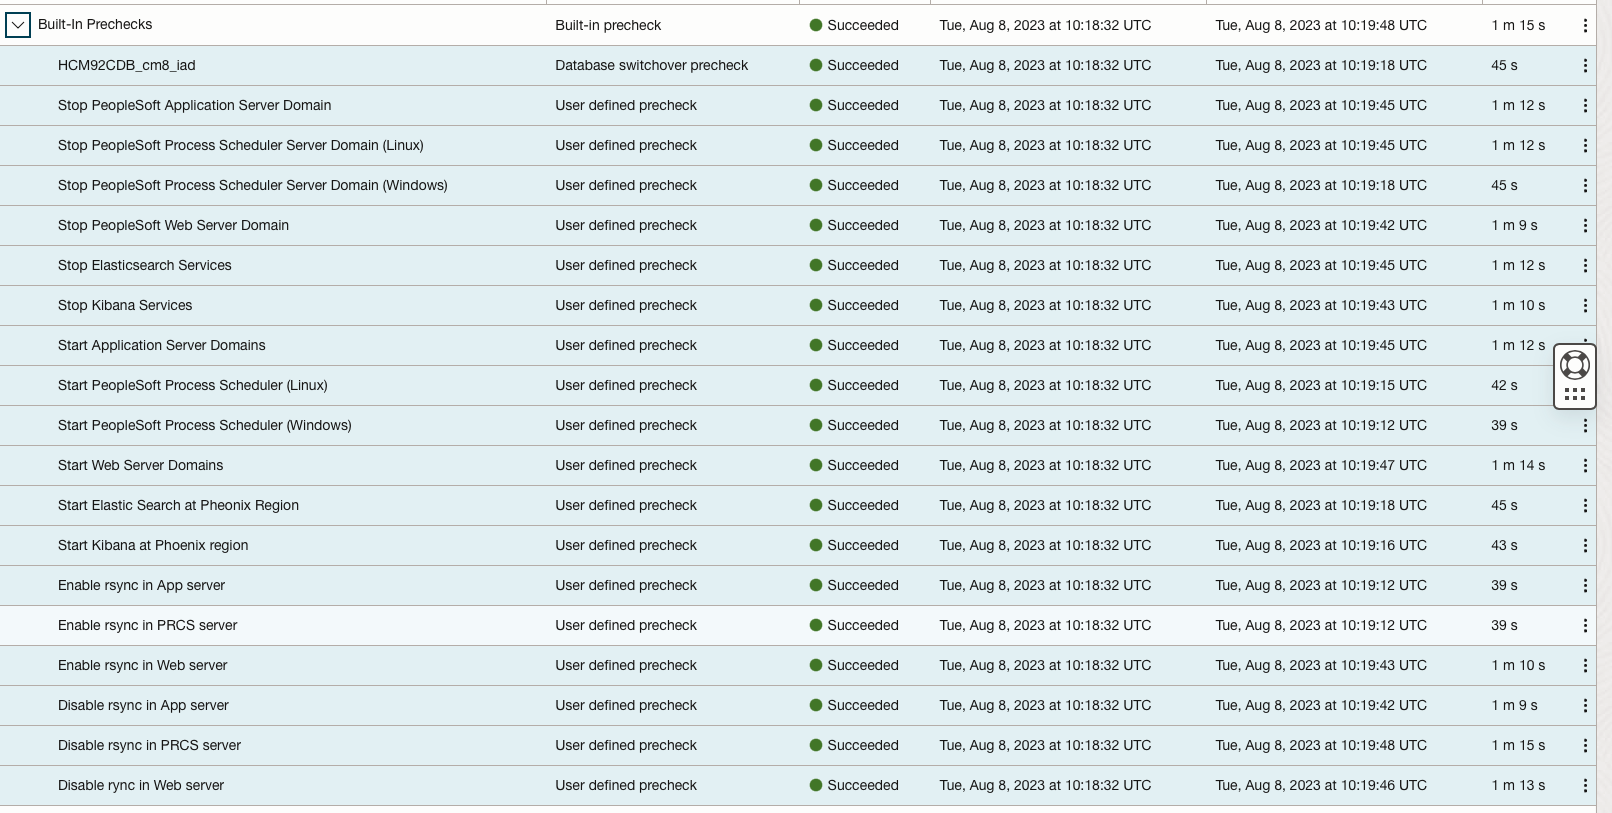
Verify for the successful completion.
-
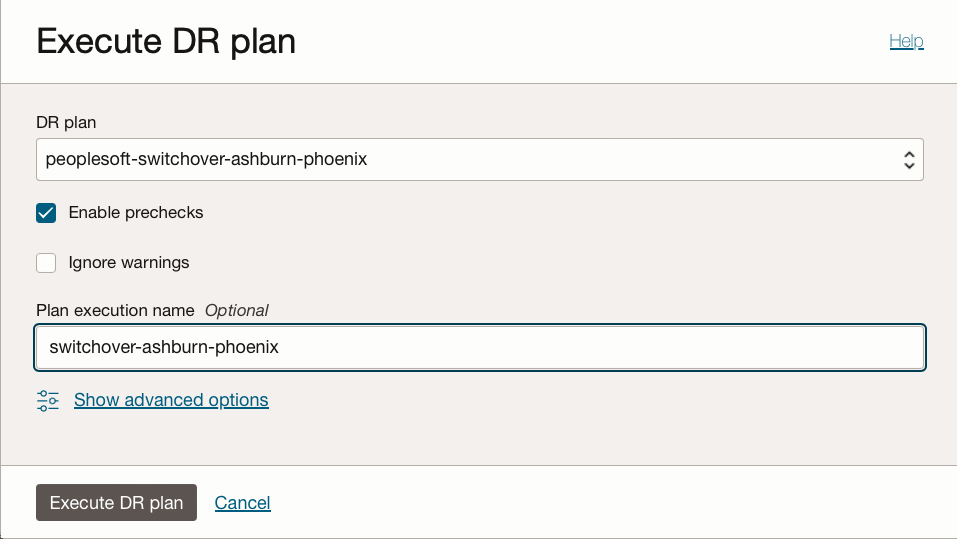
From the switchover plan peoplesoft-switchover-ashburn-phoenix, click Execute Disaster Recovery Plan to execute the plan.
-
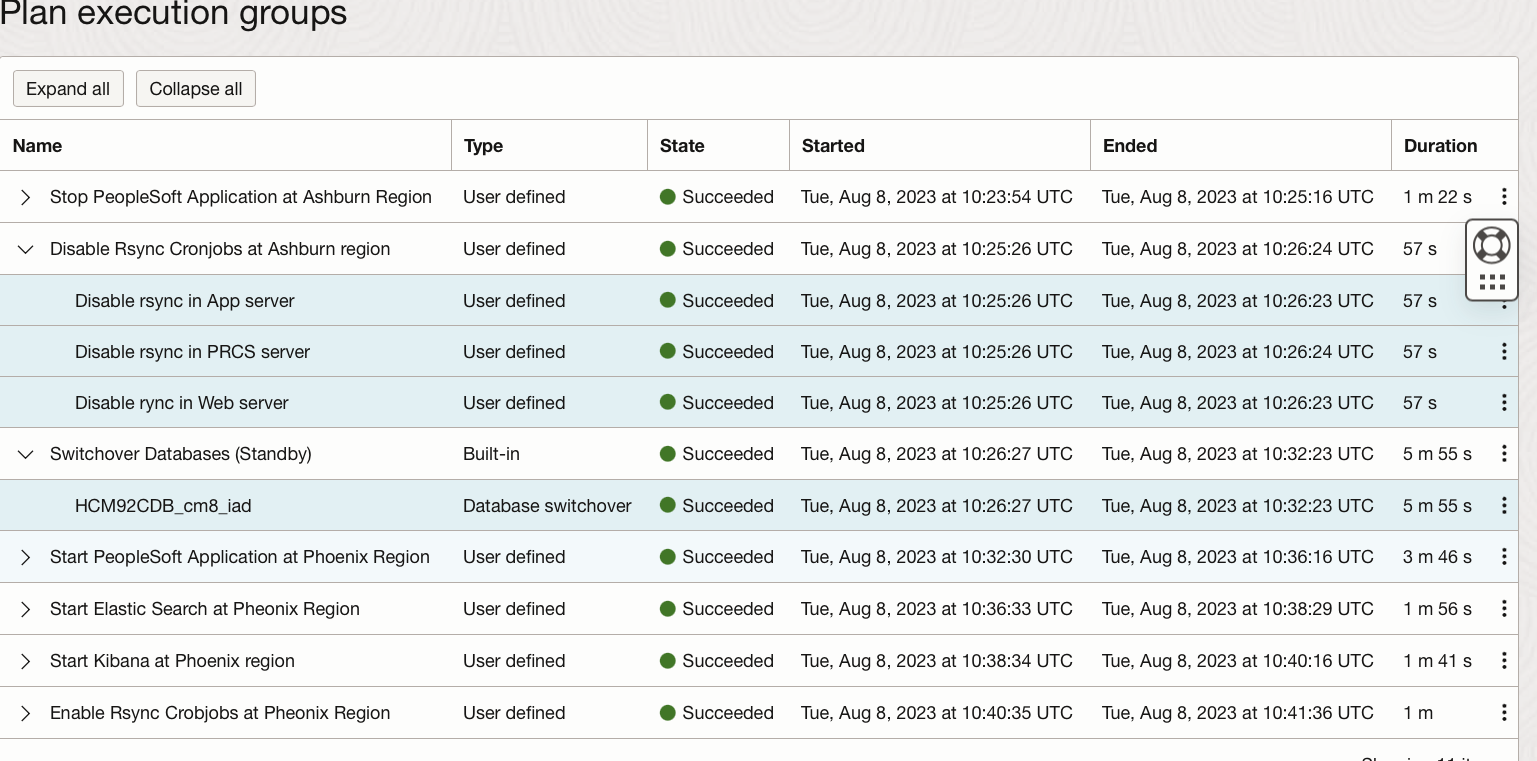
Check the status of the plan and ensure all the steps in the plan succeed.
-
The switchover plan performs all the plan groups in the specific order. After the successful plan execution, PeopleSoft application will be running from Phoenix region.
-
Automatically the role change will happen in the DRPG. Now, Phoenix will have Primary and Ashburn will have Standby role.
-
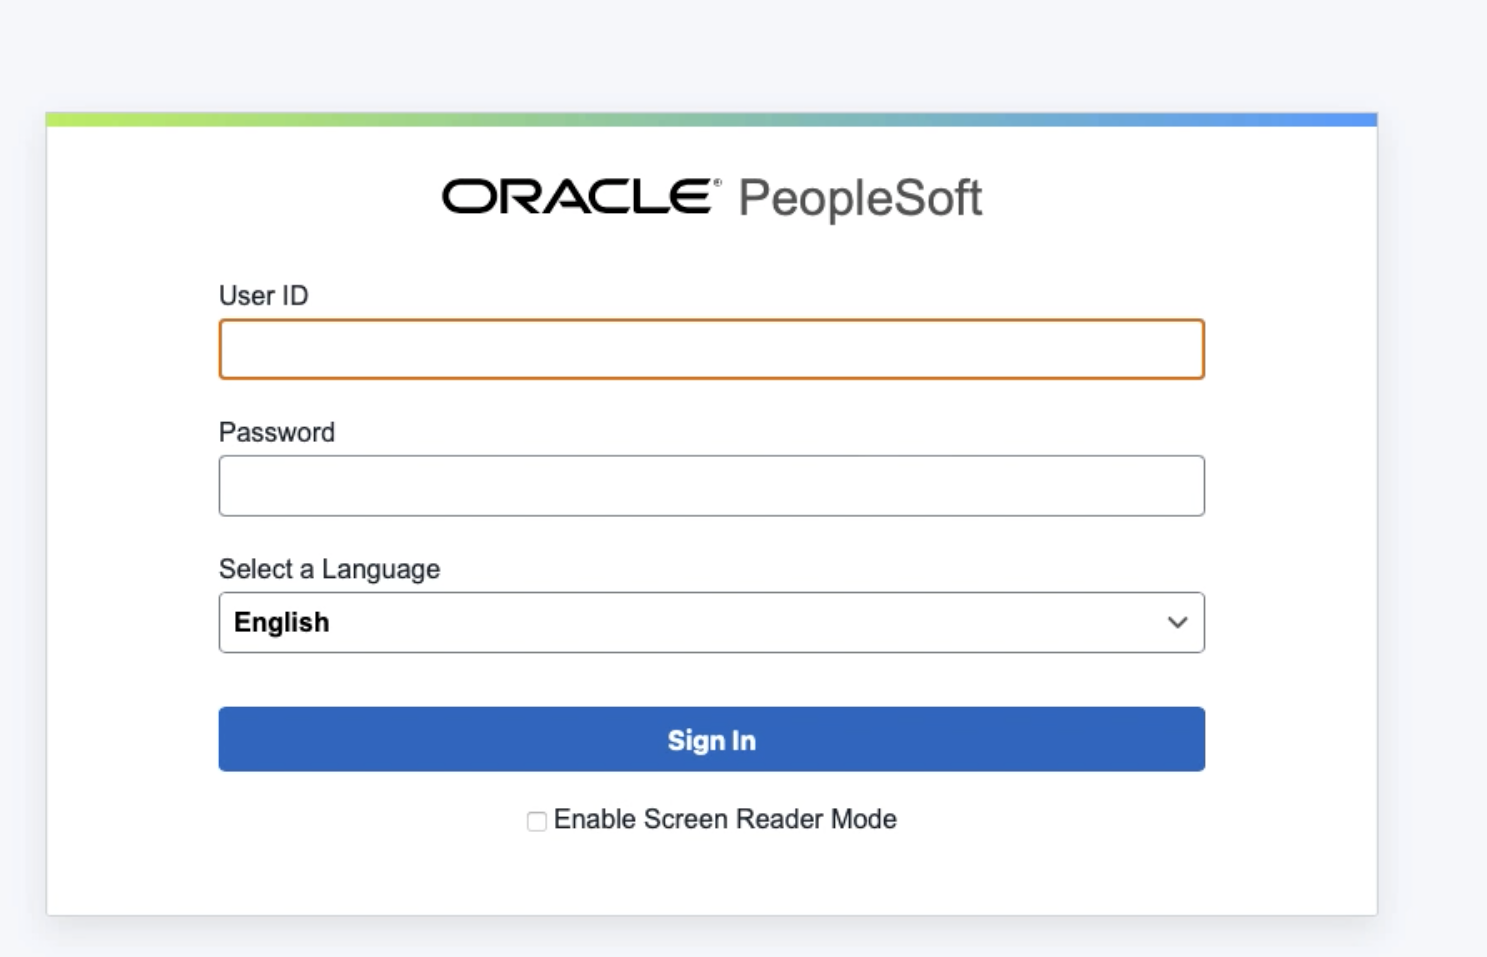
Verify the Oracle PeopleSoft application in Phoenix.
Task 6: Create failover plan in the standby DRPG (Ashburn)
Failover Plan – A type of Disaster Recovery plan that performs an unplanned transition of services to the standby Disaster Recovery protection group.
With Task 5, we have completed the switchover of the application stack from Ashburn to Phoenix. Now let’s do failover of the application stack from Phoenix to Ashburn.
-
Create failover plan in standby DRPG peoplesoft-iad.
-
Select Plans and click Create plan.
-
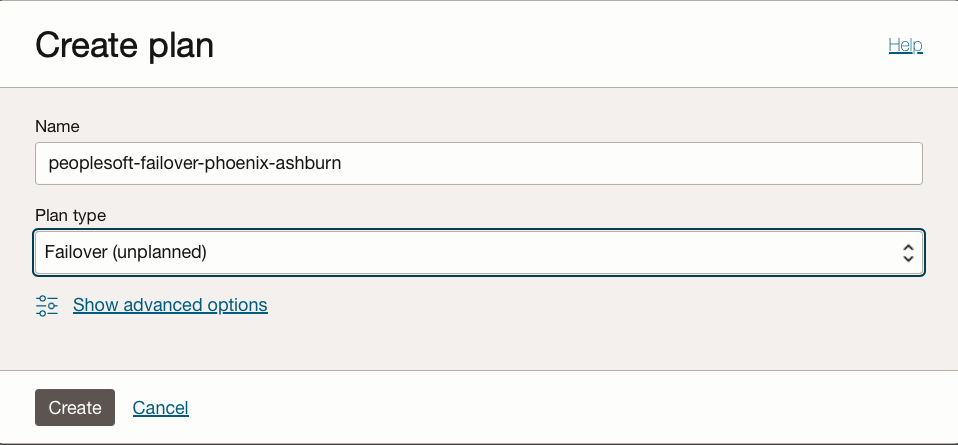
Provide name as peoplesoft-failover-phoenix-ashburn and choose plan type as Failover (unplanned).
-
Click Create.
Note: Make sure to create the failover plan from the Standby DRPG (Ashburn).
Task 7: Customize the failover plan with various user defined plan groups
As we have added Database (Base DB) and Compute (Non-Moving Instance) as members in both the Disaster Recovery protection groups, the failover plan will have Built-in prechecks and Failover Database plangroups. We need to customize the failover plan with additional user defined plan groups.

Typical workflow for Disaster Recovery switchover is as follows
-
Start PeopleSoft Application at Ashburn Regionplan group will have steps to stop Oracle PeopleSoft application, Process scheduler (Linux and Windows),Web Server, Elastic Search and Kibana services in Ashburn region. -
Failover Databasesplan group to failover the database. Ashburn will become primary database. -
Start Elastic Search at Ashburn Regionplan group will have step to start Elastic Search in Ashburn region. -
Start Kibana at Ashburn Regionplan group will have step to start Kibana in Ashburn region.Note: Plan group for Failover of DB (Step 2) will be auto generated in the failover plan and we need to create custom group for 1,3 and 4.For this setup, we don’t have DNS changes, you can create a user defined group for DNS changes based on your requirements.
Create the below mentioned three user defined plan groups
-
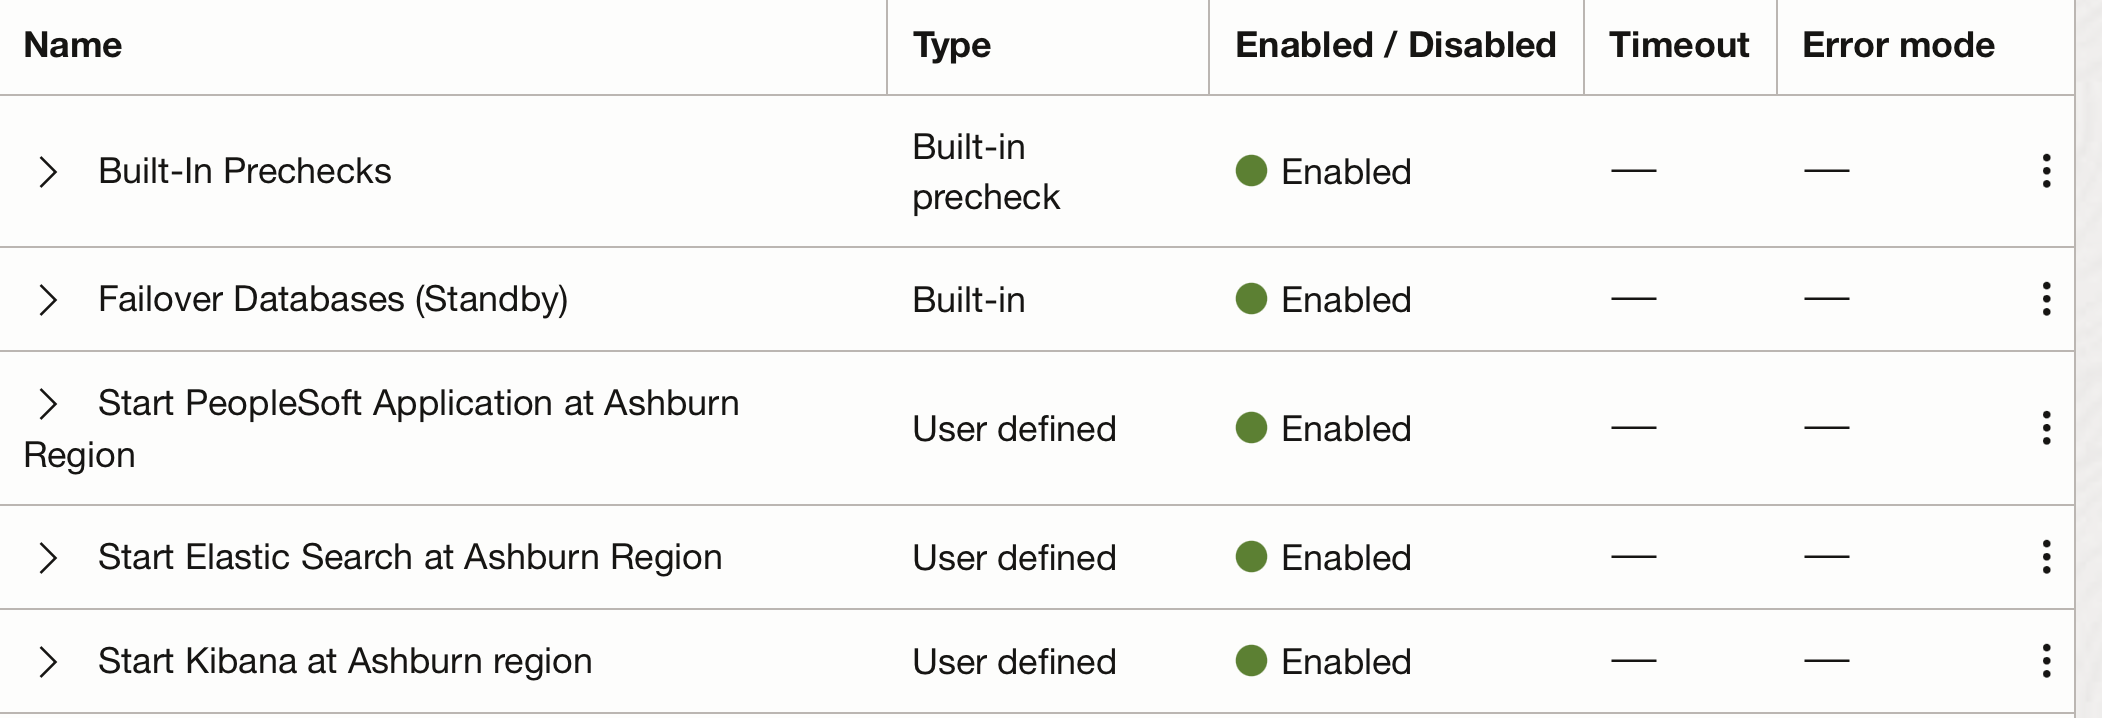
In Task4 :Customize the switchover plan with various user defined plan groups section, we have discussed in detail how to add user defined plan groups. You can refer those steps to create the above mentioned three user defined groups. Make sure to create those user-defined groups, by using the right scripts and servers
-
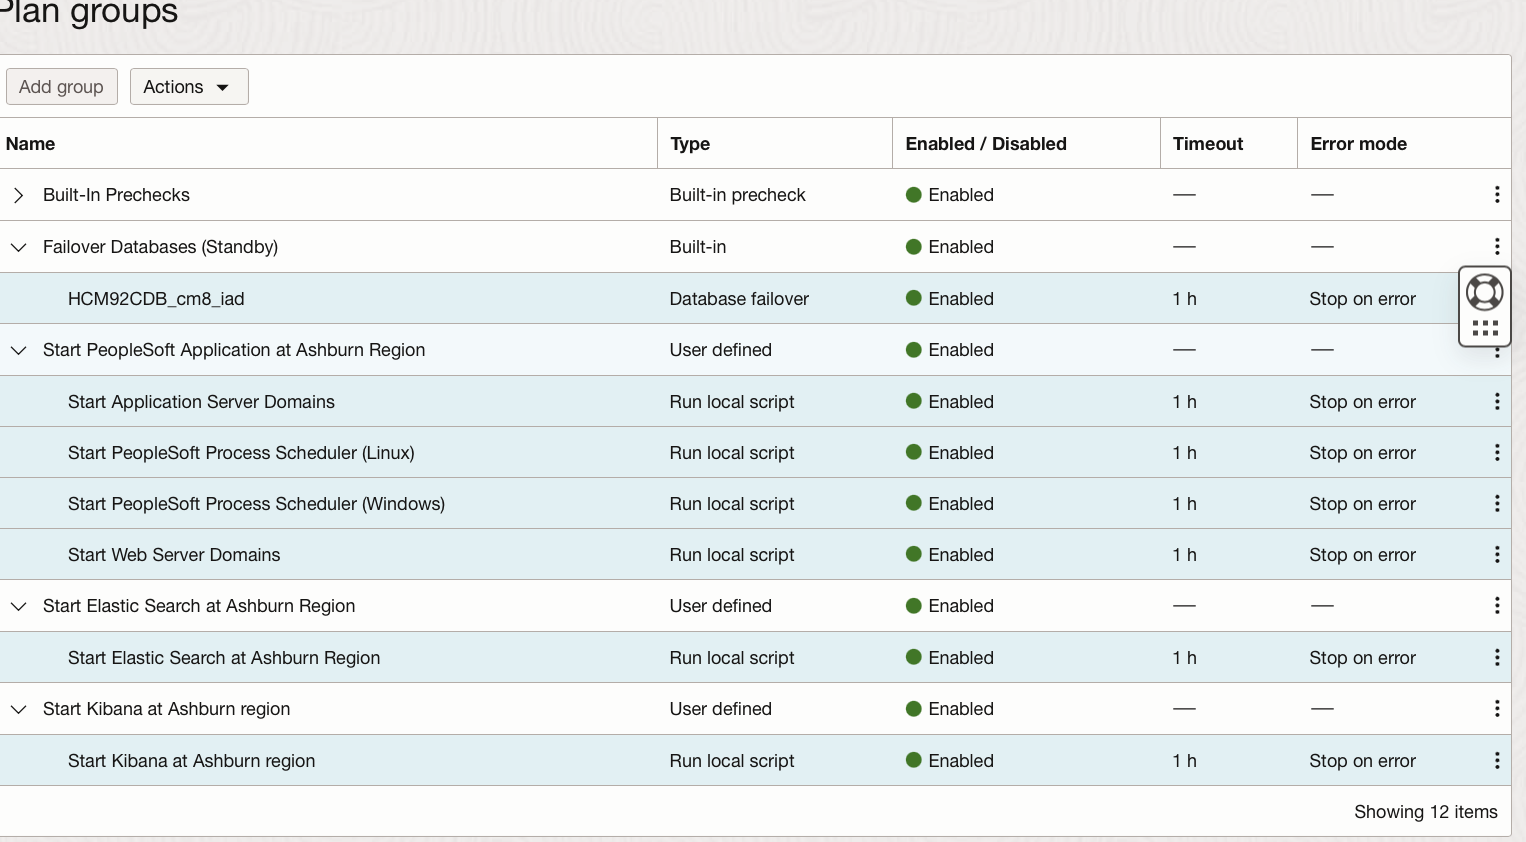
It is assumed you have created the three user-defined groups with the respective servers, scripts, username and specific order.
-
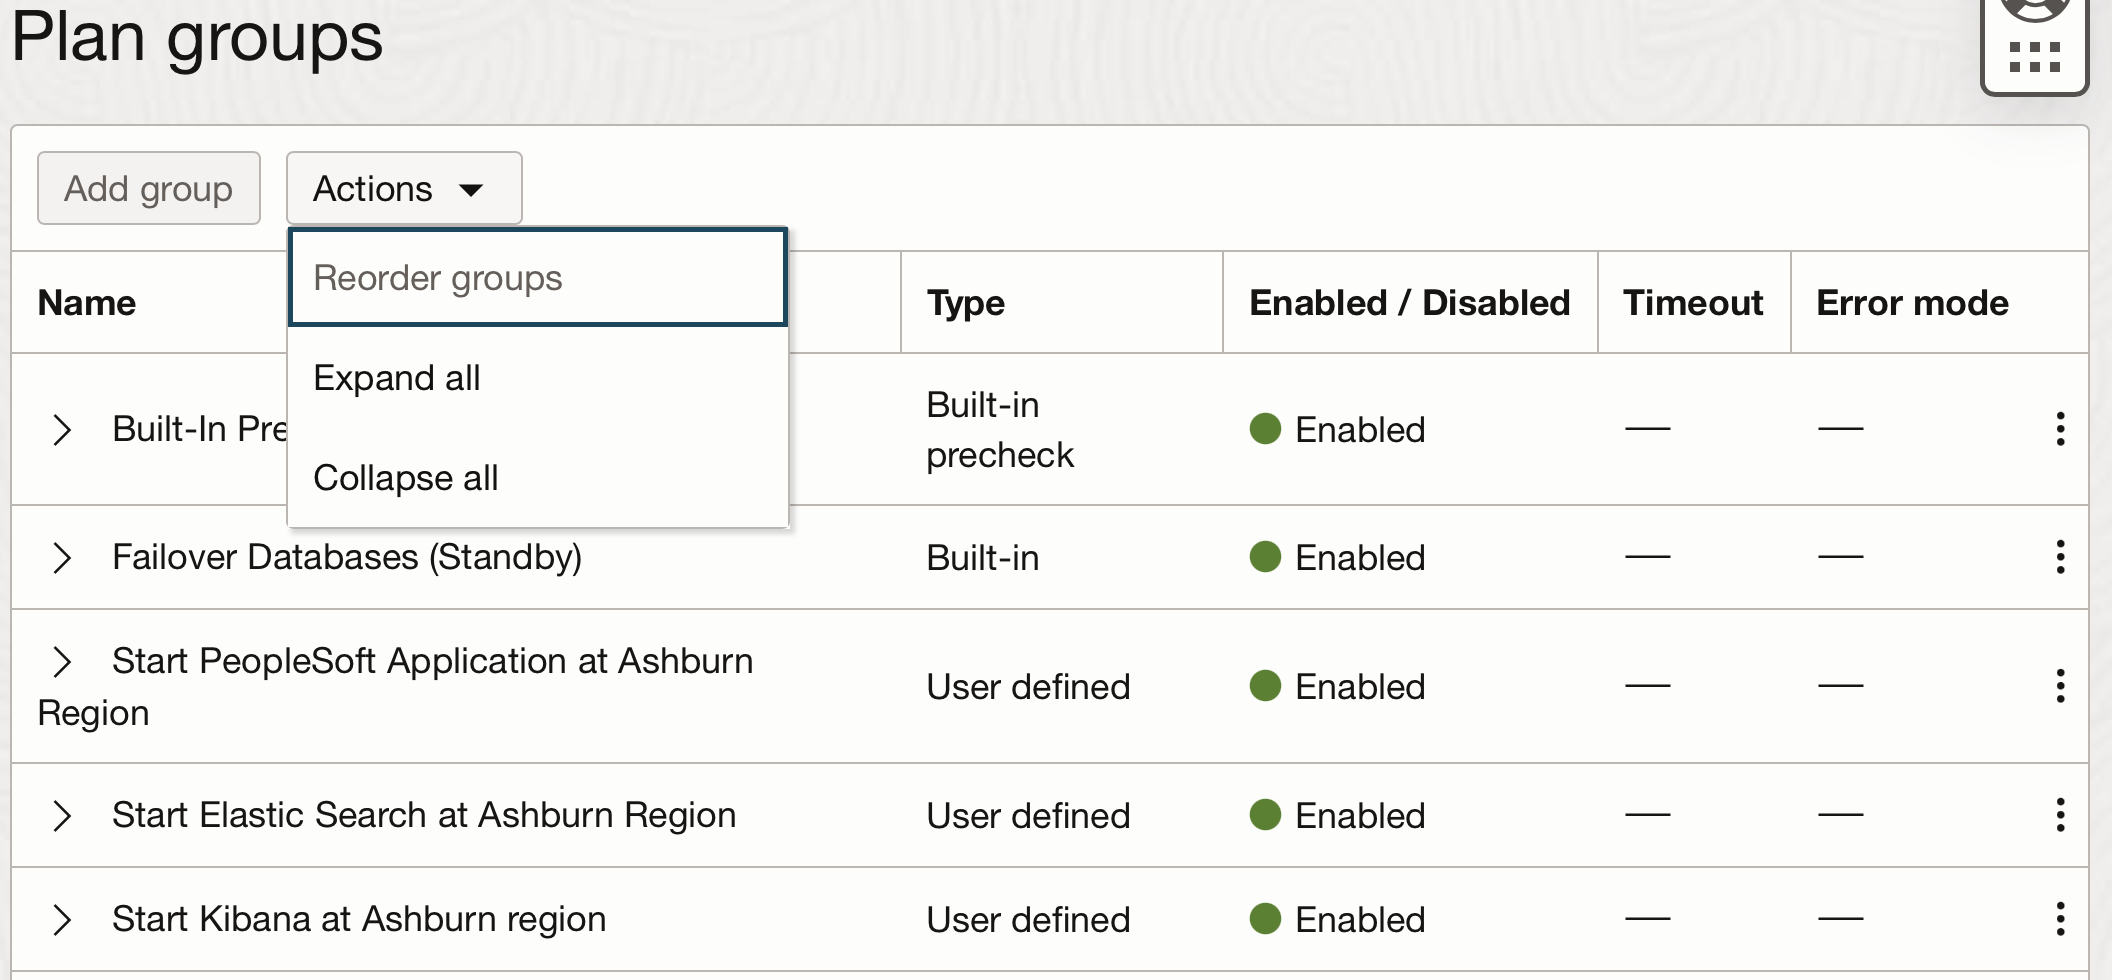
Since we created the user-defined group in a specific order, reordering of plan groups might not be required. If required use the Reorder Groups option in the plan to order switchover plan groups in the right sequence.
Task 8: Execute prechecks and run the failover plan
The Run Prechecks option performs a quick validation of all steps in a Disaster Recovery plan and the members associated with the steps.
-
From the failover plan peoplesoft-failover-phoenix-ashburn, click Run Prechecks to launch the Run Prechecks dialog.
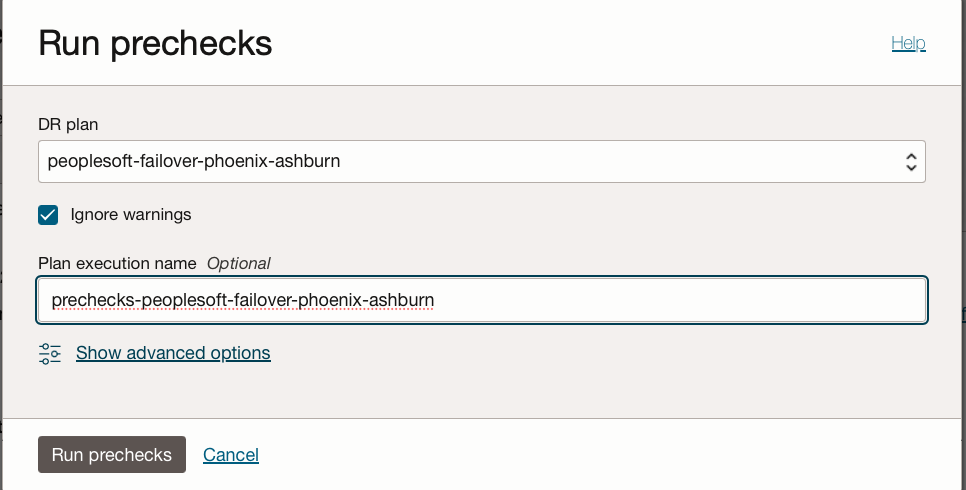
Verify for the successful completion.
-
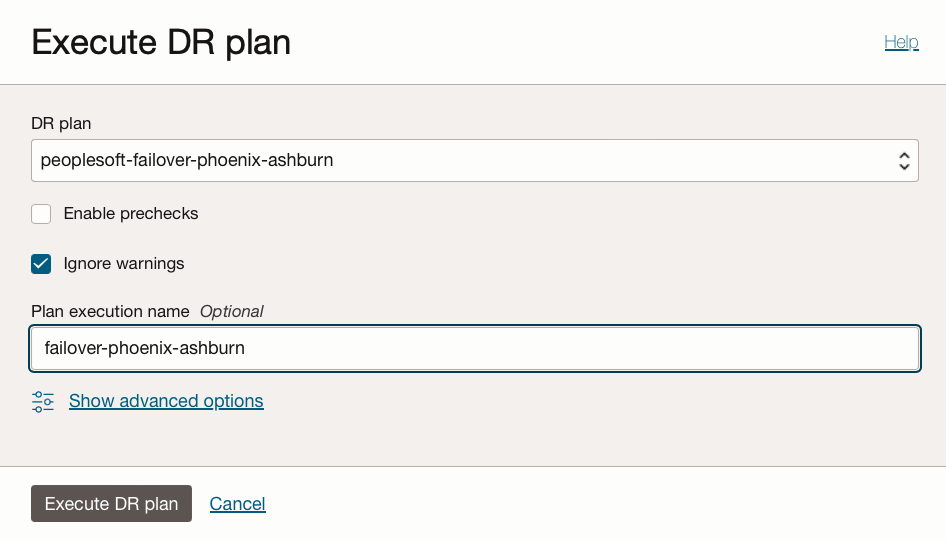
From the failover plan peoplesoft-failover-phoenix-ashburn, click Execute Disaster Recovery Plan to execute the plan.
-
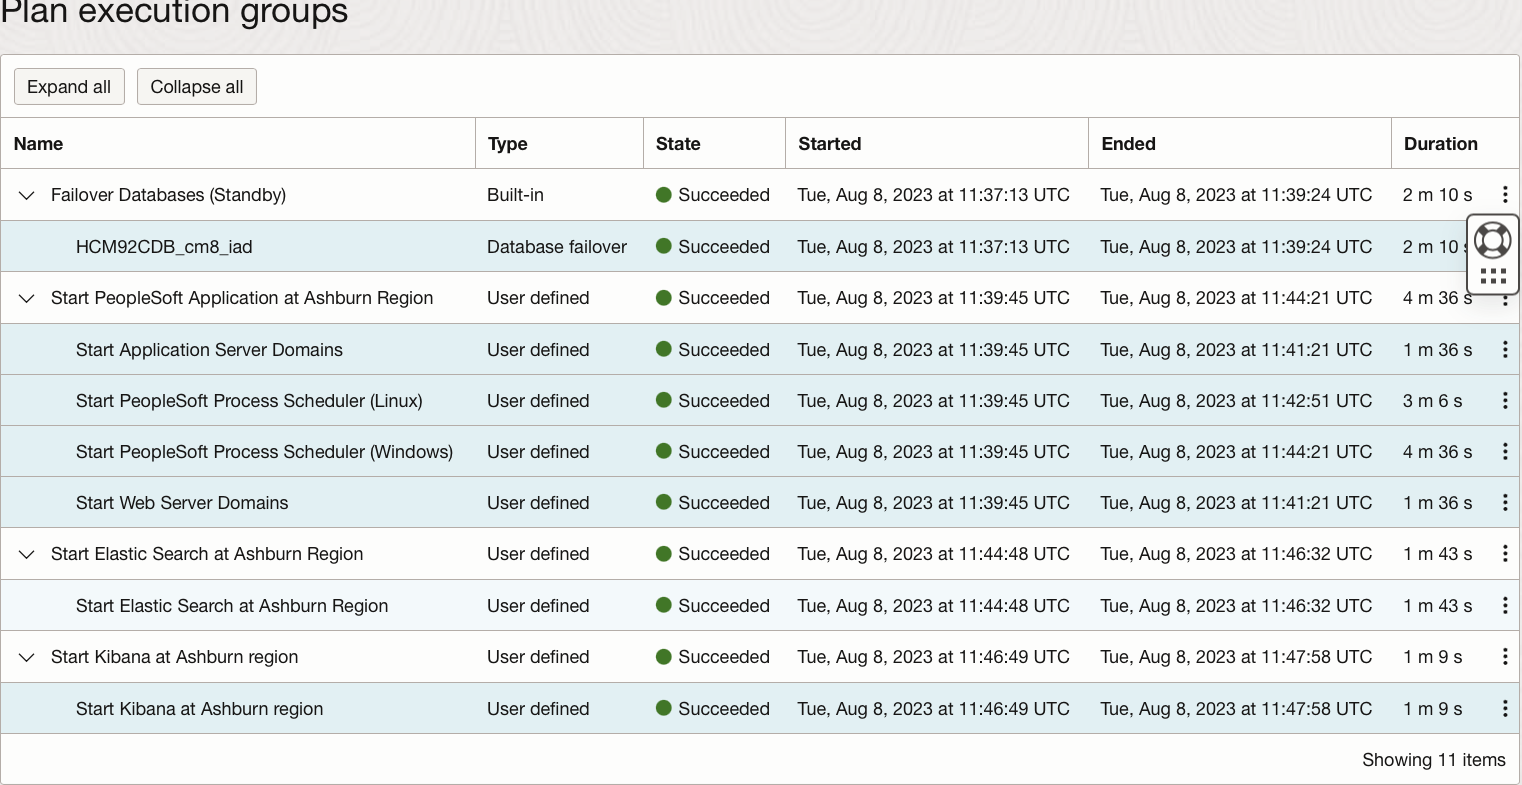
Check the status of the plan and ensure all the steps in the plan succeed.
-
The failover plan performs all the plan groups in the specific order. After the successful plan execution, PeopleSoft application will be running from Ashburn region.
-
Automatically the role change will happen in the DRPG. Now, Ashburn will have Primary and Phoenix will have Standby role.
-
Verify the Oracle PeopleSoft application in Ashburn.

Next Steps
You have seen how to automatically perform the Oracle PeopleSoft Application switchover and failover Disaster Recovery operations using OCI Full Stack Disaster Recovery. If you have a custom installation of Oracle PeopleSoft, use your own custom defined scripts and modify the plan according to your requirements. For more details, see the Full Stack Disaster Recovery documentation link in the Related Links section.
Related Links
- OCI Full Stack Disaster Recovery Product Page
- OCI Full Stack Disaster Recovery Documentation
- Full Stack Disaster Recovery - Oracle PeopleSoft User defined group scripts
- Running Commands on an Instance
- Join #full-stack-dr public slack channel
Acknowledgments
Author - Suraj Ramesh (Full Stack Disaster Recovery Product Manager)
Contributor - Vinay Shivanna (Cloud Architect- PeopleSoft)
More Learning Resources
Explore other labs on docs.oracle.com/learn or access more free learning content on the Oracle Learning YouTube channel. Additionally, visit education.oracle.com/learning-explorer to become an Oracle Learning Explorer.
For product documentation, visit Oracle Help Center.
Automate Recovery Operations for Single Instance Oracle PeopleSoft application with OCI Full Stack Disaster Recovery
F86810-01
September 2023
Copyright © 2023, Oracle and/or its affiliates.