Automating Disaster Recovery for MySQL HeatWave with Replication Channels Using OCI Full Stack Disaster Recovery
Introduction
Oracle Cloud Infrastructure Full Stack Disaster Recovery (OCI Full Stack DR) orchestrates the transition of compute, database, and applications between OCI regions from around the globe with a single click. Customers can automate the steps needed to recover one or more business systems without redesigning or re-architecting existing infrastructure, databases, or applications and without needing specialized management or conversion servers.
MySQL HeatWave is a fully managed database service deployed within Oracle Cloud Infrastructure (OCI) that supports operators and developers looking to rapidly deploy secure, cloud-native applications. MySQL HeatWave is the only MySQL offering that includes the ability to use HeatWave, an integrated, high performance, in-memory query accelerator. HeatWave enables customers to run sophisticated analytics directly against their operational MySQL database, removing the requirement for complex, time-consuming, and expensive data migration and integration with a separate analytics database. HeatWave accelerates MySQL performance tremendously for analytics and mixed workloads. HeatWave is fully optimized for OCI and MySQL HeatWave is 100% built, managed, and supported by the OCI and MySQL engineering teams.
In this tutorial, you will learn how to automate disaster recovery plans for MySQL HeatWave in OCI with channel replication. It outlines the procedures for using OCI Full Stack DR which now natively supports MySQL HeatWave to manage switchover and failover operations.
Architecture Description
The architecture presented in this tutorial showcases MySQL HeatWave where Inbound Replication is used to enable asynchronous data replication between the primary database system and a remote replica, ensuring efficient data synchronization across regions.
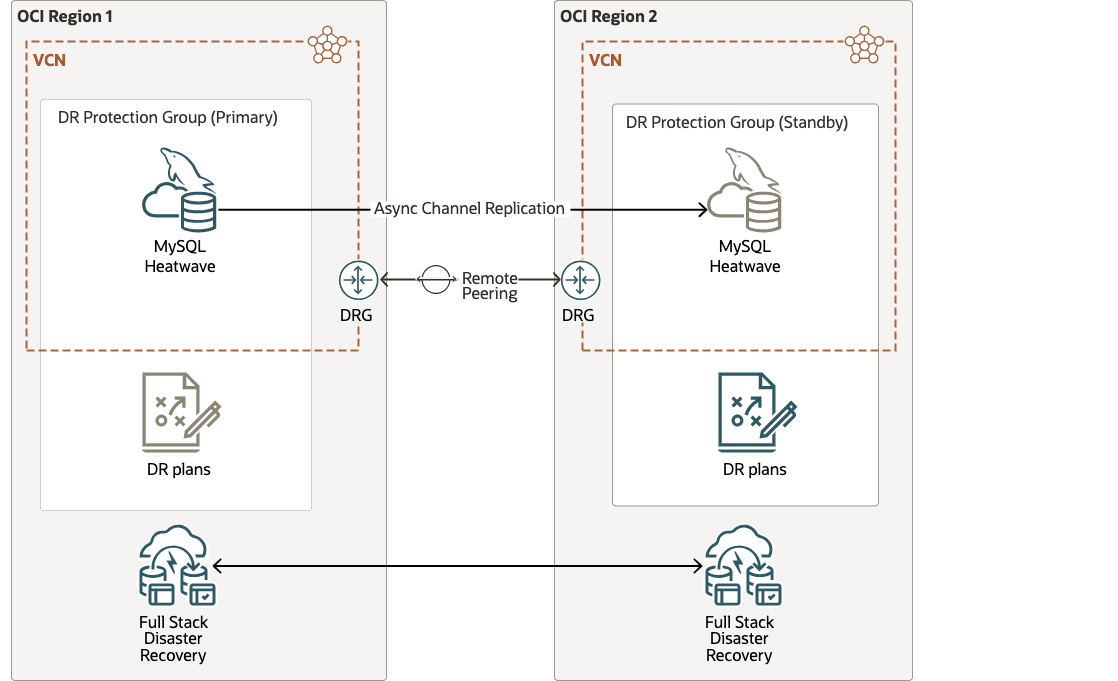
Description of the illustration full-stack-disaster-recovery-heatwave.png
Note: The MySQL HeatWave replica in the disaster recovery region must have Read-Only mode enabled to ensure data integrity and prevent unintended modifications.
Prerequisites (User Preparation)
Before initiating the replication setup, ensure that the following prerequisites are met. These include both replication-specific requirements and additional infrastructure and configuration prerequisites necessary to support a robust Full Stack Disaster Recovery (FSDR) architecture for MySQL HeatWave on Oracle Cloud Infrastructure (OCI).
- Network Connectivity
Establish secure communication between the source and target regions using:- Dynamic Routing Gateways (DRGs)
- Remote peering connections
- Network Configuration
Configure the following to allow inter-region MySQL traffic:- Security lists** or **Network security groups (NSGs)
- Routing tables
- Full Stack Disaster Recovery
Configure the required OCI IAM policies for OCI Full Stack DR as outlined in the following documents.
- Policies for OCI Full Stack DR
- Configuring Identity and Access Management (IAM) policies to use Full Stack DR
OCI Full Stack DR must have the ability to control and manage other key OCI services such as compute, networking, storage and other miscellaneous services. To configure the required OCI IAM policies for other services, see Policies for Other Services Managed by Full Stack Disaster Recovery and OCI IAM policies.
Note: for MySQL HeatWave
As a prerequisite for configuring MySQL HeatWave with FSDR, OCI Vault secrets must be created in both regions. These secrets should securely store the admin user password as well as the replication user password.
MySQL HeatWave System Setup - High-Level Summary
Below is a high-level summary of the steps required to set up cross-region replication for MySQL HeatWave on Oracle Cloud Infrastructure (OCI), ensuring secure, reliable, and scalable data synchronization across regions.
- Deploy a primary MySQL HeatWave in the source region.
- Create a replication user on the source MySQL server with appropriate privileges.
- Manually create a backup of the primary database.
- Copy the backup to the target region using OCI’s Copy Backup feature.
- Restore the backup in the target region to create a new standby DB system.
- Change the standby DB system’s mode to “Read Only”.
- On the target region, set up the replication channel using:
- Source DB hostname, port
- Replication user credentials
- Regularly monitor the replication status on the target MySQL DB.
- Perform data consistency checks to validate that replication is accurate and data integrity is maintained.
By following these steps, you can implement a robust cross-region replication setup for MySQL on OCI, enhancing your application’s resilience and availability across geographical regions.
Note: The following tutorial: Set up Cross-Region MySQL HeatWave Disaster Recovery Copy in OCI, provides a comprehensive guide for deploying disaster recovery for the MySQL database system, ensuring resilience and continuity in the event of system failures.
Definitions and Assumptions throughout the Tutorial
-
Regions:
-
Region 1 is Ashburn: Ashburn will initially serve as the primary region. However, this role will transition to standby during the switchover process, which will be performed in the later tasks as part of the disaster recovery plan.
-
Region 2 is Phoenix: Phoenix will initially function as the standby region. This role will later transition to primary following the switchover process, which will be carried out in the subsequent tasks as part of the disaster recovery procedure.
-
-
Compartments: You are free to organize this deployment and OCI Full Stack DR into any compartment scheme that works within your standards for IT governance. We have chosen to organize all the OCI resources for this tutorial in one single compartment.
Objectives
The following tasks will be covered in this tutorial:
- Task 1: Create DR Protection Groups (DRPG) in both Regions
- Task 2: Add MySQL HeatWave to the DR Protection Groups in both Regions
- Task 3: Create DR Plans in Region 2
- Task 4: Run the Prechecks of the DR plans in Region 2
- Task 5: Run the switchover plan in Region 2
- Task 6: Create DR Plans in Region 1
Task 1: Create DR Protection Groups (DRPG) in both Regions
Create DR protection groups in Region 1 and Region 2 if the protection groups for this application stack do not exist yet.
Task 1.1: Create a Protection Group in Region 1
-
Go to the OCI Console and navigate to DR Protection Groups as shown in Figure 1.1.
- Ensure that the OCI region context is set to Region 1 (Ashburn).
- Click Migration & Disaster Recovery.
- Click DR Protection Groups.
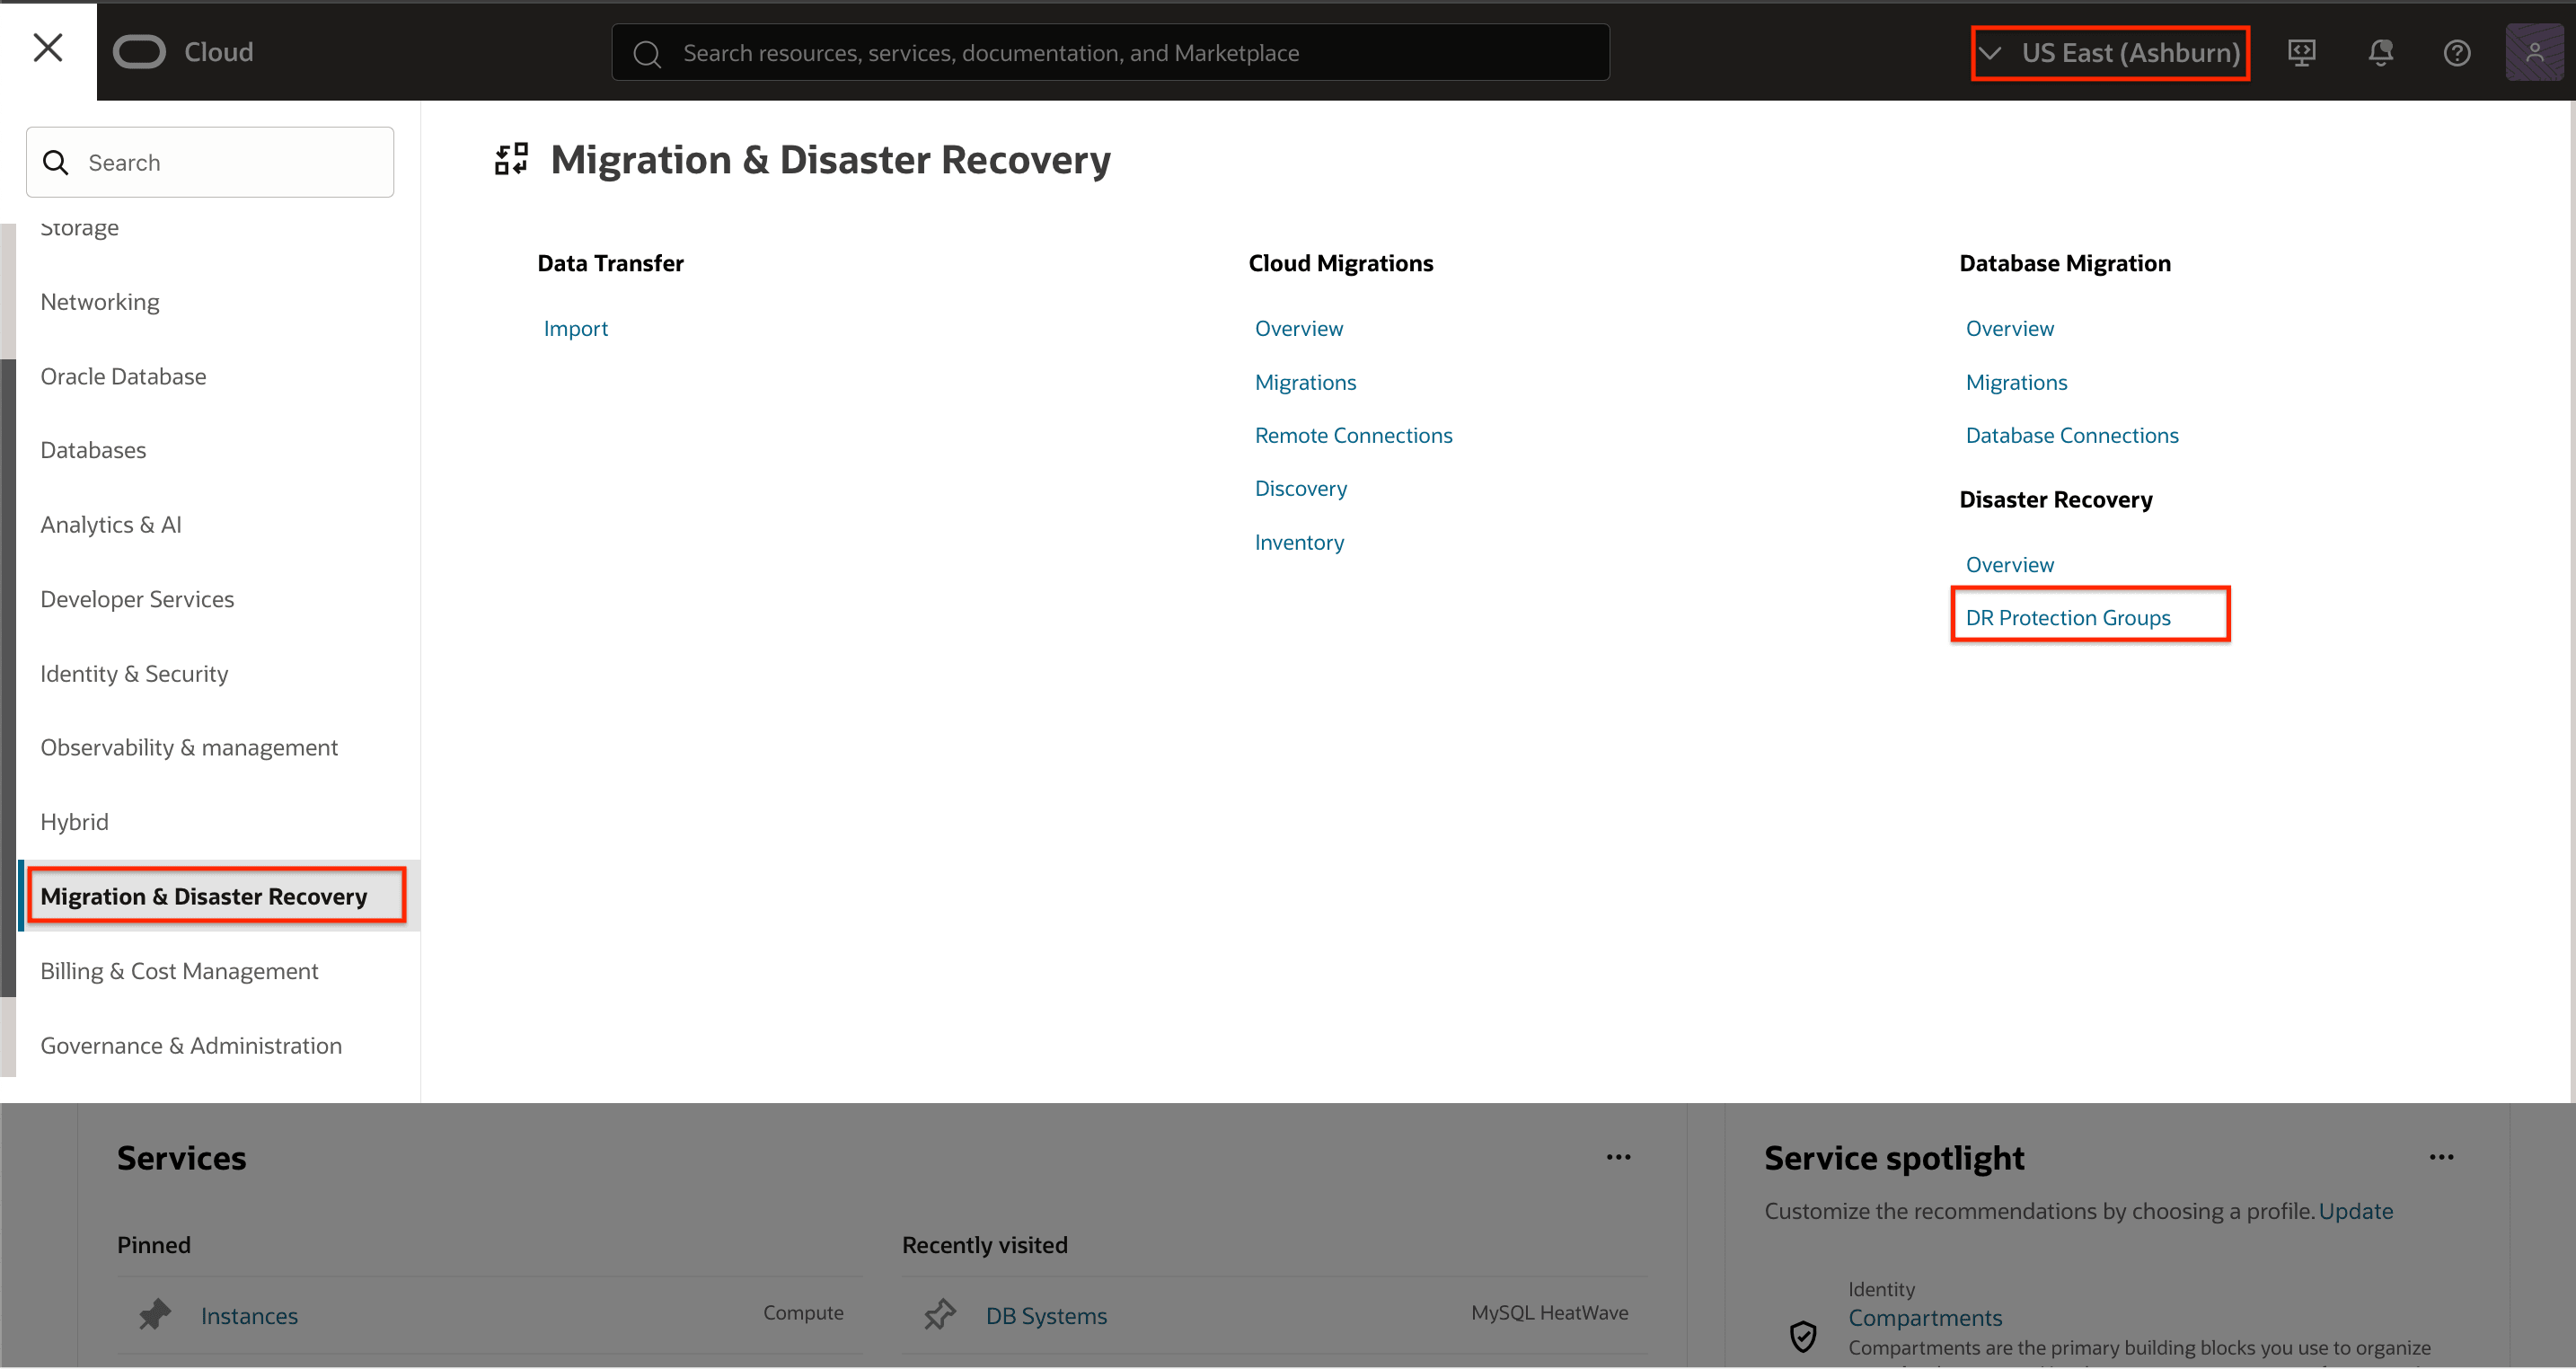
Figure 1.1: Navigate to DR protection groups -
Click Create DR protection group to open the dialog.
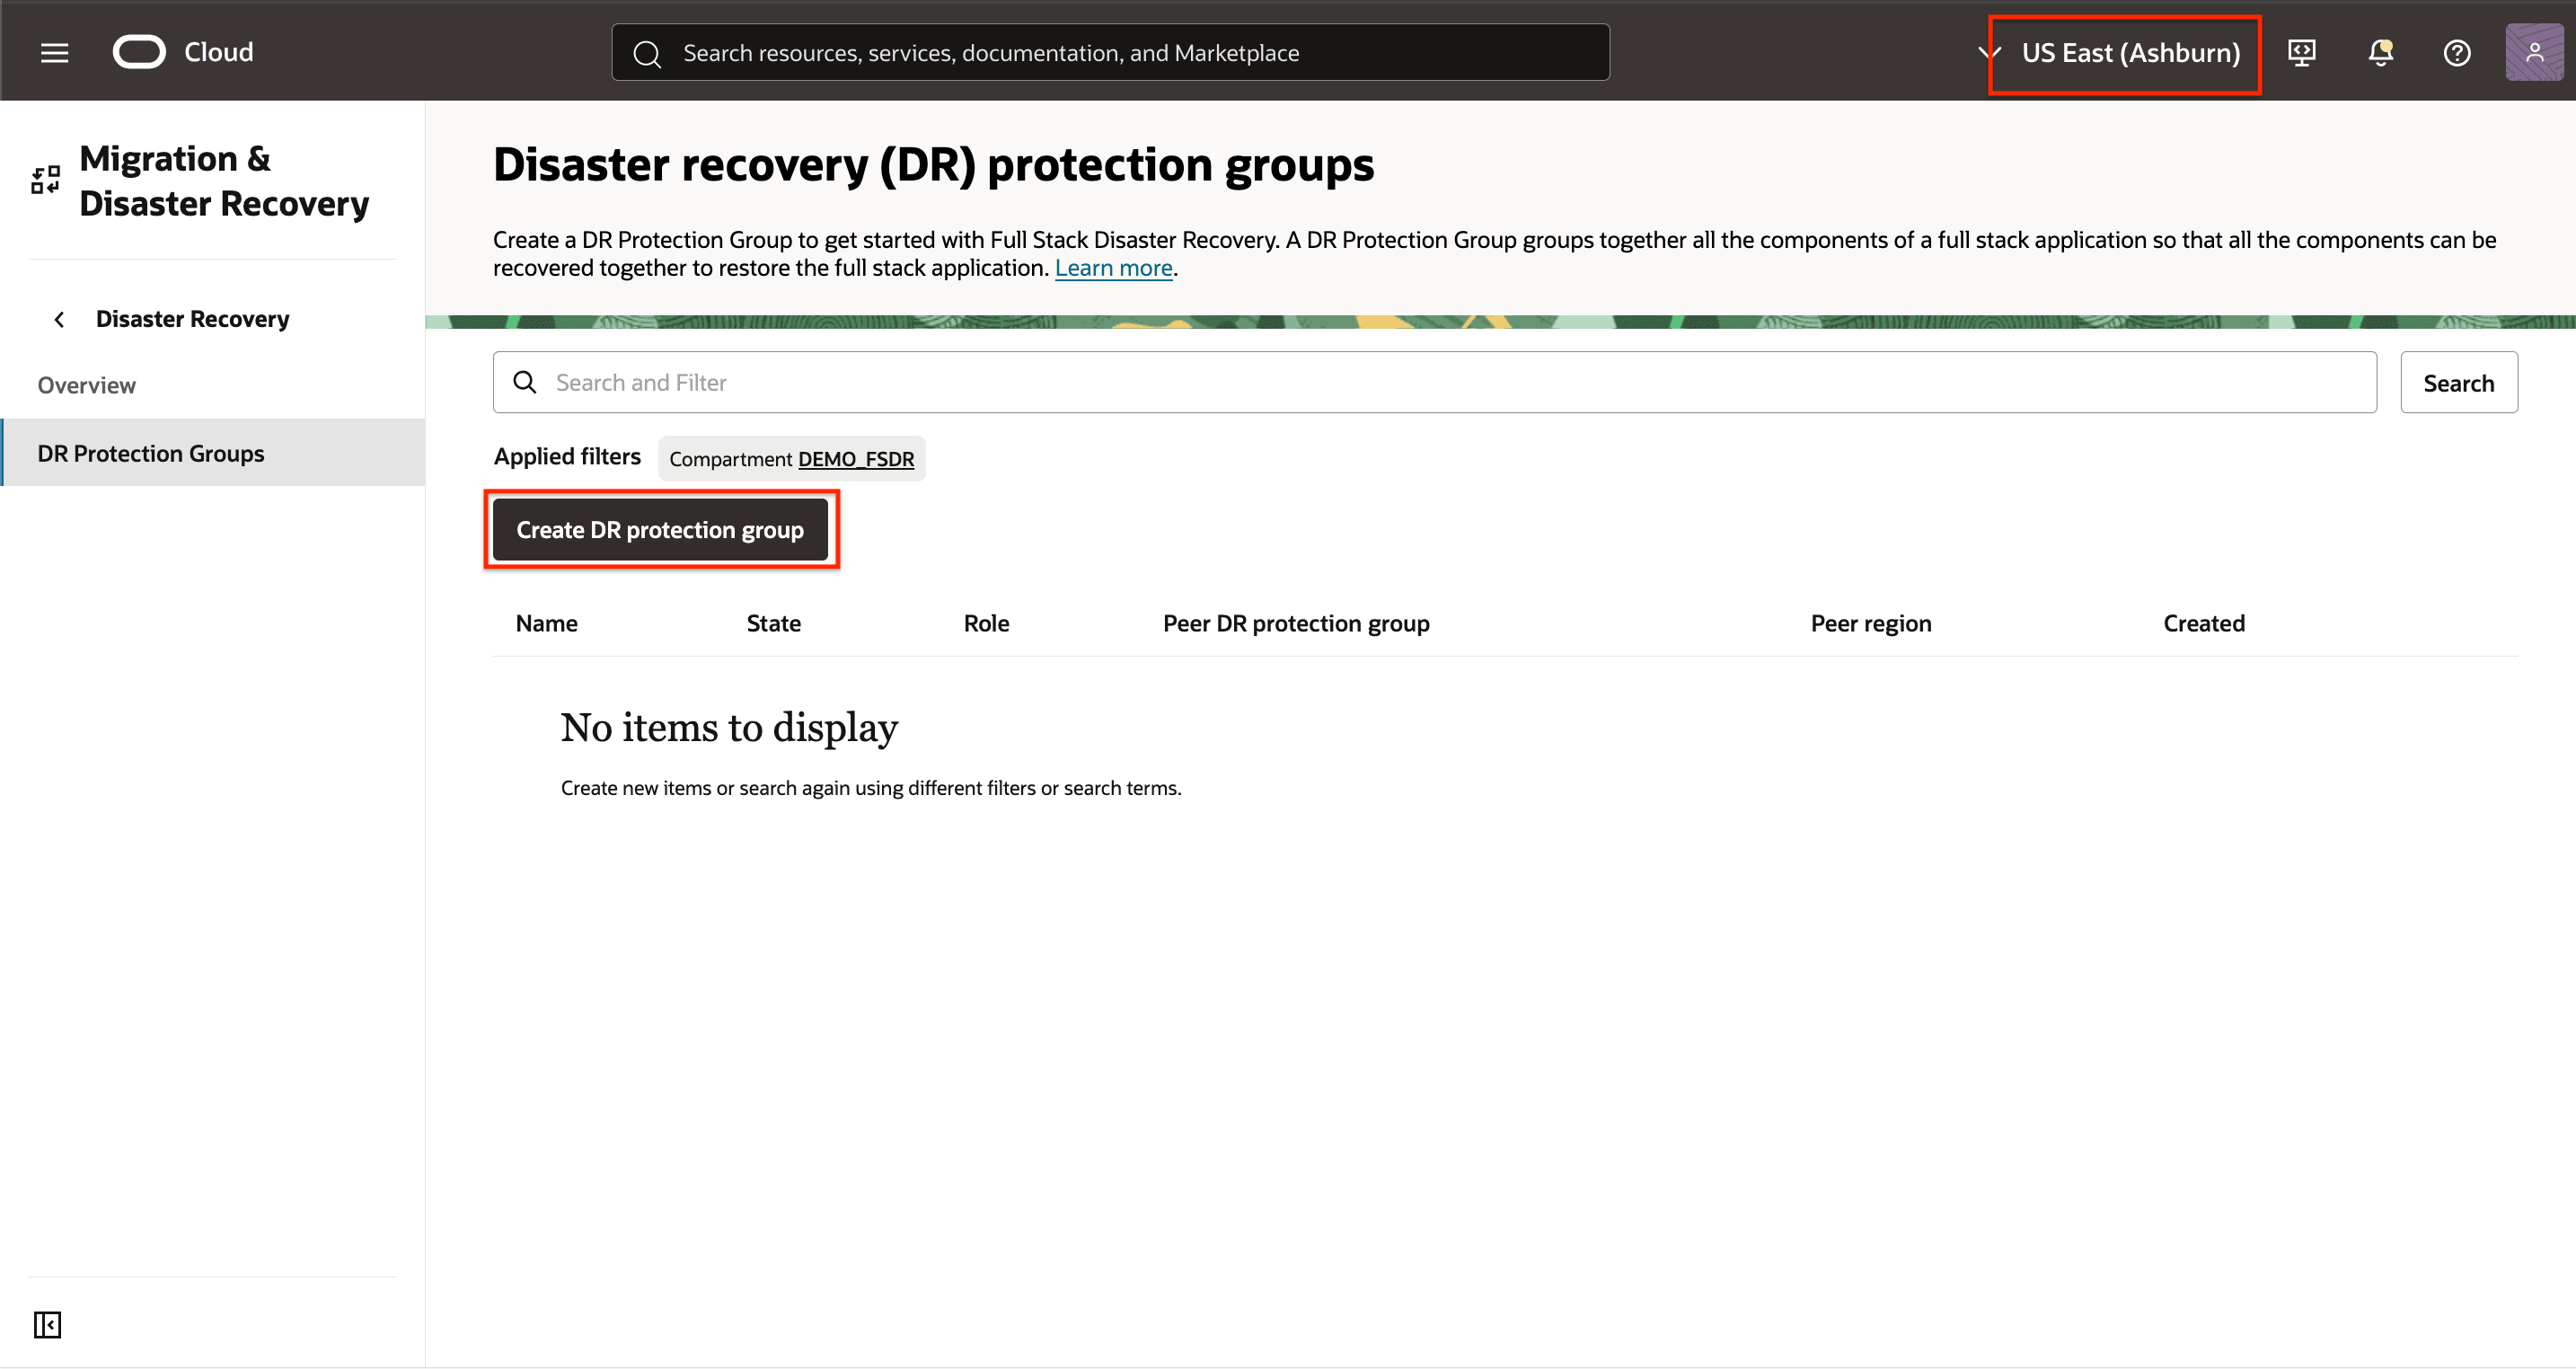
Figure 1.2: Click Create DR protection -
Create a basic DR protection group (DRPG) in Region 1 as shown in Figure 1.3. The peer, role and members will be assigned in later steps.
- Use a meaningful name for the DRPG.
- Select the compartment where you want the DRPG to be created.
- Select OCI Object Storage bucket for OCI Full Stack DR logs.
- Click Create.
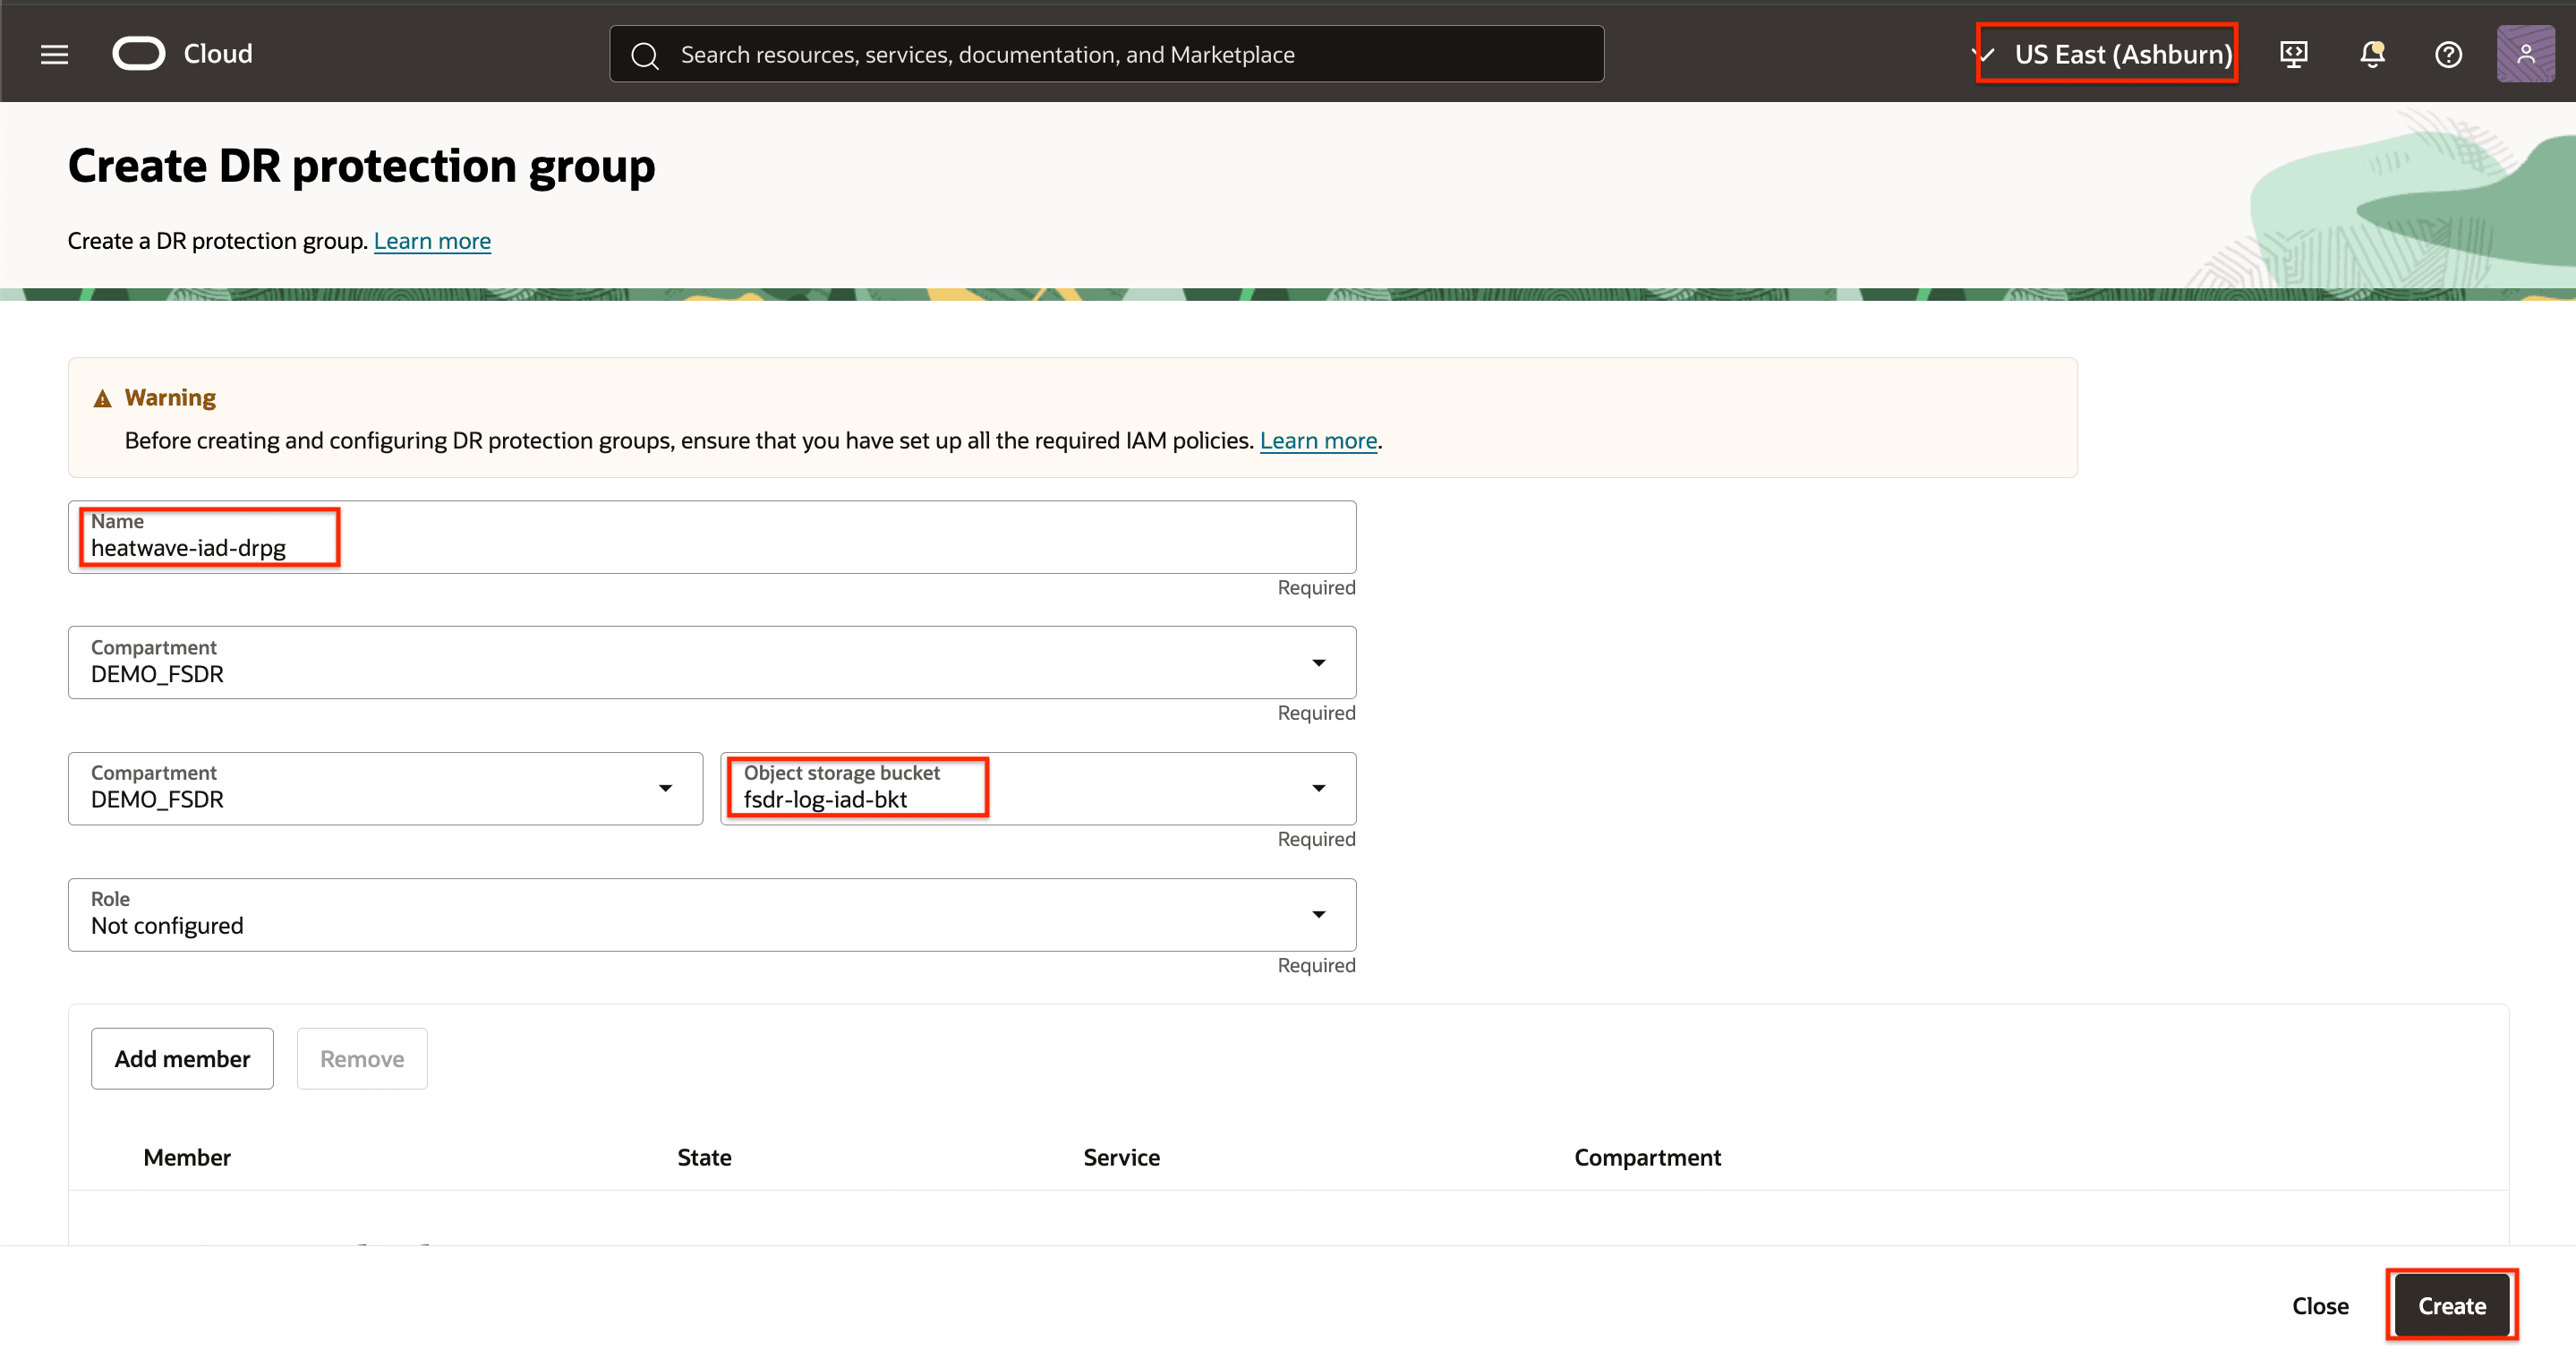
Figure 1.3: Parameters needed to create DR protection group in region 1
Task 1.2: Create a Protection Group in Region 2
-
Go to the OCI Console, navigate to DR Protection Groups as shown in Figure 1.4.
- Ensure that the OCI region context is set to Region 2 (Phoenix).
- Click Migration & Disaster Recovery.
- Click DR Protection Groups.
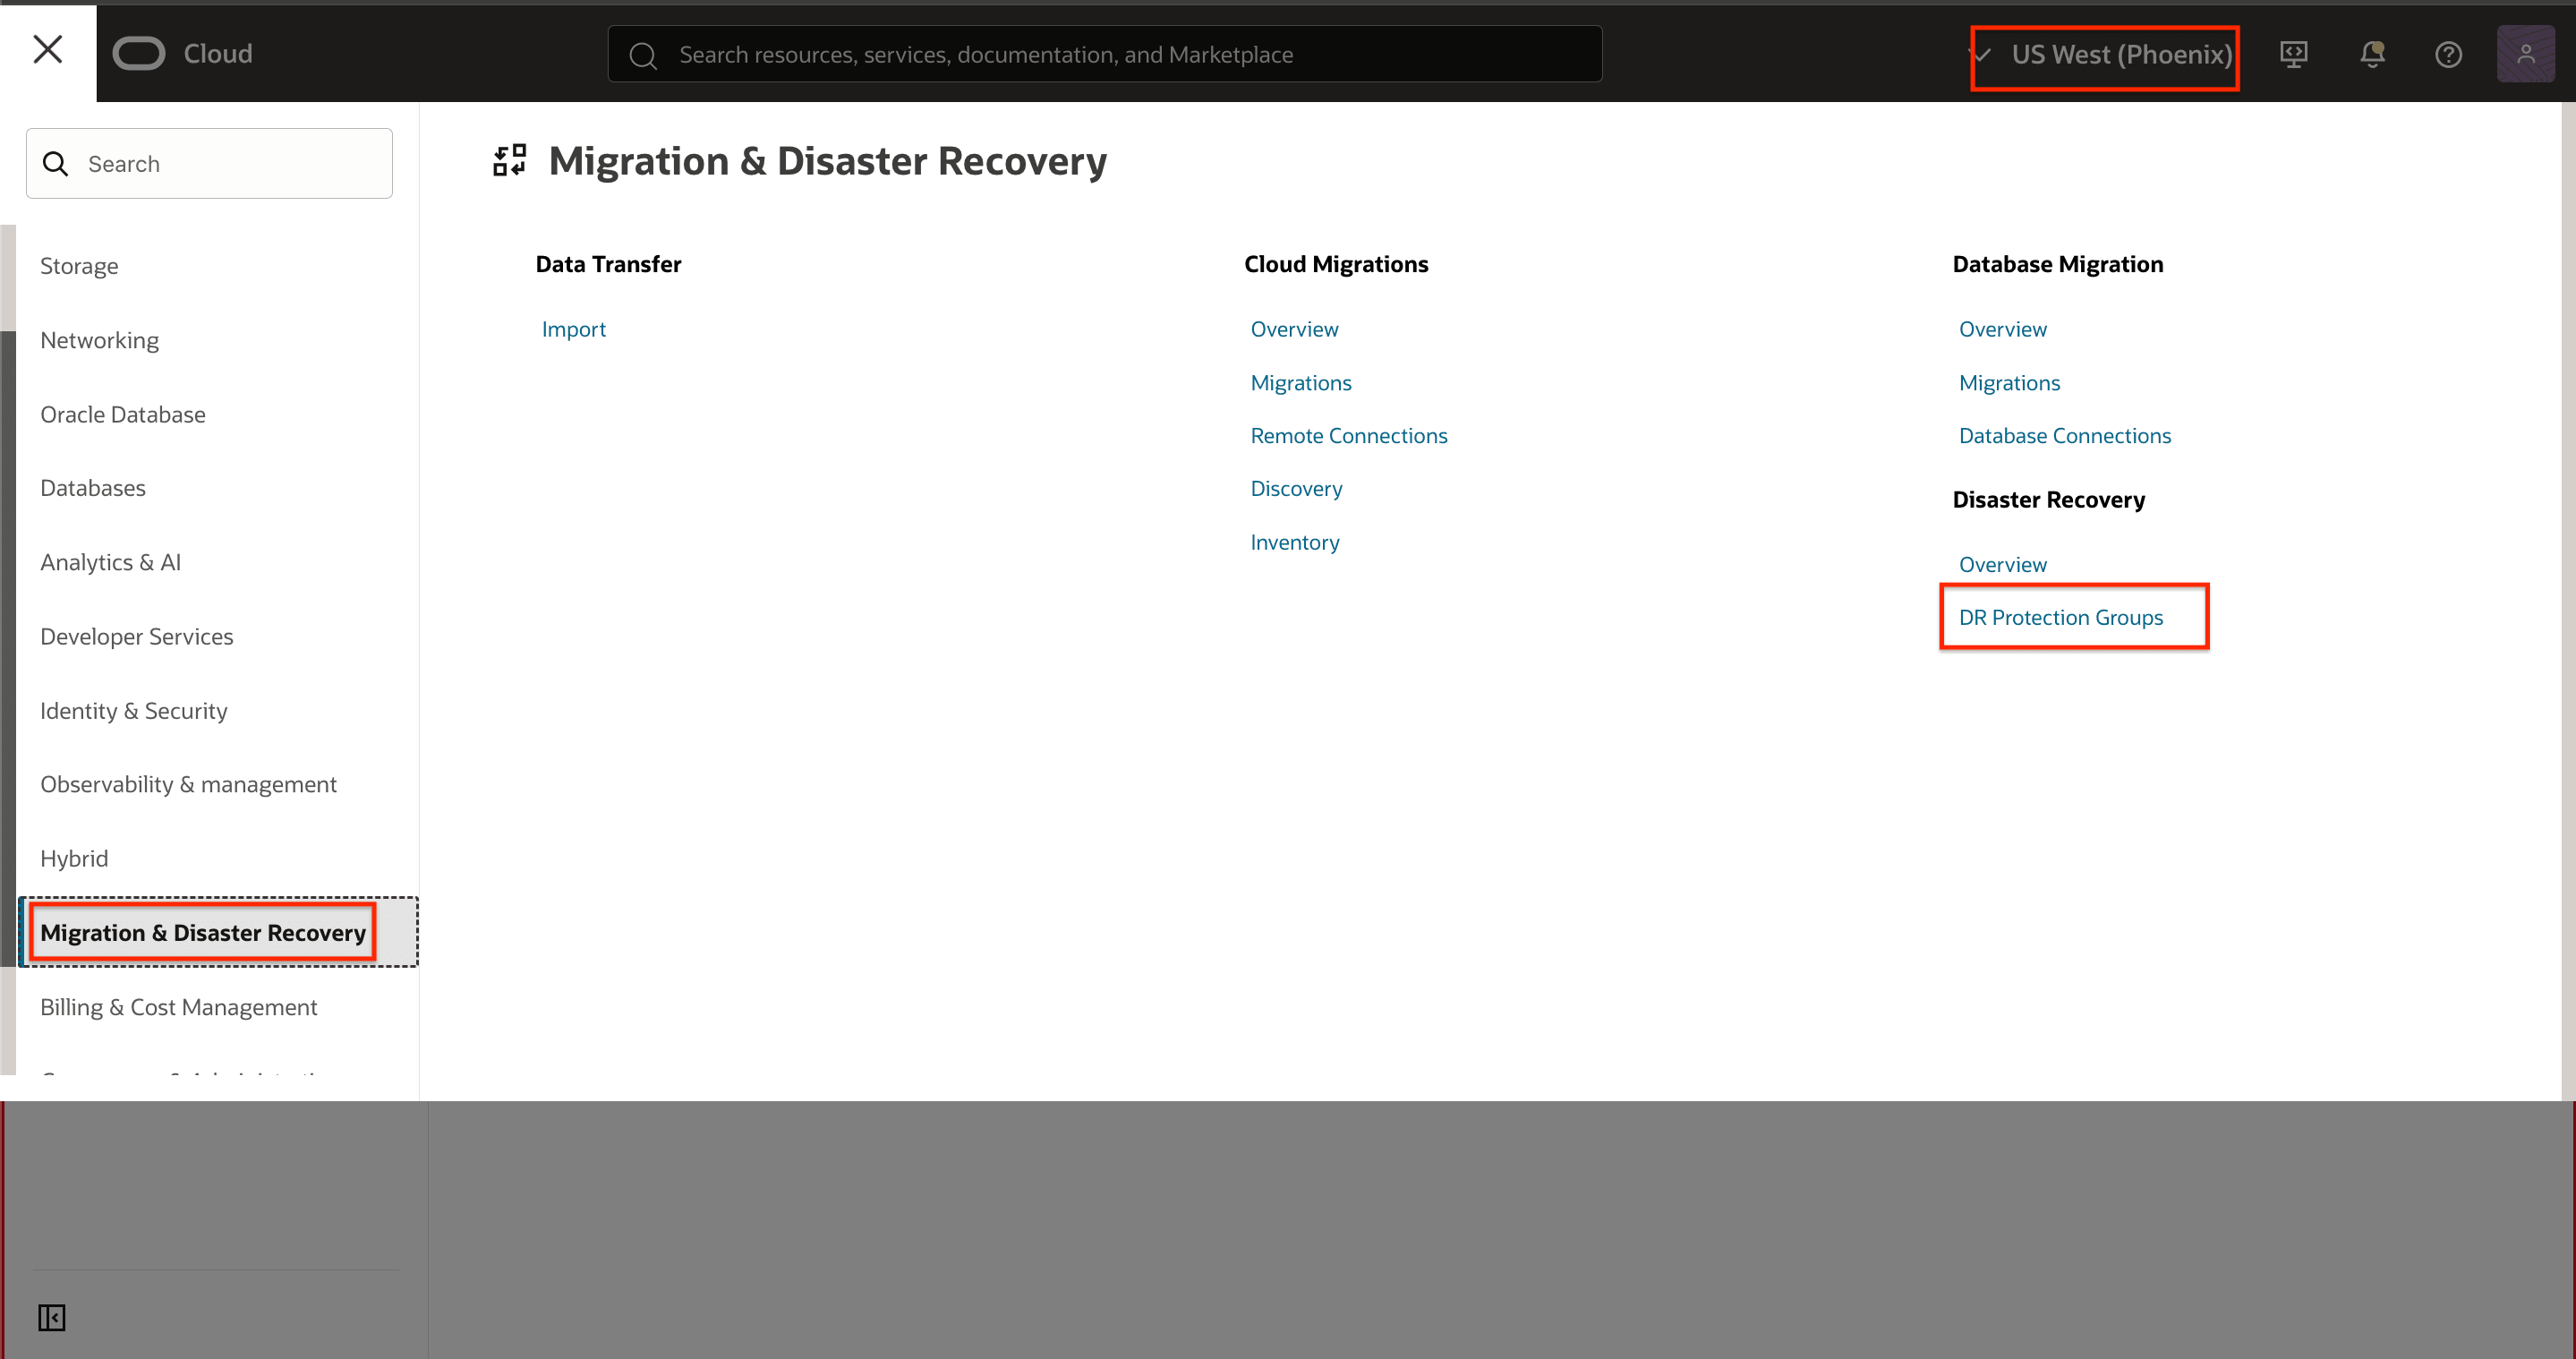
Figure 1.4: Navigate to DR protection groups -
Click Create DR protection group to open the dialog.
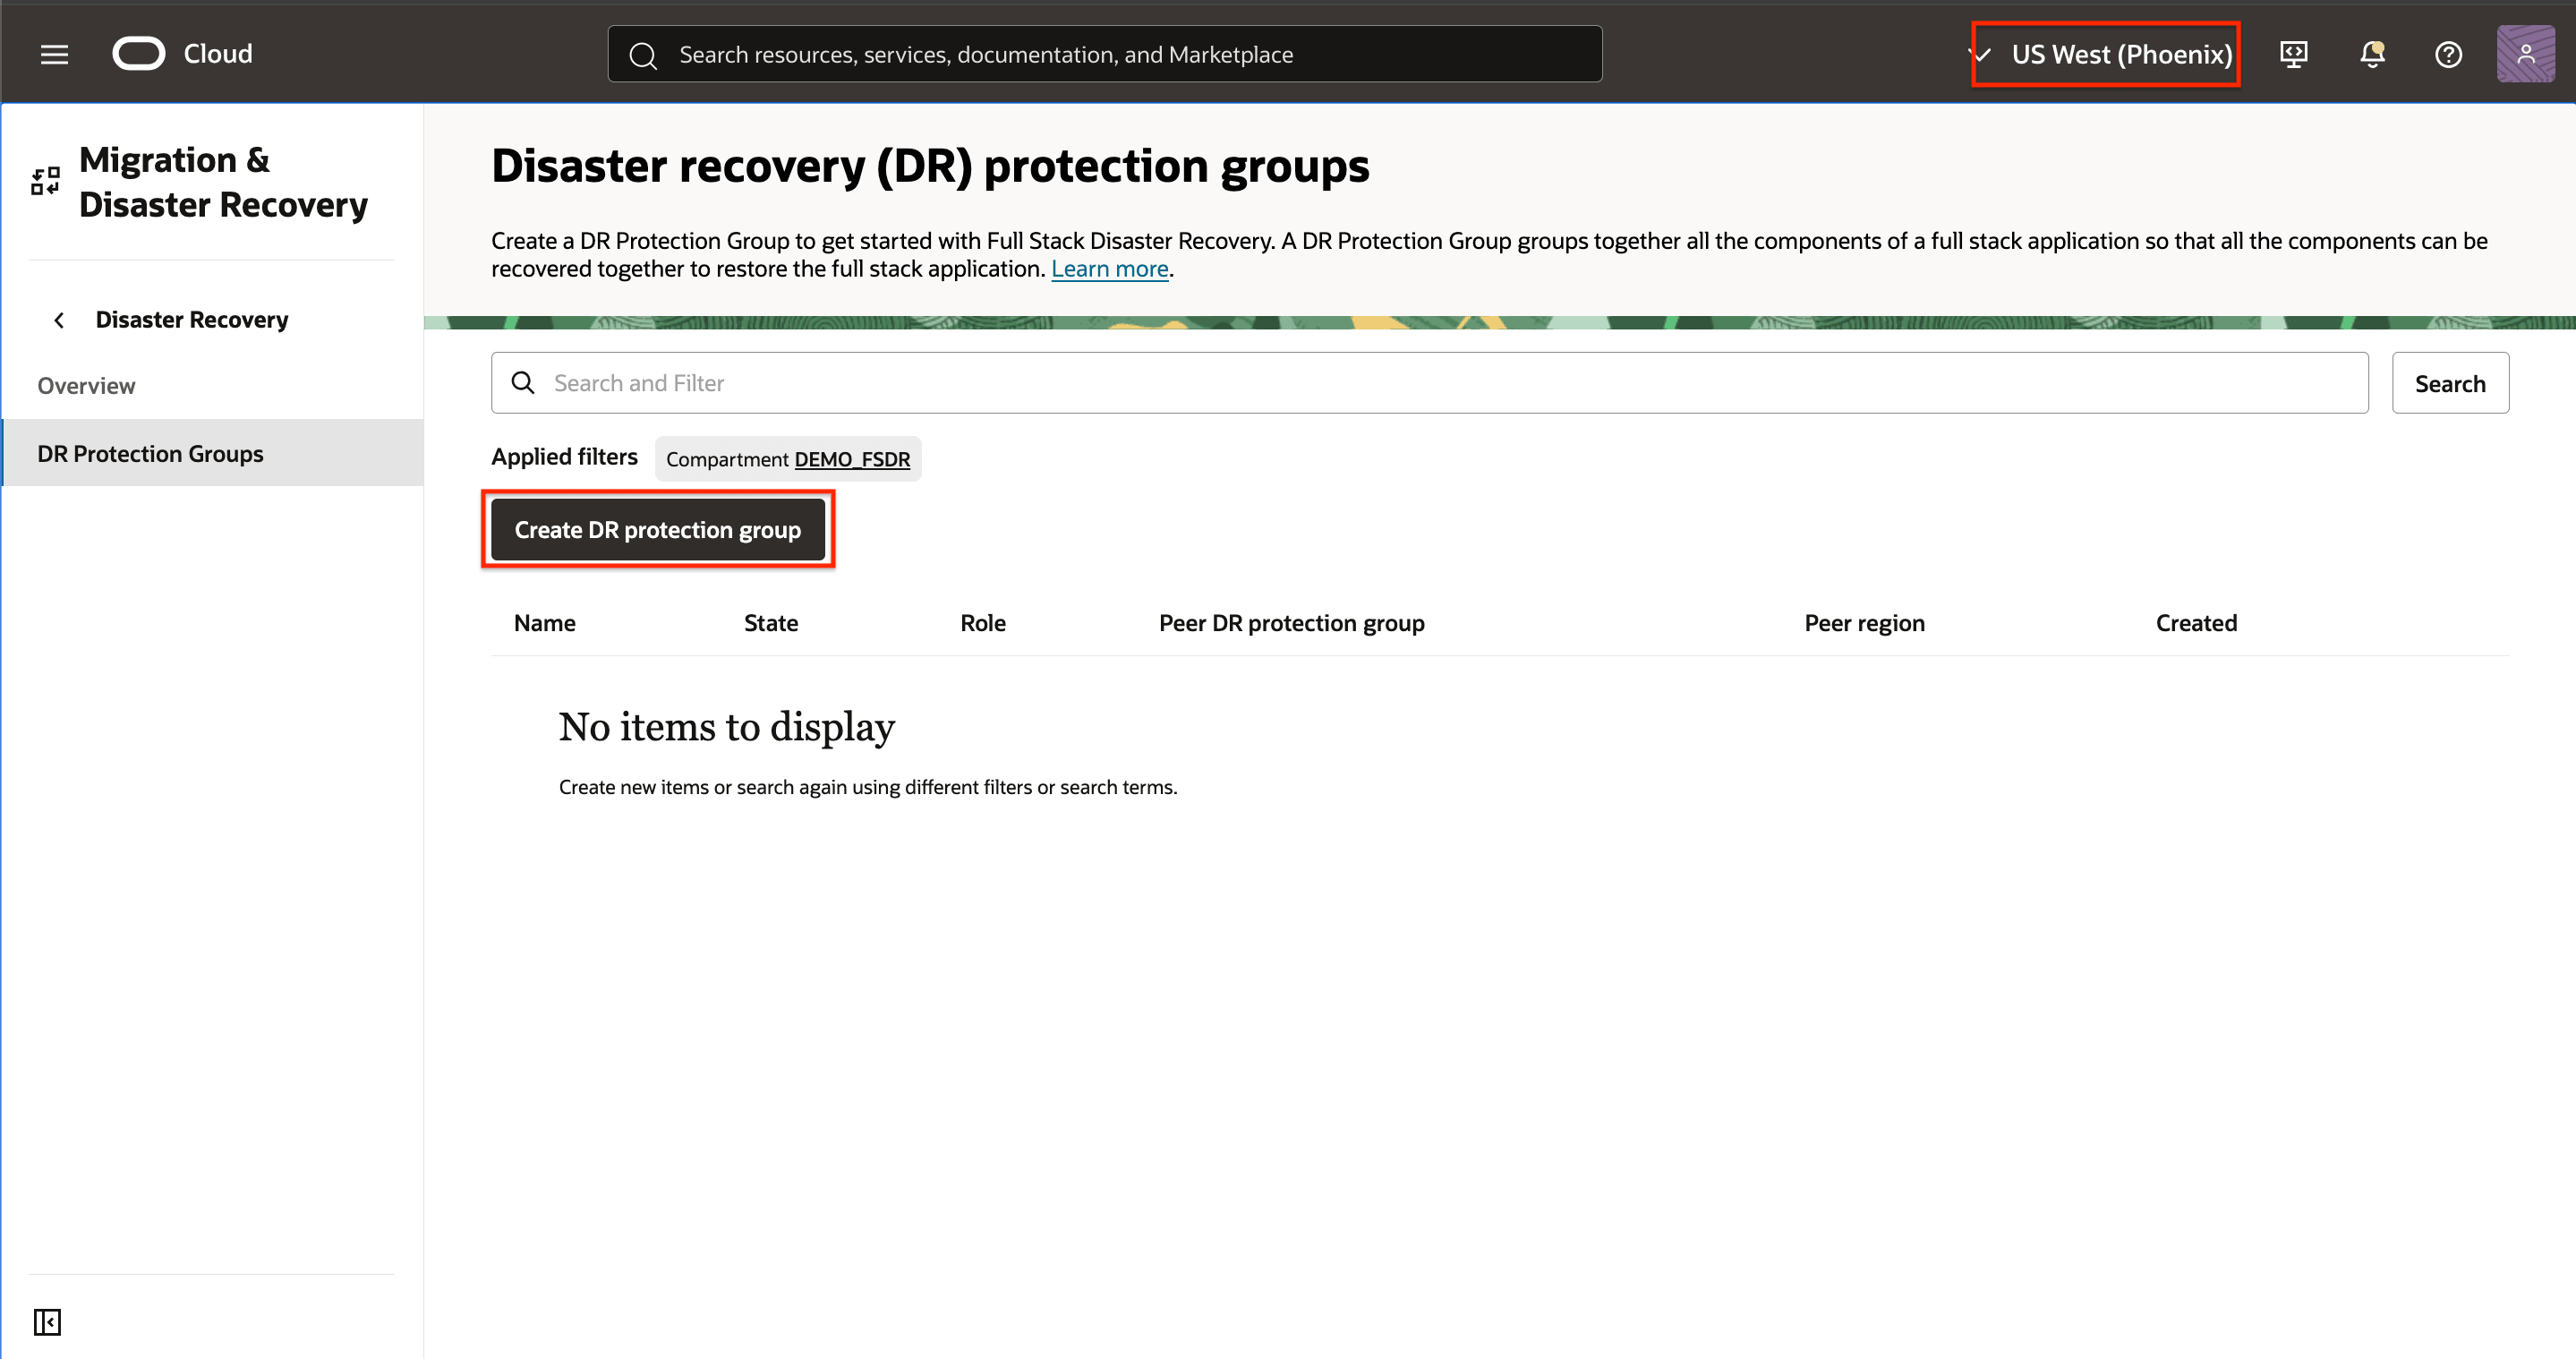
Figure 1.5: Click Create DR protection -
Create a basic DR protection group (DRPG) in Region 2 as shown in Figure 1.6. The peer, role and members will be assigned in later steps.
- Use a meaningful name for the DRPG.
- Select the compartment where you want the DRPG to be created.
- Select OCI Object Storage bucket for OCI Full Stack DR logs.
- Click Create.
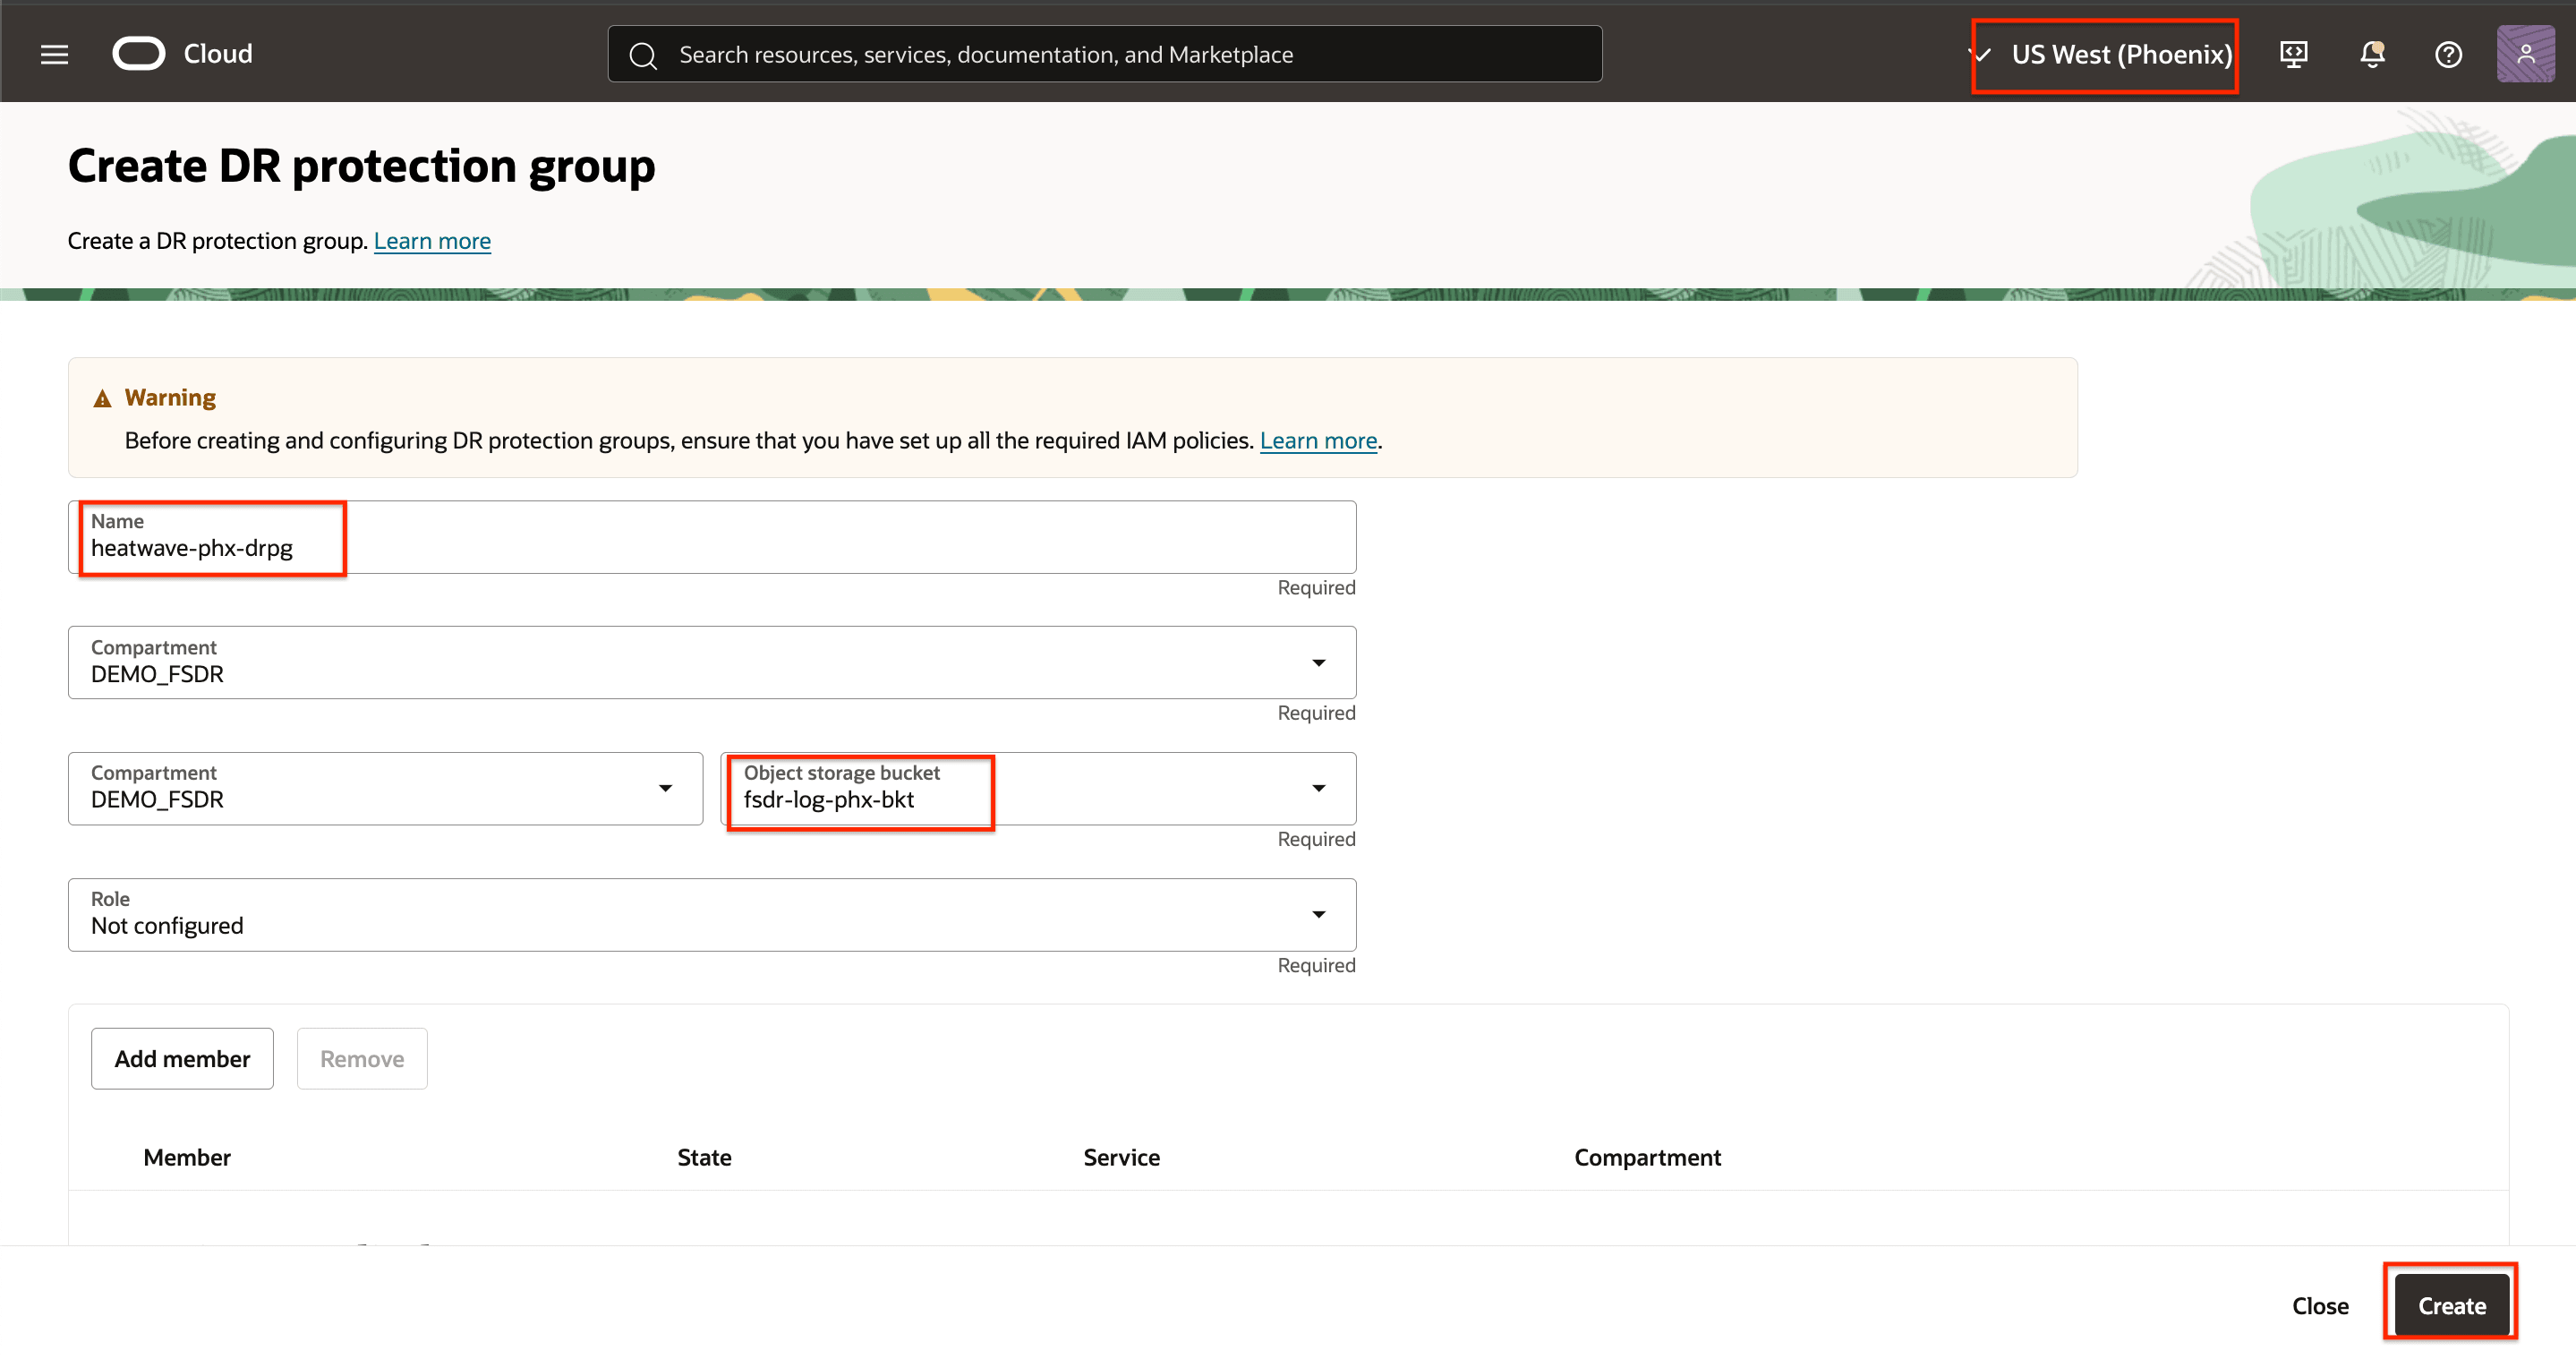
Figure 1.6: Parameters needed to create DR protection group in region 2
Task 1.3: Associate Protection Groups in Region 1 and Region 2
Associate the DRPGs in each region as peers of each other and assign the peer roles of primary and standby. The roles of primary and standby are automatically changed by OCI Full Stack DR as part of any DR operation/DR plan execution; there is no need to manage the roles manually at any time.
-
Go to the DR protection group details page.
- Ensure OCI region context is set to Region 1 (Ashburn).
- Click Action
- Click Associate to begin the process.
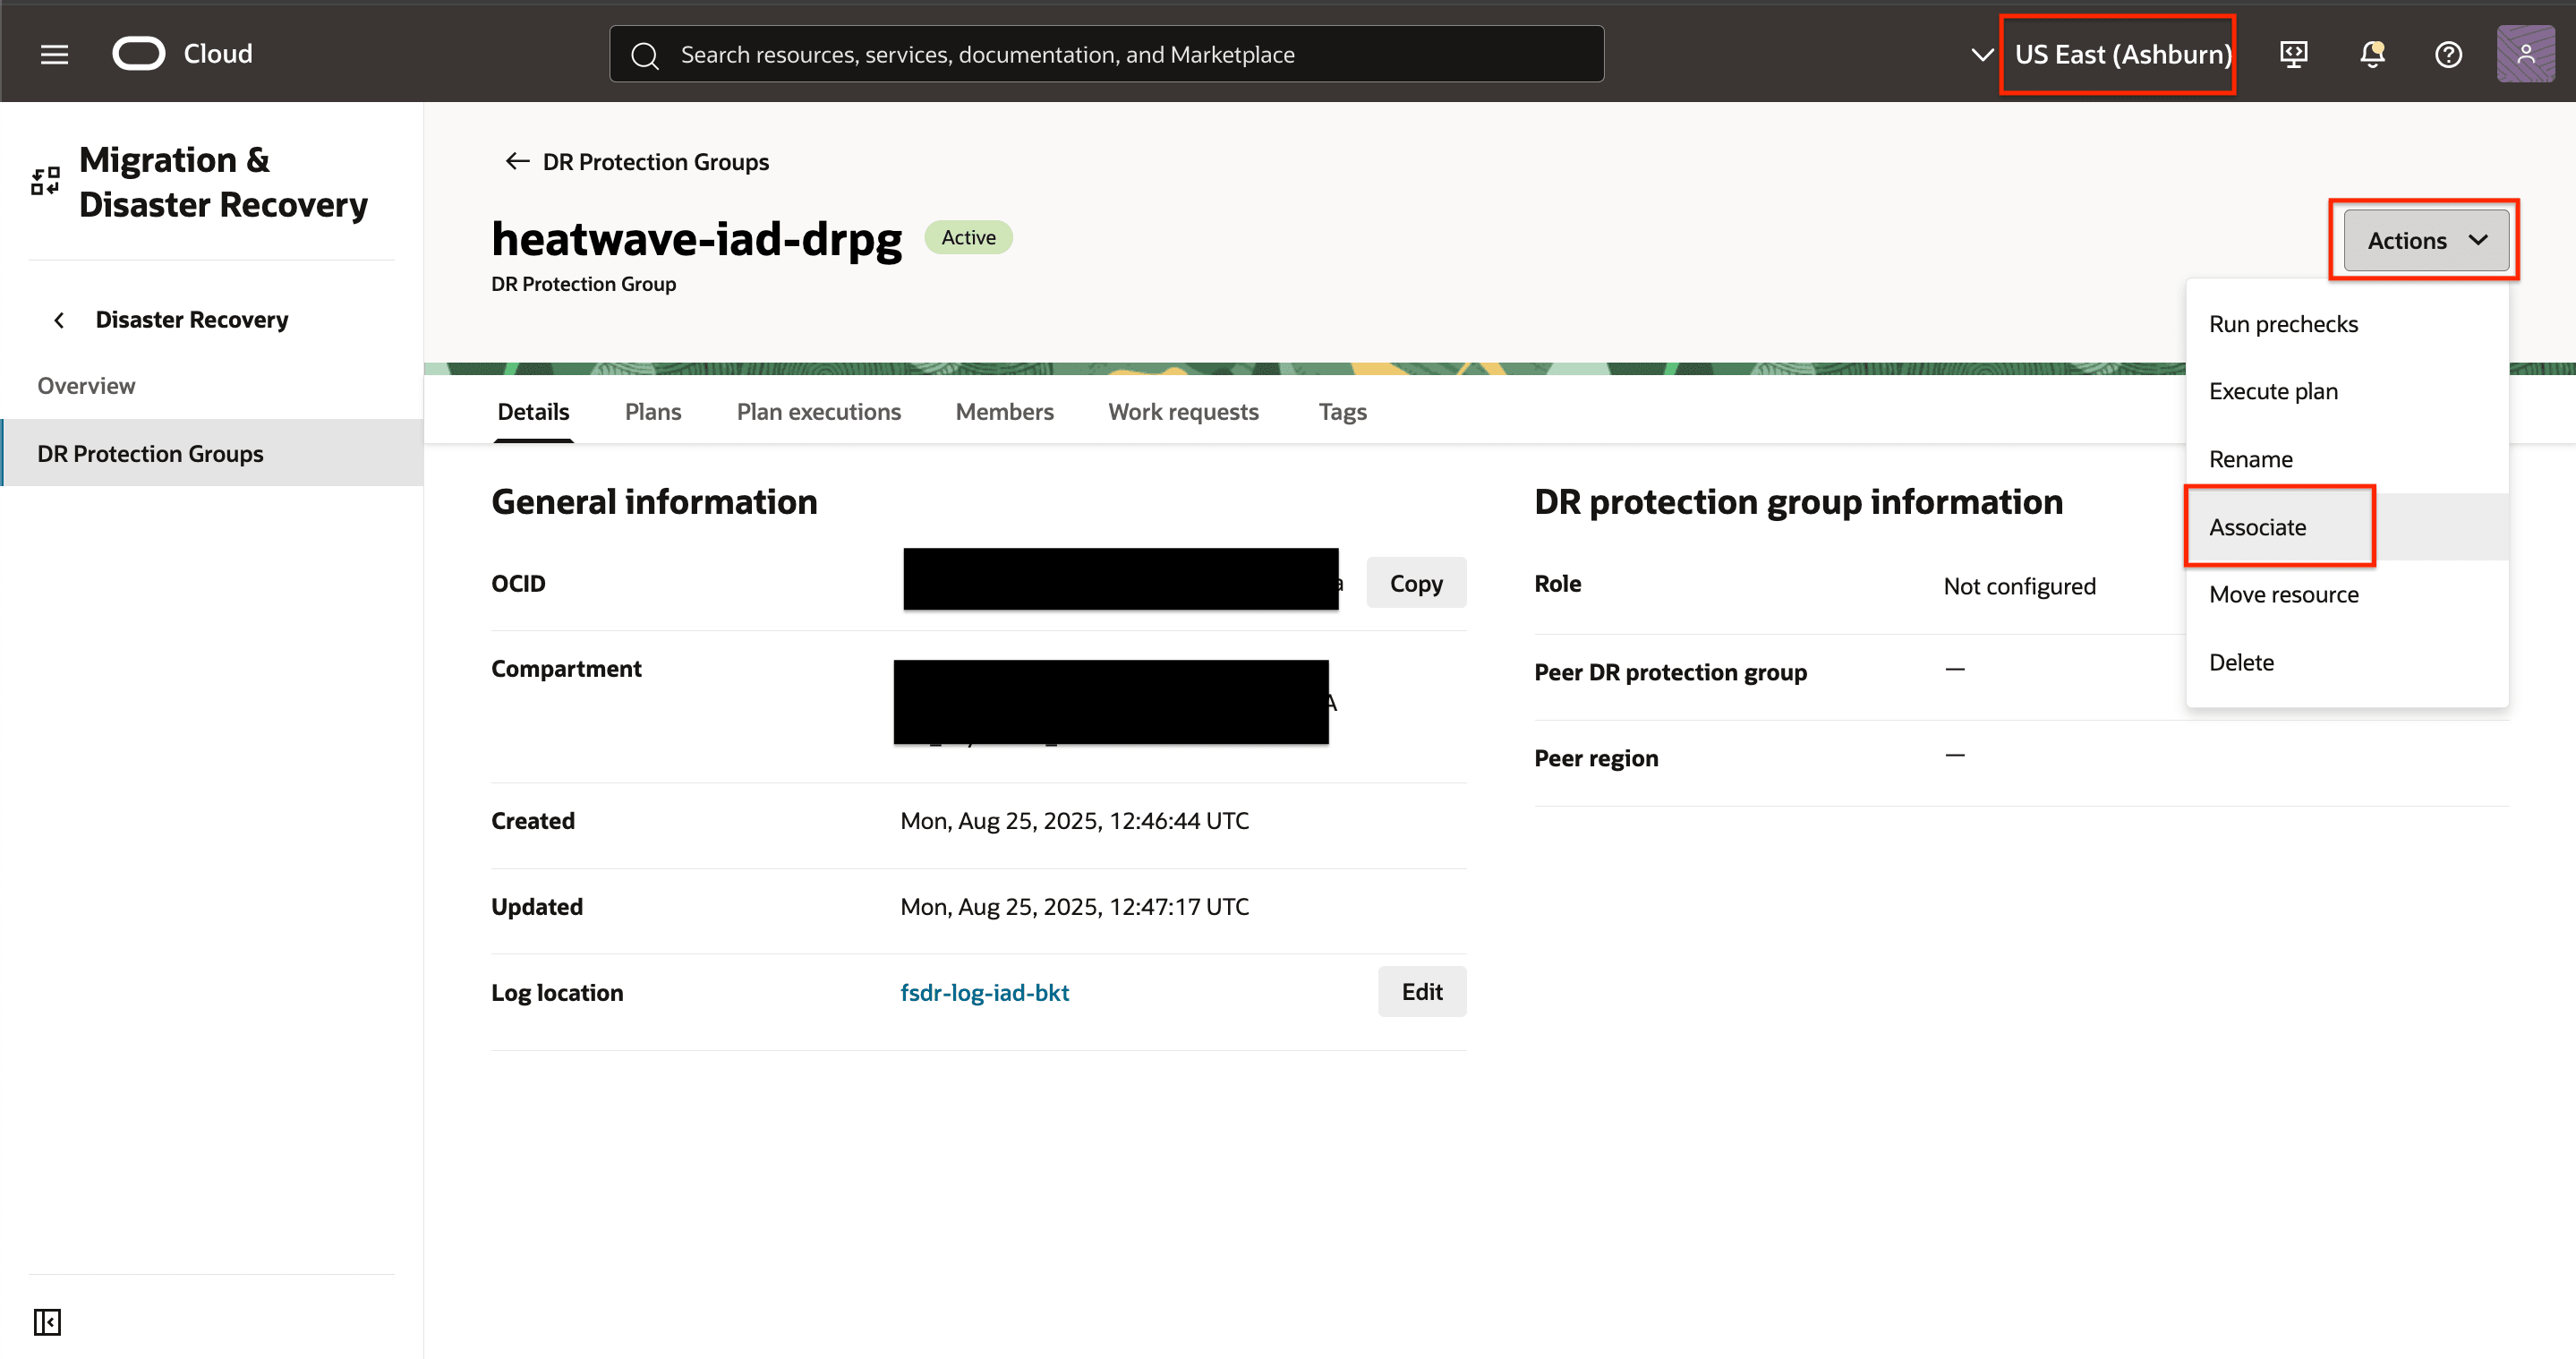
Figure 1.7: Begin DRPG association -
Enter the parameters as shown in the following image.
- Role: Select Primary role. OCI Full Stack DR will assign the standby role to Region 2 automatically.
- Peer region: Select Region 2 (Phoenix), where the other DRPG was created.
- Peer DR protection group: Select the peer DRPG that was created.
- Click Associate.
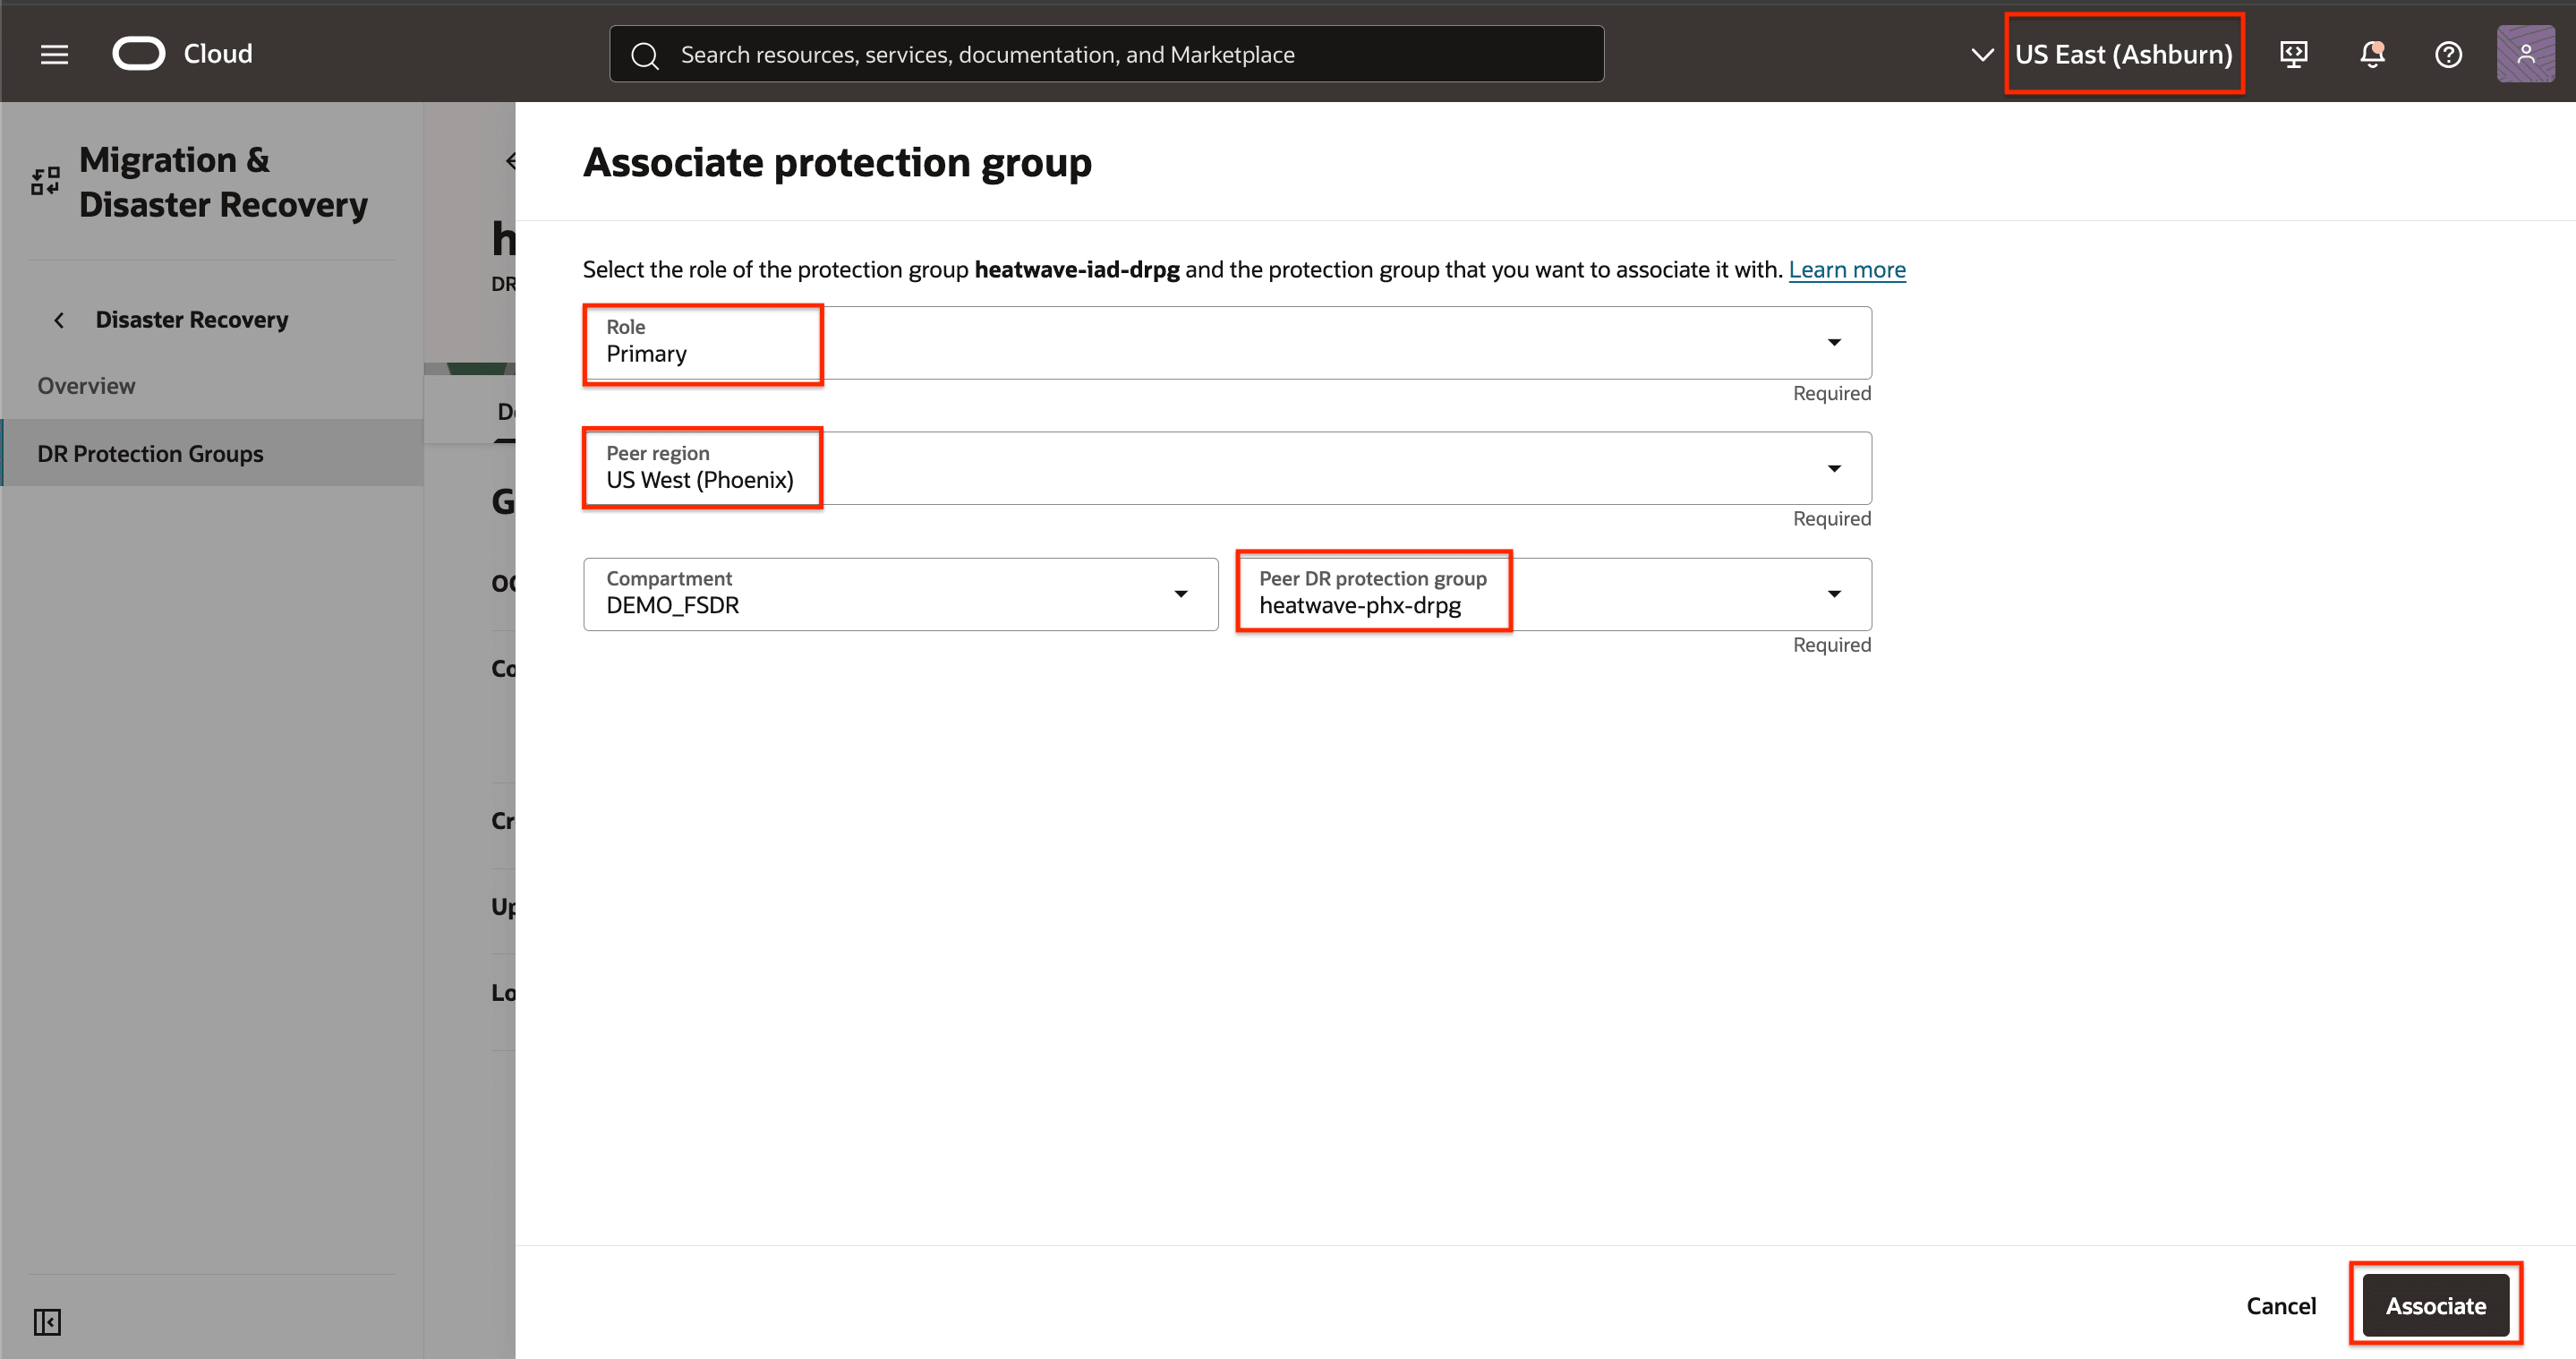
Figure 1.8: Parameters needed to associate the DRPGs -
Allow the work request to complete before proceeding.
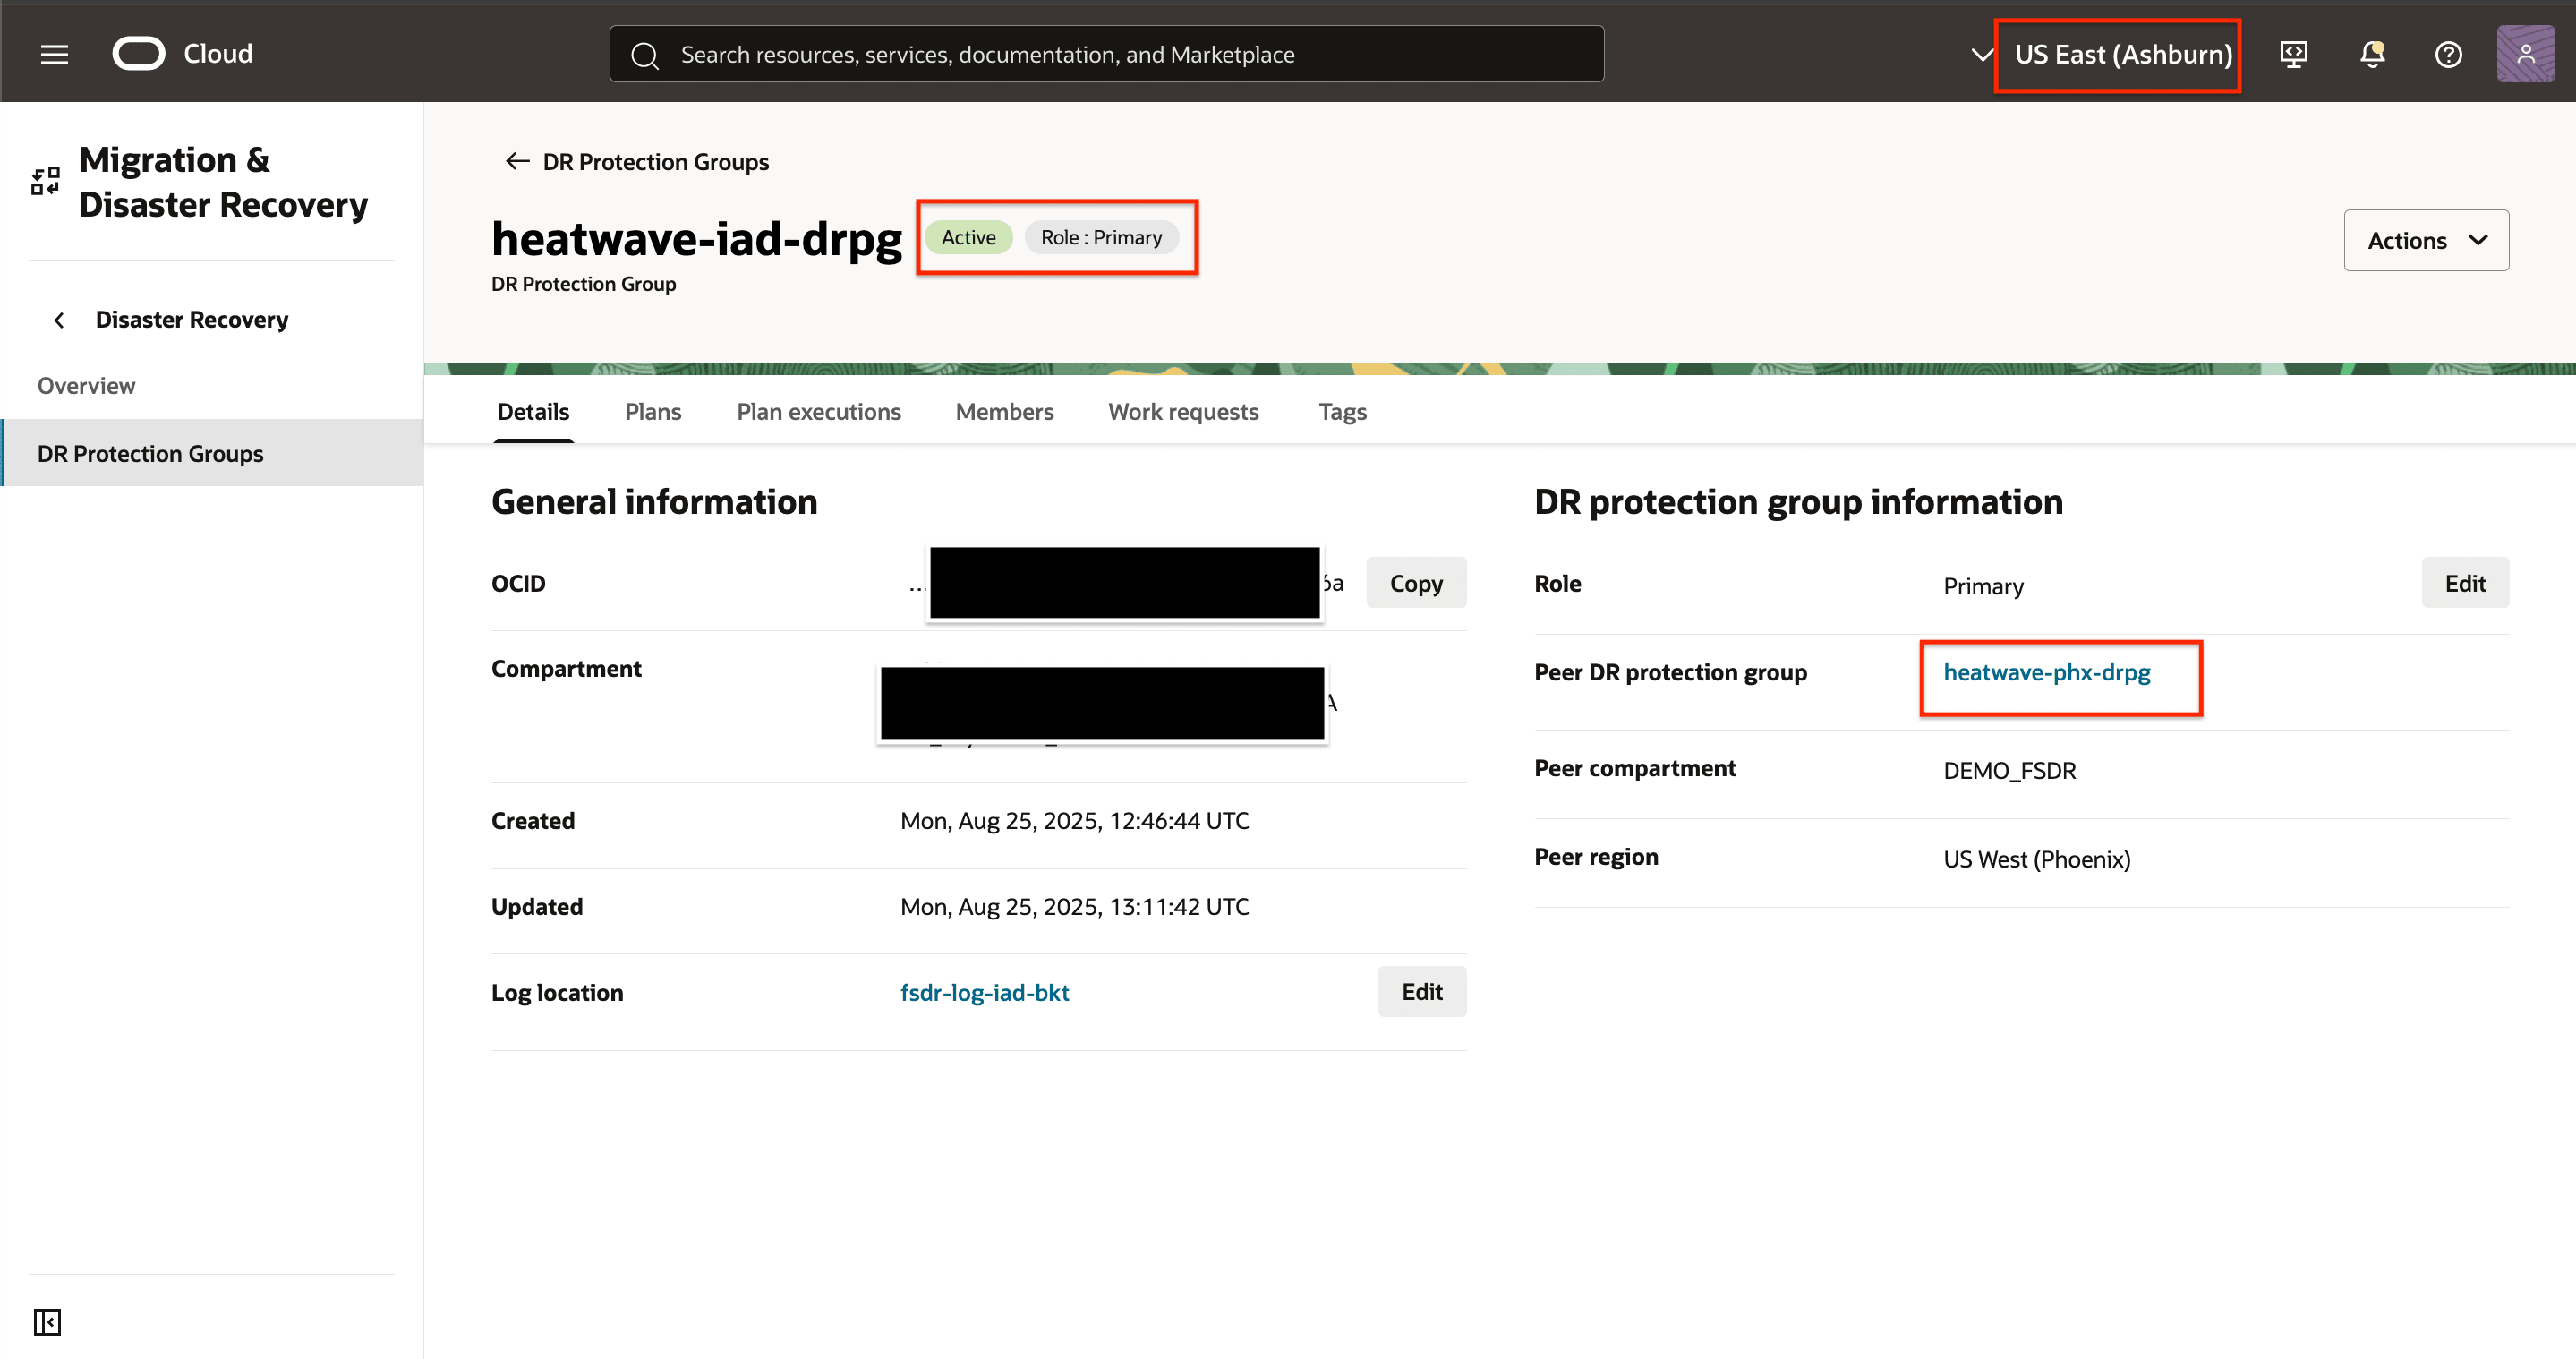
Figure 1.9: DRPG association complete.
OCI Full Stack DR will show something like as shown in the following image, once the association is completed.
- The current primary peer DRPG is Ashburn (region 1).
- The current standby peer DRPG is Phoenix (region 2).

Figure 1.10: Showing the peer relationship from the individual DRPG perspective
The same information can be found whenever the context/view is from a global perspective showing all DR protection groups as shown in the following image.
- The current primary peer DRPG is Ashburn (region 1).
- The current standby peer DRPG is Phoenix (region 2).

Figure 1.11: Showing the peer relationship from the global DRPG perspective
Task 2: Add MySQL HeatWave to the DR Protection Group
Task 2.1: Add MySQL HeatWave to DRPG in Region 1
-
Select the DRPG in Region 1 as shown in the following image.
- Ensure that the OCI region context is Region 1 (Ashburn).
- Select the DRPG in Region 1.
- Select Members.
- Click Manage members to begin the process.
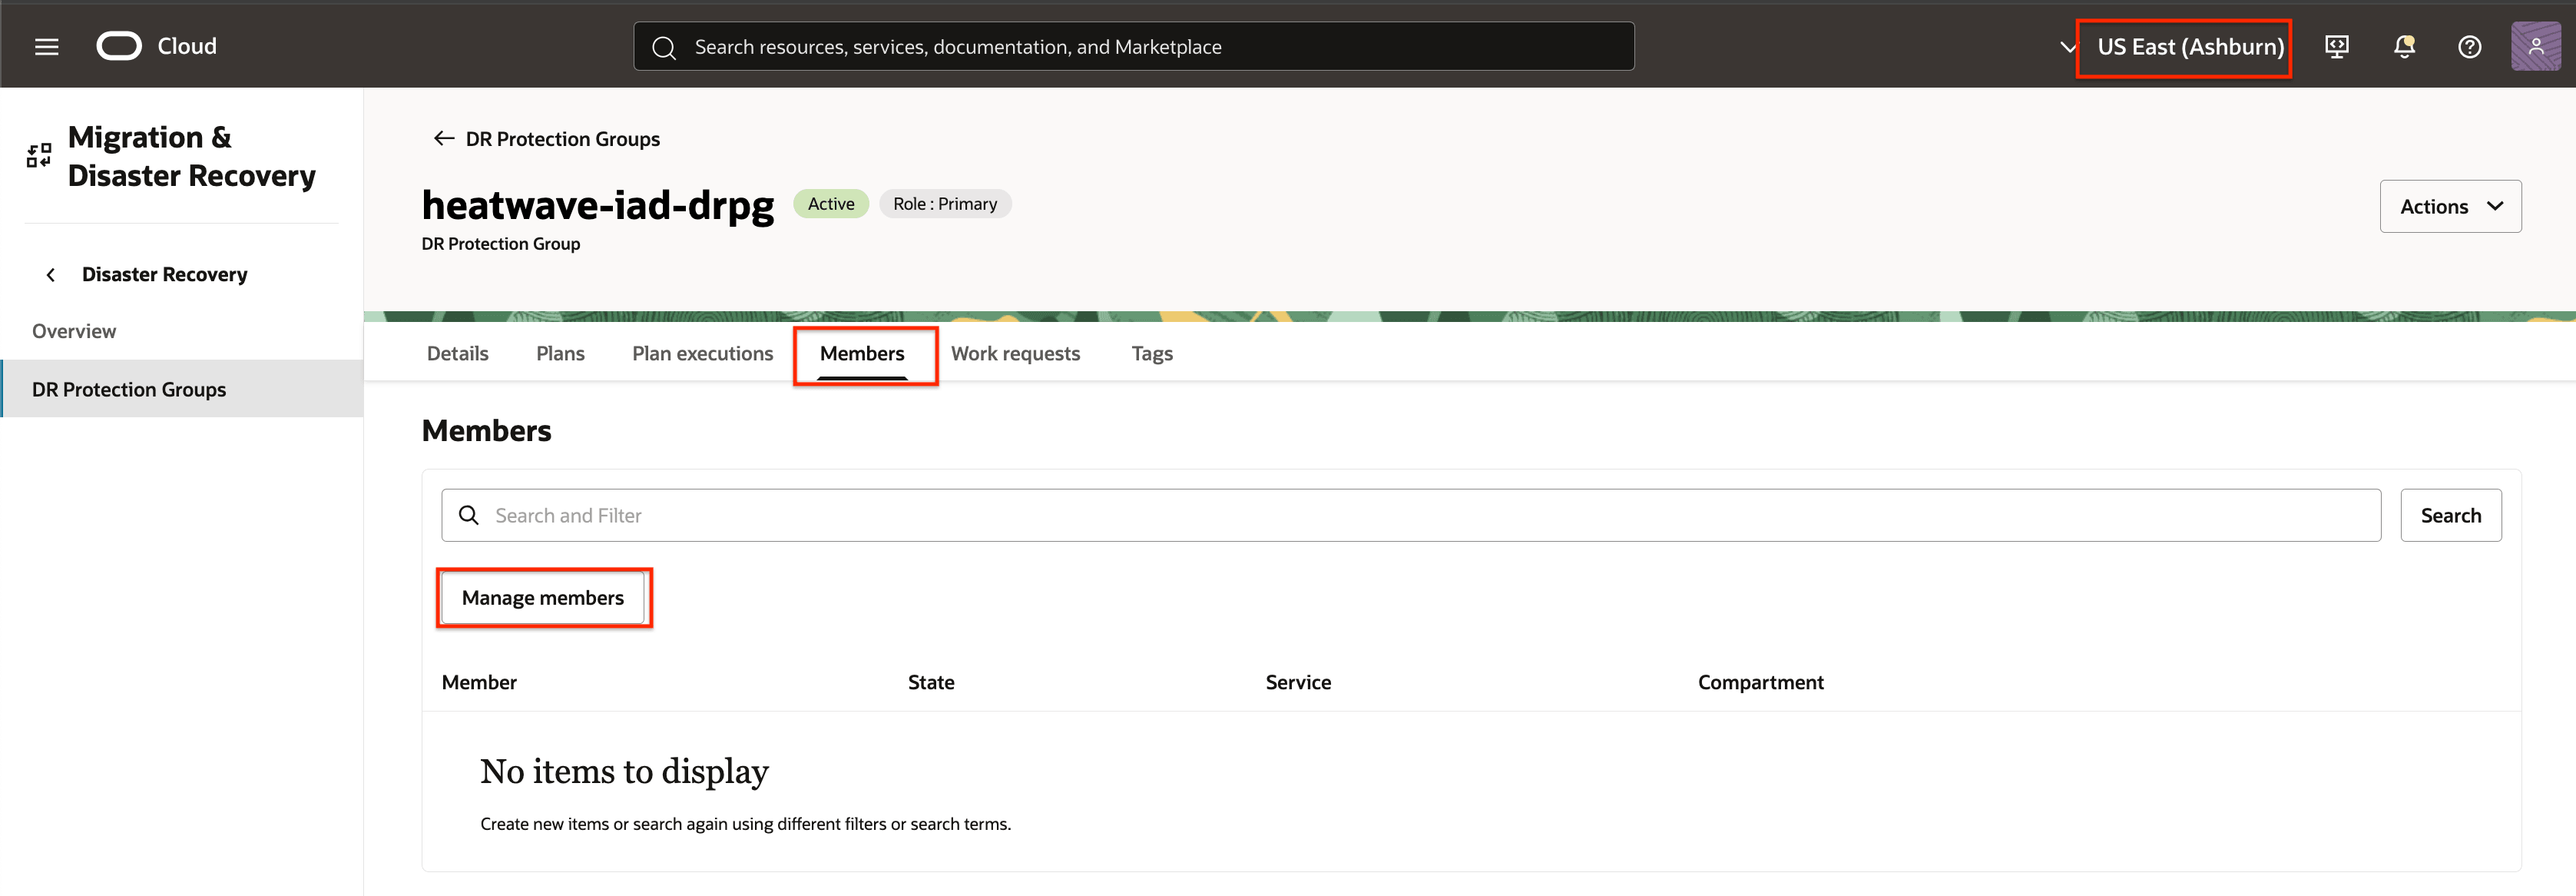
Figure 2.1: How to begin adding Members to DR protection group in Region 1 -
Click Add member.
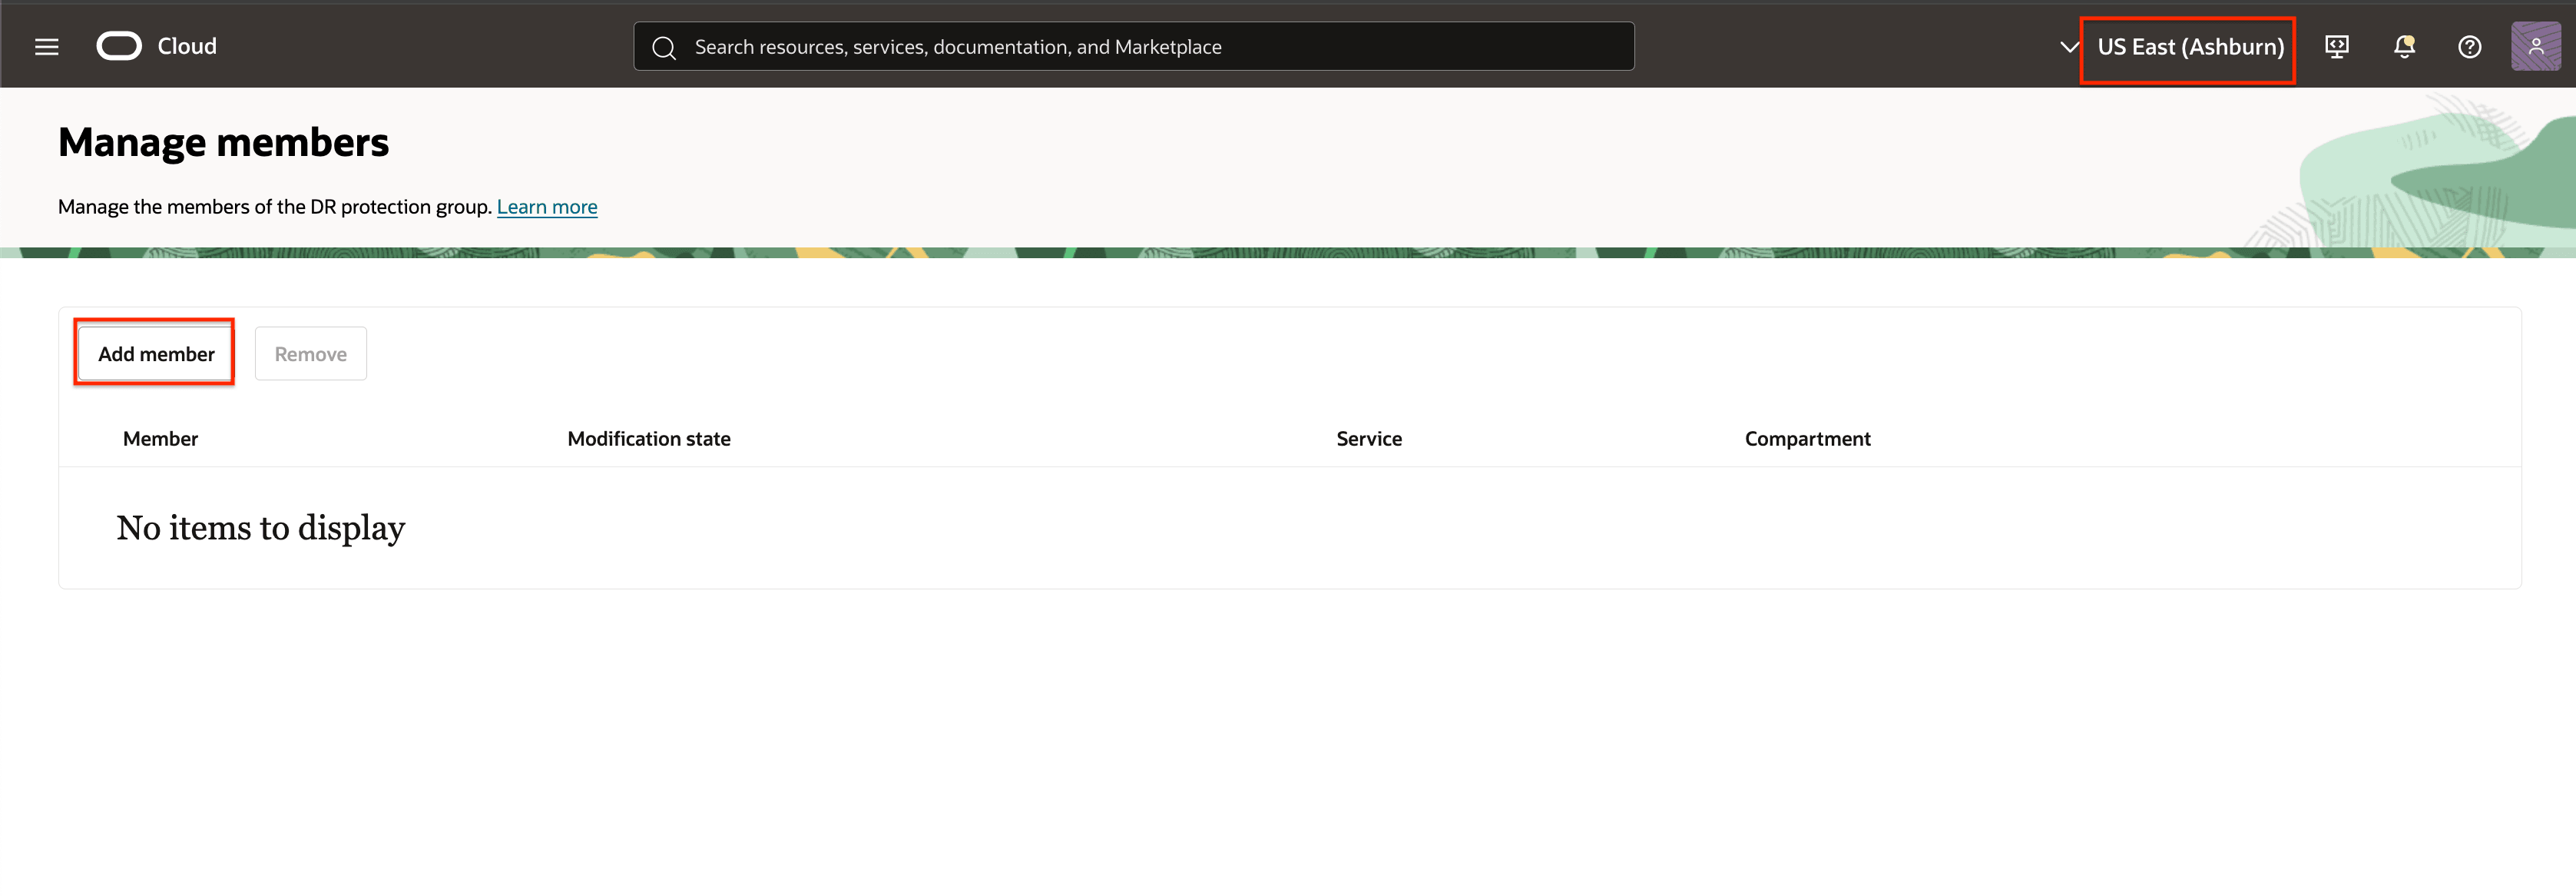
Figure 2.2: Begin adding Members to DR protection group in Region 1 -
Add the MySQL HeataWave to the DRPG in region 1.
- Enter MySQL Database System as a member Resource type.
- Select the appropriate compartment, then choose the Primary MySQL HeatWave name in Region 1 from the Database system field.
- Select the appropriate compartment, then choose the Replica MySQL HeatWave name in Region 2 from the Peer database system field.
- Type the Admin username.
- Select the appropriate compartment, then choose the Admin password secret.
- Type the Replication username.
- Select the appropriate compartment, then choose the Replication password secret.
- Click Add.
Optional Parameters:
- Reconciliation Timeout: Specifies the time, in seconds, to wait for Global Transaction Identifier (GTID) synchronization during the reconciliation process. This timeout setting ensures that the system allows sufficient time for GTID synchronization before considering the operation to have failed or completed.
- Continue on reconciliation timeout: By enabling this option, the system will bypass the GTID validation process once the timeout is exceeded. This allows the failover or switchover to proceed, even if the GTID sync is incomplete.
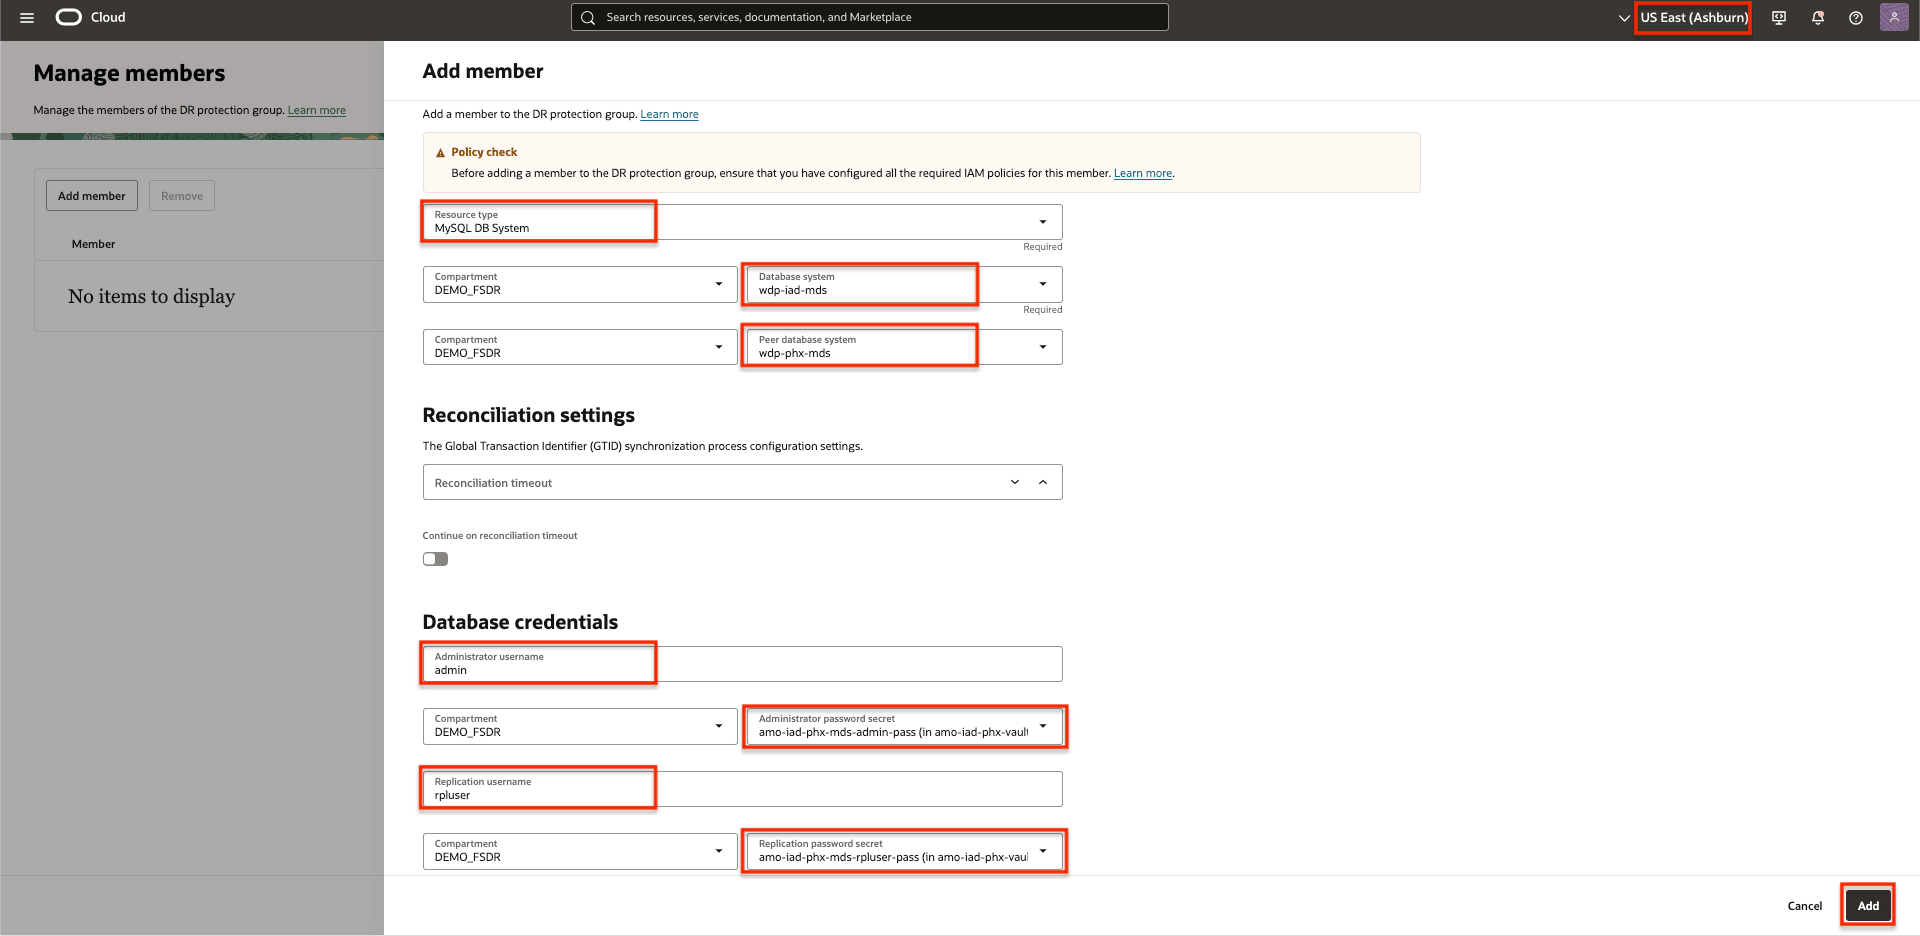
Figure 2.3: Parameters needed to add MySQL HeatWave -
Publish the changes in the DRPG Region 1
Click Publish changes.
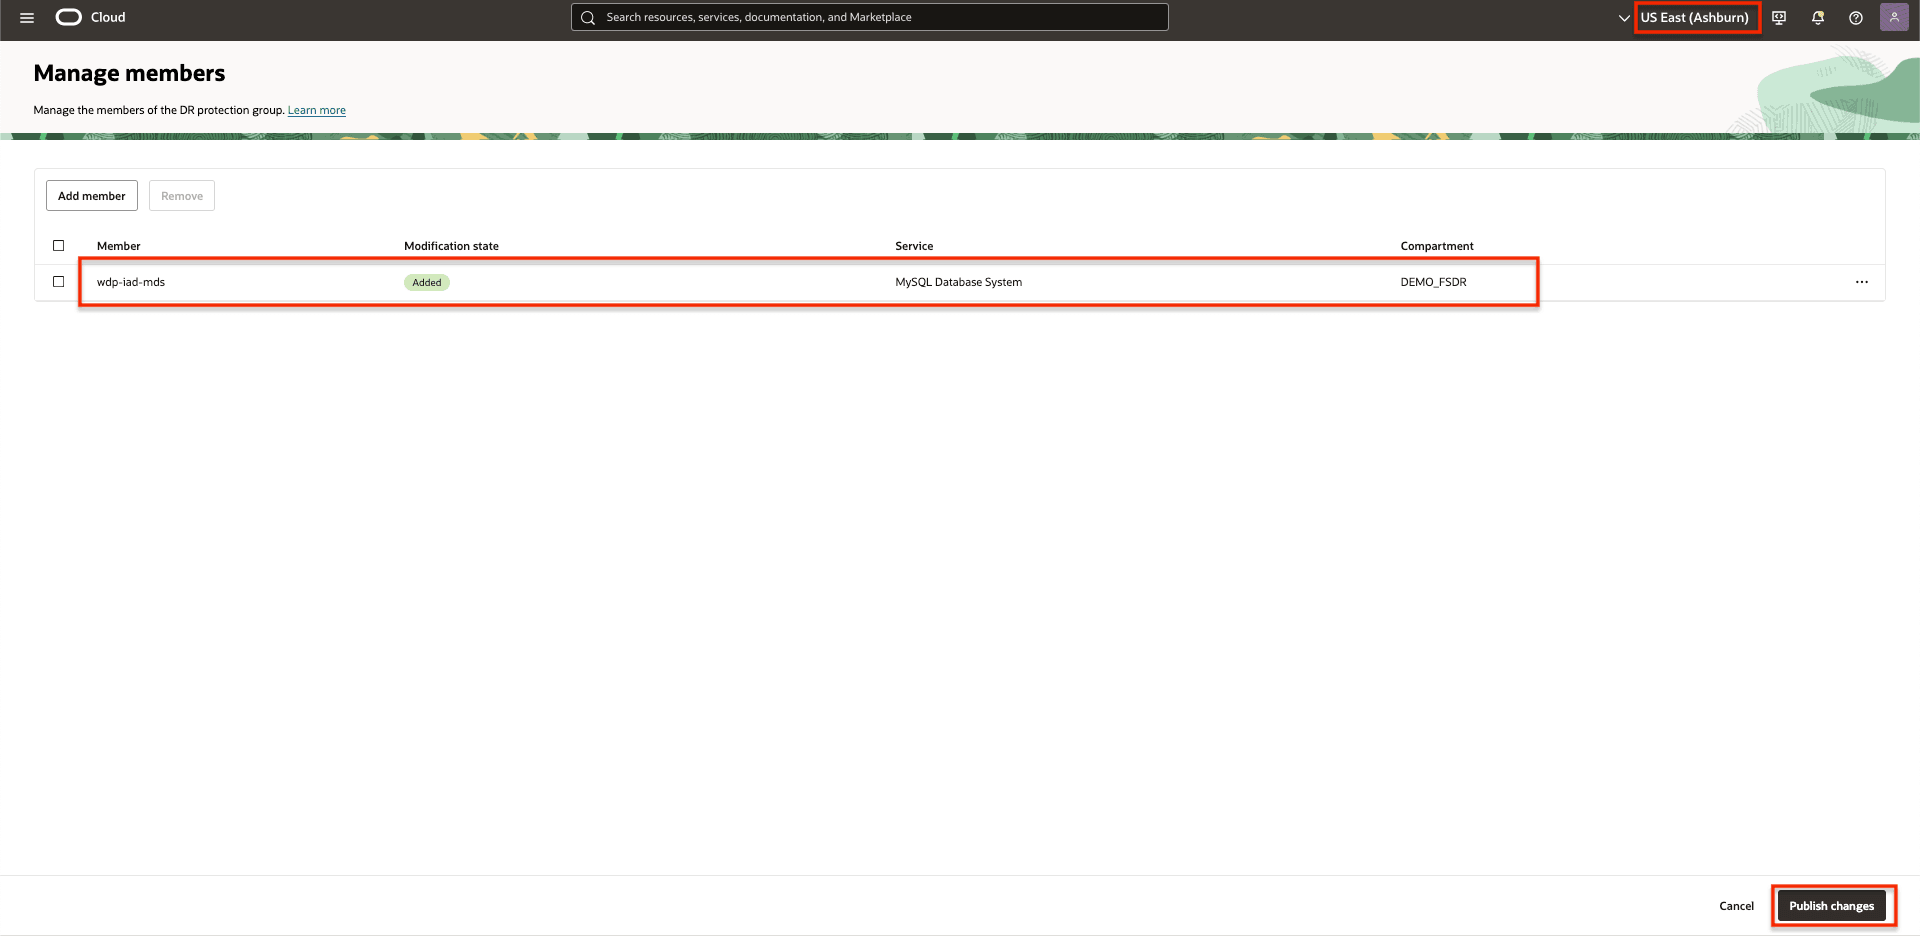
Figure 2.4: Publish changesConfirm, by clicking on Publish changes
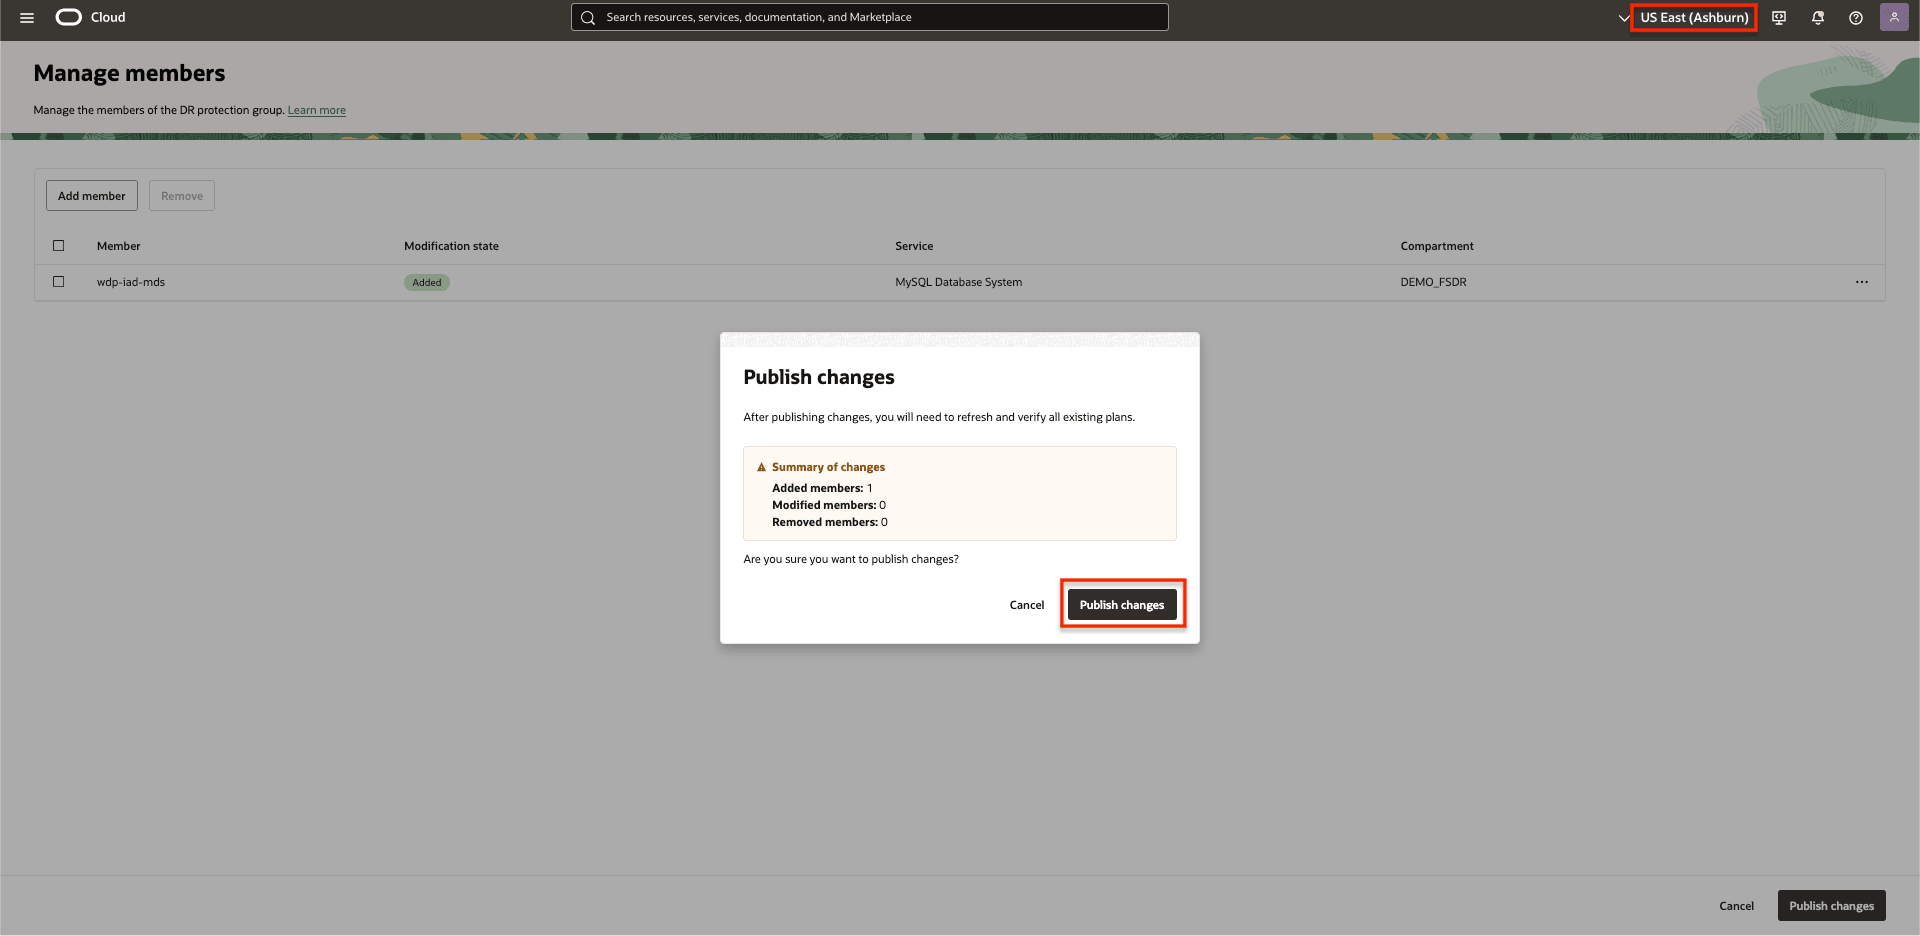
Figure 2.4: Publish changes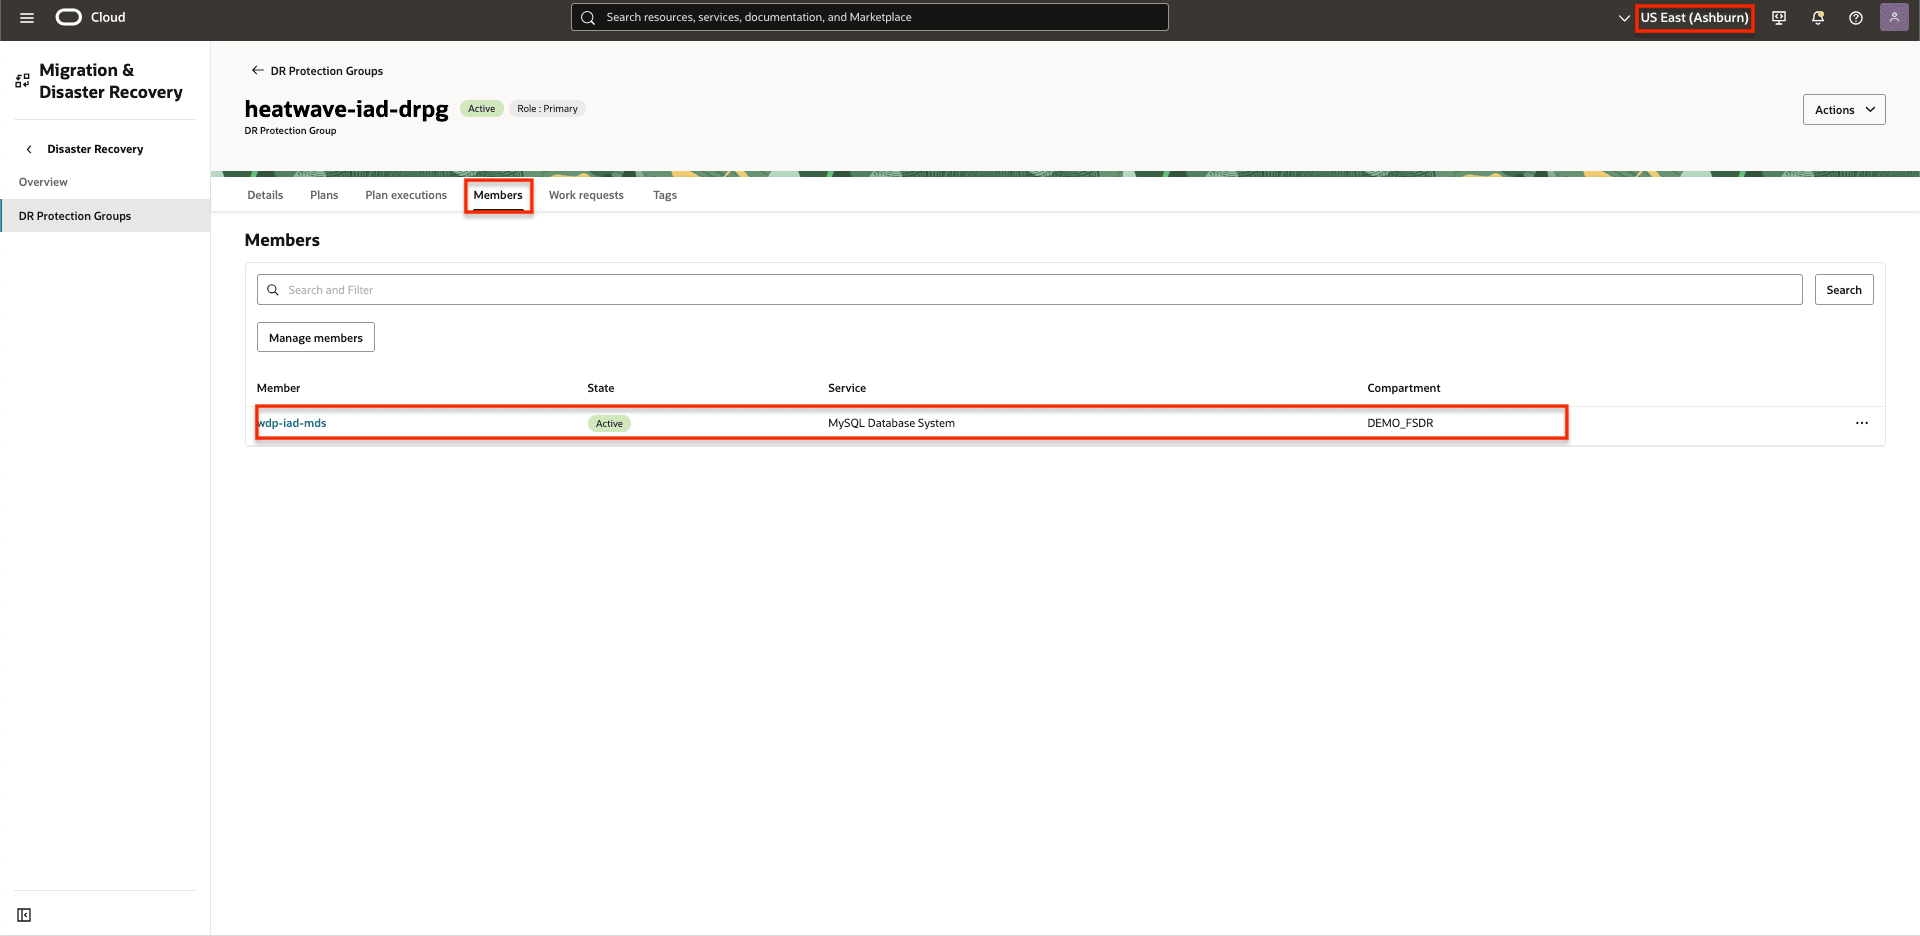
Figure 2.5: MySQL HeatWave added to the DRPG in Region 1.
Task 2.2: Add MySQL HeatWave to DRPG in Region 2
-
Select the DRPG in Region 2 as shown in the following image.
- Ensure that the OCI region context is Region 2 (Phoenix).
- Select the DRPG in Region 2.
- Select Members.
- Click Manage members to begin the process.

Figure 2.6: How to begin adding Members to DR protection group in Region 2 -
Click Add member.

Figure 2.7: Begin adding Members to DR protection group in Region 2 -
Add the MySQL HeataWave to the DRPG in region 2.
- Enter MySQL Database System as a member Resource type.
- Select the appropriate compartment, then choose the Replica MySQL HeatWave name in Region 2 from the Database system field.
- Select the appropriate compartment, then choose the Primary MySQL HeatWave name in Region 1 from the Peer database system field.
- Type the Admin username.
- Select the appropriate compartment, then choose the Admin password secret.
- Type the Replication username.
- Select the appropriate compartment, then choose the Replication password secret.
- Click Add.
Optional Parameters:
- Reconciliation Timeout: Specifies the time, in seconds, to wait for Global Transaction Identifier (GTID) synchronization during the reconciliation process. This timeout setting ensures that the system allows sufficient time for GTID synchronization before considering the operation to have failed or completed.
- Continue on reconciliation timeout: By enabling this option, the system will bypass the GTID validation process once the timeout is exceeded. This allows the failover or switchover to proceed, even if the GTID sync is incomplete.
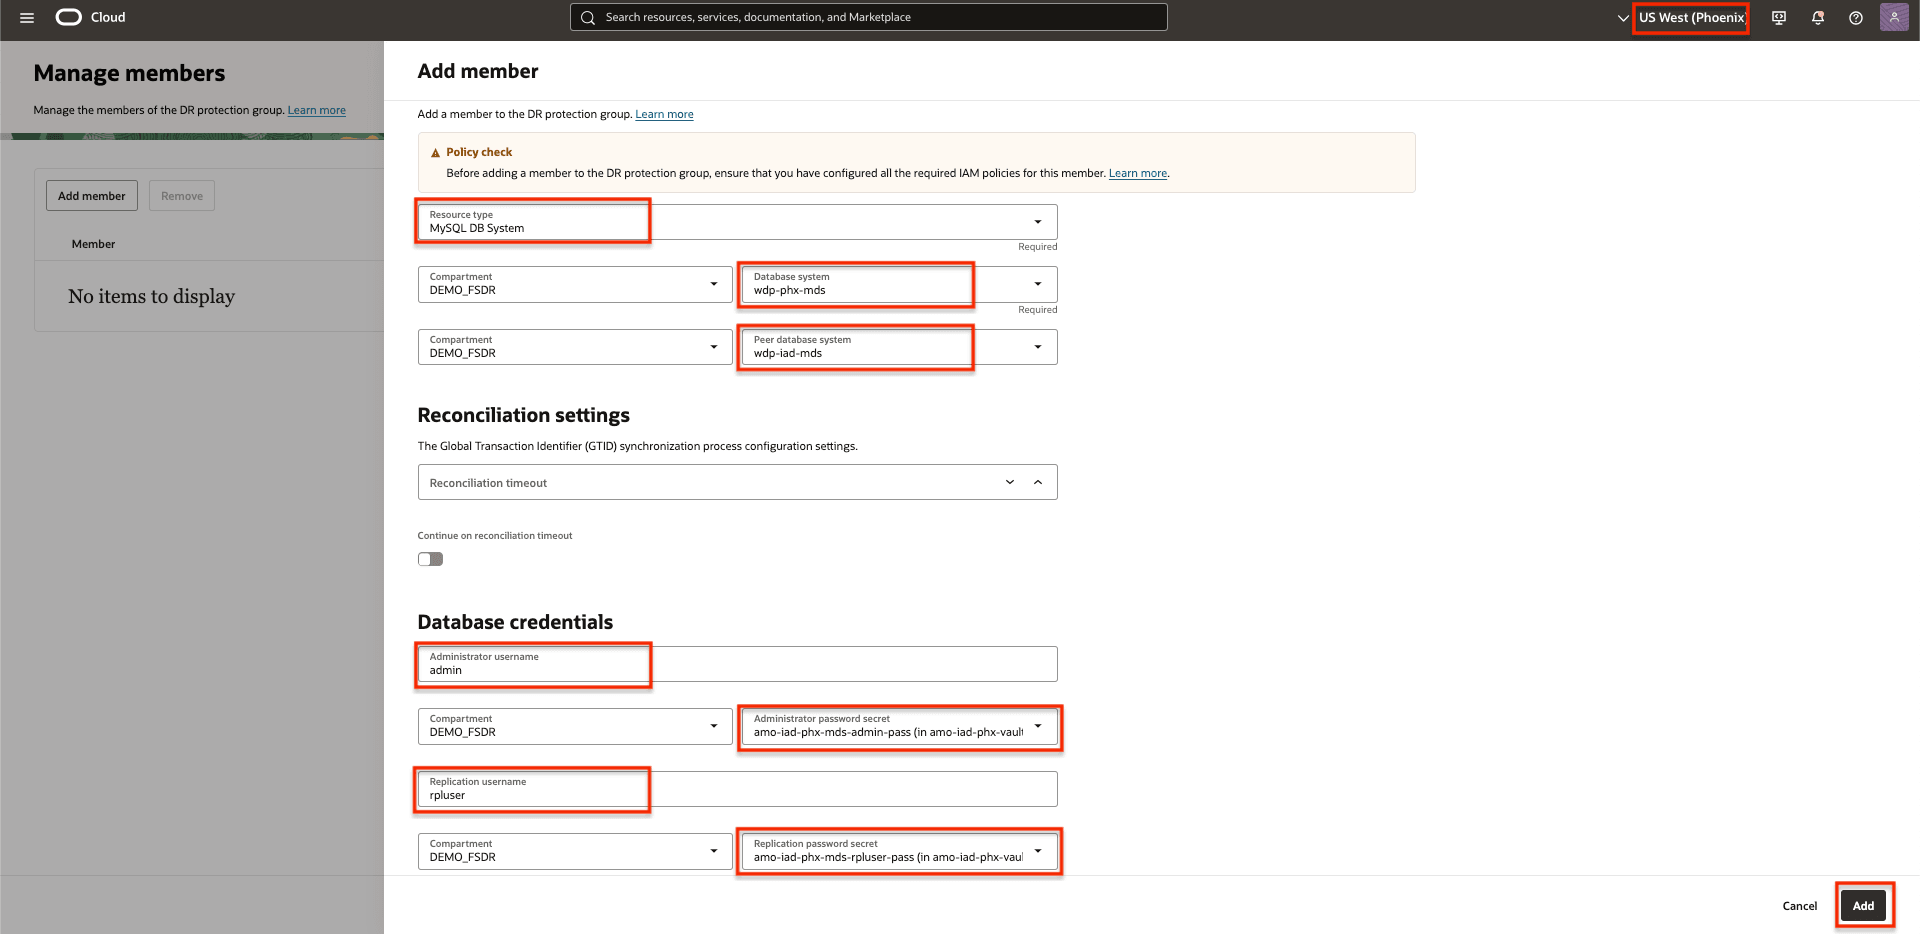
Figure 2.8: Parameters needed to add MySQL HeatWave -
Publish the changes in the DRPG Region 2.
Click Publish changes.
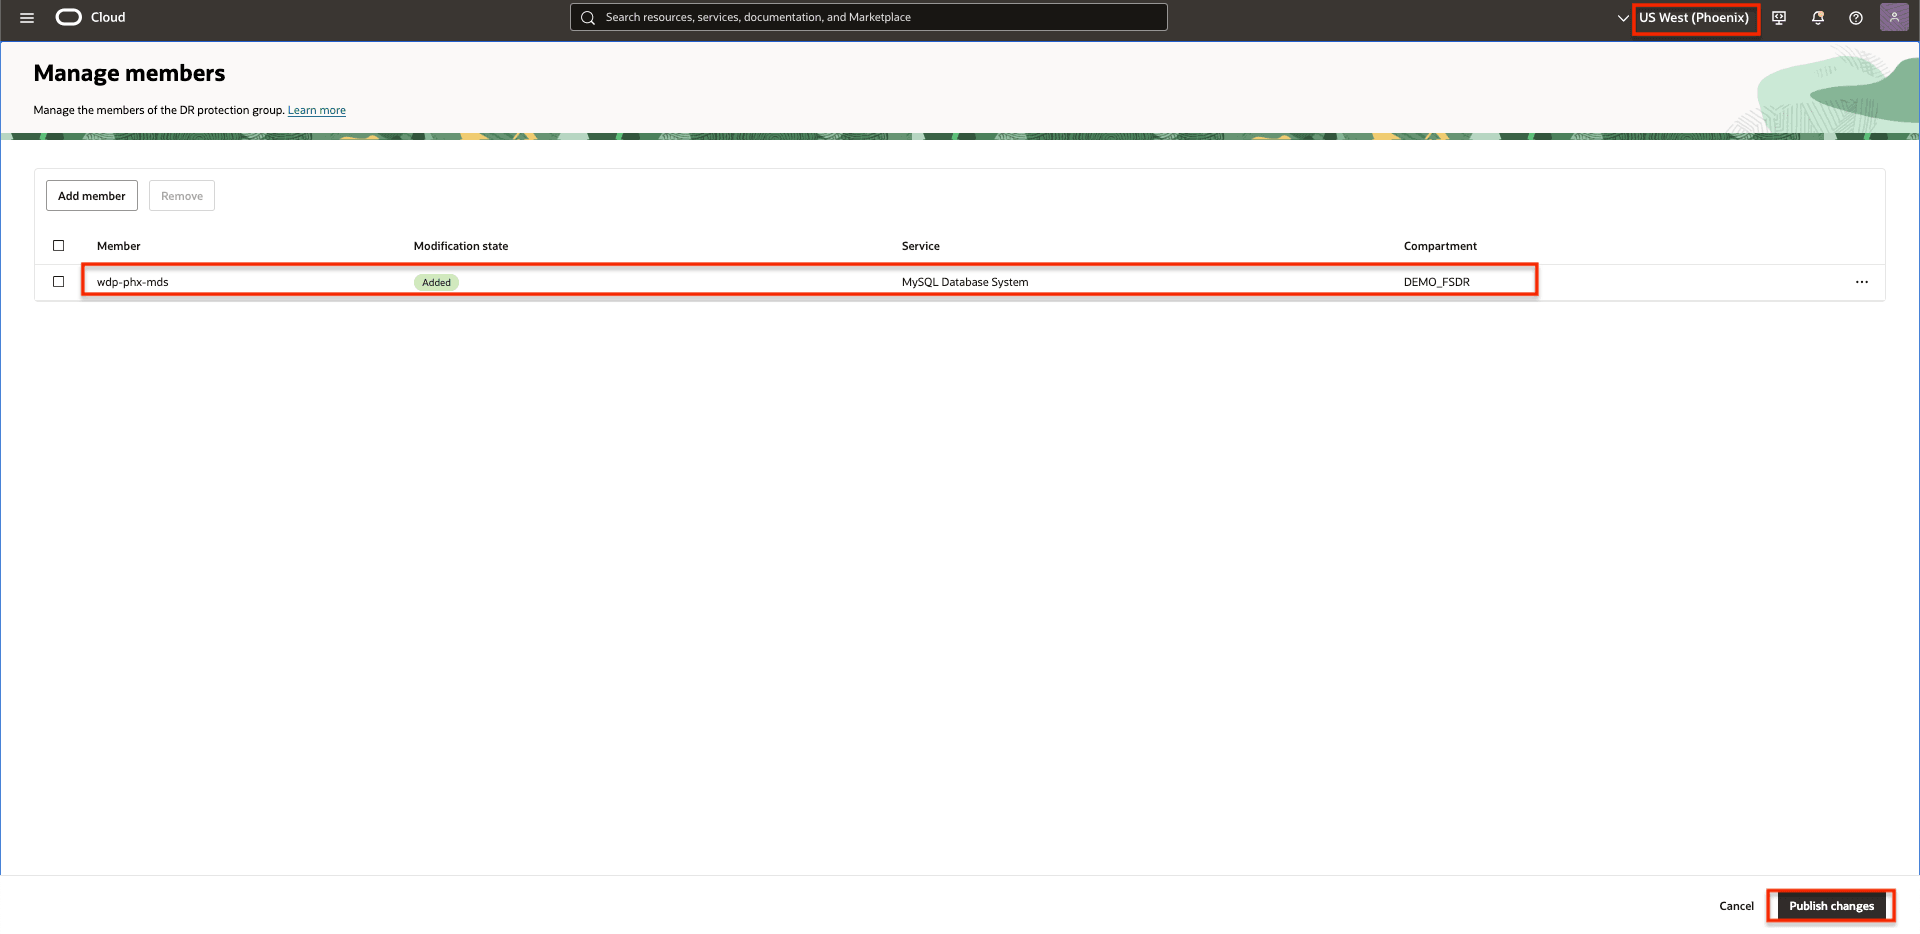
Figure 2.9: Publish changesConfirm, by clicking on Publish changes.
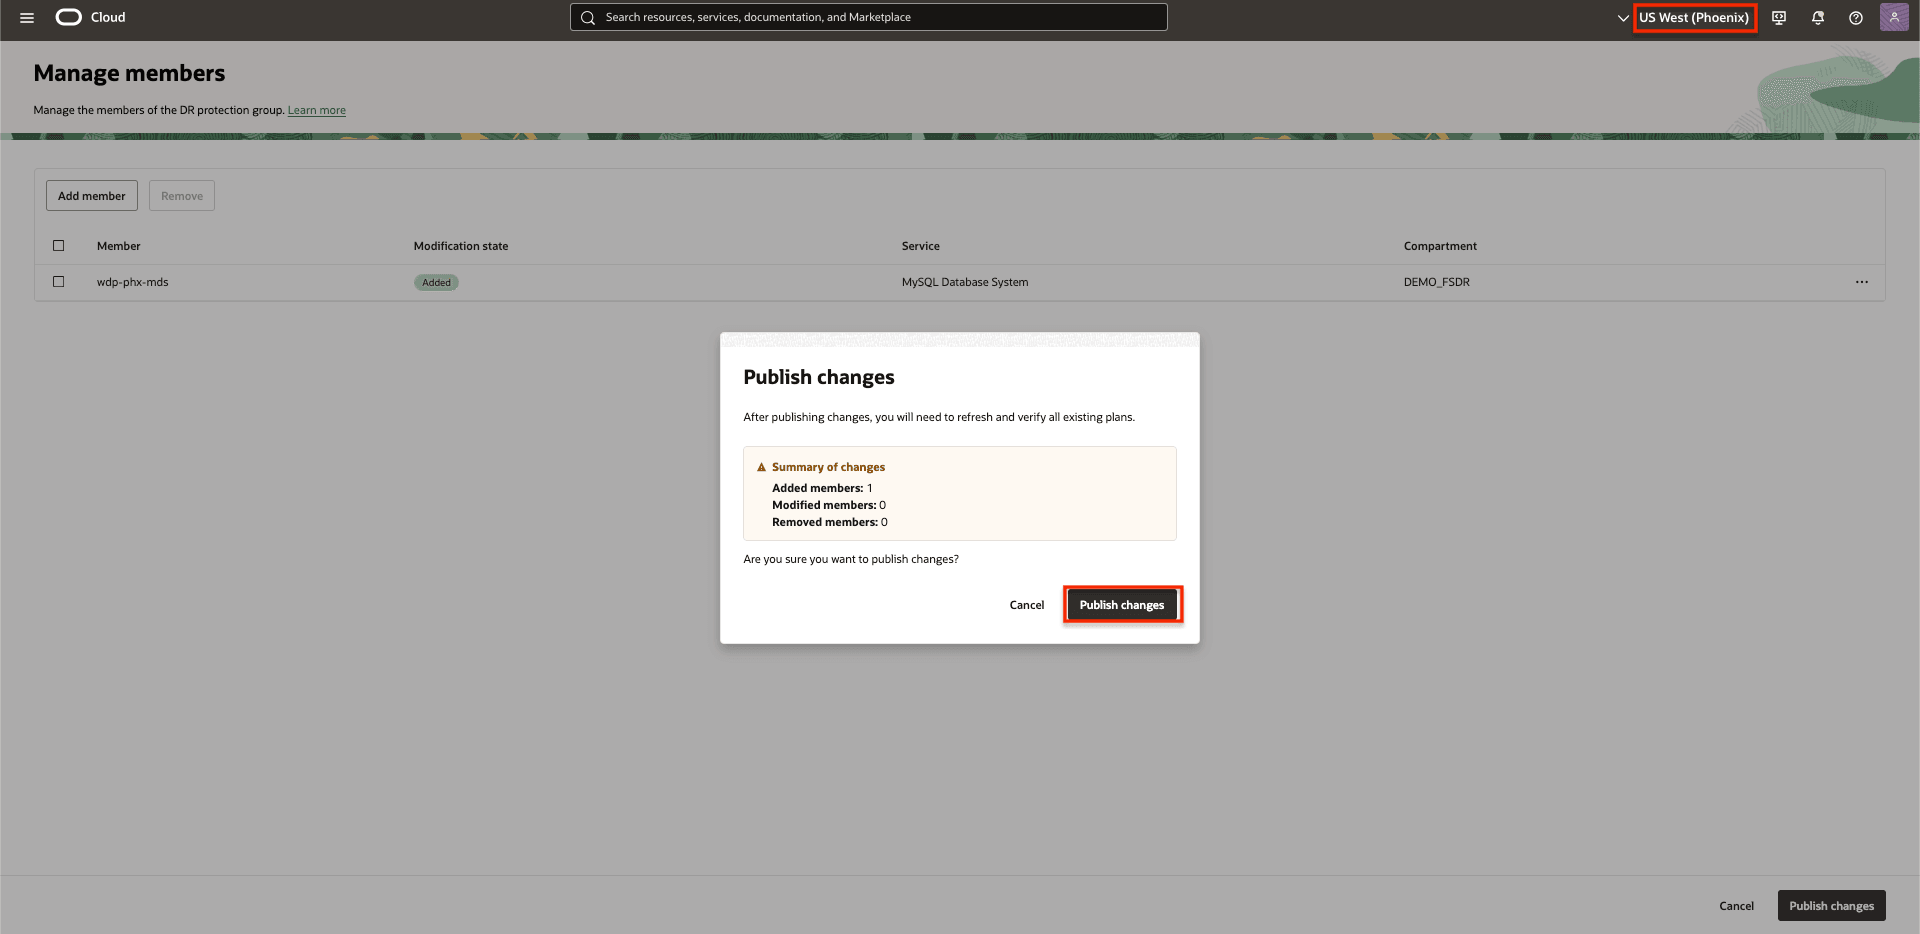
Figure 2.10: Publish changes
Figure 2.11: MySQL HeatWave added to the DRPG in Region 2
Task 3: Create DR Plans in Region 2
In this task, we will create the initial switchover and failover plans associated with the standby DR protection group in Region 2 (Phoenix).
The purpose of these plans is to seamlessly transition the workload from the primary region (Region 1) to the standby region (Region 2). As part of any DR operation, the roles of the DR protection groups in both regions are automatically reversed: the protection group in Region 1 becomes the standby, while the protection group in Region 2 assumes the primary role following a failover or switchover.
OCI Full Stack DR will pre-populate these plans with built-in steps derived from the member resources added during the previous tasks. The DR plans are automatically prepopulated with the appropriate MySQL HeatWave recovery tasks, as MySQL HeatWave is integrated with Full Stack Disaster Recovery.
DR plans are always created within the protection group holding the standby role. Because Region 2 (Phoenix) is currently the standby protection group, we will begin creating the plans there.
Task 3.1: Create DR Plans
-
Create a basic plan by selecting the DRPG in Region 2 (Phoenix)
- Ensure that the OCI region context is Region 2 (Phoenix).
- Select the standby DRPG in Region 2.
- Select Plans.
- Click Create Plan to begin the process.

Figure 3.1: How to begin creating basic DR plans in Region 2 -
Create a switchover plan.
- Enter a simple but meaningful Name for the Switchover plan. The name should be as short as possible but easy to understand at a glance to help reduce confusion and human error during a crisis.
- Select Plan type as Switchover (planned).
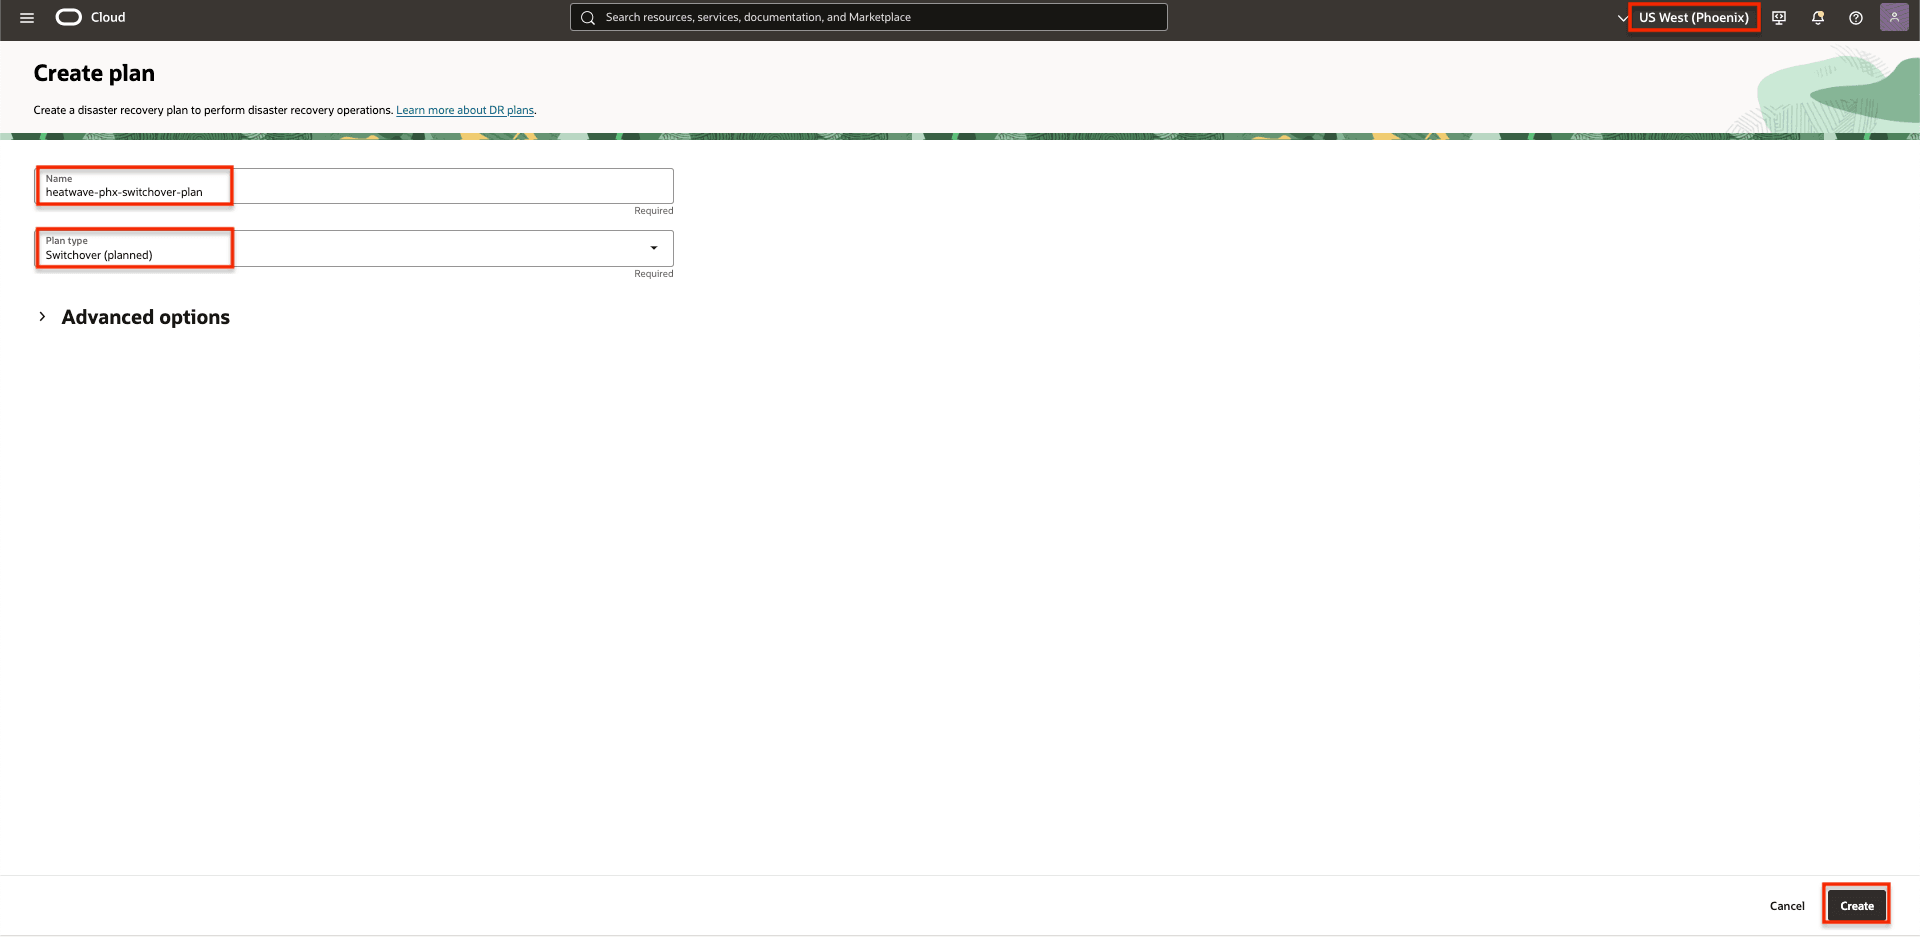
Figure 3.2: The parameters needed to create DR switchover plan
Figure 3.3: DR switchover planClick the DR plan name to see the DR plan details and the Plan Groups.

Figure 3.4: DR switchover MySQL HeatWave Plan group -
Create a failover plan.
- Enter a simple but meaningful Name for the Failover plan. The name should be as short as possible but easy to understand at a glance to help reduce confusion and human error during a crisis.
- Select Plan type as Failover (unplanned).
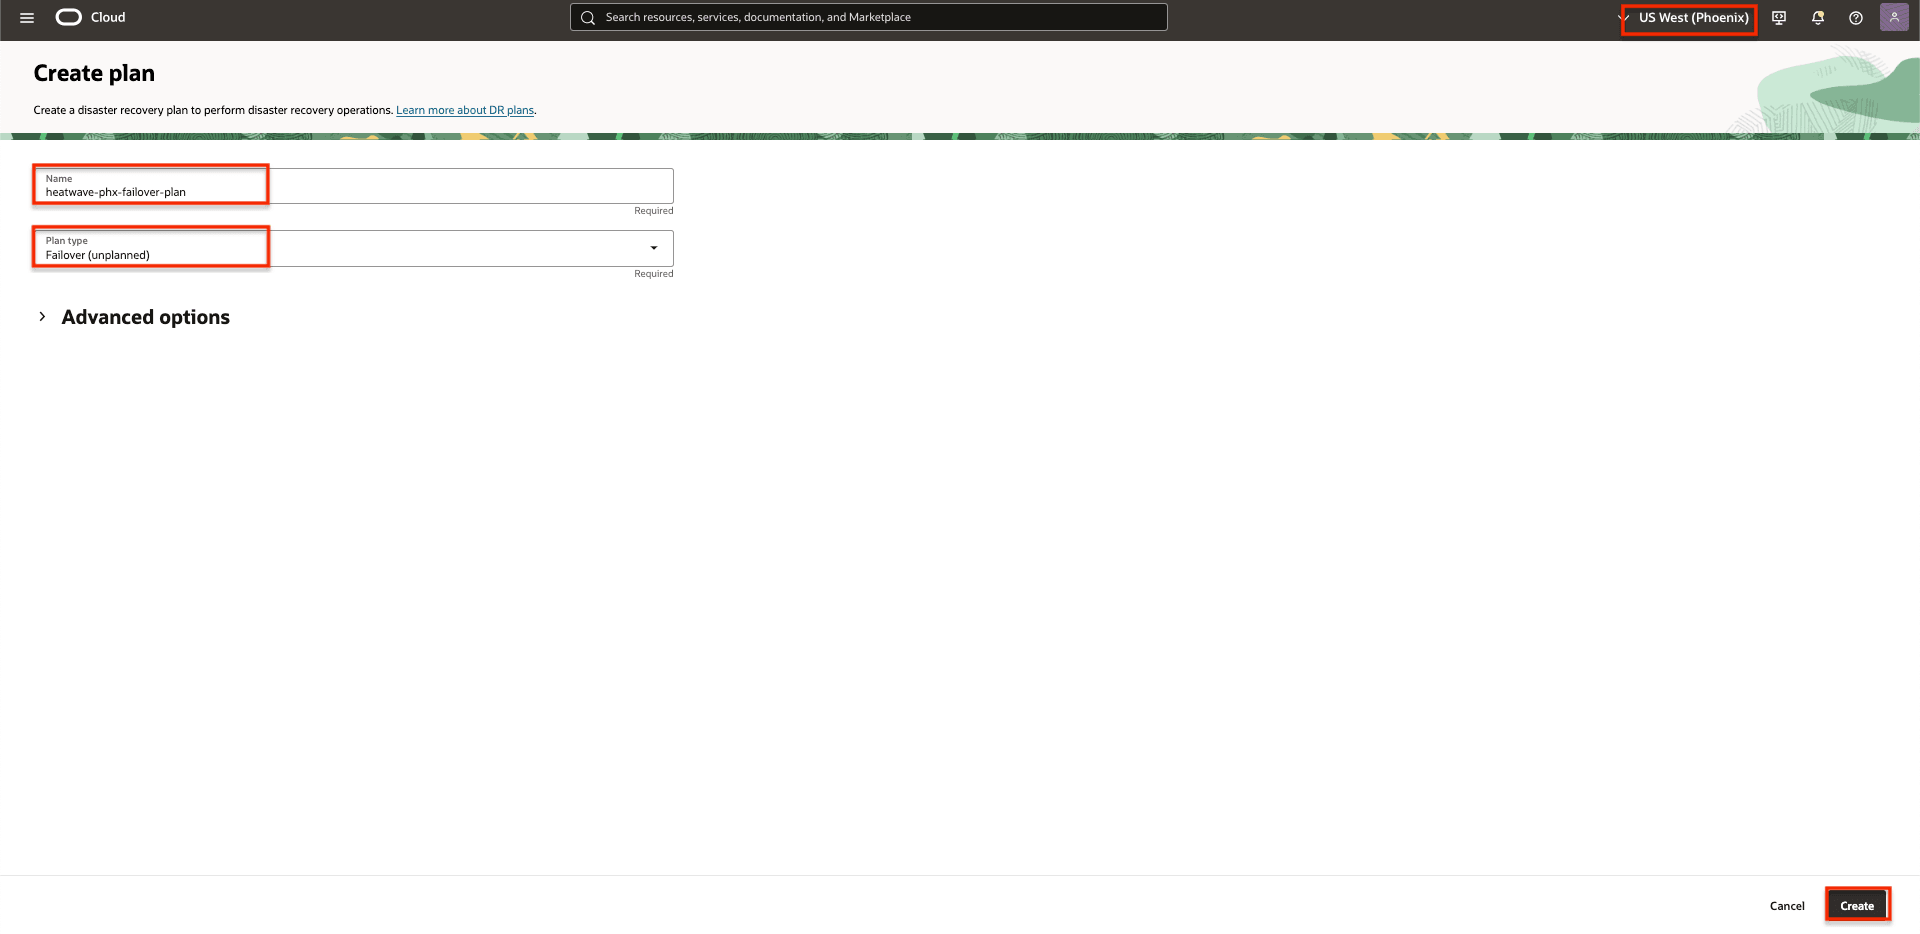
Figure 3.5: The parameters needed to create DR failover plan
Figure 3.6: DR failover planClick the DR plan name to see the DR plan details and the Plan Groups.

Figure 3.7: DR failover MySQL HeatWave Plan group
The standby DR protection group in Region 2 should now have the two DR plans. These will handle transitioning workloads from Region 1 to Region 2.
Note: Following the initial execution of the Switchover plan, we will later create corresponding plans in Region 1 to transition workloads back from Region 2.
- (Optional) Create DR Drill plans - Start Drill and Stop Drill.
Just like the Switchover and the Failover plans, you can create a Start Drill DR plan. During the Start Drill, a new DB system will be created using the latest available backups, simulating a real disaster recovery scenario where you need to recover operations in the DR region.
- Enter a simple but meaningful Name for the Start Drill plan. The name should be as short as possible but easy to understand at a glance to help reduce confusion and human error during a crisis.
-
Select Plan type as Start Drill.
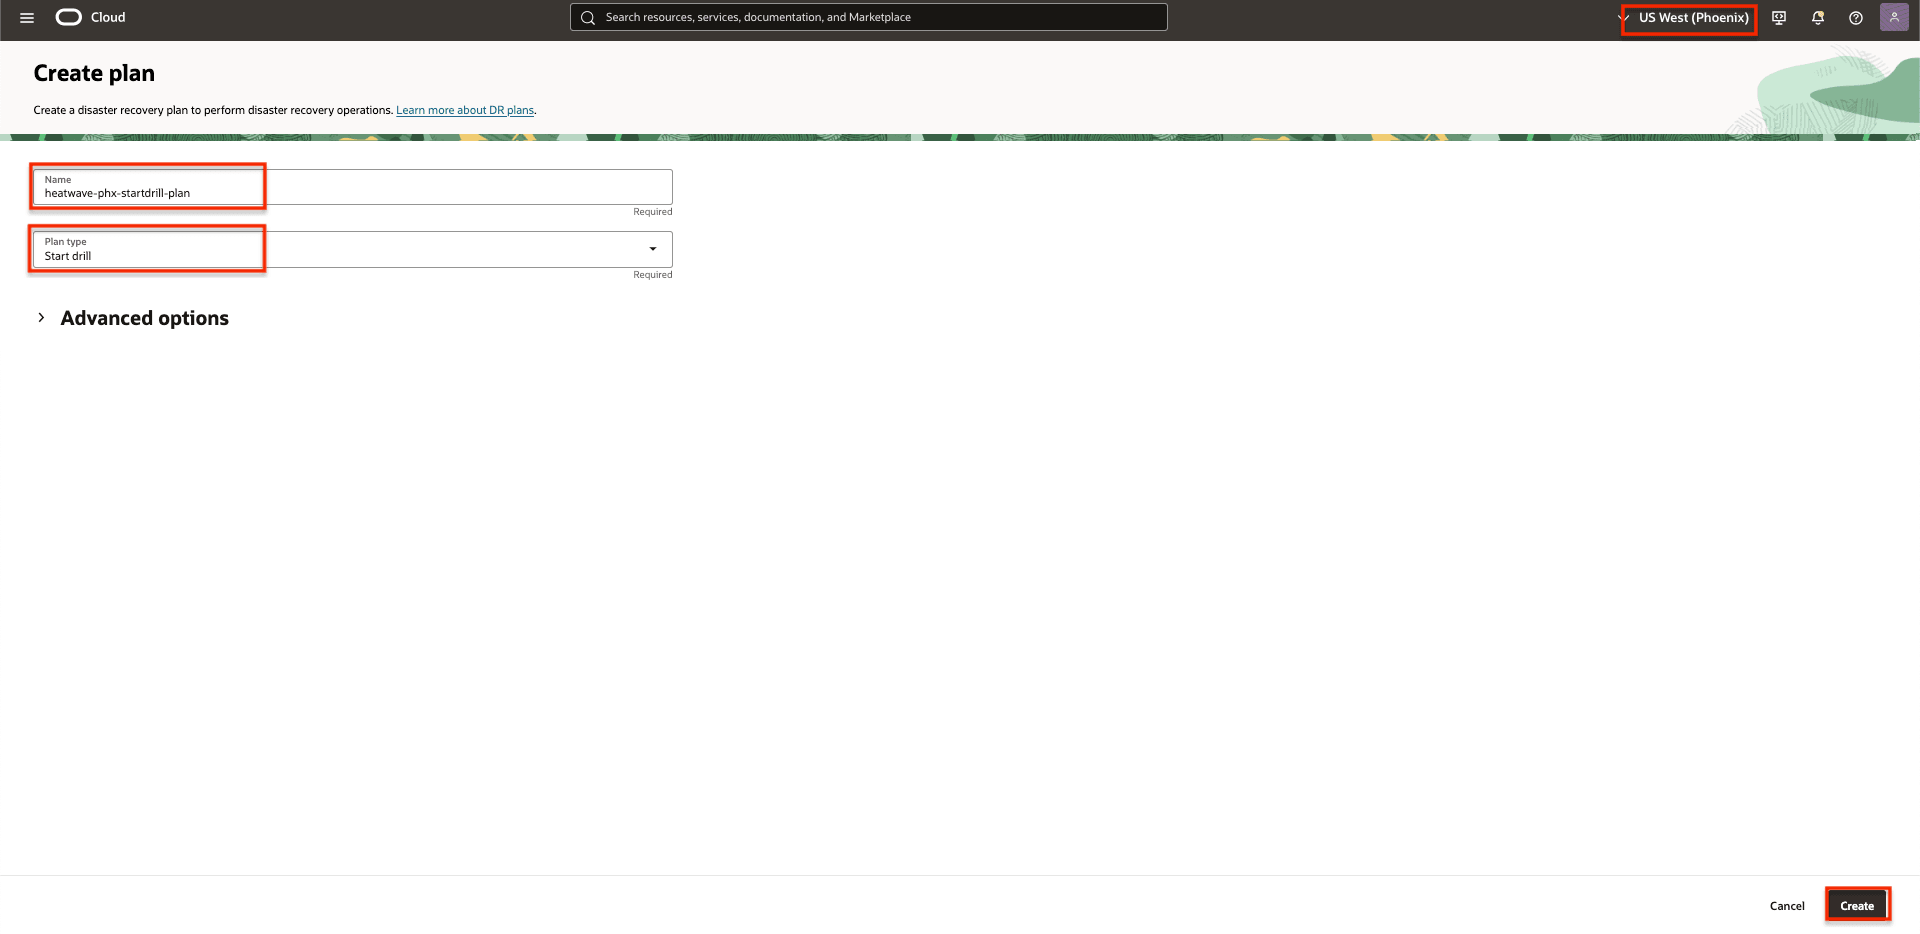
Figure 3.8: The parameters needed to create Start Drill plan
The Stop Drill should be created/executed after a successful Start Drill has been completed. This plan is responsible for terminating the DB systems created during the Start Drill execution and cleaning up any temporary resources that were used for testing purposes.
Task 4: Run Prechecks in Region 2
Both switchover and failover DR plans have been successfully created in the standby Region 2. These plans enable OCI Full Stack DR to transition workloads from Region 1 to Region 2. The subsequent task involves running the prechecks for both the switchover and failover plans to ensure readiness and validate the transition process.
Task 4.1: Begin Prechecks for the Switchover Plan
Run prechecks for the switchover DR plan.
- Ensure that the region context is set to standby Region 2.
- Ensure that the correct DR protection group in Region 2 is selected, it should be the standby role.
- Click the switchover plan name.
- Click Action.
- Click Run prechecks.

Figure 4.1: Showing how to run prechecks of the switchover plan
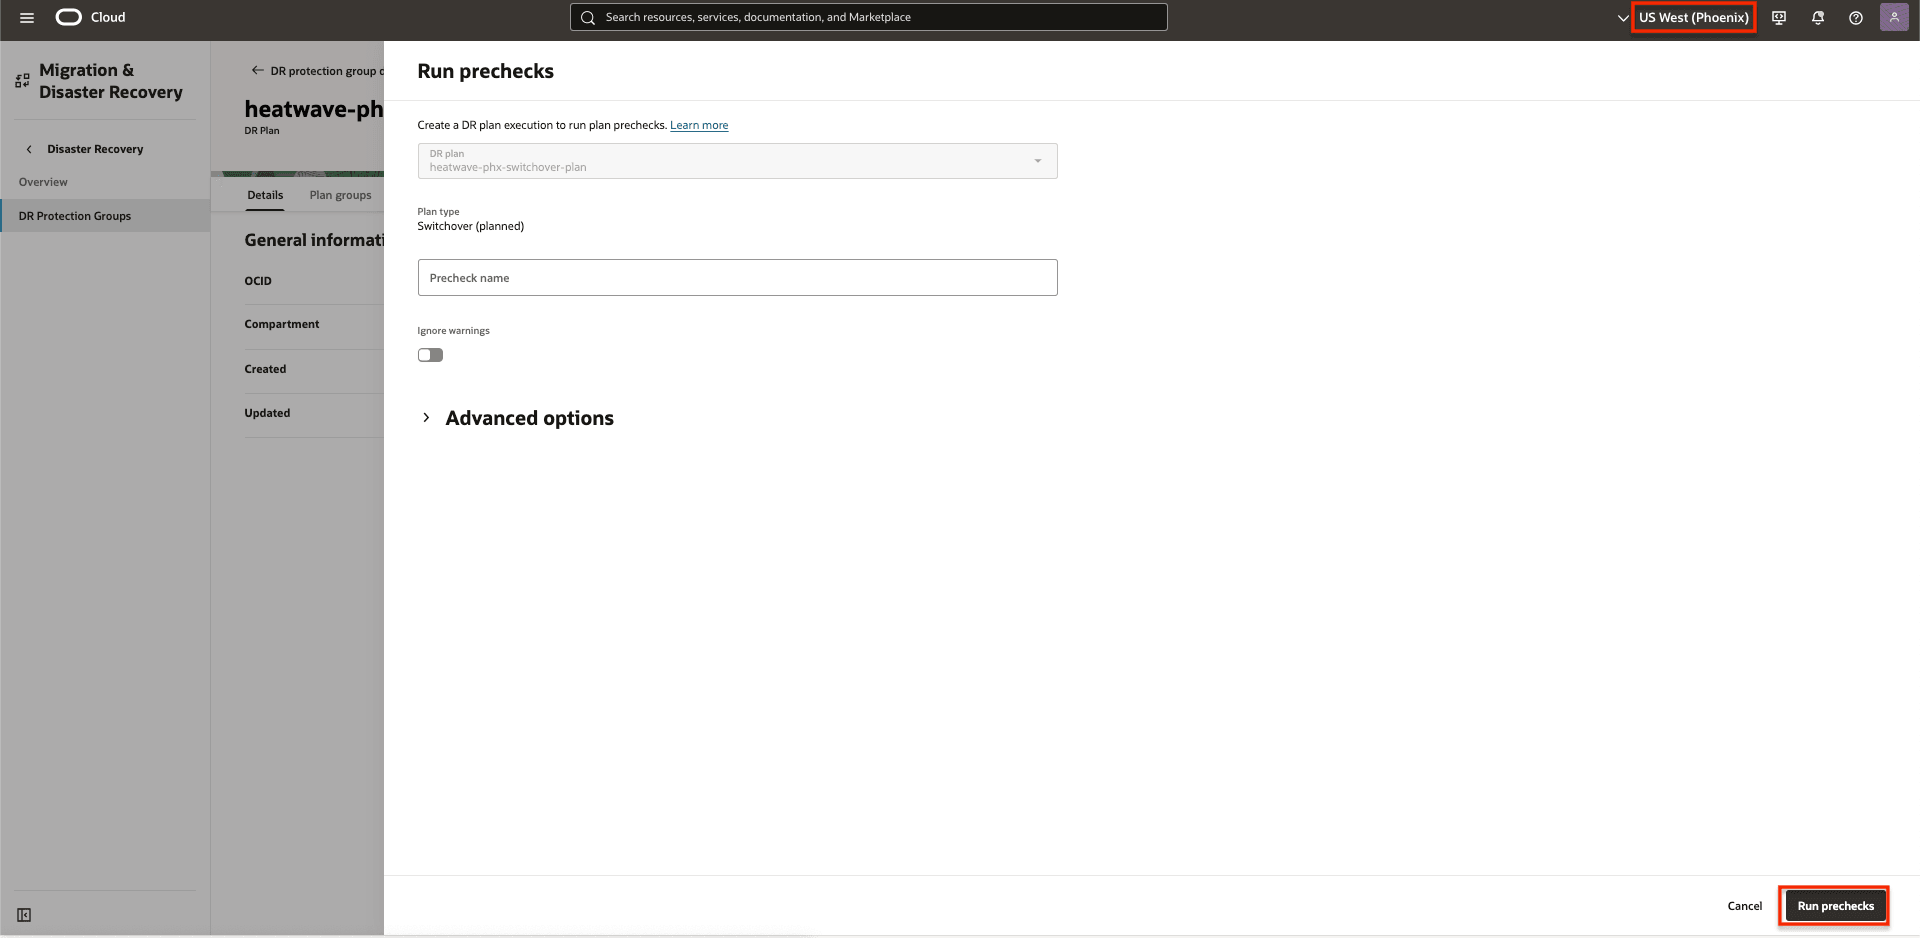
Figure 4.2: Showing how to run prechecks of the switchover plan
Plan execution groups of the switchover prechecks.

Figure 4.3: Showing a Completed prechecks of the switchover plan
Task 4.2: Begin Prechecks for the Failover Plan
Run the prechecks for the failover DR plan.
- Ensure that the region context is set to standby Region 2.
- Ensure that the correct DR protection group in Region 2 is selected, it should be the standby role.
- Click the failover plan name.
- Click Action.
- Click Run prechecks.

Figure 4.4: Showing how to run prechecks of the failover plan
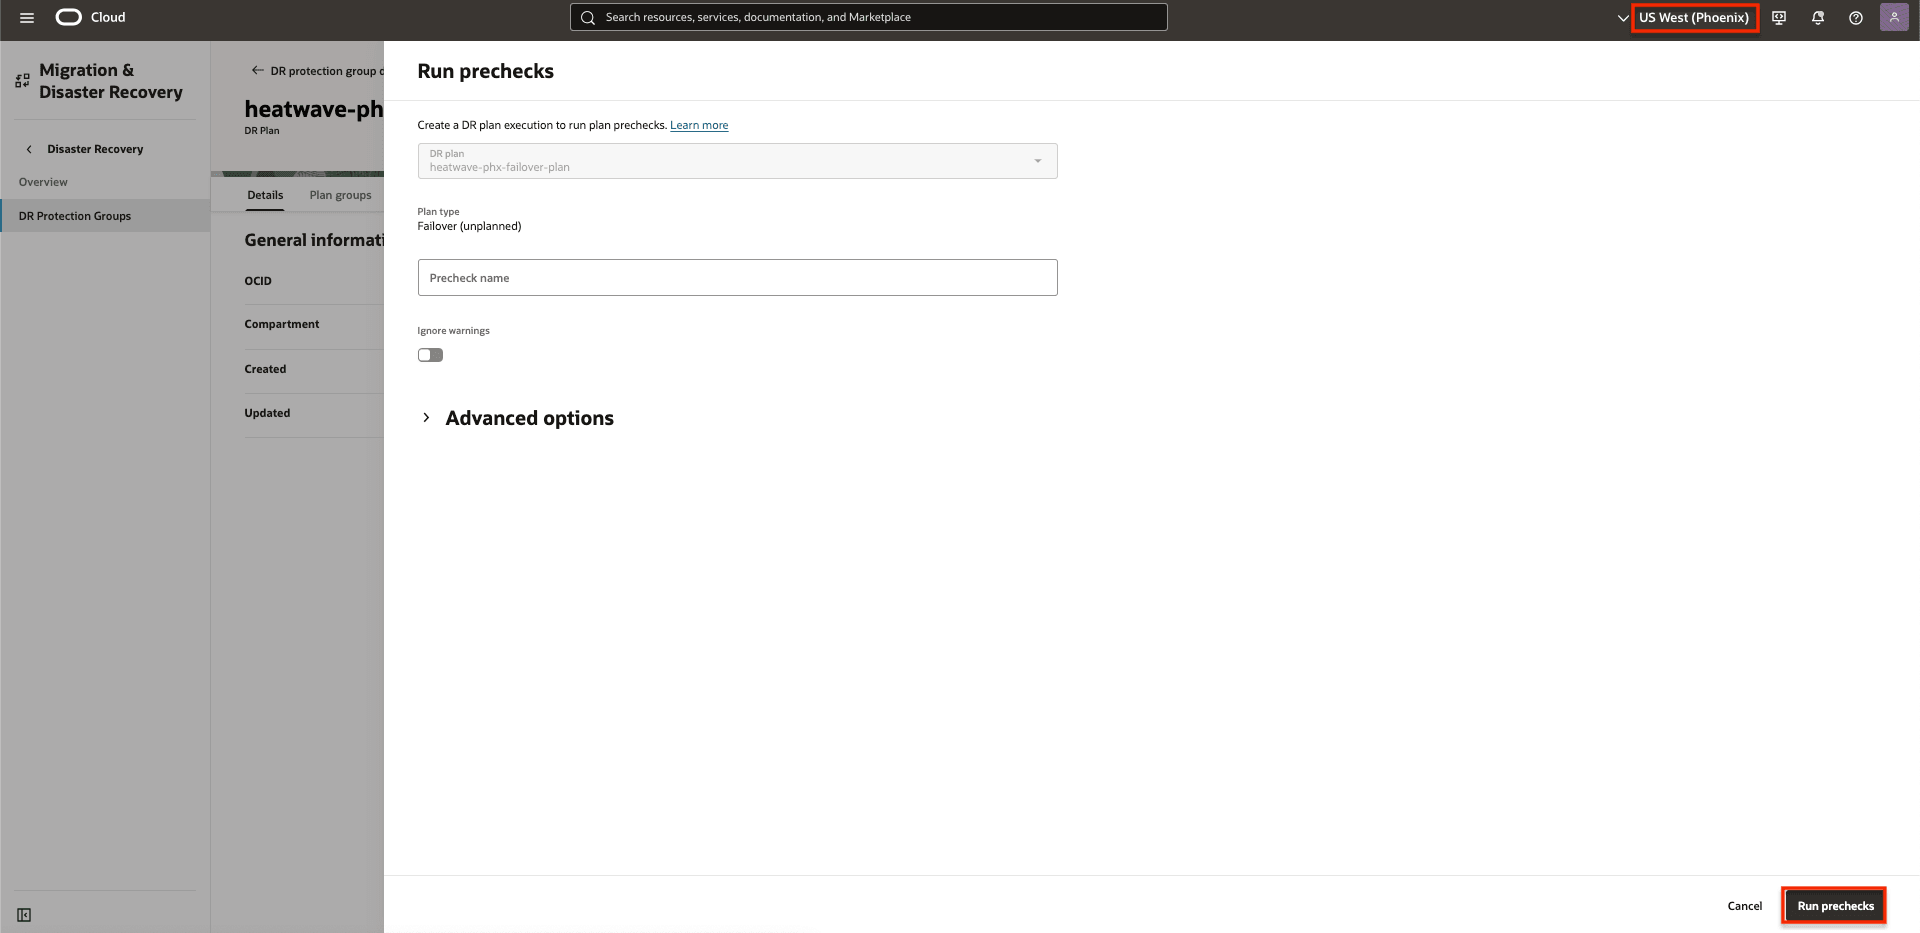
Figure 4.5: Showing how to run prechecks of the failover plan
Plan execution groups of the switchover prechecks.

Figure 4.6: Showing a Completed prechecks of the failover plan
Task 5: Run the Switchover Plan in Region 2
Run the switchover DR plan to begin the process of transitioning the WordPress application with the MySQL HeatWave from Region 1 to Region 2.
- Ensure that the region context is set to standby Region 2.
- Ensure that the correct DR protection group in Region 2 is selected, it should be the standby role.
- Click the switchover plan name.
- Click Action.
- Click Execute plan.

Figure 5.1: Showing how to Run the switchover plan
This task runs the switchover plan in Region 2.
- Deselect Enable prechecks, since they were already executed in Task 4.
- Click Execute DR plan.
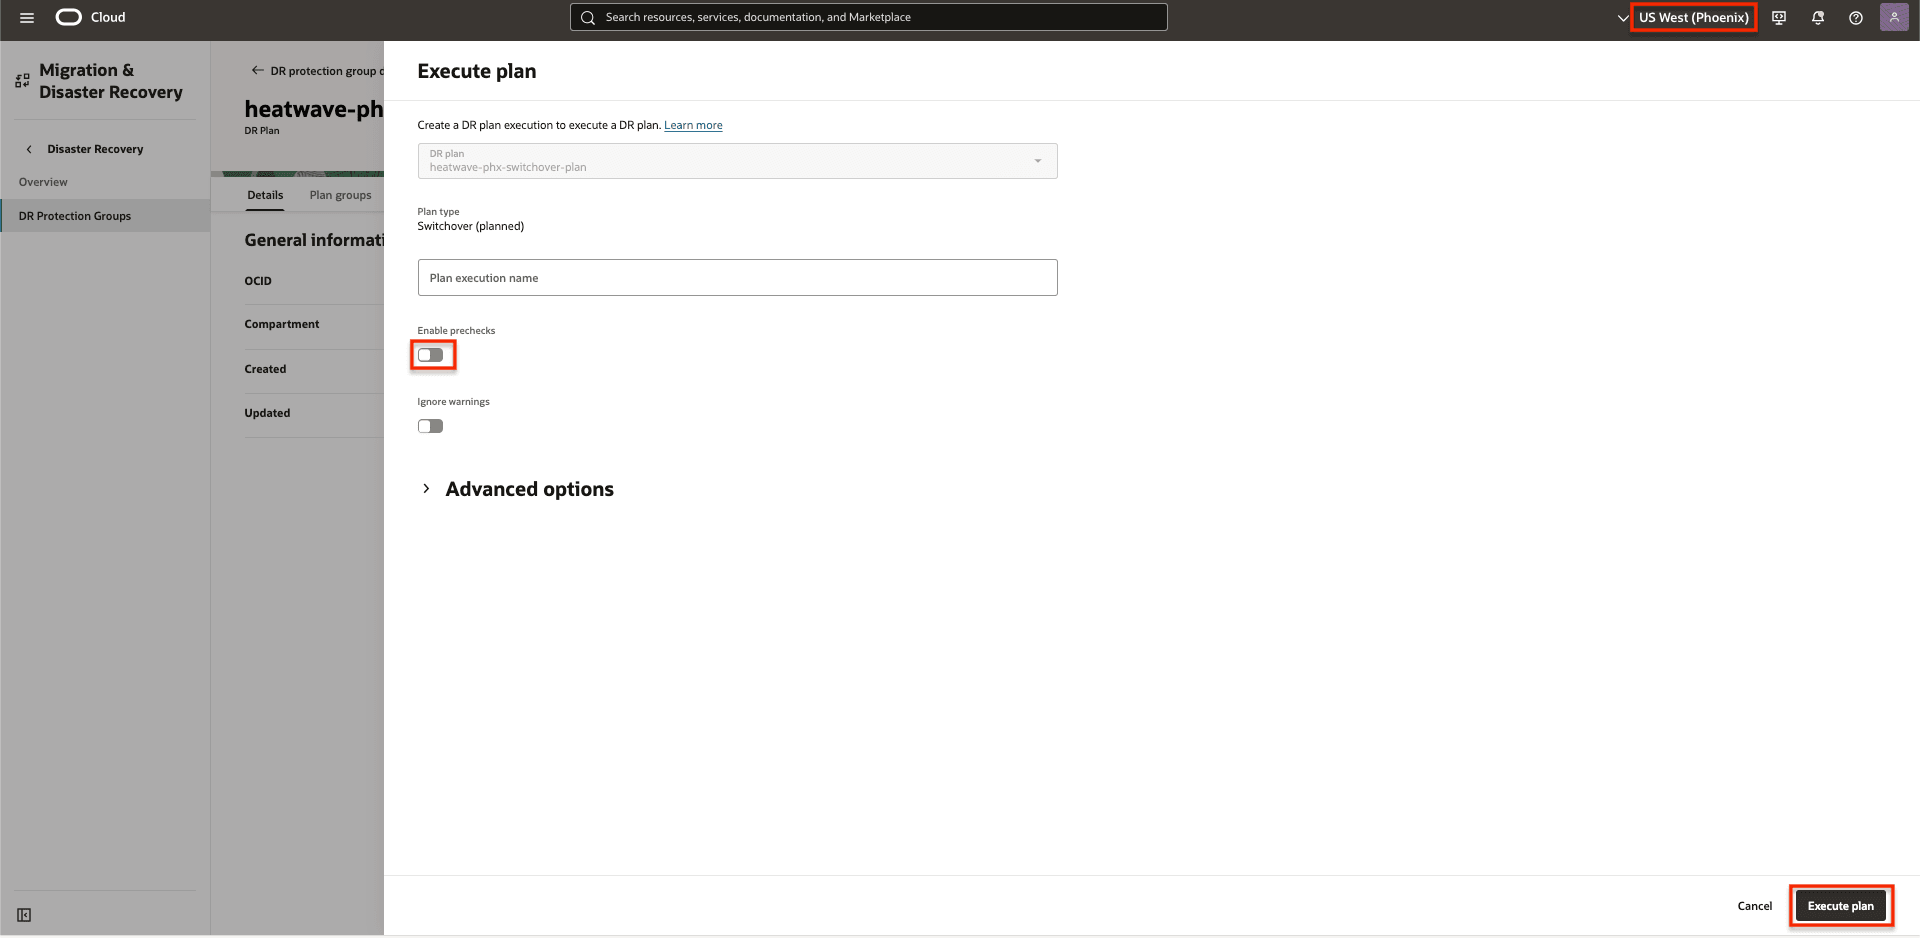
Figure 5.2: Showing how to Run the switchover plan
Click Execute DR plan to begin
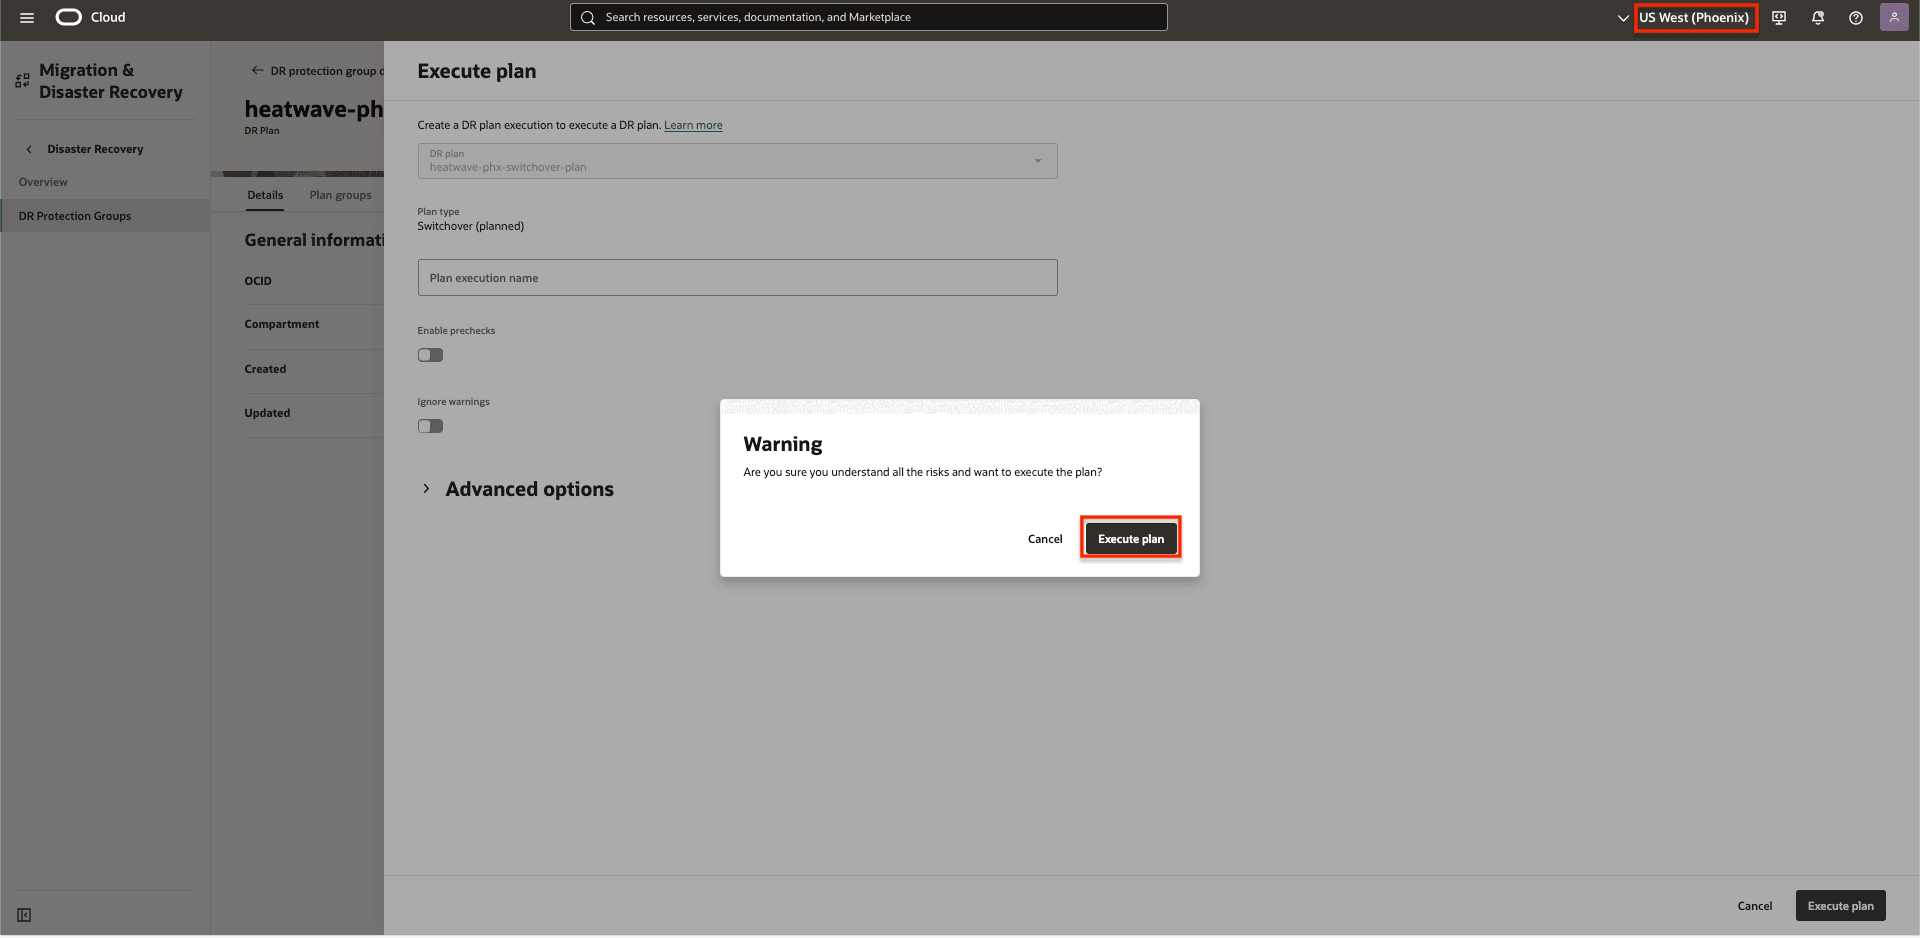
Figure 5.3: Showing how to confirm Run the switchover plan
Monitor the switchover plan until the complete workload has been fully transitioned from Region 1 to Region 2.
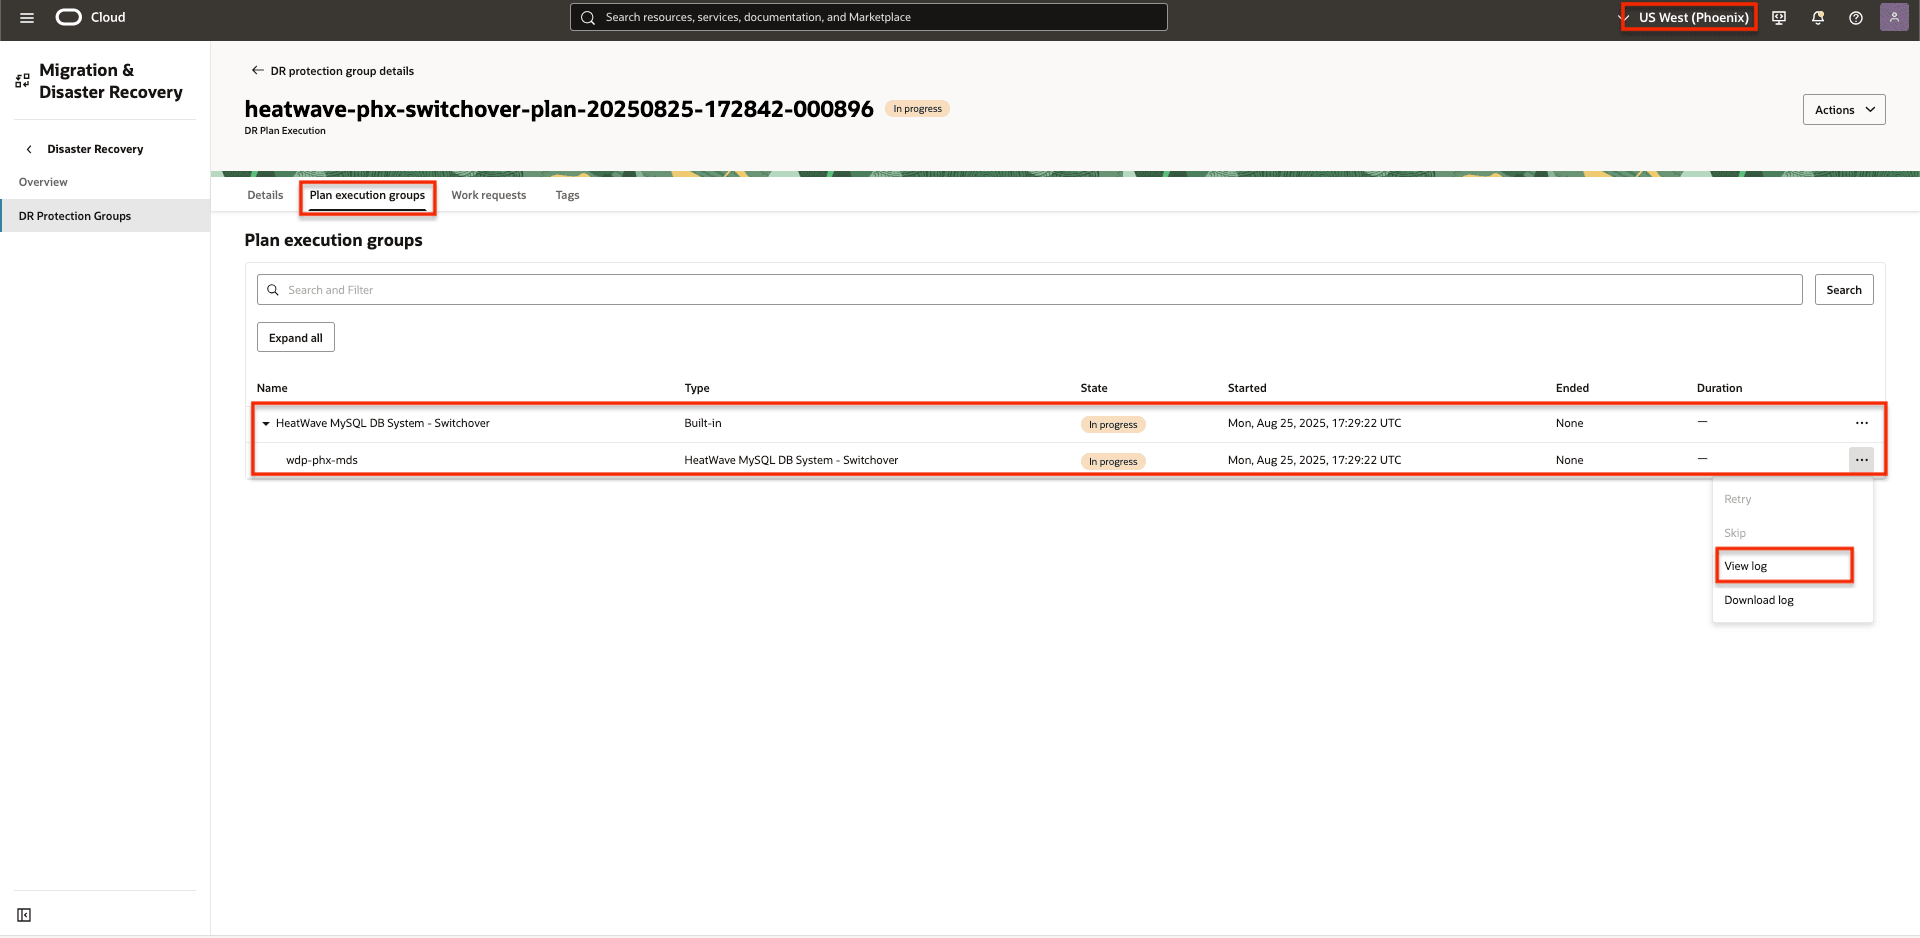
Figure 5.4: Showing in progress switchover plan group execution.
The execution of the switchover plan was successfully completed.

Figure 5.5: Showing a Completed switchover plan execution.
Task 6: Create DR plans in Region 1
With the successful completion of the switchover by OCI Full Stack DR, Region 2 has now assumed the role of the primary region, while Region 1 has transitioned to serve as the standby region.
Follow the same approach detailed in Task 3, proceed to create the switchover and failover plans within the DR protection group for Region 1, which now serves as the standby peer region.

Figure 6.1: Screenshot showing Created plans in Region 1

Figure 6.2: Screenshot showing switchover plan in Region 1

Figure 6.3: Screenshot showing Failover plan in Region 1
Next Steps
For more information, see the OCI Full Stack DR and MySQL HeatWave documentation in the Related Links section.
Related Links
-
Oracle Cloud Infrastructure (OCI) Full Stack Disaster Recovery
-
Join #full-stack-dr slack channel
Acknowledgments
-
Author - Antoun Moubarak (Architect, Office of CTO - EMEA Technology Engineering)
-
Contributor - Suraj Ramesh (Product Manager for OCI Full Stack DR)
More Learning Resources
Explore other labs on docs.oracle.com/learn or access more free learning content on the Oracle Learning YouTube channel. Additionally, visit education.oracle.com/learning-explorer to become an Oracle Learning Explorer.
For product documentation, visit Oracle Help Center.
Automate Disaster Recovery for MySQL HeatWave with Replication Channels Using OCI Full Stack Disaster Recovery
G42372-02