Note:
- This tutorial requires access to Oracle Cloud. To sign up for a free account, see Get started with Oracle Cloud Infrastructure Free Tier.
- It uses example values for Oracle Cloud Infrastructure credentials, tenancy, and compartments. When completing your lab, substitute these values with ones specific to your cloud environment.
Use Oracle Functions to load files into autonomous database
Introduction
In this tutorial, you will create Object Storage Buckets, Oracle Function, Oracle Autonomous Data Warehouse, and trigger the function whenever a file is uploaded to the Object Storage. The function will take the file and write it to the database.
Objectives
- Create an application
- Create a Dynamic Group
- Create Object Storage bucket
- Create an autonomous database
- Deploy a Function
- Create an Event rule
- Test the created Function
Prerequisites for Functions
Create Compartment
Ignore this step if you’re using a free Oracle-provided tenancy.
If you want to use an existing compartment, skip to the next step. Otherwise, click Compartments and then Create Compartment, to create a new compartment.
Create VCN and Subnets
If a suitable VCN in which to create network resources doesn’t exist already, log in to the Console as a tenancy administrator and under Core Infrastructure, go to Networking and then:
- Click Virtual Cloud Networks and choose a compartment from the previous step.
- Click Start VCN Wizard, then VCN with Internet Connectivity, then Start VCN Wizard.
- Enter a name for the new VCN (for example:
fn-vcn), click Next, and then click Create to create the VCN along with the related network resources.
Create Policy for Oracle Functions
Log in to the Console as a tenancy administrator and under Governance and Administration, go to Identity and click Policies and then do the following:
-
Select the tenancy’s root compartment
-
Click Create Policy.
-
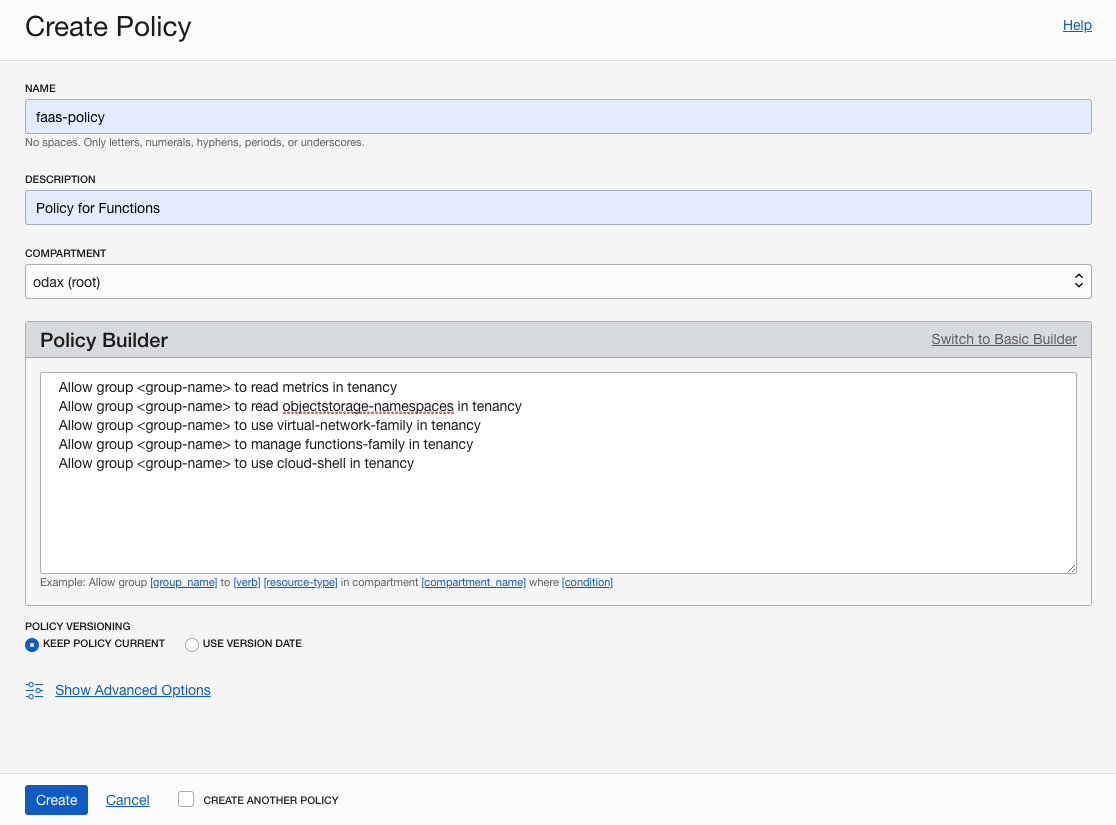
For name, enter
faas-policy. -
For description, enter
Policy for Functions. -
Click on Customize (Advanced) link and paste the policy statements into the Policy Builder field:
Allow group <group-name> to read metrics in tenancy Allow group <group-name> to read objectstorage-namespaces in tenancy Allow group <group-name> to use virtual-network-family in tenancy Allow group <group-name> to manage functions-family in tenancy Allow group <group-name> to use cloud-shell in tenancy -
Click Create.
Make sure the user is part of the group referenced in the policy statements above. To create groups and add users to groups, refer to Create a group.
Create an Application
In this step, you will create an application and set up Fn CLI on Cloud Shell.
-
Under Solutions and Platform, select Developer Services and click Functions.
-
Select your development compartment from the Compartment list.
-
Click Create Application.
-
For name, enter
etl-app. -
Select the VNC you created earlier (e.g.
fn-vcn). -
Select the public subnet.
-
Click Create.
-
Click on the created application to open the application details.
-
Click the Getting Started link and follow the Begin your Cloud Shell session and Setup fn CLI on Cloud Shell sections in the Cloud Shell Setup.

This involves launching Cloud Shell, updating the Fn context, generating an auth token for the registry, and logging into the Oracle Cloud Infrastructure Registry.
Create a Dynamic Group
To use other OCI Services, your function must be part of a dynamic group. For information on creating dynamic groups, refer to the documentation.
Before you create a dynamic group, you need to get your development compartment OCID. You will use the compartment OCID in the dynamic group matching rule.
- Open the navigation menu, select Identity, and then Compartments.
- Find your development compartment from the list, hover over the cell in the OCID column and click Copy, to copy the compartment OCID to your clipboard.
- Store the compartment OCID as you will use it soon.
Now you’re ready to create a dynamic group.
-
To create a dynamic group, open the navigation menu, select Identity, and then Dynamic Groups.
-
Click Create Dynamic Group.
-
For name, enter
functions-dynamic-group. -
For description, enter
Group with all functions in a compartment. -
To select the functions that belong to the dynamic group, [write matching rules] (https://docs.cloud.oracle.com/en-us/iaas/Content/Identity/Tasks/managingdynamicgroups.htm#Writing). Write the following matching rule that includes all functions within a compartment you created your application in:
All {resource.type = 'fnfunc', resource.compartment.id = 'ocid1.compartment.oc1..example'}Note: Make sure you replace the above value with the compartment OCID you stored earlier.
Create Object Storage Bucket
You need a input-bucket bucket in Object Storage. You will use the input-bucket to drop-in the CSV files. The function will process the file and import them into Oracle Autonomous Data Warehouse.
Let’s create the input-bucket first:
-
Open the navigation menu, select Object Storage, and then select Object Storage.
-
Select your development compartment from the Compartment list.
-
Click the Create Bucket.
-
Name the bucket input-bucket.
-
Select the Standard storage tier.
-
Check the Emit Object Events check box.
-
Click Create Bucket.

Create IAM Policies
Create a new policy that allows the dynamic group (functions-dynamic-group) to manage objects in the bucket.
-
Open the navigation menu, select Identity, and then select Policies.
-
Click Create Policy.
-
For name, enter
functions-buckets-policy. -
For description, enter
Policy that allows functions dynamic group to manage objects in the bucket. -
Click the Customize (Advanced) link and paste the policy statements into the Policy Builder field:
Allow dynamic-group functions-dynamic-group to manage objects in compartment [compartment-name] where target.bucket.name='input-bucket'Note: replace the
compartment-namewith the name of your development compartment (the one where you created the VCN and Function Application). -
Click Create.

Create Autonomous Database
The function accesses the autonomous database using SODA (Simple Oracle Document Access) for simplicity. You can use the other type of access by modifying the function.
-
Open the navigation menu, select Autonomous Data Warehouse.
-
Click Create Autonomous Database.
-
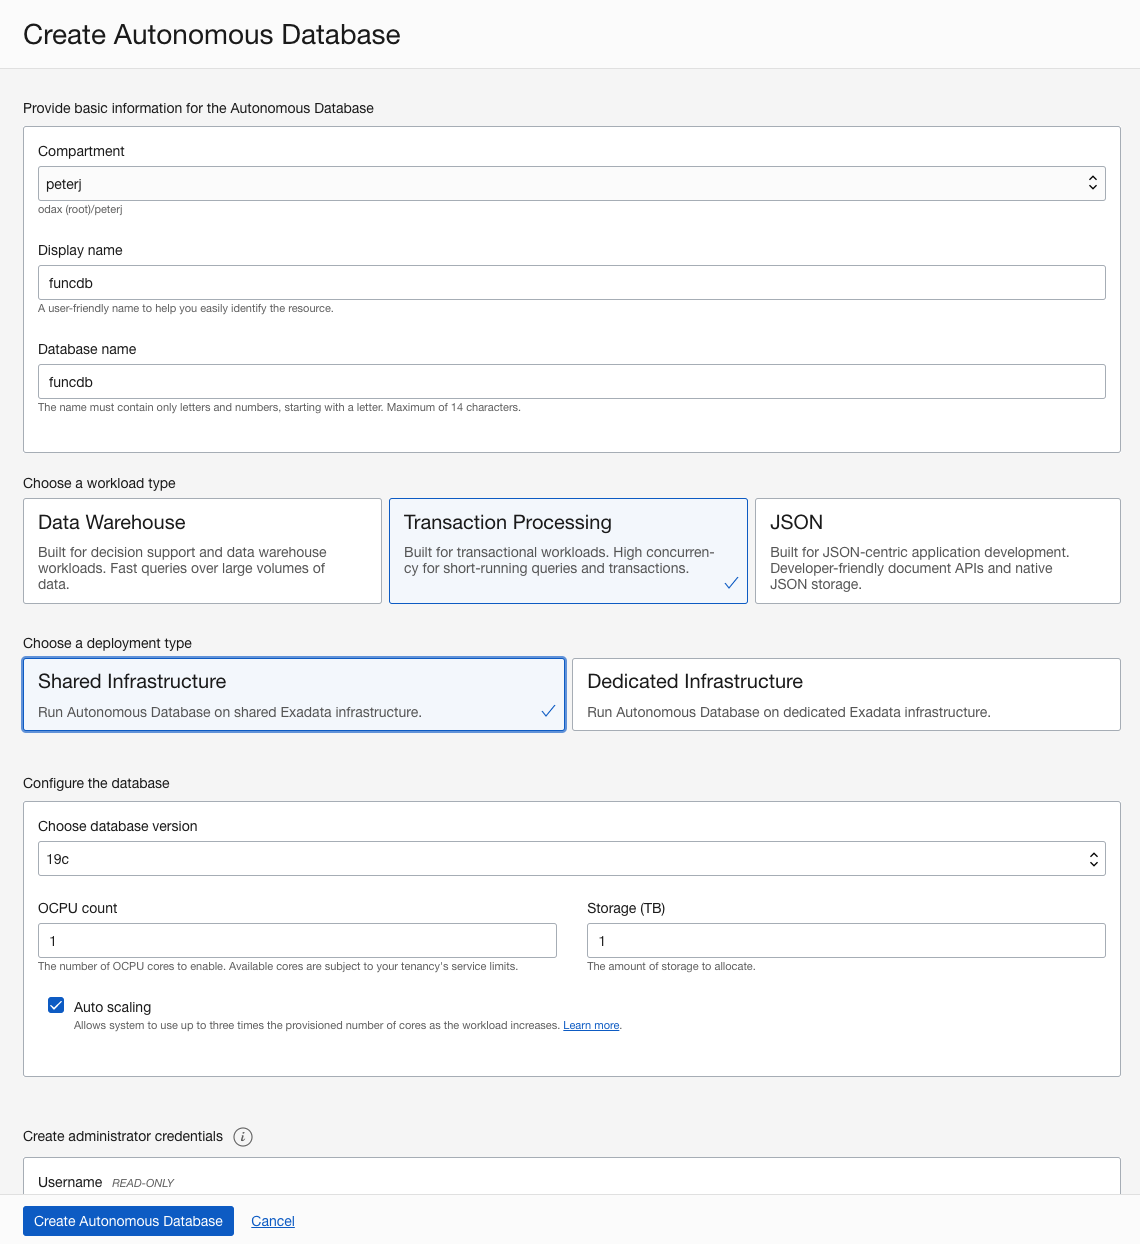
From the list, select your development compartment.
-
For display name and database name, enter
funcdb. -
For the workload type, select Transaction Processing.
-
For deployment type, select Shared Infrastructure.
-
Enter the admin password.
-
Click Create Autonomous Database.
Wait for OCI to provision the autonomous database, and then click the Service Console button.
-
Click Development from the sidebar.
-
Under RESTful Services and SODA, click Copy URL.
-
From your terminal (or Cloud Shell), create the collection called
regionsnumbersby running the command below. Make sure you replace the<ORDS_BASE_URL>with the value you copied in the previous step, and<DB-PASSWORD>with the admin password you set when you created the autonomous database.export ORDS_BASE_URL=<ORDS_BASE_URL> curl -X PUT -u 'ADMIN:<DB-PASSWORD>' -H "Content-Type: application/json" $ORDS_BASE_URL/admin/soda/latest/regionsnumbers -
To double check collection was created, you can list all collections. The output should look similar as below:
	bash
$ curl -u 'ADMIN:<DB-password>' -H "Content-Type: application/json" $ORDS_BASE_URL/admin/soda/latest/

{"items":[{"name":"regionsnumbers","properties":{"schemaName":"ADMIN","tableName":"REGIONSNUMBERS","keyColumn":{"name":"ID","sqlType":"VARCHAR2","maxLength":255,"assignmentMethod":"UUID"},"contentColumn":{"name":"JSON_DOCUMENT","sqlType":"BLOB","jsonFormat":"OSON"},"versionColumn":{"name":"VERSION","type":"String","method":"UUID"},"lastModifiedColumn":{"name":"LAST_MODIFIED"},"creationTimeColumn":{"name":"CREATED_ON"},"readOnly":false},"links":[{"rel":"canonical","href":"https://.../ords/admin/soda/latest/regionsnumbers"}]}],"hasMore":false}
Deploy the Function
In this step, you will clone the functions source code repository and use the fn deploy command to build the Docker image, push the image to OCIR, and deploy the function to Oracle Functions in your application.
-
From the Console UI, open the Cloud Shell.
-
Clone the Functions source code repository:
git clone https://github.com/oracle/oracle-functions-samples.git -
Go to the
samples/oci-load-file-into-adw-pythonfolder:cd oracle-functions-samples/samples/oci-load-file-into-adw-python -
Deploy the function to the
etl-app:fn -v deploy --app etl-appAfter you deploy the function, you need to set function configuration values so the function knows how to connect to the Autonomous Database.
-
Using the Fn CLI, set the following configuration values. Make sure you replace the
[ORDS_BASE_URL]and[DB_PASSWORD]with your values:fn config function etl-app oci-load-file-into-adw-python ords-base-url [ORDS_BASE_URL] fn config function etl-app oci-load-file-into-adw-python db-schema admin fn config function etl-app oci-load-file-into-adw-python db-user admin fn config function etl-app oci-load-file-into-adw-python dbpwd-cipher [DB-PASSWORD] fn config function etl-app oci-load-file-into-adw-python input-bucket input-bucket fn config function etl-app oci-load-file-into-adw-python processed-bucket processed-bucket
Create an Event Rule
In this step, you will configure a Cloud Event to trigger the function when you drop the files into the input-bucket.
-
From Console UI, open navigation and select Application Integration and click Events Service.
-
Select your development compartment from the Compartment list.
-
Click Create Rule.
-
For display name, enter
load_CSV_into_ADW. -
For description, enter
Load CSV file into ADW. -
Create three rules. You can click Another Condition to add more conditions:
Condition Service/Attribute Name Event Type/Attribute Values Event Type Object Storage Object - Create Attribute compartmentName Attribute bucketName input-bucket -
Under Actions, select Functions:
- For function compartment, select your development compartment.
- For function application, select
etl-app. - For function, select
oci-load-file-into-adw-python.
-
Click Create Rule.

Test the Function
To test the function, you can upload a .csv file to the input-bucket. You can do that from the Console UI or the Cloud Shell using the OCI CLI.
-
Open the Cloud Shell.
-
Go to the functions folder:
cd ~/oracle-functions-samples/samples/oci-load-file-into-adw-python -
Use the OCI CLI to upload
file1.csvto theinput-bucket:$ oci os object put --bucket-name input-bucket --file file1.csv Uploading object [####################################] 100% { "etag": "607fd72d-a041-484c-9ee0-93b9f5488084", "last-modified": "Tue, 20 Oct 2020 18:03:50 GMT", "opc-content-md5": "O8mZv0X2gLagQGT5CutWsQ==" }To see the data in the database, follow these steps:
-
From the OCI console, navigate to Autonomous Data Warehouse.
-
Select your development compartment from the Compartment list.
-
Select Transaction Processing from the Workload Type list.
-
Click on the database name (
funcdb). -
Click the Service Console.
-
Click Development link from the side bar.
-
Click SQL Developer Web.
-
Use ADMIN and the admin password to authenticate.
-
In the worksheet, enter the following query:
select UTL_RAW.CAST_TO_VARCHAR2( DBMS_LOB.SUBSTR( JSON_DOCUMENT, 4000, 1 )) AS json from regionsnumbers -
Click the green play button to execute the query.
-
The data from the CSV file is in the Query Result tab.
-
Congratulations! You have successfully completed the tutorial.
Acknowledgements
- Author - Greg Verstraeten
- Contributors - Peter Jausovec, Prasenjit Sarkar, Adao Junior
More Learning Resources
Explore other labs on docs.oracle.com/learn or access more free learning content on the Oracle Learning YouTube channel. Additionally, visit education.oracle.com/learning-explorer to become an Oracle Learning Explorer.
For product documentation, visit Oracle Help Center.
Use Oracle Functions to load files into autonomous database
F40586-03
October 2022
Copyright © 2022, Oracle and/or its affiliates.