Note:
- This tutorial requires access to Oracle Cloud. To sign up for a free account, see Get started with Oracle Cloud Infrastructure Free Tier.
- It uses example values for Oracle Cloud Infrastructure credentials, tenancy, and compartments. When completing your lab, substitute these values with ones specific to your cloud environment.
Integrate Active Directory with VMware NSX-T on Oracle Cloud VMware Solution
Introduction
The Oracle Cloud VMware Solution is a fully customer-managed, customer-operated native VMware cloud environment based on VMware validated design for use with a public Oracle Cloud Infrastructure (OCI) implementation. Oracle Cloud VMware Solution allows you to create and manage VMware enabled software-defined data centers (SDDCs) in OCI. Oracle Cloud VMware Solution integrates VMware on-premises tools, skillsets and processes with public Oracle Cloud services. You can rapidly transpose VMware estates to the cloud without changes to best practices or tools. VMware environments operate in a securely isolated customer tenancy with predictable performance and costs.
Oracle Cloud VMware Solution NSX-T Manager allows Active Directory integration and configuring Role-Based Access Control (RBAC). The integration is useful for scenarios wherein on-premises/corporate AD group needs a limited permission on VMware NSX-T console. It will help VMware NSX-T administrators delegate the required control to a group of users without having to grant complete admin privileges.
Objective
This tutorial summarizes how an on-premises/corporate Active Directory (AD) user can access Oracle Cloud VMware Solution NSX-T console with their on-premises/corporate AD credentials. This approach can be considered for customers who would like to restrict VMware NSX-T admin credentials in their organization. It will also help customers to designate specific controls and not admin control to specific groups.
Tasks Overview
- Create an on-premises/corporate AD Group and add AD users to it
- Integrate the on-premises/corporate AD with VMware NSX-T
- Create a custom VMware NSX-T role for an on-premises/corporate AD group
- Map the on-premises/corporate AD group with the custom VMware NSX-T role
Prerequisites
Oracle Cloud VMware Solution NSX-T must be able to resolve an on-premises/corporate AD server via FQDN and vice versa over IPSEC VPN or Fastconnect.
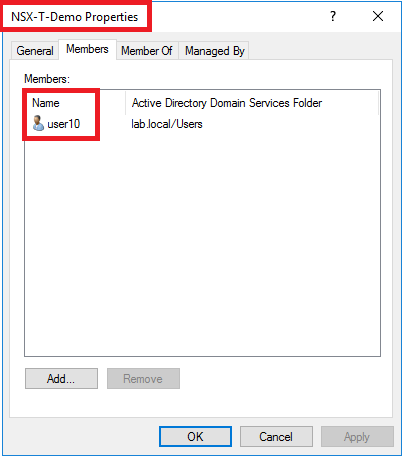
Task 1: Create an on-premises/corporate AD Group and add AD users to it
In this tutorial, we have created an on-premises/corporate AD group NSX-T-Demo and added an on-premises/corporate AD user user10 as its member.
Task 2: Integrate the on-premises/corporate AD with NSX-T
-
Log in to Oracle Cloud VMware Solution NSX-T console with user name admin and the password specified on the Oracle Cloud VMware Solution portal.
-
Navigate to the System tab, click User Management and then click on the LDAP tab.

-
Click Add Identity Source, enter the details and click the Set link.

-
Enter the on-premises AD details and save.

VMware NSX-T should display a successful connection to the on-premises/corporate AD server.

Task 3: Create a custom NSX-T role for the on-premises/corporate AD group
VMware NSX-T offers built-in roles for different use cases. However, in this tutorial we will create a custom role.
-
Click on the Roles tab, and then click Add Role.

-
Enter role name and customize the permissions as required.
-
To deny permission to a specific tab, for example Troubleshooting, click Read-only.

-
In the Set Permissions window, select None and the click APPLY.

-
The following image displays the role details and you can save the configuration.

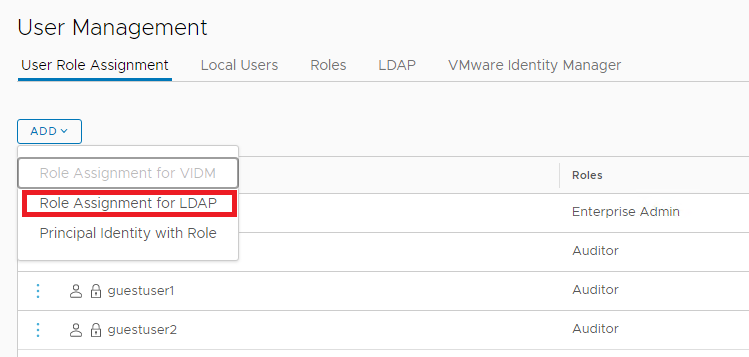
Task 4: Map the on-premises/corporate AD group with custom NSX-T role
-
Click User Role Assignment. By default, we have few defined roles. Click Add and choose Role Assignment for LDAP.
-
Add the details for the on-premises/corporate AD group and save the details.

User10 (on-premises/corporate AD user) can now login to Oracle Cloud VMware Solution NSX-T console with their on-premises/corporate AD credentials. The user will only see the tabs that they have permission to.

Acknowledgments
- Author - Vaibhav Tiwari (Cloud Solutions Architect)
More Learning Resources
Explore other labs on docs.oracle.com/learn or access more free learning content on the Oracle Learning YouTube channel. Additionally, visit education.oracle.com/learning-explorer to become an Oracle Learning Explorer.
For product documentation, visit Oracle Help Center.
Integrate Active Directory with VMware NSX-T on Oracle Cloud VMware Solution
F72107-01
November 2022
Copyright © 2022, Oracle and/or its affiliates.