Note:
- This tutorial requires access to Oracle Cloud. To sign up for a free account, see Get started with Oracle Cloud Infrastructure Free Tier.
- It uses example values for Oracle Cloud Infrastructure credentials, tenancy, and compartments. When completing your lab, substitute these values with ones specific to your cloud environment.
Migrate to Oracle Cloud Infrastructure Database with PostgreSQL using OCI Object Storage and Rclone
Introduction
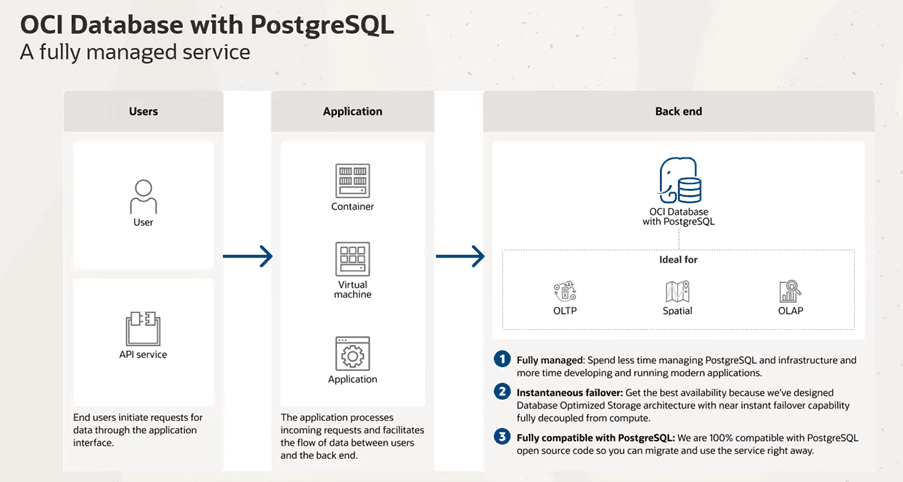
Oracle Cloud Infrastructure Database with PostgreSQL (OCI Database with PostgreSQL) is a fully managed service that reduces the time spent on routine tasks such as patching, backups and storage management. It’s key features include a database-optimized storage architecture that decouples the SQL transaction processing engine from the storage layer, multiple replicas to boost user activity, cross-regional backup copies, and full compatibility with the open-source PostgreSQL database.

Note: PostgreSQL versions 14 and 15 are supported (as of June 2025).
OCI Object Storage provides scalable, durable, low-cost storage for any type of data. It this tutorial, it will be used to store PostgreSQL dump file.
Rclone is an open source, command-line program to manage or transfer files on cloud storages.
In this tutorial, we will discuss how to effectively migrate data from an on-premises PostgreSQL database to OCI Database with PostgreSQL. We will use the pg_dump and pg_restore utilities leveraging cost effective OCI Object Storage and Rclone for fast, multipart upload and the mount feature.
Objectives
-
Export PostgreSQL database using
pg_dump. -
Copy exported data files to OCI Object Storage using rclone.
-
Mount OCI Object Storage to OCI Compute with rclone.
-
Import data directly from OCI Object Storage using
pg_restore.
Prerequisites
-
Access to an OCI account. To sign up for a free account, see Get started with Oracle Cloud Infrastructure Free Tier.
-
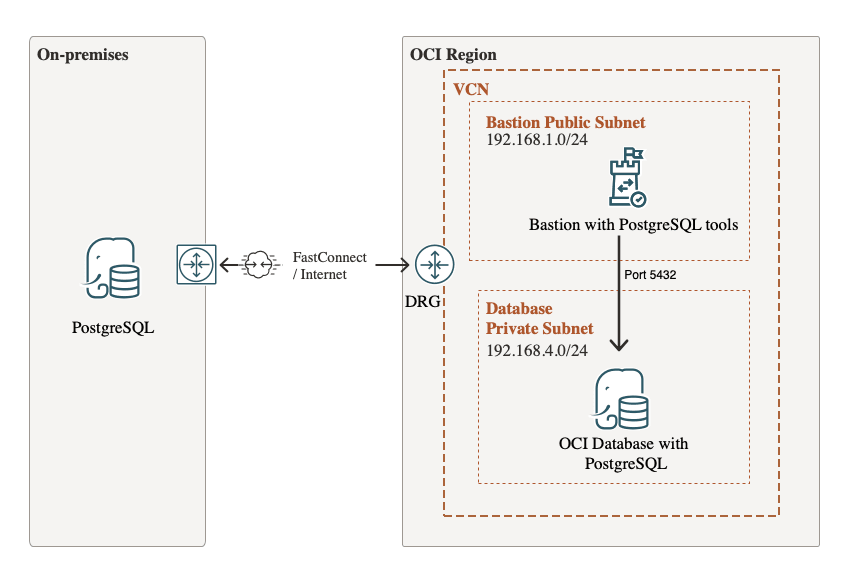
VCN with a public and private subnets, ensure that port
5432is open in the OCI security list for the private subnet. -
An OCI Compute instance in public subnet, acting as a bastion and utility node, with Rclone and PostgreSQL client tools installed (called bastion in this tutorial, don’t mix it with OCI Bastion service)
-
This tutorial is based on Oracle Linux 8, commands may differ for other operating systems.
-
Provisioned OCI Database with PostgreSQL in the private subnet. For more information, see Deploy OCI Database with PostgreSQL.
-
Local PostgreSQL on-premises instance with PostgreSQL client tools installed.
Note OCI Database with PostgreSQL is not available in the OCI Always Free Tier.

Task 1: Create OCI API Key User Credentials
-
Log in to the OCI Console, click the profile menu
 and select My profile.
 -
In Resources, click API Keys.
-
Click Add API Key at the top left of the API keys list.
-
Click Download Private Key and save the key to your
.ocidirectory. In most cases, you do not need to download the public key. -
Click Add.
The key is added and the Configuration File Preview is displayed. The file snippet includes required parameters and values that you will need to create your configuration file.
user: The Oracle Cloud Identifier (OCID) of the user for whom the key pair is being added.fingerprint: The fingerprint of the key that was just added.tenancy: Your tenancy’s OCID.region: The currently selected region in the OCI Console.key_file: The path to your downloaded private key file. You must update this value to the path on your file system where you saved the private key file.
For more information, see Required Keys and OCIDs.
Task 2: Export PostgreSQL Data with pg_dump
In your on-premises host, use pg_dump to export PostgreSQL database.
pg_dump -U your_username -h your_host -p your_port -F c -f /path/to/output.dump your-database-name
-U your_username: The database username.-h your_host: The host where the database is running (forr example,localhost).-p your_port: The port number (default is usually5432).-F c: Format of the output (c is for custom, which is flexible and restorable viapg_restore).-f /path/to/output.dump: The file path where the dump will be saved.
your-database-name: The name of the database you want to dump.
Task 3: Install, Configure and Transfer Data with Rclone
-
In your on-premises host, install rclone.
sudo -v ; curl https://rclone.org/install.sh | sudo bash -
Run the following command to configure rclone.
rclone configFor more information to configure OCI Object Storage connection, see Rclone documentation. Use Option 2: an OCI user and an API key for authentication (created in Task 1).
-
Use rclone multipart upload to copy the exported database to an OCI Object Storage bucket. For example:
rclone --progress --oos-no-check-bucket --fast-list --no-traverse --transfers 8 --oos-chunk-size 10M --oos-upload-concurrency 10 --checkers 10 copy <source> <dest>Example command and an output:
	rclone --progress  --oos-no-check-bucket --fast-list --no-traverse --transfers 8 --oos-chunk-size 10M --oos-upload-concurrency 10 --checkers 10  copy output.dump OCI:bucket_db-dump
	Transferred:        4.500 KiB / 4.500 KiB, 100%, 0 B/s, ETA -
	Transferred:            1 / 1, 100%
	Elapsed time:         0.0s
For more information, see Copy Data to Oracle Cloud Using Rclone to Build Insights in Oracle Analytics Cloud.
Task 4: Mount OCI Object Storage using Rclone
-
In your OCI Compute bastion host, install PostgreSQL tools.
dnf install postgresqlOCI Database with PostgreSQL supports versions 14 and 15, so install PostgreSQL tools accordingly.
sudo dnf module reset postgresql sudo dnf module enable postgresql:15 sudo dnf install postgresql -
Install and configure rclone in your bastion host - repeat Task 3, Step 2.
-
Mount your bucket with your data copied in Task 3. For example,
/mnt/oci.rclone mount OCI:bucket_db-dump /mnt/oci --vfs-cache-mode full --log-file /home/opc/rclone.log --config ~/.config/rclone/rclone.conf --log-level DEBUG --daemon --attr-timeout 1s -
Check files on your mounted OCI Object Storage.
ls /mnt/oci
Task 5: Restore OCI Database with PostgreSQL using pg_restore
Restore your OCI Database with PostgreSQL database with parallel jobs, in a background, as a daemon process, using mounted file system.
nohup pg_restore -d test -h <OCI PostgreSQL hostname or IP> -p 5432 -U <dbuser> -v -c -j 10 -F c /mnt/oci/output.dump >import.log 2>&1
The target database (test in this example) must already exist before running pg_restore. To create the database beforehand:
createdb -U postgres -h localhost -p 5432 test
You can also add –verbose for progress details or –clean to drop objects before recreating them.
Task 6: Verify the Restored Database
Using psql, log in to OCI Database with PostgreSQL and verify completeness of restored data.
psql -h <OCI PostgreSQL hostname or IP> -p 5432 -U <dbuser> -d test
Now you can use SQL select statements to verify the number of rows in tables.
Related Links
Acknowledgments
- Author - Sylwester Dec (OCI Open Source Data Black Belt)
More Learning Resources
Explore other labs on docs.oracle.com/learn or access more free learning content on the Oracle Learning YouTube channel. Additionally, visit education.oracle.com/learning-explorer to become an Oracle Learning Explorer.
For product documentation, visit Oracle Help Center.
Migrate to Oracle Cloud Infrastructure Database with PostgreSQL using OCI Object Storage and Rclone
G37097-01
Copyright ©2025, Oracle and/or its affiliates.