Note:
- This tutorial requires access to Oracle Cloud. To sign up for a free account, see Get started with Oracle Cloud Infrastructure Free Tier.
- It uses example values for Oracle Cloud Infrastructure credentials, tenancy, and compartments. When completing your lab, substitute these values with ones specific to your cloud environment.
Run Mistral LLM Model on OCI Compute A10 Instance with Oracle Resource Manager using One Click Deployment
Introduction
Oracle Cloud Infrastructure (OCI) Compute lets you create different types of shapes to test graphics Processing Unit (GPU) for Artificial Intelligence (AI) models deployed locally. In this tutorial, we will use A10 shape with a pre-existing VCN and subnet resources that you can select from the Oracle Resource Manager.
The Terraform code also includes configuring the instance to run a local Virtual Large Language Model (vLLM) Mistral model(s) for natural language processing tasks.
Objectives
- Create an A10 shape on OCI Compute, download Mistral AI LLM model and query the local vLLM model.
Prerequisites
-
Ensure you have an OCI Virtual Cloud Network (VCN) and a subnet where the virtual machine (VM) will be deployed.
-
Understanding of the network components and their relationships. For more information, see Networking Overview.
-
Understanding of networking in the cloud. For more information watch the following video: Video for Networking in the Cloud EP.01: Virtual Cloud Networks.
-
Requirements:
- Instance Type: A10 shape with one Nvidia GPU.
- Operating System: Oracle Linux.
- Image Selection: The deployment script selects the latest Oracle Linux image with GPU support.
- Tags: Adds a free-form tag GPU_TAG = “A10-1”.
- Boot Volume Size: 250GB.
- Initialization: Uses cloud-init to download and configure the vLLM Mistral model(s).
Task 1: Download the Terraform Code for One Click Deployment
Download ORM Terraform code from here: orm_stack_a10_gpu-main.zip, to implement Mistral vLLM model(s) locally which will allow you to select an existing VCN and a subnet to test local deployment of Mistral vLLM model(s) in an A10 instance shape.
Once you have the ORM Terraform code downloaded locally, follow the steps from here: Creating a Stack from a Folder to upload the stack and to execute apply of the Terraform code.
Note: Ensure you have created an OCI Virtual Cloud Network (VCN) and a subnet where the VM will be deployed.
Task 2: Create a VCN on OCI (Optional if not created already)
To create a VCN in Oracle Cloud Infrastructure, see: Video for Explore how to create a Virtual Cloud Network on OCI.
or
To create a VCN, follow the steps:
-
Log in to the OCI Console, enter Cloud Tenant Name, User Name, and Password.
-
Click the hamburger menu (≡) from the upper left corner.
-
Go to Networking, Virtual Cloud Networks and select the appropriate compartment from List Scope section.
-
Select VCN with Internet Connectivity, and click Start VCN Wizard.
-
In the Create a VCN with Internet Connectivity page, enter the following information and click Next.
- VCN NAME: Enter
OCI_HOL_VCN. - COMPARTMENT: Select the appropriate compartment.
- VCN CIDR BLOCK: Enter
10.0.0.0/16. - PUBLIC SUBNET CIDR BLOCK: Enter
10.0.2.0/24. - PRIVATE SUBNET CIDR BLOCK: Enter
10.0.1.0/24. - DNS Resolution: Select USE DNS HOSTNAMES IN THIS VCN.
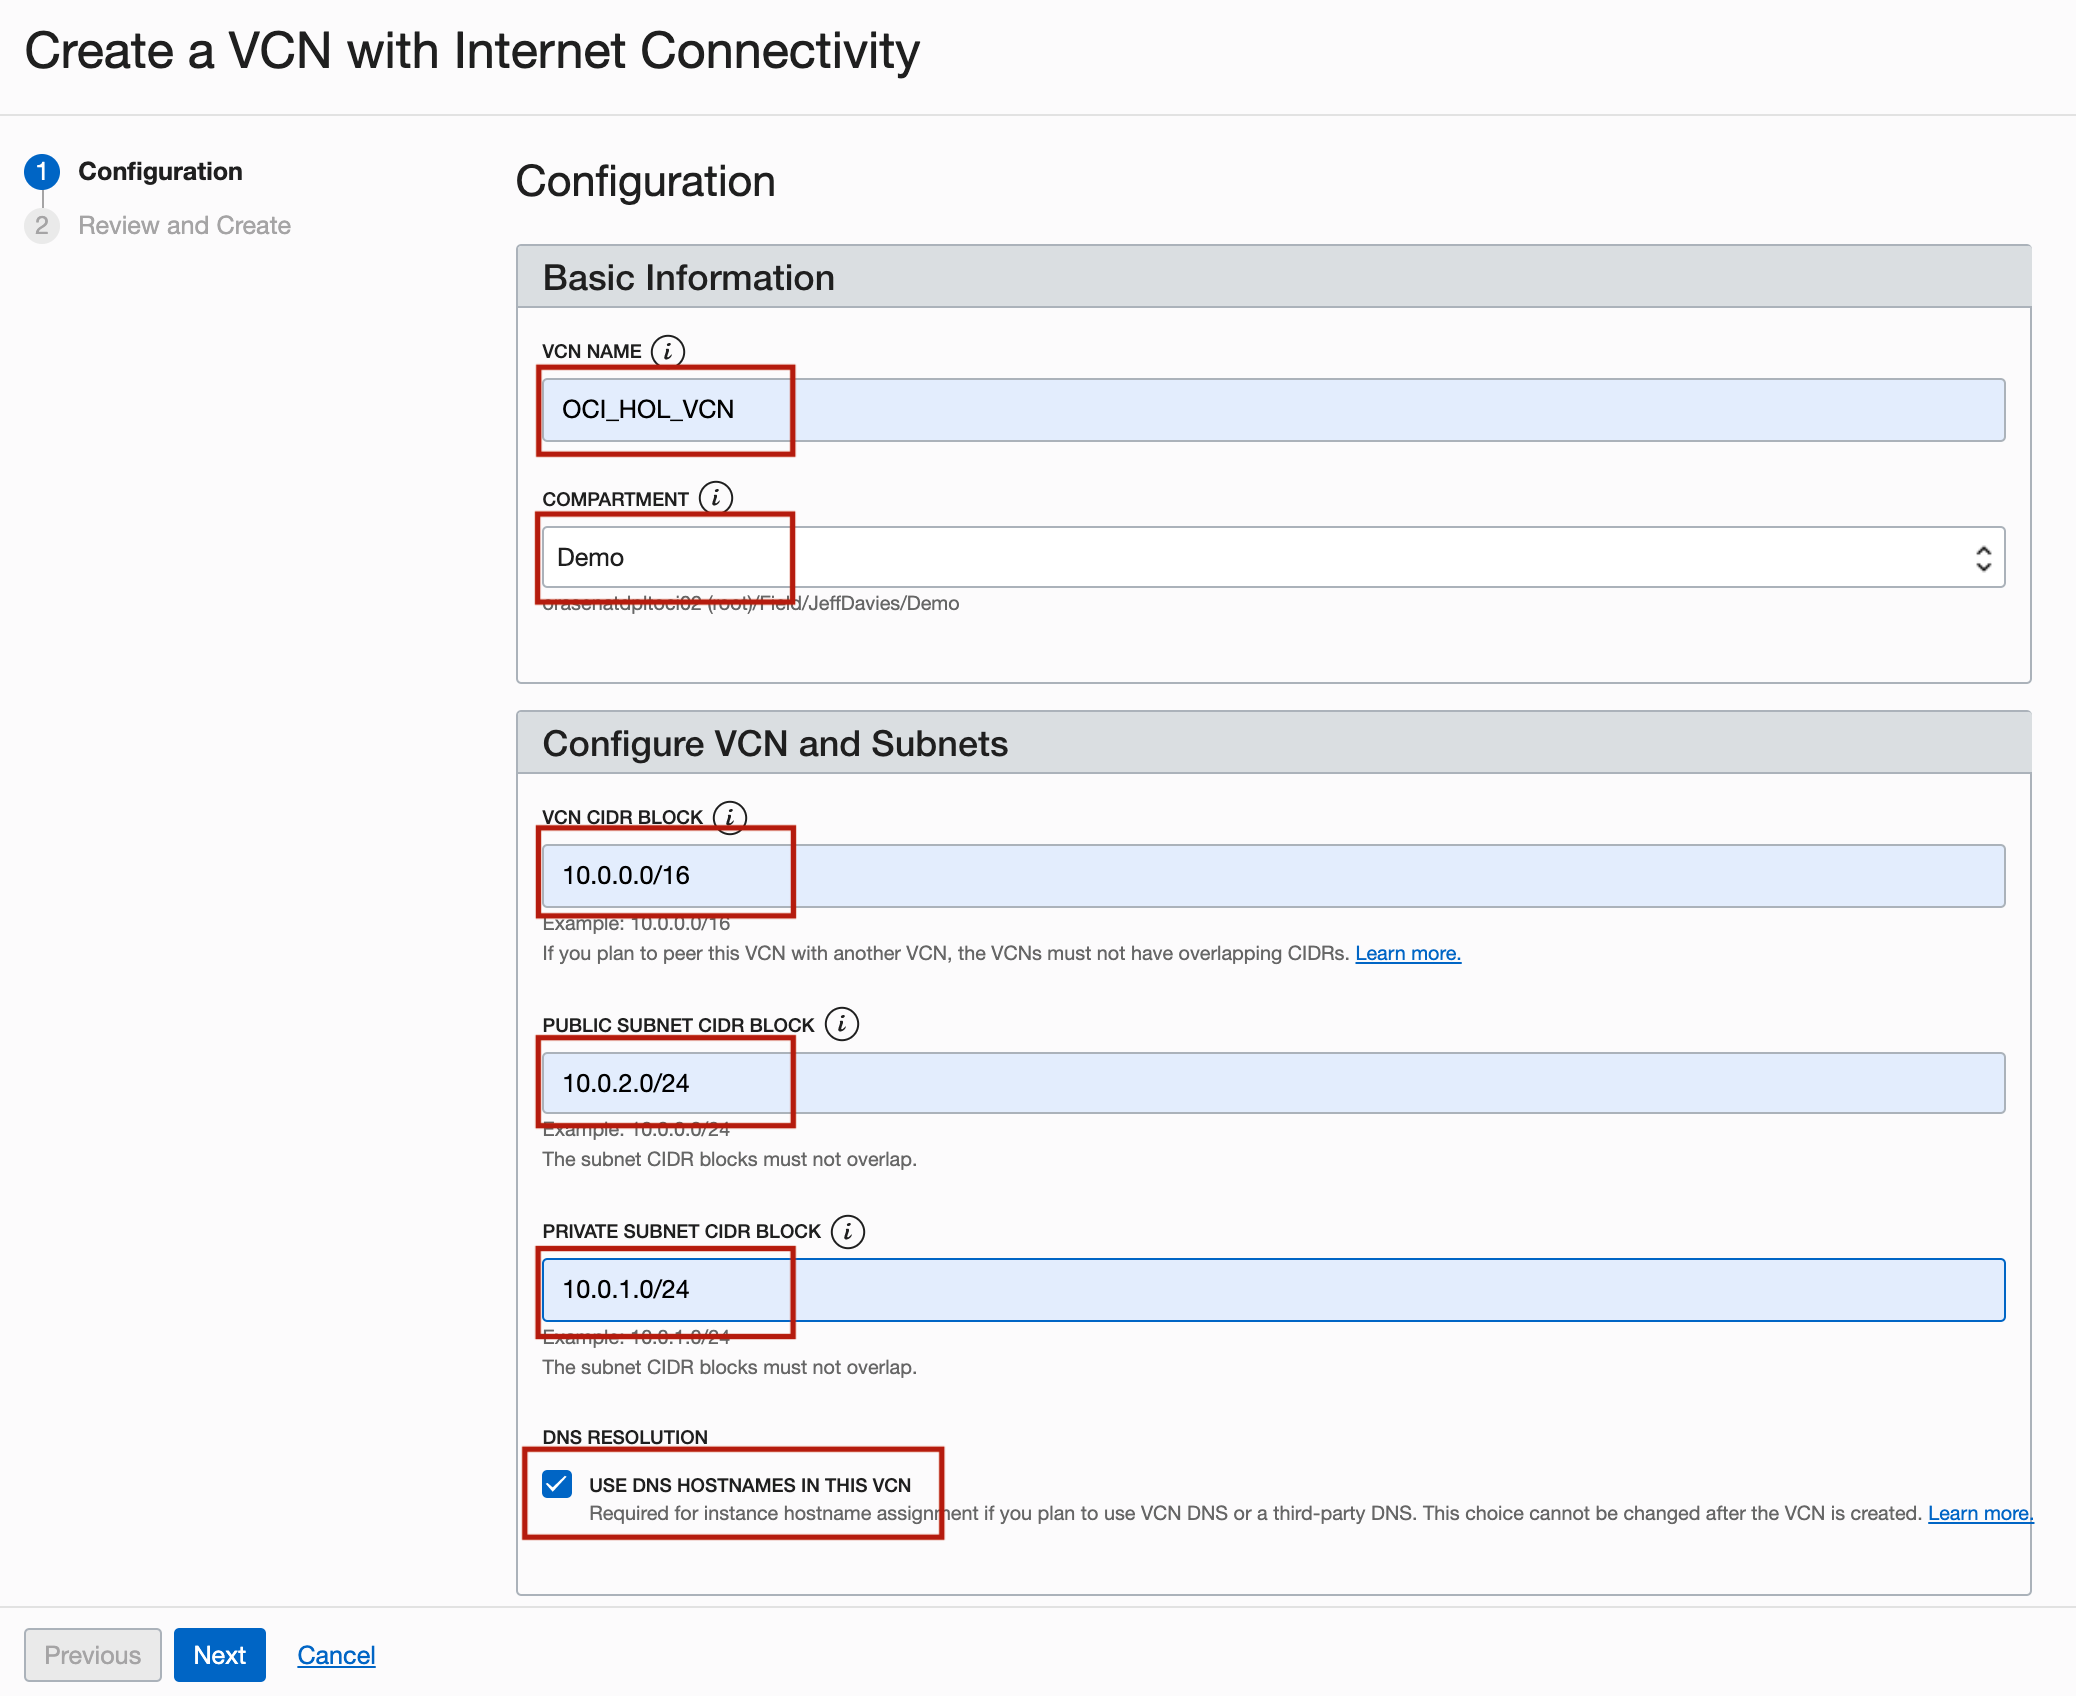
- VCN NAME: Enter
-
In the Review page, review your settings and click Create.
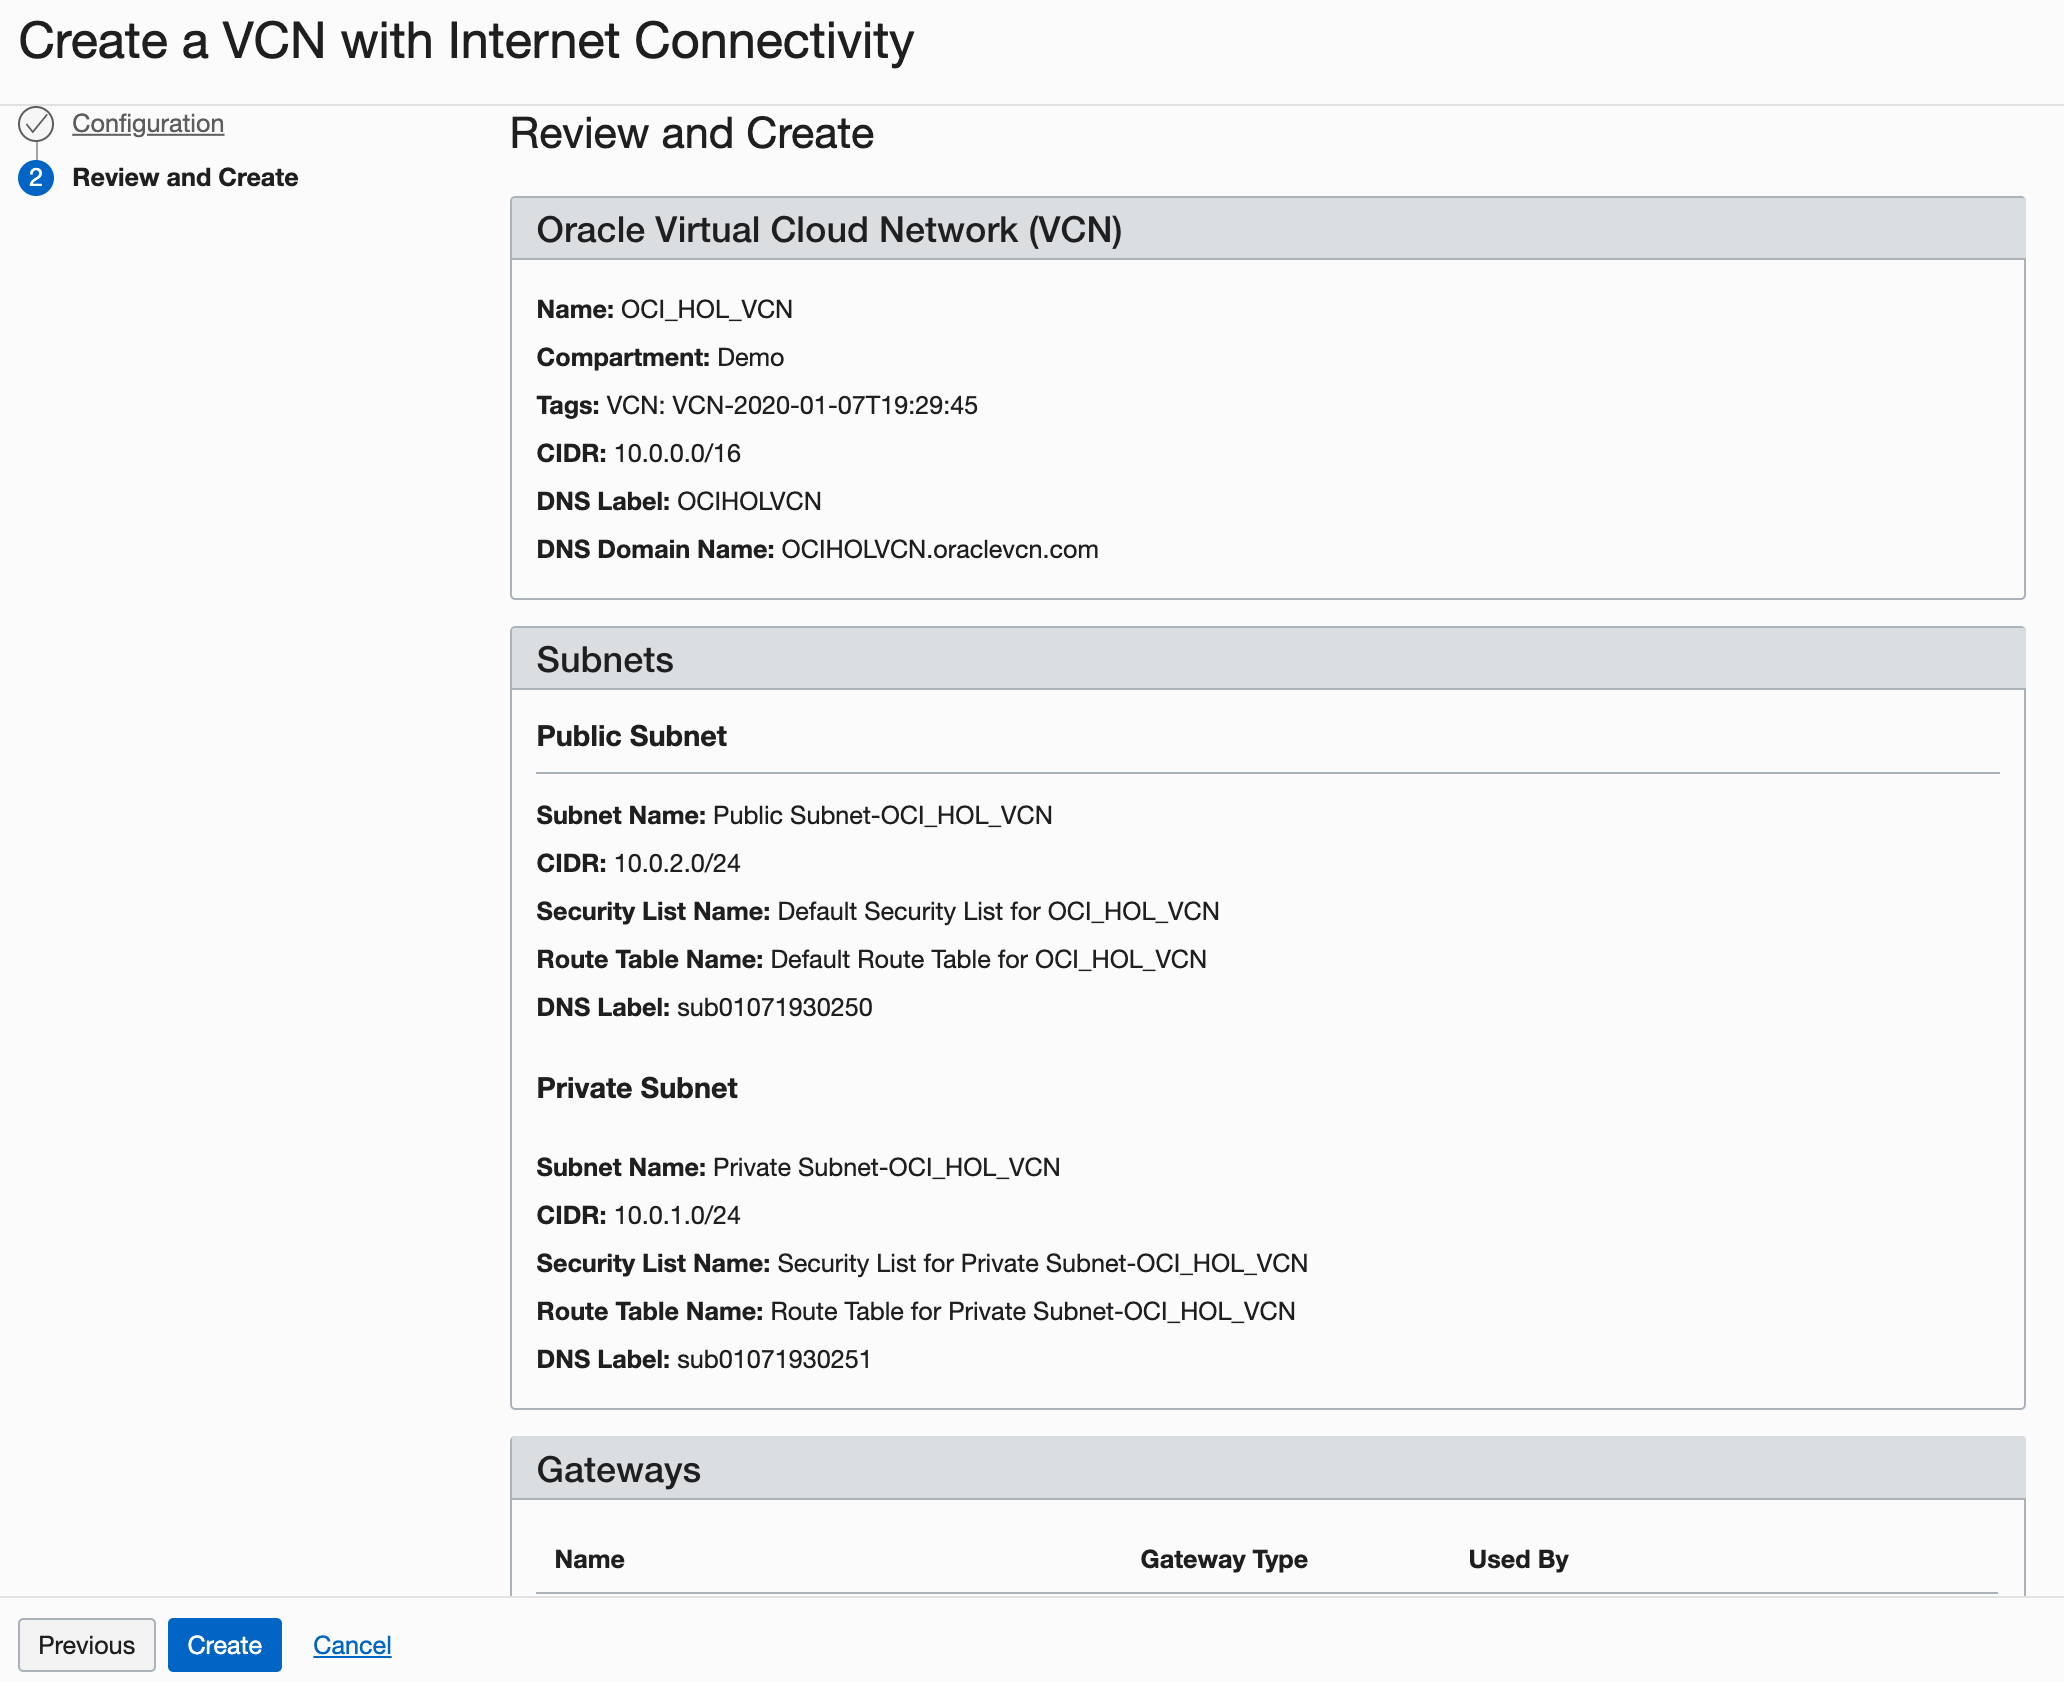
Description of the illustration setupVCN4.png
It will take a moment to create the VCN and a progress screen will keep you apprised of the workflow.

-
Once the VCN is created, click View Virtual Cloud Network.
In real-world situations, you will create multiple VCNs based on their need for access (which ports to open) and who can access them.
Task 3: See cloud-init Configuration Details
The cloud-init script installs all the necessary dependencies, starts Docker, downloads and starts the vLLM Mistral model(s). You can find the following code in the cloudinit.sh file downloaded in Task 1.
dnf install -y dnf-utils zip unzip
dnf config-manager --add-repo=https://download.docker.com/linux/centos/docker-ce.repo
dnf remove -y runc
dnf install -y docker-ce --nobest
systemctl enable docker.service
dnf install -y nvidia-container-toolkit
systemctl start docker.service
...
Cloud-init will download all the files needed to run Mistral model based per your API token predefined in Hugging Face.
API token creation will select the Mistral model based on your input from ORM GUI allowing the authentication needed to download the model files locally. For more information, see User access tokens.
Task 4: Monitor the System
Track the cloud-init script completion and GPU resource usage with the following commands (if needed).
-
Monitor cloud-init completion:
tail -f /var/log/cloud-init-output.log. -
Monitor GPUs utilization:
nvidia-smi dmon -s mu -c 100. -
Deploy and interact with the vLLM Mistral model using Python: (Change the parameters only if needed (the command is already included in the
cloud-initscript)):python -O -u -m vllm.entrypoints.openai.api_server \ --host 0.0.0.0 \ --model "/home/opc/models/${MODEL}" \ --tokenizer hf-internal-testing/llama-tokenizer \ --max-model-len 16384 \ --enforce-eager \ --gpu-memory-utilization 0.8 \ --max-num-seqs 2 \ >> "${MODEL}.log" 2>&1 &
Task 5: Test the Model Integration
Interact with the model in the following ways using the commands or Jupyter Notebook details.
-
Test the model from Command Line Interface (CLI) once the
cloud-initscript has completed.curl -X 'POST' 'http://0.0.0.0:8000/v1/chat/completions' \ -H 'accept: application/json' \ -H 'Content-Type: application/json' \ -d '{ "model": "/home/opc/models/'"$MODEL"'", "messages": [{"role":"user", "content":"Write a small poem."}], "max_tokens": 64 }' -
Test the model from Jupyter Notebook (Ensure to open port
8888).import requests import json import os # Retrieve the MODEL environment variable model = os.environ.get('MODEL') url = 'http://0.0.0.0:8000/v1/chat/completions' headers = { 'accept': 'application/json', 'Content-Type': 'application/json', } data = { "model": f"/home/opc/models/{model}", "messages": [{"role": "user", "content": "Write a short conclusion."}], "max_tokens": 64 } response = requests.post(url, headers=headers, json=data) if response.status_code == 200: result = response.json() # Pretty print the response for better readability formatted_response = json.dumps(result, indent=4) print("Response:", formatted_response) else: print("Request failed with status code:", response.status_code) print("Response:", response.text) -
Integrate Gradio with Chatbot to query the model.
import requests
import gradio as gr
import os

def interact_with_model(prompt):
    model = os.getenv("MODEL")  # Retrieve the MODEL environment variable within the function
    url = 'http://0.0.0.0:8000/v1/chat/completions'
    headers = {
        'accept': 'application/json',
        'Content-Type': 'application/json',
    }

    data = {
        "model": f"/home/opc/models/{model}",
        "messages": [{"role": "user", "content": prompt}],
        "max_tokens": 64
    }

    response = requests.post(url, headers=headers, json=data)

    if response.status_code == 200:
        result = response.json()
        completion_text = result["choices"][0]["message"]["content"].strip()  # Extract the generated text
        return completion_text
    else:
        return {"error": f"Request failed with status code {response.status_code}"}

# Example Gradio interface
iface = gr.Interface(
    fn=interact_with_model,
    inputs=gr.Textbox(lines=2, placeholder="Write a prompt..."),
    outputs=gr.Textbox(type="text", placeholder="Response..."),
    title="Mistral 7B Chat Interface",
    description="Interact with the Mistral 7B model deployed locally via Gradio.",
    live=True
)

# Launch the Gradio interface
iface.launch(share=True)
Task 6: Deploy the Model using Docker (if needed)
Alternatively, deploy the model using Docker and external source.
docker run --gpus all \
    -v ~/.cache/huggingface:/root/.cache/huggingface \
    --env "HUGGING_FACE_HUB_TOKEN=$ACCESS_TOKEN" \
    -p 8000:8000 \
    --ipc=host \
    --restart always \
    vllm/vllm-openai:latest \
    --model mistralai/$MODEL \
    --max-model-len 16384
You can query the model in the following ways:
-
Query the model started with Docker and external source using CLI.
curl -X 'POST' 'http://0.0.0.0:8000/v1/chat/completions' \ -H 'accept: application/json' \ -H 'Content-Type: application/json' \ -d '{ "model": "mistralai/'"$MODEL"'", "messages": [{"role": "user", "content": "Write a small poem."}], "max_tokens": 64 }' -
Query the model with Docker from external source using Jupyter Notebook.
import requests import json import os # Retrieve the MODEL environment variable model = os.environ.get('MODEL') url = 'http://0.0.0.0:8000/v1/chat/completions' headers = { 'accept': 'application/json', 'Content-Type': 'application/json', } data = { "model": f"mistralai/{model}", "messages": [{"role": "user", "content": "Write a short conclusion."}], "max_tokens": 64 } response = requests.post(url, headers=headers, json=data) if response.status_code == 200: result = response.json() # Pretty print the response for better readability formatted_response = json.dumps(result, indent=4) print("Response:", formatted_response) else: print("Request failed with status code:", response.status_code) print("Response:", response.text) -
Query the model with Docker from external source using Jupyter Notebook and Gradio Chatbot.
import requests import gradio as gr import os # Function to interact with the model via API def interact_with_model(prompt): url = 'http://0.0.0.0:8000/v1/chat/completions' headers = { "accept": "application/json", "Content-Type": "application/json", } # Retrieve the MODEL environment variable model = os.environ.get('MODEL') data = { "model": f"mistralai/{model}", "messages": [{"role": "user", "content": prompt}], "max_tokens": 64 } response = requests.post(url, headers=headers, json=data) if response.status_code == 200: result = response.json() completion_text = result["choices"][0]["message"]["content"].strip() # Extract the generated text return completion_text else: return {"error": f"Request failed with status code {response.status_code}"} # Example Gradio interface iface = gr.Interface( fn=interact_with_model, inputs=gr.Textbox(lines=2, placeholder="Write a prompt..."), outputs=gr.Textbox(type="text", placeholder="Response..."), title="Model Interface", # Set a title for your Gradio interface description="Interact with the model deployed via Gradio.", # Set a description live=True ) # Launch the Gradio interface iface.launch(share=True) -
Model running with docker using the already downloaded local files (starts quicker).
docker run --gpus all \ -v /home/opc/models/$MODEL/:/mnt/model/ \ --env "HUGGING_FACE_HUB_TOKEN=$TOKEN_ACCESS" \ -p 8000:8000 \ --env "TRANSFORMERS_OFFLINE=1" \ --env "HF_DATASET_OFFLINE=1" \ --ipc=host vllm/vllm-openai:latest \ --model="/mnt/model/" \ --max-model-len 16384 \ --tensor-parallel-size 2 -
Query the model with Docker using the local files and CLI.
curl -X 'POST' 'http://0.0.0.0:8000/v1/chat/completions' -H 'accept: application/json' -H 'Content-Type: application/json' -d '{ > "model": "/mnt/model/", > "messages": [{"role": "user", "content": "Write a humorous limerick about the wonders of GPU computing."}], > "max_tokens": 64, > "temperature": 0.7, > "top_p": 0.9 > }' -
Query the model with Docker using the local files and Jupyter Notebook.
import requests import json import os url = "http://0.0.0.0:8000/v1/chat/completions" headers = { "accept": "application/json", "Content-Type": "application/json", } # Assuming `MODEL` is an environment variable set appropriately model = f"/mnt/model/" # Adjust this based on your specific model path or name data = { "model": model, "messages": [{"role": "user", "content": "Write a humorous limerick about the wonders of GPU computing."}], "max_tokens": 64, "temperature": 0.7, "top_p": 0.9 } response = requests.post(url, headers=headers, json=data) if response.status_code == 200: result = response.json() # Extract the generated text from the response completion_text = result["choices"][0]["message"]["content"].strip() print("Generated Text:", completion_text) else: print("Request failed with status code:", response.status_code) print("Response:", response.text) -
Query the model with Docker from external source using Jupyter Notebook and Gradio Chatbot.
import requests
import gradio as gr
import os

# Function to interact with the model via API
def interact_with_model(prompt):
    url = 'http://0.0.0.0:8000/v1/chat/completions'  # Update the URL to match the correct endpoint
    headers = {
        "accept": "application/json",
        "Content-Type": "application/json",
    }

    # Assuming `MODEL` is an environment variable set appropriately
    model = "/mnt/model/"  # Adjust this based on your specific model path or name

    data = {
        "model": model,
        "messages": [{"role": "user", "content": prompt}],
        "max_tokens": 64,
        "temperature": 0.7,
        "top_p": 0.9
    }

    response = requests.post(url, headers=headers, json=data)

    if response.status_code == 200:
        result = response.json()
        completion_text = result["choices"][0]["message"]["content"].strip()
        return completion_text
    else:
        return {"error": f"Request failed with status code {response.status_code}"}

# Example Gradio interface
iface = gr.Interface(
    fn=interact_with_model,
    inputs=gr.Textbox(lines=2, placeholder="Write a humorous limerick about the wonders of GPU computing."),
    outputs=gr.Textbox(type="text", placeholder="Response..."),
    title="Model Interface",  # Set your desired title here
    description="Interact with the model deployed locally via Gradio.",
    live=True
)

# Launch the Gradio interface
iface.launch(share=True)
Note: Firewall commands to open the
8888port for Jupyter Notebook.sudo firewall-cmd --zone=public --permanent --add-port 8888/tcp sudo firewall-cmd --reload sudo firewall-cmd --list-all
Acknowledgments
-
Author - Bogdan Bazarca (Senior Cloud Engineer)
-
Contributors - Oracle NACI-AI-CN-DEV team
More Learning Resources
Explore other labs on docs.oracle.com/learn or access more free learning content on the Oracle Learning YouTube channel. Additionally, visit education.oracle.com/learning-explorer to become an Oracle Learning Explorer.
For product documentation, visit Oracle Help Center.
Run Mistral LLM Model on OCI Compute A10 Instance with Oracle Resource Manager using One Click Deployment
G11766-01
July 2024