Note:
- This tutorial requires access to Oracle Cloud. To sign up for a free account, see Get started with Oracle Cloud Infrastructure Free Tier.
- It uses example values for Oracle Cloud Infrastructure credentials, tenancy, and compartments. When completing your lab, substitute these values with ones specific to your cloud environment.
Create Kubernetes load balancer services
Introduction
Once you have a private subnet in the Kubernetes cluster VCN, you can create load balancer services in Kubernetes. In this tutorial, you will collect domain information from the WebLogic services, create YAML files, enter the domain and private subnet information into the files, and finally apply the YAML to create load balancer services in Kubernetes.
Estimated time: 15 minutes
- Completion of the Migrating WebLogic Server to Kubernetes workshop, labs 1, 2, 3 and 4.
- Completion of the preceding tutorials in this workshop
Objectives
- Create Kubernetes load balancer services
Collect WebLogic information
-
In the Oracle Cloud console, select the Cloud Shell icon (>_ ) from the menu bar to launch a Cloud Shell session window if one is not. Copy and paste the kubectl get svc command to list out all the namespaces.
kubectl get svc --all-namespacesWrite down the service names for the WebLogic admin server and WebLogic managed servers so you can reference them later. They are sample-domain1-admin-server, sample-domain1-managed-server1, sample-domain1-managed-server2 in the image below, for example.

-
Execute kubectl describe svc command to obtain label names of the WebLogic admin server service.
kubectl describe svc sample-domain1-admin-server -n sample-domain1-ns -
From the command output, locate the three parameters shown below, under the Labels section.
- weblogic.domainName
- weblogic.domainUID
- weblogic.serverName

Open a text file in your computer, write down the values of the parameters. You will need these values in the subsequent steps to create a YAML file.
-
Similarly, run the below command to collect the domainName, domainUID and serverName information for the managed-server-1. Note down the values to the text file.
kubectl describe svc sample-domain1-managed-server1 -n sample-domain1-ns
-
Repeat the steps described in the #3 above to collect the information from the managed-server-2.
kubectl describe svc sample-domain1-managed-server2 -n sample-domain1-ns

Create YAML files to set up load balancer services
-
Using the Oracle Cloud Shell, from the home directory, create YAML files.
cd ~; touch admin-lb.yaml; touch managed-lb.yaml -
Open the admin-lb.yaml file just created with an editor on your choice (E.g., vi editor). This will be the YAML file that configures the load balancer service for the WebLogic Admin Server, admin-server.
vi ~/admin-lb.yaml -
Hit “i” key to turn on the edit mode, then copy the below contents and paste into the file. Replace the OCID of the private subnet collected in the Tutorial 2, Task 1, step 6.
apiVersion: v1 kind: Service metadata: annotations: service.beta.kubernetes.io/oci-load-balancer-internal: "true" service.beta.kubernetes.io/oci-load-balancer-subnet1: "<OCID of the Private Subnet>" name: wlsoke-admin-svc namespace: sample-domain1-ns spec: selector: weblogic.serverName: admin-server weblogic.domainName: sample-domain1 weblogic.domainUID: sample-domain1 weblogic.createdByOperator: "true" type: LoadBalancer ports: - name: t3channel protocol: TCP port: 30012 targetPort: 30012 - name: admin protocol: TCP port: 7001 targetPort: 7001- wlsoke-admin-svc is the name of the load balancer service, for the WebLogic Administration server.
- Default values are preconfigured for the namespace, weblogic.ServerName , weblogic.domainName, and weblogic.domainUID. If you used a different namespace or server names at the domain creation, replace with the values collected from the Kubernetes service in the previous steps.
Save the file with esc + :wq.
Suggested Editing Tips:
- Use your mouse to select the text above, and manually copy and paste it into a text file.
- Auto copy is not provided as it may break the indentation.
- Replace the OCID of the Private Subnet, then copy the modified text into the YAML file.
- Make sure to keep the syntax of 2 space indentation.
- Refer to the screenshot image below to see how it should look like after the file is modified.

-
Next, Open the managed-lb.yaml with an editor. This will be the YAML file that configures the load balancer services for the WebLogic managed servers, managed-server1 and managed-server2.
vi ~/managed-lb.yaml -
Hit “i” key to turn on the edit mode, then copy the below contents and paste into the file. Replace the OCID of the private subnet collected in the Tutorial 2, Task 1, step 6. Note that there are two locations in the file where you need to replace the OCID.
apiVersion: v1
kind: Service
metadata:
  annotations:
    service.beta.kubernetes.io/oci-load-balancer-internal: "true"
    service.beta.kubernetes.io/oci-load-balancer-subnet1: "<OCID of the Private Subnet>"
  name: wlsoke-mng1-svc
  namespace: sample-domain1-ns
spec:
  selector:
    weblogic.serverName: managed-server1
    weblogic.domainName: sample-domain1
    weblogic.domainUID: sample-domain1
    weblogic.createdByOperator: "true"
  type: LoadBalancer
  ports:
  - name: monitor
    protocol: TCP
    port: 8001
    targetPort: 8001
---
apiVersion: v1
kind: Service
metadata:
  annotations:
    service.beta.kubernetes.io/oci-load-balancer-internal: "true"
    service.beta.kubernetes.io/oci-load-balancer-subnet1: "<OCID of the Private Subnet>"
  name: wlsoke-mng2-svc
  namespace: sample-domain1-ns
spec:
  selector:
    weblogic.serverName: managed-server2
    weblogic.domainName: sample-domain1
    weblogic.domainUID: sample-domain1
    weblogic.createdByOperator: "true"
  type: LoadBalancer
  ports:
  - name: monitor
    protocol: TCP
    port: 8001
    targetPort: 8001
wlsoke-mng1-svc and wlsoke-mng2-svc are the names of the load balancer services, for the managed WebLogic servers. Ensure the expected values are entered and the indentation is set correctly. Save the file with esc + :wq.
NOTE: Refer to the screenshot image below to see how it should look like after the file is modified.
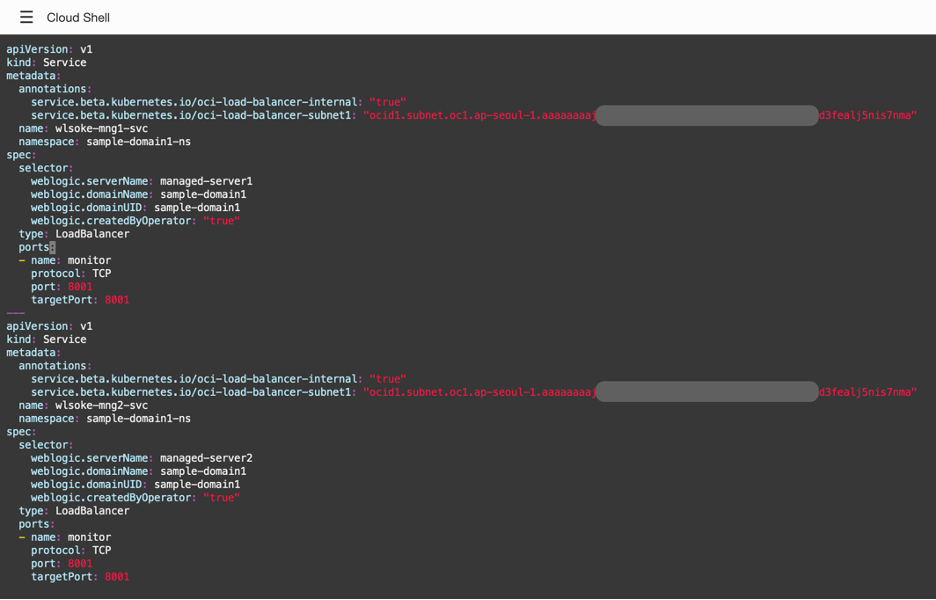
This YAML configures two managed WebLogic Servers in a single file, and three hyphens “—” are used as separators. If you have more than two managed servers, you can add sections in the file, collect server names from the kubectl describe pod command, and populate them in the YAML file.
Apply the configuration
-
From the home directory in the Oracle Cloud Shell, execute the following commands to apply the configuration to the Kubernetes pods.
kubectl apply -f admin-lb.yaml -n sample-domain1-ns
kubectl apply -f managed-lb.yaml -n sample-domain1-ns
-
Wait for few minutes, then run the following command to verify the load balancer services are created. Make sure they have EXTERNAL-IPs assigned.
kubectl get svc -n sample-domain1-ns -
Open a text file on your computer and write down the names of the WebLogic Server services, and the matching External IPs of the load balancer services. You will need these values later when configuring the hosts file in the EM agent compute instance.

Format: <External IP of the matching LB> <WLS Server service name>
E.g.,
10.0.x.248 sample-domain1-admin-server
10.0.x.252 sample-domain1-managed-server1
10.0.x.156 sample-domain1-managed-server2
You may now proceed to the next tutorial.