Note:
- This tutorial requires access to Oracle Cloud. To sign up for a free account, see Get started with Oracle Cloud Infrastructure Free Tier.
- It uses example values for Oracle Cloud Infrastructure credentials, tenancy, and compartments. When completing your lab, substitute these values with ones specific to your cloud environment.
Implement multicloud security using OCI Audit to capture events from OCI Identity and Access Management
Introduction
Oracle Cloud Infrastructure Identity and Access Management (OCI IAM) identity domains generate audit data in response to operations performed by administrators and end users. Audit events are generated for operations such as the creation or update of user accounts or group memberships, and for successful or unsuccessful login attempts.
To access this audit data, you can generate reports directly in the Oracle Cloud Infrastructure (OCI) Console or you can also send these events to an external security monitoring solution, which may be operating in an external cloud platform. It’s common for organizations to leverage third-party Security Incident and Event Management (SIEM) solutions, and a typical requirement is to ingest OCI IAM audit data into the SIEM for threat analysis and compliance. One way to meet that requirement is to leverage the OCI IAM identity domain AuditEvents APIs, but identity domains offer another option that may be easier to implement for some organizations and supports sharing of audit events across multicloud environments.
OCI Audit is an OCI service that automatically records calls to all supported OCI APIs as events. There are a few common reasons that you might choose to pull OCI IAM audit events from the OCI Audit service instead of using OCI IAM identity domain APIs. OCI Audit offers the following benefits:
- All audit data, for customers with multiple identity domains is available in one central place. With OCI IAM APIs, you would need to query each identity domain separately, which creates additional overhead.
- Data can be pushed to external systems such as SIEMs, while OCI IAM AuditEvents APIs requires polling.
- OCI Audit stores event data for a year; OCI IAM stores audit events for 90 days.
Objective
Sync audit events generated in an OCI IAM Identity Domain to an external store.
Prerequisites
- OCI tenancy with Identity Domains
- Azure cloud account with Azure Log Analytics Workspace
Task 1: Understand how to leverage OCI Audit to capture audit events from OCI IAM
To demonstrate the approach of using OCI Audit to capture audit events from OCI IAM, we will use the following scenario:
You have a tenancy with two OCI IAM identity domains. The tenancy Default domain, which is used for tenancy administration, has a domain type of Free. We’ll call that the administrator domain. There is an additional identity domain with a domain type of Oracle Apps Premium, to which all employees are provisioned for access to Oracle SaaS and on-premises applications. We’ll call that the employee domain. Accounts are provisioned into the employee domain from Microsoft Azure AD. This may happen in one of several ways (System for Cross-domain Identity Management [SCIM], Just-in-Time provisioning, or bulk user import). You also have a SIEM solution (e.g., Microsoft Sentinel) that ingests audit data from numerous systems in your environment, and there is a requirement to publish all audit events from both identity domains to the SIEM in near real-time.
The overall approach we will take to address the requirements includes using the OCI Audit service, OCI Events service, OCI Functions service, and Azure Log Analytics Workspace. The basic flow is as follows:
- The OCI IAM identity domain writes an audit event to OCI Audit.
- The OCI Events service has a rule that is watching OCI Audit for specific audit event types from OCI IAM. When the rule is triggered, it invokes a function in OCI Functions.
- The function receives raw audit log in its payload, and invokes Azure Log Analytics Data Collector API to send the data to Azure Log Analytics Workspace.
- Azure Log Analytics Workspace serves as the data store for Microsoft Sentinel.

Task 2: Capture audit events from OCI IAM using OCI Audit
-
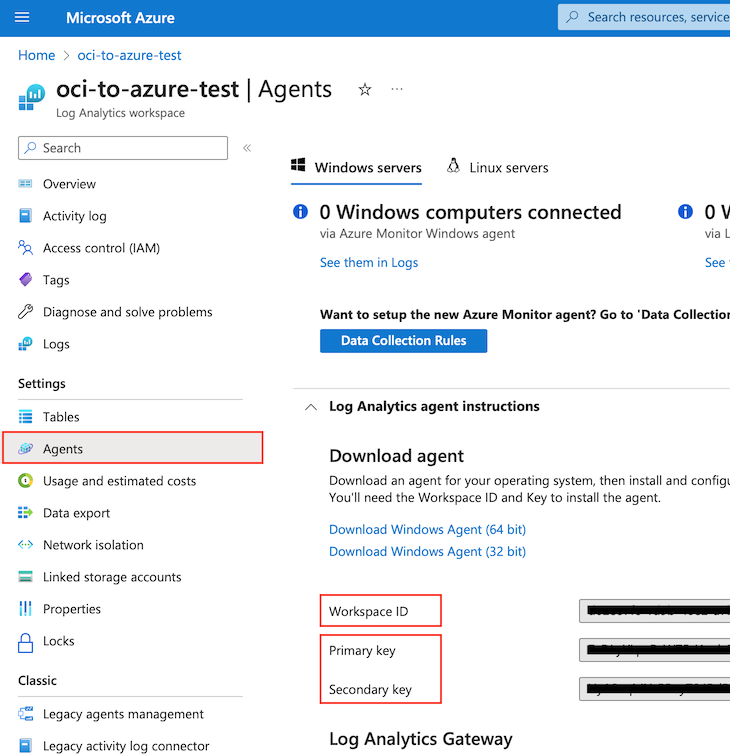
This example assumes that you’ve set up an Azure Log Analytics Workspace in Azure portal. Once you’ve set it up, copy the Workspace ID, and the primary (or secondary) key under your-workspace-name, Settings, Agents, Log Analytics Agent Instructions. You will need these values while you are writing your custom function with OCI Functions.

-
Log in to the OCI Console as a tenancy administrator.
-
Write your custom function that will be deployed with OCI Functions. The following code example uses Python, but you can easily implement the function in the language of your choice. Let’s add the function code in three simple steps.
-
Create a Python file called
func.pyand add the following required import statements and parameter declarations. The parameter values must match your Log Analytics workspace environment. You can find the customer ID (workspace ID in the portal) and shared key values in the Azure Portal under Log Analytics workspace, your-workspace-name, and Agents management page. The log type parameter is a friendly name used to define a new (or select an existing) custom log in your Azure Log Analytics workspace and the target location for data uploads.Instead of hardcoding the Log Analytics workspace customer ID and shared key values, you can use the OCI Secrets service to provide secure access to the values in the OCI Function. For a detailed walk-through of the steps to use OCI Secrets in your code, see the following articles:
- Secure way of managing secrets in OCI
- Using the OCI Instance Principals and Vault with Python to retrieve a Secret
For the purpose of this tutorial, we will assume you have the secrets stored in a vault and set up IAM policies to grant access to the OCI function instance principal.
{.python .numberLines .lineAnchors} import oci import io import json import requests import datetime import hashlib import hmac import base64 import logging from fdk import response # Get instance principal context, and initialize secrets client signer = oci.auth.signers.InstancePrincipalsSecurityTokenSigner() secret_client = oci.secrets.SecretsClient(config={}, signer=signer) # Replace values below with the ocids of your secrets customer_id_ocid = "ocid1.vaultsecret.oc1.<customer_id_ocid>" shared_key_ocid = "ocid1.vaultsecret.oc1.<shared_key_ocid>" # Retrieve secret def read_secret_value(secret_client, secret_id): response = secret_client.get_secret_bundle(secret_id) base64_Secret_content = response.data.secret_bundle_content.content base64_secret_bytes = base64_Secret_content.encode('ascii') base64_message_bytes = base64.b64decode(base64_secret_bytes) secret_content = base64_message_bytes.decode('ascii') return secret_content # Retrieve the customer ID using the secret client. customer_id = read_secret_value(secret_client, customer_id_ocid) # For the shared key, use either the primary or the secondary Connected Sources client authentication key _shared_key = read_secret_value(secret_client, shared_key_ocid) # The log type is the name of the event that is being submitted log_type = 'OCILogging' -
Add the following lines of code to define the tasks for making secure REST calls to the Azure data upload endpoint. You may need to validate this code to verify the syntax against Microsoft’s latest endpoint or version syntax.
Note: Portions of this code are copied from the following Microsoft documentation.
{.python .numberLines .lineAnchors} # Build the API signature def build_signature(customer_id, shared_key, date, content_length, method, content_type, resource): x_headers = 'x-ms-date:' + date string_to_hash = method + "\n" + str(content_length) + "\n" + content_type + "\n" + x_headers + "\n" + resource bytes_to_hash = bytes(string_to_hash, encoding= "utf-8" ) decoded_key = base64.b64decode(shared_key) encoded_hash = base64.b64encode(hmac.new(decoded_key, bytes_to_hash, digestmod=hashlib.sha256).digest()).decode() authorization = "SharedKey {}:{}" .format(customer_id,encoded_hash) return authorization # Build and send a request to the POST API def post_data(customer_id, shared_key, body, log_type, logger): method = 'POST' content_type = 'application/json' resource = '/api/logs' rfc1123date = datetime.datetime.utcnow().strftime( '%a, %d %b %Y %H:%M:%S GMT' ) content_length = len(body) signature = build_signature(customer_id, shared_key, rfc1123date, content_length, method, content_type, resource) uri = 'https://' + customer_id + '.ods.opinsights.azure.com' + resource + '?api-version=2016-04-01' headers = { 'content-type' : content_type, 'Authorization' : signature, 'Log-Type' : log_type, 'x-ms-date' : rfc1123date } response = requests.post(uri,data=body, headers=headers) if (response.status_code >= 200 and response.status_code <= 299 ): logger.info( 'Upload accepted' ) else : logger.info( "Error during upload. Response code: {}" .format(response.status_code)) print(response.text) -
Add the following code block to your
func.pycode file to define the run entry point and framework details. You don’t need to make any changes unless you want to add optional features, such as advanced data parsing, formatting, or custom exception handling.{.python .numberLines .lineAnchors} """ Entrypoint and initialization """ def handler(ctx, data: io.BytesIO= None ): logger = logging.getLogger() try : _log_body = data.getvalue() post_data(_customer_id, _shared_key, _log_body, _log_type, logger) except Exception as err: logger.error( "Error in main process: {}" .format(str(err))) return response.Response( ctx, response_data=json.dumps({ "status" : "Success" }), headers={ "Content-Type" : "application/json" } )
-
-
Follow this guide to deploy your function using CloudShell: Functions Quickstart on CloudShell.
-
Create a rule in the OCI Events service, that looks for audit logs matching your criteria and invokes the function you created and deployed in steps 3 and 4.
-
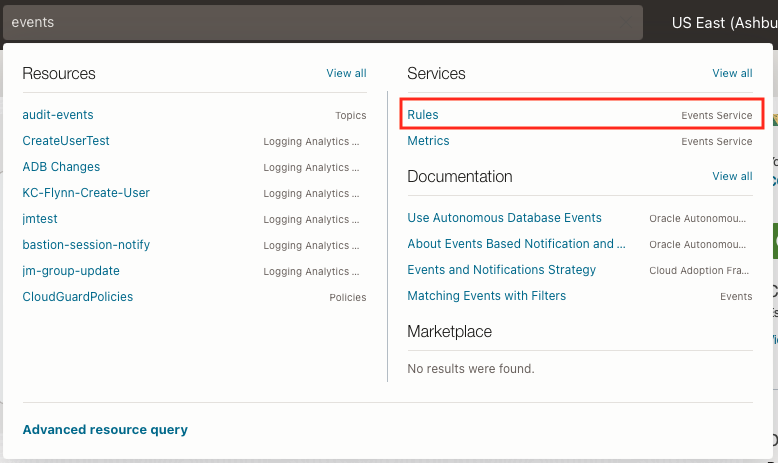
Go to the Events Service, by searching for “events” in the console search bar or in the search bar inside the services menu on the left. Click on Rules in the search results.


-
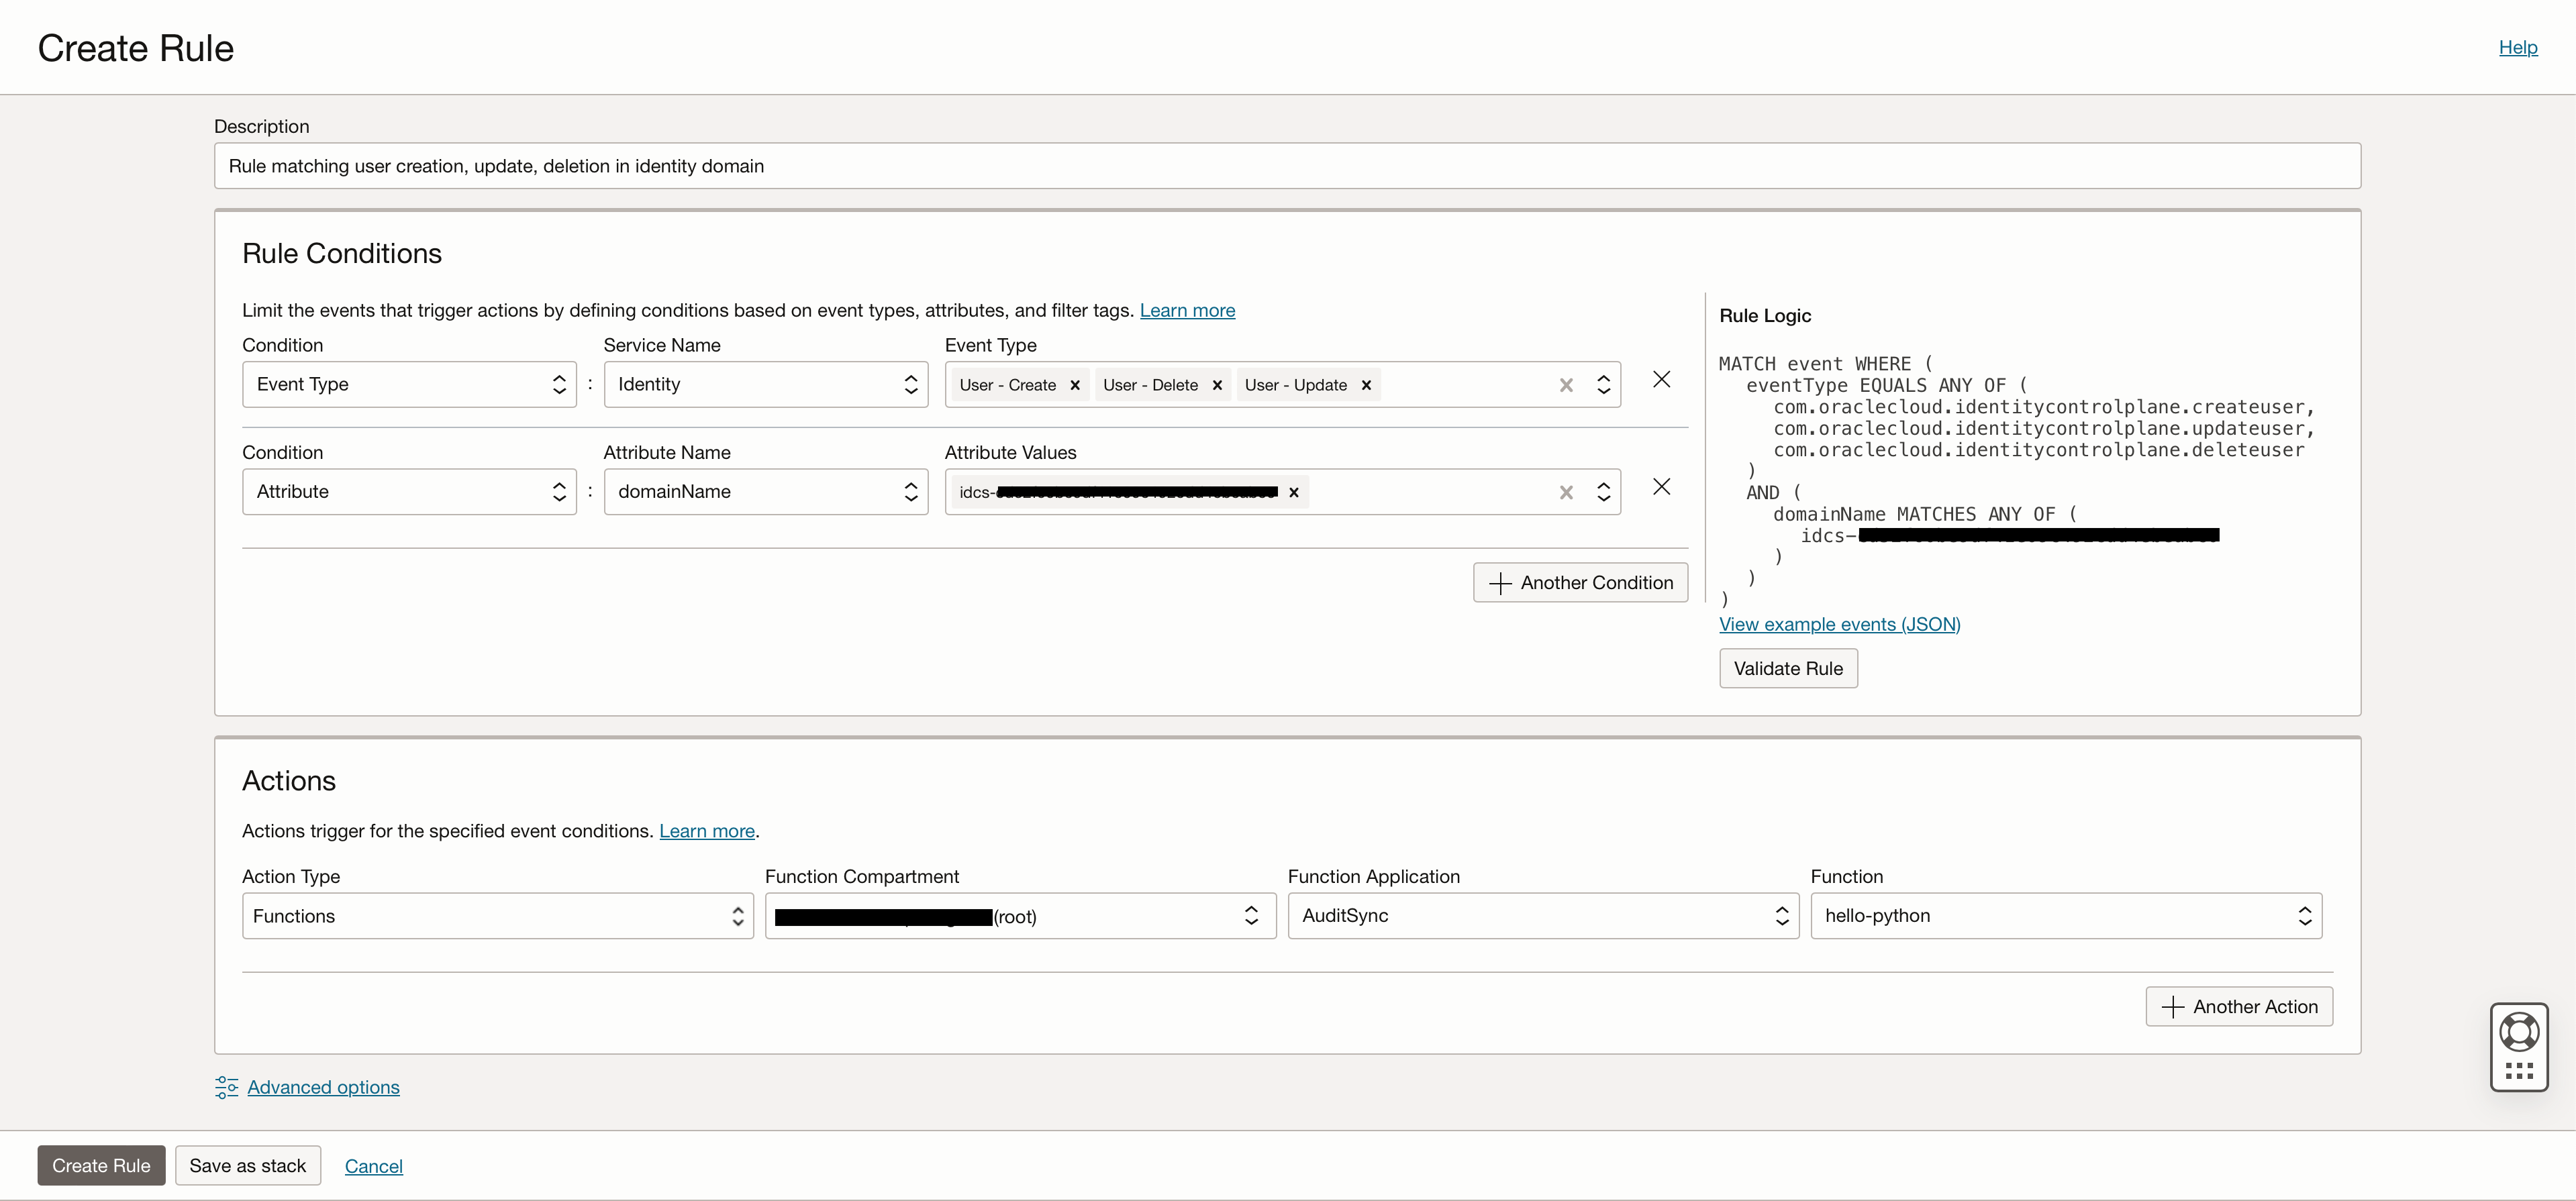
Create a rule with conditions that look for user create, update, or delete events in the administrator and employee domains.
-
User create, update, and delete event types will be available under the Identity service.
-
Add an additional “attribute” condition with the GUIDs of the two identity domains.
Note: This is optional. By default, audit events for all identity domains in the cloud account are matched. But if you are only interested in a subset of identity domains, you can explicitly specify the in-scope domains.) You can find the identity domain GUID on the identity domain overview page.
-
In the Actions panel, select the Functions Action Type and select the function that you created and deployed in steps 3 and 4 above.

-
-
-
Now, when you create, update, or delete a user in either of the identity domains, the OCI Function is invoked with the raw audit log as the payload. The OCI Function, in turn, posts the data to Azure Log Analytics Workspace. You will see the data in a custom table named
OCILogging_CL.
Related Links
Acknowledgments
- Authors: Ari Kermaier (Consulting Member of Technical Staff, OCI Identity) and Manoj Gaddam (Principal Product Manager, OCI Identity)
More Learning Resources
Explore other labs on docs.oracle.com/learn or access more free learning content on the Oracle Learning YouTube channel. Additionally, visit education.oracle.com/learning-explorer to become an Oracle Learning Explorer.
For product documentation, visit Oracle Help Center.
Implement multicloud security using OCI Audit to capture events from OCI Identity and Access Management
F83130-01
June 2023
Copyright © 2023, Oracle and/or its affiliates.