Note:
- This tutorial requires access to Oracle Cloud. To sign up for a free account, see Get started with Oracle Cloud Infrastructure Free Tier.
- It uses example values for Oracle Cloud Infrastructure credentials, tenancy, and compartments. When completing your lab, substitute these values with ones specific to your cloud environment.
Configure and protect an Oracle Integration (Process) Custom Endpoint with OCI WAF
Introduction
Oracle Integration is a fully managed, preconfigured environment that gives you the power to integrate your cloud and on-premises applications, automate business processes, gain insight into your business processes, develop visual applications, use an SFTP-compliant file server to store and retrieve files, and exchange business documents with a B2B trading partner.
Use Oracle Cloud Infrastructure Web Application Firewall (OCI WAF) to protect applications from malicious and unwanted internet traffic. WAF can protect any internet facing endpoint, providing consistent rule enforcement across a customer’s application.
Objective
Configure and protect an Oracle Integration instance with Custom Endpoint against malicious traffic from the Internet using OCI Firewall.
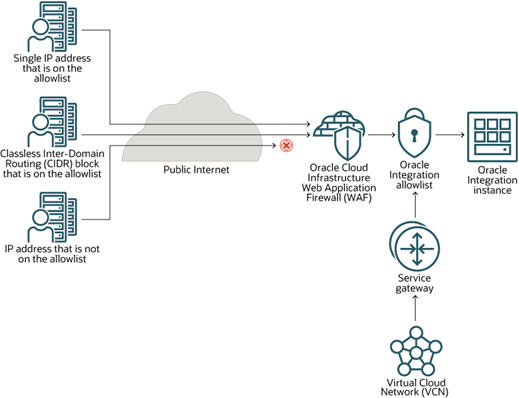
This tutorial will follow the Oracle Integration reference architecture recommendations for using the WAF and allowlist as suggested by the documentation.
More information can be found at: Provisioning and Administering Oracle Integration Generation 2.
Prerequisites
- Access to an Oracle Cloud tenancy
- An Oracle Integration instance setup in your tenancy
- A VCN with a public subnet in your tenancy
- A custom endpoint with a CNAME to a DNS domain
- A SSL certificate
- An OCI WAF policy to protect the Oracle Integration instance custom endpoint
Task 1: Create the Oracle Integration instance
-
To create a new Oracle Integration instance via the Web Console, go to the Developer Services menu and click Integration.

-
On the Integration instances screen, select the compartment where the instance will be created and click Create instance.

-
A screen for creating the instance will appear. Fill in the instance name, select the Oracle Integration version (Gen 2) and click Create.

Note: The other items can be configured according to the needs of your environment. In this tutorial, we leave the default values.
-
After creation is finished, the instance will be available. Click on the instance name to view details.

-
To validate the functioning of your Oracle Integration instance, after accessing the details of your instance, click Service console.

-
A new browser tab will open and you will have access to the Oracle Integration home screen.

Task 2: Set up OCI Vault, DNS and SSL certificate
Once the Oracle Integration instance is created, create the Custom Endpoint for your instance. The Custom Endpoint will allow you to access the Oracle Integration interface using a private domain, for example:
https://oic-lab.<exampledomain>.com/ic/home
To create the Custom Endpoint, follow these 5 steps:
- Create a VCN with a public subnet
- Create a CNAME entry in the custom DNS pointing to the Oracle Integration endpoint
- Create an SSL certificate for the new link (example,
oic.<exampledomain>.com) - Create an OCI Vault where the certificate will be stored
- Perform Custom Endpoint configuration on your Oracle Integration instance
Task 2.1: Create a VCN and public subnet in your compartment
-
To create a VCN, open the services menu of your OCI web console and click Virtual Cloud Networks.

-
Once inside the Networking page, check if you are in the correct compartment and click Start VCN Wizard.

-
Create your VCN according to the requirements of the environment you are building. Oracle Integration requires a public subnet to be created and service gateways to be available (NAT Gateway).

-
The VCN will be used during the creation of the Oracle Integration Custom Endpoint.
Important: Make a note of your VCN’s OCID as it will be used for WAF configuration on Oracle Integration.
-
Task 2.2: Create a CNAME entry in custom DNS for the Oracle Integration endpoint
You must now access your domain’s DNS configuration environment to create a CNAME entry that will point to your Oracle Integration. When we configure the WAF, this CNAME entry will be changed, but it is important to create it at this time so that we can import the SSL certificate that will be used for encryption in transit of access to your Oracle Integration.
-
Go back to the Oracle Integration service page in your OCI console.

-
Within your instance details, note the domain FQDN provided by OCI for accessing the Service Console of your Oracle Integration instance.

- In our example, we will use the FQDN
oic-lab-instance-axyjvqi24eaa-gr.integration.ocp.oraclecloud.com.
- In our example, we will use the FQDN
-
Create a CNAME in your domain pointing to the FQDN of your Oracle Integration Custom Endpoint.
Note: It is not in the scope of this tutorial to show how to configure a CNAME in your DNS zone file.
-
Once you have your FQDN, configure the CNAME of your own domain. After configuration, validate that the CNAME is correctly configured using the command
dig.$ dig <oic>.<exampledomain>.com
Task 2.3: Create a SSL certificate for the new domain
Once the CNAME has been created, you must create an SSL certificate in order to enable encrypted Internet traffic for your instance. In this tutorial we will create a self-signed SSL certificate. However, in production environments, the certificate must be valid.
-
To create the self-signed certificate, let’s first create a private key.
$ openssl genrsa -out oic-lab.key 2048- As a result you will get the private key named
oic-lab.key.

- As a result you will get the private key named
-
Now, let’s create the CSR (Certificate Signing Request).
$ openssl req -key oic-lab.key -new -out oic-lab.csr- Fill in the requested information to obtain your .csr file at the end. Note that the “Common Name” must be exactly the FQDN used for our tutorial.

-
Now that we have the private key (oic-lab.key) and the csr (oic-lab.csr), let’s create the self-signed SSL certificate. To do this, run the command below.
$ openssl x509 -signkey oic-lab.key -in oic-lab.csr -req -days 365 -out oic-lab.crt- This command will generate a self-signed certificate valid for 365 days.

Now that we have our self-signed certificate, we can import it into an OCI Vault for use within Oracle Integration.
Task 2.4: Create an OCI Vault and import the SSL certificate
Now that we already have the self-signed SSL certificate, we must create an OCI Vault inside the compartment where Oracle Integration is running.
-
To create the OCI Vault, access the Services menu in your OCI web console.

-
Once the Vault screen is loaded, check if you are in the correct compartment and click Create vault.

-
Fill in the information for creating your Vault correctly, and click Create Vault.

-
After creating the Vault, create your Master Encryption Key.

-
Before creating the Vault secret that will contain your self-signed certificate, you need to adapt the format of the certificate to be stored in the Vault. This suitability is just the concatenation of your certificate, key, intermediate certificates (if any) and certificate passphrase (if any). The final file format will be in JSON, as shown in the model below:
``` { "key": "-----BEGIN PRIVATE KEY-----\n…..-----END PRIVATE KEY-----\n", "cert": "-----BEGIN CERTIFICATE-----\n….-----END CERTIFICATE-----\n", "intermediates": [ "-----BEGIN CERTIFICATE-----\n….-----END CERTIFICATE-----\n", "-----BEGIN CERTIFICATE-----\n….-----END CERTIFICATE-----\n" ], "passphrase": "<private key password if encrypted key is provided>" } ```- To get to this format with our set of certificates and keys, it will take some processing, because, as you can see, there should be no line breaks either in the key or in the certificate or passphrase.
-
-
Use the command below to adjust your key.
`awk -v RS= '{gsub(/\n+/, "\\n")}1' <seu\_arquivo.key>`
-
Copy this value and insert it in the “key” item of the example JSON above. Repeat the process with the file
crt.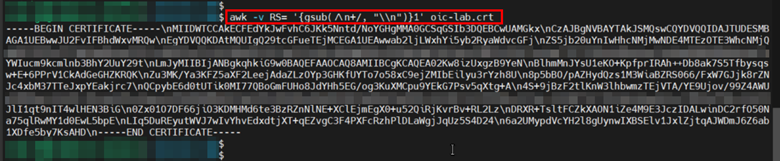
-
Go back to the OCI web console and click on the Secrets menu of your OCI Vault and then click Create Secret.

-
Fill in the fields correctly and in the Secret Contents field, insert the JSON created in the steps above.

- Fill the information needed at the Secret creation form, select your Master Encryption Key and paste your JSON secret in the Secret Contents field. Once the Secret has been created, let’s create the Oracle Integration Custom Endpoint.
Task 2.5: Configure Custom Endpoint for your Oracle Integration instance
-
To configure the Oracle Integration Custom Endpoint, return to the Integration page in your OCI web console and access your instance.

-
Click Edit.

-
In the Oracle Integration settings edit page, click Show Advanced Settings to view the Custom Endpoint configuration items.

-
To proceed with the configuration, enter a name for your Custom Endpoint and select the Secret that contains your SSL certificate stored inside the Vault. Finally, click Save changes.

- Your Oracle Integration instance will change to UPDATING status. Wait until it becomes active again.
-
Once the instance has returned to the ACTIVE state, click Service Console to test access to your new Custom Endpoint.

- If everything has been configured correctly, the Service Console will open using the FQDN you configured in your DNS CNAME (Step 2 of Task 2.2).
-
As in this tutorial, we are using a self-signed SSL certificate, it is expected that the browser issues an alert stating that the certificate cannot be verified. However, note that your Custom Endpoint’s FQDN is already in use.

-
Once accessed, your Oracle Integration console should display, which indicates that your Custom Endpoint is working correctly.

Note: If you use a valid SSL certificate, the browser warning message about the validity of your certificate will not be issued.
Task 3: Configure WAF and Oracle Integration AllowList
Now that we have the Custom Endpoint up and running, let’s configure the WAF rule and Oracle Integration allowlist to protect access from Layer 7 attacks.
Before creating and configuring OCI WAF to protect Oracle Integration against external attacks, let’s first configure the Oracle Integration allowlist to restrict which source IP addresses can access the Custom Endpoint we just created. The idea is that only the WAF OCI CIDR has access permissions. In this way, we will be able to restrict external access to the Oracle Integration instance and, consequently, tunnel all external access only via the WAF.
To create the allowlist correctly, we will first need to capture the service CIDR that the WAF OCI uses in the region where we configure our Oracle Integration.
Task 3.1: Find your OCI region’s CIDR
-
This CIDR is available at: https://docs.oracle.com/en-us/iaas/tools/public_ip_ranges.json. This JSON file contains the CIDRs of all OCI services available on the Internet.
-
To find the WAF CIDR, first, within the JSON file of the URL above, search for the string that identifies your region. As we are using the region of São Paulo, the reference string is sa-saopaulo-1.
-
If you are using another region, access the following URL to identify the string that identifies where you are deploying your Oracle Integration: Regions and Availability Domains
Task 3.2: Find your region’s WAF CIDR
-
Now that you know where the OCI service public ranges are and where to find the region string you are using to instantiate your OCI resources, to find the WAF CIDR you will need the full list of WAF service IP ranges from OCI.
-
The URL containing the public CIDRs for the WAF service at OCI is as follows: Getting Started with Edge Policies.
-
Go to Step 6. Securing Your WAFand expand CIDR Ranges.

-
There you will find all available addresses of the OCI WAF service. Now, for the IPs in your region that you raised in Task 3.1 above, do a search and find the WAF range that corresponds to your region by searching for the “OSN” (Oracle Services Network) entries.
-
For this tutorial, which uses the São Paulo region IPs.
Note the addresses you find so that we can now include these records in the Oracle Integration allowlist.
Task 3.3: Configure AllowList in Oracle Integration
-
Now that we have the WAF OCI public addresses, let’s create the allowlist within Oracle Integration. To do so, go back to your instance screen, click on the Network access menu and then click Edit.

-
Fill in the information with the CIDRs obtained in the previous steps and also the OCID of the VCN that was created in Task 2.2.1.

-
Once the allowlist is configured, only the WAF CIDR will be able to directly access the console. All other accesses coming via the Internet, must go through the WAF.
-
To validate this, try to access your Oracle Integration Service Console. If everything is configured correctly, you will get a 403 Forbidden message in your browser.

Let’s configure the WAF to allow this access to be monitored and protected.
Task 3.4: Configure the OCI WAF Edge Rule
Initially we will need, also in the WAF, to create the record of the SSL certificate that will be used to provide secure HTTPS access to the Oracle Integration console.
-
From your OCI web console menu, click Edge Policy Resources.

-
On the service page, click Create Certificate.

-
A page for configuring the digital certificate will open. Fill in the requested information and upload the .crt and .key file created in step 2.2.3 above.

Note: The Self signed certificate option is selected because the SSL certificate we created is self-signed. If you are going to use a valid certificate, this option must be unchecked.
-
Once the certificate is created, go back to the Web Application Firewall menu to create a WAF policy that will protect the already configured Oracle Integration endpoint. To do this, in the Policies menu, click Create WAF policy.

-
Click on the link for a “legacy workflow” rule to be created.

-
A new menu will open and you will have to fill in the requested information correctly.

where:
- Name: Fill in a name for your policy.
- WAF Policy Compartment: Select in which compartment your policy will be created.
- Primary Domain: FQDN of the instance you created in your DNS.
- Origin Name: A name that will identify the URL where the WAF will send external user accesses.
- URI: The FQDN of your Oracle Integration instance (the same as the one configured in the CNAME in step 2.2.2 above).
- After filling in the items, click Create Edge policy. A new screen will appear with the details of your policy. Wait until the policy status is “ACTIVE”.
Now, to finish, we will need to perform the WAF protection rules configuration and, also, we will need to reconfigure the DNS CNAME to an FQDN belonging to the WAF infrastructure.
Task 3.5: Configure the OCI WAF protection rules
-
Once your Edge Policy is created, you will need to set some parameters to protect access to your Oracle Integration instance via WAF. To do this, within your WAF Policy, click on the Settings menu, and then click Edit on the General Settings tab.

-
Select the Enable HTTPS Support option and select the certificate you created in step 3.3. Click Save changes.

-
After configuring the WAF to use the SSL certificate, you can configure the “Access Control” policy and the “Protection Rules”. These rules will provide the necessary security so that access to the Oracle Integration console is protected. WAF OCI has predetermined rules that can be used initially in its configuration, and it is also possible to customize rules according to the needs of your business. Customizing WAF rules is not in the scope of this procedure.
-
Access Control creation
-
To configure the Access Control, click on the Access Control menu and then click Add access rule.

-
Within the Access Control configuration screen, fill in the items correctly and click Add access rule. Note that for this tutorial, we will create a rule that will allow access to the Oracle Integration console page only from IP addresses coming from Brazil.

-
-
Creation of Protection Rules
-
To carry out the configuration, click on the Protection Rules menu, then click on the Rules tab, and enable the policies you want. Click on the service menu of each rule and put it in Block.

- Select as many rules as necessary. In this tutorial, we will only enable Cross-Site Scripting (XSS) rules for demonstration purposes.
-
Once the WAF protection rules are enabled, click on the Unpublished changes menu and then click Publish all.

-
-
Applying WAF rules takes approximately 10-15 minutes.
Task 3.6: Set the CNAME to the FQDN of the WAF
Once the “Protection Rules” of your WAF are configured, you can change the CNAME of your private domain so that all requests addressed to it are forwarded to the WAF and no longer to the Custom Endpoint of Oracle Integration.
-
To do this, go to your WAF Policy page and copy the CNAME address that you must configure in your DNS.

-
Copy this address and change the DNS pointing within your zone. After changing your DNS, run the command below to validate that the configuration is correct.
$ dig <oic>.<exampledomain>.com
Task 3.7: Configure the Oracle Integration Application Role
One last step before testing access to Oracle Integration via the WAF is to change the Application Role of Oracle Integration to grant access to users correctly. Without this, users will not be able to access the Oracle Integration console.
- In your OCI web console, click Domains and access your Identity Domain configuration.

Note: If you have not set up a custom Identity Domain, then you will be using the domain called default. In this tutorial, we are using the default domain.
-
In the Domains page, click default.

-
Once inside the default domain page, click on the “Oracle Cloud Services” menu and then click on the link for your ICO instance:

-
Within your instance’s configuration page, click on the Application Roles menu to view the existing roles within the Oracle Integration application. In each of the roles, it is possible to assign users or groups of users, thus allowing detailed management of access profiles to the Oracle Integration environment.

Task 4: Test and validate
After you finish applying your WAF policy and configuring your domain’s CNAME to point to the WAF’s FQDN, you can finally test that everything is working correctly.
-
Access your endpoint’s URL via the FQDN of your domain. The Oracle Integration console page should display.

-
To validate the filtering performed by the WAF, access your policy configuration page and click on the Logs menu.

-
To validate the operation of the WAF, we can test a simple XSS attack via URL in the browser.
https://<oic>.<exampledomain>.com/ic/home/?default=<script>alert(document.cookie)</script>
-
Finally, access the WAF log and see the record of blocking unauthorized access motivated by the XSS attack.

You now have an Oracle Integration environment available on the Internet and protected by the OCI WAF.
Related Links
Before using this material, we recommend reading the reference links and official documentation for administering Oracle cloud environments.
Acknowledgments
Author - Rodrigo Pace de Barros (Oracle LAD A-Team Cloud Security Solution Engineer)
More Learning Resources
Explore other labs on docs.oracle.com/learn or access more free learning content on the Oracle Learning YouTube channel. Additionally, visit education.oracle.com/learning-explorer to become an Oracle Learning Explorer.
For product documentation, visit Oracle Help Center.
Configure and protect an Oracle Integration (Process) custom endpoint with OCI WAF
F80991-01
May 2023
Copyright © 2023, Oracle and/or its affiliates.