Note:
- This tutorial requires access to Oracle Cloud. To sign up for a free account, see Get started with Oracle Cloud Infrastructure Free Tier.
- It uses example values for Oracle Cloud Infrastructure credentials, tenancy, and compartments. When completing your lab, substitute these values with ones specific to your cloud environment.
Configure Disaster Recovery - Cold Standby using RackWare® with Oracle Cloud VMware Solution
Introduction
The Oracle Cloud VMware Solution environment has a minimum server configuration and that minimum is sometimes an expensive choice to pre-provision and keep it running for Disaster Recovery. The option described in this tutorial enables Disaster Recovery for the workloads by replicating the data from any on-premises or cloud environment to the RackWare RMM server. Provisioning of Oracle Cloud VMware Solution SDDC will take place only in the event of Disaster Recovery. The VMs will be autoprovisioned and recovered from the RMM image repository to Oracle Cloud VMware Solution.
The following image shows the overall flow of the solution described in the tutorial.
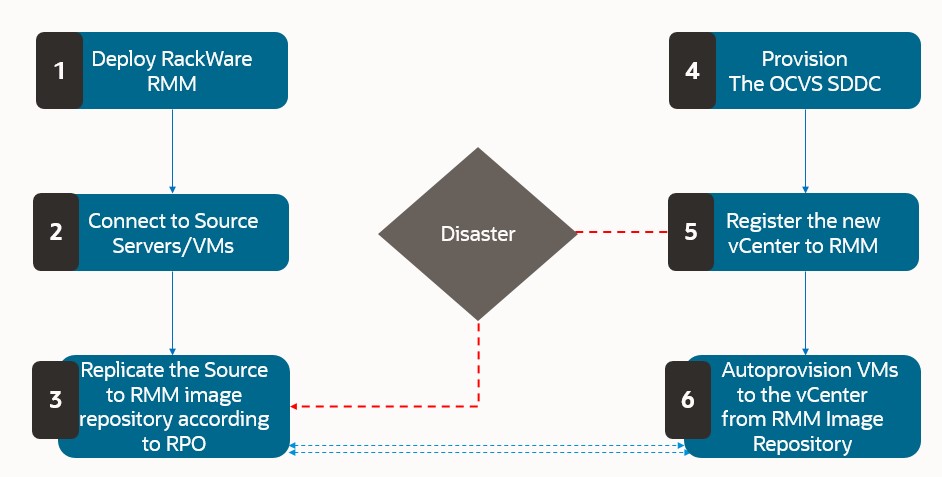
This option allows customers to save initial cost by not requiring to provision the SDDC from day 1. However, the RTO of the application workloads can significantly be impacted in the event of Disaster Recovery. The RTO will be a minimum of 4 hours plus and the detailed description is available in the Disaster Recovery Runbook section.
Note: This approach can be considered to save the upfront cost of the Oracle Cloud VMware Solution environment. However, in the event of Disaster Recovery, the minimum RTO can be in hours/day/days. The Oracle Cloud VMware Solution provisioning takes about 2.5 to 3 hours and the additional task of creating the network and provisioning servers from the repository will take additional time depending upon the size of the data. Hence, the RTO cannot be guaranteed with the cold Disaster Recovery and careful consideration is required to follow this Cold Disaster Recovery scenario.
Important Note: This tutorial does not cover Disaster Recovery for Oracle Cloud Infrastructure (OCI) native services. However, RackWare can be used to recover workloads for native OCI compute service.
Objective
This tutorial summarizes how RackWare RMM can seamlessly autoprovision replicated data from the image repository to the Oracle Cloud VMware Solution for a Cold Standby Disaster Recovery use case and will only be provisioned in the event of Disaster Recovery.
Prerequisites
- Admin access to manage the deployment of RackWare and additional components to manage the OCI environment effectively.
- Connectivity between source and OCI tenancy.
- Rackware Disaster Recovery license for the no. of VMs/Servers which will be protected.
- Service limit for no. of Oracle Cloud VMware Solution nodes identified for SDDC cluster. A minimum of 1 SDDC and 3 ESXi hosts must be always available.
Note the common terminology used in RackWare.
-
RackWare RMM: The Rackware Management Module is a core of the solution that provides you a web UI to perform the migration and Disaster Recovery configuration.
-
Wave: A Wave is a collection of servers participating in the migration or Disaster Recovery plans.
Solution Overview
The architecture diagram represents the RMM server deployed in OCI with block storage for the image repository. The workloads from the source will be replicated to the RMM image repository unlike the normal Disaster Recovery scenario where the workloads get deployed in Oracle Cloud VMware Solution and sync happens to the passive copies of the VMs.
The following image shows the architectural representation of Disaster Recovery with Oracle Cloud VMware Solution using RackWare.
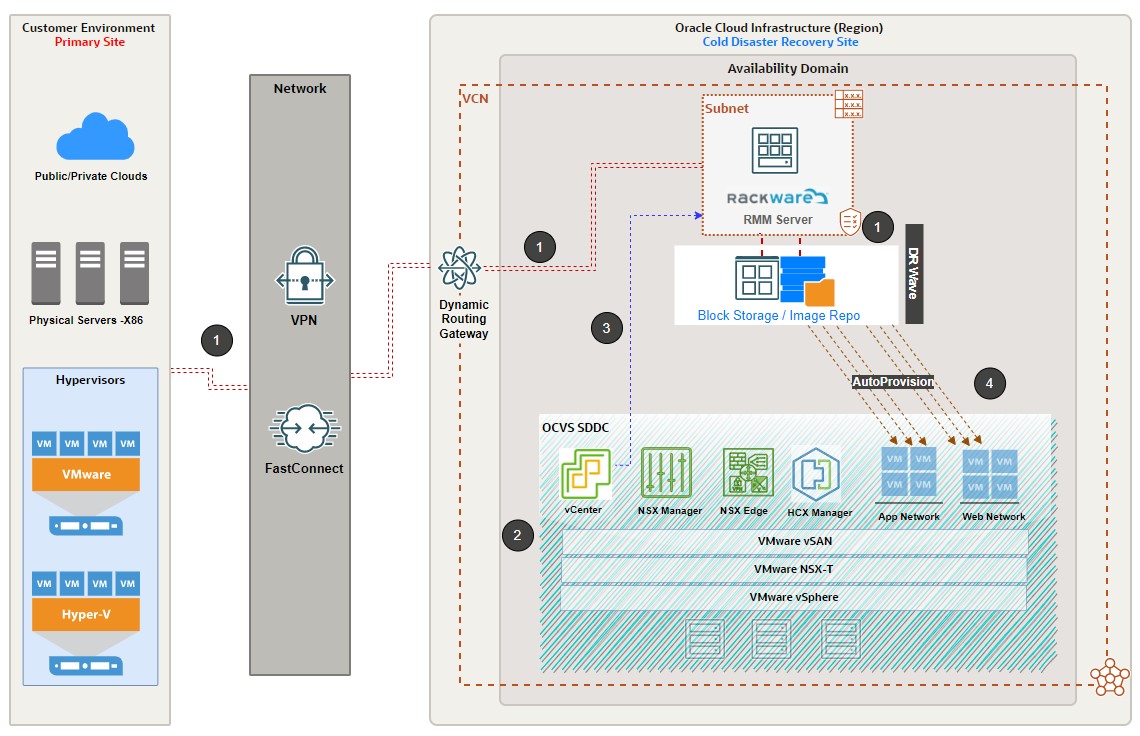
The Oracle Cloud VMware Solution representation in the architecture is shaded to show that it will not be available from day 1 of the architecture implementation. However, it will only be provisioned when the disaster strikes at the primary site.
The architecture consists of the following components.
- Oracle Cloud VMware Solution SDDC: The Oracle Cloud VMware Solution is a Disaster Recovery site to recover the protected VMs in the event of a disaster and will only be provisioned in the event of Disaster Recovery.
- RMM Server: RackWare Management Module is the core component of RackWare to replicate the workloads to its local repository and autoprovision it to the Oracle Cloud VMware Solution environment.
- OCI FastConnect: Dedicated private network connectivity between source and OCI tenancy. The bandwidth requirement of the link will be dependent on the size of the data that needs to be replicated across the sites.
- VPN: OCI IPSec VPN for connectivity over the internet where FastConnect implementation is not possible. However, VPN does not guarantee desired RPO and is recommended to use this option only for Proof Of Concept (POC).
- Block Storage: Block storage is attached to RMM server to scale the ZFS pool capacity for local image repository. Ensure that the size of your block storage is equivalent to and or greater than the size of the workloads that need to be replicated.
Task 1: Prepare the Disaster Recovery Environment
This section describes the steps required to build the RackWare environment to complete the entire Disaster Recovery setup with Oracle Cloud VMware Solution being a Cold Standby.
Task 1: Deploy RackWare RMM Server
The RackWare RMM is available as an OCI Marketplace image with BYOL and with the paid option.
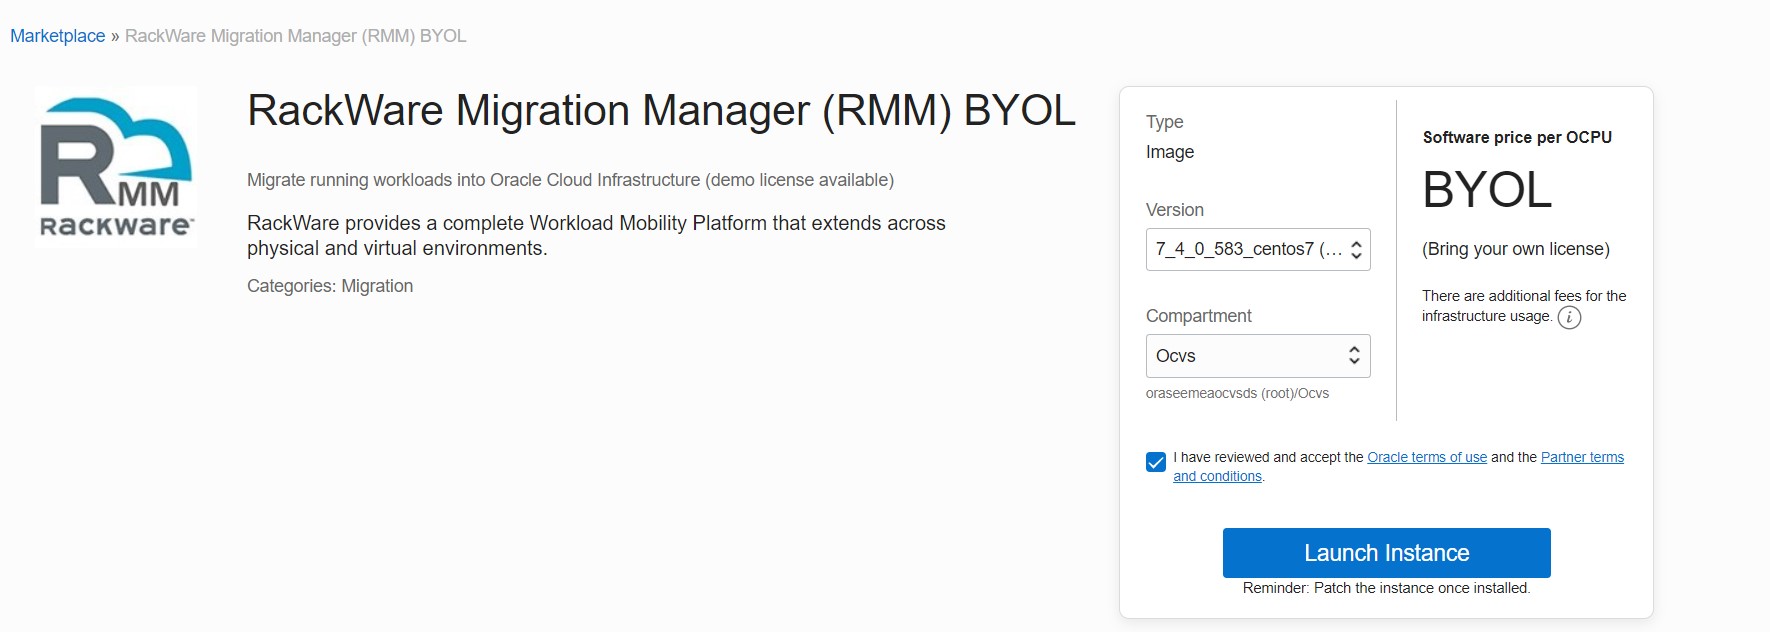
Follow the installation and configuration instructions from the link to complete the RackWare RMM setup in Oracle Cloud Infrastructure: RackWare RMM Getting Started with OCI
Task 2: Create a Disaster Recovery Wave
In this section, we will create a Disaster Recovery wave to replicate the source environment into the RackWare RMM image repository.
-
Log in to the RMM server using admin credentials.
-
Navigate to Replication, click Waves and then click (+) and select + Create Wave. Alternatively, you can use the Upload File option to upload the servers in bulk using a template. Provide the name of the wave and leave the default options.
-
Click on the newly created wave and click (+) to add hosts to this wave.
-
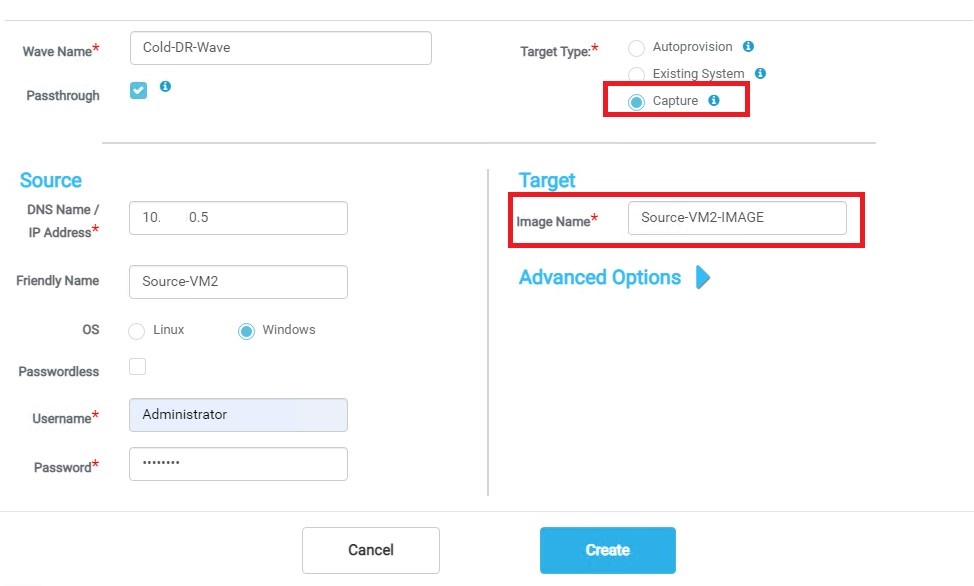
Fill in the source information details such as IP address, OS type, and credentials. It is recommended to use a Passwordless option for secure access from RMM to the source server.
-
You must select the Capture option and provide the image name as shown in the sample screenshot below. This option allows the capture of an image for the source to the local RMM local repository.
Note: Add all the source servers into the specific Disaster Recovery waves. The Add Host can also be performed using the RackWareWaveTemplateVcenter.xlsx file. The Excel file can hold all the server source details and can be uploaded to the Disaster Recovery wave which can reduce manual efforts to add hosts one at a time. For details, refer to the following sample xlsx file screenshot.

Important Note: When you add hosts into a Disaster Recovery wave, the Network Labels are the NSX-T logical network segments that you will create in the event of Disaster Recovery in Oracle Cloud VMware Solution SDDC.
Task 3: Create a Disaster Recovery Policy and Execute a Disaster Recovery Wave
Before you begin, let us understand the different target sync operation in RackWare. The following table provides you the description of each stage and how this can be used in Cold Standby Disaster Recovery use case.
| Sync Option | Description |
|---|---|
| Direct Sync | Target sync option used for direct sync between source and the target server |
| Stage 1 | Target sync option where the source data will be replicated to the RMM server image repository |
| Stage 2 | Target sync option where the data will be replicated from RMM image repository to target endpoint |
| Stage 1 & 2 | Target sync option where the sync happens between source to RMM and from RMM to Target. |
Next, create a Disaster Recovery policy according to the RPO requirement of the application.
Note: You will create a Wave under Replication but when the Disaster Recovery policy is attached to the Wave, it will automatically be moved under the Disaster Recovery tab.
-
Click “Policies” under the Disaster Recovery tab and click on (+) to create a Disaster Recovery Policy.
-
Configure settings according to your Disaster Recovery requirement and select Periodicity according to your RPO requirements. Refer to the sample screenshot below where the RPO is set to 15 mins.
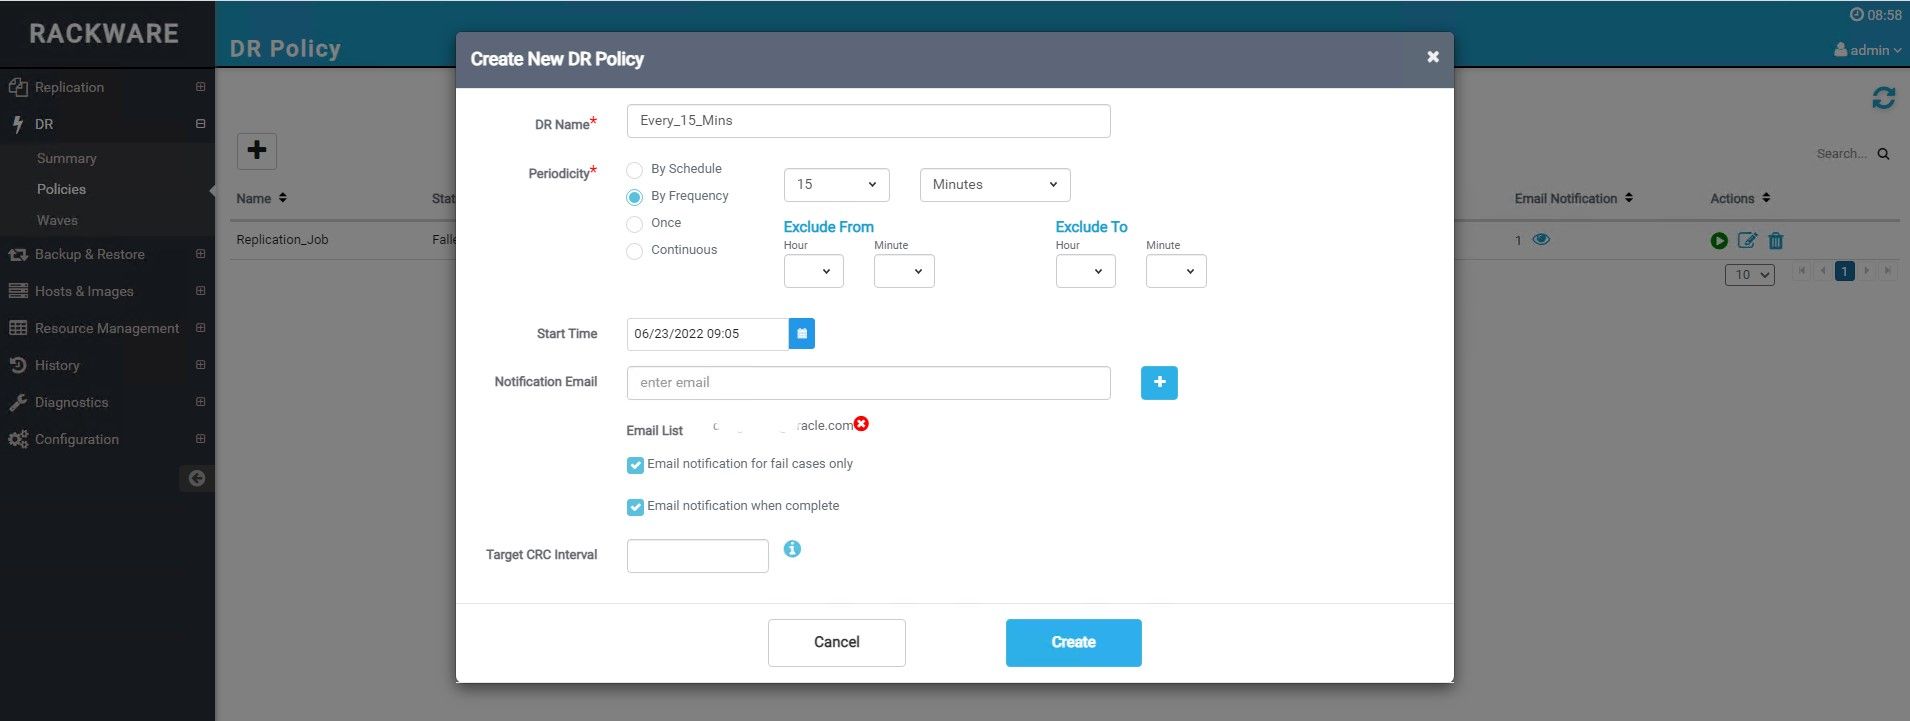
Note: You can verify the status of the policy. Since the policy is not yet assigned to the Wave and it’s not being executed, the state will reflect it as a Pending Resume.
-
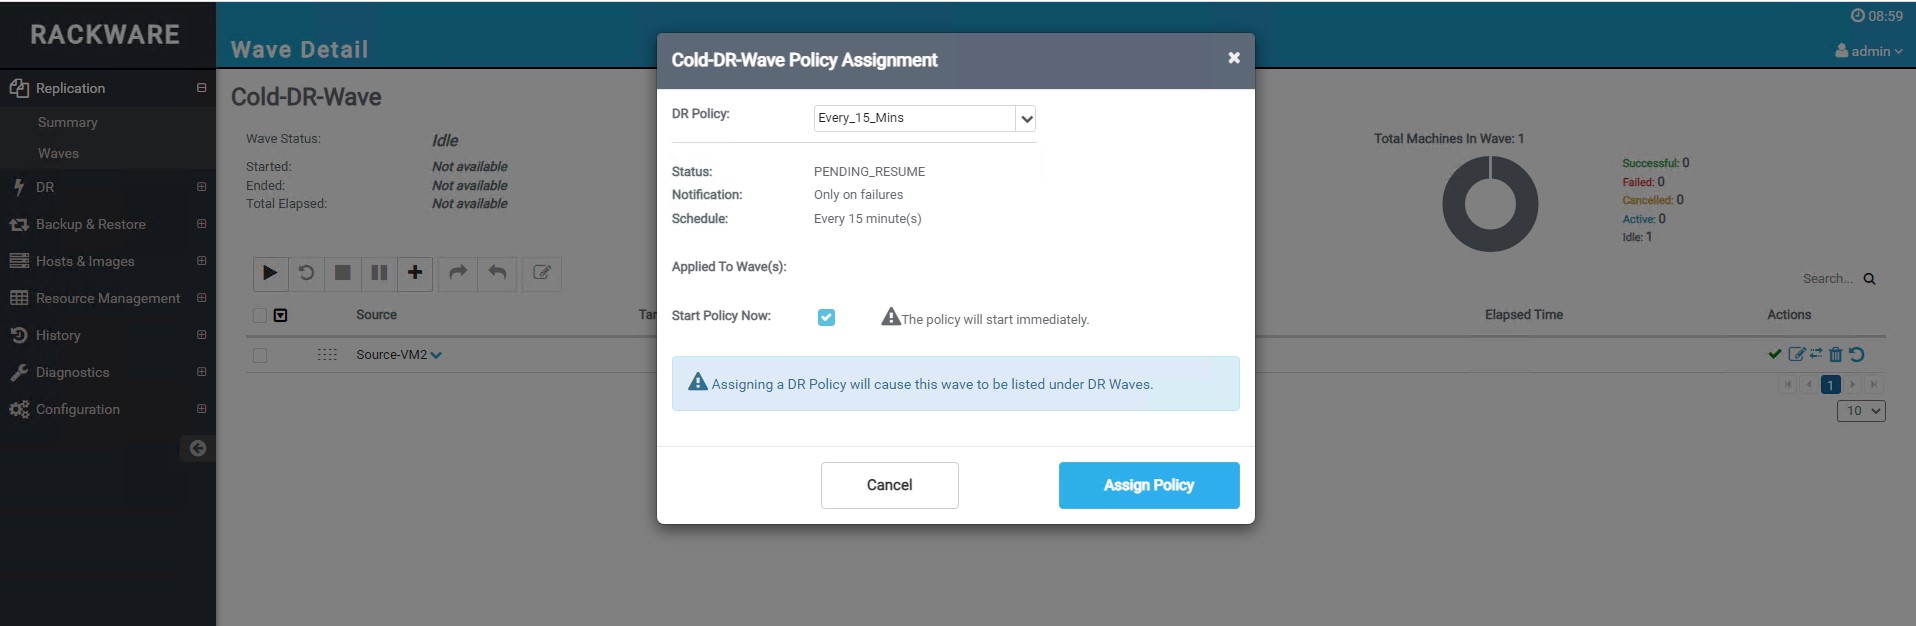
Click Waves under the Disaster Recovery tab and select the previously created wave and associate the newly created Disaster Recovery policy.
Note: Refer to the sample screenshot below where Disaster Recovery Policy named Every_15_Mins has been associated with the Disaster Recovery Wave with the default settings. You can clear the Start Policy Now check box if you don’t want to start the policy immediately after assigning it to the wave.
-
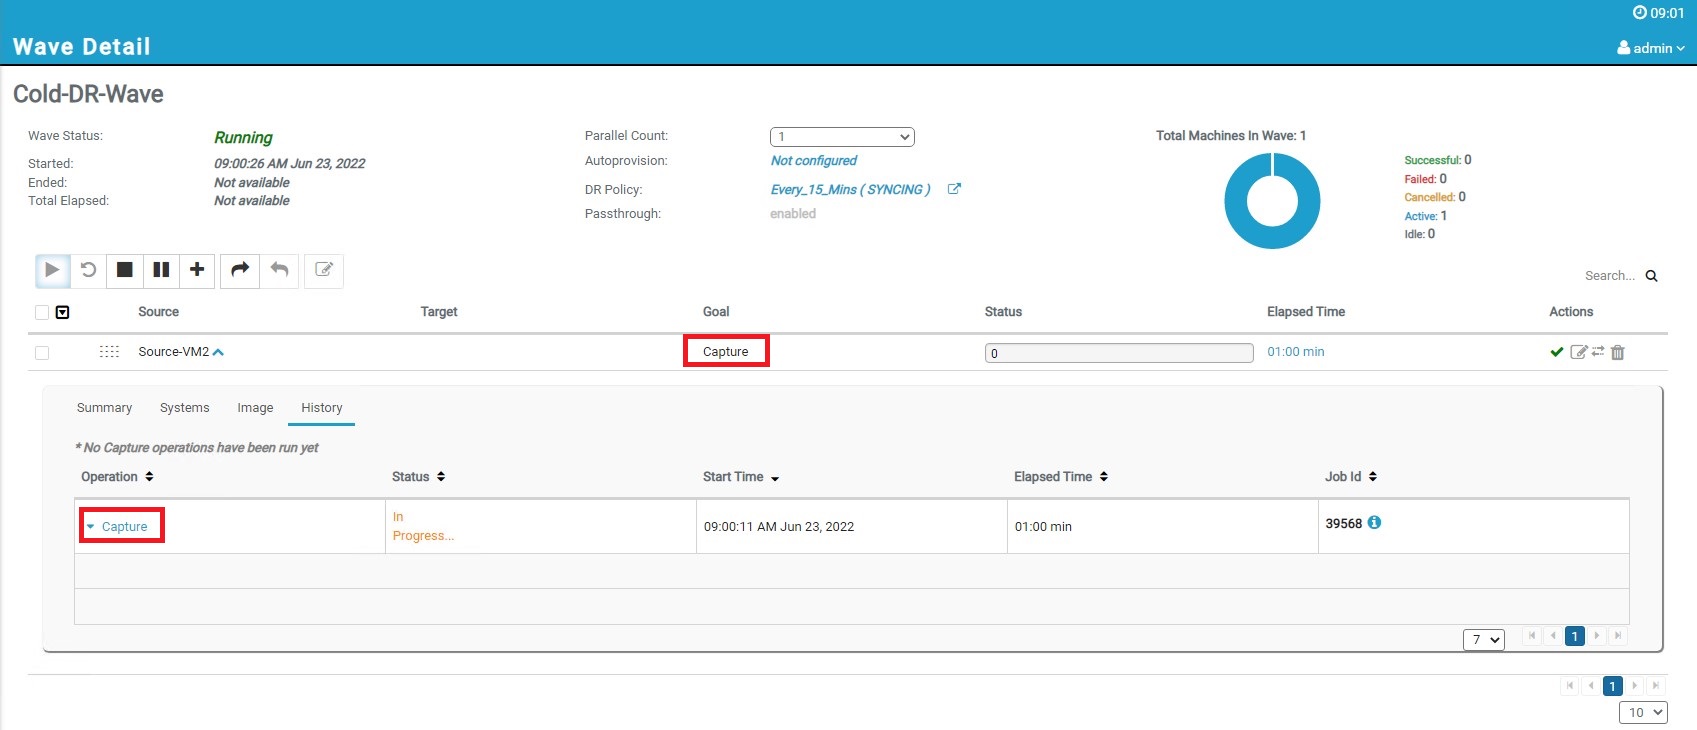
Execute the wave by clicking a play button that can trigger the replication job from the source to RMM local image repository. Replication will be Manual for the first time and then will continue to sync automatically according to the frequency set in the Disaster Recovery policy. Refer to the screenshot below, where the Goal column reflects the Capture status.
-
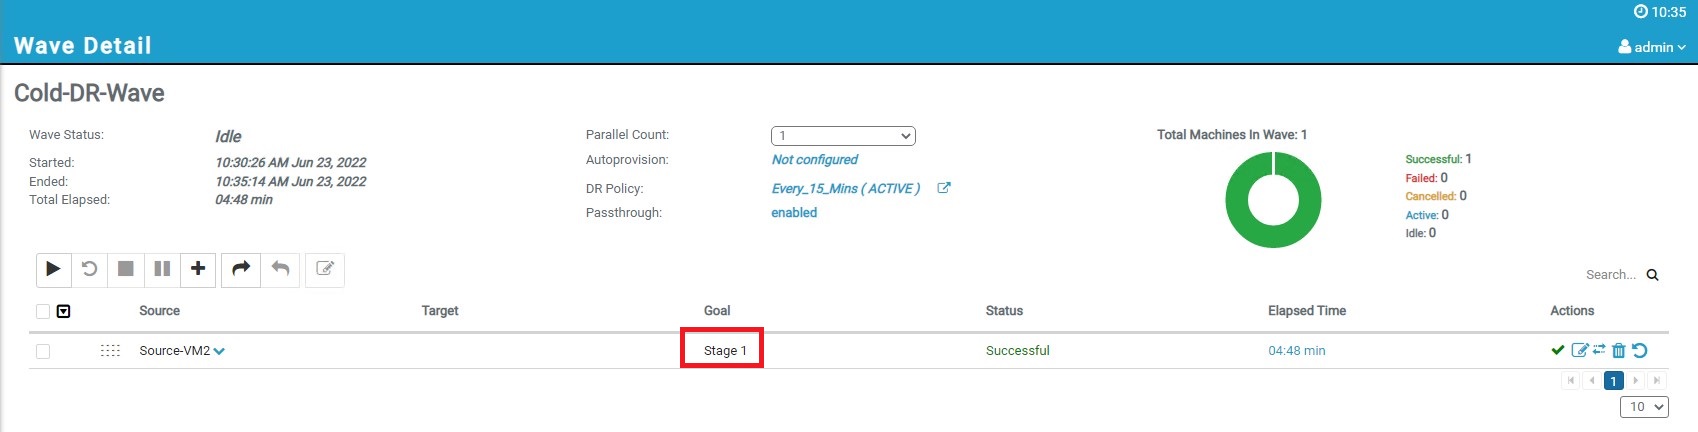
After successful replication, the Goal status is changed to Stage1 from Capture which means replication happened from source to RMM local image repository.
Note: You can also refer to the autoprovision status as set to “Not Configured” because we haven’t set any Autoprovision settings yet.
At this stage, the source workloads are getting synced with the RMM image repository.
Task 2: Configure the Disaster Recovery Runbook to address a Disaster situation
In the event of a disaster, the primary site is not available. To recover the environment from a disaster, the following steps summarize the whole Disaster Recovery Runbook in the event of Disaster Recovery.
Task 1: Provision Oracle Cloud VMware Solution SDDC
At this stage, the first task is to provision the Oracle Cloud VMware Solution SDDC environment and create the necessary networking layout from the NSX-T infrastructure.
Follow the details in the link to Create and Configure Oracle Cloud VMware Solution SDDC.
Task 2: Register the new VMware vCenter server to RackWare RMM
Once the Oracle Cloud VMware Solution SDDC is successfully provisioned, follow the steps below to register the VMware vCenter server.
-
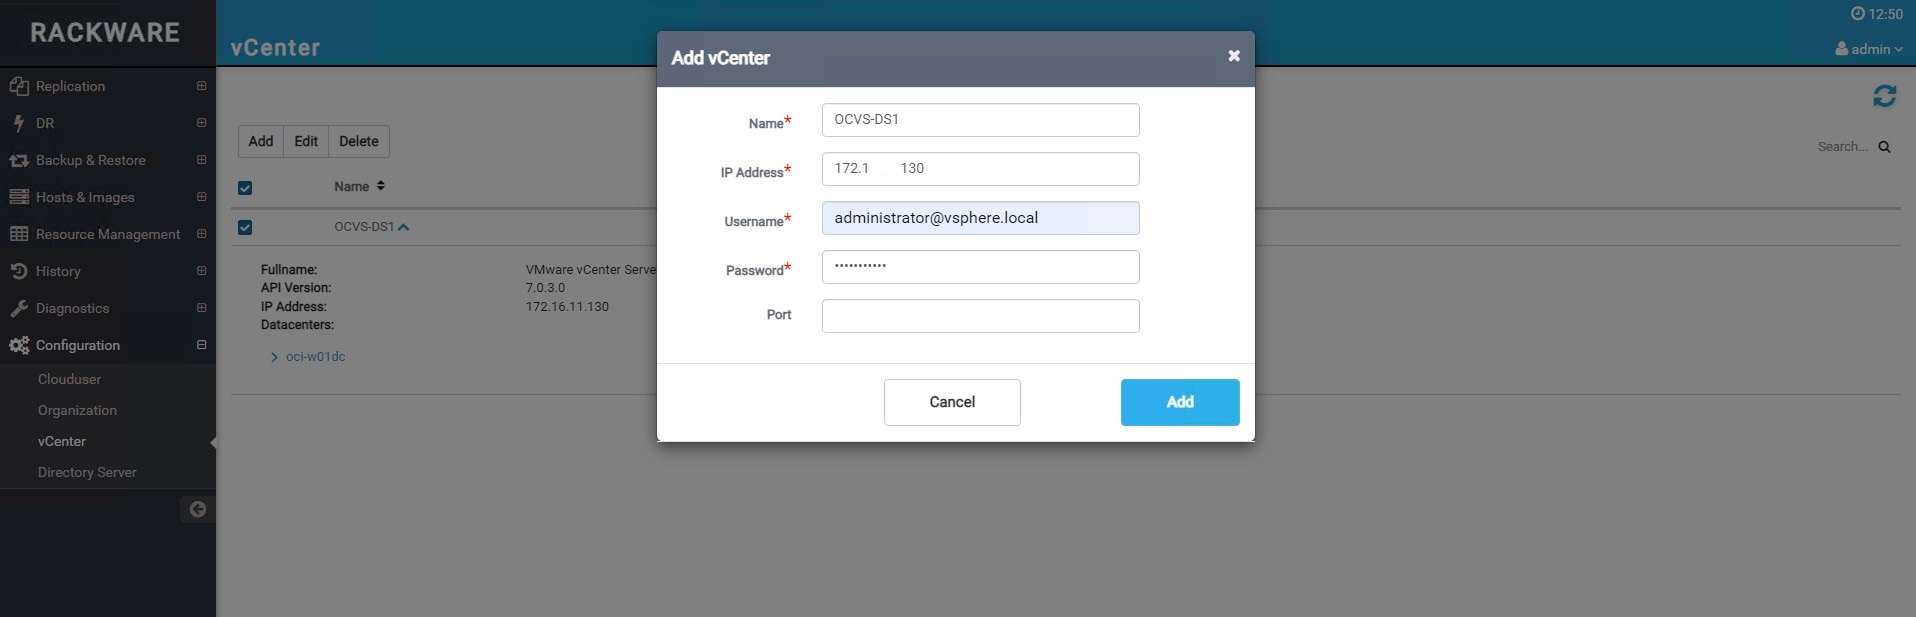
Navigate to Configuration, then click vCenter and then click Add to register the VMware vCenter server.
-
Provide the VMware vCenter details such as IP address and credentials and click Add.
Task 3: Update Disaster Recovery Wave with Autoprovision to Oracle Cloud VMware Solution
-
Click on the Disaster Recovery tab, select your Disaster Recovery wave and click Not Configured against Autoprovision, and update the Autoprovision setting to the newly registered VMware vCenter server.
-
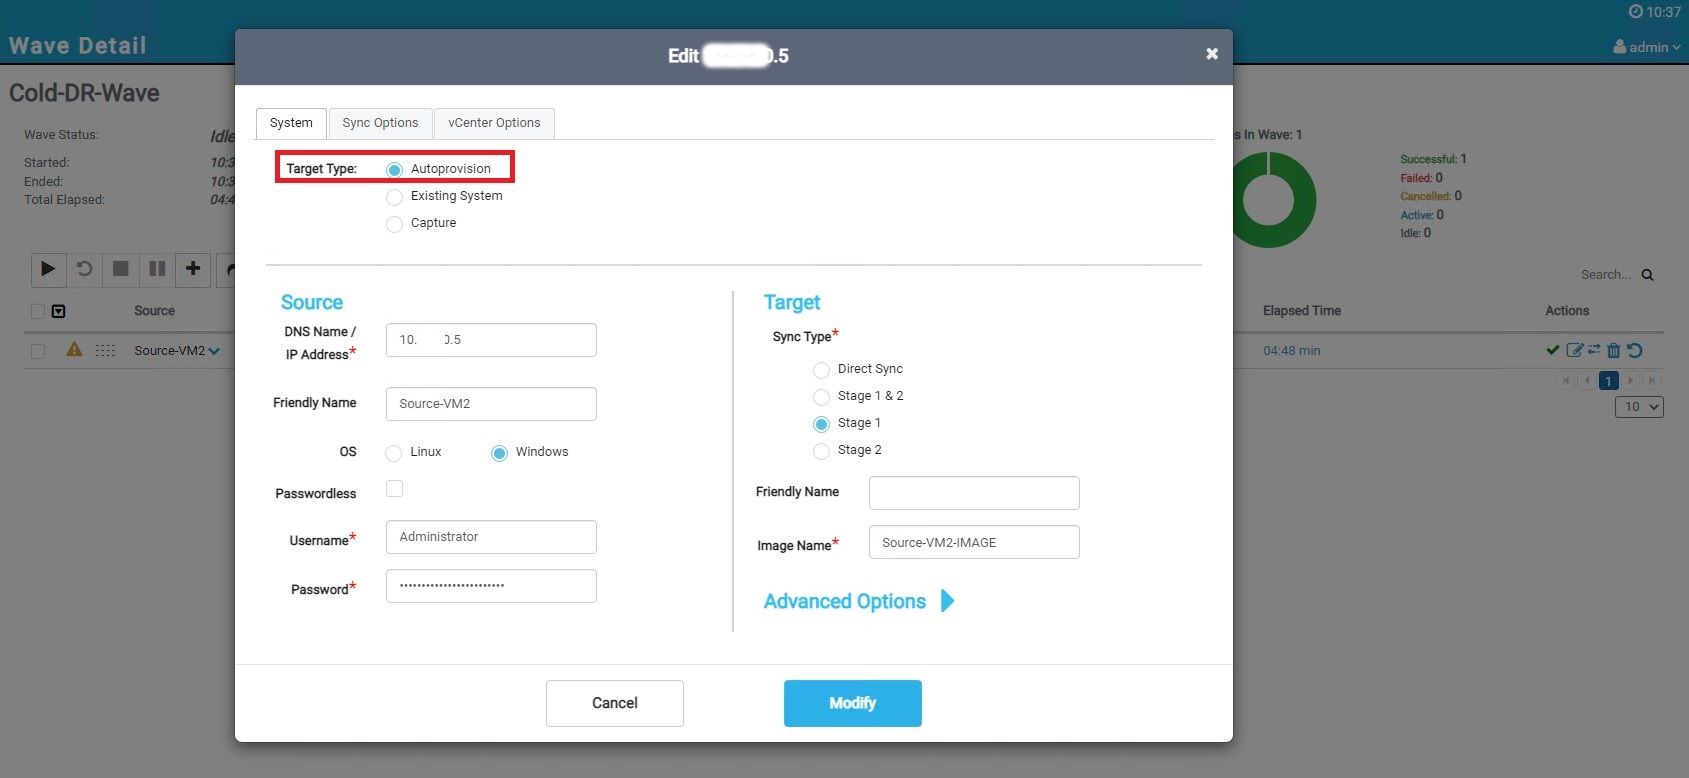
Update the hosts and change the Target Type to Autoprovision from Capture. Provide a user friendly name (optional). This setting is applicable per host. However, this setting can be updated to a large number of hosts in the wave by uploading the template file.
-
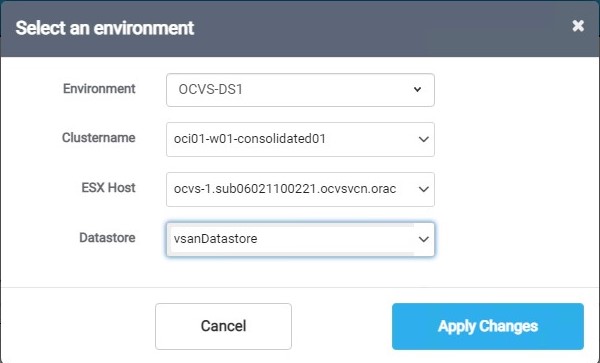
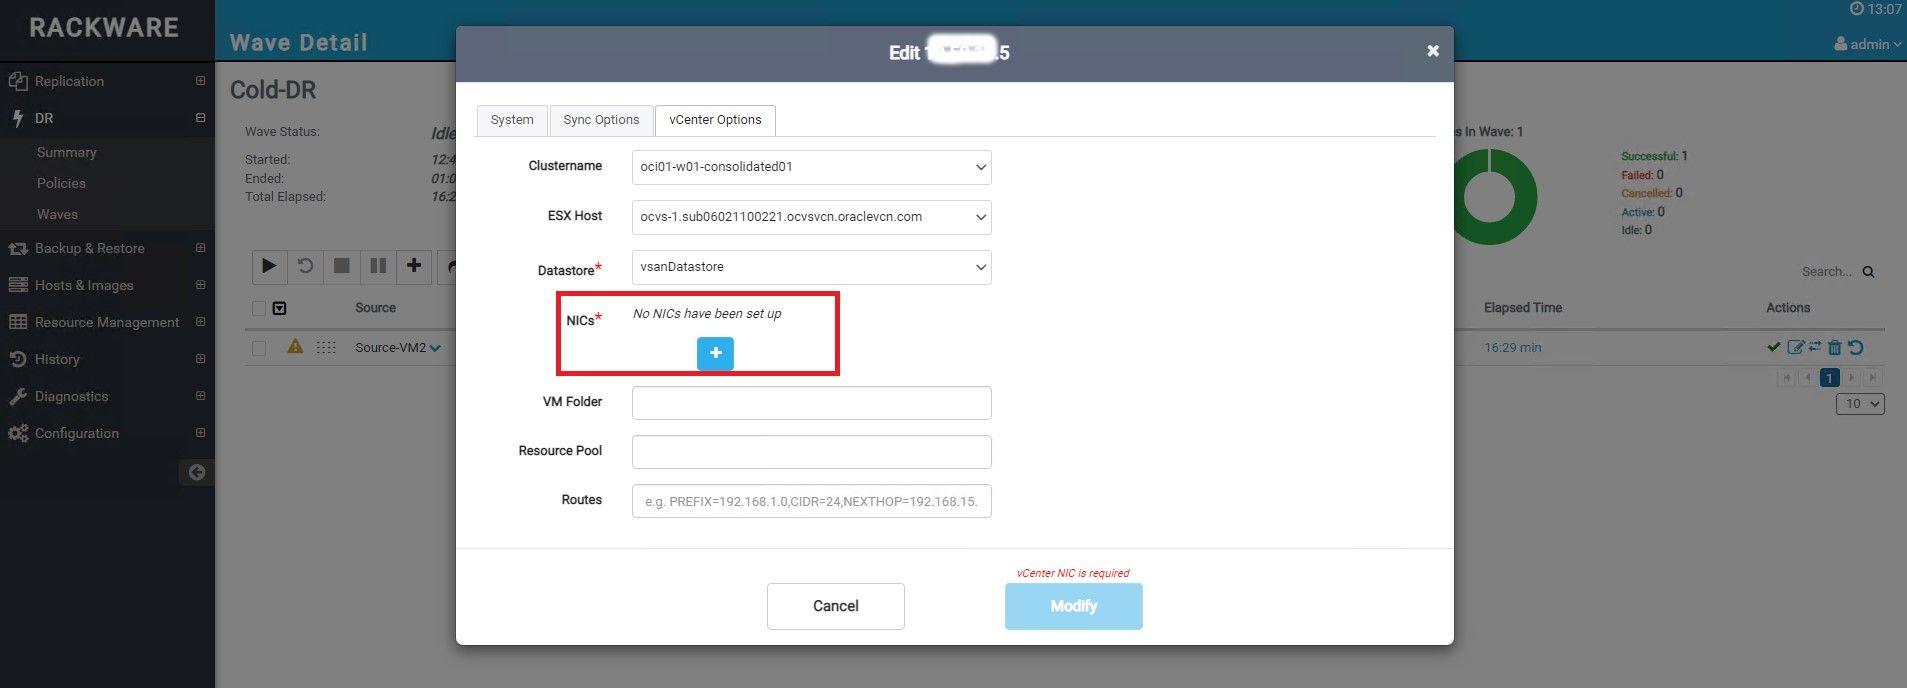
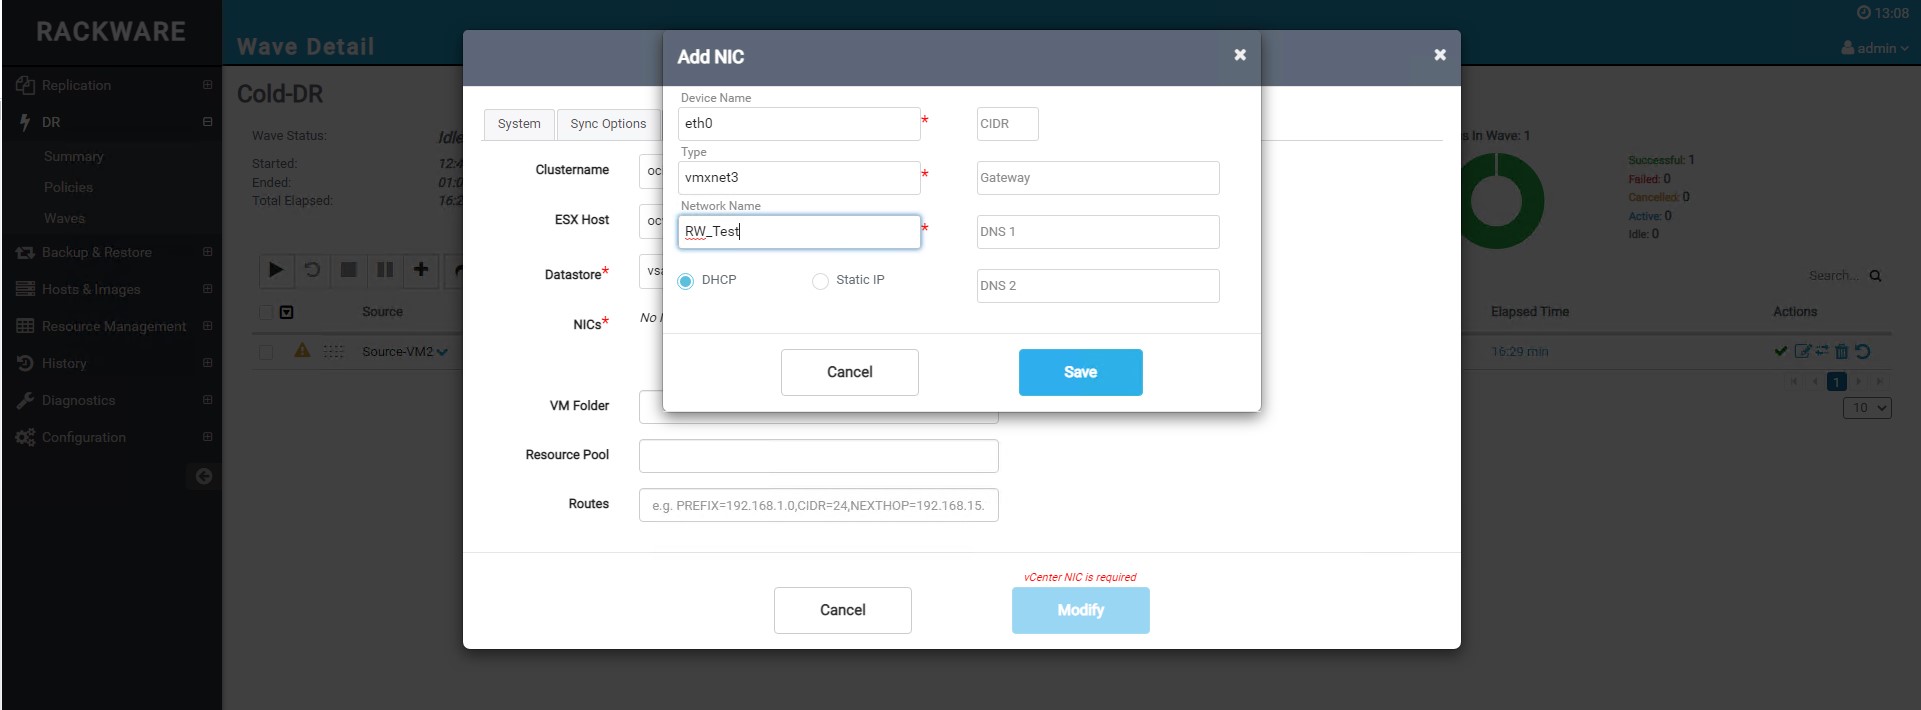
On the same Edit host screen, go to the vCenter Options tab and add NICs information.
-
Update the NIC information according to the Oracle Cloud VMware Solution target environment. Refer to the sample screenshot below where “RW_Test” is the name of the network backed by NSX-T.
-
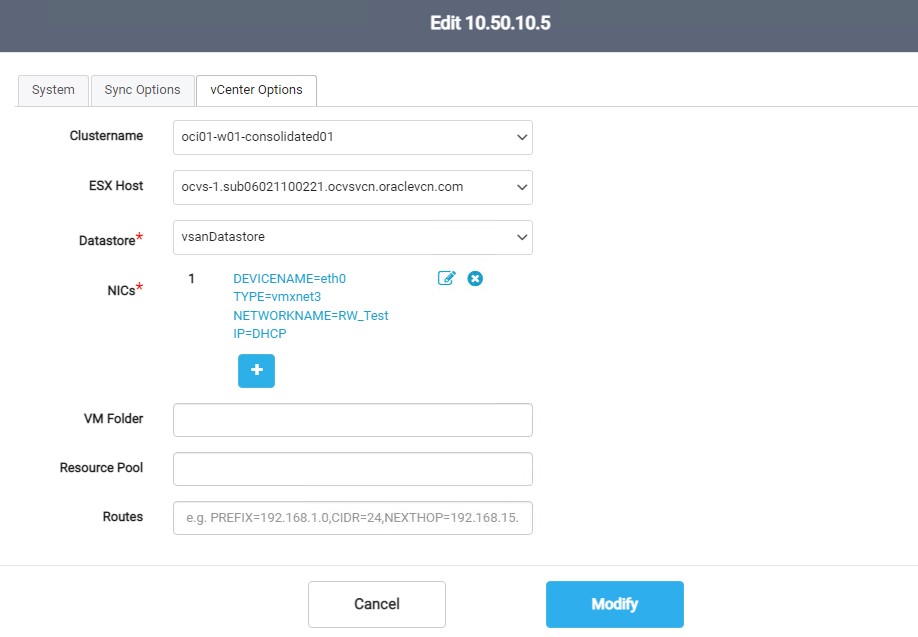
After updating the NICs information, you should see a similar output as shown in the following screenshot.
-
Now, execute the wave by clicking Failover. The servers will be Autoprovisioned to Oracle Cloud VMware Solution SDDC from the RackWare RMM image repository as a result of this operation.
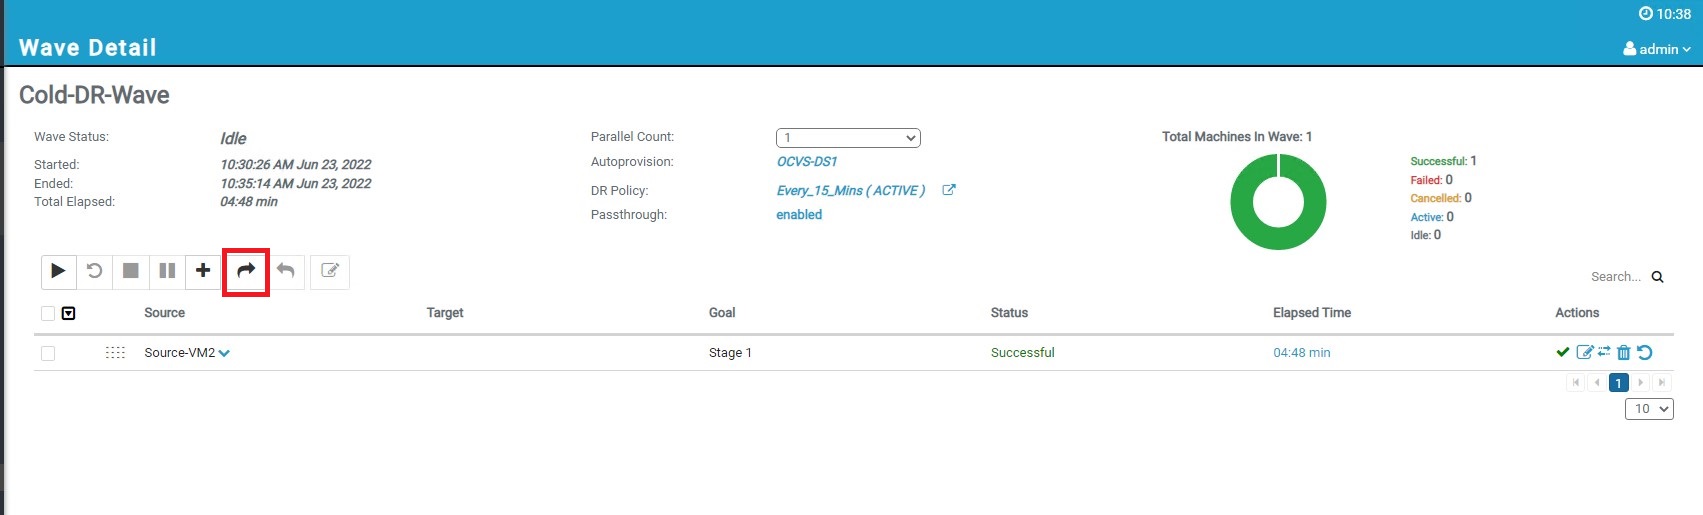
-
Do not select the Test Mode check box as you are going to perform this in the event of a real Disaster. However, it is recommended that you must perform a Disaster Recovery drill by provisioning Oracle Cloud VMware Solution SDDC for hourly billing and decommission it after the Disaster Recovery drill.
-
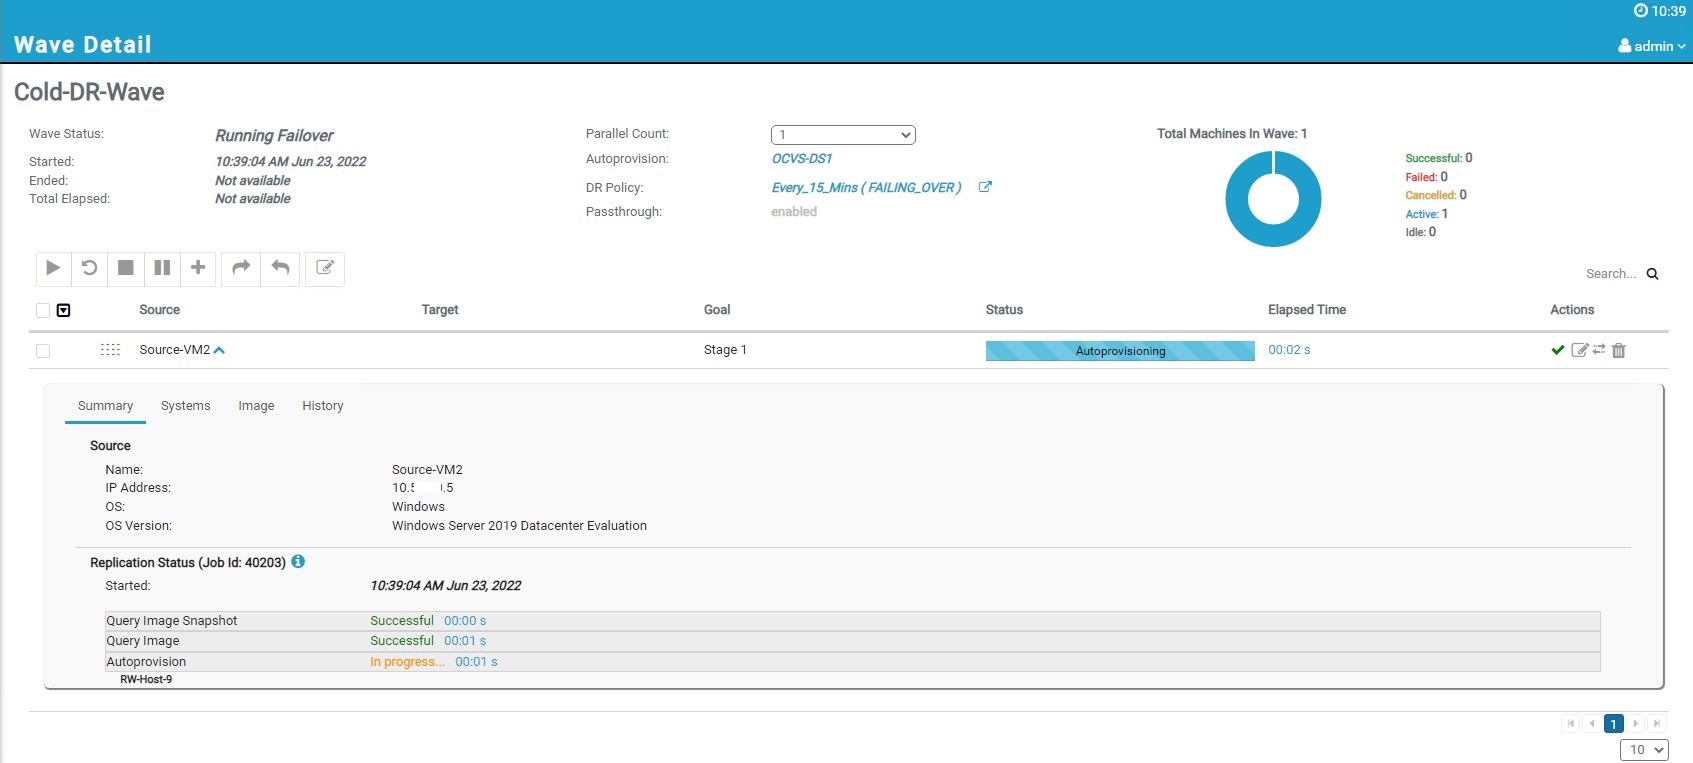
Validate the status of the Wave and you should notice the VMs being created in the Oracle Cloud VMware Solution vCenter Server.
-
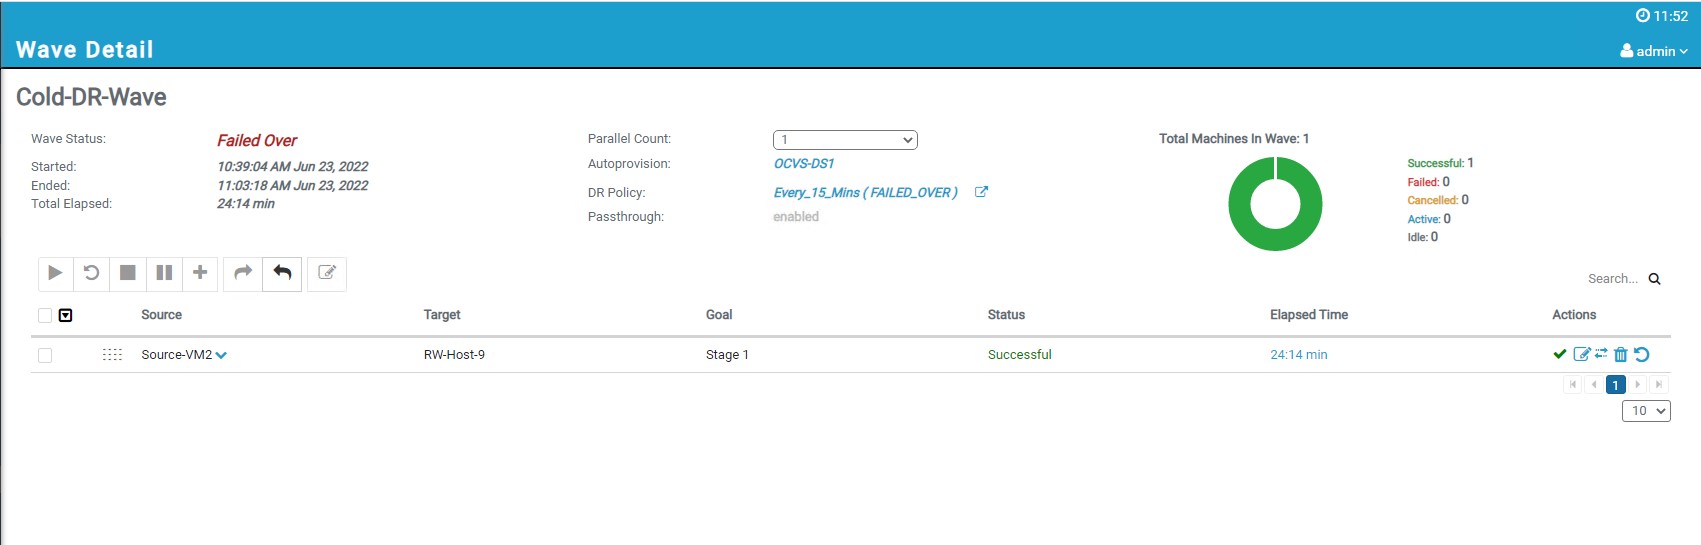
When the Failover operation is successful, all servers with the last data changes in the repository will be created and activated in the Oracle Cloud VMware Solution SDDC.
Related Links
- Configure Disaster Recovery with RackWare using Oracle Cloud VMware Solution
- RackWare Autoprovision support for Oracle Cloud VMware Solution
- Oracle Cloud VMware Solution
- Oracle Cloud VMware Solution Overview Help Center
- OCI Networking
- RackWare RMM BYOL in Oracle Marketplace
- RackWare RMM Getting Started with OCI
Acknowledgments
- Author - Devendra Gawale (Cloud Solutions Architect)
More Learning Resources
Explore other labs on docs.oracle.com/learn or access more free learning content on the Oracle Learning YouTube channel. Additionally, visit education.oracle.com/learning-explorer to become an Oracle Learning Explorer.
For product documentation, visit Oracle Help Center.
Configure Disaster Recovery - Cold Standby using RackWare® with Oracle Cloud VMware Solution
F70771-01
September 2022
Copyright © 2022, Oracle and/or its affiliates.