Note:
- This tutorial requires access to Oracle Cloud. To sign up for a free account, see Get started with Oracle Cloud Infrastructure Free Tier.
- It uses example values for Oracle Cloud Infrastructure credentials, tenancy, and compartments. When completing your lab, substitute these values with ones specific to your cloud environment.
Configure VMware HCX with Oracle Cloud VMware Solution
Introduction
Today, large-scale enterprises run their virtualized workloads in VMware Hypervisor in on-premises data centers. Customers are currently looking for enterprise cloud migration, Datacenter exit, or Hybrid Cloud Strategy that aligns with their business objectives. Oracle Cloud VMware Solution enables organizations that have a significant investment in VMware infrastructure to take advantage of the benefits of public cloud. Oracle Cloud VMware Solution gives you a fully automated implementation of a VMware software-defined data center (SDDC) within your own Oracle Cloud Infrastructure (OCI) tenancy, running on Oracle Cloud Infrastructure bare metal instances.
The Oracle Cloud VMware Solution offers VMware HCX advanced as part of the SDDC implementation along with vSphere, vSAN, and NSX-T. The Oracle Cloud VMware Solution also offers the VMware HCX Enterprise license for additional use cases. VMware HCX is a software suite, an application mobility platform designed for simplifying application migration, rebalancing workloads, and optimizing disaster recovery across data centers and clouds.
Objective
This tutorial provides an operational overview of how to install and configure VMware HCX with your on-premises VMware infrastructure and the Oracle Cloud VMware Solution SDDC. The focus of this tutorial is to highlight the ‘how-to’ steps required for OCI, your on-premises VMware Infrastructure, and the pre-requisites required for successful implementation of VMware HCX. The intent is to enable Oracle Cloud VMware Solution teams, lift implementation teams, and customers to perform these deployment and configuration steps adhering to best practices architecture & design considerations for VMware HCX.
This tutorial provides information about Oracle Cloud VMware Solution deployment overview, VMware HCX Overview, pre-requisites needed for implementation, and step-by-step implementation guidelines.
Prerequisites
This section describes the pre-requisites that are needed for VMware HCX implementation.
-
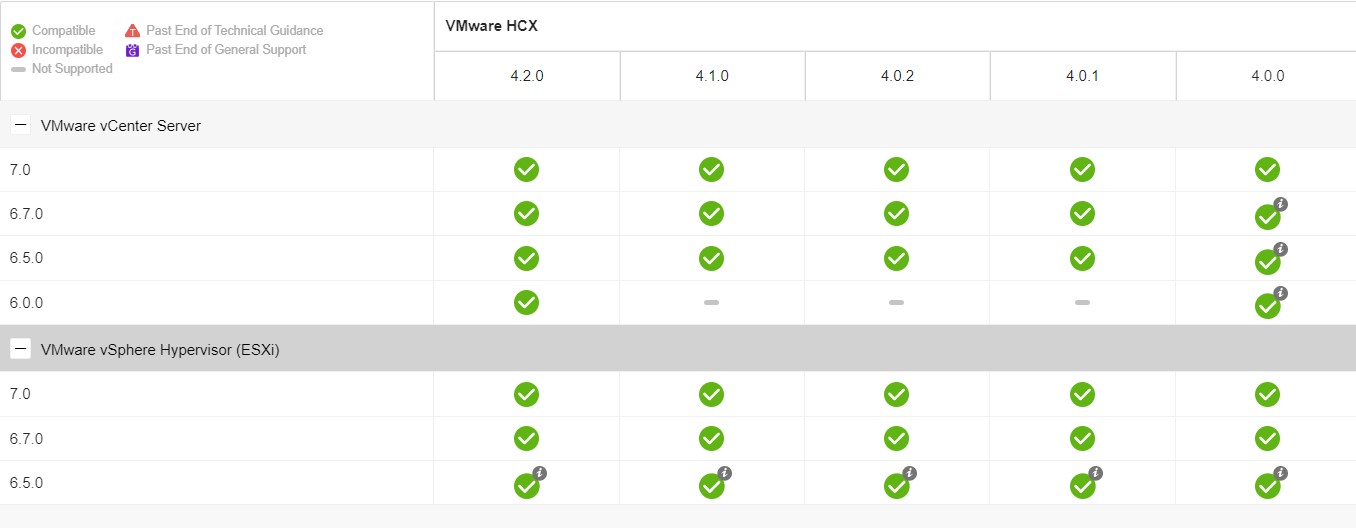
Compatibility Check - Verify the source VMware environment version for HCX compatibility. Check the VMware interoperability matrix to understand whether you are running a supported version of VMware vSphere. See the VMware Interoperability matrix. The following sample screenshot shows the compatibility for VMware HCX 4. x with different VMware vCenter and VMware ESXi versions.
-
Connectivity - OCI FastConnect with a minimum of 1 Gps bandwidth is required between the on-premises VMware environment and the OCI region where Oracle Cloud VMware Solution is deployed. All the required routes should be published to communicate from the VMware on-premises network to Oracle Cloud VMware Solution VCN CIDR.
-
Access - Administrative access in an on-premises VMware vCenter Server.
-
Network dvPortGroup - The following set of VLAN-backed network
dvportgroupsneeds to be created in an on-premises VMware vCenter server. Some of thedvportgroupswill already exist and can be ignored if they satisfy the communication requirements.
| DvPortGroup | Purpose | Comments |
|---|---|---|
| Management(vmk) | Management Network | You don’t need to create this network rather it should already exist. Make sure that this network can establish communication with management components within the site. |
| HCX-Uplink | This should be a routed vlan where HCX interconnect appliance will be connected to. | This VLAN should communicate to HCX-Uplink netowkr in Oracle Cloud VMware Solution. Create this as a VLAN-backed network portgroup. |
| vMotion(vmk) | This carries vMotion traffic and must already be present. | This must be already available. Do not create a new one. |
| HCX-replication(vmk) | This carries replication traffic for bulk migration and DR. | Create Replication dvportgroup to completely isolate the traffic. Enable replication on this vmkernel adapter. |
-
Network Communication - See VMware Ports and Protocols for VMware HCX communication requirements. According to the services that you are planning to activate, necessary firewall communication rules should be implemented between and within sites.
-
Bastion Host - A Bastion host is required in OCI to access all the Oracle Cloud VMware Solution components. The Bastion host needs to be deployed in a separate VCN subnet and should be allowed to communicate with Oracle Cloud VMware Solution VLANs. The steps are not covered in this document for Bastion host, security list, and network security group.
About VMware HCX
VMware HCX is an application mobility platform designed for simplifying application migration, rebalancing workloads, and optimizing disaster recovery across data centers and clouds. For more details about VMware HCX, see the Related Links section.
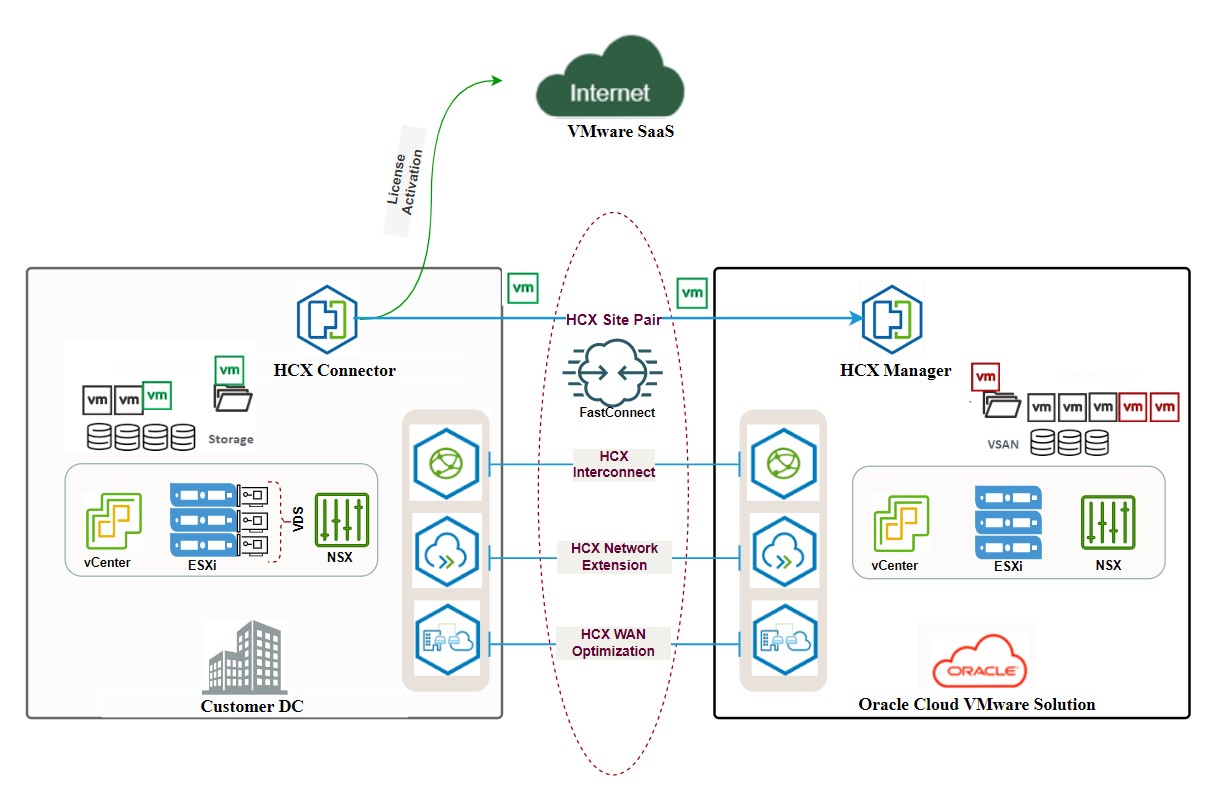
VMware HCX implementation with Oracle Cloud VMware Solution Overview
The technical implementation of VMware HCX consists of the steps that are required to be performed at on-premises site and at the cloud site. The VMware HCX implementation and configuration at Oracle Cloud is taken care as part of the SDDC provisioning operation. Therefore, only minimum steps are required to be performed at Oracle Cloud side for successful implementation of VMware HCX.
The following image illustrates the solution overview for VMware HCX implementation with Oracle Cloud VMware Solution.
VMware HCX licensing with Oracle Cloud VMware Solution
HCX Advanced(No Additional cost) - With VMware HCX advanced, Oracle Cloud VMware Solution offers 3 on-premises connection activation keys. It does not support enterprise features such as replication assisted vMotion, SRM integration etc.
HCX Enterprise(Billed upgrade) - With VMware HCX enterprise, Oracle Cloud VMware Solution offers 10 license activation keys to utilize enterprise features. For detailed descriptions of the VMware HCX licensing with Oracle Cloud VMware Solution, see the Related Links section.
VMware HCX Configuration - Oracle Cloud VMware Solution
Let’s review the VMware HCX configuration for Oracle Cloud VMware Solution. VMware HCX is pre-configured as part of the SDDC provisioning operation and utilizes Network profiles from SDDC VLANs. VMware HCX is integrated with the VMware vCenter server and VMware NSX as a part of the SDDC provisioning operation.
- To review the VMware HCX configuration, login to the VMware HCX manager using admin credentials.
Note: The VMware HCX manager is accessible from the Bastion host.
VMware HCX network profiles
The following set of Network profiles is created and utilizes the VLAN backed dvPortgroups in Oracle Cloud VMware Solution environment.
| Network Profile | VLAN Backing | IP Subnet | Purpose |
|---|---|---|---|
| Management Network | vds01-vSphere(vmk0) | X.Y.0.3.128/26 | Management network communicates with all the management components within site |
| Uplink Network Profile | vds01-hcx | X.Y.3.192/26 | Uplink network profile communicates with on-premises HCX interconnect appliance |
| vMotion Network Profile | vds01-vMotion(vmk1) | X.Y.2.128/25 | vMotion network profile carries vMotion traffic |
| vSphere Replication | vds01-replication(vmk2) | X.Y.4.0/25 | Replication network profile carries replication traffic for bulk migration and uses NFC protocol |
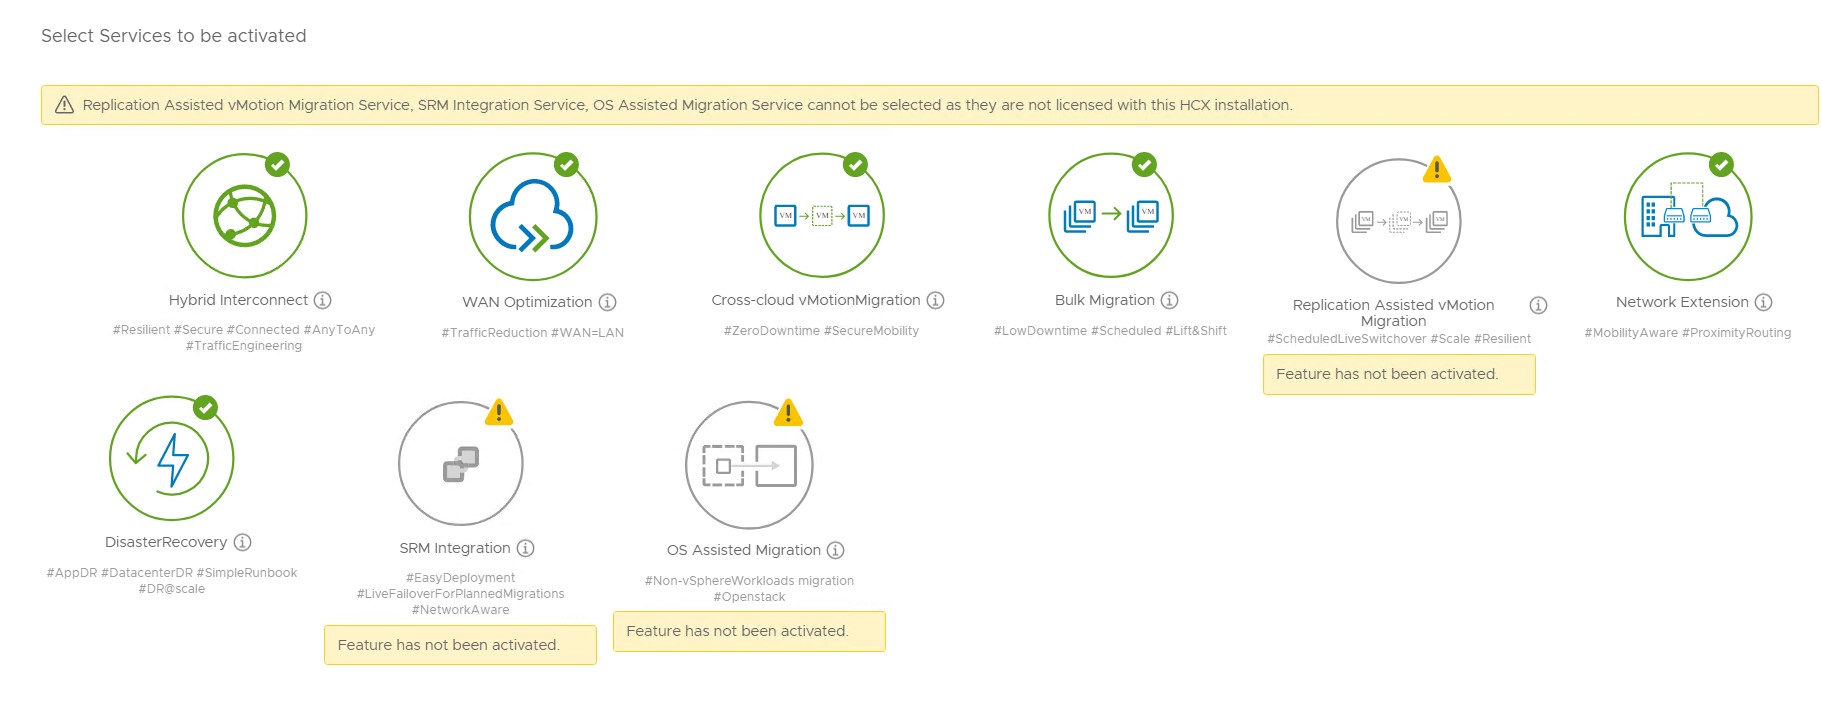
VMware HCX compute profiles
VMware HCX compute profile utilizes the Oracle Cloud VMware Solution SDDC cluster for placement of the VMware HCX Service Mesh appliances. The VMware HCX compute profile is pre-configured and activated with VMware HCX advanced features. You have an option to activate additional features after upgrading VMware HCX from Advanced to Enterprise license.
The following figure illustrates the default services that are activated in a pre-configured compute profile.
Note: You don’t need to perform any configuration in Oracle Cloud VMware Solution at this stage. Just verify the information about VMware HCX integration, network and compute profiles that have been created. The information provided in this document is applicable for Oracle Cloud VMware Solution SDDC version 7.0 and might be subject to change depending upon the version that you are using.
Task 1: Install and Configure VMware HCX in Oracle Cloud VMware Solution
This section describes the steps that are necessary in an on-premises VMware environment for successful deployment and configuration of VMware HCX. You must perform these steps in the on-premises Data Center in consultation with an Oracle Cloud VMware Solution expert.
Note: Before you start, make sure that all the pre-requisites are in place. Both sites can talk to each other over OCI FastConnect and required routes are published. Here on, we will refer to the on-premises site as the source and Oracle Cloud VMware Solution as a destination throughout this tutorial.
The following steps are applicable for the Oracle Cloud VMware Solution environment only. To perform these steps, you must have the Bastion host provisioned and ensure you can access all the Oracle Cloud VMware Solution management components such as vCenter, HCX, and NSX from the Bastion server.
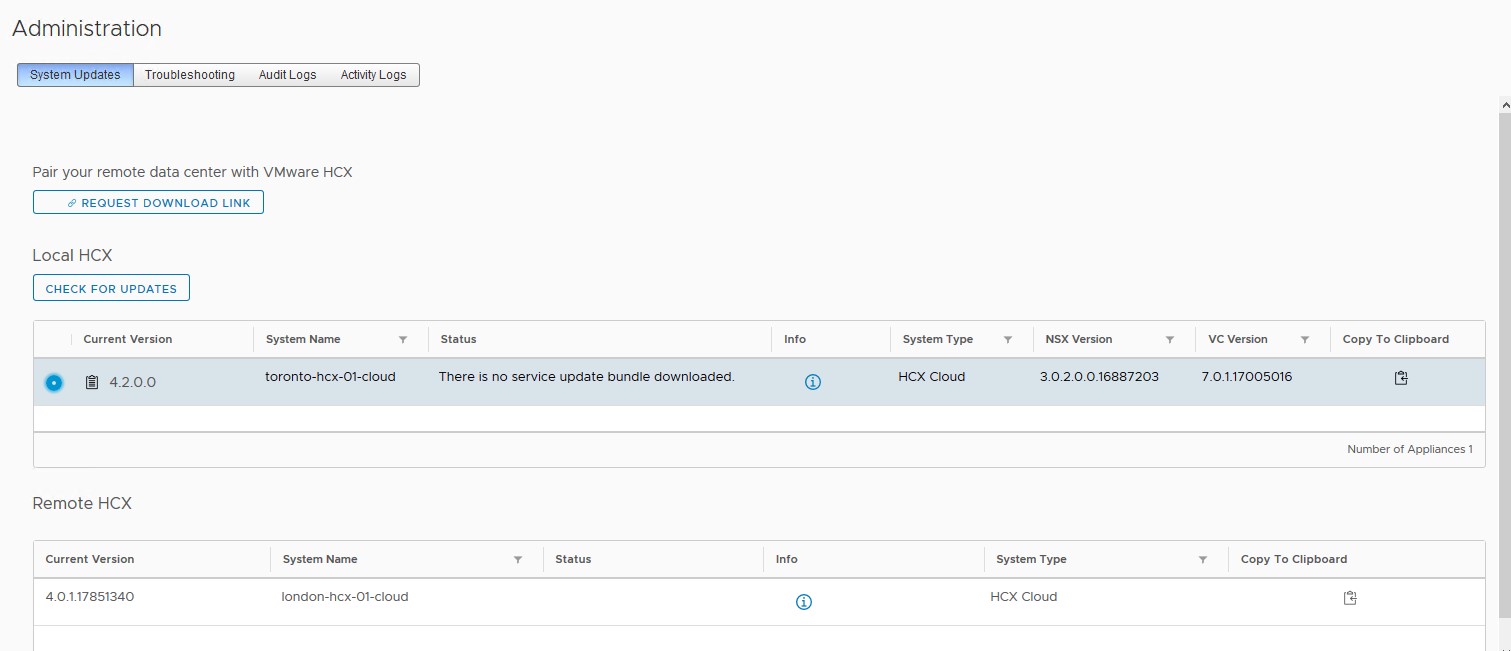
Task 1: Verify and update the VMware HCX bundle
System updates are necessary to use the latest version of the VMware HCX bundle. This is to ensure that the latest version being used in the environment has enhancements and bug fixes.
-
Log in to the VMware vCenter server and take a snapshot of the HCX VM.
-
Navigate to Menu, and then click HCX.
-
Click System, and then click Administration.
-
On the right-hand side panel, click System Updates.
-
In the Local HCX section, click CHECK FOR UPDATES.
-
If the new bundle is available, select the bundle, then click SELECT SERVICE UPDATE, and then click Download and Upgrade.
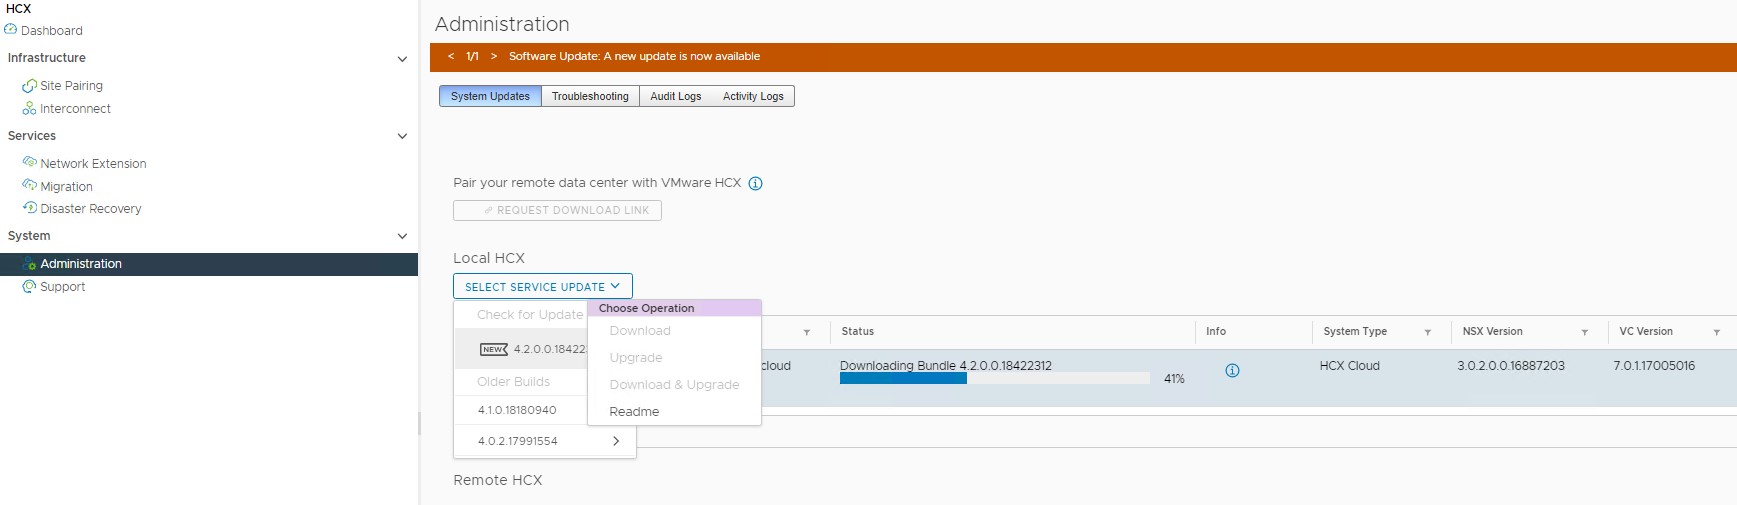
Wait for the system update to complete. The HCX appliance will be restarted. Verify that you can access the VMware HCX admin page after the system update and that all the services are up and running.
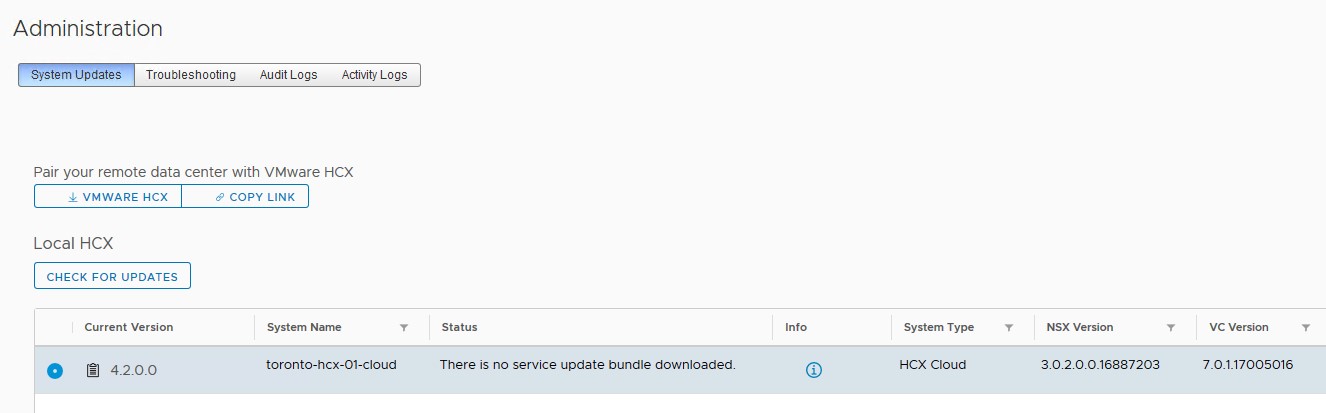
Task 2: Request download link for the VMware HCX connector bundle
This VMware HCX connector download link will be used to download the VMware HCX connector appliance and will be deployed at an on-premises vCenter Server.
Once the system update is successful and VMware HCX services are up and running, proceed with the following steps.
-
Login to VMware vCenter and navigate to Menu, then click HCX, and then click Administration.
-
Click System updates on the right side pane, and then click on the current version bundle under Local HCX.
-
Click CHECK FOR UPDATES, this is just to ensure that the REQUEST DOWNLOAD LUNK gets enabled because there is no new bundle available for updates.
-
Click REQUEST DOWNLOAD LINK.
-
Click VMWARE HCX to download the OVA file or use the COPY LINK option to copy the VMware HCX connector URL.
Task 3: Verify compute and network profiles
This is a verification step to understand what network profiles are configured by default and how they are being used in compute profiles.
- Log in to VMware vCenter and navigate to Menu, and then click HCX.
- Click Interconnect under Infrastructure.
- On the right side pane, click Network Profiles and verify what network profiles are being created. Also, check Compute Profile settings by performing EDIT on the default compute profile created in the Oracle Cloud VMware Solution HCX instance.
Note: DO NOT change any settings, EDIT will allow you to see the configuration in Compute Profiles**
Task 2: Deploy and Configure VMware HCX in the Source (On-Premises) VMware vCenter Server :
The below steps are applicable for an on-premises environment only. Make sure the pre-requisites are in place before you perform these steps.
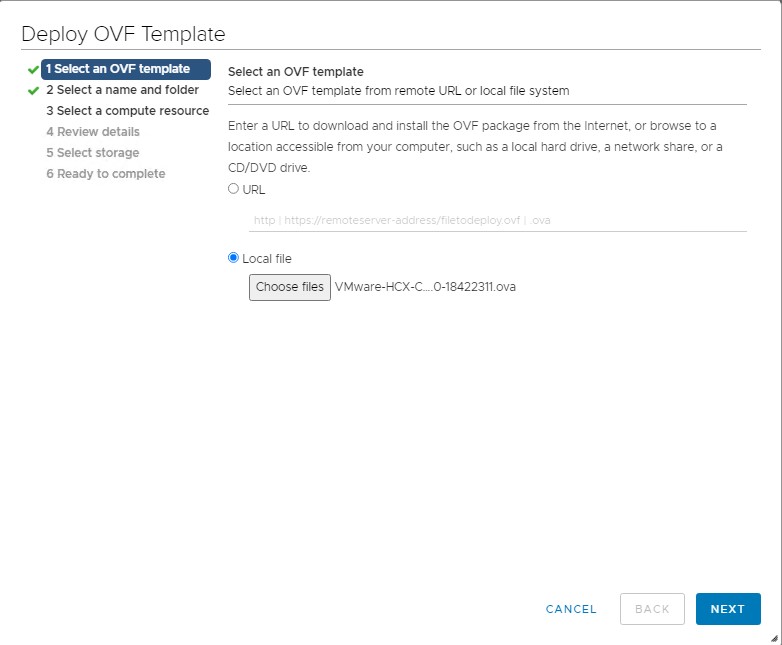
Task 1: Deploy VMware HCX Connector
Before you begin, ensure that the VMware HCX connector OVA file is downloaded as described in the previous section.
-
Log in to the source VMware vCenter Server with Administrative privileges and click Host & Cluster.
-
Right-click on the Host & Cluster view and select the Deploy OVF Template option.
-
The Deploy OVF Template wizard displays. Select the Local file option and then click Choose files to select the VMware HCX connector OVA file which was downloaded in the previous steps. Click NEXT.
-
Specify Name of the VMware HCX connector VM, choose Folder and then click NEXT.
-
In the Select a compute resource section, leave the default selected value and click NEXT. Make sure the compatibility checks are successful.
-
Review details on this screen and click NEXT.
-
Accept the license agreement on this screen and click NEXT.
-
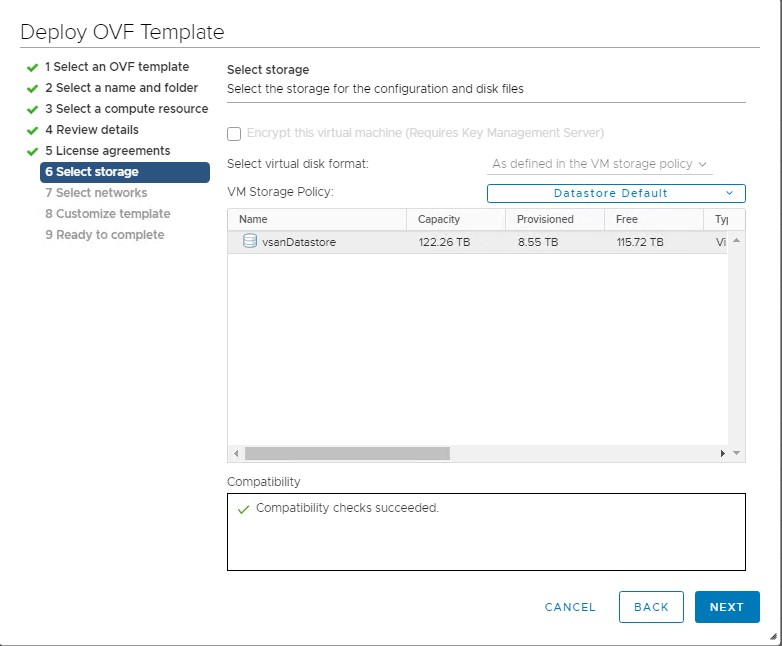
Select datastore as a storage for the placement of the HCX connector VM and click NEXT. Make sure the compatibility checks are successful. The sample screenshot shows vsanDatastore.
-
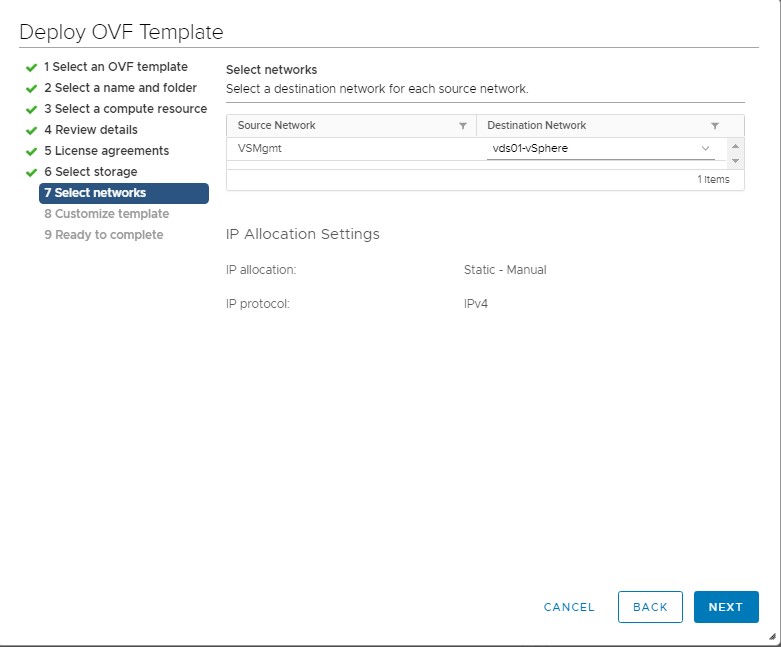
Select the network port group where the VMware HCX connector will be connected, and then click NEXT.
Important: Select the network which allows outbound internet access and also can talk to other management components such as vCenter, NTP, DNS, etc. It is recommended to use the same network portgroup where VMware vCenter is connected, provided it satisfies the communication requirement.
-
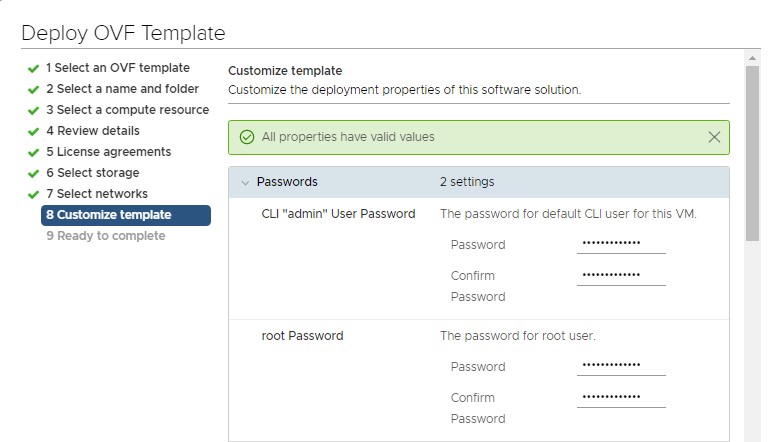
Configure the different customization settings for this appliance.
-
Specify admin user password and root user password. Make sure to keep the password safe as we will need them to access UI and Shell.
-
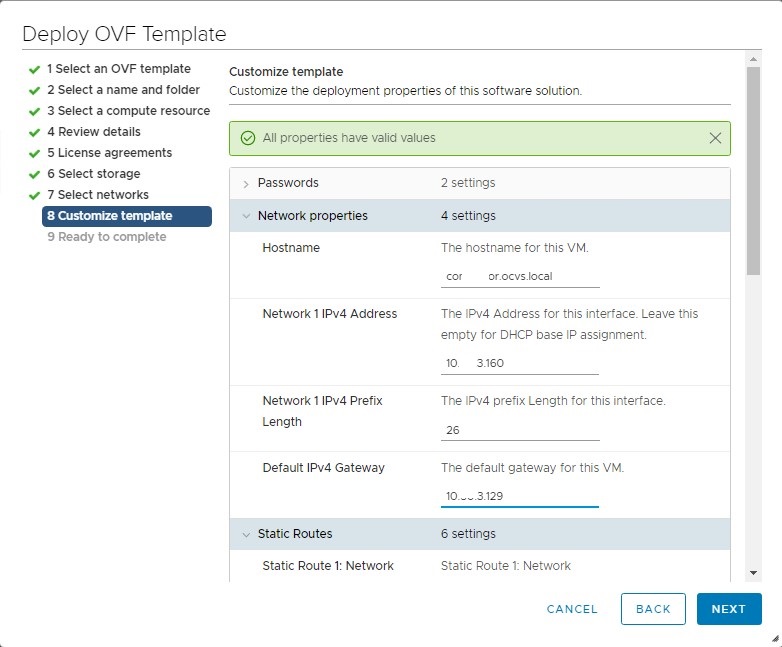
In the Network Properties section, provide networking details such as IP address, hostname, etc.
-
Leave the default setting for Static Routes unless it is required.
-
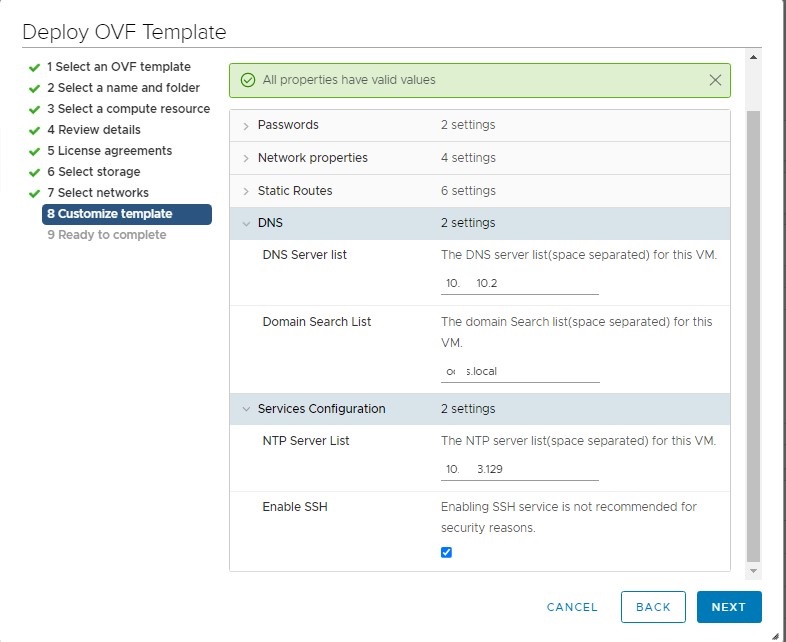
In the DNS section, configure DNS settings such as domain name and DNS server.
-
In the Services Configuration section, configure NTP setting and Enable SSH.
-
-
Click NEXT.
-
Click FINISH and power on the VMware HCX connector appliance. Verify if you can ping the HCX connector using the IP address and Hostname.
Task 2 : Configure the VMware HCX Connector
Ensure the HCX connector appliance is powered ON and can be reached over IP and Hostname. The below screenshot shows the firewall rule needed.

Note: Before you begin, refer to the firewall ports requirement for VMware HCX local site communication and remote site. At this stage, you must enable the required ports for VMware HCX local site which includes communication between on-premises VMware HCX connector to all the management components such as vCenter, NSX, SSO/PSC, DNS, NTP, etc.
-
Access the VMware HCX connector URL https://hcx-connector-ip:9443/login.jsp using admin credentials.
-
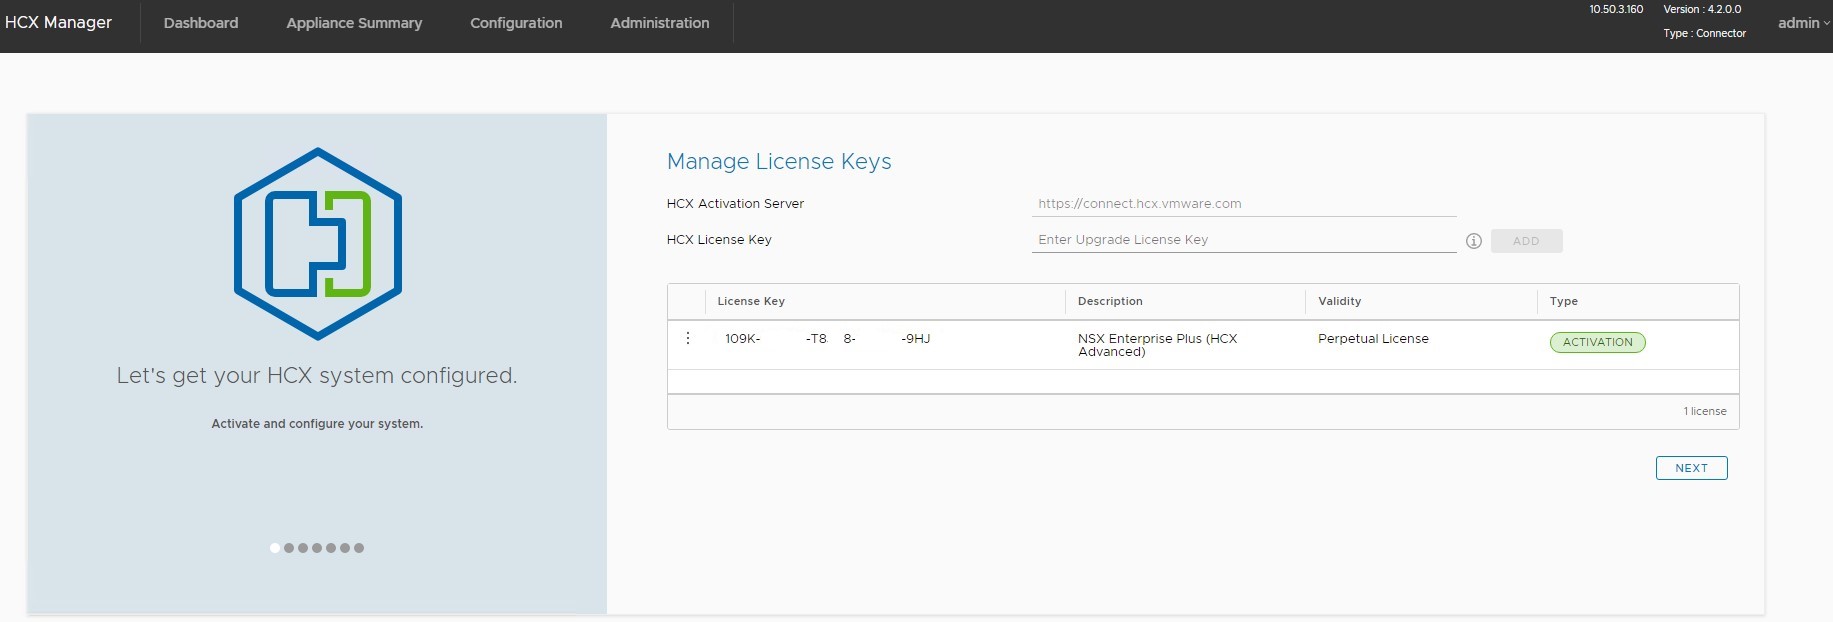
Now, we will need the HCX connector activation key. As described previously, Oracle Cloud VMware Solution provides 3 activation keys with HCX advanced. To obtain the key, login to OCI Cloud Console and navigate to Hybrid, then click Software-Defined Data Center, and then click Name-of-the-SDDC.
-
On the Oracle Cloud VMware Solution summary screen, in the HCX Manager Information section, click view for HCX on-premises Connector Activation Keys: and make a note of the activation key.

-
Enter HCX Activation Key obtained from Step 3 and click ADD. This step will connect to the VMware SaaS portal for the verification and activation of the VMware HCX connector. Post successful ACTIVATION, click NEXT.
-
On the next screen, select the Location where VMware HCX is located. This is your on-premises Datacenter geographic location for representation purposes only. Click CONTINUE.
-
Provide System Name and click CONTINUE.
-
You will receive a successful activation message on the next screen. Click YES, CONTINUE to continue with the remaining configuration steps.
-
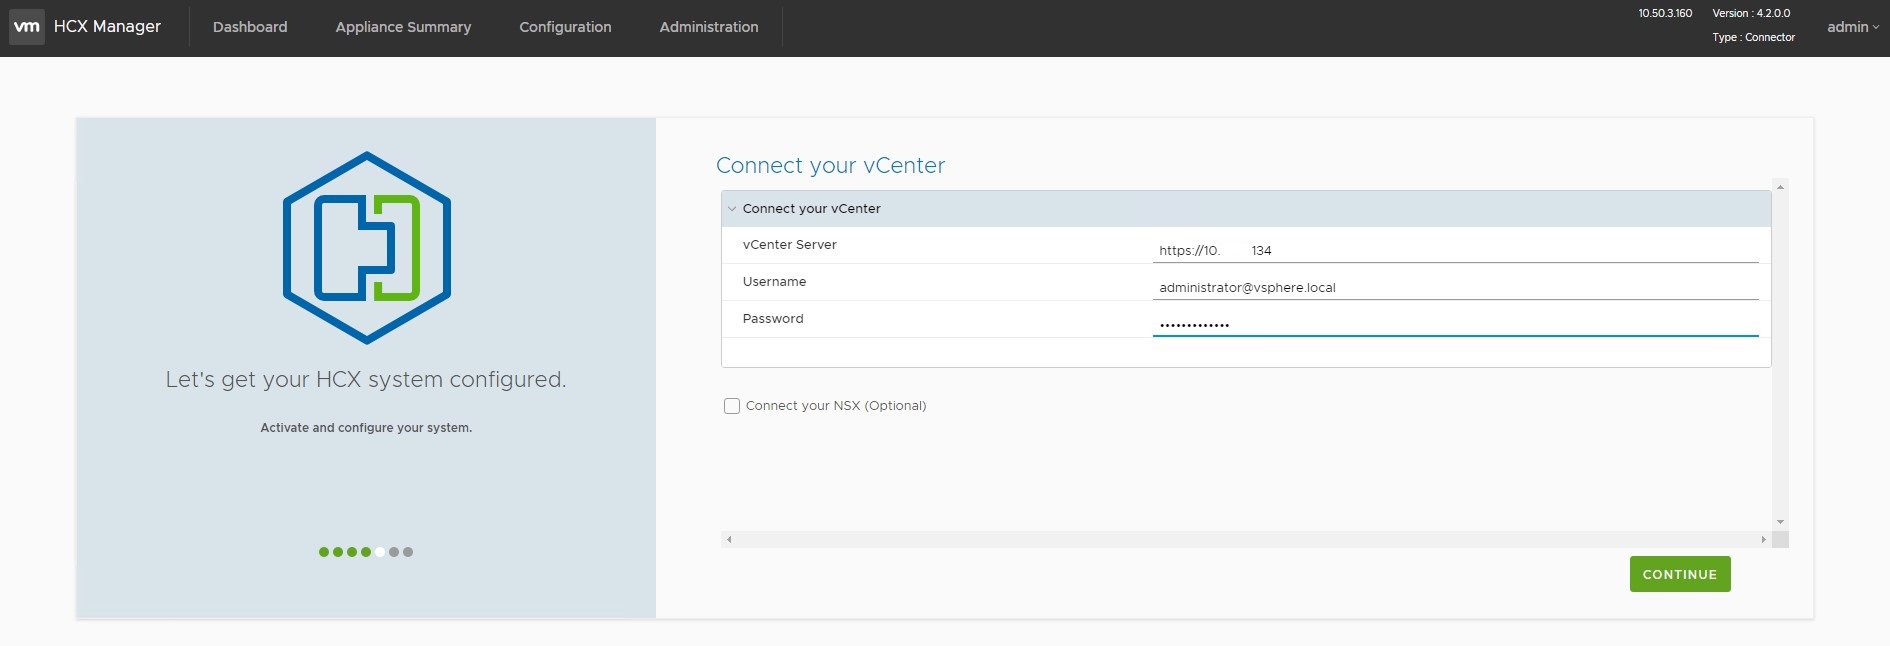
Here we will connect the VMware HCX connector with the source VMware vCenter server. Provide the VMware vCenter URL and credentials. Click Connect your NSX (optional) check box if you have NSX in your on-premises environment. Leave default, if you are only using dvSwitches, and click CONTINUE.
-
On the next screen, enter the Platform Services Controller or SSO details. Use VMware vCenter URL as PSC/SSO if you are using embedded installation or else use the respective SSO/PSC URL. Click CONTINUE.
-
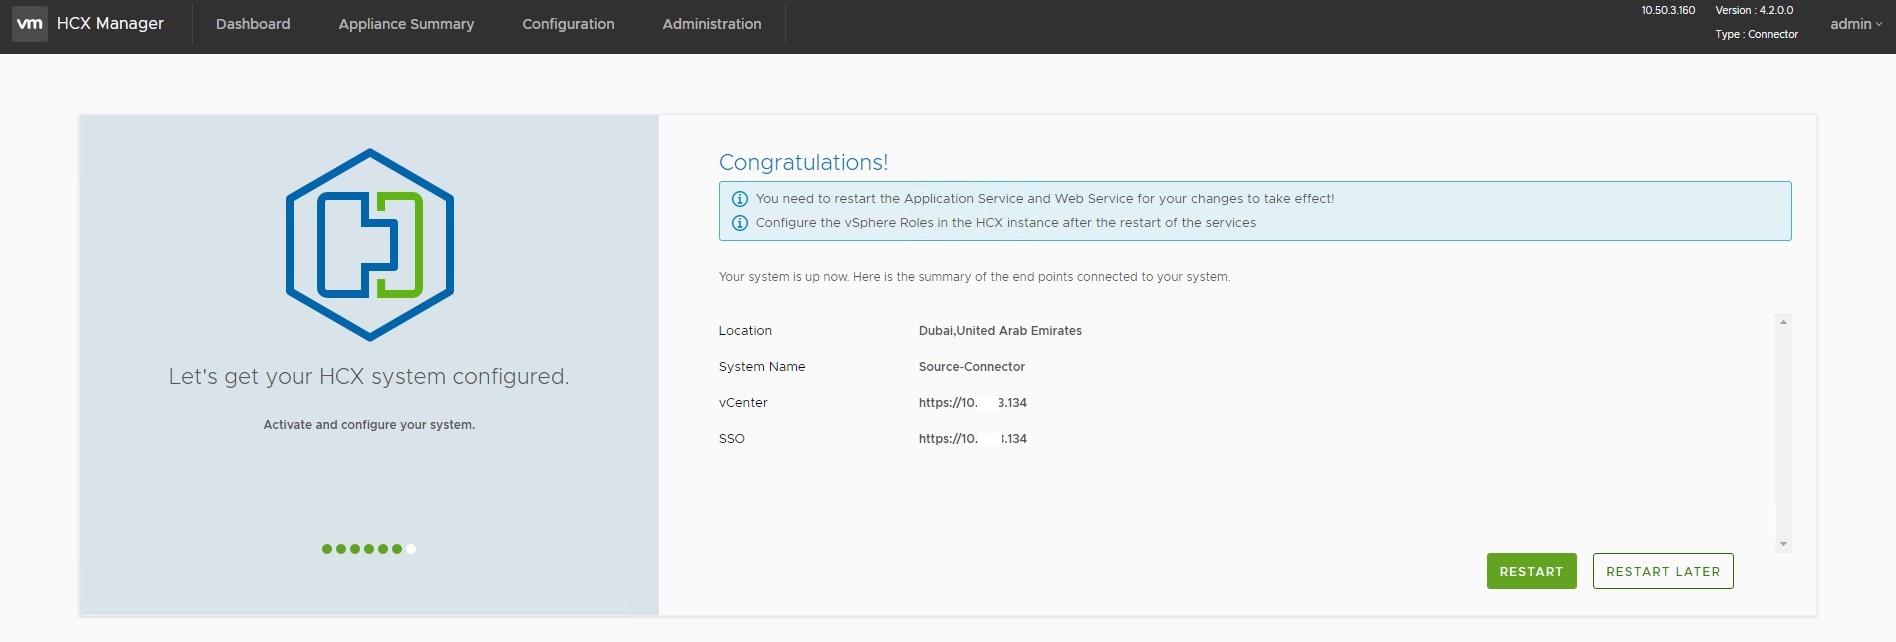
Based on the entered details, VMware HCX will communicate with the VMware vCenter server, NSX, and SSO/PSC to finish the configuration. The summary screen will show successful configuration.
Note: Make sure all the local site VMware HCX firewall communication requirements are completed to avoid any issues during configuration.
-
Click RESTART to finish the VMware HCX connector on-premises configuration.
-
After successful restart of the VMware HCX connector appliance, log in to the VMware vCenter Server using administrative credentials and verify if you can see the VMware HCX icon under Menu.
-
Log in to VMware HCX Connector UI using admin credentials and check the Dashboard and appliance summary. To access the VMware HCX connector through the browser use <https://hcx-connector-ip fqdn:9443/hcx-manager-ui>. 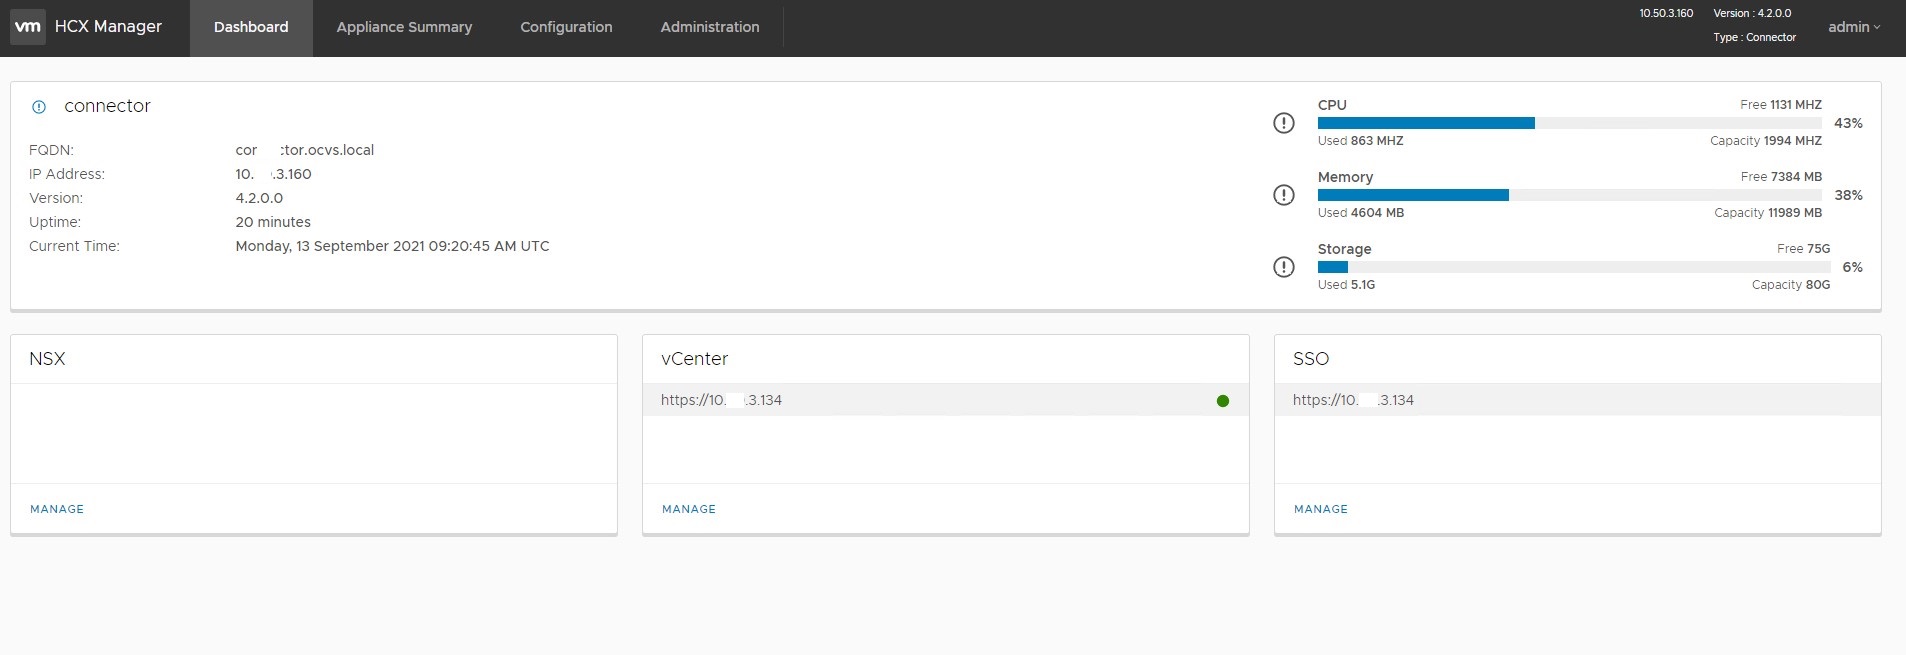
Task 3: Pair VMware HCX Site with Oracle Cloud VMware Solution HCX Manager
This section describes the site pair operation between the source VMware HCX connector with destination Oracle Cloud VMware Solution HCX Manager. Before you proceed, make sure that both HCX instances can talk to each other on port 443 as per the HCX port requirements mentioned in the link https://ports.esp.vmware.com/home/VMware-HCX.
-
Log in to Source (on-premises) VMware vCenter Server with Administrative privileges and navigate to Menu, and then click HCX.
-
Click Site Pairing under Infrastructure and then click ADD A SITE PAIRING.
-
Enter the Oracle Cloud VMware Solution HCX instance URL as a Remote HCX URL with credentials of the Oracle Cloud VMware Solution vCenter Server and click CONNECT.
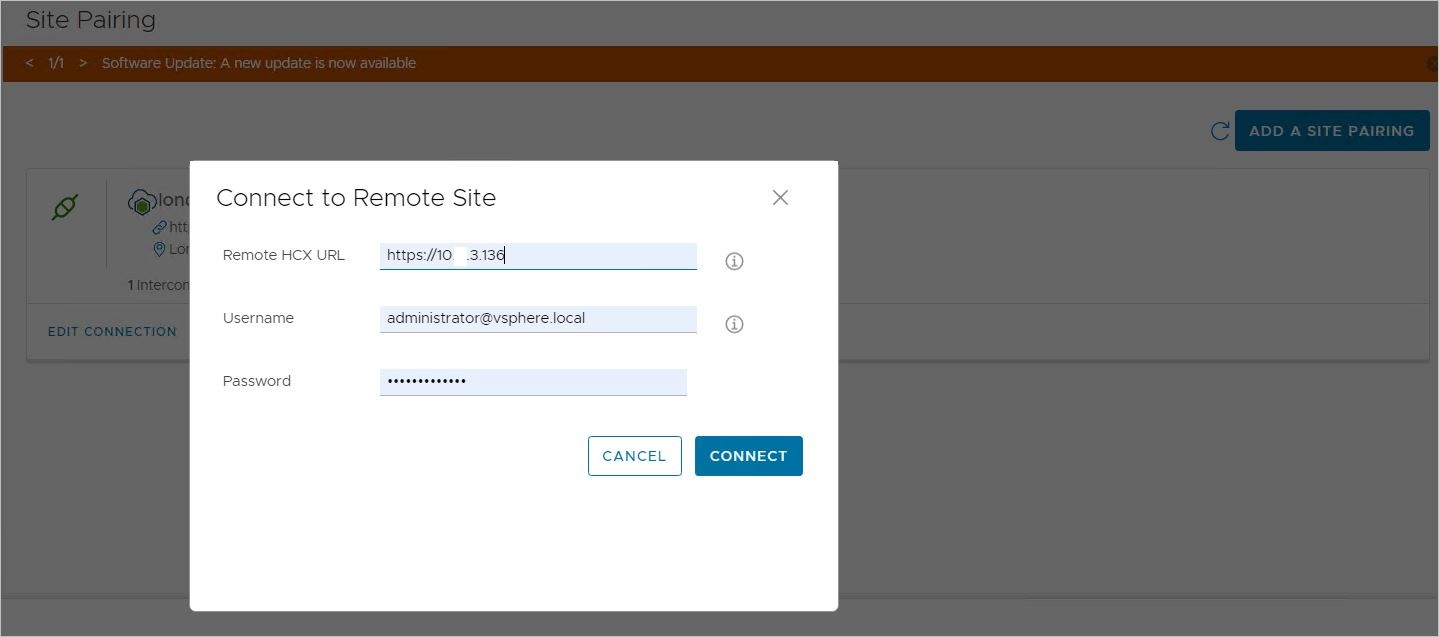
Upon successful completion of the site pair operation, both source, and destination sites will be connected for migrations and other HCX services.
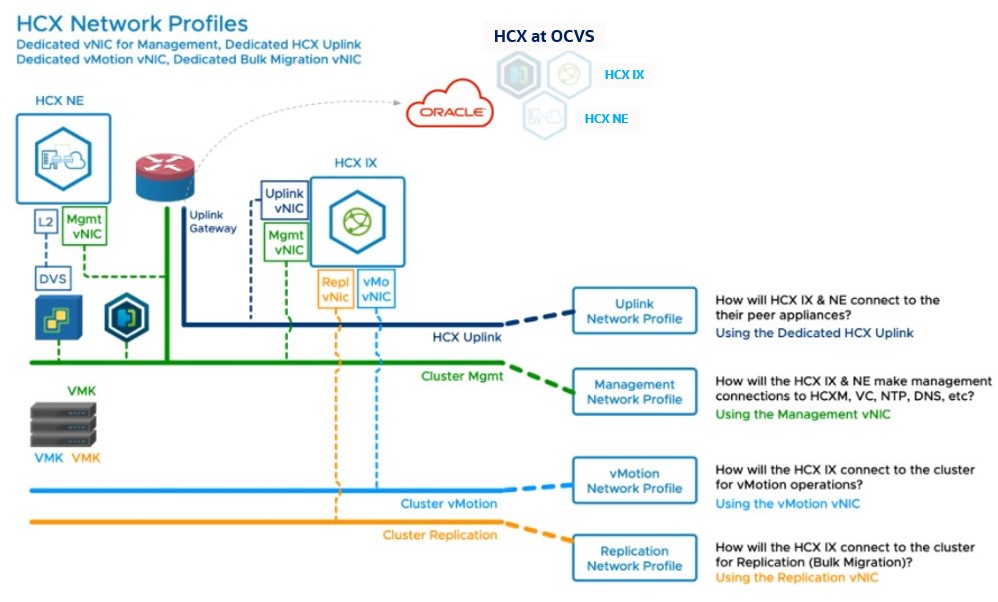
Task 4: Create VMware HCX network profile
In this section, we will create an HCX network profile that will be used for computing profiles. The purpose of network profiles is to determine the communication requirement within the source and destination sites for VMware HCX services appliances such as Interconnect, Network Extension, and WAN Optimization. We will create the following VLAN-backed network profiles. Before you proceed, ensure that the pre-requisites of creating dvPortgroups are already completed.
Create network profiles according to the table below.
| Sr No | DvPortgroup | Network Profile in HCX | Routed / Non-Routed | Description |
|---|---|---|---|---|
| 1 | Management Network | HCX-Management | Routed | HCX Interconnect appliance will use this network to communicate management components within source site. For example, vCenter Server, DNS, NTP server. |
| 2 | HCX-Uplink | HCX-Uplink | Routed | HCX Interconnect appliance will use this network to communicate to the HCX interconnect appliance from Oracle Cloud VMware Solution side. |
| 3 | vMotion | HCX-vMotion | Non-Routed | HCX Interconnect appliance will use this network to communicate to the cluster for vMotion requirements. |
| 4 | Replication | HCX-Replication | Non-Routed | HCX interconnect appliance will use this network to initiate the bulk migration using replication traffic. |
Refer to the diagram below which showcases the network topology for dedicated networks for each function.
Note: We can combine the multiple functions into a single Network profile backed by the same DvPortgroup. However, we don’t recommend this approach as it may lead to issues in migration.
The below steps outline Network Profile creation tasks in HCX Source site vCenter Server. In this example, we will create HCX-Uplink as a sample Network profile.
-
Log in to Source (on-premises) VMware vCenter Server with Administrative privileges and navigate to Menu, and then click HCX.
-
Click Interconnect under Infrastructure and select the Network Profile tab from the right side pane.
-
Click CREAT NETWORK PROFILE and select Distributed Portgroup in the Network section.
-
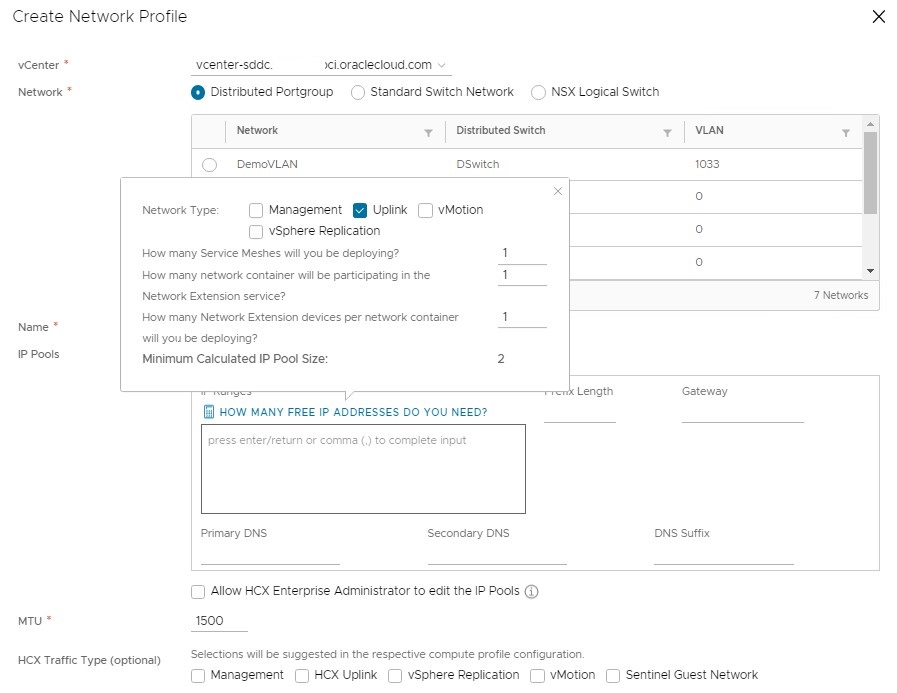
Select the DvPortgroup that you want to associate with HCX-Uplink. Give it a name for Network Profile. Use the MTU settings according to your on-premises networking support. For example, use MTU 9000 if Jumbo Frames is supported for this network.
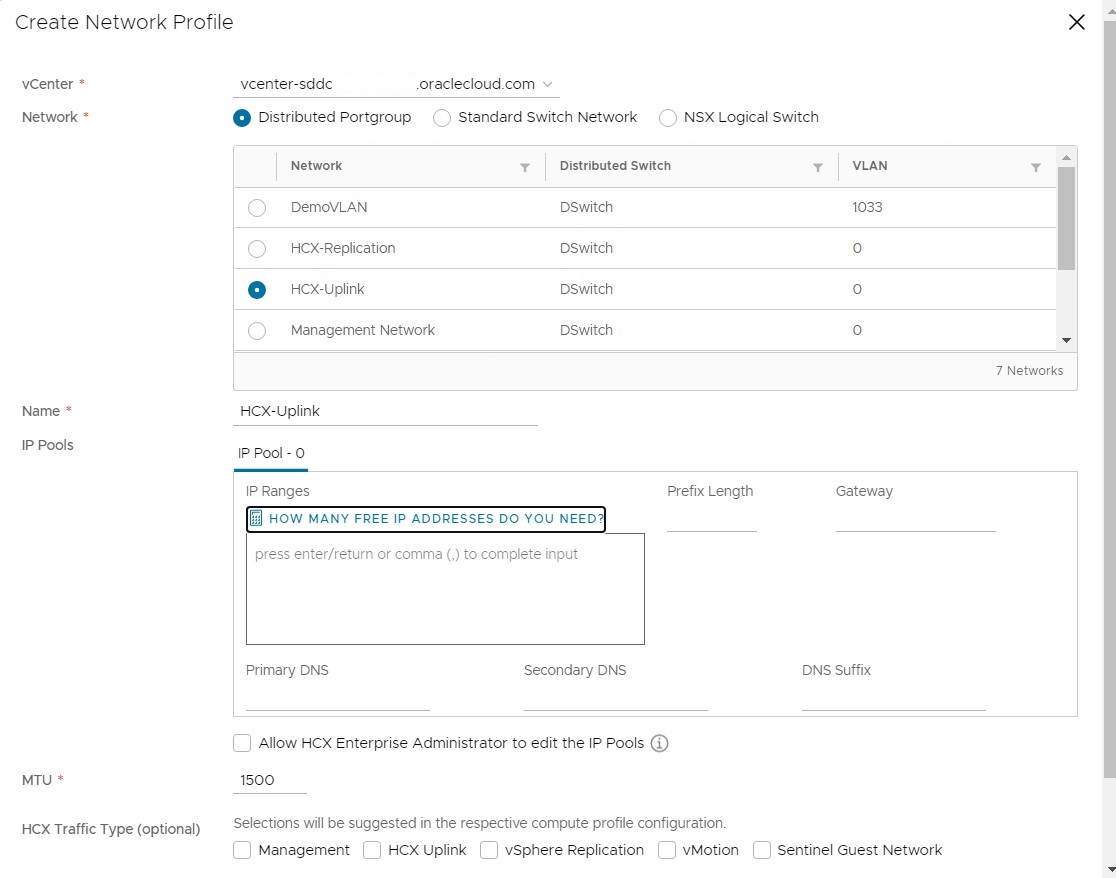
-
Under IP Pools, click HOW MANY FREE IP ADDRESSES DO YOU NEED and calculate the IP addresses that you need. Specify the prefix length and Gateway. Specify any additional settings such as DNS IP and Suffix.
-
Leave the MTU default setting to 1500 unless the dvPortgroup backed VLANs are configured with jumbo frames. If the Jumbo Frames is enabled change MTU to 9000 for Network Profiles.
-
Leave the default HCX Traffic Type and click CREATE to complete the network profile creation task.
-
Perform steps 1 to 7 and create additional network profiles listed in the table above for Management, vMotion, and Replication.
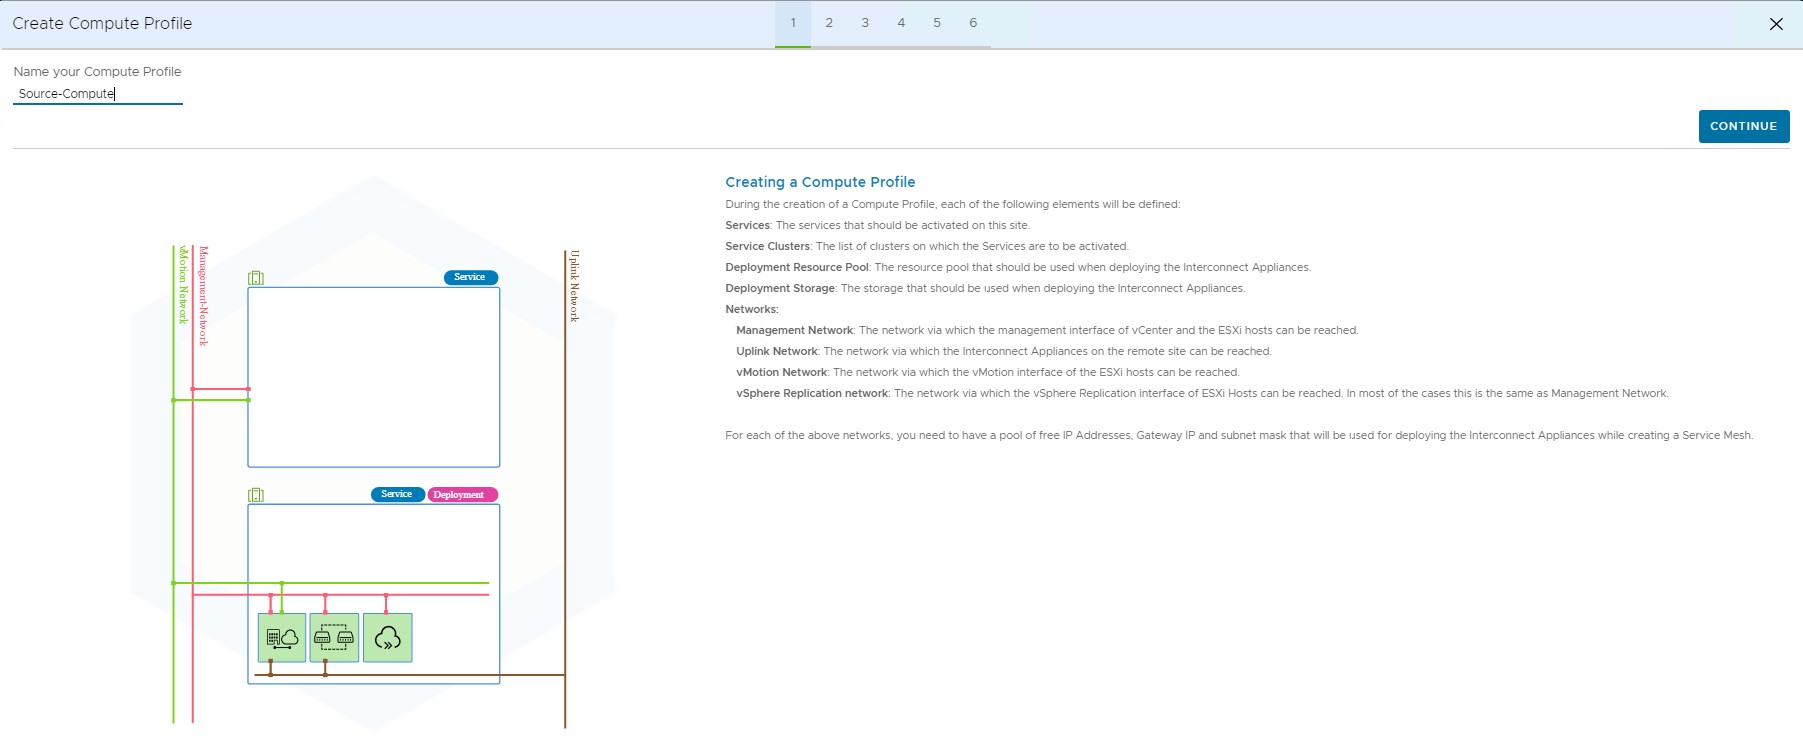
Task 5 : Create VMware HCX compute profile
Compute profile is the placeholder for the compute, storage, and network setting for the VMware HCX appliances. Perform the following steps in the source vCenter Server to create a compute profile.
-
Log in to Source (on-premises) VMware vCenter Server with Administrative privileges and navigate to Menu, and then click HCX.
-
Click Interconnect under Infrastructure and select the Compute Profiles tab in the right side pane and click on CREATE COMPUTE PROFILE.
-
Provide the name of the Compute Profile and click CONTINUE.
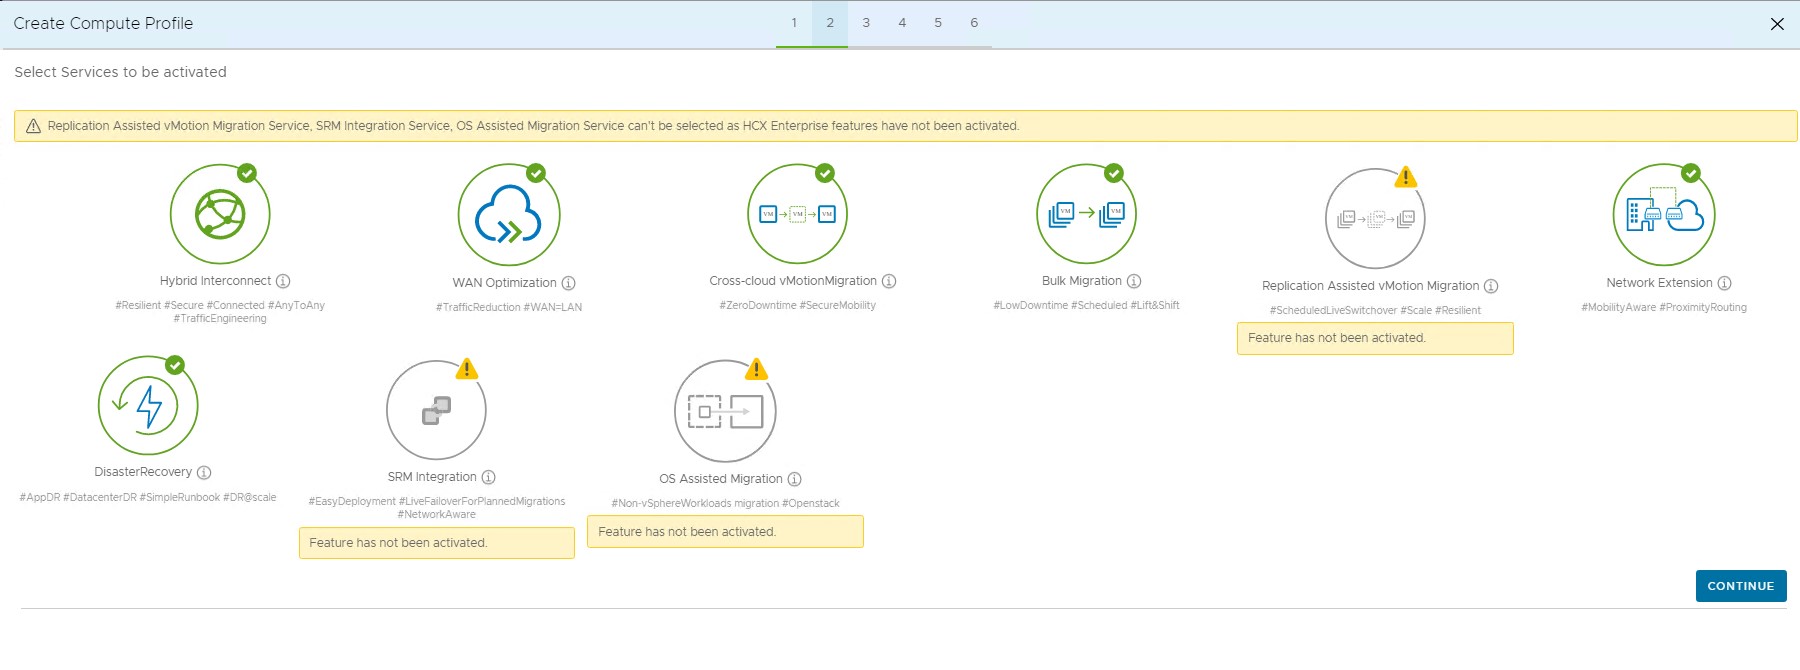
-
Select services to be activated from the list and click CONTINUE.
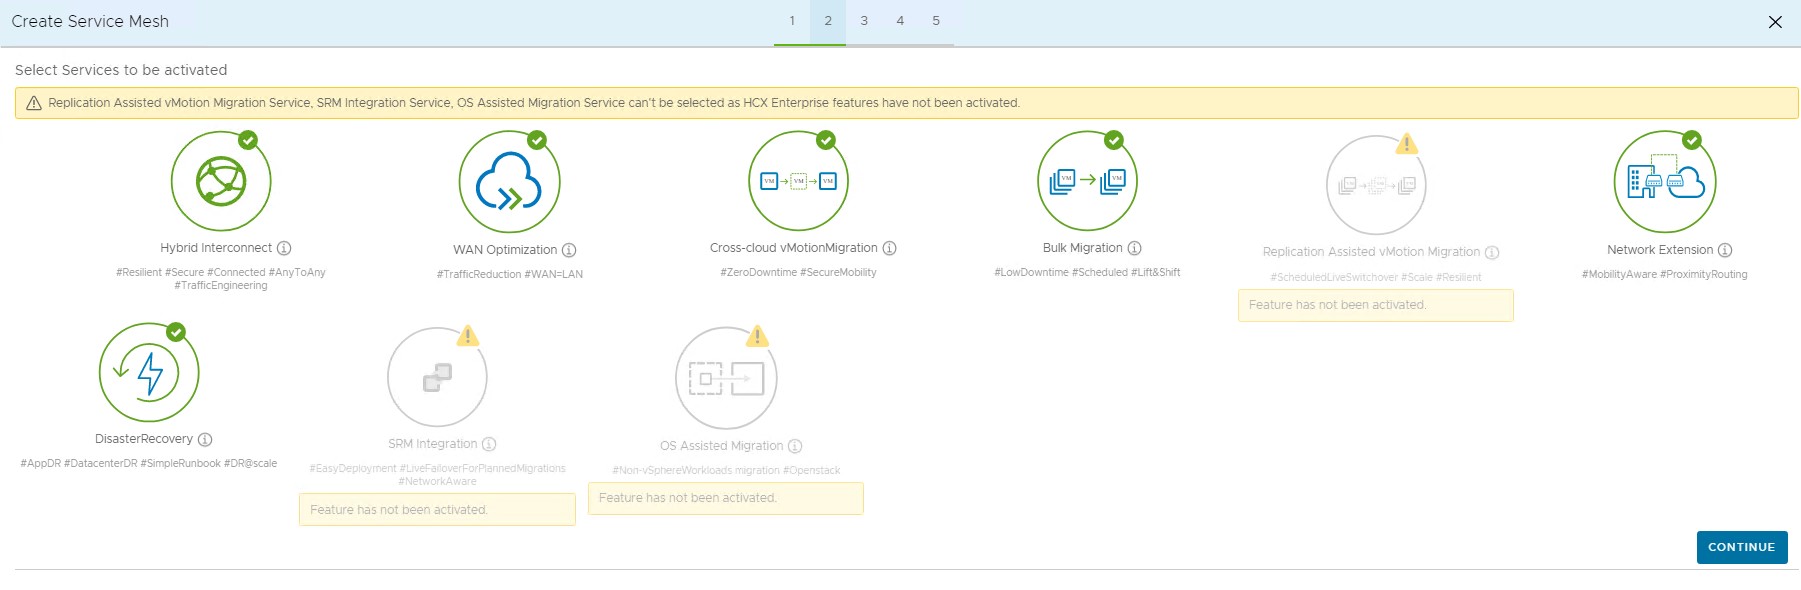
Note: Some services are disabled because they can only be activated with an HCX Enterprise license.
-
Select Service Resources. This will be the source vCenter server Cluster or Datacenter. Click CONTINUE.
-
Select Deployment Resources and Reservations, select compute, storage for the appliances. Select Folder and reservation settings according to your requirement.

-
Select Management Network Profile created in the Network Profile section and click CONTINUE.

-
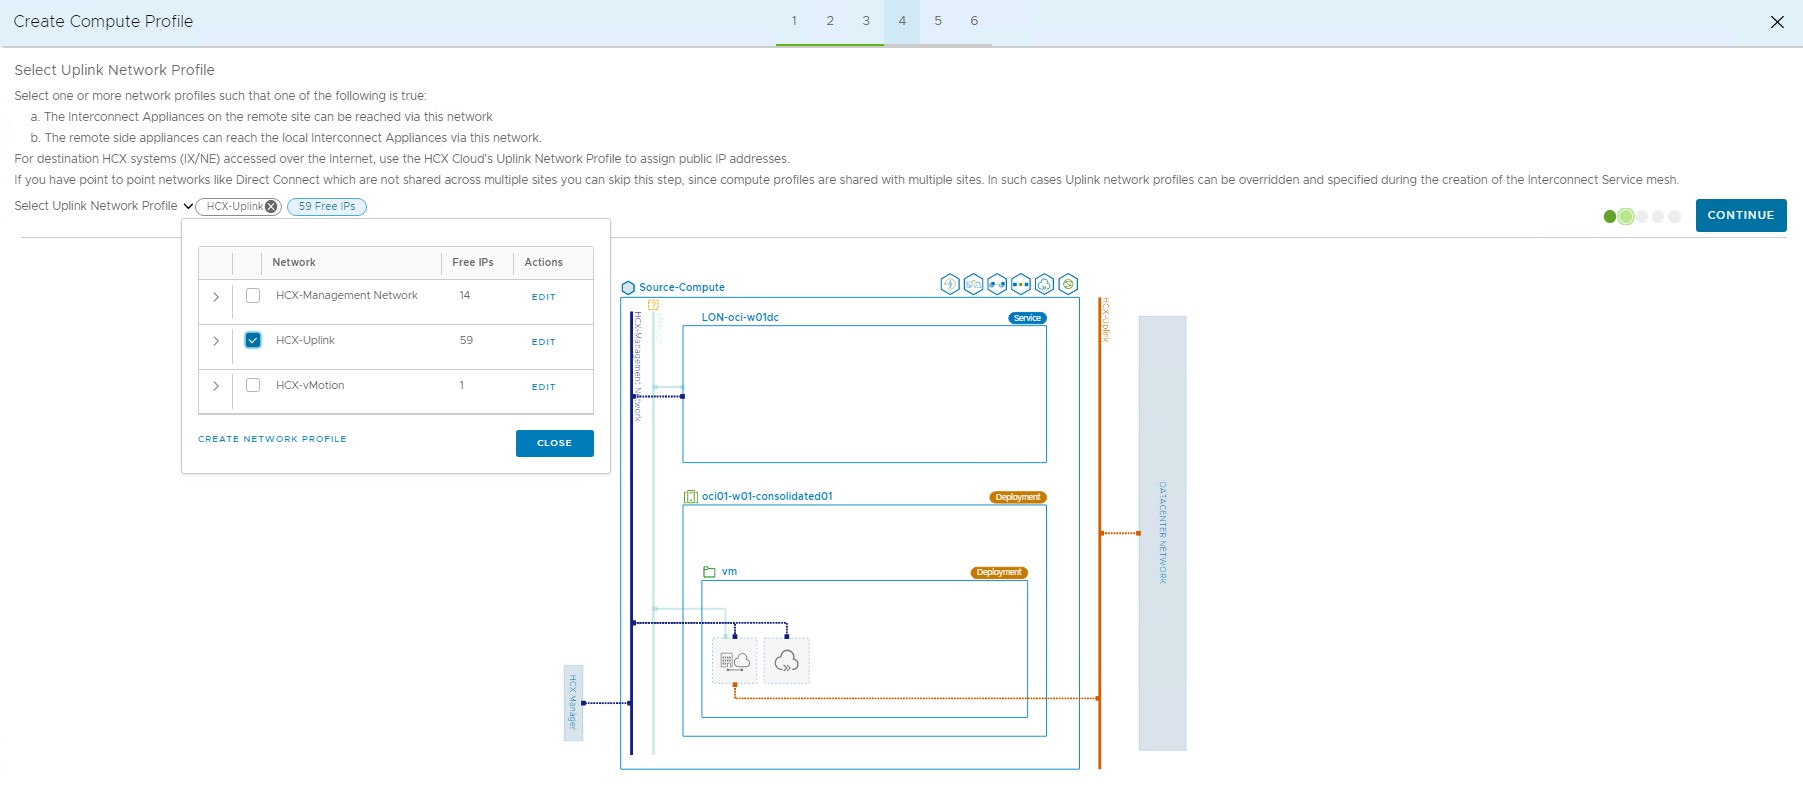
Select Uplink Network Profile created in the Network Profile section and click CONTINUE.
-
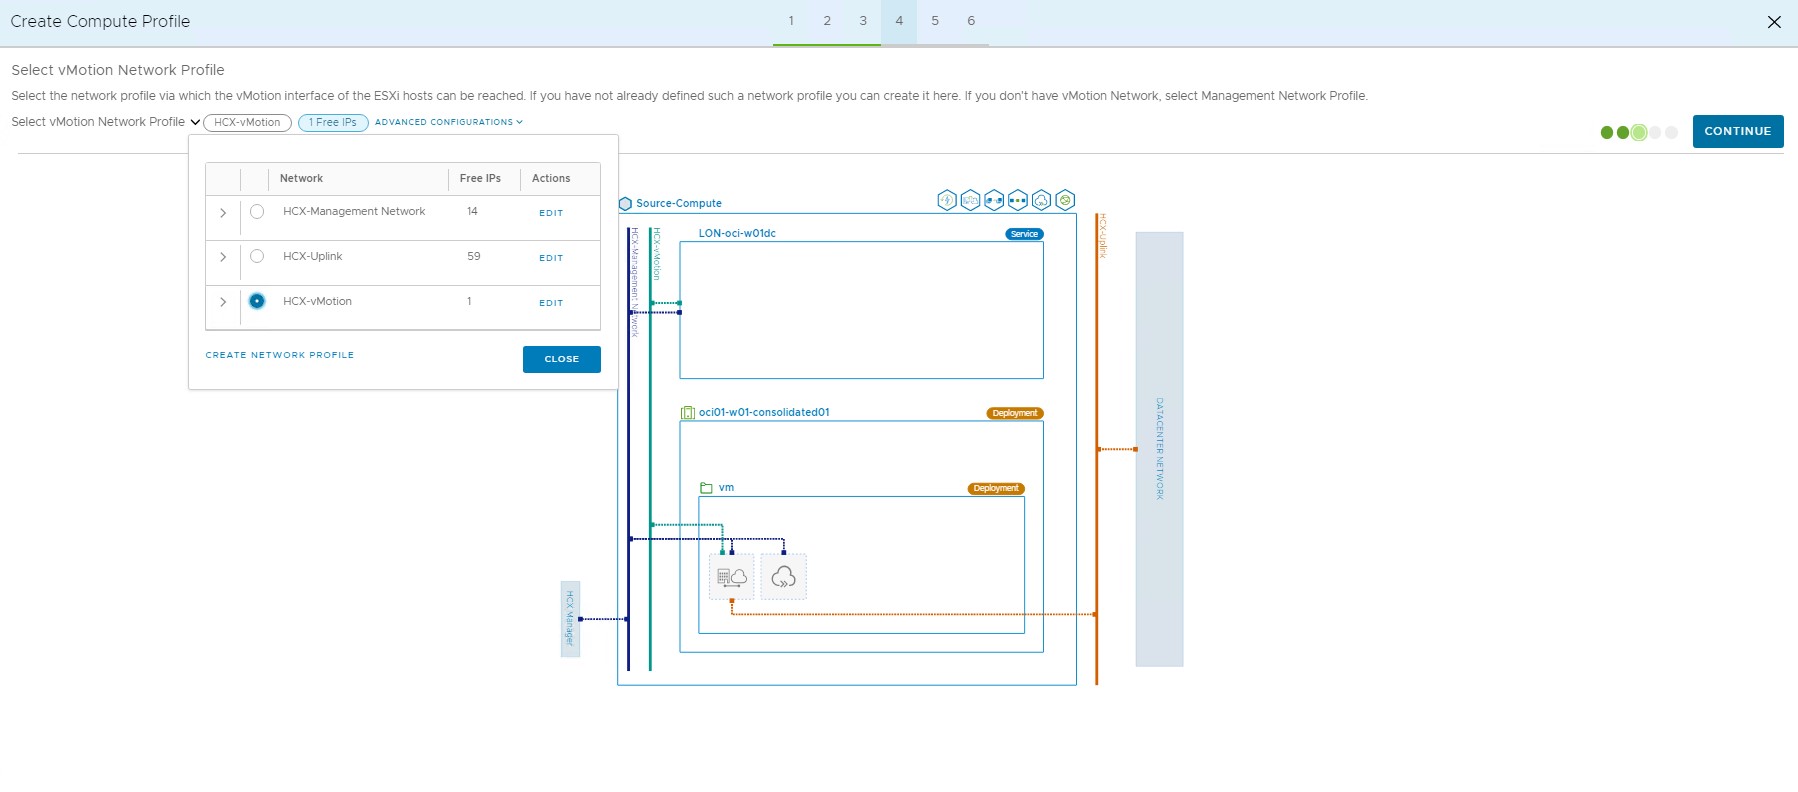
Select vMotion Network Profile created in the Network Profile section and click CONTINUE.
-
Select Replication Network Profile created in the Network Profile section and click CONTINUE.

-
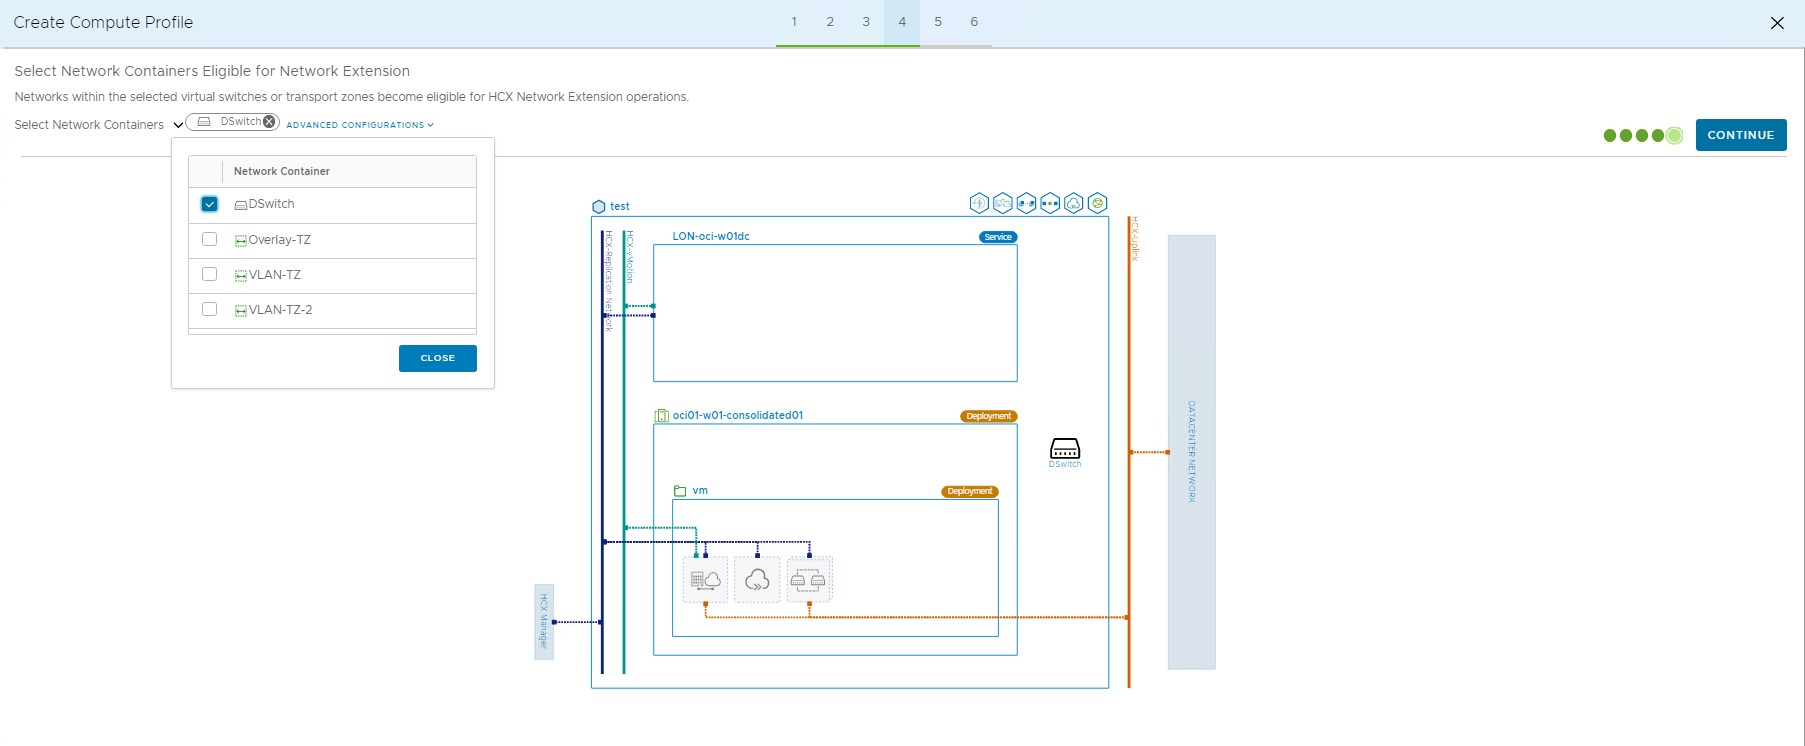
Select Network Containers. Selected virtual switches or transport zones from NSX become eligible for Network extension. If NSX is not part of the deployment in an on-premises vCenter server then just select DSwitch if an L2 network extension is desired.
-
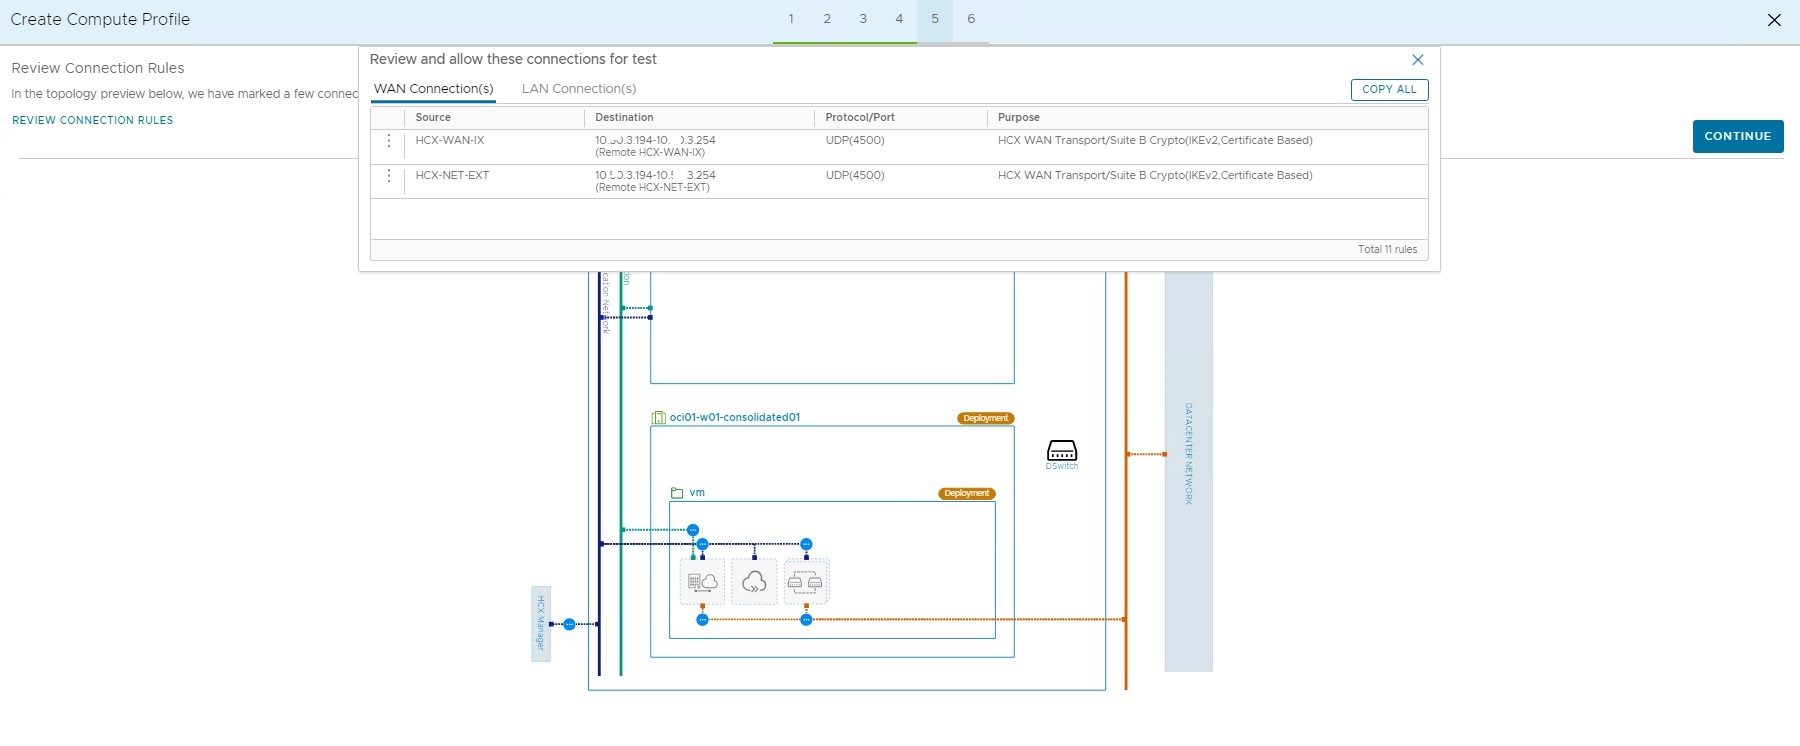
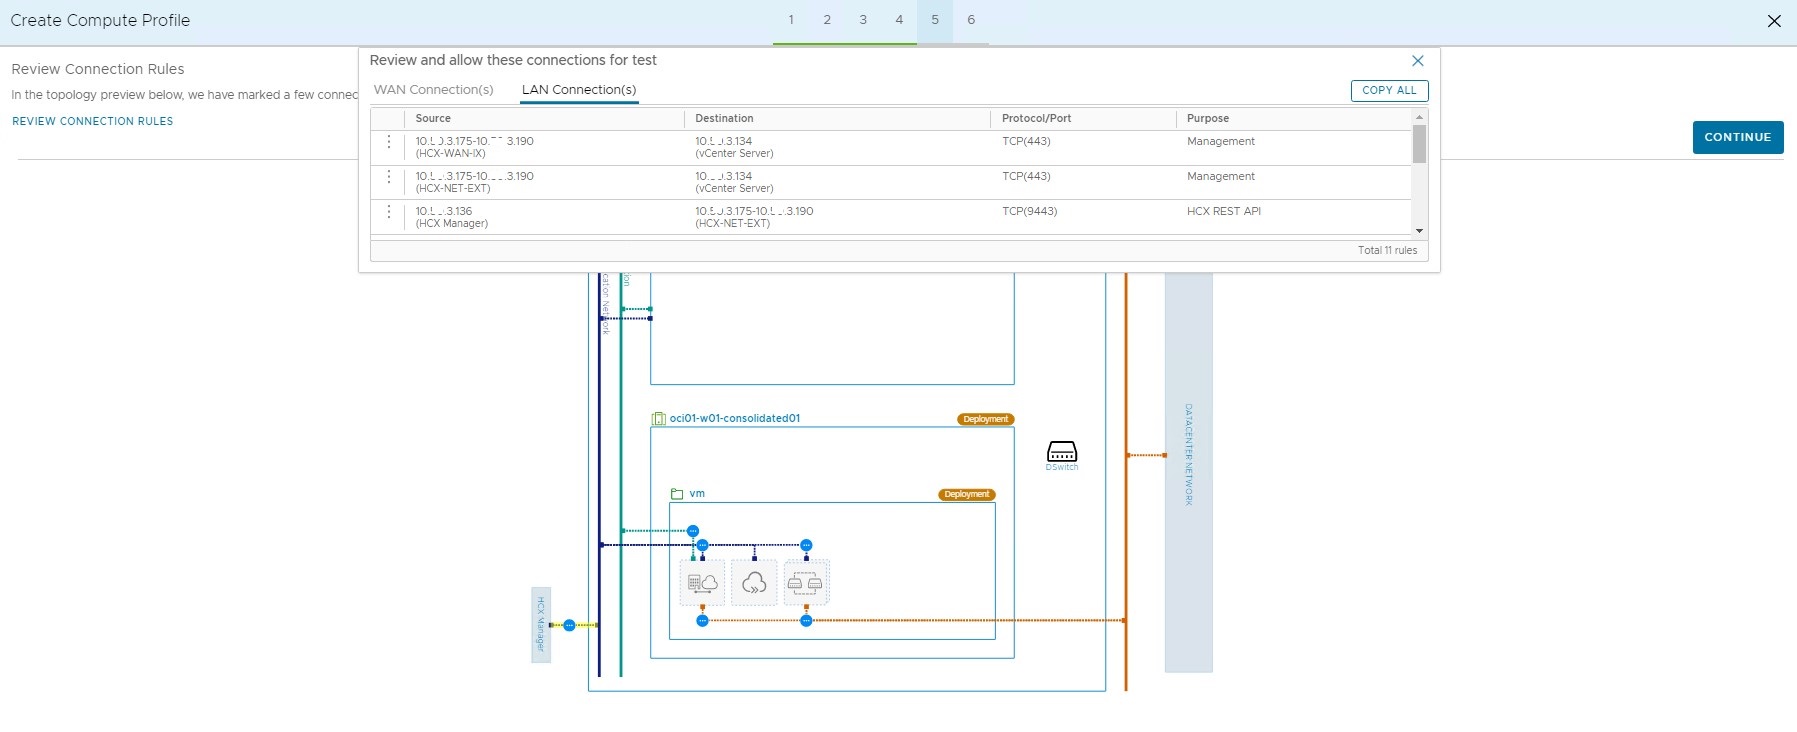
On this screen, review the connection rules for WAN and LAN connections. Copy the rules and configure the required firewall rules for a successful VMware HCX Implementation.
-
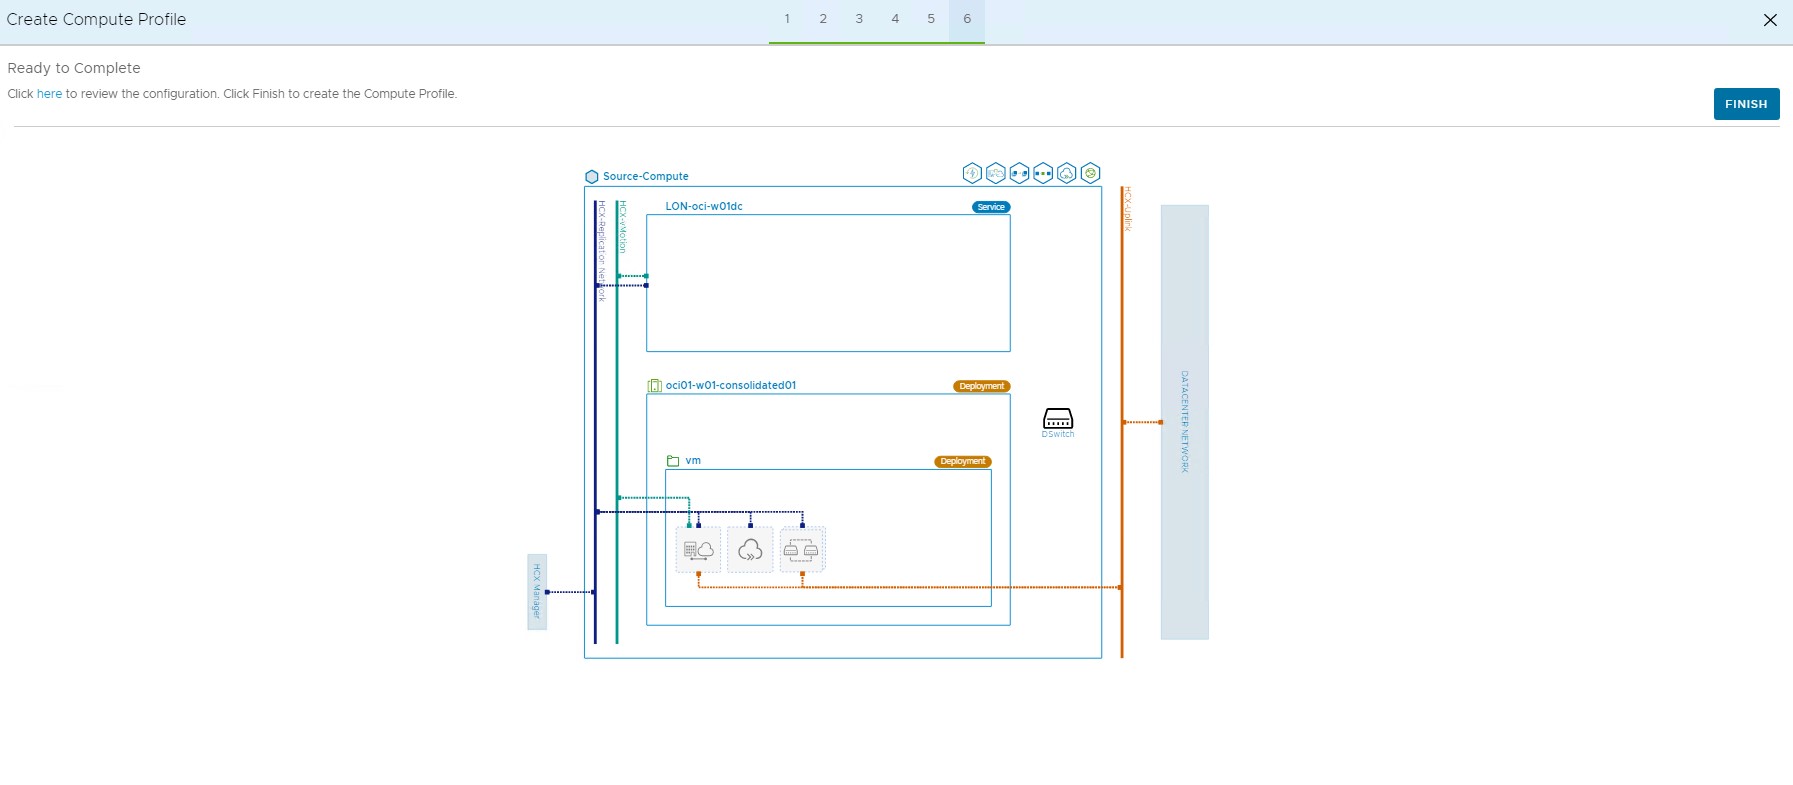
Review the Compute Profile setting and click FINISH to complete the Compute profile creationn.
-
Login to OCI console and navigate to Networking, then click VCN, and then click VLAN.
Note: Each VLAN is associated with the Network Security Group, update the network security group to accept the communication from the on-premises VMware network to accomplish the configuration. Add necessary ingress and egress rules in Network Security Group of respective VLAN.
Task 6: Configure VMware HCX Service Mesh
In this section, we will create a service mesh configuration that will result in the deployment of HCX Interconnect, Network Extension, and WAN optimization appliances in the source and destination vCenter Server. Follow the below steps to complete the service mesh configuration.
-
Log in to Source (on-premises) VMware vCenter Server with Administrative privileges and navigate to Menu, and then click HCX.
-
Select Interconnect under Infrastructure and click Service Mesh tab on the right side pane. Click CREATE SERVICE MESH.
-
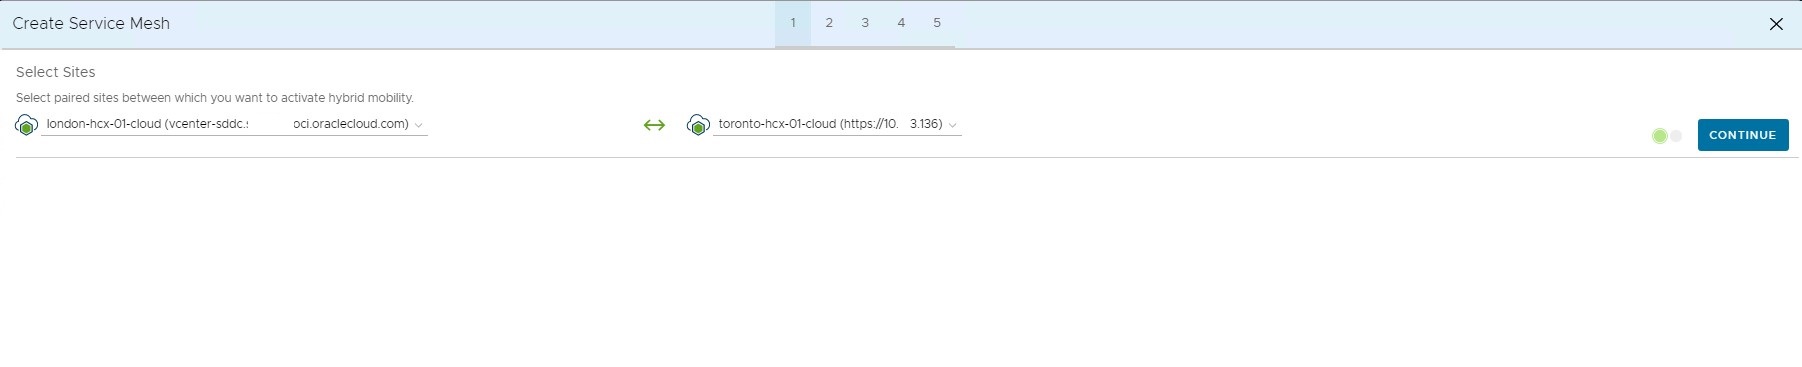
Select sites from Source and Destination. Chose the right one if you have more than one site pair configured. Click CONTINUE.
-
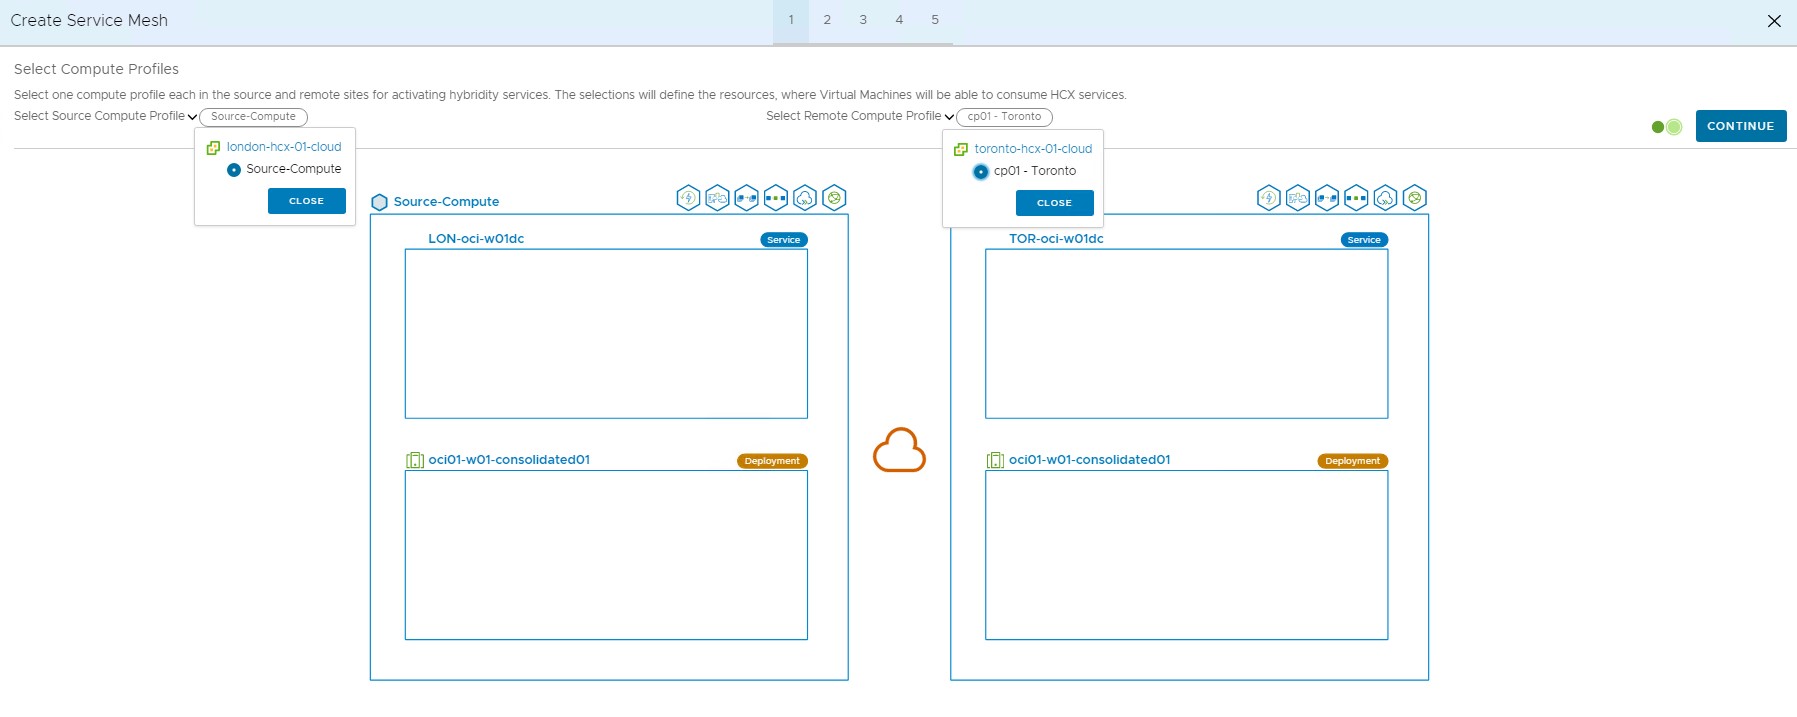
Select compute profiles from source and destination sites and click CONTINUE.
-
Leave the defaults on the services that need to be activated unless you want to enable/disable any services. This is by default coming from computing profiles. Click CONTINUE.
-
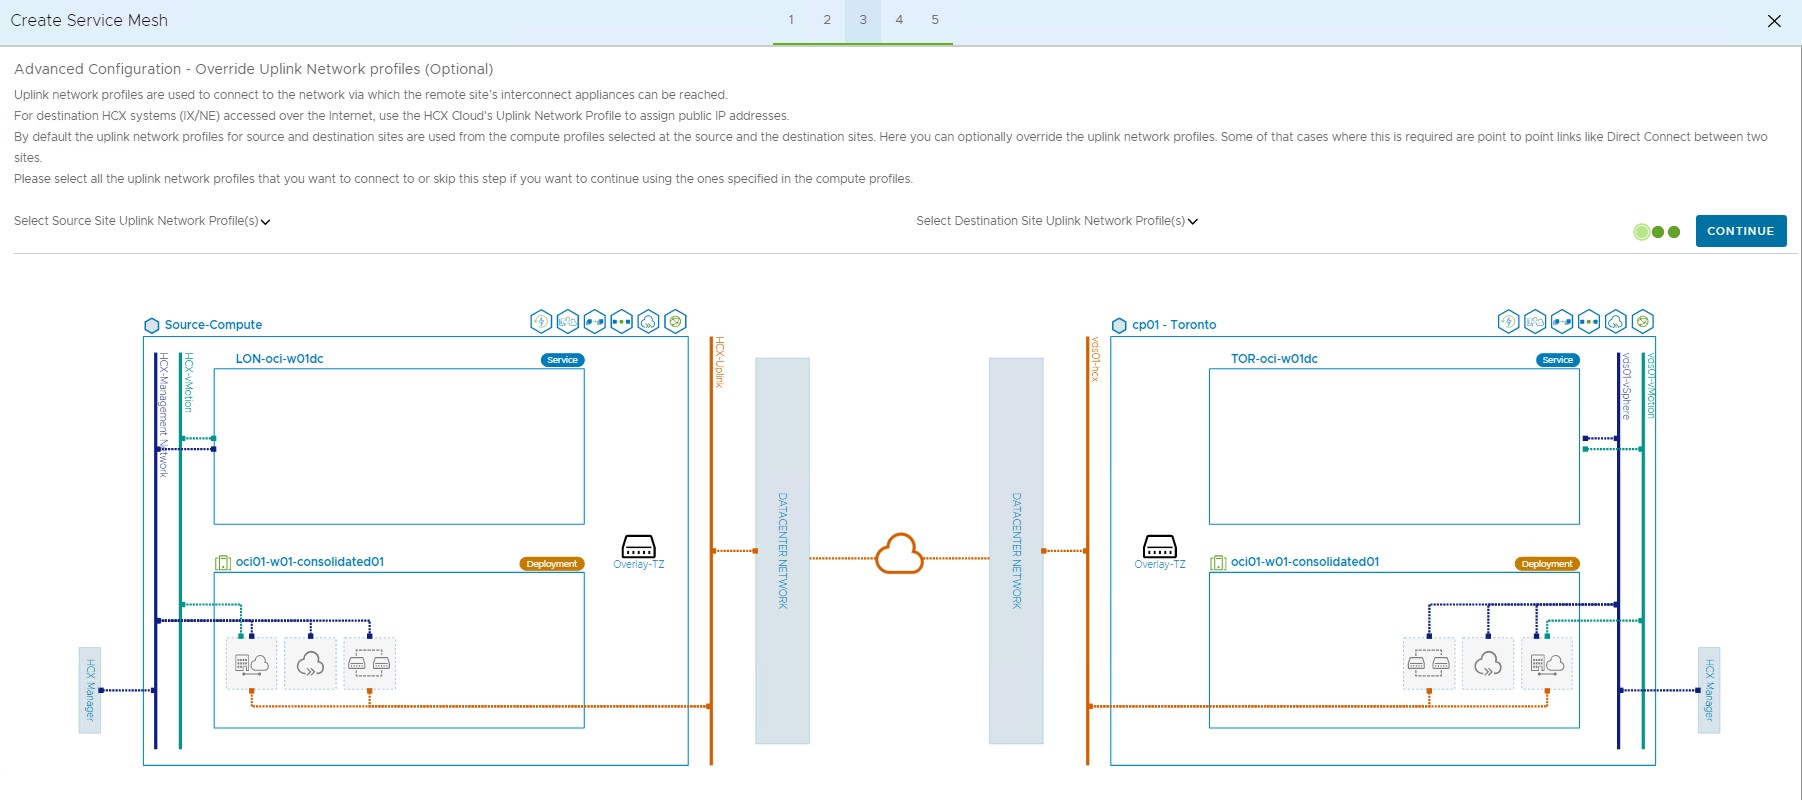
Do not override the uplink network profile. Leave the default setting and click CONTINUE. We have selected HCX-Uplink as our uplink network profile.
-
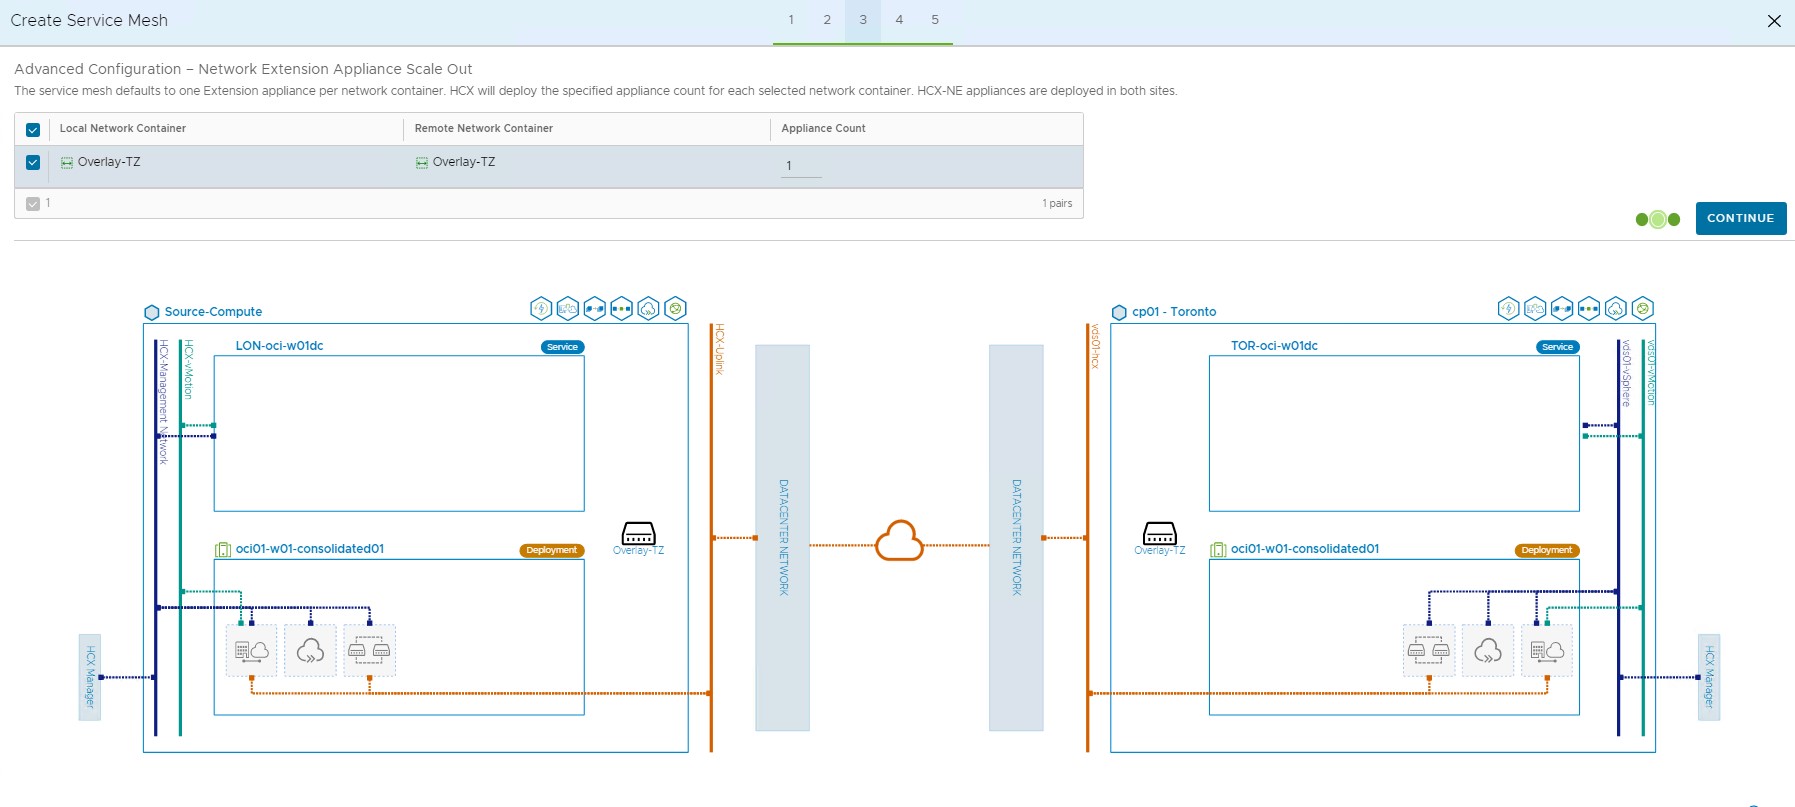
Leave the default configuration under this screen for Network Container mapping. The Container mapping will be shown based on your selection of the Network containers in computing profiles. Click CONTINUE.
-
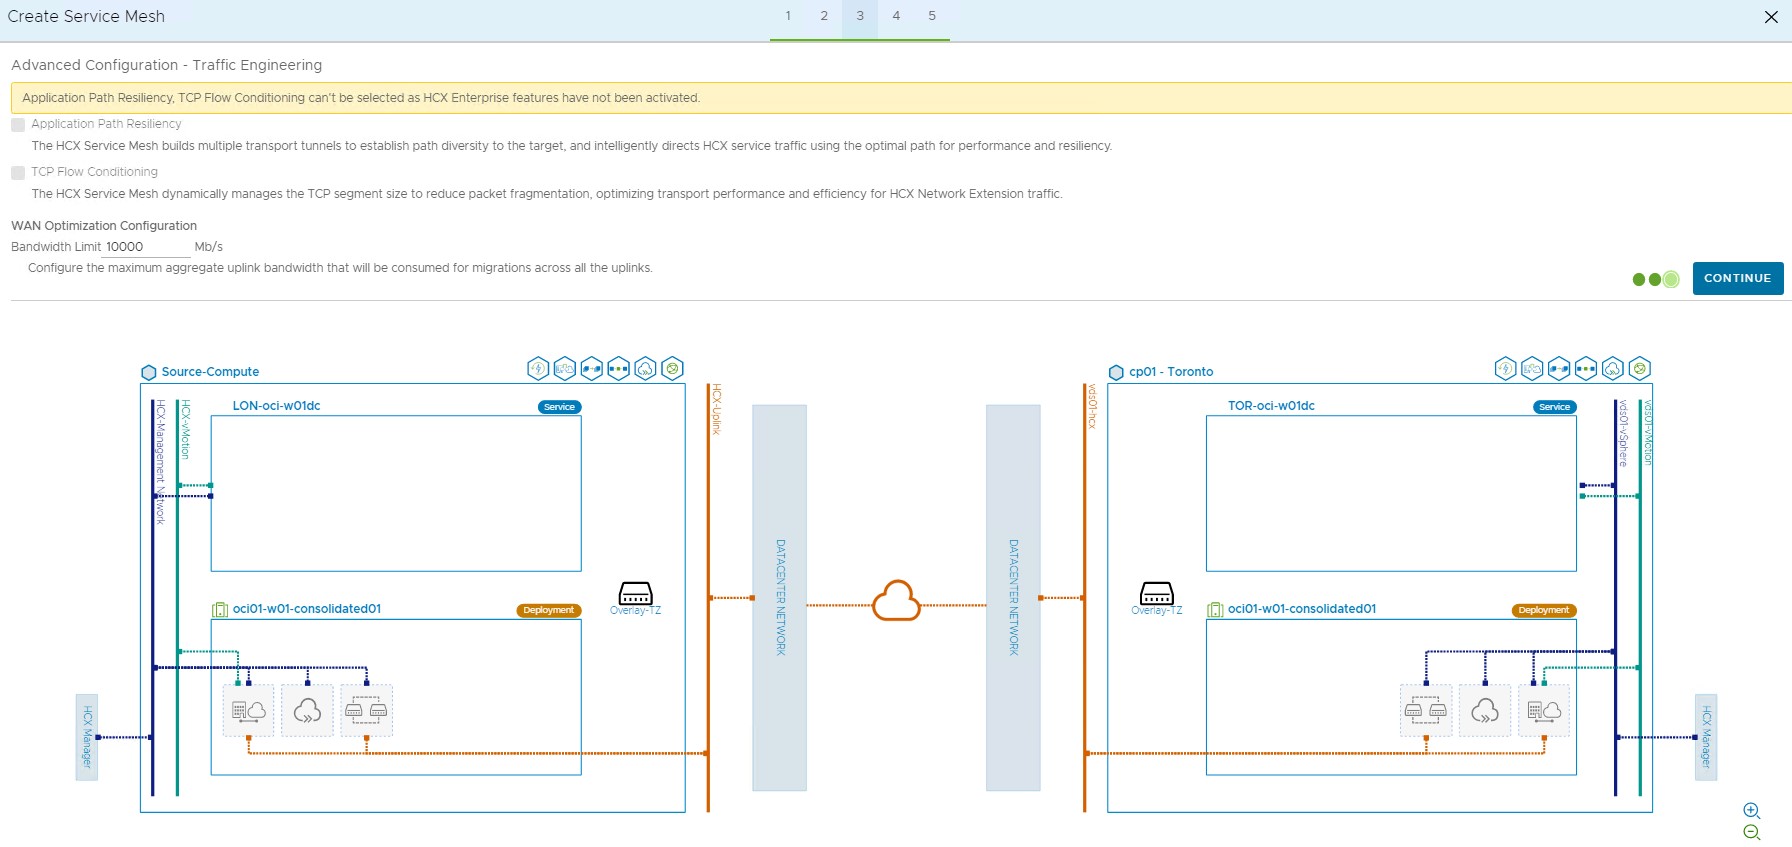
Under Advanced Configuration - Traffic engineering, leave the default and click CONTINUE. Alternatively, you can specify the Bandwidth limit for WAN optimization.
-
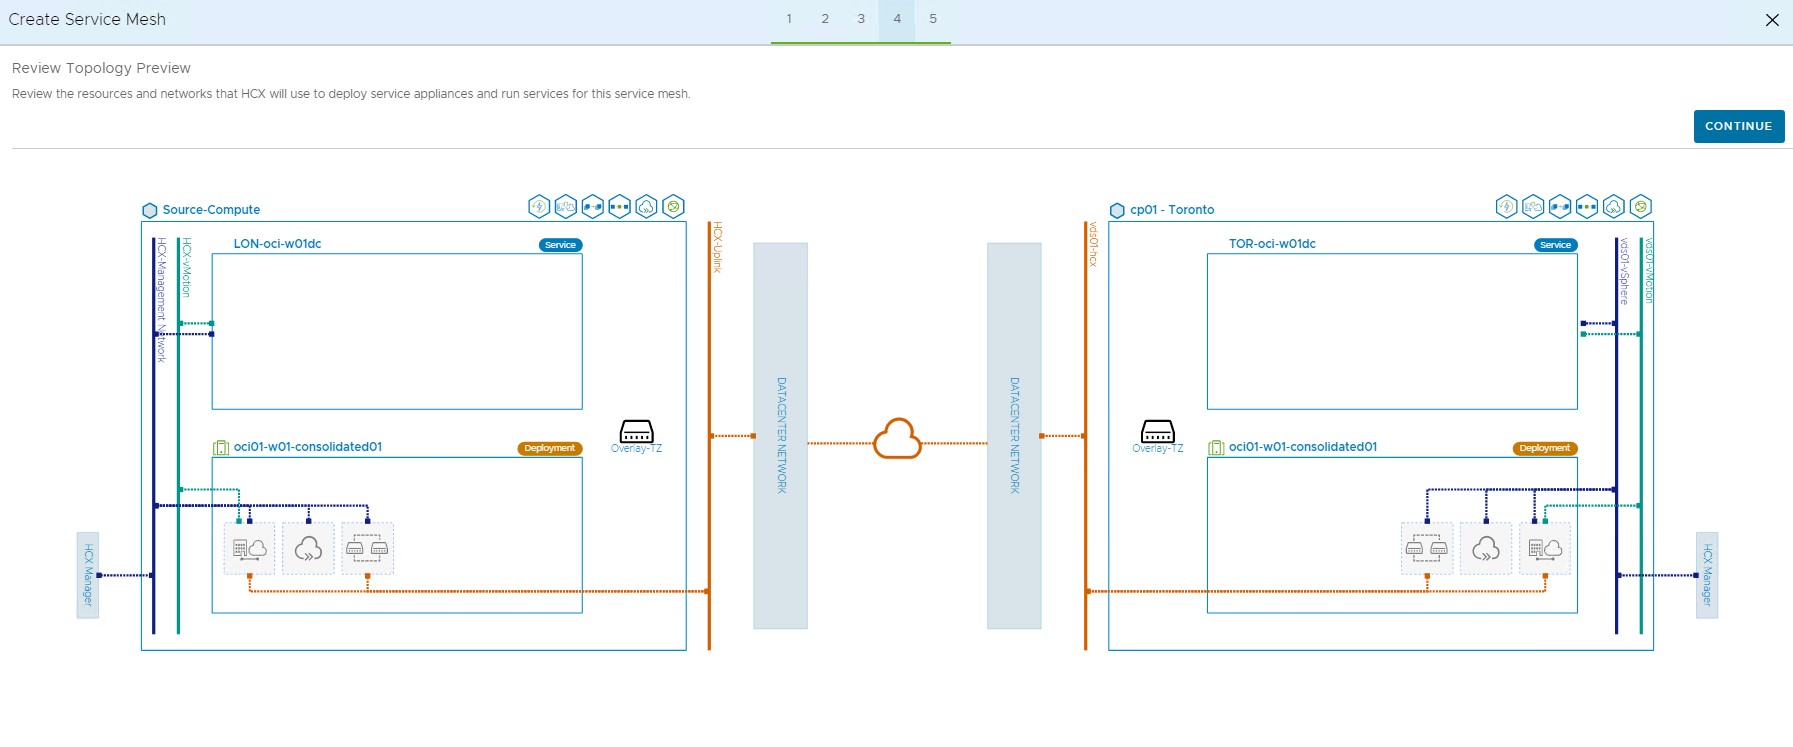
Review the topology of the service mesh and click CONTINUE to finish the Service Mesh Configuration.
-
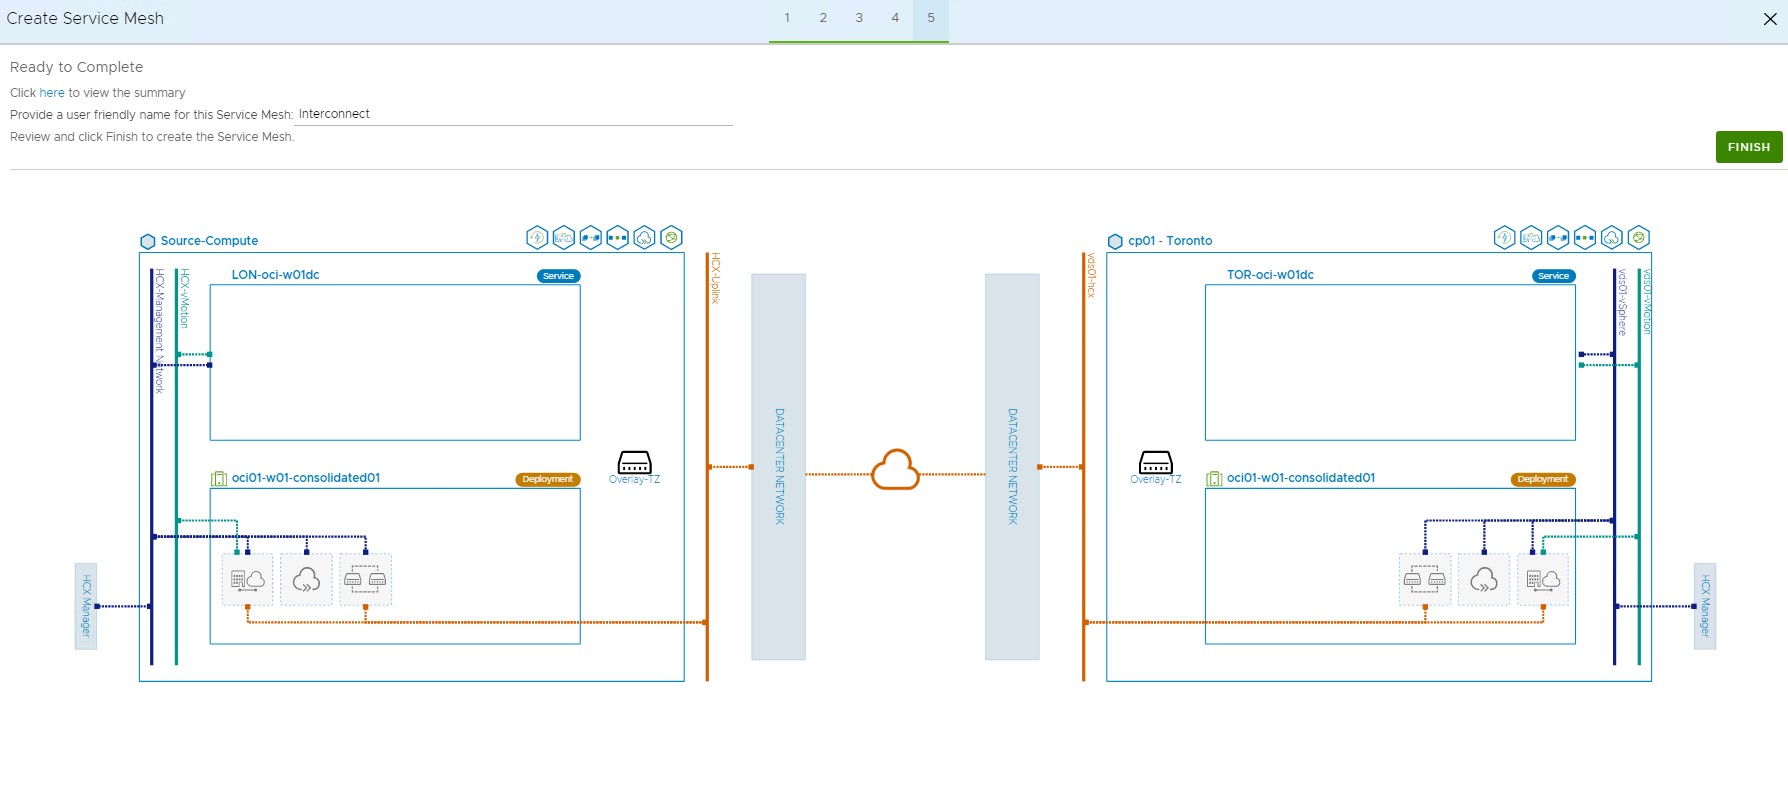
Specify a name for the Service Mesh and click FINISH.
-
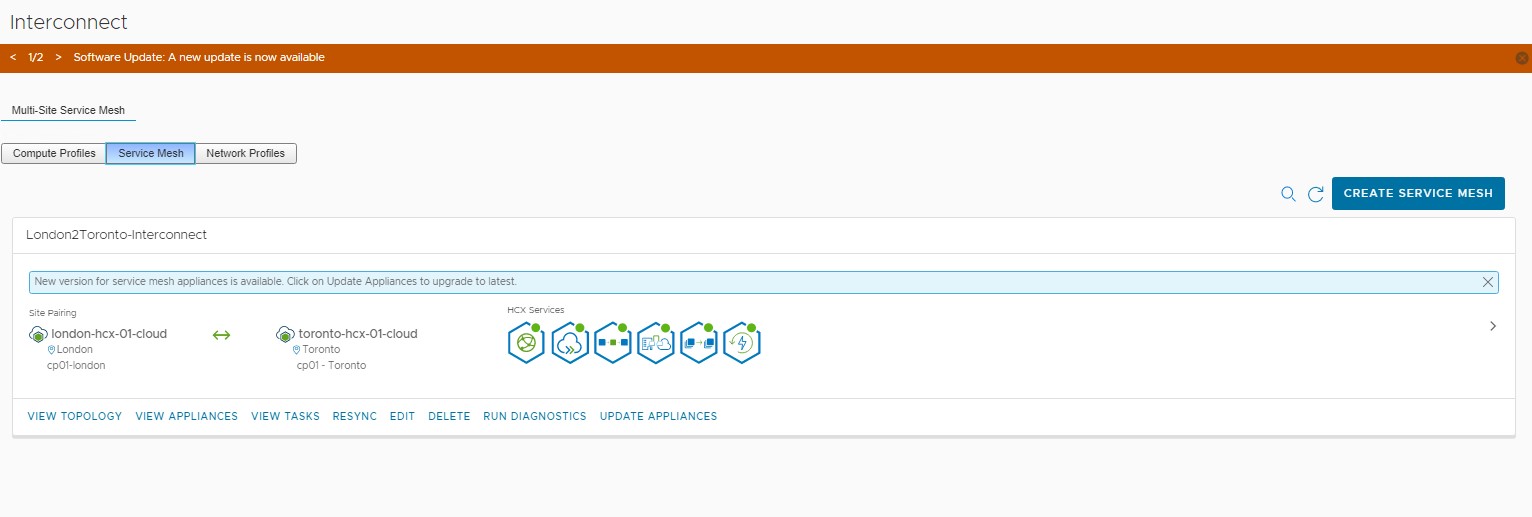
Click VIEW TASKS for the progress of service mesh creation. The service mesh operation will deploy HCX Interconnect, Network Extension, and WAN Optimization appliance according to your services selection.
Task 3: Validate the VMware HCX Migration
Now that the setup is ready to validate the migration and other use cases associated with the VMware HCX, follow the blog post which describes the VMware HCX migration.
Related Links
- Oracle Cloud VMware Solution
- Oracle Cloud VMware Solution Overview Help Center
- OCI Networking
- VMware HCX Overview
- VMware HCX with Oracle Cloud VMware Solution
- VMware Interoperability Matrix
- Blog: Announcing VMware HCX Enterprise for Oracle Cloud VMware Solution
- VMware HCX Licensing and Packaging Overview
Acknowledgments
- Author - Devendra Gawale (Cloud Solutions Architect)
More Learning Resources
Explore other labs on docs.oracle.com/learn or access more free learning content on the Oracle Learning YouTube channel. Additionally, visit education.oracle.com/learning-explorer to become an Oracle Learning Explorer.
For product documentation, visit Oracle Help Center.
Configure VMware HCX with Oracle Cloud VMware Solution
F62088-02
September 2022
Copyright © 2022, Oracle and/or its affiliates.