Note:
- This tutorial requires access to Oracle Cloud. To sign up for a free account, see Get started with Oracle Cloud Infrastructure Free Tier.
- It uses example values for Oracle Cloud Infrastructure credentials, tenancy, and compartments. When completing your lab, substitute these values with ones specific to your cloud environment.
Connect to Oracle Cloud Infrastructure Database with PostgreSQL using DBeaver
Introduction
In this tutorial, we will explore how to connect to an Oracle Cloud Infrastructure Database with PostgreSQL using a database administration tool like DBeaver.
DBeaver is a free, open-source database management tool that significantly enhances PostgreSQL database administrators (DBAs’) efficiency by providing a user-friendly interface for database administration, development, and data analysis. Any other tool can also be considered.
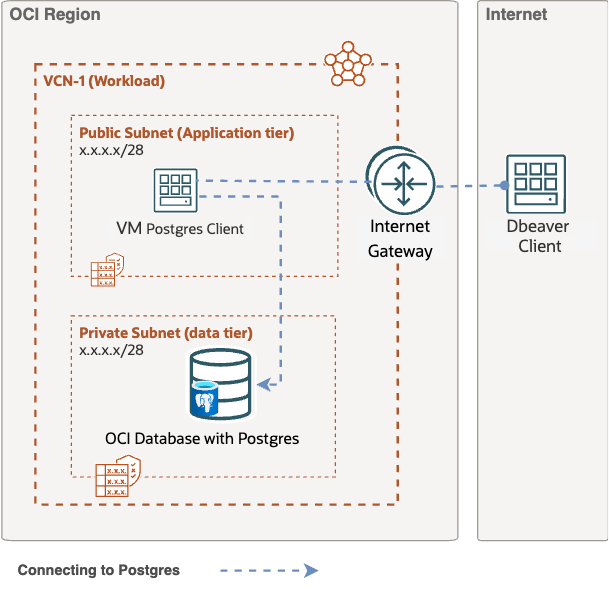
This tutorial will demonstrate how to provision an OCI Database with PostgreSQL within a private subnet. Additionally, in the second and third task, we will provision a compute instance to serve as a bastion host in the same Virtual Cloud Network (VCN), allowing access to the PostgreSQL database through a database administration tool like DBeaver.
The following schema depicts the approach.
Objectives
-
Create a PostgreSQL database instance in a private subnet.
-
Create Oracle Cloud Infrastructure (OCI) Compute instance to connect to PostgreSQL in a public subnet, using the same VCN. Add port
5432to the private subnet security list. -
Connect using DBeaver.
Prerequisites
- Access to an OCI tenancy with privileges to create databases and compute instances.
Task 1: Create a PostgreSQL Database Instance in a Private Subnet
We can use multiple methods to create a PostgreSQL database instance like OCI Console, CLI and API. For more information, see Creating a Database System.
In this task, we will use the OCI Console to create a managed PostgreSQL database system.
-
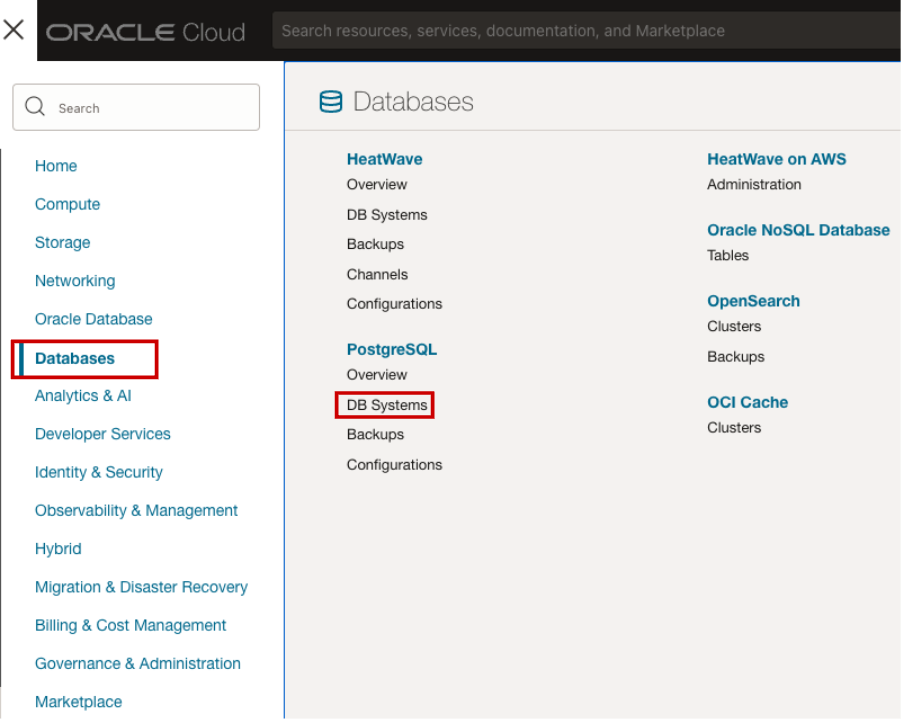
Log in to the OCI Console, navigate to Databases, PostgreSQL and click DB Systems.
-
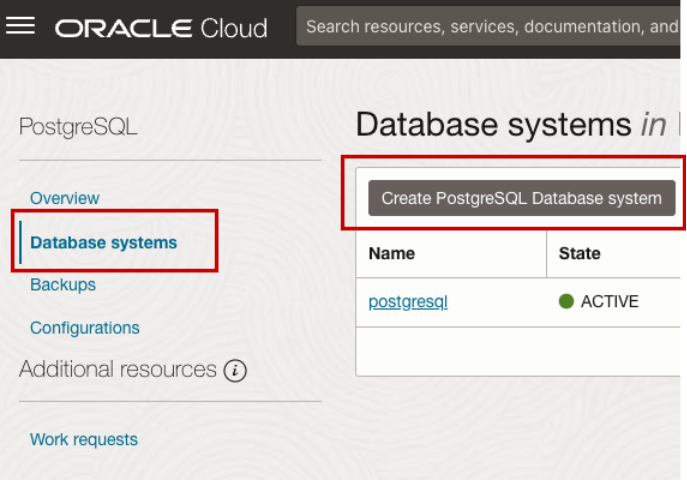
Click Create PostgreSQL Database system.
-
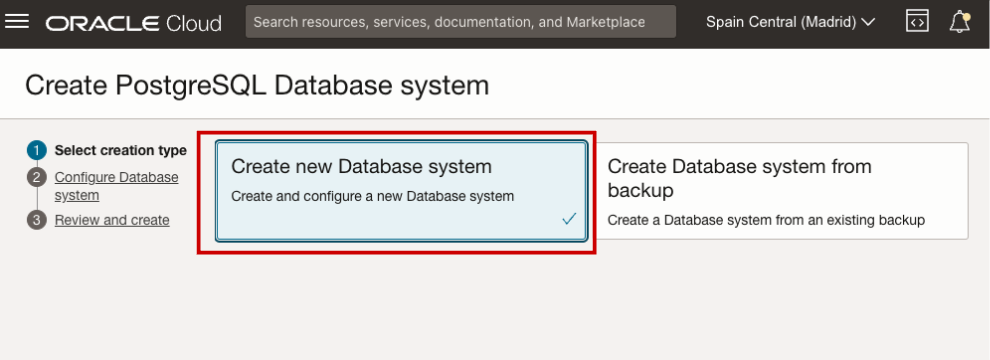
In the Create PostgreSQL Database system page, select Create new Database system and click Next.
-
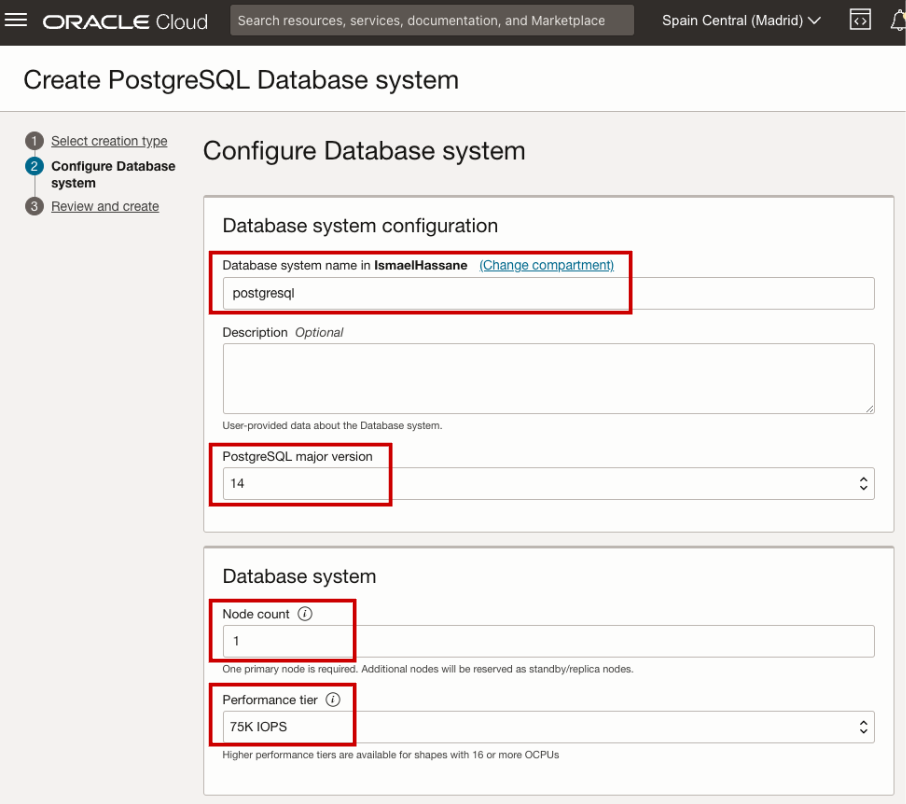
In the Database system configuration section, enter the following information.
-
Database system name: Enter a name for the database system.
-
Description (Optional): Enter a description for the database system.
-
PostgreSQL major version: Select a major version of the PostgreSQL database. The only allowed value is 14.
-
-
In the Database system section, enter a value for Node count. One primary node is required. Extra nodes are reserved as read replica nodes.
-
Select Performance tier for the database. For more information, see Performance Tiers.
-
Select Data placement.
- Regional: Data is durably stored in multiple availability domains in the region.
- Availability Domain-specific: Data is durably stored in the selected availability domain.
-
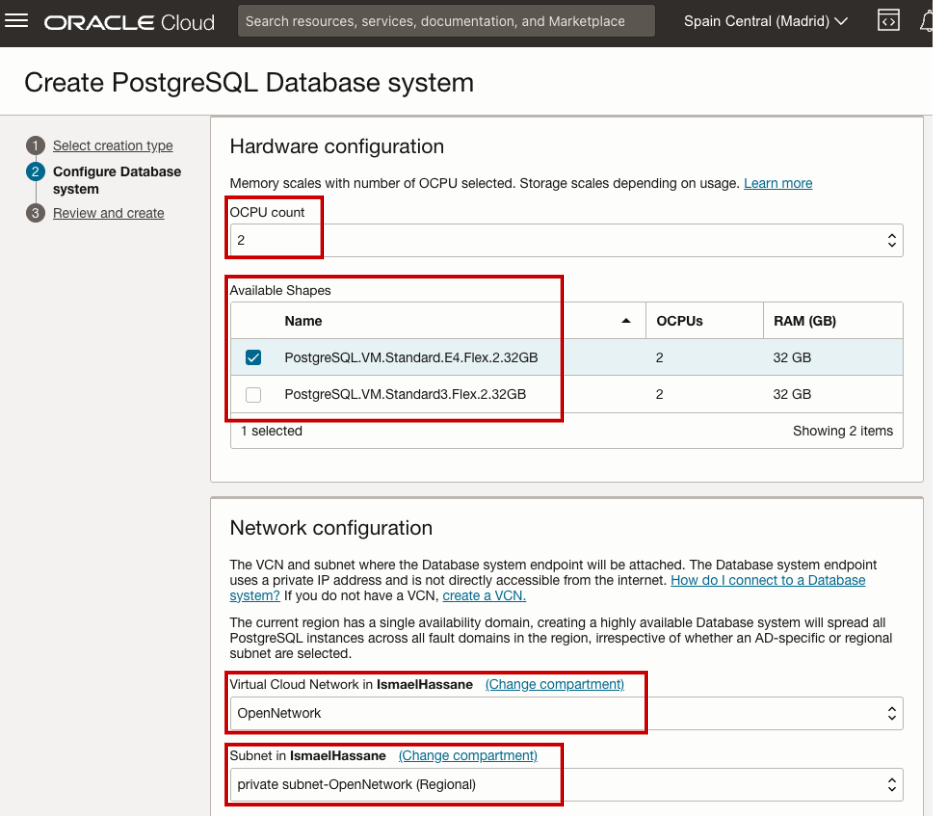
In the Hardware configuration section, enter the following information.
-
OCPU count: Select the number of OCPUs per node.
-
Available Shapes: Select the shape of the database nodes.
-
-
In the Network configuration section, enter the following information.
-
Virtual Cloud Network: Select the VCN in which you want to create the database. If you need to create a VCN, click create a VCN. For more information, see VCN and Subnet Management.
-
Subnet: Select the private subnet of the selected VCN.
-
Private IP address: A private IP address in the subnet for the database instance. The value is optional. If an IP address is not provided, one is chosen from among the available IP addresses in the specified subnet.
-
-
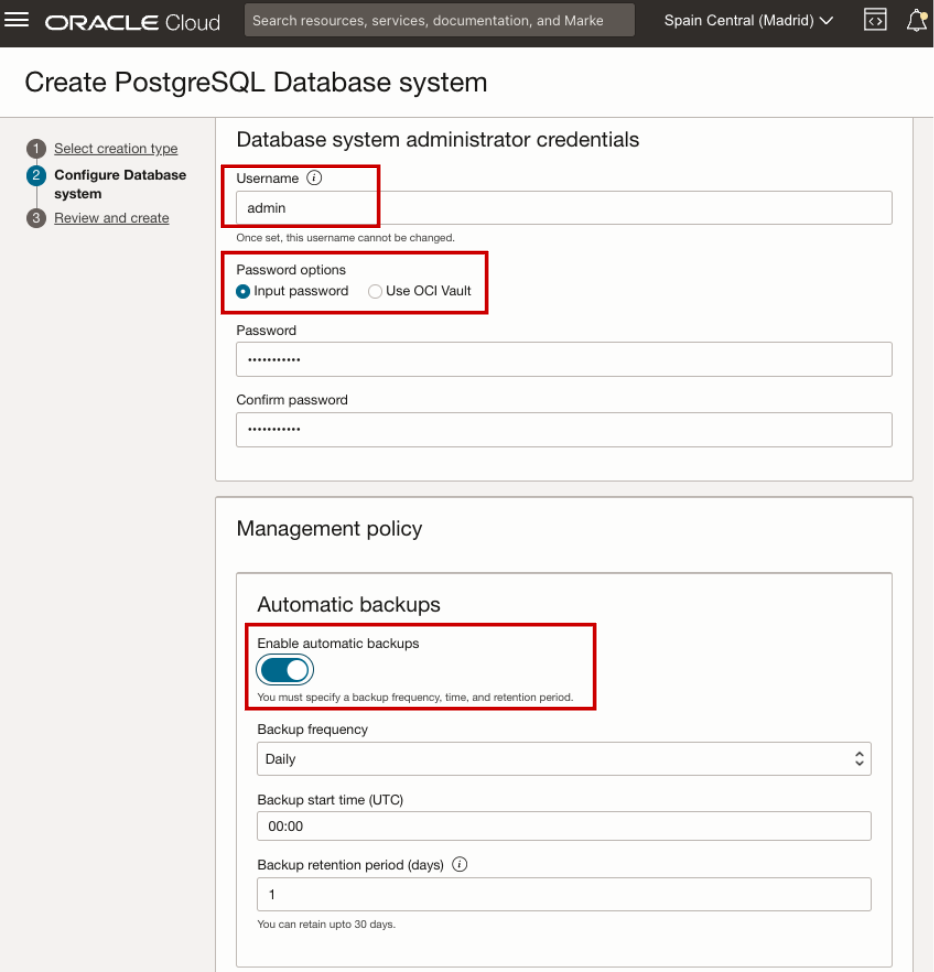
In the Database system administrator credentials section, enter credentials for the database. Administrators do not get superuser access. An OCI Database with PostgreSQL admin user can create users and roles.
-
Username: Specify the username of the administrator. This value cannot be changed after the database system is created.
-
Password options: Select one of the following option.
-
Input password:
-
Password: Enter the administrator password.
-
Confirm password: Confirm the administrator password.
-
-
Use OCI Vault:
-
Vault: Select the vault that contains the administrator password.
-
Secret: Select the secret containing the administrator password.
-
Secret version: Select a secret version.
-
-
-
-
After configuring the database system, click Next.
-
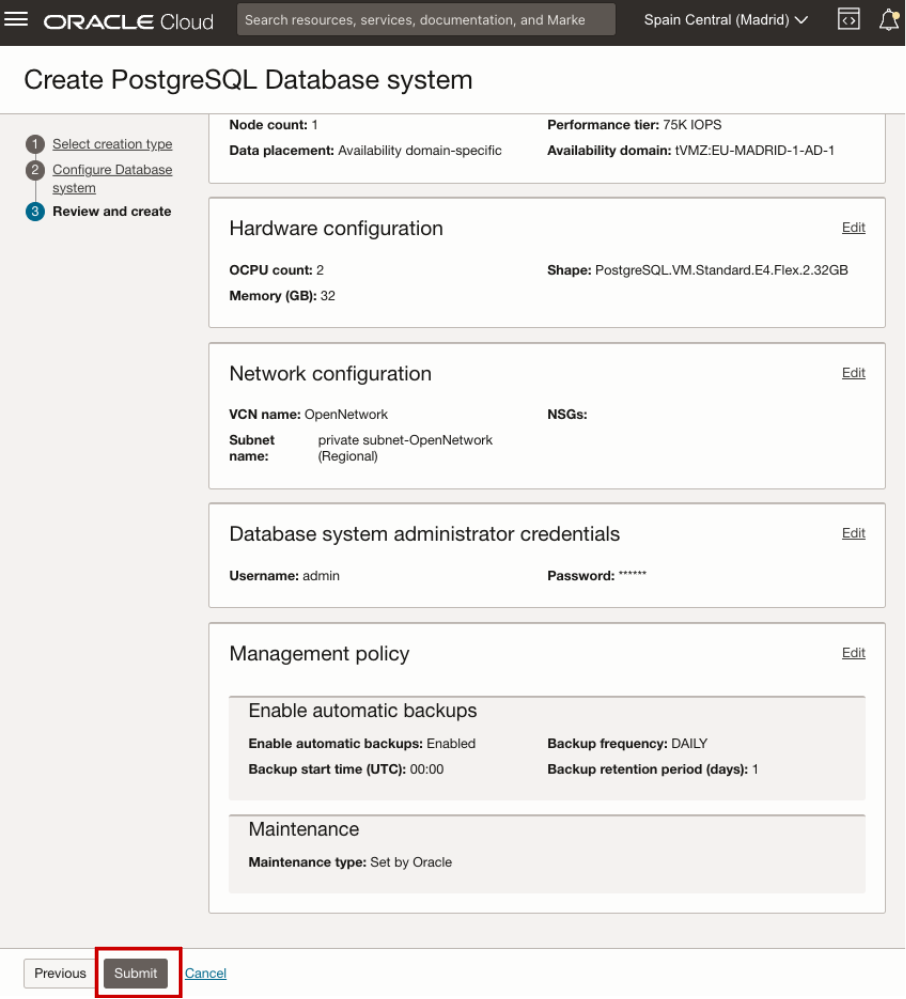
Review the database system configuration and click Submit.
-
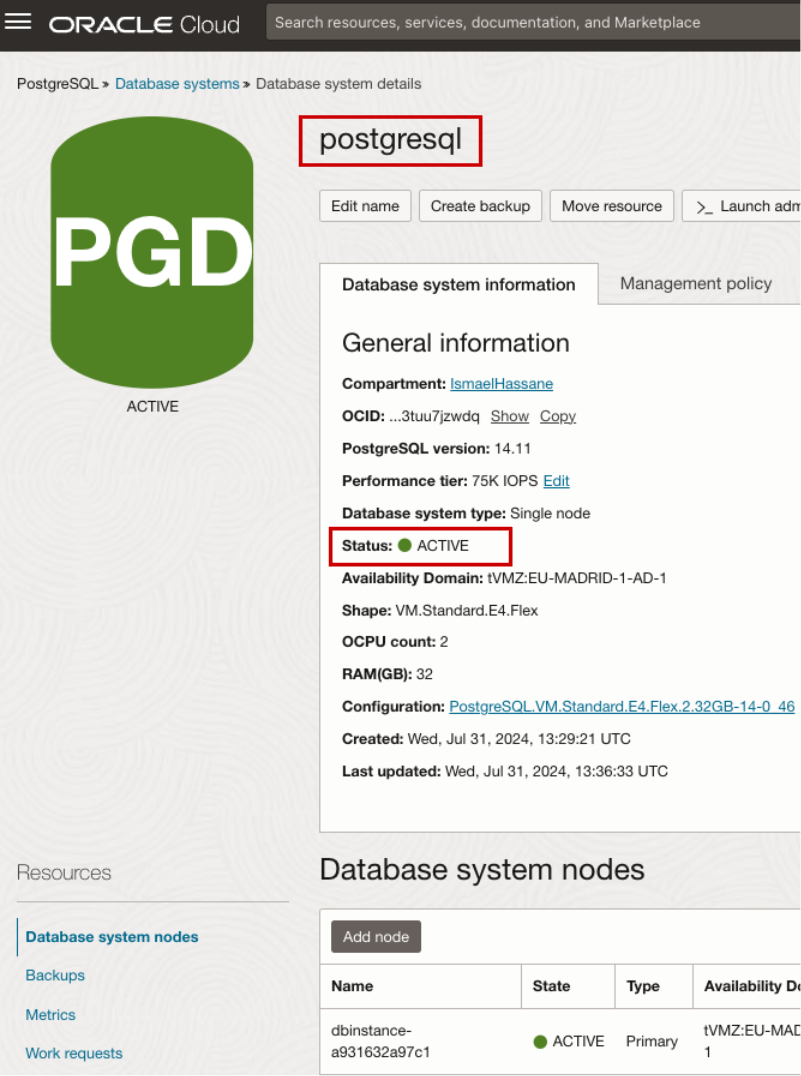
After successful creation, access the general information page for the database system.
Task 2: Create OCI Compute Instance to Connect to PostgreSQL
PostgreSQL database is being deployed within a private network, we will create an instance with a public IP address and grant it access to PostgreSQL. This newly created instance will serve as an entry point to the PostgreSQL database.
-
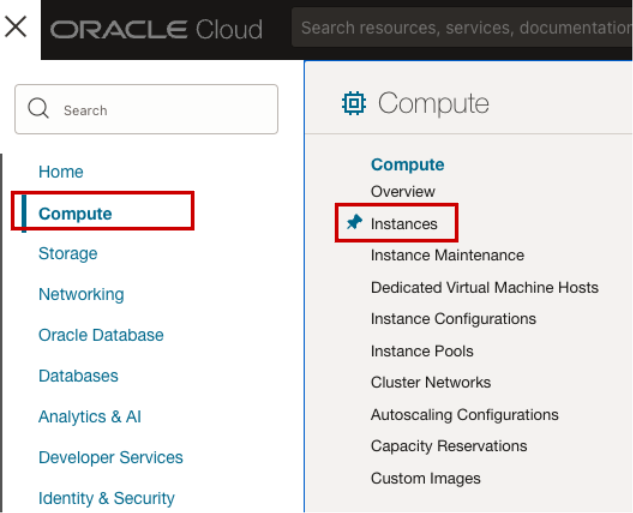
Go to the OCI Console, navigate to Compute and Instances.
-
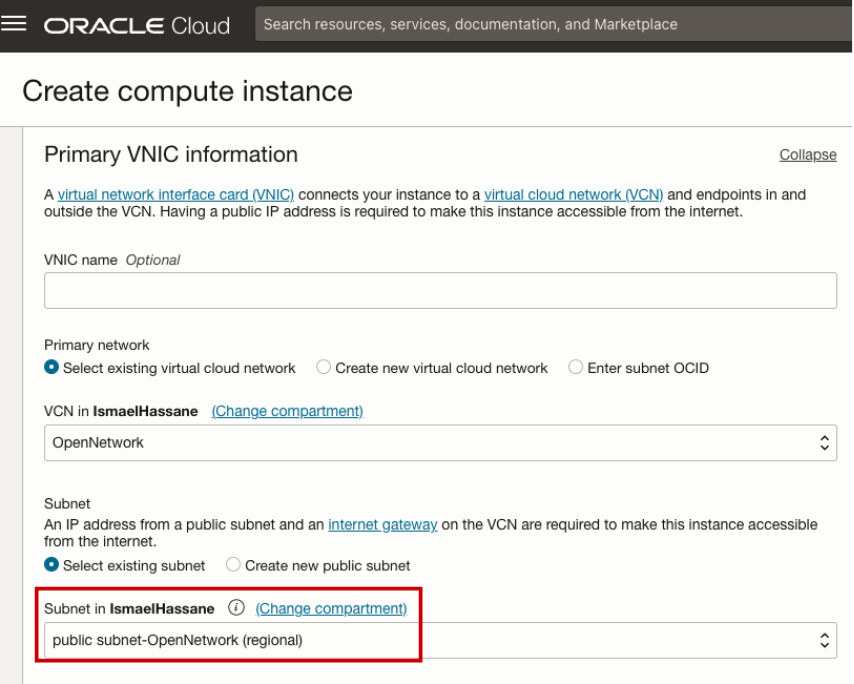
Select a public subnet in the same VCN you provisioned the OCI PostgreSQL database instance.
-
SSH into the instance and run the following commands. This will install the client for PostgreSQL version 14.
sudo dnf install -y https://download.postgresql.org/pub/repos/yum/reporpms/EL-8-x86_64/pgdg-redhat-repo-latest.noarch.rpm
sudo dnf -qy module disable postgresql
sudo dnf install -y postgresql14-server
sudo /usr/pgsql-14/bin/postgresql-14-setup initdb
sudo systemctl enable postgresql-14
sudo systemctl start postgresql-14
rm -rf ~/.pgpass -
Go to your OCI PostgreSQL overview page, click Copy in the CA certificate or download the certificate and run the following command in the terminal.
sudo nano ./dbsystem.pubCopy and paste the full certificate in the
dbsystem.pubfile. Save and close the file. -
Test the connection using the following command.
psql -h [DB Private IP] -U [user name] -d postgresFor example:
psql -h 10.0.1.165 -U admin -d postgres -
Run the statement as test to review the connection.
SELECT VERSION();
-
Run the following statement to connect as user.
psql "sslmode=verify-full sslrootcert=./dbsystem.pub host=<endpoint_fqdn> hostaddr=[DB private IP] dbname=postgres user=<user_name>"For example:
psql "sslmode=verify-full sslrootcert=dbsystem.pub host= yfya3utrulnsbuzniy7545tsnwvuzq-primary.postgresql.eu-madrid-1.oc1.oraclecloud.com hostaddr=10.0.1.165 dbname=postgres user=admin" -
Run the following statement to test if the connection is working.
SELECT VERSION();
Task 3: Connect using DBeaver
In this task, we will install DBeaver and connect to PostgreSQL.
-
Download and install DBeaver from here: DBeaver Community.
-
Add the credentials to connect to the OCI Database with PostgreSQL.

-
Enter the virtual machine (VM) IP address and Port 22. DBeaver will use the same VM instance in the public subnet using SSH to access the OCI Database with PostgreSQL database.

-
(Optional) Run the following statement to create a table and load data using DBeaver.
DROP TABLE cars;
CREATE TABLE cars (
  brand VARCHAR(255),
  model VARCHAR(255),
  year INT
);
INSERT INTO cars (brand, model, year)
VALUES
  ('Toyota', 'Camry', 2023),
  ('Honda', 'Accord', 2022),
  ('Ford', 'Mustang', 2024),
  ('Chevrolet', 'Corvette', 2023),
  ('BMW', '3 Series', 2021),
  ('Mercedes-Benz', 'C-Class', 2022),
  ('Volkswagen', 'Golf', 2023),
  ('Audi', 'A4', 2024);
COMMIT;
SELECT * FROM cars;
Overview of the table created.

Related Links
Acknowledgments
- Authors - Ismael Hassane (Senior Solution Architect, Data Platform), Jevon Rowan (Principal Cloud Solution Engineer, Open Source Data Services Specialist)
More Learning Resources
Explore other labs on docs.oracle.com/learn or access more free learning content on the Oracle Learning YouTube channel. Additionally, visit education.oracle.com/learning-explorer to become an Oracle Learning Explorer.
For product documentation, visit Oracle Help Center.
Connect to Oracle Cloud Infrastructure Database with PostgreSQL using DBeaver
G15126-01
September 2024