Note:
- This tutorial requires access to Oracle Cloud. To sign up for a free account, see Get started with Oracle Cloud Infrastructure Free Tier.
- It uses example values for Oracle Cloud Infrastructure credentials, tenancy, and compartments. When completing your lab, substitute these values with ones specific to your cloud environment.
Get started with GraalVM on Ampere A1 on Oracle Cloud Infrastructure
This tutorial describes how to get started with GraalVM on Ampere A1 compute platform in Oracle Cloud Infrastructure (OCI). You will first run a Spring Boot application in the JVM mode and then build and run a Micronaut.io application as a native binary. You can use GraalVM to improve the performance of your existing applications and build lightweight polyglot applications for the cloud. It’s an ideal companion for the Ampere A1 compute shapes, which provide linear scalability and an unbeatable price-performance ratio.
The Ampere A1 compute platform based on Ampere Altra CPUs represent a generational shift for enterprises and application developers that are building workloads that can scale from edge devices to cloud data centers. The unique design of this platform delivers consistent and predictable performance as there are no resource contention within a compute core and offers more isolation and security. This new class of compute shapes on Oracle Cloud Infrastructure provide an unmatched platform that combines power of the Altra CPUs with the security, scalability and eco-system of services on OCI.
Introduction
What is GraalVM?
GraalVM is a high-performance runtime for applications written in Java, JavaScript, LLVM-based languages such as C and C++, and other dynamic languages. It significantly improves application performance and efficiency, so it can help you run your existing applications more efficiently on cloud platforms.
GraalVM also builds native executable binaries—native images—for existing JVM-based applications. The resulting native image contains the whole program in machine-code form for immediate execution and avoids the startup and memory footprint of the JVM itself. This capability makes GraalVM ideal for building cloud native applications, and several microservice frameworks for JVM languages include this capability today.
Objectives
In this tutorial, you will:
- Create an Ampere A1 compute instance
- Install GraalVM Enterprise Edition
- Run the popular Spring Boot sample application Pet Clinic using GraalVM in JVM mode
- Build and Run a Micronaut application as a GraalVM native image
- Evaluate the suitability of using GraalVM on Ampere A1
- Clean up the deployments
Prerequisites
- An Oracle Free Tier (Trial), Paid or LiveLabs Cloud Account
- Familiarity with OCI console
- Overview of Networking
- Familiarity with Compartments
- Basic conceptual knowledge of containers and Podman
Setup Cloud Environment
You will begin by initiating the Oracle cloud environment that will be used to create and deploy your Java EE application. This environment will be contained within a cloud Compartment, and communication within the Compartment will be via a Virtual Cloud Network (VCN). The Compartment and VCN will isolate and secure the overall environment. You will create an Ampere A1 compute instance to install and run your applications using GraalVM Enterprise Edition.
Basic OCI Infrastructure Setup
-
Open the navigation menu. Under Governance and Administration, go to Identity and click Compartments. From this screen, you will see a list of compartments, click Create Compartment.
-
Enter the following:
- Name: Enter “AppDev”.
- Description: Enter a description (required), for example: “AppDev compartment for the getting started tutorial”. Avoid entering confidential information.
- Parent Compartment: Select the compartment you want this compartment to reside in. Defaults to the root compartment (or tenancy).
- Click Create Compartment.
- Your compartment is displayed in the list.
Create Ampere A1 Compute Instance
-
To create an Ampere A1 compute instance, use navigation menu in the top-left corner of the Console and go to Compute > Instances.
-
Open the instance creation flow.
- Verify you are in the AppDev Compartment
- Click Create Instance.
-
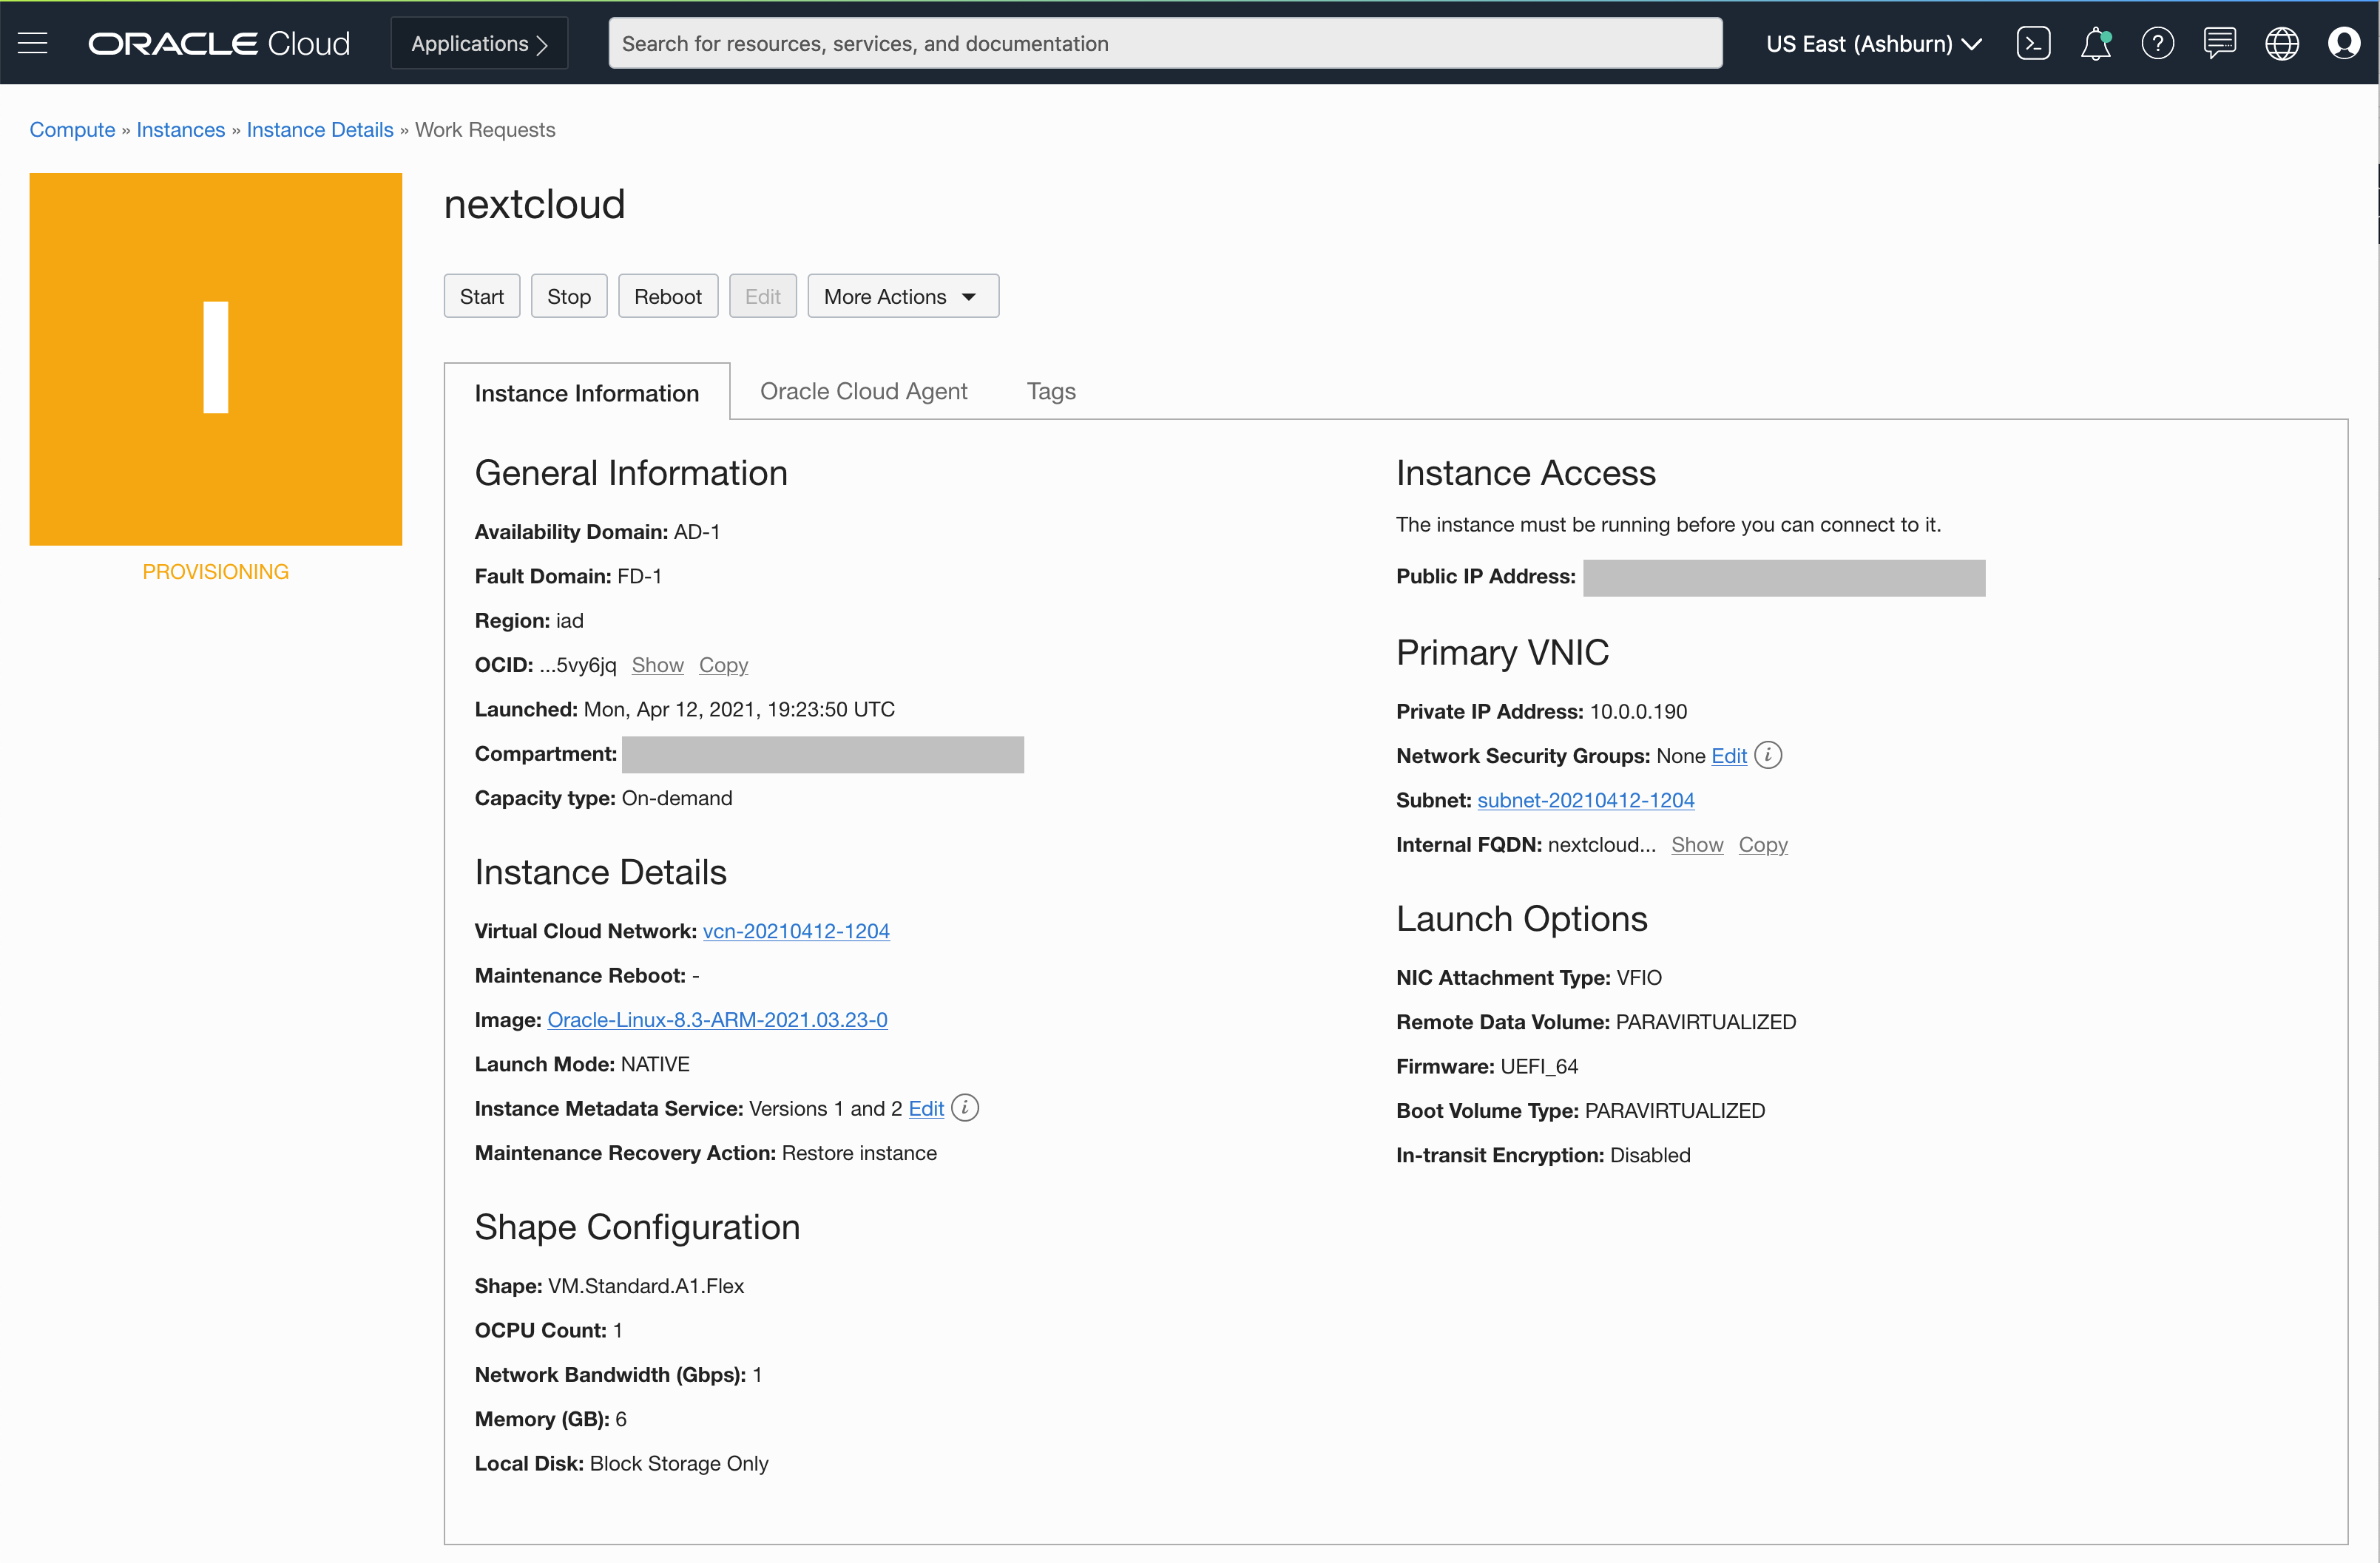
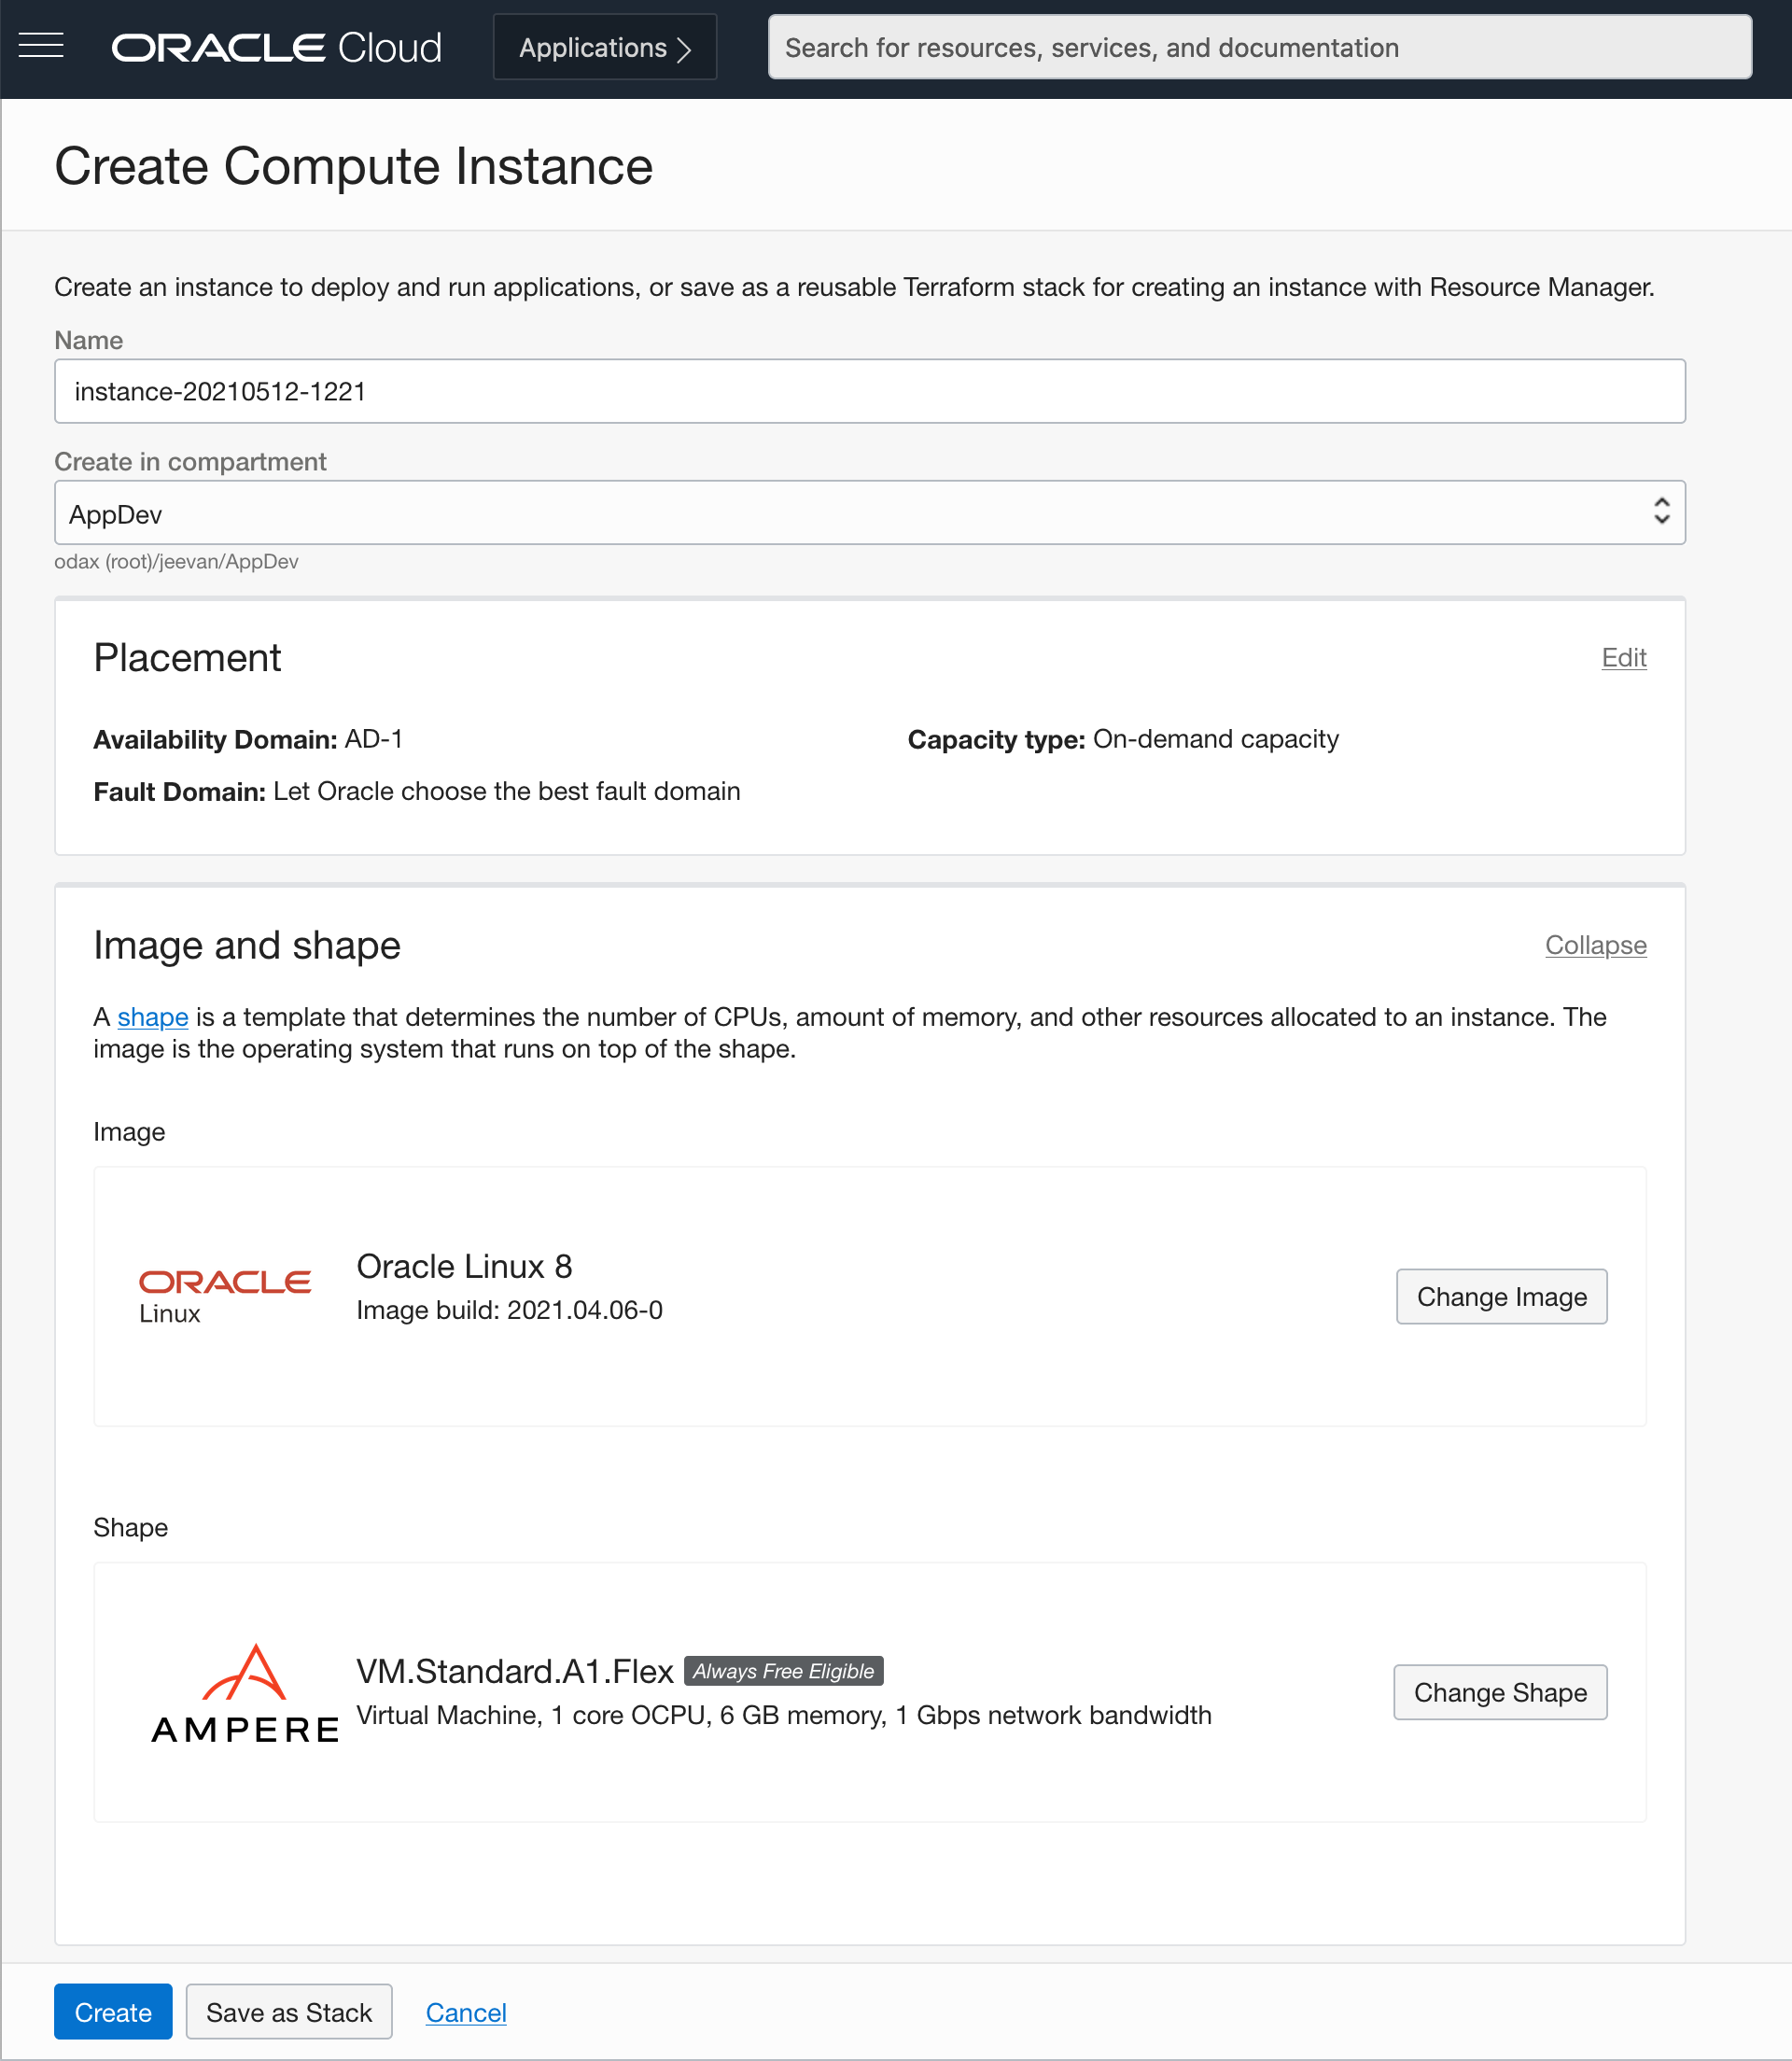
In the create instance page you will create the new instance along with the new network resources such as Virtual Cloud Network (VCN), Internet Gateway (IG)and more.
- Name the instance GraalVMApp
- Update the Image selection to use Oracle Linux 7.9.
- Click the Change Shape button to see the available compute shapes.
-
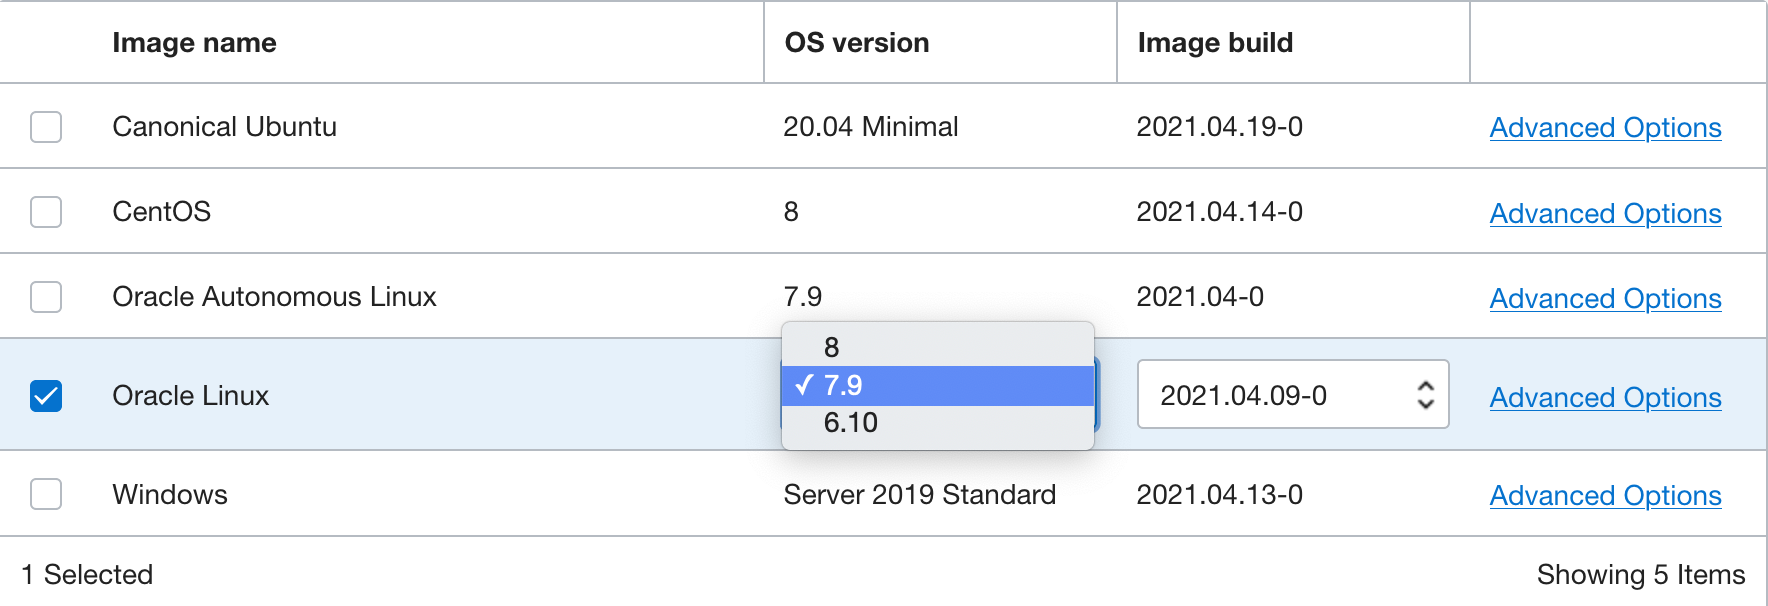
Configure the image for your instance.
- Click the Change Image button to see available OS images.
- Choose Oracle Linux 7.9.
-
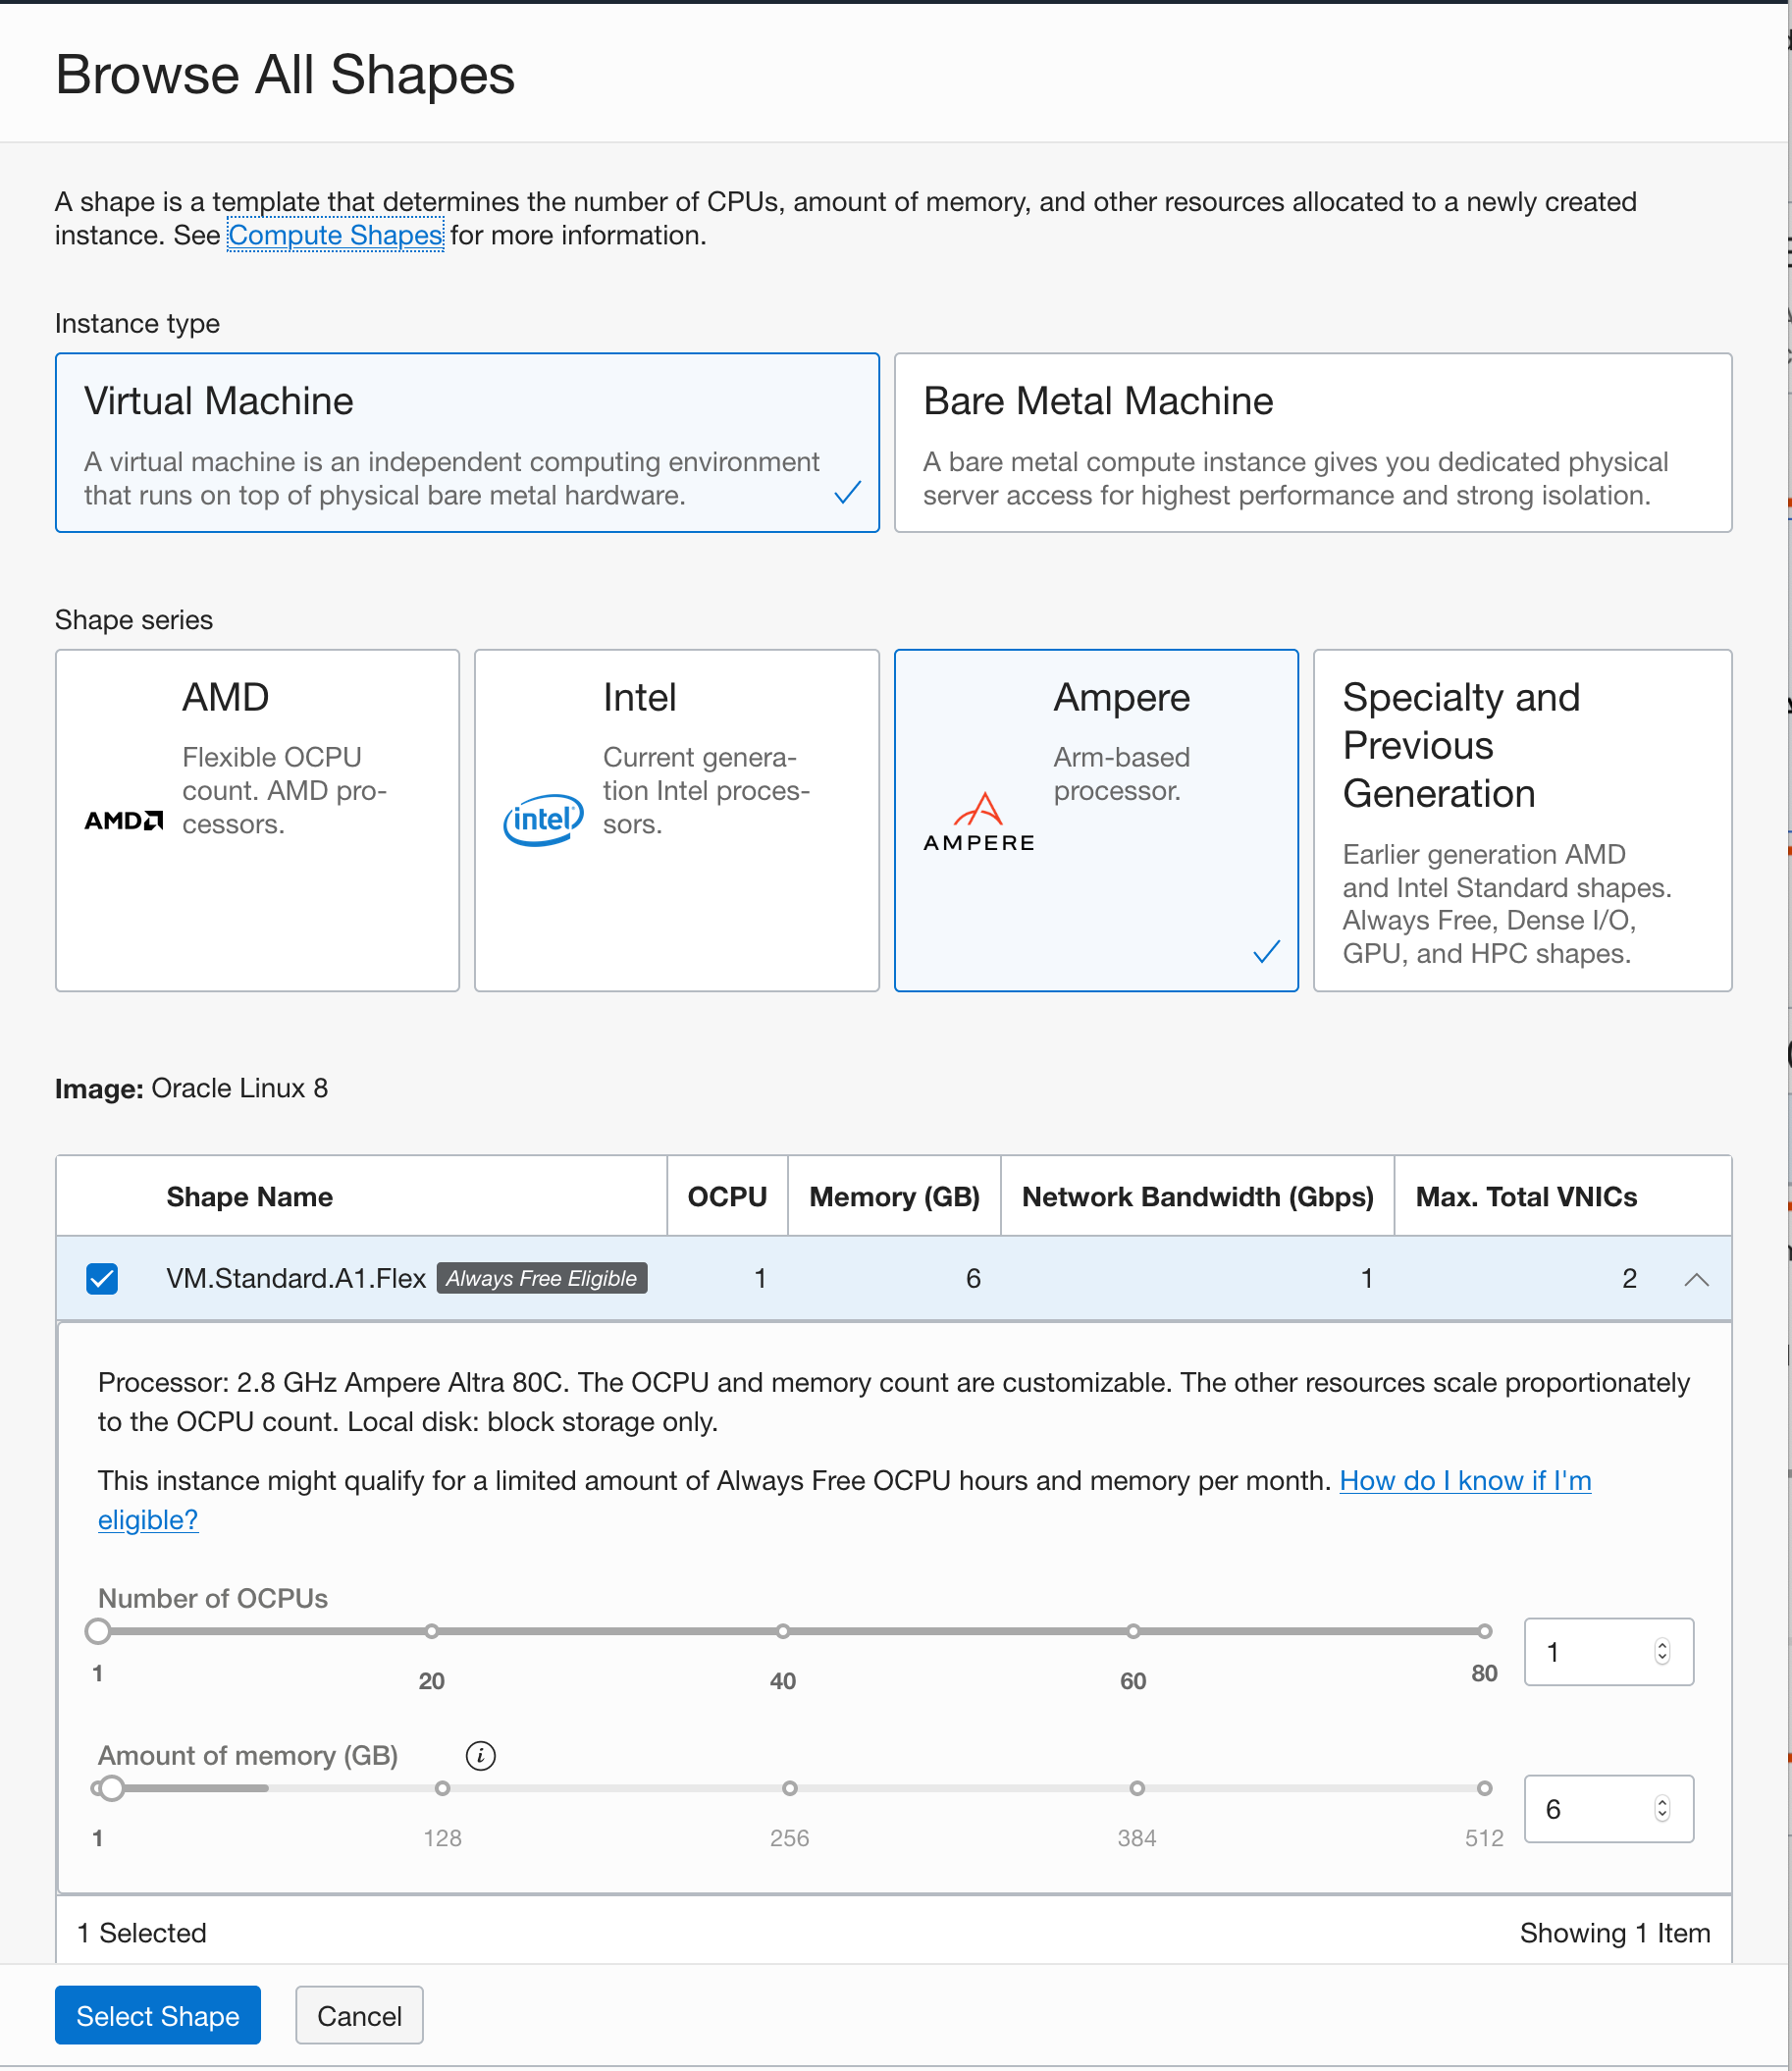
Configure the resources for your instance.
- Choose the Ampere Arm based processor in the choice for shape series.
- Choose the
VM.Standard.A1.Flexshape from the list of shapes with Ampere Arm based processors. Ampere A1 shapes are flexible and you can modify the number of cores and the amount of memory. Choose 1 core and 6 GB of memory for the VM.
-
Choose your networking options. Create a new VCN and subnet for your next cloud deployment. Make sure you choose to assign a public IP address for your instance.
-
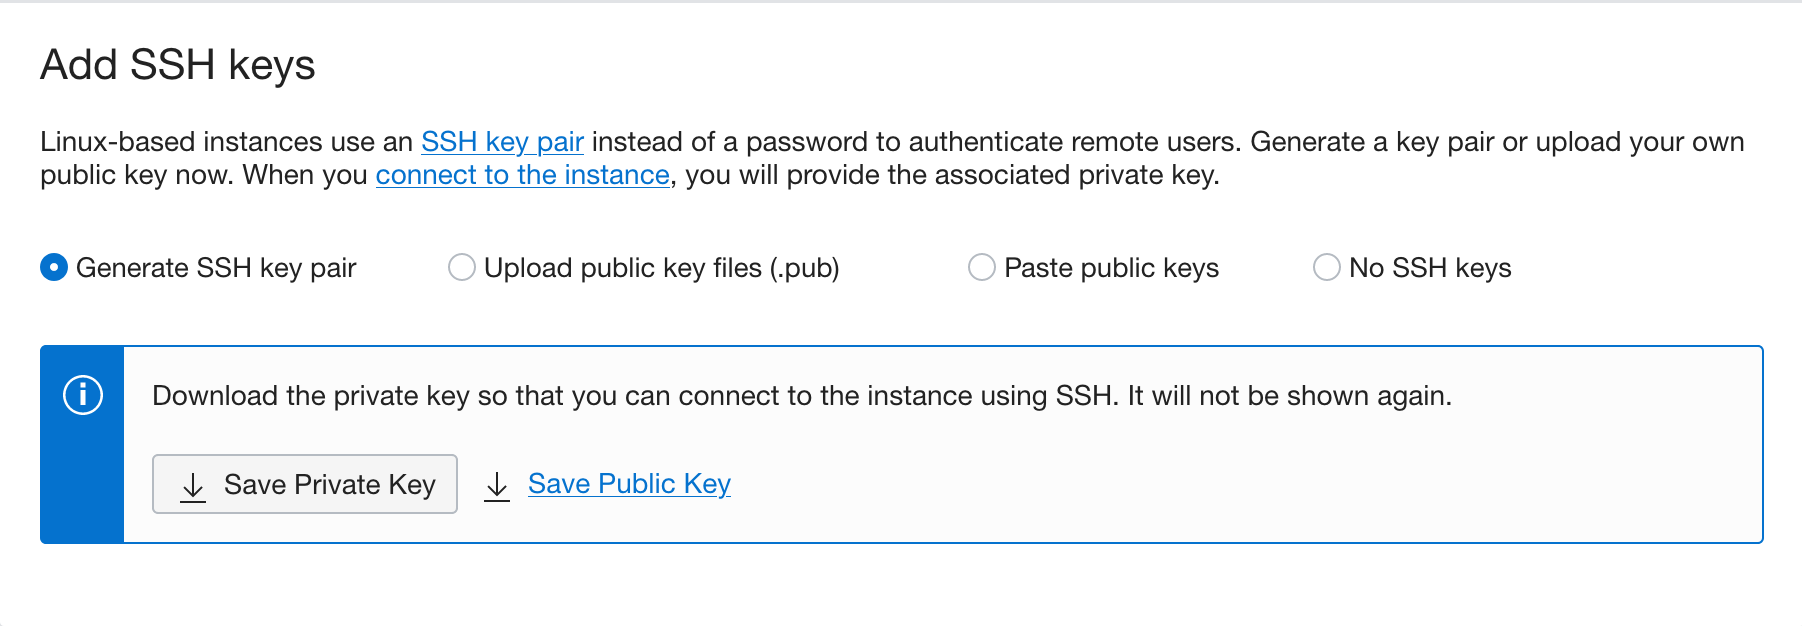
Generate and download the SSH keypair. This step is optional, but highly recommended for later maintenance and upgrades. You can also bring your public key if you already have a keypair that you would like to use. If you want to know how to generate SSH keys, then follow instructions in the Generate SSH Keys tutorial.
-
Click Create to create the networking resources and launch the compute instance.
 Description of illustration launch instance
Expose Application Ports to Users
For applications to be accessible from the internet, you need to open the ports that our application will use. In this section, you will configure security lists on your cloud network and firewall rules on your compute instance to enable your applications to send and receive traffic.
Configure your Virtual Cloud Network (VCN)
A security list acts as a virtual firewall for an instance, with ingress and egress rules that specify the types of traffic allowed in and out. Security lists as configured at the subnet level, which applies the security rules to all network elements in that subnet. Your network comes with a default security list, which contain an initial set of rules. The default security list enables you to connect to your instance using SSH and for your instance to make outbound network calls to any destination.
Configure the Security List to Expose Application Ports
-
Navigate the the instance details page for the instance that you have created. Compute > Instances > Click on the instance you have created
-
Navigate to the subnet your instance is attached to, by clicking on the subnet
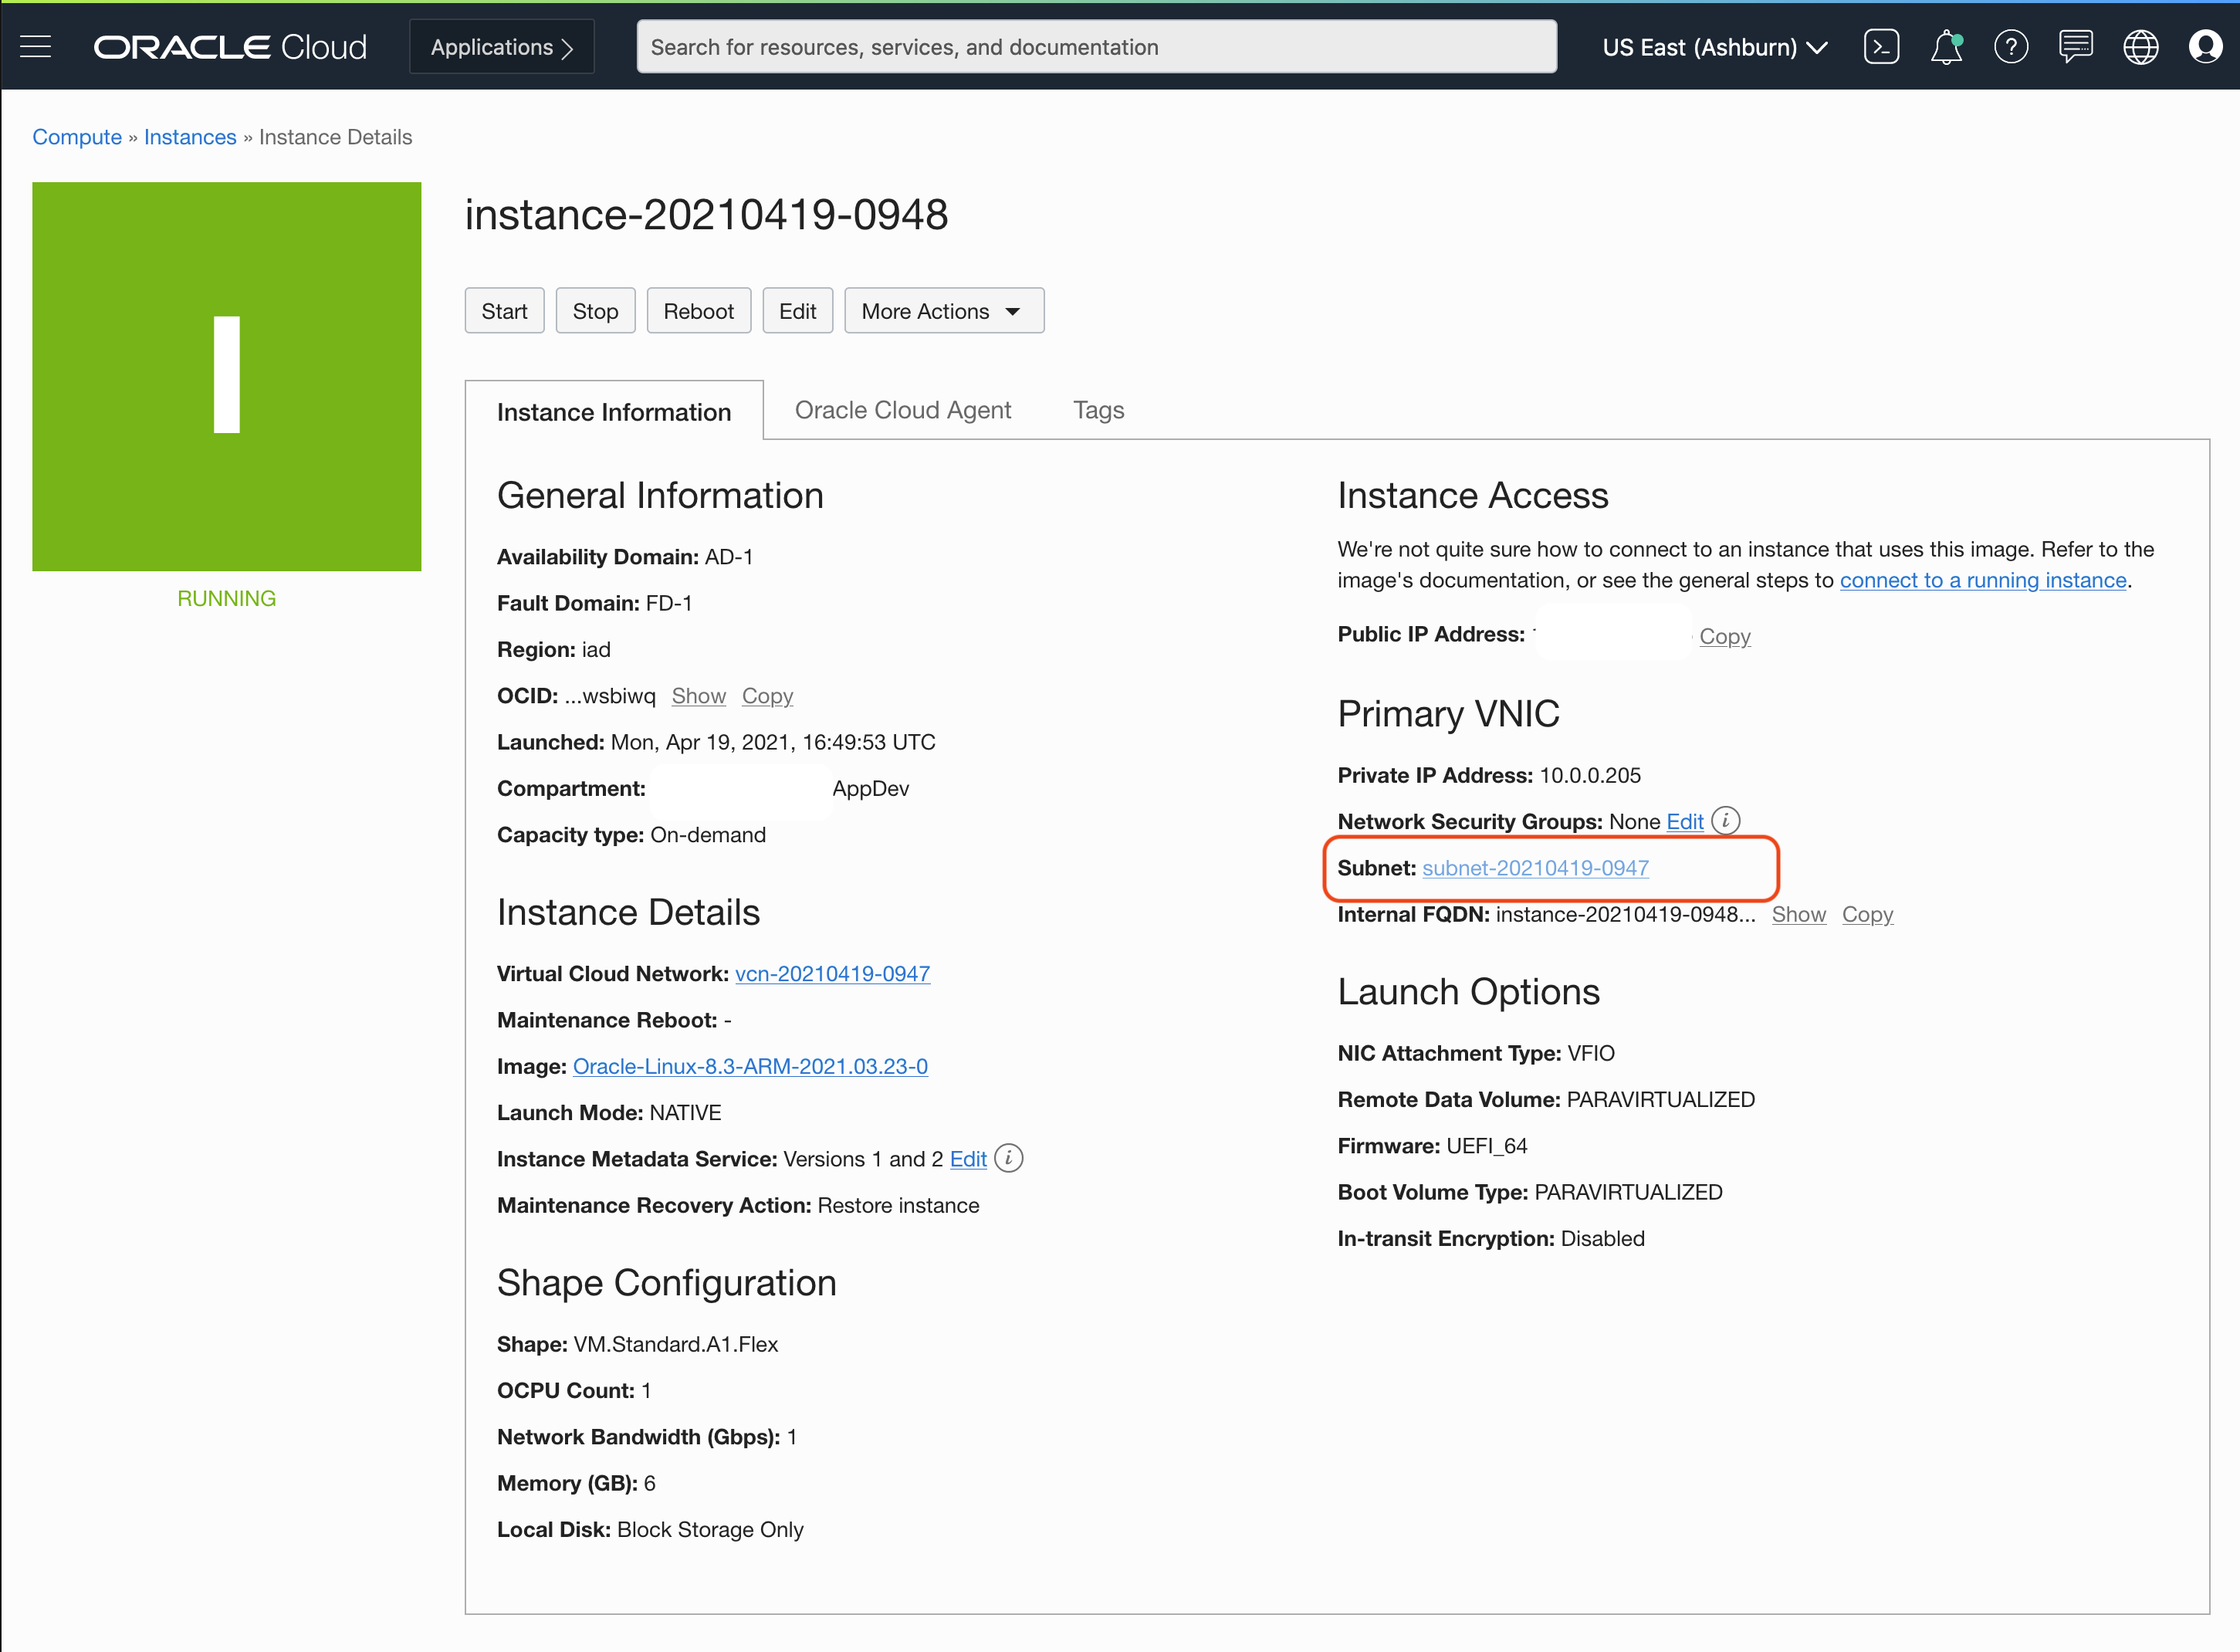 Description of illustration Select subnet
 -
On the subnet page, click on the default security list to view details and configure it.
-
Click on “Add Ingress Rule” to add a new rule to allow incoming traffic that match the rules.
-
Add an ingress rule to allow incoming traffic on port 8080
- Set the Source CIDR to
0.0.0.0/0. This allows incoming traffic from all sources. - Set the Destination Port Range to
8080. This sets the destination to only port8080. The rule now allows traffic from all sources to use port8080. This is what we need, so that our application can be reached from anywhere. - Provide a description
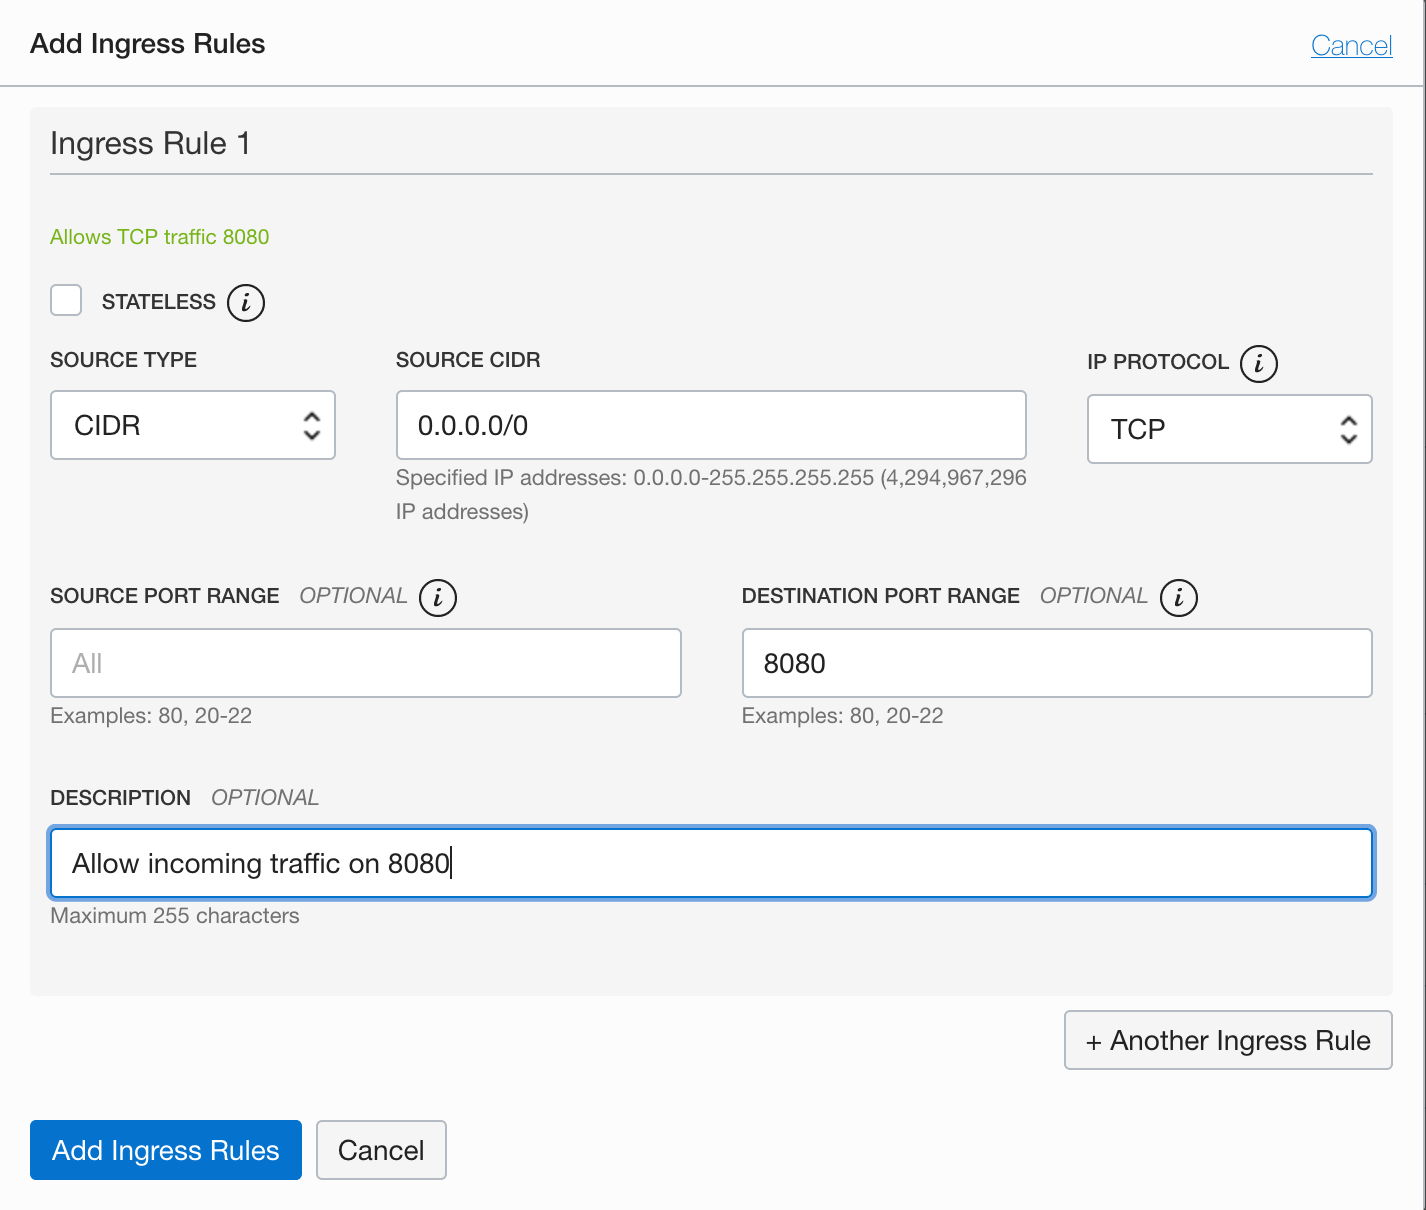 Description of illustration Add ingress rule
- Set the Source CIDR to
Configure your Instance
Firewall rules control packet-level traffic in/out of an instance. You configure firewall rules directly on the instance itself, and provide an additional level of security.
- Navigate the the instance details page for the instance that you have created. Compute > Instances > Click on the instance you have created
- Copy the public IP address of your instance.
- Connect to the instance using SSH. Use the key either generated by you or provided during the instance creation step. The default username for instances using the Oracle Linux operating system is
opc. -
Execute the firewall configuration commands. This modifies the firewall in the instance itself to expose port
8080and accept incoming traffic.sudo firewall-cmd --zone=public --permanent --add-port=8080/tcp sudo firewall-cmd --reload
Install and use GraalVM Enterprise Edition on Ampere A1
OCI offers Oracle GraalVM Enterprise Edition for free to its customers. GraalVM Enterprise support is included in the Oracle Cloud subscription. The combination of high-performance Arm-based compute shapes and GraalVM Enterprise on OCI provides a compelling platform for both existing and new enterprise applications.
- Navigate the the instance details page for the instance that you have created. Compute > Instances > Click on the instance you have created.
- Copy the public IP address of your instance.
- Login to the instance using SSH. Use the key you either generated or provided during the instance creation step. The default username for instances using the Oracle Linux operating system is
opc.
To install GraalVM and Git on OCI, run the following command:
sudo yum install graalvm21-ee-11 git
After it’s installed, GraalVM is available in the /usr/lib64/graalvm directory.
Run Existing Java Applications on GraalVM
GraalVM includes a JDK, and by default it replaces the top-tier Java JIT compiler with the GraalVM compiler. The new and innovative GraalVM compiler can improve the performance of your existing JVM language applications. After installing GraalVM, the java runtime is available on your system and you can check the version with the following command.
java -version

java version "11.0.10" 2021-01-19 LTS
Java(TM) SE Runtime Environment GraalVM EE 21.0.0.2 (build 11.0.10+8-LTS-jvmci-21.0-b06)
Java HotSpot(TM) 64-Bit Server VM GraalVM EE 21.0.0.2 (build 11.0.10+8-LTS-jvmci-21.0-b06, mixed mode, sharing)
As an example of an existing Java application, we can run the Spring PetClinic sample application, which is built with Spring Boot.
-
Clone the repository to get started.
git clone https://github.com/spring-projects/spring-petclinic.git -
Build and run the application.
cd spring-petclinic
./mvnw spring-boot:run
The first time you run the application, Maven downloads the dependencies. It could take several minutes before the downloads are complete. You should see output similar to the following example:
2021-03-05 18:11:28.447  INFO 3704 --- [           main] o.s.s.petclinic.PetClinicApplication     : No active profile set, falling back to default profiles: default
2021-03-05 18:11:31.531  INFO 3704 --- [           main] .s.d.r.c.RepositoryConfigurationDelegate : Bootstrapping Spring Data JPA repositories in DEFAULT mode.
2021-03-05 18:11:31.697  INFO 3704 --- [           main] .s.d.r.c.RepositoryConfigurationDelegate : Finished Spring Data repository scanning in 144 ms. Found 4 JPA repository interfaces.
2021-03-05 18:11:33.436  INFO 3704 --- [           main] o.s.b.w.embedded.tomcat.TomcatWebServer  : Tomcat initialized with port(s): 8080 (http)
2021-03-05 18:11:33.720  INFO 3704 --- [           main] o.a.c.c.C.[Tomcat].[localhost].[/]       : Initializing Spring embedded WebApplicationContext
2021-03-05 18:11:33.721  INFO 3704 --- [           main] w.s.c.ServletWebServerApplicationContext : Root WebApplicationContext: initialization completed in 5133 ms
2021-03-05 18:11:34.797  INFO 3704 --- [           main] o.hibernate.jpa.internal.util.LogHelper  : HHH000204: Processing PersistenceUnitInfo [name: default]
2021-03-05 18:11:34.902  INFO 3704 --- [           main] org.hibernate.Version                    : HHH000412: Hibernate ORM core version 5.4.28.Final
2021-03-05 18:11:34.983  INFO 3704 --- [           main] o.hibernate.annotations.common.Version   : HCANN000001: Hibernate Commons Annotations {5.1.2.Final}
2021-03-05 18:11:35.266  INFO 3704 --- [           main] org.hibernate.dialect.Dialect            : HHH000400: Using dialect: org.hibernate.dialect.MySQLDialect
2021-03-05 18:11:36.838  INFO 3704 --- [           main] o.h.tuple.entity.EntityMetamodel         : HHH000157: Lazy property fetching available for: org.springframework.samples.petclinic.owner.Owner
2021-03-05 18:11:37.094  INFO 3704 --- [           main] o.h.e.t.j.p.i.JtaPlatformInitiator       : HHH000490: Using JtaPlatform implementation: [org.hibernate.engine.transaction.jta.platform.internal.NoJtaPlatform]
2021-03-05 18:11:37.112  INFO 3704 --- [           main] j.LocalContainerEntityManagerFactoryBean : Initialized JPA EntityManagerFactory for persistence unit 'default'
2021-03-05 18:11:38.696  INFO 3704 --- [           main] o.s.s.concurrent.ThreadPoolTaskExecutor  : Initializing ExecutorService 'applicationTaskExecutor'
2021-03-05 18:11:40.604  INFO 3704 --- [           main] o.s.b.a.e.web.EndpointLinksResolver      : Exposing 13 endpoint(s) beneath base path '/actuator'
2021-03-05 18:11:40.758  INFO 3704 --- [           main] o.s.b.w.embedded.tomcat.TomcatWebServer  : Tomcat started on port(s): 8080 (http) with context path ''
2021-03-05 18:11:40.783  INFO 3704 --- [           main] o.s.s.petclinic.PetClinicApplication     : Started PetClinicApplication in 13.846 seconds (JVM running for 14.906)
The application starts in about 14 seconds. As you can see, GraalVM contains a full JDK and can be a drop-in replacement for your existing JVM.
To learn more about the optimization flags available to GraalVM, see the documentation here
Build Blazing Fast Native Images
GraalVM can create self-contained executable binaries from your Java applications, which can run incredibly fast. The GraalVM ahead-of-time compilation of your Java code processes all application classes, dependencies, and runtime libraries, and removes the overhead and footprint of a JVM itself. However, some advanced language features, such as runtime proxies and reflection, require additional configuration. Many microservice Java frameworks, such as Micronaut, Helidon and Quarkus support building native images immediately.
-
To start, install the native image tooling. These packages are available in the yum repositories for OCI but are not installed by default.
cd ~
sudo yum install  graalvm21-ee-11-native-image
For this tutorial, we’re using Micronaut to build the application because Micronaut uses a dependency injection and aspect-oriented runtime that doesn’t use reflection.
-
Generate a new project on using micronaut.io/launch using the commands below to get started:
curl --location --request GET 'https://launch.micronaut.io/create/default/com.example.graal-on-arm?lang=JAVA&build=MAVEN&test=JUNIT&javaVersion=JDK_11&features=graalvm' --output graal-on-arm.zip unzip graal-on-arm.zip -d graal-on-arm cd graal-on-arm -
Run the application to see how long it takes for it to start on a JVM:
./mvnw mn:runYou should see output similar to the following example:
__  __ _                                  _
|  \/  (_) ___ _ __ ___  _ __   __ _ _   _| |_
| |\/| | |/ __| '__/ _ \| '_ \ / _` | | | | __|
| |  | | | (__| | | (_) | | | | (_| | |_| | |_
|_|  |_|_|\___|_|  \___/|_| |_|\__,_|\__,_|\__|
  Micronaut (v2.5.3)

09:59:34.504 [main] INFO  io.micronaut.runtime.Micronaut - Startup completed in 755ms. Server Running: http://localhost:8080
The application starts in 755 milliseconds, which is impressive.
-
Now, build a native image for the application and compare the startup time:
./mvnw package -Dpackaging=native-imageIt takes about 5 minutes to build the native image. After it’s built, the native image is placed in the
targetdirectory, and will be named with the name of the project. -
Run the native image.
./target/graal-on-armYou should see output similar to the following example:
__  __ _                                  _
| |  \/  (_) ___ _ __ ___  _ __   __ _ _   _| |_
| |\/| | |/ __| '__/ _ \| '_ \ / _` | | | | __|
| |  | | | (__| | | (_) | | | | (_| | |_| | |_
|_|  |_|_|\___|_|  \___/|_| |_|\__,_|\__,_|\__|
  Micronaut (v2.5.3)

09:59:18.558 [main] INFO  io.micronaut.runtime.Micronaut - Startup completed in 18ms. Server Running: http://localhost:8080
The naive image is more than 40 times faster, starting in just 18 milliseconds.
The key takeaway here is that regardless of how simple or complex your application is, GraalVM native images can give you an immediate performance boost. Combined with the latest Arm-based compute shapes and GraalVM Enterprise, Oracle Cloud Infrastructure provides an unmatched platform for building and evolving your enterprise workloads.
Acknowledgements
Author - Jeevan Joseph
More Learning Resources
Explore other labs on docs.oracle.com/learn or access more free learning content on the Oracle Learning YouTube channel. Additionally, visit education.oracle.com/learning-explorer to become an Oracle Learning Explorer.
For product documentation, visit Oracle Help Center.
Get started with GraalVM on Ampere A1 in Oracle Cloud Infrastructure
F42194-03
December 2021
Copyright © 2021, Oracle and/or its affiliates.