Note:
- This tutorial requires access to Oracle Cloud. To sign up for a free account, see Get started with Oracle Cloud Infrastructure Free Tier.
- It uses example values for Oracle Cloud Infrastructure credentials, tenancy, and compartments. When completing your lab, substitute these values with ones specific to your cloud environment.
Deploy Nextcloud on Ampere A1 on Oracle Cloud Infrastructure
In this tutorial, you will install Nextcloud, the popular open source collaboration platform on Oracle Cloud Infrastructure (OCI). You will use a single Ampere A1 compute instance for the Nextcloud server. You shall also run Nextcloud as a set of containers, using Podman. Podman is a container engine for managing and running containers using the Open Container Initiative standards. It offers full API compatibility with Docker and acts as a drop in replacement for the docker command. It however offers some benefits compared to Docker, which include a daemonless architecture, support for rootless containers and cgroupsv2 support.
Nextcloud offers docker container images which support the Arm architecture. Nextcloud also requires a database, for which we can use MySQL or MariaDB. For more scalable deployments, you can consider using the MySQL database service on OCI which makes it easy to scale, back up and manage your MySQL database.
Data created inside a container is not persisted, and Nextcloud requires persistent storage to store the files we upload, and for internal state. To persist data, we can use volumes using the OCI Block Storage service. A volume is a storage device created and managed by Podman. Volumes are created directly using the podman volume command or during container creation.
To enable the Nextcloud web based UI and the services, we need to make the necessary changes to the OCI Network security list to allow traffic.
With these components, we have a basic topology for our deployment.
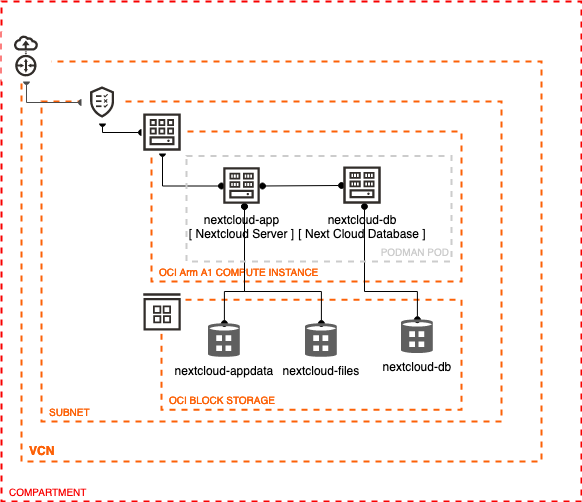
Description of the illustration arch.png
Introduction
Objectives
In this tutorial, you will:
- Create an Ampere A1 compute instance
- Prepare the compute instance for deploying containerized applications
- Deploy Nextcloud as a set of containers.
- Connect the application and setup file sync.
- Clean up the deployments
Prerequisites
- An Oracle Free Tier (Trial), Paid or LiveLabs Cloud Account
- Familiarity with OCI console
- Overview of Networking
- Familiarity with Compartments
- Basic conceptual knowledge of containers and Podman
Set up your Environment
You will begin by initiating the Oracle cloud environment that will be used to create and deploy your Java EE application. This environment will be contained within a cloud Compartment, and communication within the Compartment will be via a Virtual Cloud Network (VCN). The Compartment and VCN will isolate and secure the overall environment. You will deploy the Ampere A1 compute instance to host the Nextcloud server. Once the compute instance is created, you will setup access policies to expose the application and install Nextcloud on your instance.
Basic OCI Infrastructure Setup
-
Open the navigation menu. Under Governance and Administration, go to Identity and click Compartments. From this screen, you will see a list of compartments, click Create Compartment.
-
Enter the following:
- Name: Enter “AppDev”.
- Description: Enter a description (required), for example: “AppDev compartment for the getting started tutorial”. Avoid entering confidential information.
- Parent Compartment: Select the compartment you want this compartment to reside in. Defaults to the root compartment (or tenancy).
- Click Create Compartment.
- Your compartment is displayed in the list.
Create an Ampere A1 Compute Instance
-
To create an Ampere A1 compute instance, use navigation menu at the top-left corner of the Console and go to Compute > Instances.
-
Open the instance creation flow.
- Verify you are in the AppDev Compartment
- Click Create Instance.
-
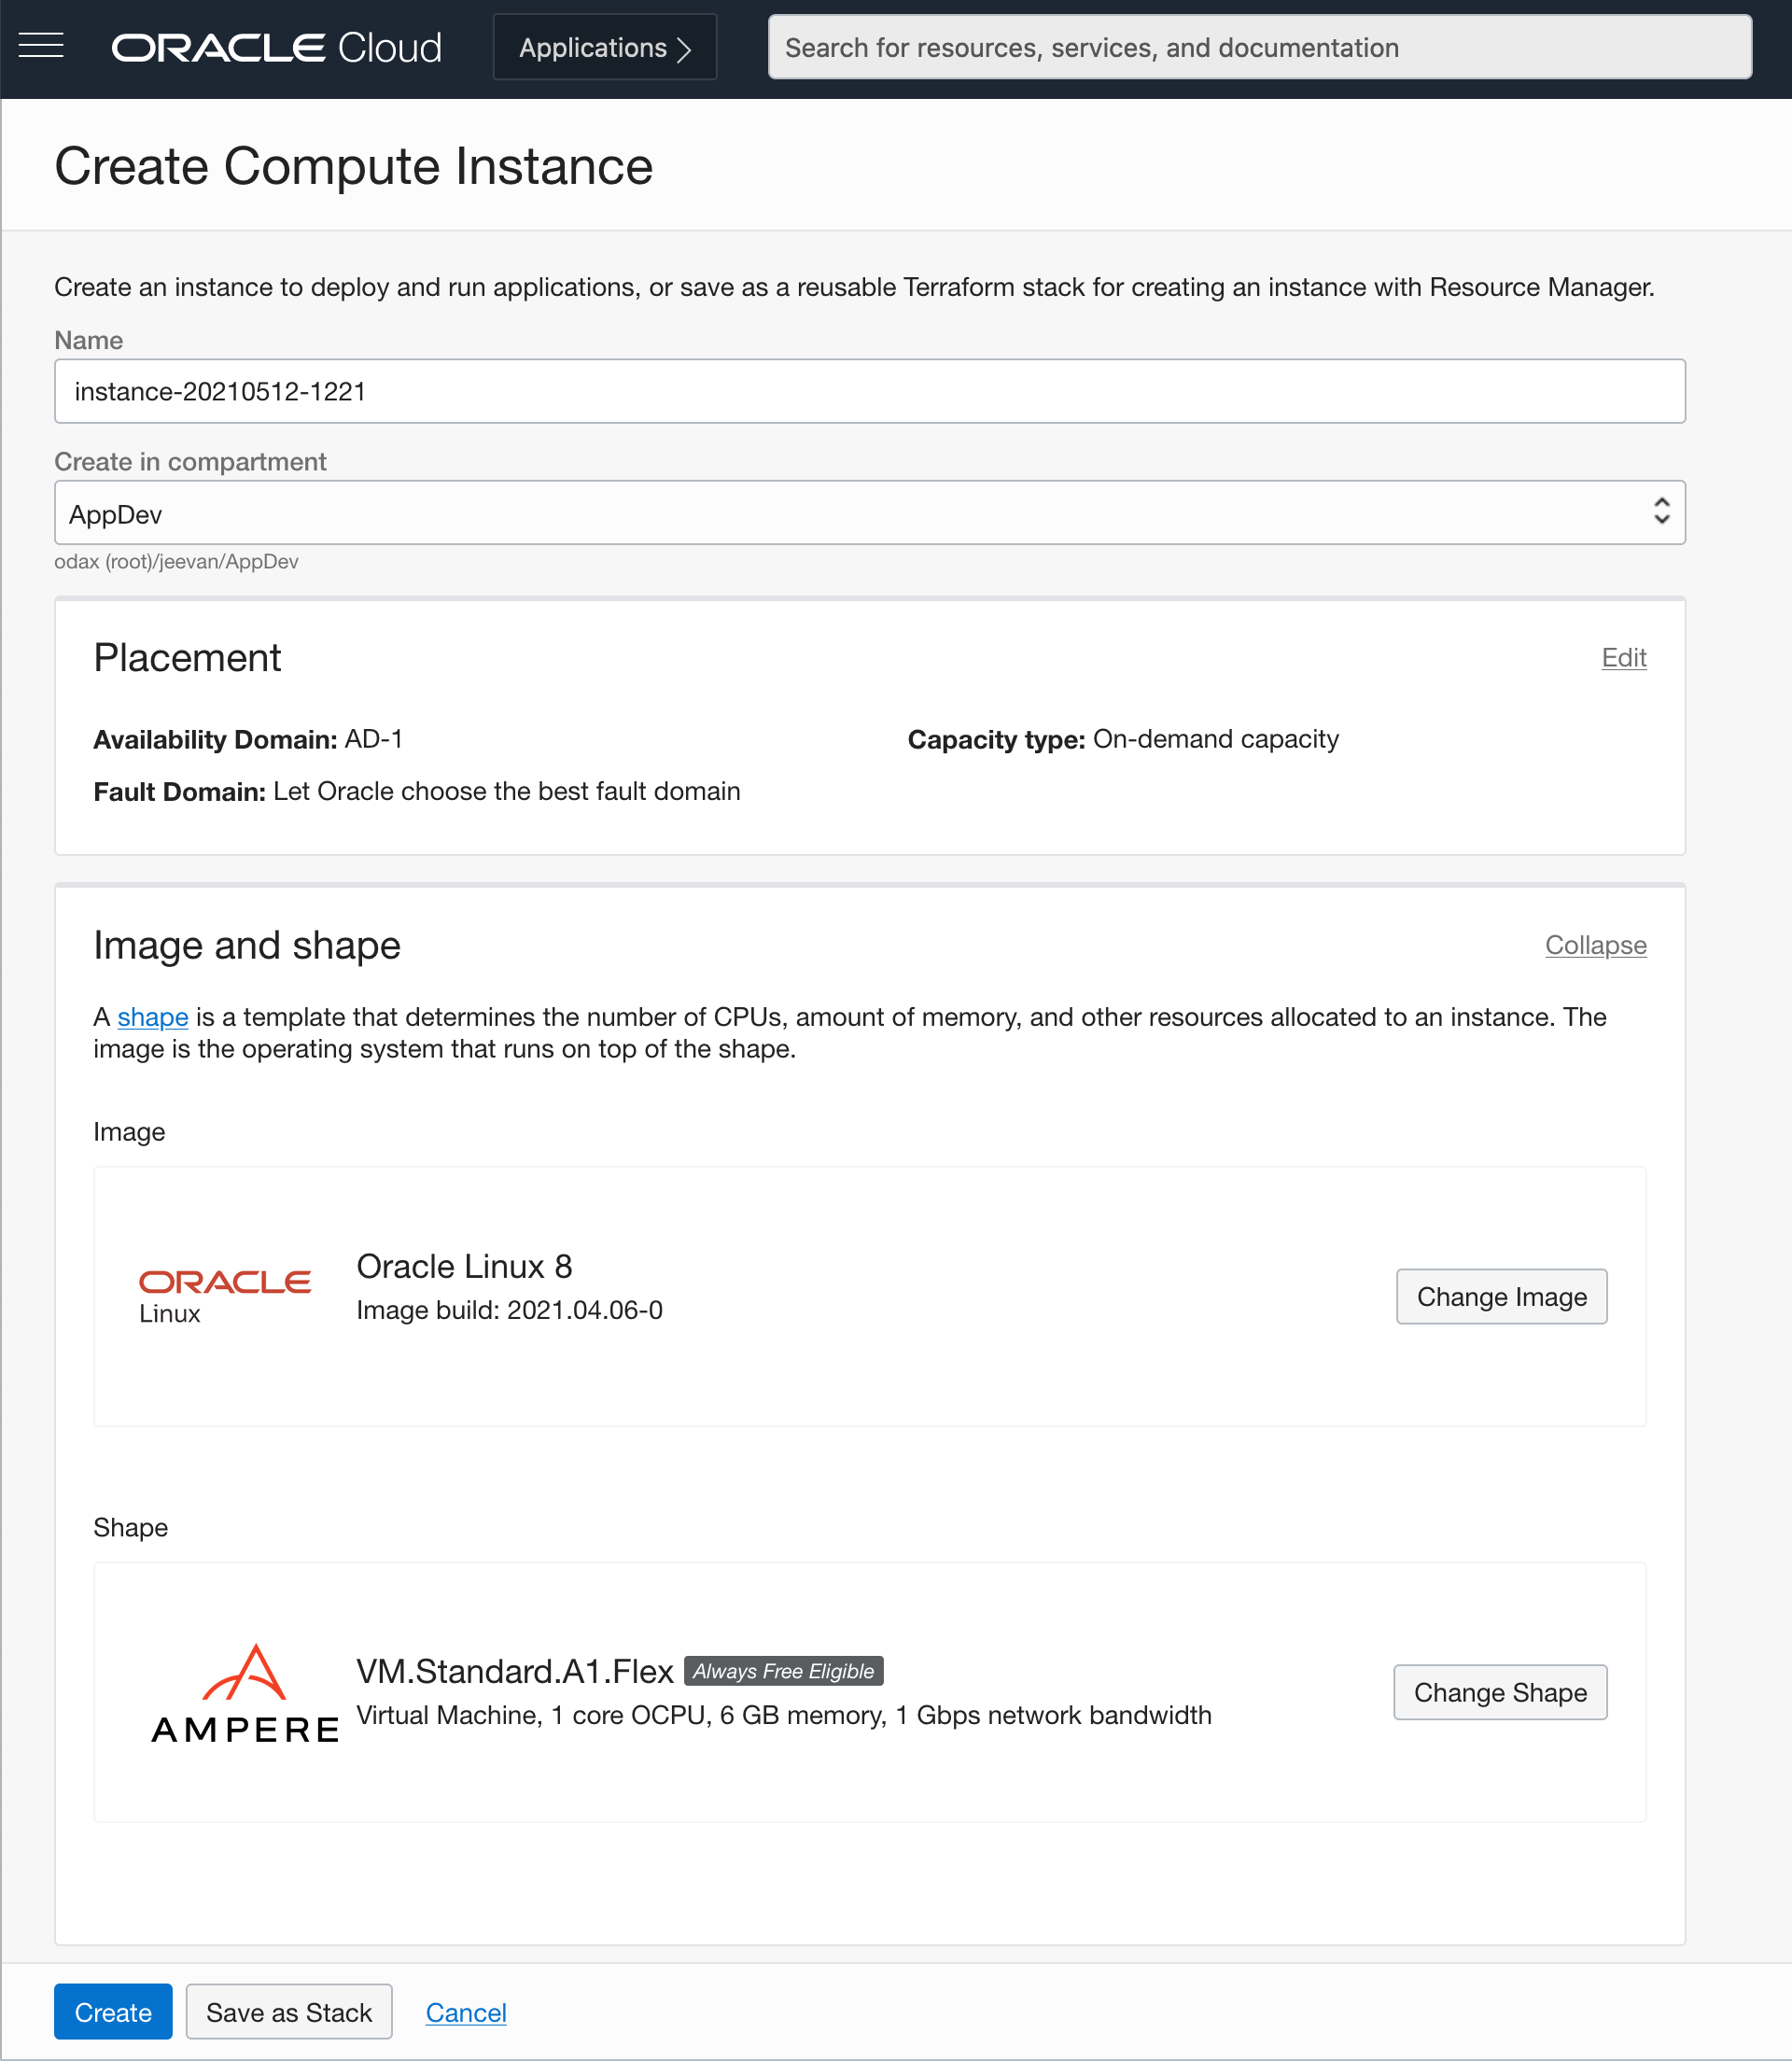
In the create instance page you will create the new instance along with the new network resources such as Virtual Cloud Network (VCN), Internet Gateway (IG)and more.
- Name the instance Nextcloud
- Update the Image selection to use Oracle Linux 8 or newer
- Click the Change Shape button to see the available compute shapes.
-
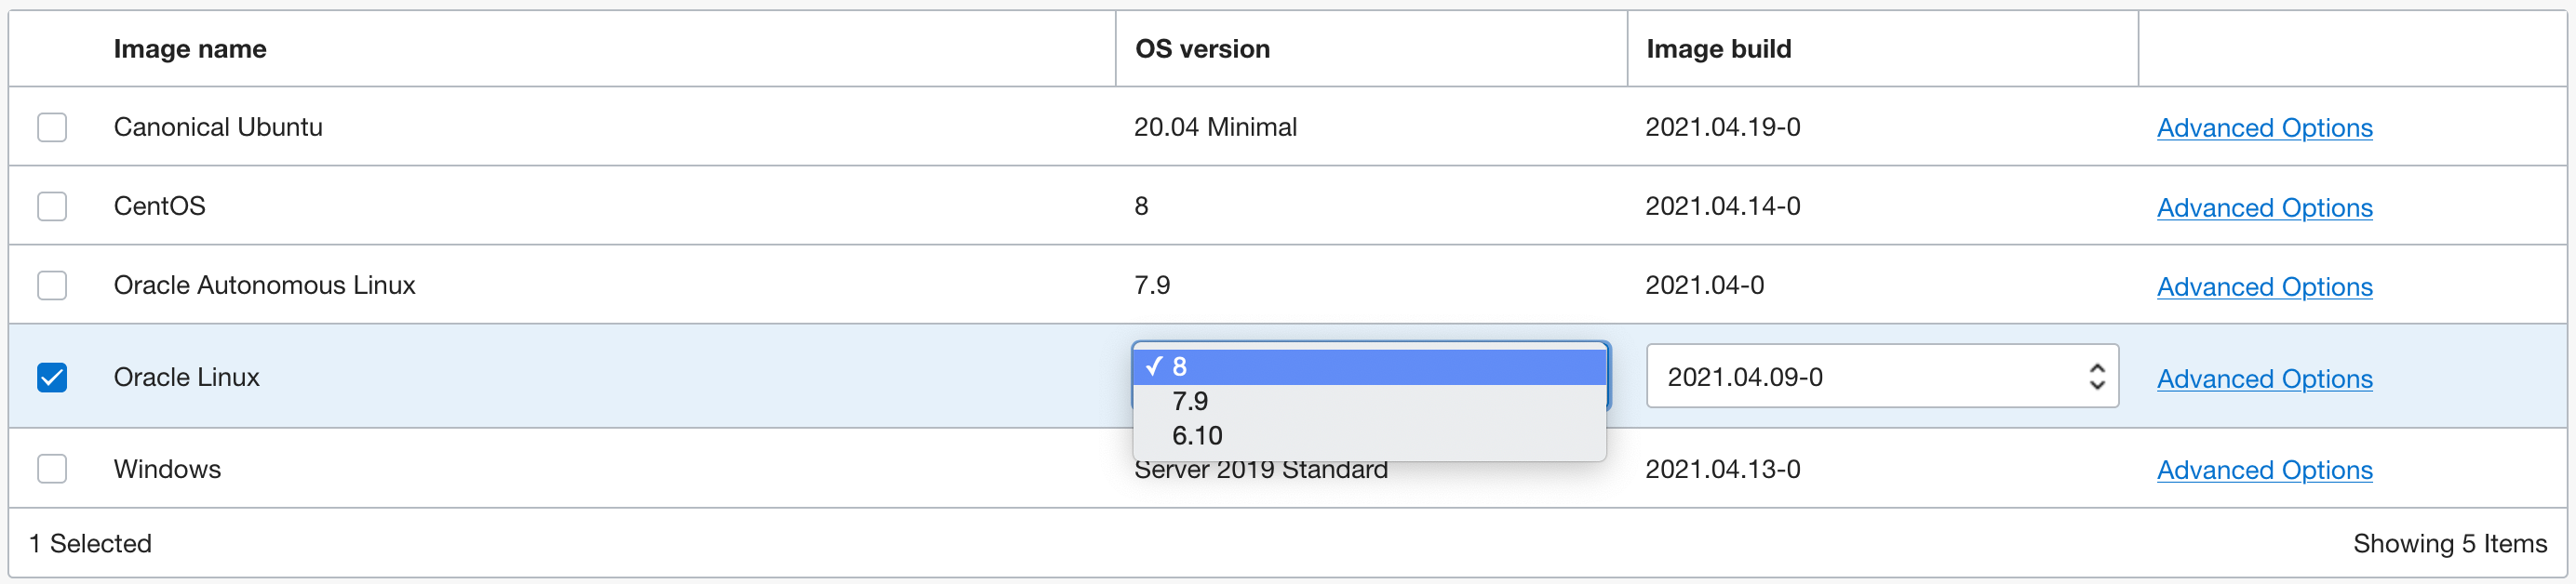
Configure the image for your instance.
- Click the Change Image button to see available OS images.
- Choose Oracle Linux 8 or newer.
-
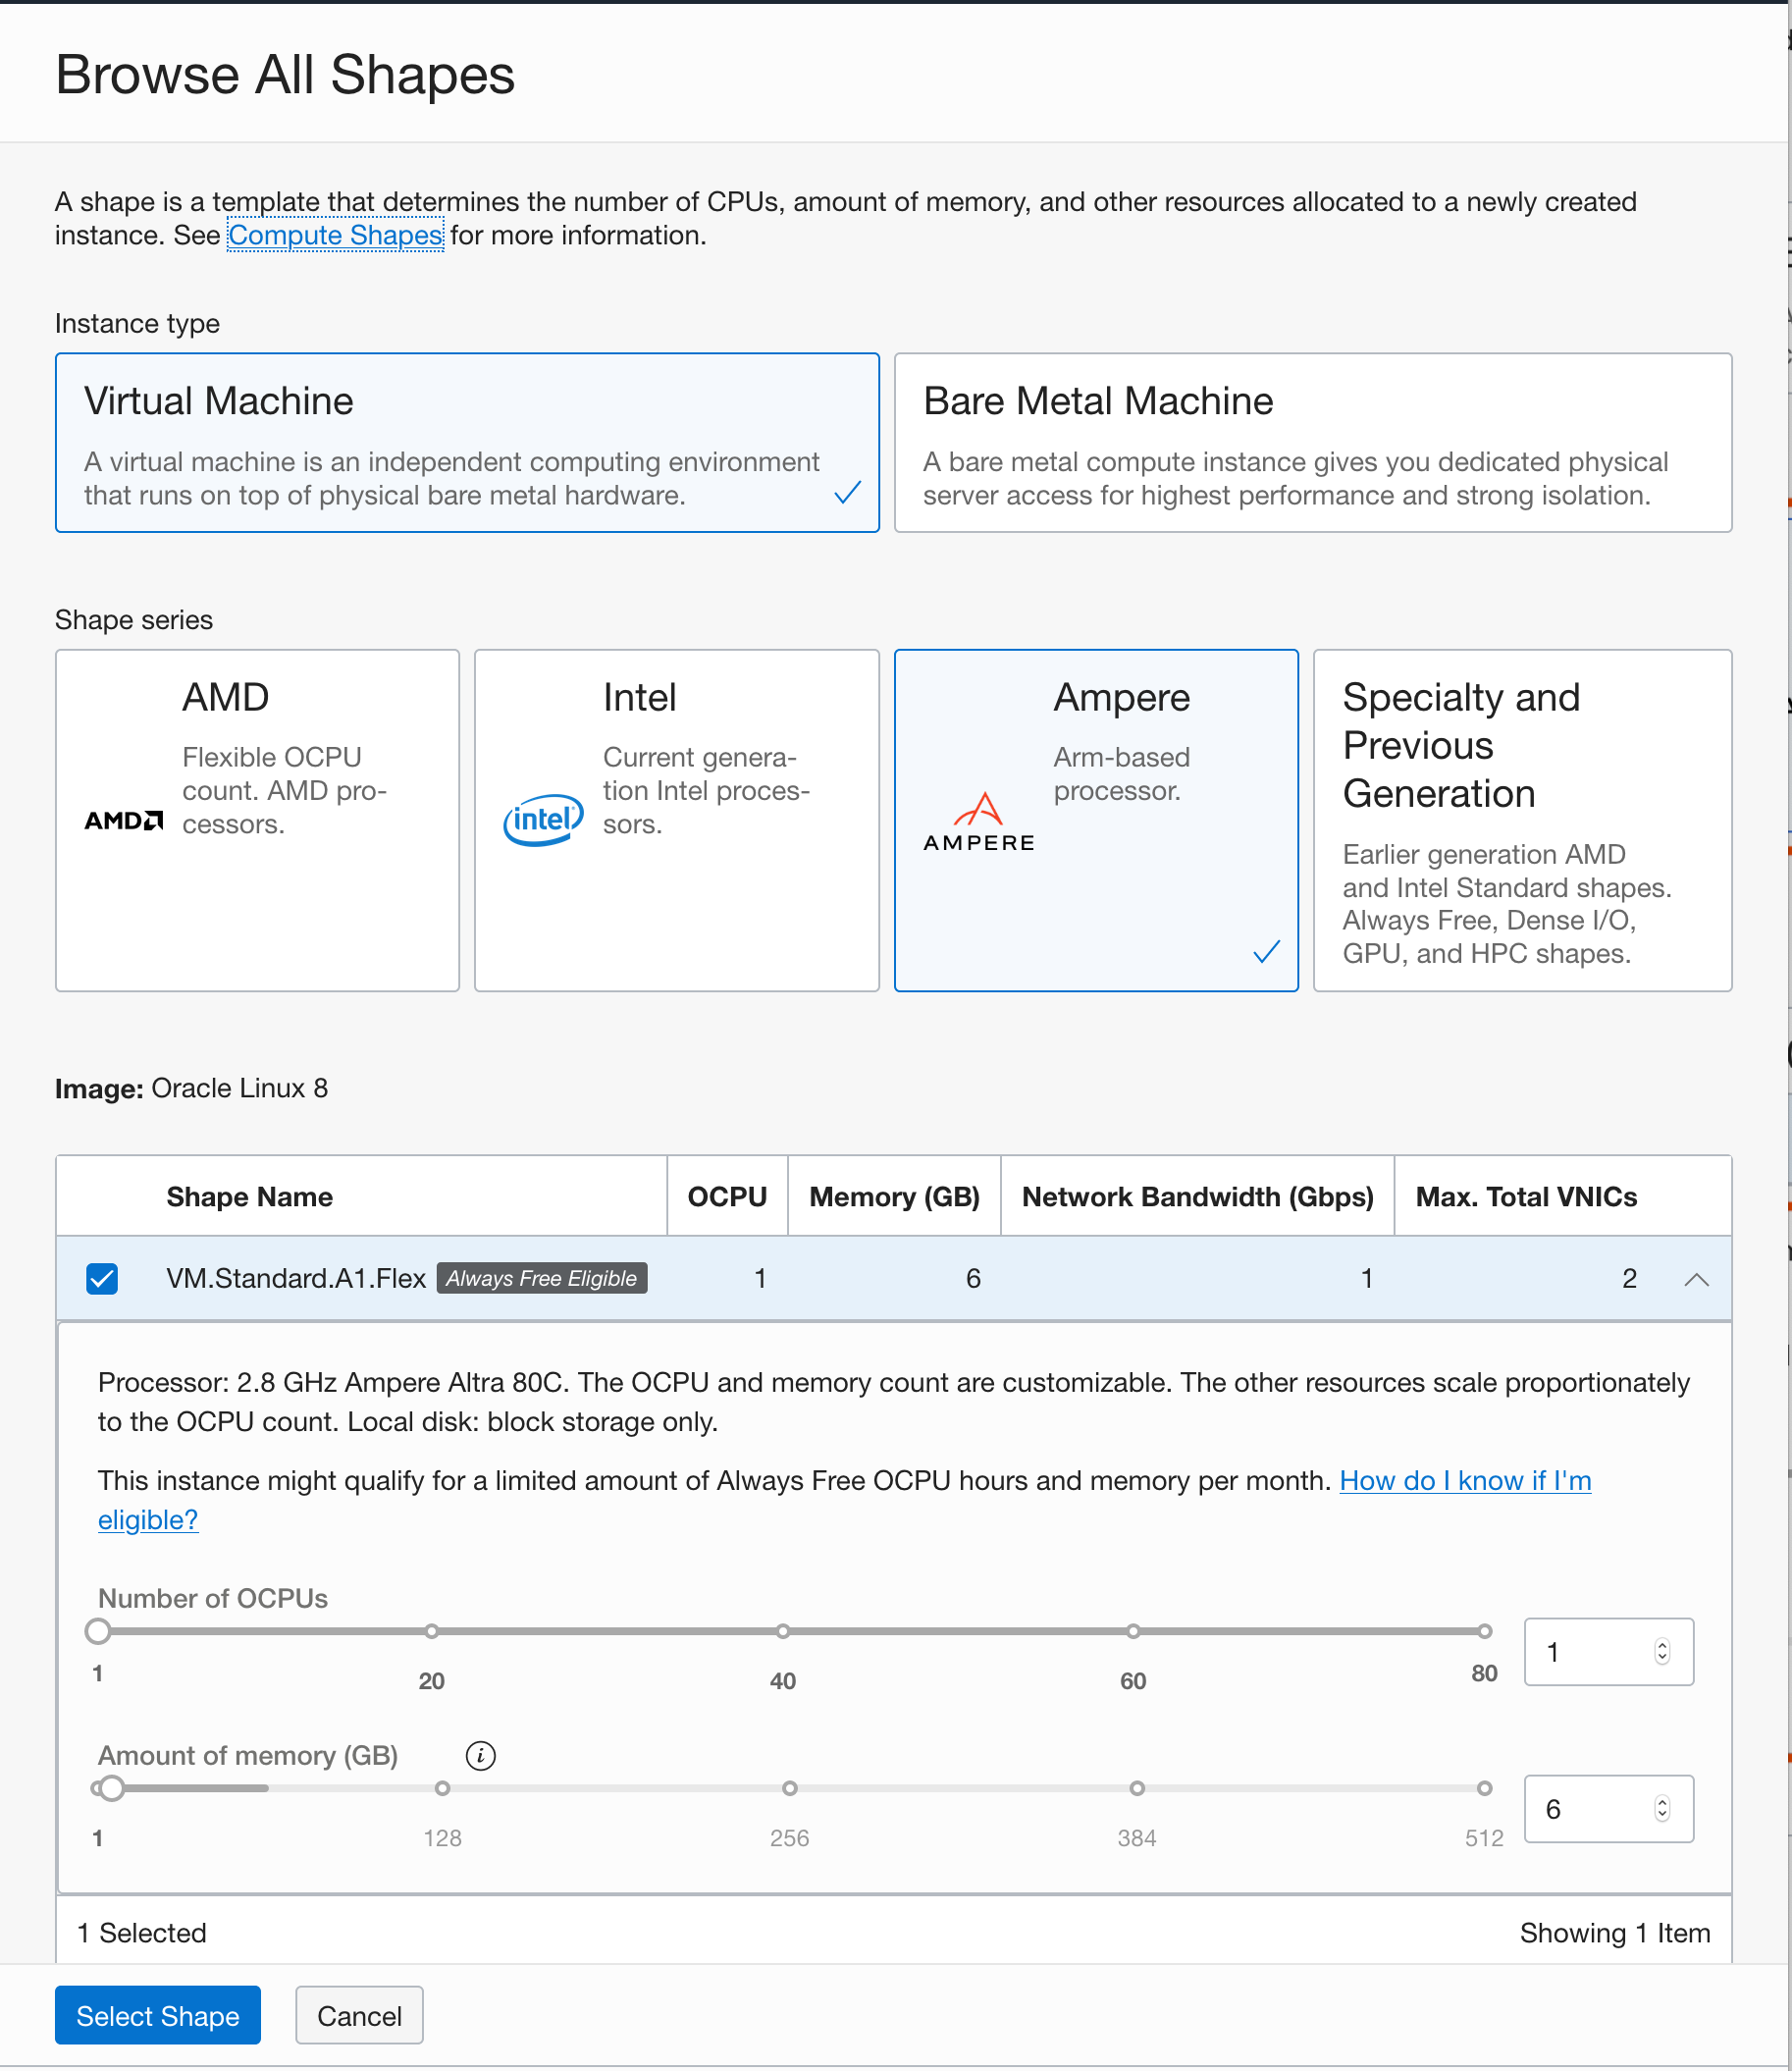
Configure the resources for your instance.
- Choose the Ampere Arm based processor in the choice for shape series.
- Choose the
VM.Standard.A1.Flexshape from the list of shapes with Ampere Arm based processors. Ampere A1 shapes are flexible and you can modify the number of cores and the amount of memory. Choose 1 core and 6 GB of memory for the VM.
-
Choose your networking options. Create a new VCN and subnet for your next cloud deployment. Make sure you choose to assign a public IP address for your instance.
-
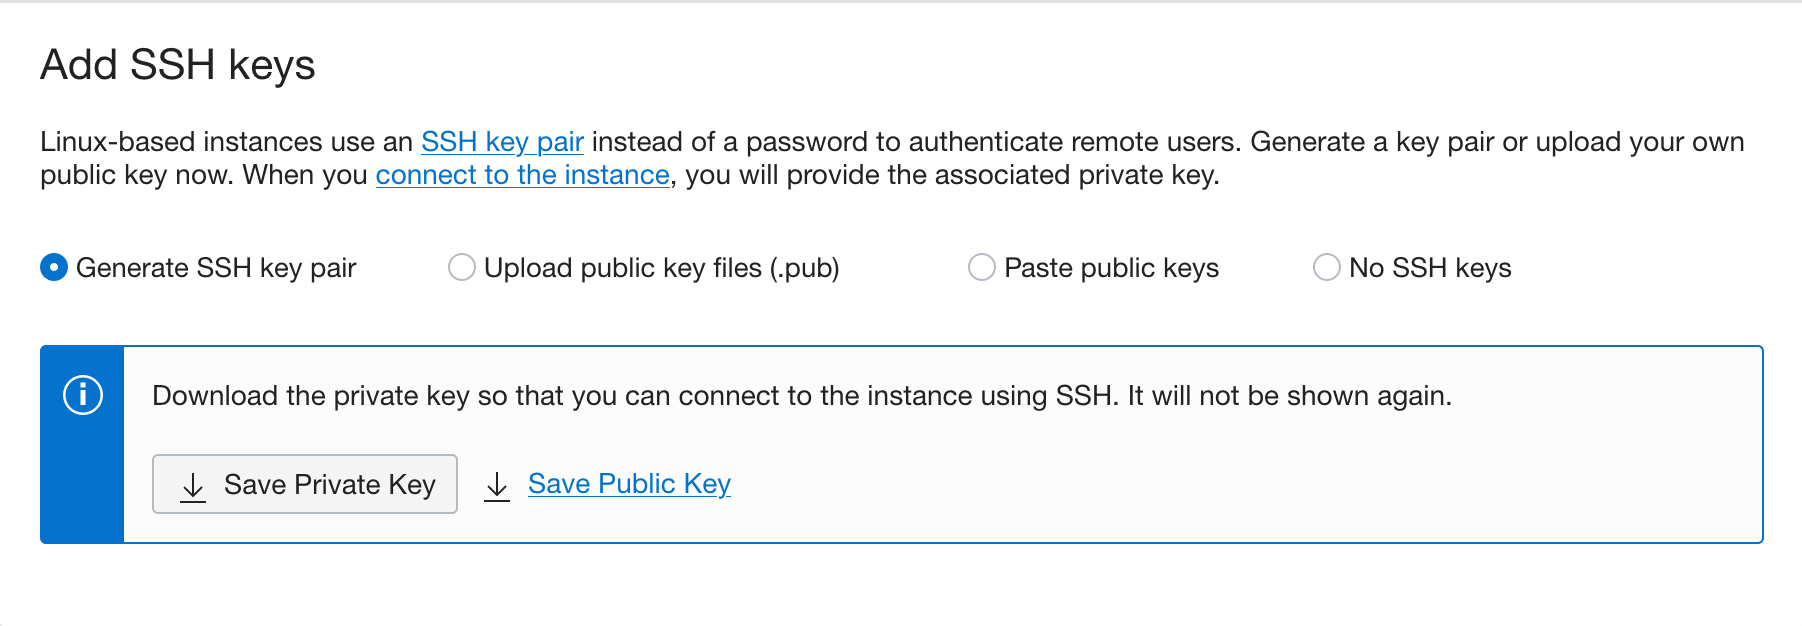
Generate and download the SSH keypair. This step is optional, but highly recommended for later maintenance and upgrades. You can also bring your public key if you already have a keypair that you would like to use. If you want to know how to generate SSH keys, then follow instructions in the Generate SSH Keys tutorial.
-
Click Create to create the networking resources and launch the compute instance.
Expose Application Ports to Users
For applications to be accessible from the internet, you need to open the ports that our application will use. In this section, you will configure security lists on your cloud network and firewall rules on your compute instance to enable your applications to send and receive traffic.
Configure your Virtual Cloud Network (VCN)
A security list acts as a virtual firewall for an instance, with ingress and egress rules that specify the types of traffic allowed in and out. Security lists as configured at the subnet level, which applies the security rules to all network elements in that subnet. Your network comes with a default security list, which contain an initial set of rules. The default security list enables you to connect to your instance using SSH and for your instance to make outbound network calls to any destination.
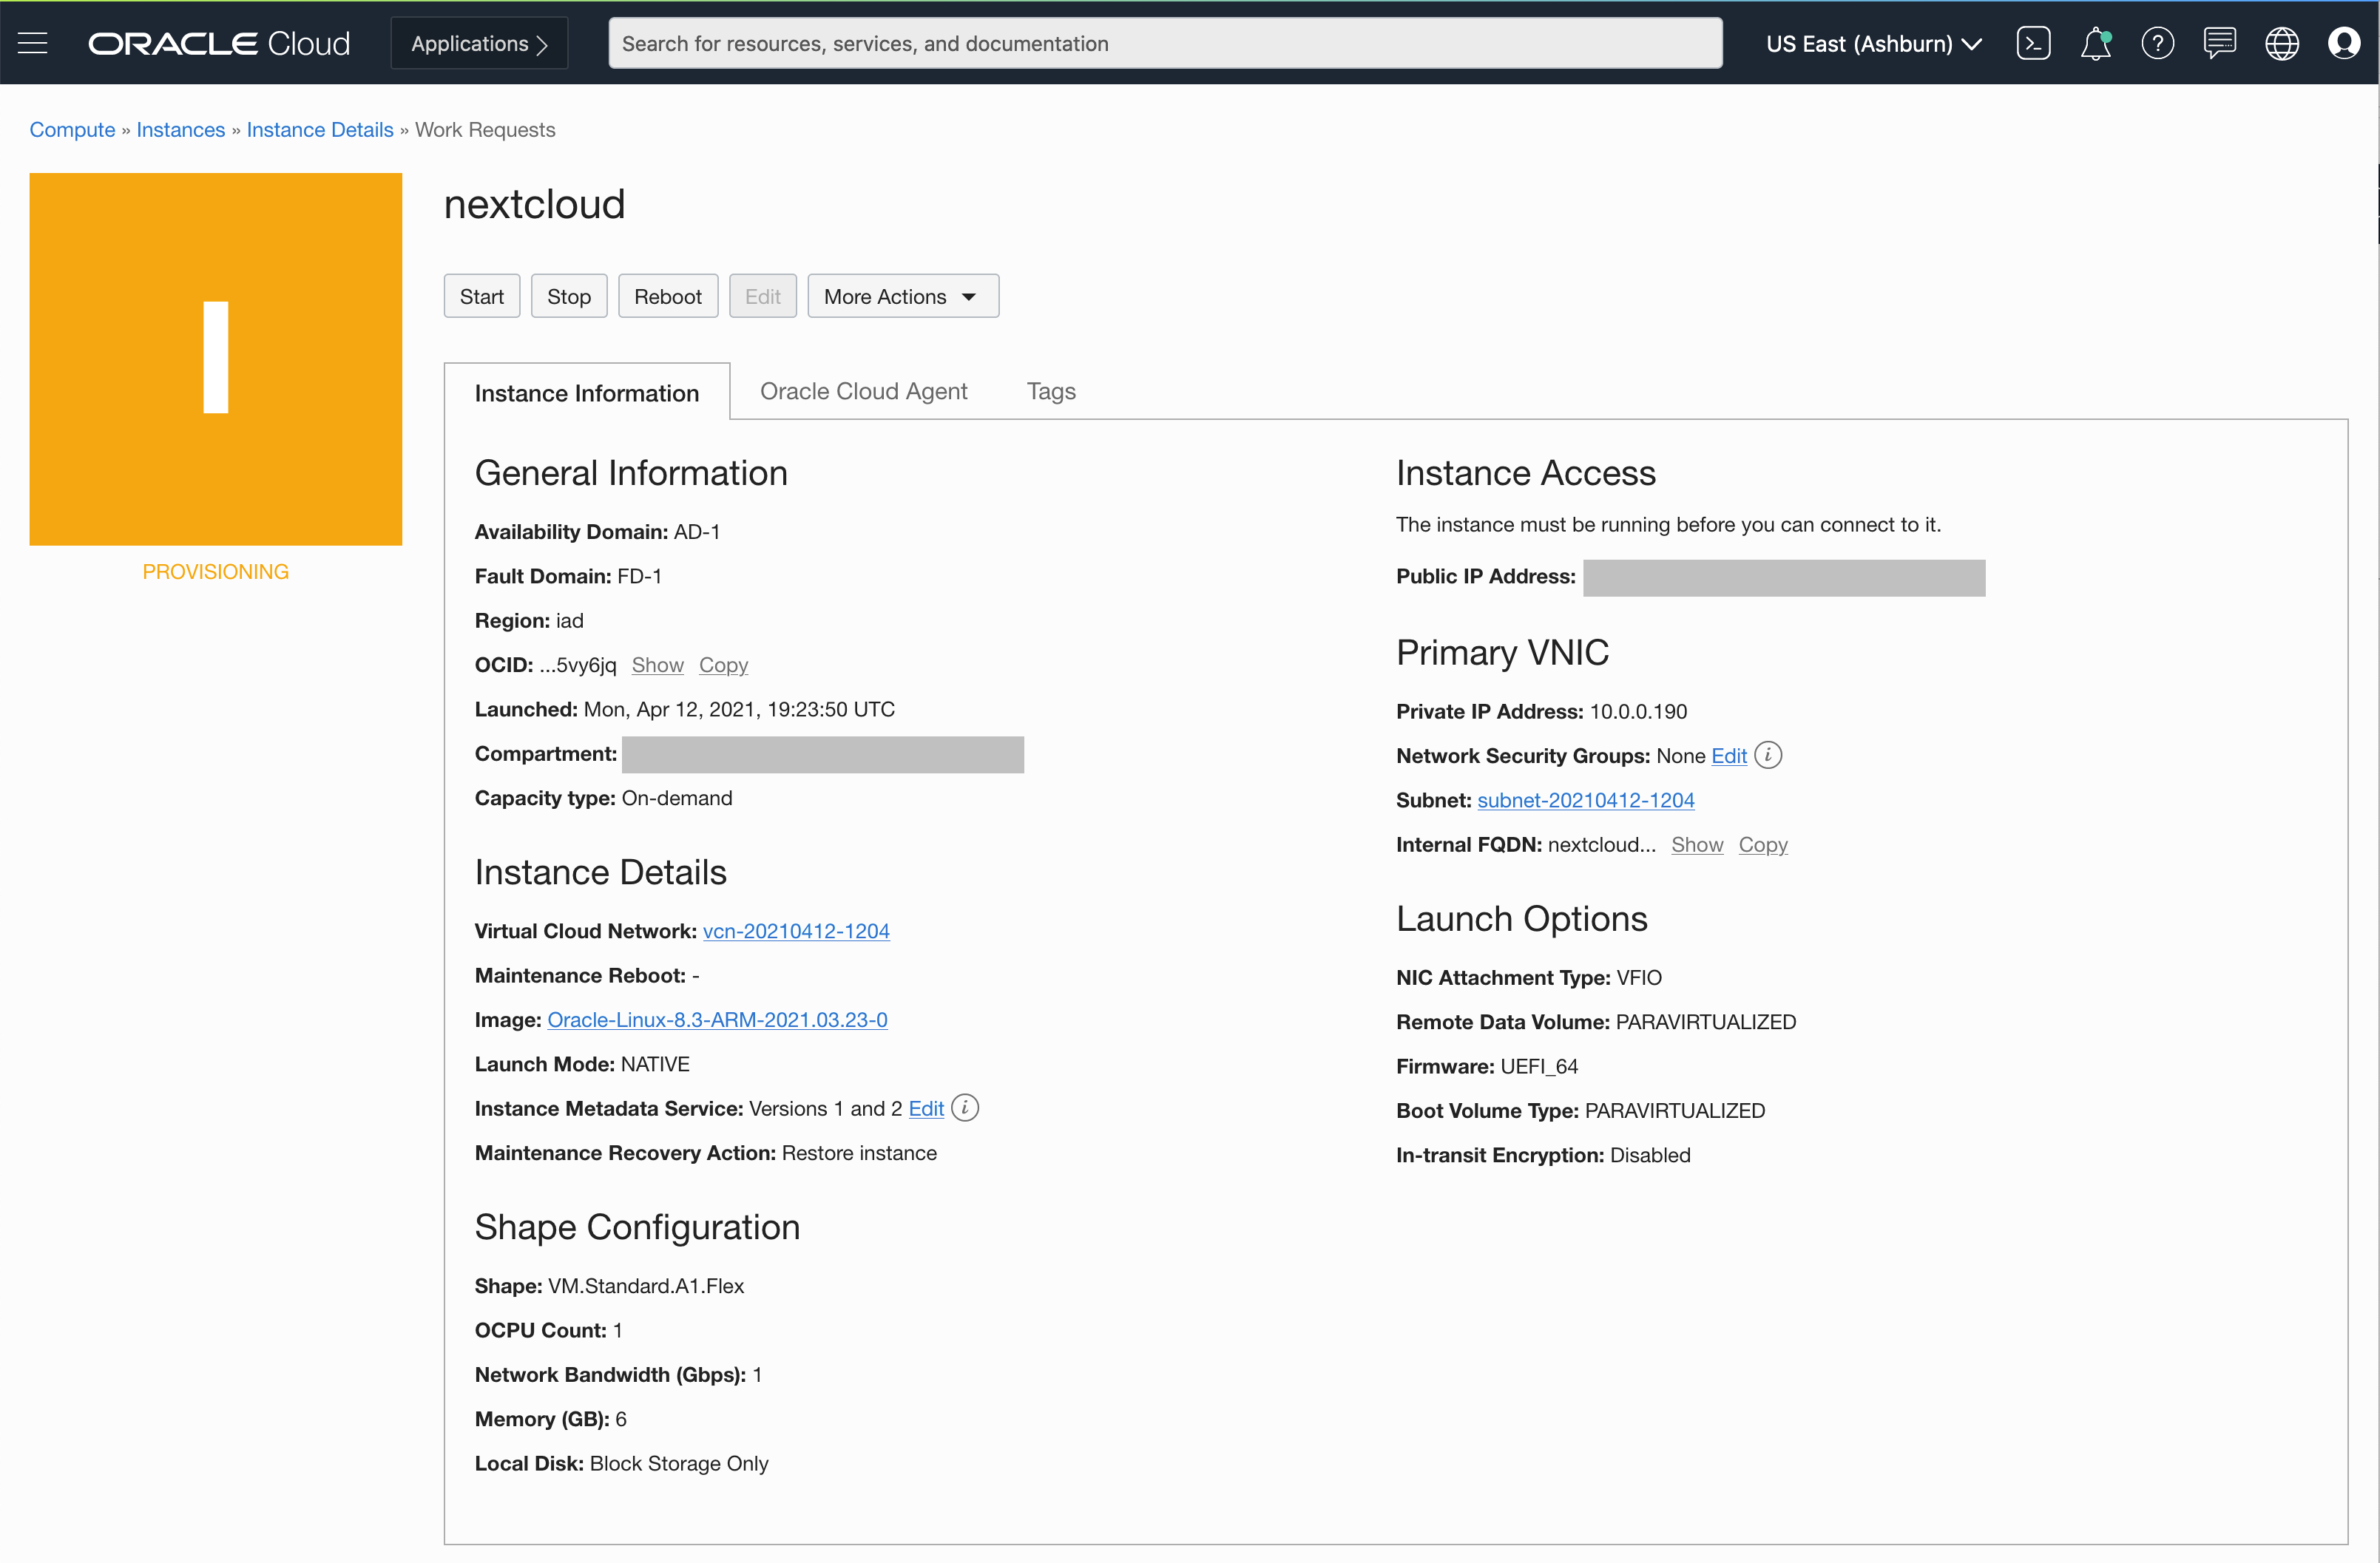
- Navigate the the instance details page for the instance that you have created. Compute > Instances > Click on the instance you have created
-
Navigate to the subnet your instance is attached to, by clicking on the subnet
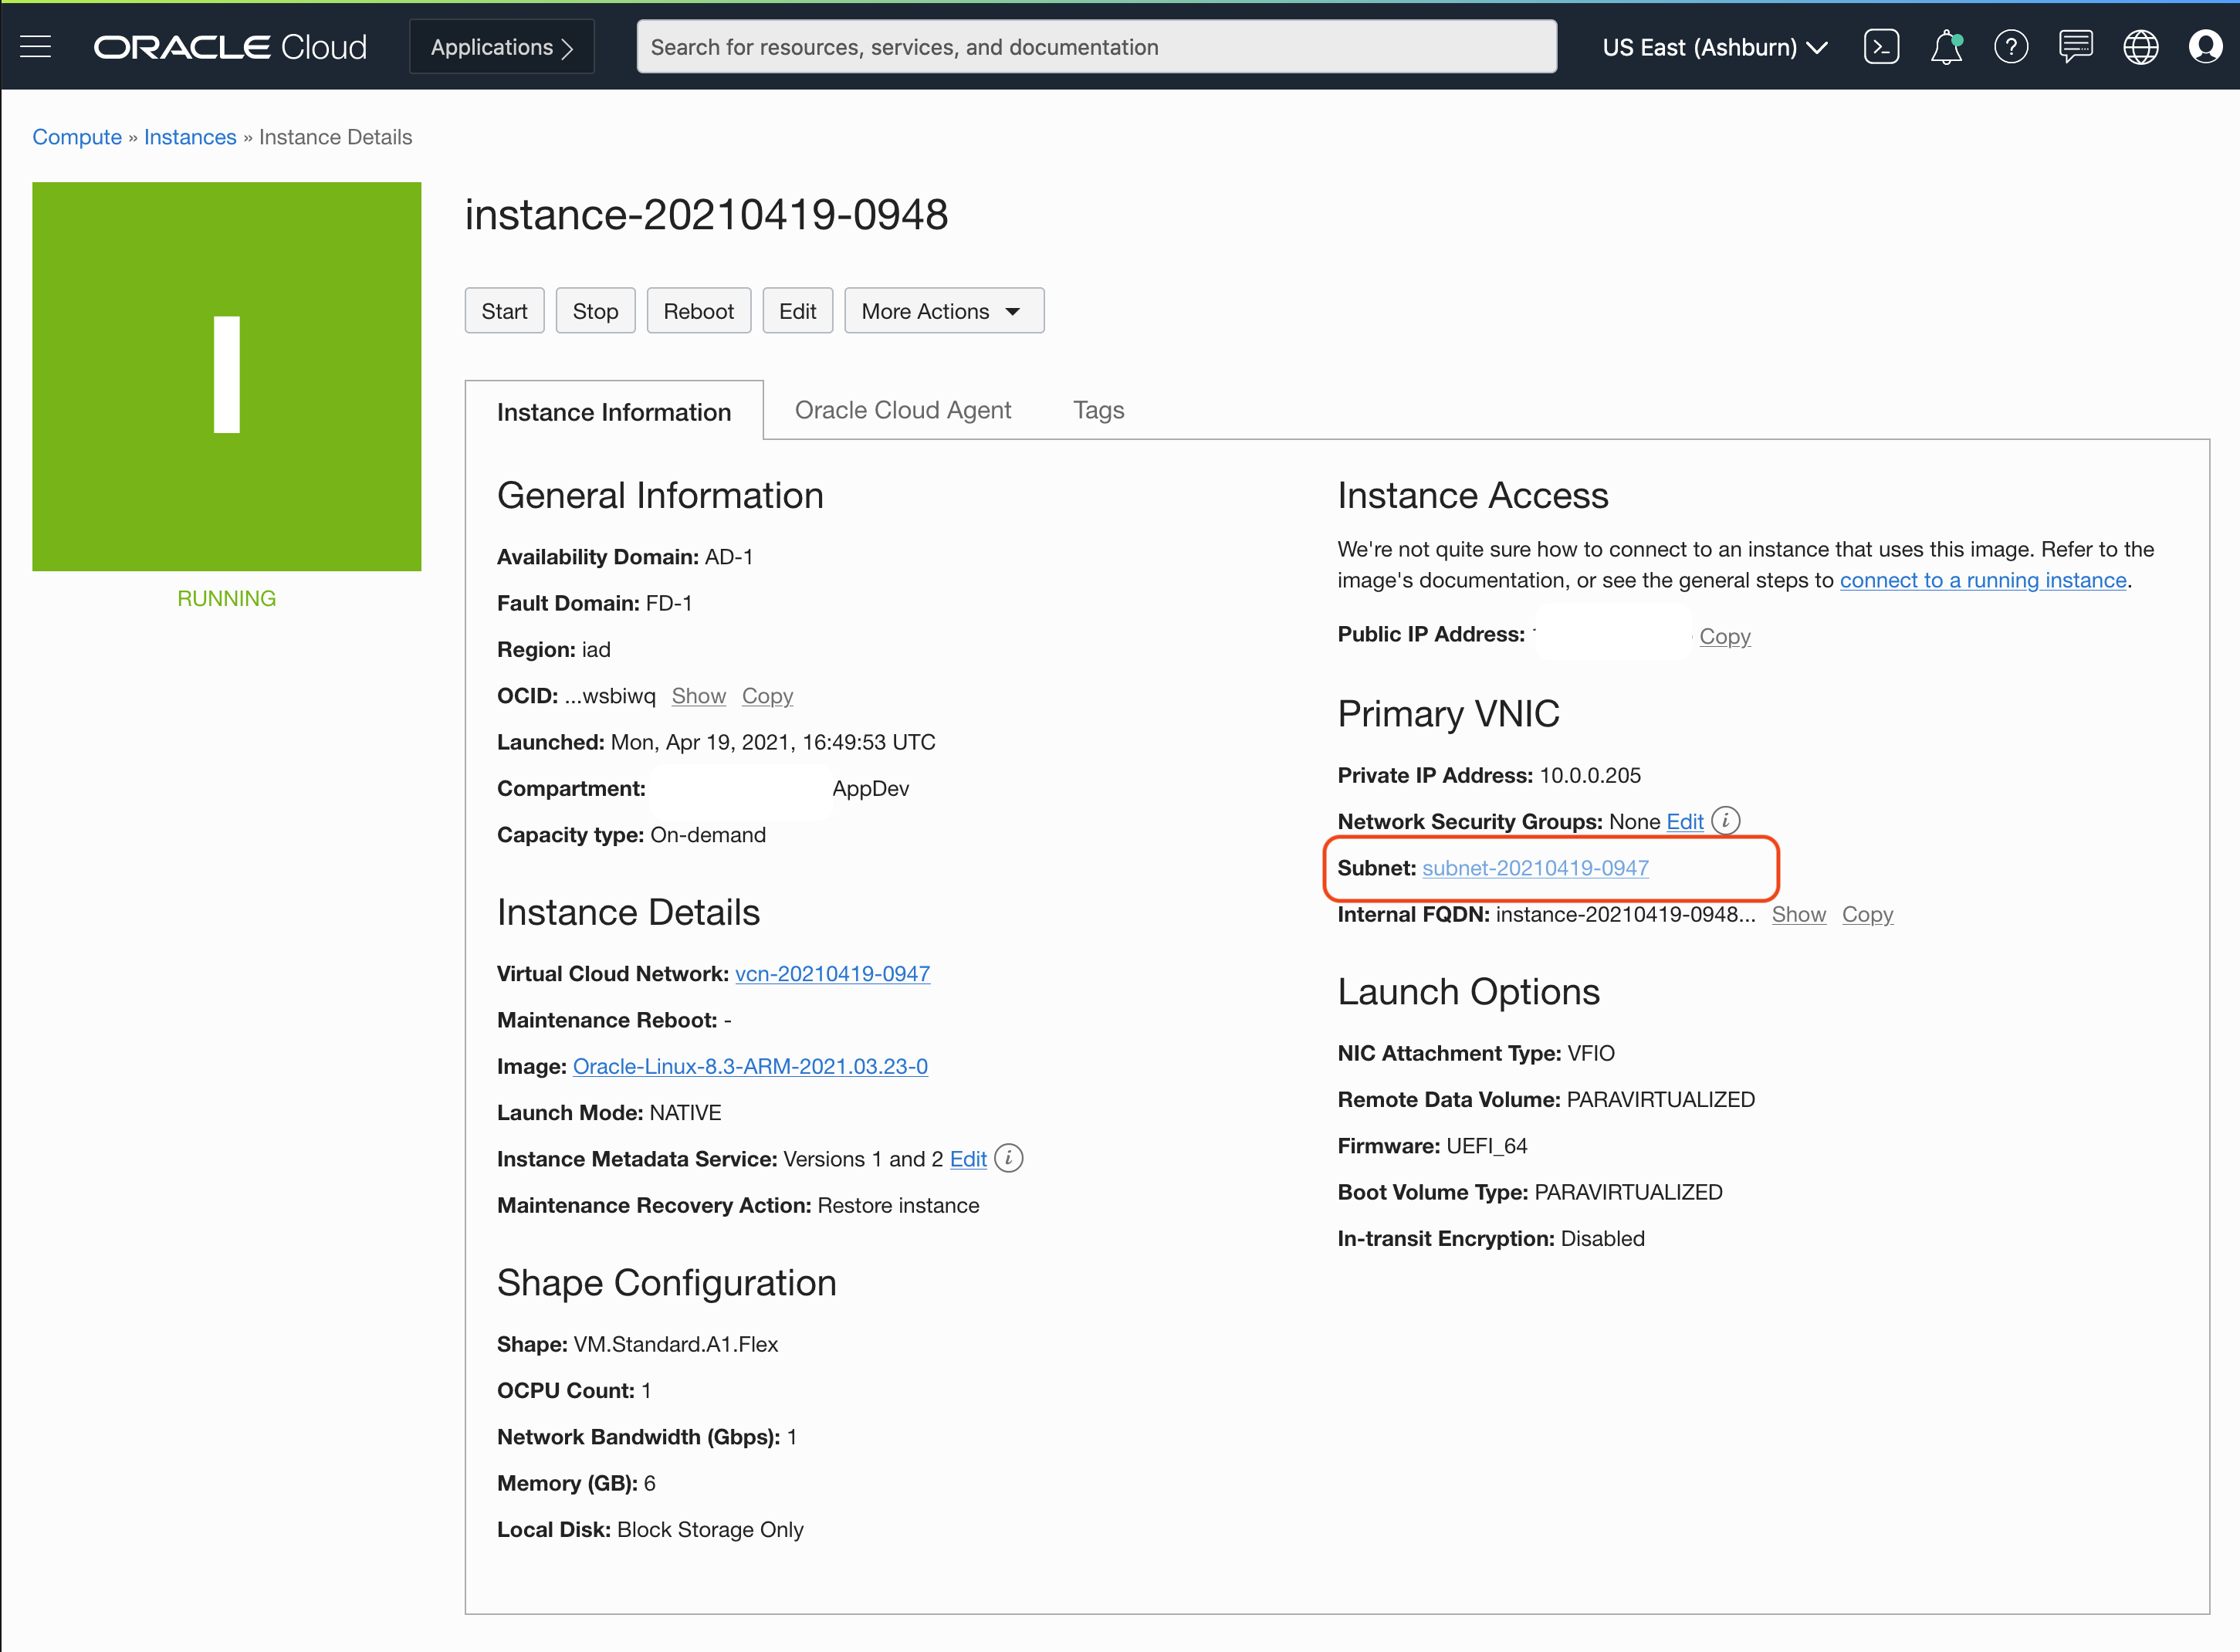
- On the subnet, select the default security list
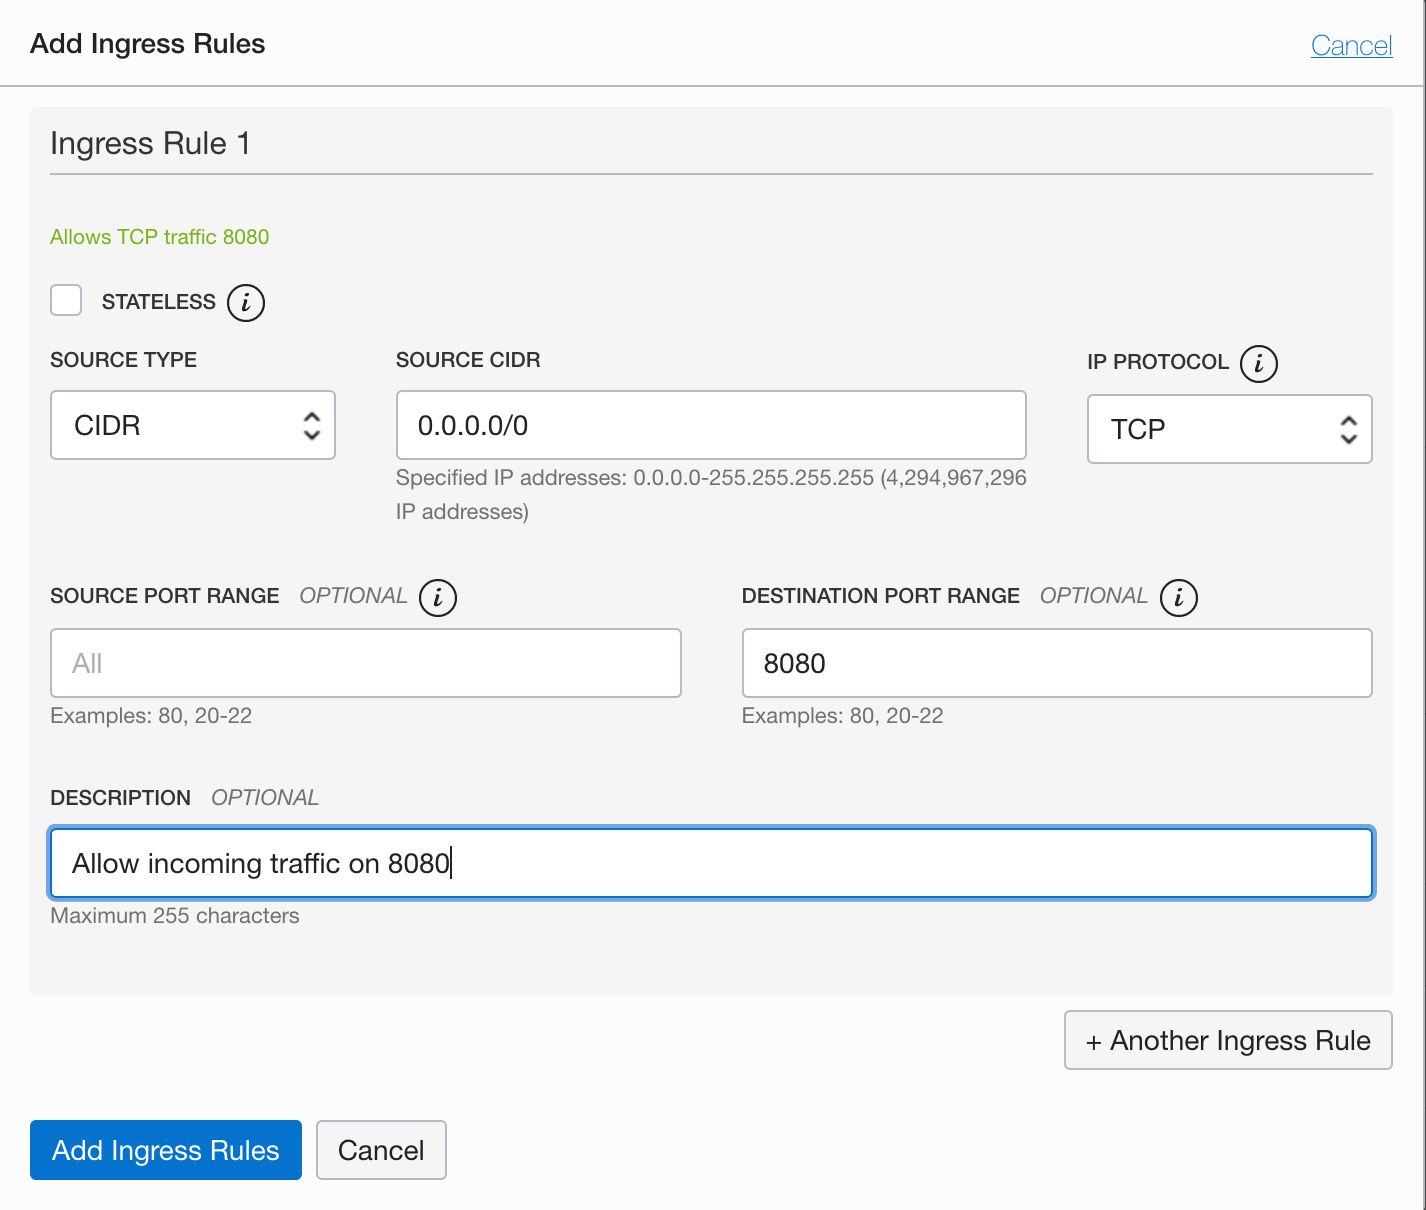
- Click on “Add Ingress Rule” to add a new rule to allow incoming traffic that match the rules.
- Add an ingress rule to allow incoming traffic on port 8080
- Set the Source CIDR to
0.0.0.0/0. This allows incoming traffic from all sources. - Set the Destination Port Range to
8080. This sets the destination to only port8080. The rule now allows traffic from all sources to use port8080. This is what we need, so that our application can be reached from anywhere. -
Provide a description.
- Set the Source CIDR to
Configure your Instance
Firewall rules control packet-level traffic in/out of an instance. You configure firewall rules directly on the instance itself, and provide an additional level of security.
- Navigate the the instance details page for the instance that you have created. Compute > Instances > Click on the instance you have created
- Copy the public IP address of your instance.
- Login to the instance using SSH. Use the key you either generated or provided during the instance creation step. The default username for instances using the Oracle Linux operating system is
opc. -
Execute the firewall configuration commands. This modifies the firewall in the instance itself to expose port
8080and accept incoming traffic.sudo firewall-cmd --zone=public --permanent --add-port=8080/tcp sudo firewall-cmd --reload
Deploy Nextcloud on Ampere A1
Now you can run Nextcloud on the Ampere A1 compute platform as a container deployment. You will also use the new container tools such as Podman, included in Oracle Linux 8. Podman provides a lightweight utility to run and manage Open Container Initiative (OCI) compatible containers. A Podman deployment can re-use existing container images. Podman does not require a running daemon and enables containers to start and run without root permissions. To learn more about Podman on Oracle Linux, visit the official documentation
Install the Container Tools
Once the instance has been created with Oracle Linux 8.x, we can install the container-tools package to prepare our instance with the required tools to deploy containerized workloads.
-
Login to the instance using SSH. Use the key you either generated or provided during the instance creation step. The default username for instances running on the Oracle Linux operating system is
opc. -
Install the
container-toolsmodule that pulls in all the tools required to work with containers.sudo dnf module install container-tools:ol8sudo dnf install git
Create a Pod Definition
Podman can manage groups of containers called Pods. Formally, pods are a group of one or more containers sharing the same network, pid and ipc namespaces. This concept was initially introduced by the Kubernetes project, and Podman pods are very similar to Kubernetes Pods.
In many ways a pod behaves like a virtual host on which the services within each container are run. This means that each container can access the services on each other container as if they were running on the same host. Running containers in this way can remove a lot of complexity around networking and can make it easier to limit public exposure of ports that are only intended for use by services within the application itself.
Pods are a great way to manage related containers, like when an application is made up of multiple containers. In this tutorial, you shall deploy Nextcloud as a Pod. The containers required for NextCloud are contained inside our Pod, and started and stopped together. The first step in managing our application as a Pod is to create an empty pod definition.
Create a Pod with the command below
podman pod create --hostname nextcloud --name nextcloud --publish 8080:80 --infra-image k8s.gcr.io/pause:3.1
podman pod create- creates a pod.--hostname nextcloud- sets the hostname for the pod asnextcloud--name nextcloud- sets the name of the pod asnextcloud--publish 8080:80- publish port80on the pod to port8080on the host.
Define Storage Volumes
Now that the pod is defined, we should define some storage options as well before we populate the Pod with our containers. Containers use writable containers layers by default for all files created inside a container. This means that the files and data created by the processes in a container are not persisted and is lost when the container is removed or terminated. It also makes it hard to share the data across containers. Volumes are the preferred way to persist data created by containers. They can be thought of as storage abstractions for storage locations on the host machine, but managed independent of the container’s lifecycle. They also make it easy to share data between containers by simultaneously mounting them on multiple containers.
Based on Nextcloud recommendations, we use 3 volumes to manage data.
-
The volume named
nextcloud-appdatawill store the main application state for next cloud -
The volume named
nextcloud-fileswill store the files uploaded and created by uses. -
The volume named
nextcloud-dbwill store the database files for the MySQL database.podman volume create nextcloud-appdata podman volume create nextcloud-files podman volume create nextcloud-db
Run MySQL Database
Now you can start the database for Nextcloud with the volume attached. The database container is started in the pod that has already been created. The database used by Nextcloud is MySQL, and here we are running it as a container in the pod. For a more robust and fully managed deployment, you can replace this container with the OCI MySQL database service.
The command to start the database is shown below, and each of the options are explained.
Note : Ensure to provide strong passwords for
MYSQL_PASSWORDandMYSQL_ROOT_PASSWORDvariables below.
podman run --detach --pod=nextcloud \
--env MYSQL_DATABASE=nextcloud \
--env MYSQL_USER=nextcloud \
--env MYSQL_PASSWORD=NEXTCLOUD_PASSWORD \
--env MYSQL_ROOT_PASSWORD=MYSQL_ROOT_PASSWORD \
--volume nextcloud-db:/var/lib/mysql:Z \
--restart on-failure \
--name nextcloud-db \
mysql/mysql-server:8.0
podman run- the run command tells podman to run a command in a container with the given parameters. The command to be run is typically defined in the image itself.--detach- Detached mode: run the container in the background and print the new container ID.--pod=nextcloud- Run container in an existing pod. Here we chose to run the container int he pod we created earlier for Nextcloud--env- Sets arbitrary environment variables. These environment variables can be accessed by the processes running inside the container.--volume nextcloud-db:/var/lib/mysql:Z- mounts the volume namednextcloud-dbat the location/var/lib/mysql, the default location for MySQL data files. TheZoption tells Podman to label the content with a private unshared label.--restart on-failure- Restart policy to follow when containers exit. Here the container will be restarted when it fails. A failure is when the process in the container exists with a non-zero exist status.--name nextcloud-db- assigns the namenextcloud-dbto the container.mysql/mysql-server:8.0- the image to run use for creating the container
Since you are running the container in detached mode, Podman will start it in the background and exit. To see the status of the startup and logs, you can execute the following command. Press Ctrl+C to stop following the logs.
podman logs -f nextcloud-db
Deploy Nextcloud
Now you can deploy Nextcloud itself as another container in the same pod. The parameters are similar to the previous command, and here you are passing in the database connectivity details about the database that Nextcloud should use.
Note: Ensure that the values for the variables
MYSQL_DATABASE,MYSQL_USERandMYSQL_PASSWORDare the same that you provided when you started the database. Ensure you update the values forNEXTCLOUD_ADMIN_USERandNEXTCLOUD_ADMIN_PASSWORDto your choice.
podman run --detach --pod=nextcloud \
  --env MYSQL_HOST=127.0.0.1 \
  --env MYSQL_DATABASE=nextcloud \
  --env MYSQL_USER=nextcloud \
  --env MYSQL_PASSWORD=NEXTCLOUD_PASSWORD \
  --env NEXTCLOUD_ADMIN_USER=NC_ADMIN \
  --env NEXTCLOUD_ADMIN_PASSWORD=NC_PASSWORD \
  --env NEXTCLOUD_TRUSTED_DOMAINS=<your public IP> \
  --volume nextcloud-appdata:/var/www/html:Z \
  --volume nextcloud-files:/var/www/html/data:Z \
  --restart on-failure \
  --name nextcloud-app \
  docker.io/library/nextcloud:21
--env MYSQL_HOST=127.0.0.1- Since both the database and the application are in the same pod, the application can access the database container using127.0.0.1, as if they were both running on the same host.--env NEXTCLOUD_TRUSTED_DOMAINS=<your public IP>- Trusted domains are a security feature used by Nextcloud, and you need to provide the list of every domain at which your Nextcloud can be accessed. In this case, it will be the public IP address of the instance, since that is where we will expect Nextcloud to run.
To see the startup logs you can use :
podman logs -f nextcloud-app
Once the start up is complete, you can navigate to to http://<your_public_ip>:8080 to reach your Nextcloud server. Use the values you provided for NEXTCLOUD_ADMIN_USER and NEXTCLOUD_ADMIN_PASSWORD to login.
More Learning Resources
Explore other labs on docs.oracle.com/learn or access more free learning content on the Oracle Learning YouTube channel. Additionally, visit education.oracle.com/learning-explorer to become an Oracle Learning Explorer.
For product documentation, visit Oracle Help Center.
Deploy Nextcloud on Ampere A1 on Oracle Cloud Infrastructure
F42200-03
November 2021
Copyright © 2021, Oracle and/or its affiliates.