Note:
- This tutorial requires access to Oracle Cloud. To sign up for a free account, see Get started with Oracle Cloud Infrastructure Free Tier.
- It uses example values for Oracle Cloud Infrastructure credentials, tenancy, and compartments. When completing your lab, substitute these values with ones specific to your cloud environment.
Access your Oracle Cloud VMware Solution SDDC Resources in Oracle Cloud Infrastructure
Introduction
Oracle Cloud VMware Solution provides a customer-managed, native VMware-based cloud environment, installed within a customer’s tenancy. It offers complete control using familiar VMware tools. Users can move or extend VMware-based workloads to the cloud without rearchitecting applications or retooling operations.
The VMware resources within Oracle Cloud Infrastructure (OCI) are deployed in the customer’s tenancy and are local to the VCN. Users can access these resources using different methods:
-
Establish a FastConnect or IPsec VPN to their tenancy from on-premises to access the software-defined data center (SDDC) resources.
-
If the tenancy does not require connectivity to on-premises, users can launch a Oracle Linux Bastion host as an entry point into the tenancy and then have a Windows jump host to access the VMware resources securely from the public internet.
-
Use the OCI Bastion service to securely access the SDDC resources from anywhere.
In this tutorial, we will discuss the method using Linux Bastion host and a Windows jump host to access the Oracle Cloud VMware Solution SDDC resources from the public internet.
Objective
- Access your Oracle Cloud VMware Solution SDDC Resources in Oracle Cloud Infrastructure (OCI).
Prerequisites
Completion of the tasks described in the following tutorials.
-
Get Started with Oracle Cloud VMware Solution to understand the prerequisites and plan for the deployment.
-
Create a Multi-Cluster Oracle Cloud VMware Solution Software-Defined Data Center
Task 1: Prepare the environment to access the SDDC
The following sections describe high-level steps to access the SDDC from the public internet using the SSH port-forwarding method.
Task 1.1: Create a Public and Private Subnet
-
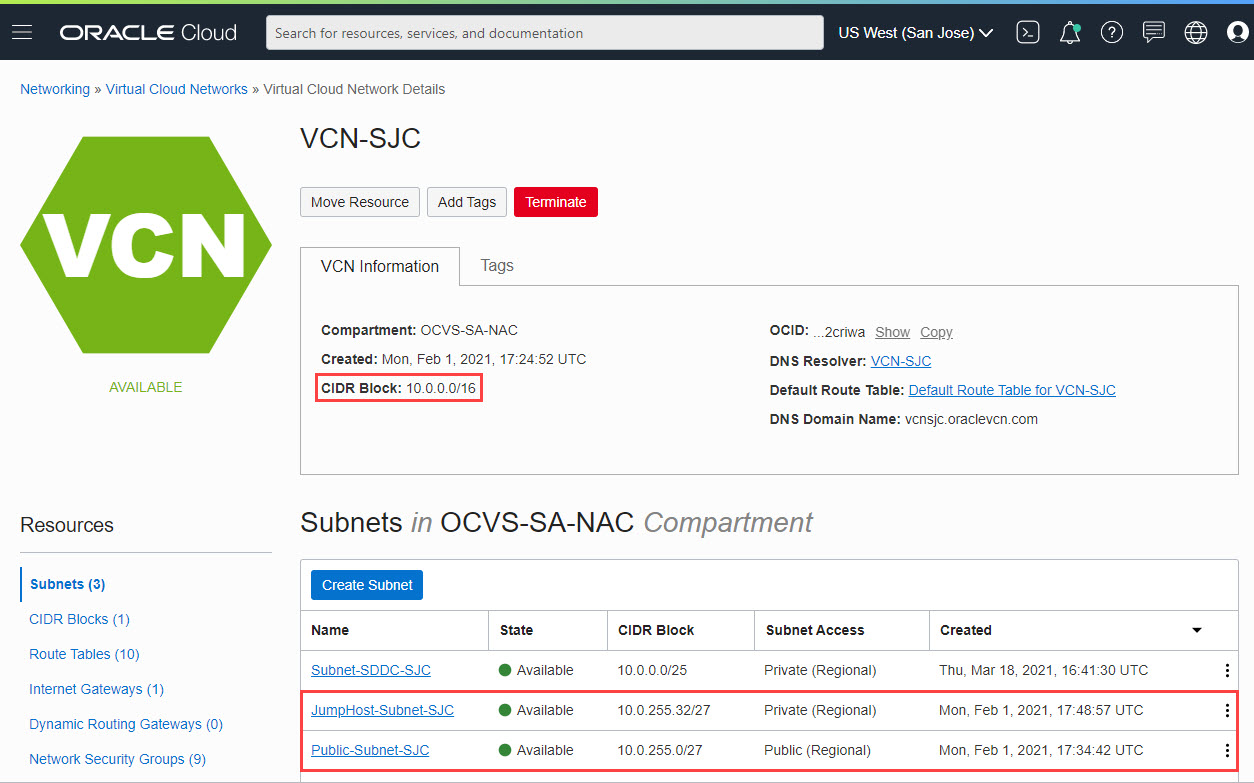
In the following screenshot we can see a total of three subnets. Subnet-SDDC-SJC was created as part of the automated SDDC provisioning to deploy the ESXi BM instances. We created two additional subnets:
-
Public-Subnet-SJC: To launch a Oracle Linux bastion host
-
JumpHost-Subnet-SJC: To launch a Windows jump host
-
-
To access the Windows jump host from our workstation, we will establish SSH tunneling using the Oracle Linux Bastion host.
Task 1.2: Create an Internet Gateway and attach it to the Public Subnet
-
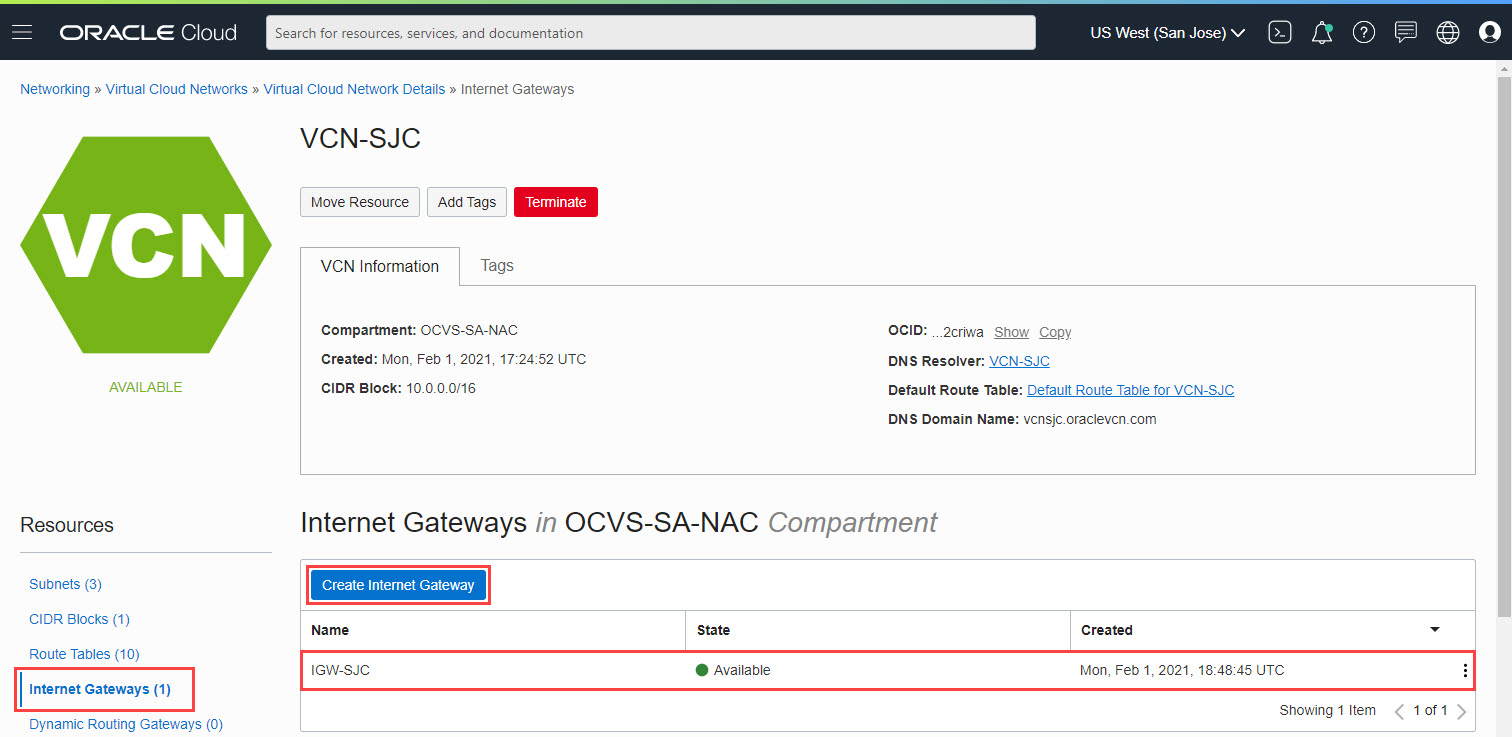
To create an Internet gateway, navigate to the VCN:
-
From the Resources section on the left pane, select Internet Gateways.
-
Click Create Internet Gateway.
-
Provide a name for the Internet gateway, select the compartment, and click Create Internet Gateway.
In this tutorial we have created an internet gateway named IGW-SJC.
-
-
To attach the Internet gateway to the public subnet:
-
Navigate to the public subnet, Public-Subnet-SJC.
-
Select the associated Route Table in the top panel.
-
Click Add Route Rules.
-
In the window, select the Target Type as Internet Gateway.
-
Enter the Destination CIDR Block as 0.0.0.0/0.
-
Select Internet Gateway IGW-SJC from the drop-down list and click Add Route Rule.
This ensures all the traffic to the Internet from this subnet is routed through the Internet Gateway.
-
-
Configure security rules:
-
Navigate back to the public subnet and select the associated security list.
-
Validate that an egress rule exists for 0.0.0.0/0 for All Protocols.
-
As we will be establishing a SSH session into the Oracle Linux Bastion host, validate that there is an ingress rule from 0.0.0.0/0, all ports to destination port 22.
-
Task 1.3: Attach the NAT Gateway to the JumpHost-Subnet-SJC
During the SDDC deployment process, if the user has selected to deploy VMware HCX, the workflow creates a NAT gateway. In this tutorial, we will use an existing NAT gateway for the jump host private subnet. If a NAT gateway doesn’t exist, create one before continuing to the next steps.
-
Attach a NAT gateway to JumpHost-Subnet-SJC:
-
Navigate to the JumpHost-Subnet-SJC.
-
Select the associated Route Table in the top panel.
-
Click Add Route Rules.
-
In the dialog box, select the Target Type as NAT Gateway.
-
Enter the Destination CIDR Block as 0.0.0.0/0.
-
Select NAT Gateway NAT Gateway for VCN-SJC from the drop-down list and click Add Route Rule.
This ensures all the traffic to the Internet from this subnet is routed through the NAT gateway.
-
-
Configure security rules:
-
Navigate back to the Jump Host subnet and select the associated Security List.
-
Validate that an egress rule exists for 0.0.0.0/0 for All Protocols.
-
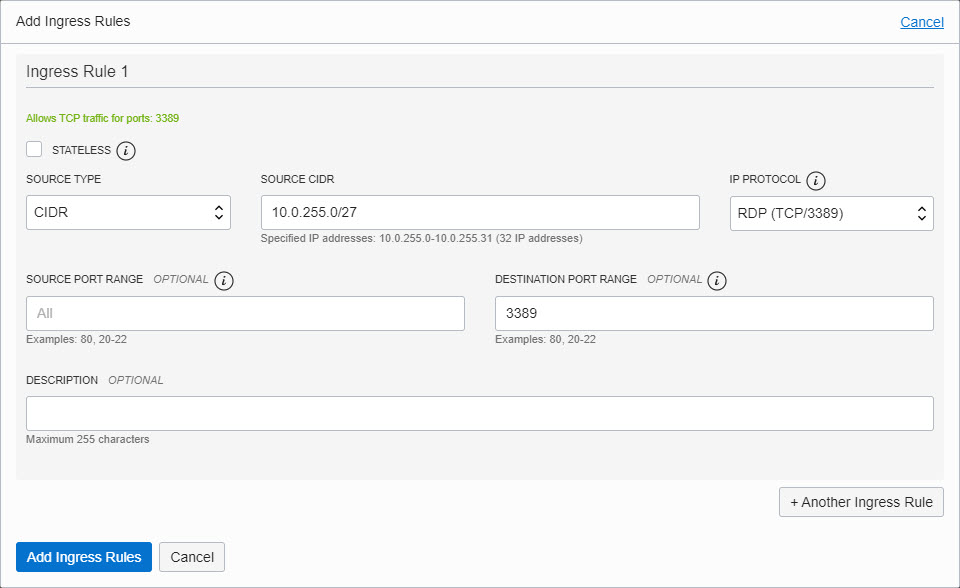
As we will be establishing SSH tunneling from the public subnet to the JumpHost Subnet to create a Remote Desktop Protocol (RDP) session, add an ingress rule with Source CIDR of the Public Subnet CIDR, and the IP Protocol as RDP.
-
Task 1.4: Launch Compute Instances for Bastion and Jump Hosts
Now that we have the routing established, let’s launch the compute instances for the Bastion Host and jump hosts.
-
Launch a Public Oracle Linux Instance.
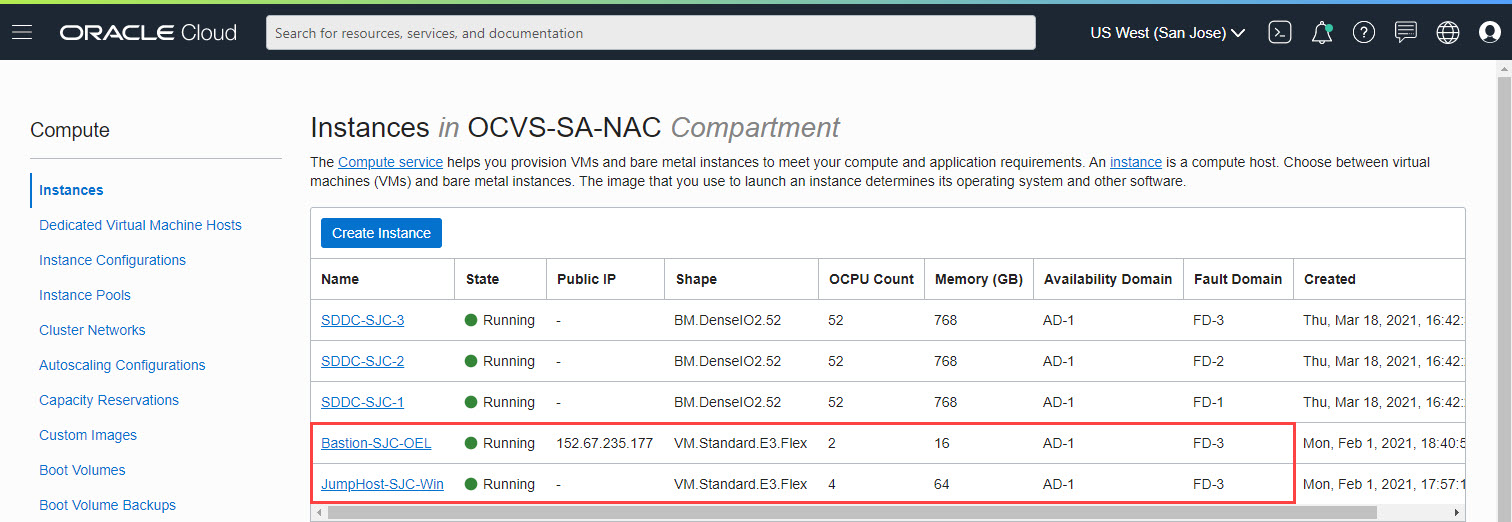
For this tutorial, we launched a Oracle Linux 7.9 compute instance, Bastion-SJC-OEL in the Public-Subnet-SJC subnet. During the creation of an Oracle Linux instance, you’re required to provide or create a new SSH key pair. Store the SSH key pair in a secure location.
-
Launch a Private Windows Instance.
For the purpose of jump host, we launched a Windows Server 2019 compute instance named JumpHost-SJC-Win in JumpHost-Subnet-SJC private subnet, as seen in the below image.
Task 2: Access the SDDC resources
To access VMware vCenter, NSX Manager or VMware HCX, we need to RDP into the Windows jump host and use the URLs and credentials provided in the SDDC details section from the Oracle Cloud Infrastructure (OCI) console.
To create a RDP connection, we will use SSH tunneling via the Oracle Linux Bastion. Below sections provide steps to establish connectivity using a Windows and a Mac workstation.
Use a Windows Workstation
To RDP into the Windows jump host, we need to create a SSH tunnel via the Oracle Linux Bastion Host. We require PuTTY, PuTTYgen and Windows RDP to successfully complete the below steps.
-
Convert the SSH Keys provided to launch SDDC to .ppk format using PuTTYgen.
-
Launch PuTTY and enter details of the Oracle Linux Bastion.
-
In the SSH - Auth section, browse and select the converted private key.
-
In the Tunnel section, choose a free Source port, we entered
5001. For the Destination, provide the private IP of the Windows Jumphost with port 3389 (RDP) as seen in the below image and select Add.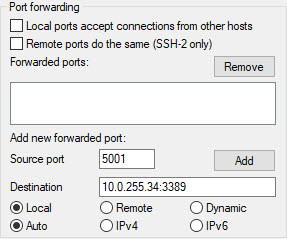
-
Save the session and start the SSH session.
-
Once the SSH session is established, launch RDP on your workstation and enter the hostname as localhost:5001 and connect. Provide the initial credentials provided in the OCI console and change the password when prompted.
Use a Mac Workstation
-
Similar to Windows, to configure SSH tunneling using Mac OS, launch a terminal session and use the below command syntax to connect. In the below image we have provided the SourcePort as 3392:
ssh -i privatekey.pem opc@<LinuxBastion-PublicIP> -L <SourcePort>:<JumpHost-PrivateIP>:3389
-
Once a SSH session is configured as detailed above, launch Microsoft Remote Desktop and provide the PC name as 127.0.0.1:SourcePort or localhost:SourcePort. Provide the initial password of the Windows Jump Host as provided in the Oracle Cloud Console and change the password when prompted.
Access vCenter, NSX Manager, and VMware HCX
-
Navigate to the VMware Solution in the Oracle Cloud Console and select the SDDC to view the details.
-
Open a browser of your choice on the Windows jump host.
-
To access vCenter, copy the FQDN provided in the Oracle Cloud Console and paste it in the browser.
-
Click through the security alerts and you should see the Getting Started page. Select Launch vSphere Client (HTML5).
-
Copy the credentials provided in the Oracle Cloud Console and log in to vSphere.
-
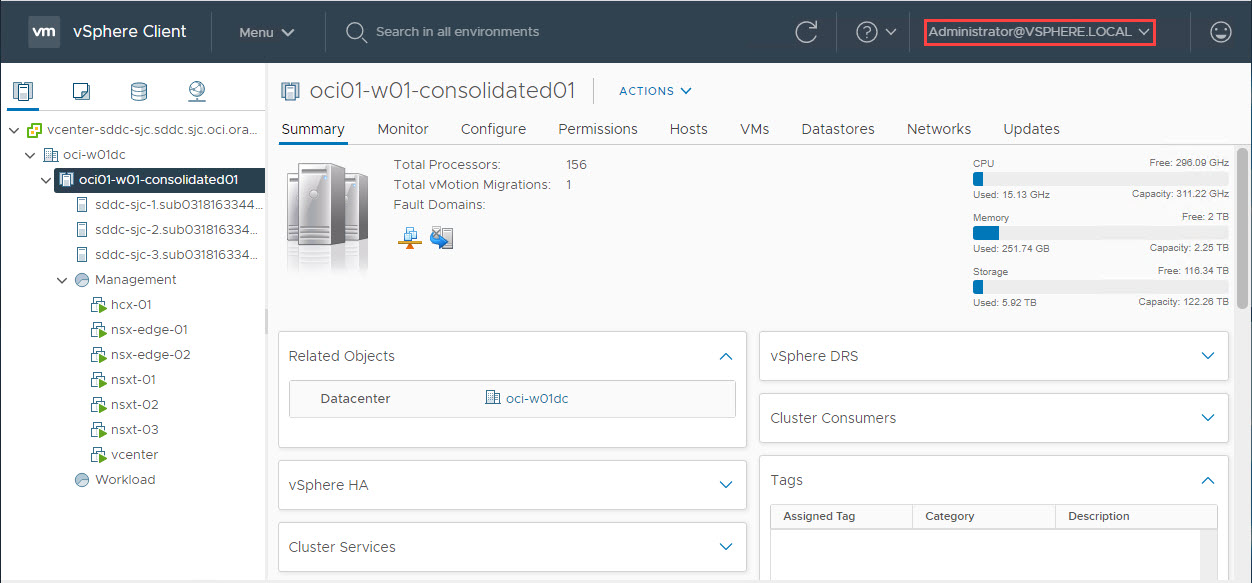
Once you’re logged in, it is just VMware. You have Administrator privileges and full control to your ESXi cluster.
-
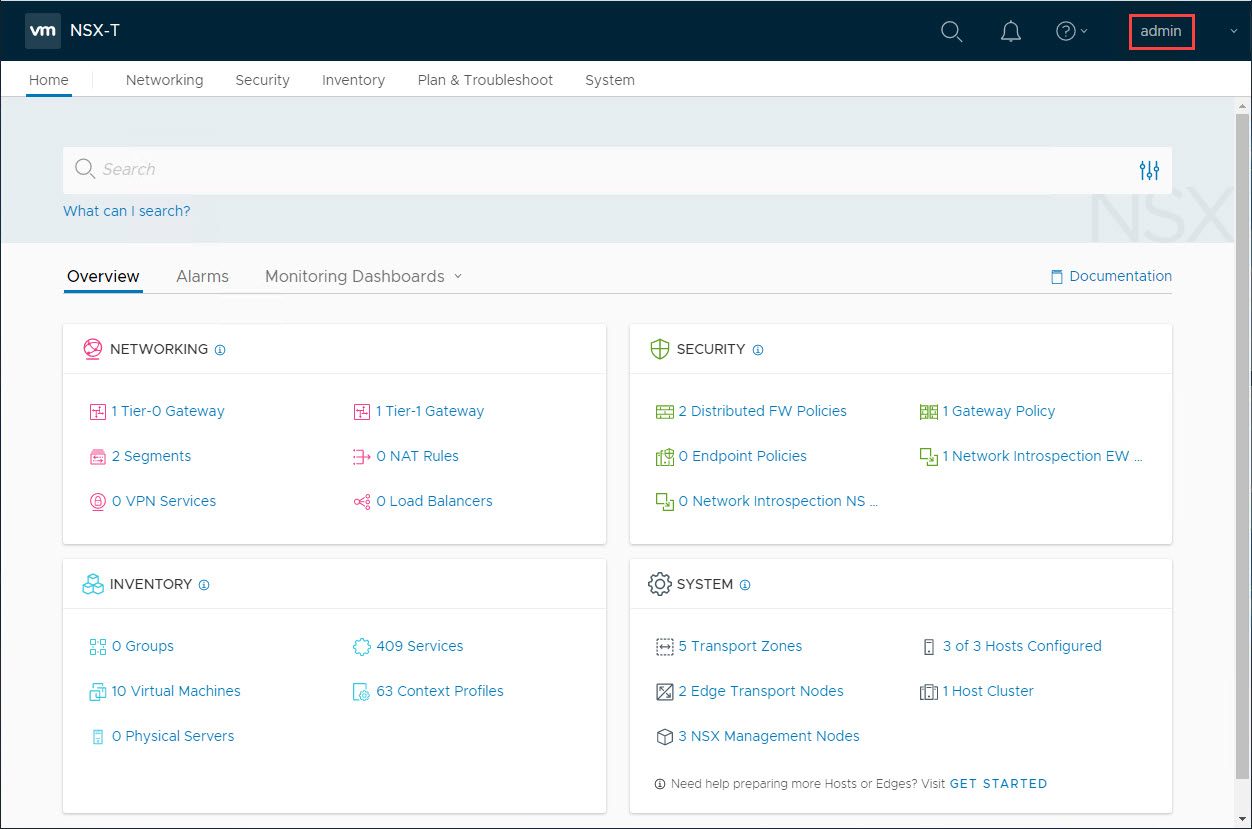
Similarly, you can login to NSX Manager with full Administrator privileges.
-
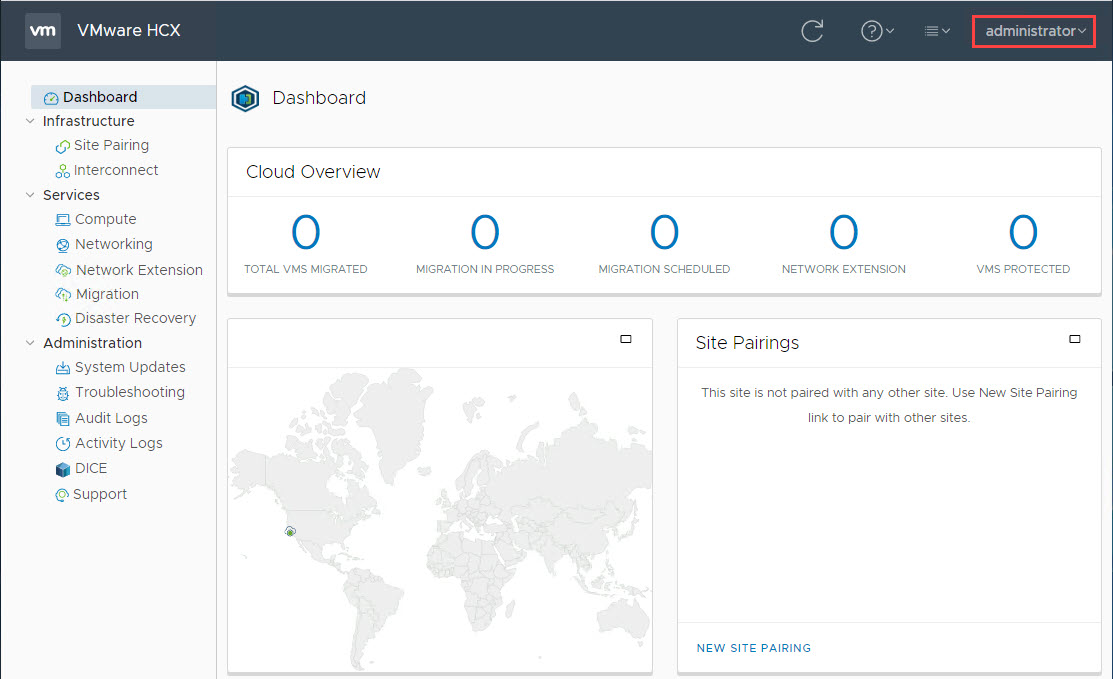
Finally, you can access VMware HCX manager and establish Site Pairing and Service Mesh to start migrating from an on-premises vCenter.
Acknowledgments
- Author - Praveen Kumar Pedda Vakkalam (Principal Solutions Architect)
More Learning Resources
Explore other labs on docs.oracle.com/learn or access more free learning content on the Oracle Learning YouTube channel. Additionally, visit education.oracle.com/learning-explorer to become an Oracle Learning Explorer.
For product documentation, visit Oracle Help Center.
Access your Oracle Cloud VMware Solution SDDC Resources in Oracle Cloud Infrastructure
F81179-02
December 2023
Copyright © 2023, Oracle and/or its affiliates.