Note:
- This tutorial requires access to Oracle Cloud. To sign up for a free account, see Get started with Oracle Cloud Infrastructure Free Tier.
- It uses example values for Oracle Cloud Infrastructure credentials, tenancy, and compartments. When completing your lab, substitute these values with ones specific to your cloud environment.
Use OCI VCN-Native Pods Networking CNI Plugin to Provide Networking Services to Oracle Cloud Infrastructure Container Engine for Kubernetes
Introduction
By default, Oracle Cloud Infrastructure Container Engine for Kubernetes (OKE) uses the Oracle Cloud Infrastructure (OCI) VCN-Native Container Network Interface (CNI) plugin to provide network or security features to containerized applications. In this tutorial, we will show you how you can verify what CNI plugin is used and how we can use this default CNI plugin (OCI VCN-Native CNI plugin) to configure an OCI Load Balancer service and attach it to an application running inside a container.
The benefit of using the OCI VCN-Native Pods Networking CNI Plugin is that the pods or containers will get an IP address from the private subnet in the VCN. This means that your Kubernetes pods are in the same network as your VMs (instances) or your baremetal nodes or other workloads.
Objectives
- We will see how we can verify the default CNI plugin that is used by OKE. We will deploy a new Nginx containerized application to test some basic networking features of the default OCI VCN-Native CNI plugin and leverage the OCI VCN-Native Pods Networking CNI plugin to create a new network service of load balancer type and expose that service to our deployed Nginx application. In the end, we will clear up the application and the load balancer service.
Task 1: Deploy a Kubernetes Cluster using OKE
For more information about the different OKE deployment models we can choose, see Example Network Resource Configurations.
The example OKE deployment models are:
-
Example 1: Cluster with Flannel CNI Plugin, Public Kubernetes API Endpoint, Private Worker Nodes, and Public Load Balancers.
-
Example 2: Cluster with Flannel CNI Plugin, Private Kubernetes API Endpoint, Private Worker Nodes, and Public Load Balancers.
-
Example 3: Cluster with OCI CNI Plugin, Public Kubernetes API Endpoint, Private Worker Nodes, and Public Load Balancers.
-
Example 4: Cluster with OCI CNI Plugin, Private Kubernetes API Endpoint, Private Worker Nodes, and Public Load Balancers.
We will select Example 3 deployment model. For more information, see Set up Oracle Cloud Infrastructure Container Engine for Kubernetes with Three Worker Nodes.
Task 2: Verify the Installed CNI Plugin
When Kubernetes cluster using OKE is fully deployed and you have access to this, you can run the following command.
-
Run the following command.
iwan_hooge@cloudshell:~ (eu-amsterdam-1)$ **kubectl get all -n kube-system** NAME READY STATUS RESTARTS AGE pod/coredns-64ffdf5cf7-lvrhq 1/1 Running 0 2d pod/coredns-64ffdf5cf7-rmxt8 1/1 Running 0 2d pod/coredns-64ffdf5cf7-vq76p 1/1 Running 0 2d pod/csi-oci-node-ghff6 1/1 Running 0 2d pod/csi-oci-node-jrjpr 1/1 Running 0 2d pod/csi-oci-node-r68qz 1/1 Running 1 (2d ago) 2d pod/kube-dns-autoscaler-5bb955d5c-r2j2q 1/1 Running 0 2d pod/kube-proxy-5cznp 1/1 Running 0 2d pod/kube-proxy-fddrd 1/1 Running 0 2d pod/kube-proxy-sb769 1/1 Running 0 2d pod/proxymux-client-7s7f9 1/1 Running 0 2d pod/proxymux-client-lngrm 1/1 Running 0 2d pod/proxymux-client-qxlf2 1/1 Running 0 2d **pod/vcn-native-ip-cni-hkfjz 1/1 Running 0 2d pod/vcn-native-ip-cni-pdv4c 1/1 Running 0 2d pod/vcn-native-ip-cni-qfvk8 1/1 Running 0 2d** NAME TYPE CLUSTER-IP EXTERNAL-IP PORT(S) AGE service/kube-dns ClusterIP 10.96.5.5 <none> 53/UDP,53/TCP,9153/TCP 2d NAME DESIRED CURRENT READY UP-TO-DATE AVAILABLE NODE SELECTOR AGE daemonset.apps/csi-oci-node 3 3 3 3 3 <none> 2d daemonset.apps/kube-proxy 3 3 3 3 3 beta.kubernetes.io/os=linux 2d daemonset.apps/node-termination-handler 0 0 0 0 0 oci.oraclecloud.com/oke-is-preemptible=true 2d daemonset.apps/nvidia-gpu-device-plugin 0 0 0 0 0 <none> 2d daemonset.apps/proxymux-client 3 3 3 3 3 node.info.ds_proxymux_client=true 2d **daemonset.apps/vcn-native-ip-cni 3 3 3 3 3 <none> 2d** NAME READY UP-TO-DATE AVAILABLE AGE deployment.apps/coredns 3/3 3 3 2d deployment.apps/kube-dns-autoscaler 1/1 1 1 2d NAME DESIRED CURRENT READY AGE replicaset.apps/coredns-64ffdf5cf7 3 3 3 2d replicaset.apps/kube-dns-autoscaler-5bb955d5c 1 1 1 2d iwan_hooge@cloudshell:~ (eu-amsterdam-1)$ -
Notice that the name is
vcn-nativein the output in the pod section. -
Notice that the name is
vcn-nativein the output in the daemonset section.
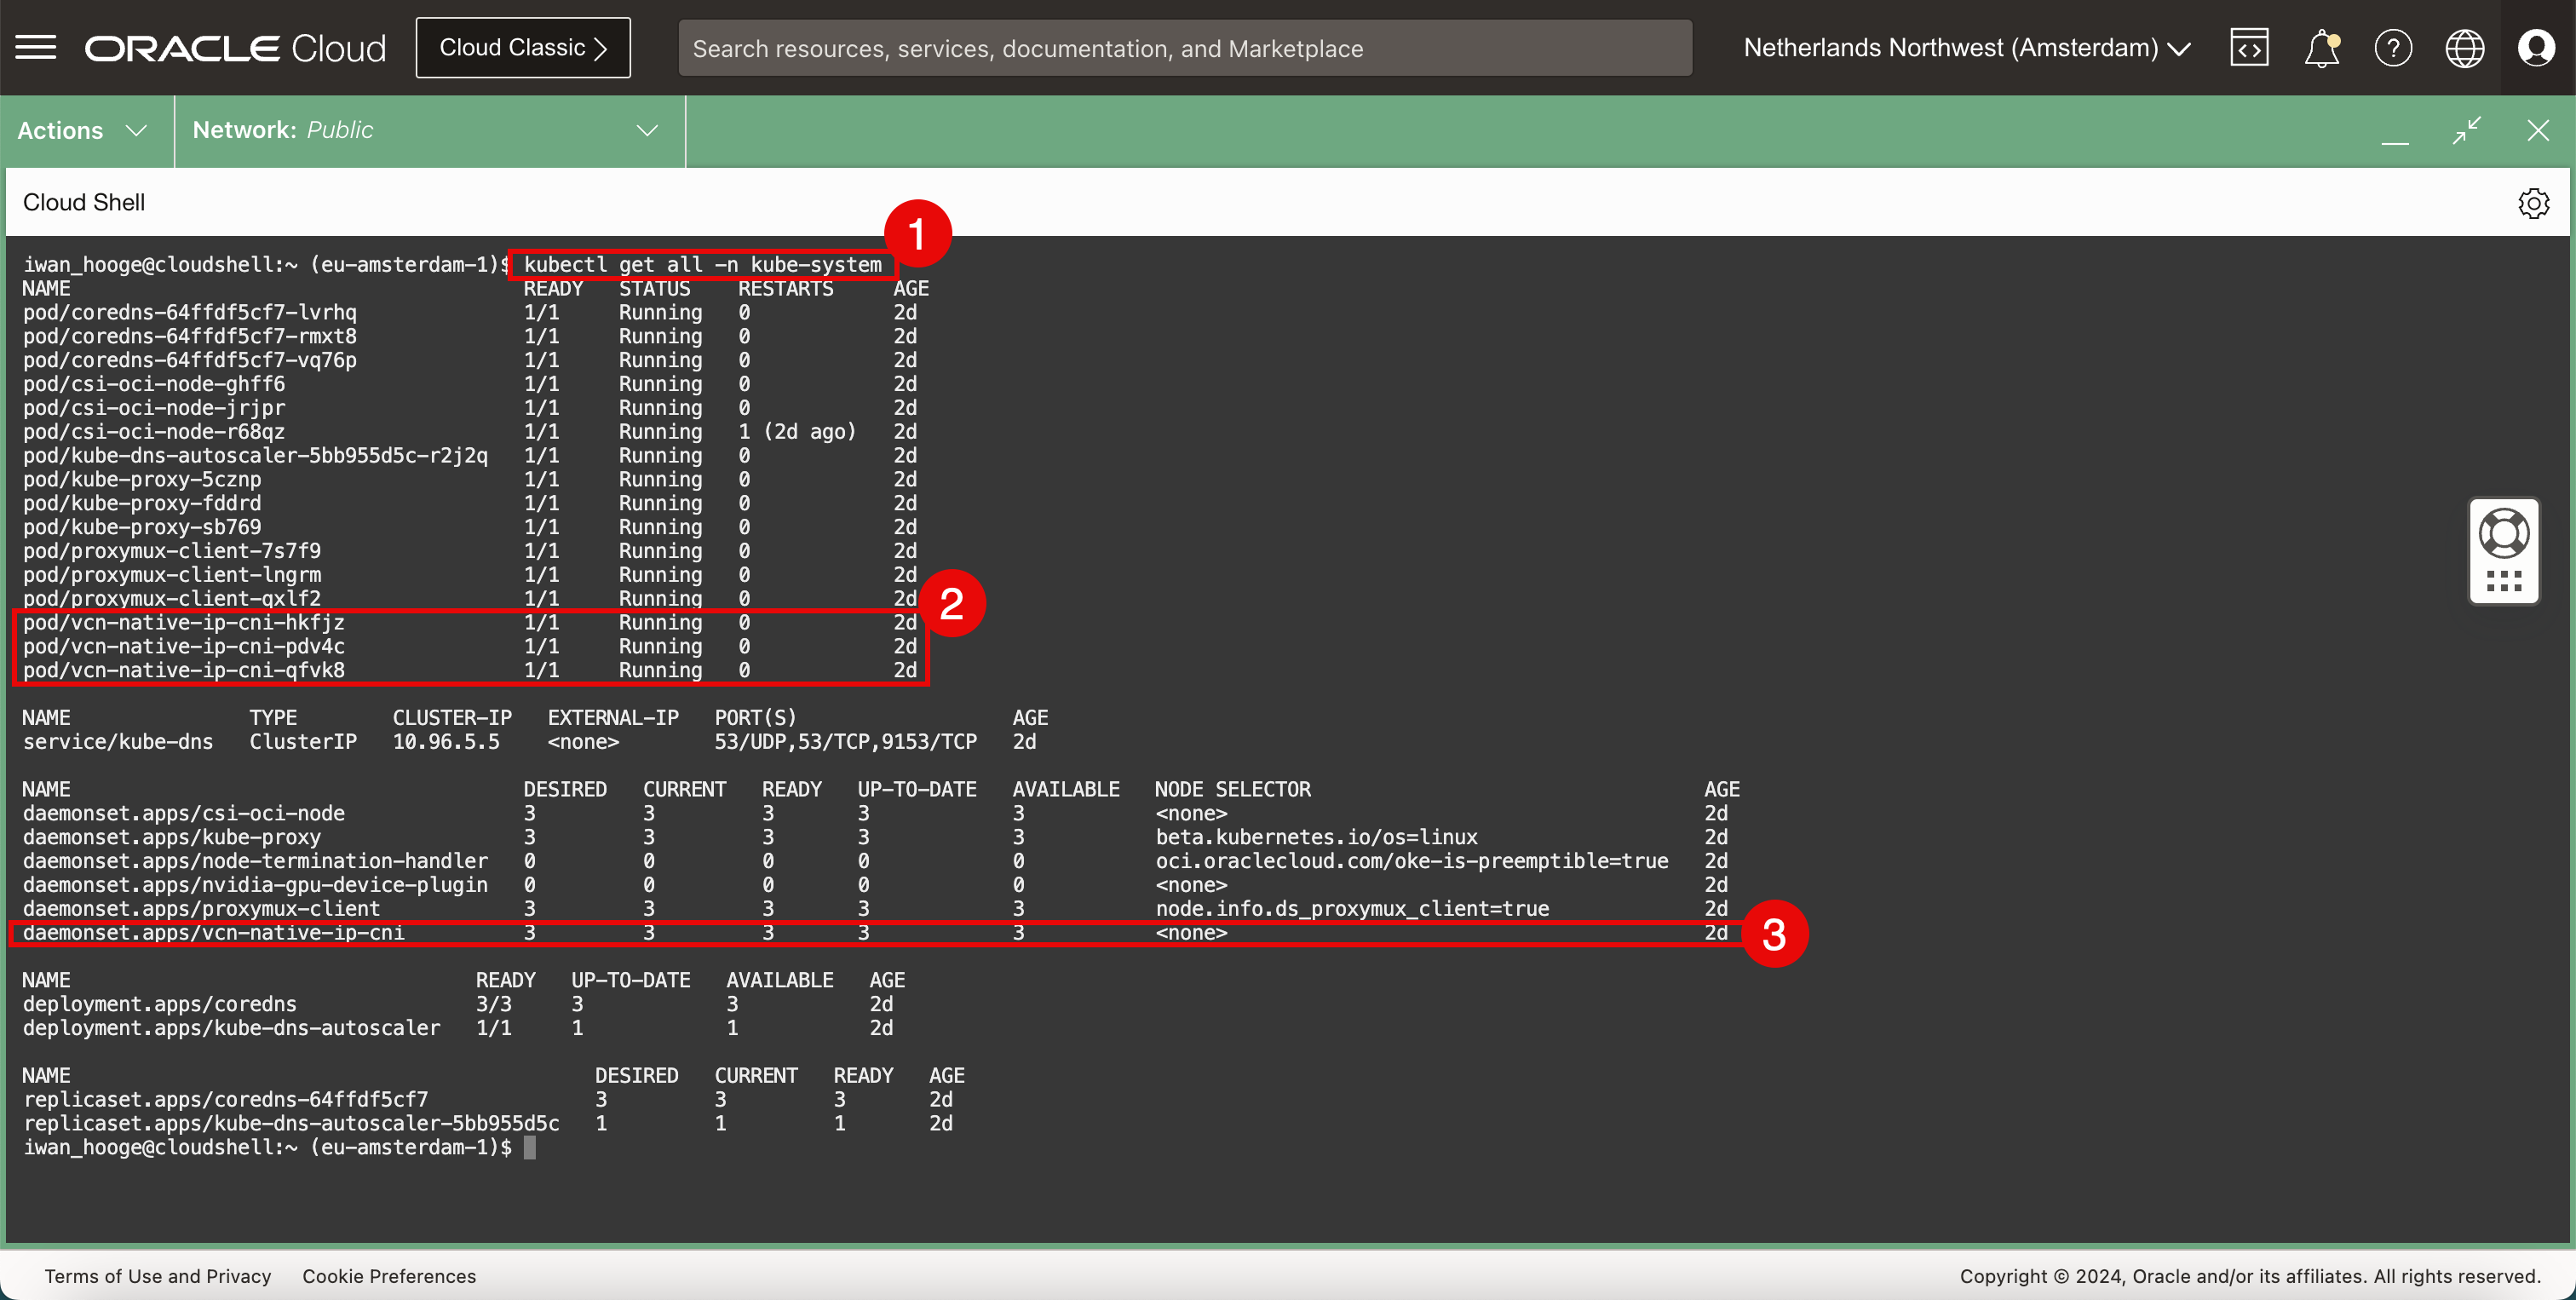
This will show you that the OCI VCN-Native Pods Networking CNI plugin is currently used for this deployed OKE deployment.
Task 3: Deploy a Sample Application
We will use this sample application together with the OCI VCN-Native Pods Networking CNI plugin and enable the OCI Load Balancer service type in the next task.
-
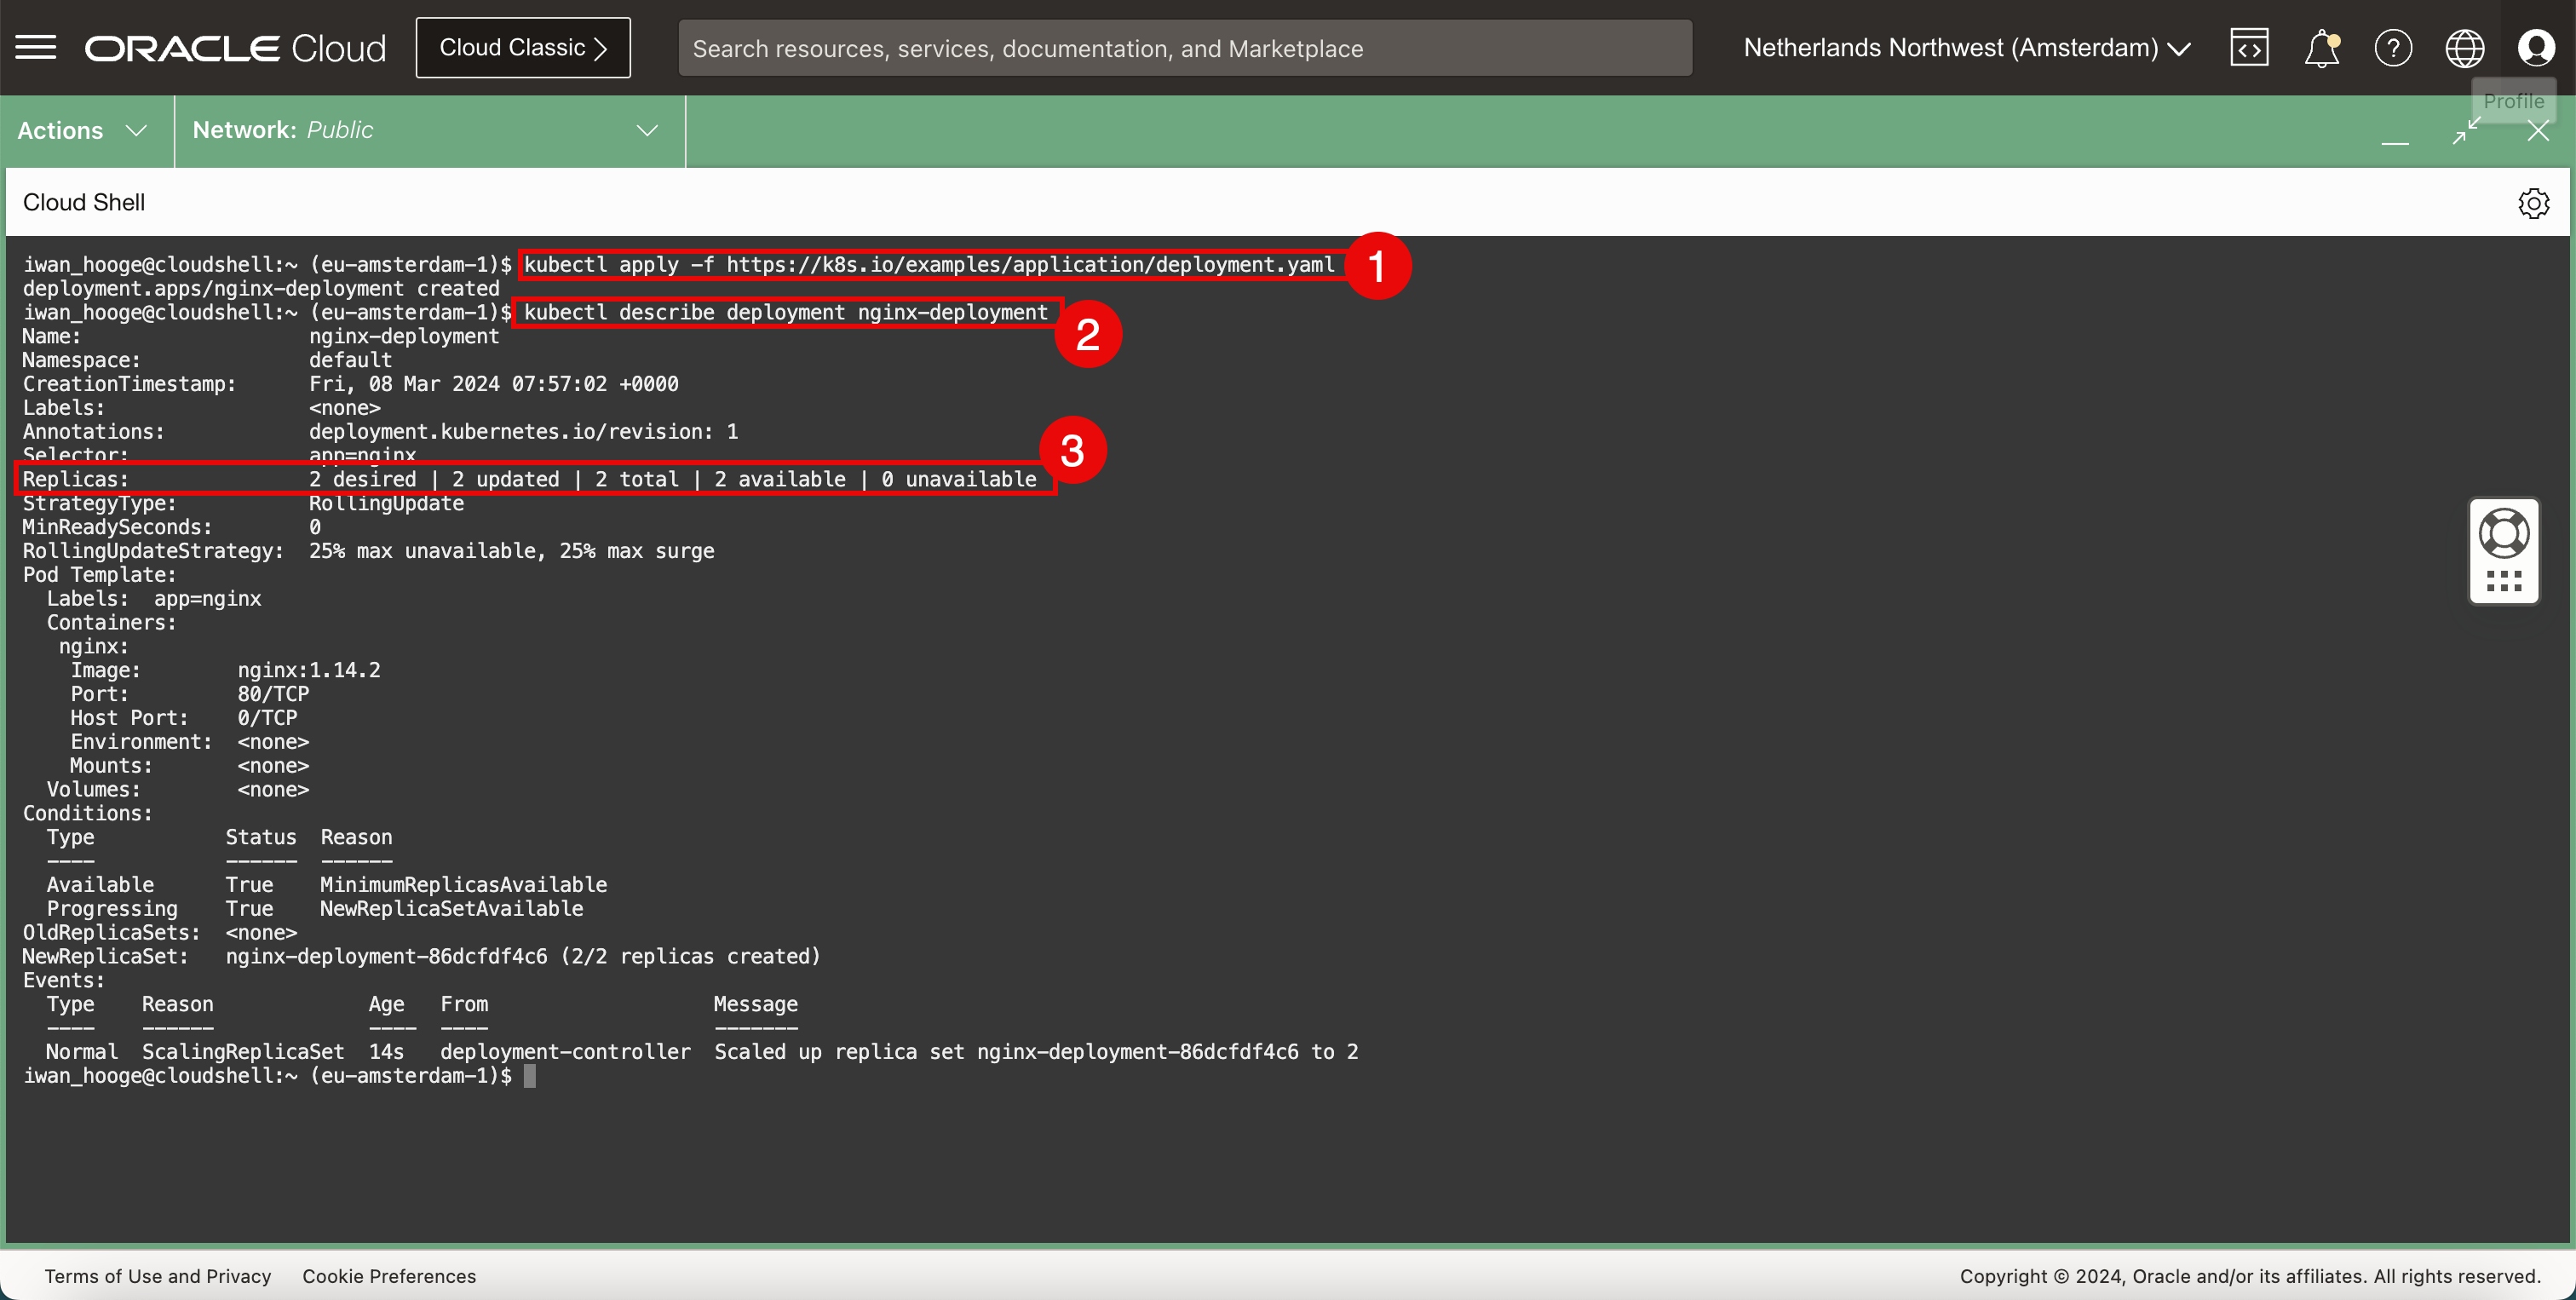
Run the following command to deploy a sample Nginx application inside OKE.
iwan_hooge@cloudshell:~ (eu-amsterdam-1)$ kubectl apply -f https://k8s.io/examples/application/deployment.yaml deployment.apps/nginx-deployment created -
Run the following command to verify the details of the deployed sample Nginx application.
iwan_hooge@cloudshell:~ (eu-amsterdam-1)$ kubectl describe deployment nginx-deployment Name: nginx-deployment Namespace: default CreationTimestamp: Fri, 08 Mar 2024 07:57:02 +0000 Labels: <none> Annotations: deployment.kubernetes.io/revision: 1 Selector: app=nginx Replicas: 2 desired | 2 updated | 2 total | 2 available | 0 unavailable StrategyType: RollingUpdate MinReadySeconds: 0 RollingUpdateStrategy: 25% max unavailable, 25% max surge Pod Template: Labels: app=nginx Containers: nginx: Image: nginx:1.14.2 Port: 80/TCP Host Port: 0/TCP Environment: <none> Mounts: <none> Volumes: <none> Conditions: Type Status Reason ---- ------ ------ Available True MinimumReplicasAvailable Progressing True NewReplicaSetAvailable OldReplicaSets: <none> NewReplicaSet: nginx-deployment-86dcfdf4c6 (2/2 replicas created) Events: Type Reason Age From Message ---- ------ ---- ---- ------- Normal ScalingReplicaSet 14s deployment-controller Scaled up replica set nginx-deployment-86dcfdf4c6 to 2 iwan_hooge@cloudshell:~ (eu-amsterdam-1)$ -
Notice that the application is deployed using two pods.
-
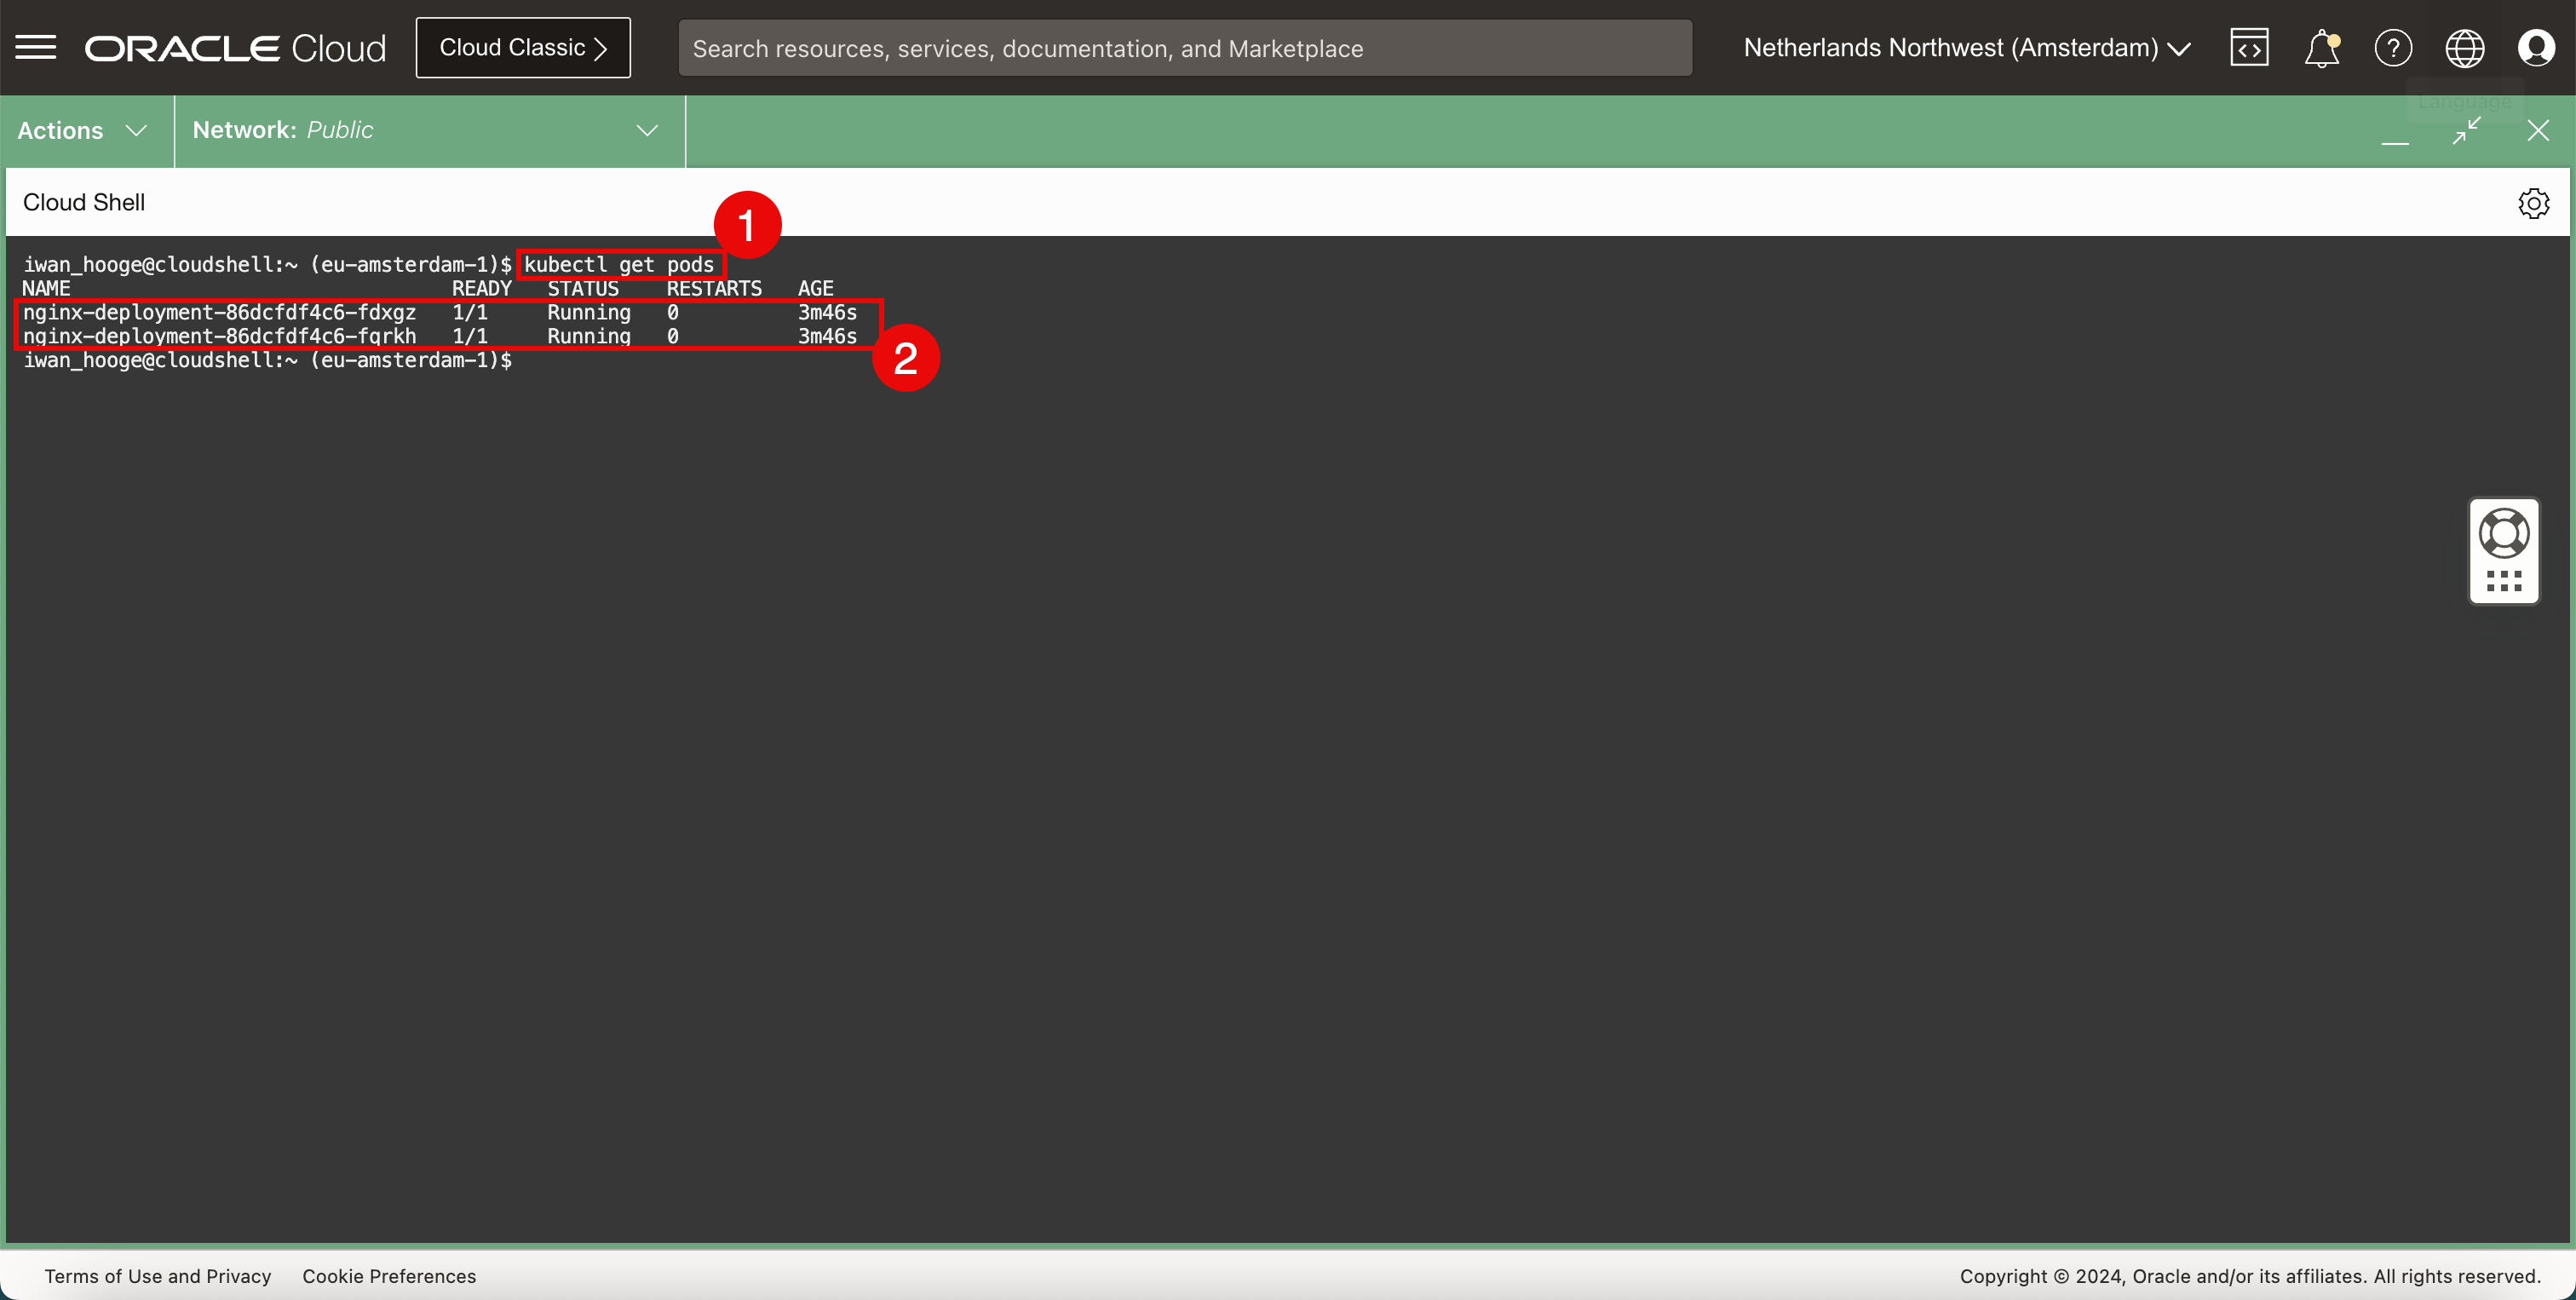
Execute the following command to take a closer look at the deployed pods.
iwan_hooge@cloudshell:~ (eu-amsterdam-1)$ kubectl get pods NAME READY STATUS RESTARTS AGE nginx-deployment-86dcfdf4c6-fdxgz 1/1 Running 0 3m46s nginx-deployment-86dcfdf4c6-fqrkh 1/1 Running 0 3m46s iwan_hooge@cloudshell:~ (eu-amsterdam-1)$ -
Notice that there are two instances or pods or replicas of the Nginx application and the status is set to RUNNING.
A visual representation of the deployment can be found in the following diagram. Focus on the two deployed pods inside the worker nodes.
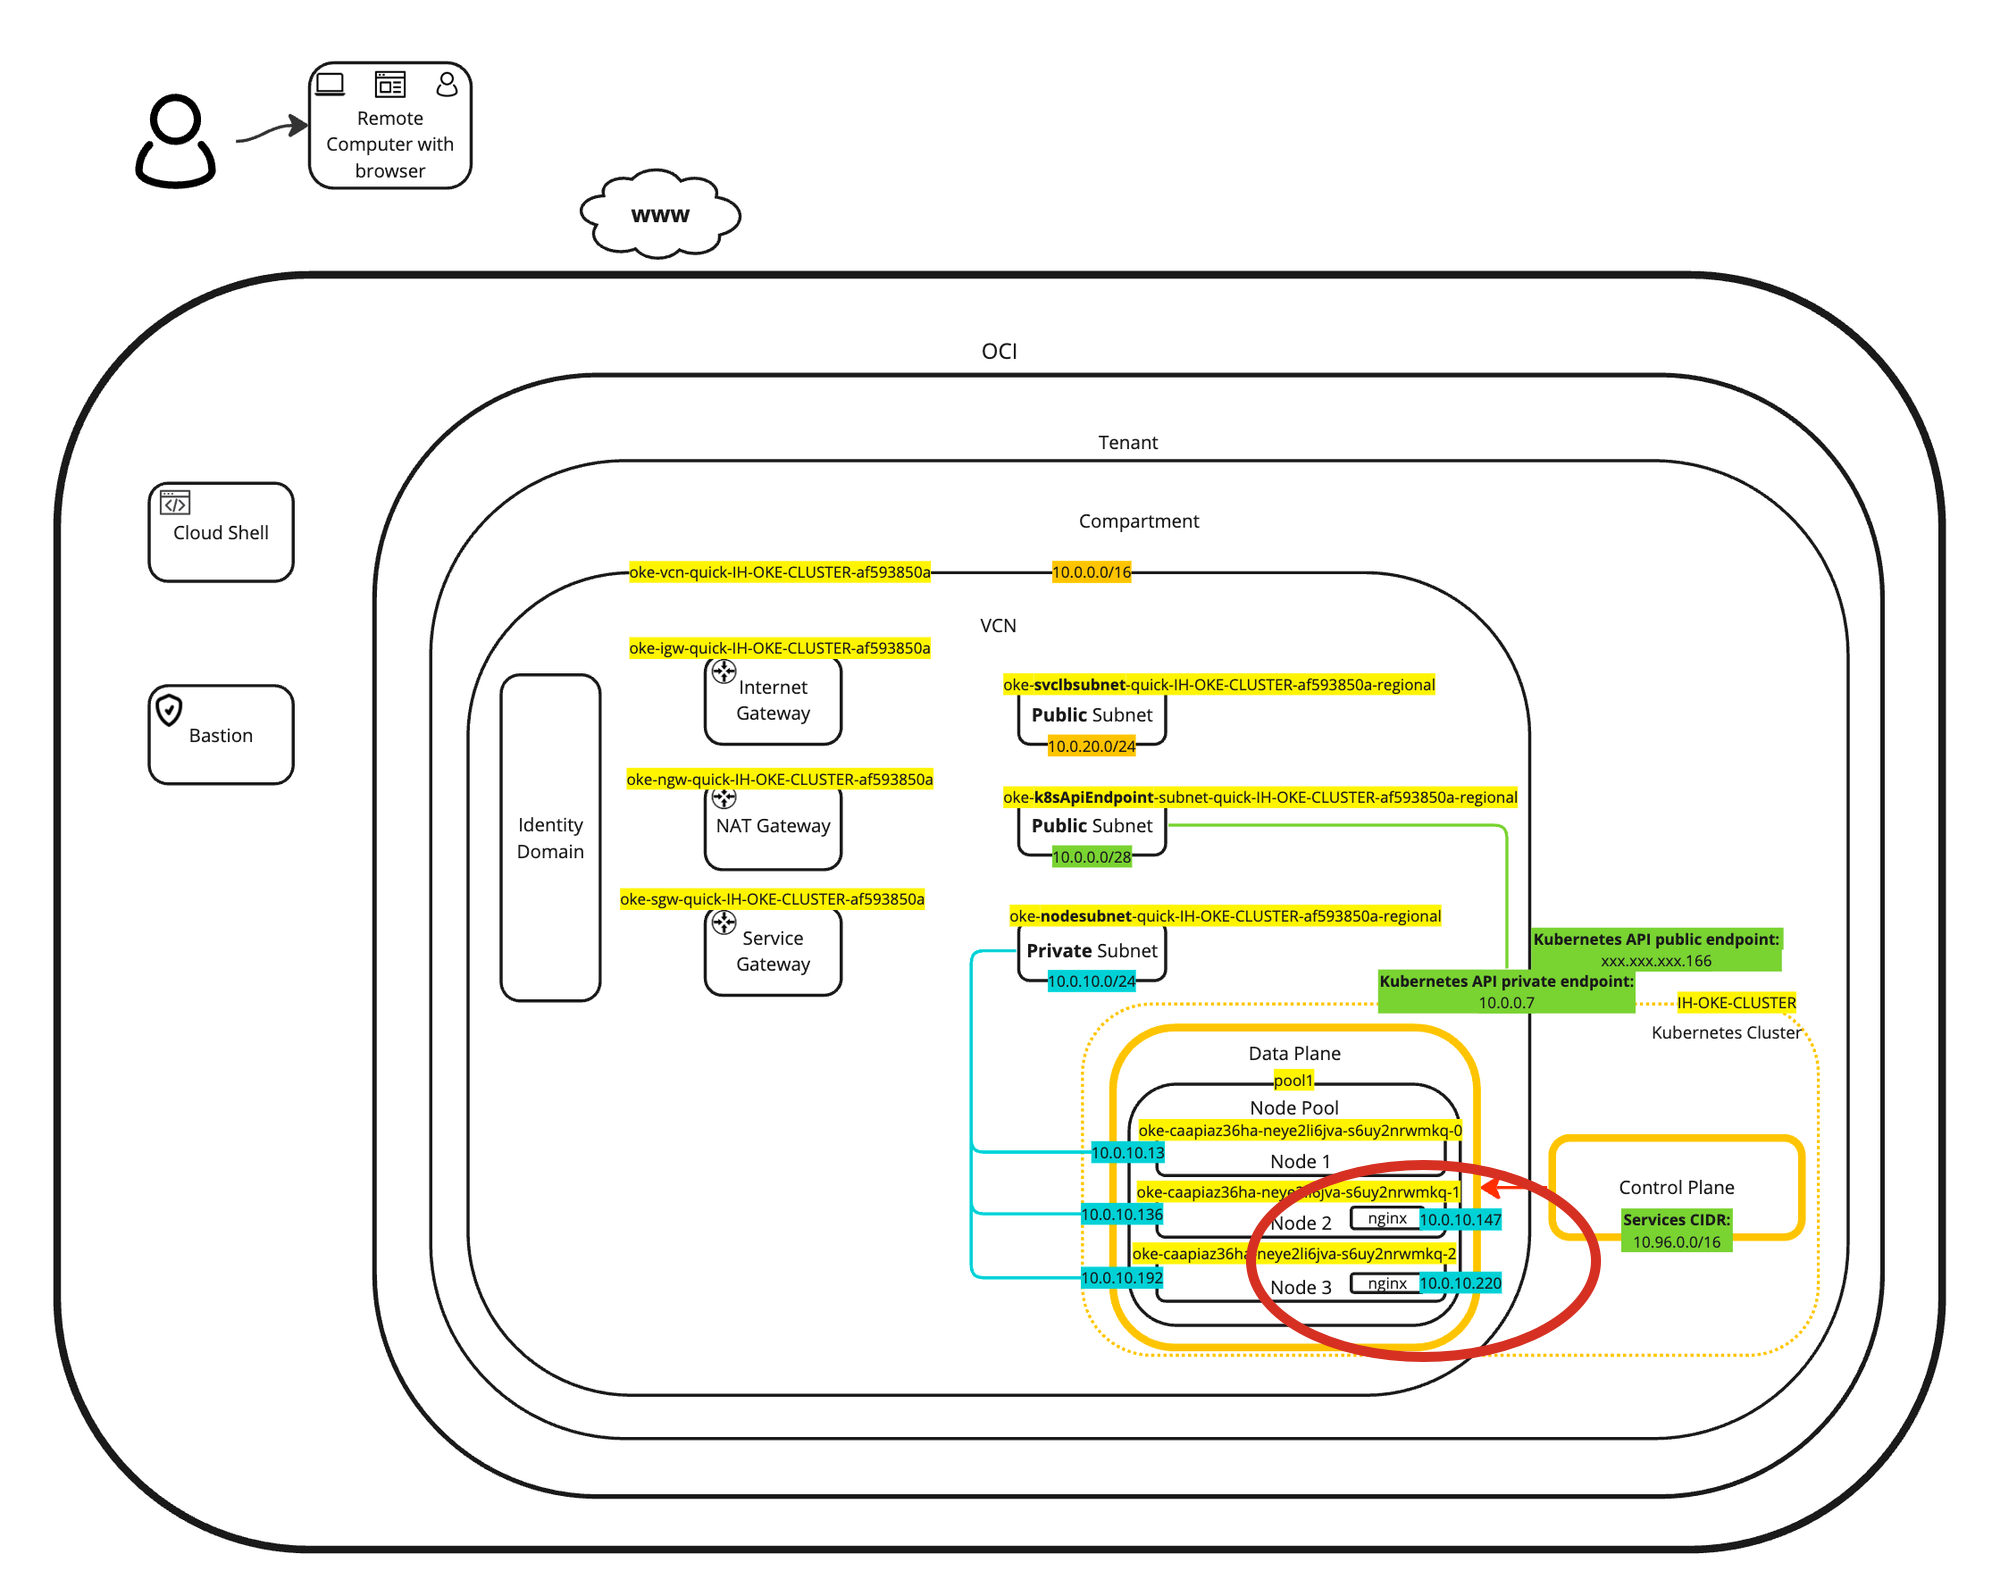
The benefit of using the OCI VCN-Native Pods Networking CNI plugin is that the pods or containers will get an IP address from the private subnet in the VCN. This means that your Kubernetes pods are in the same network as your VMs (instances) or your baremetal nodes or other workloads.
Task 4: Configure Kubernetes Services of Load Balancer Type
We have our sample application running inside OKE, it is time to expose the application to the network or to the internet by attaching a network service of load balancer type to the application.
-
Check the existing running services in the Kubernetes cluster.
-
Run the following command to review the existing running services in the Kubernetes cluster.
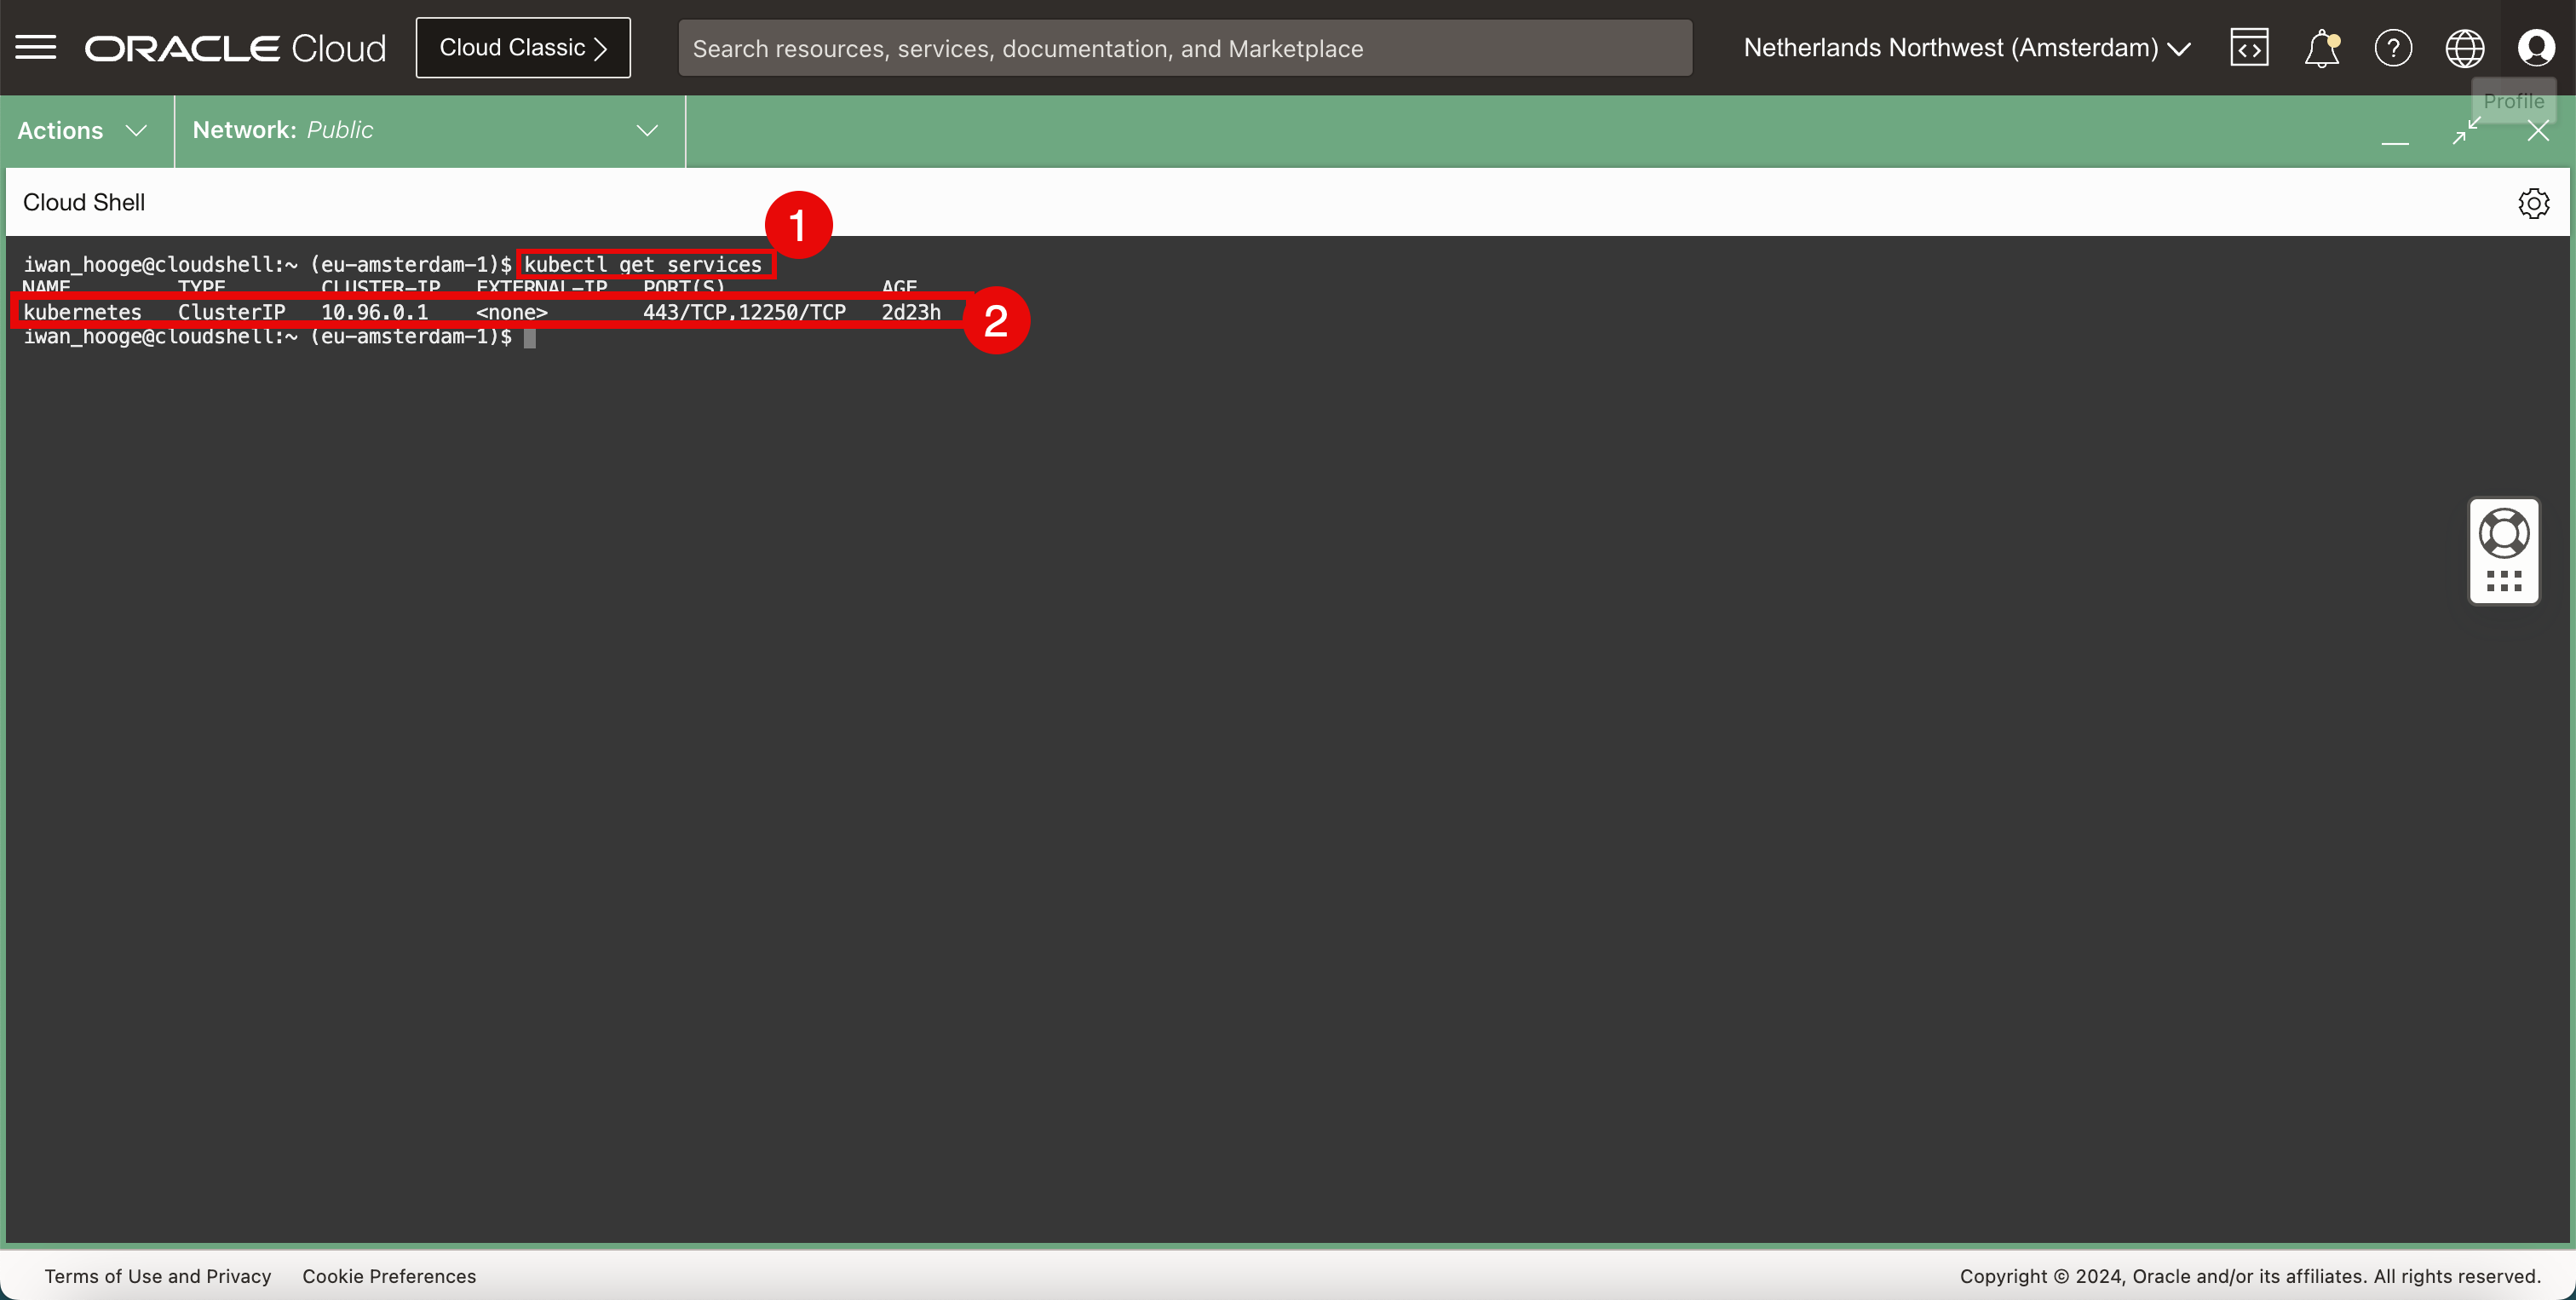
iwan_hooge@cloudshell:~ (eu-amsterdam-1)$ kubectl get services NAME TYPE CLUSTER-IP EXTERNAL-IP PORT(S) AGE kubernetes ClusterIP 10.96.0.1 <none> 443/TCP,12250/TCP 2d23h iwan_hooge@cloudshell:~ (eu-amsterdam-1)$ -
Notice that the only service that is running belongs to the Kubernetes control plane.
-
-
Add network service to the application.
-
Run the following command to deploy a new OCI VCN-Native Pods Networking CNI plugin network service of load balancer type and expose this new service to the application.
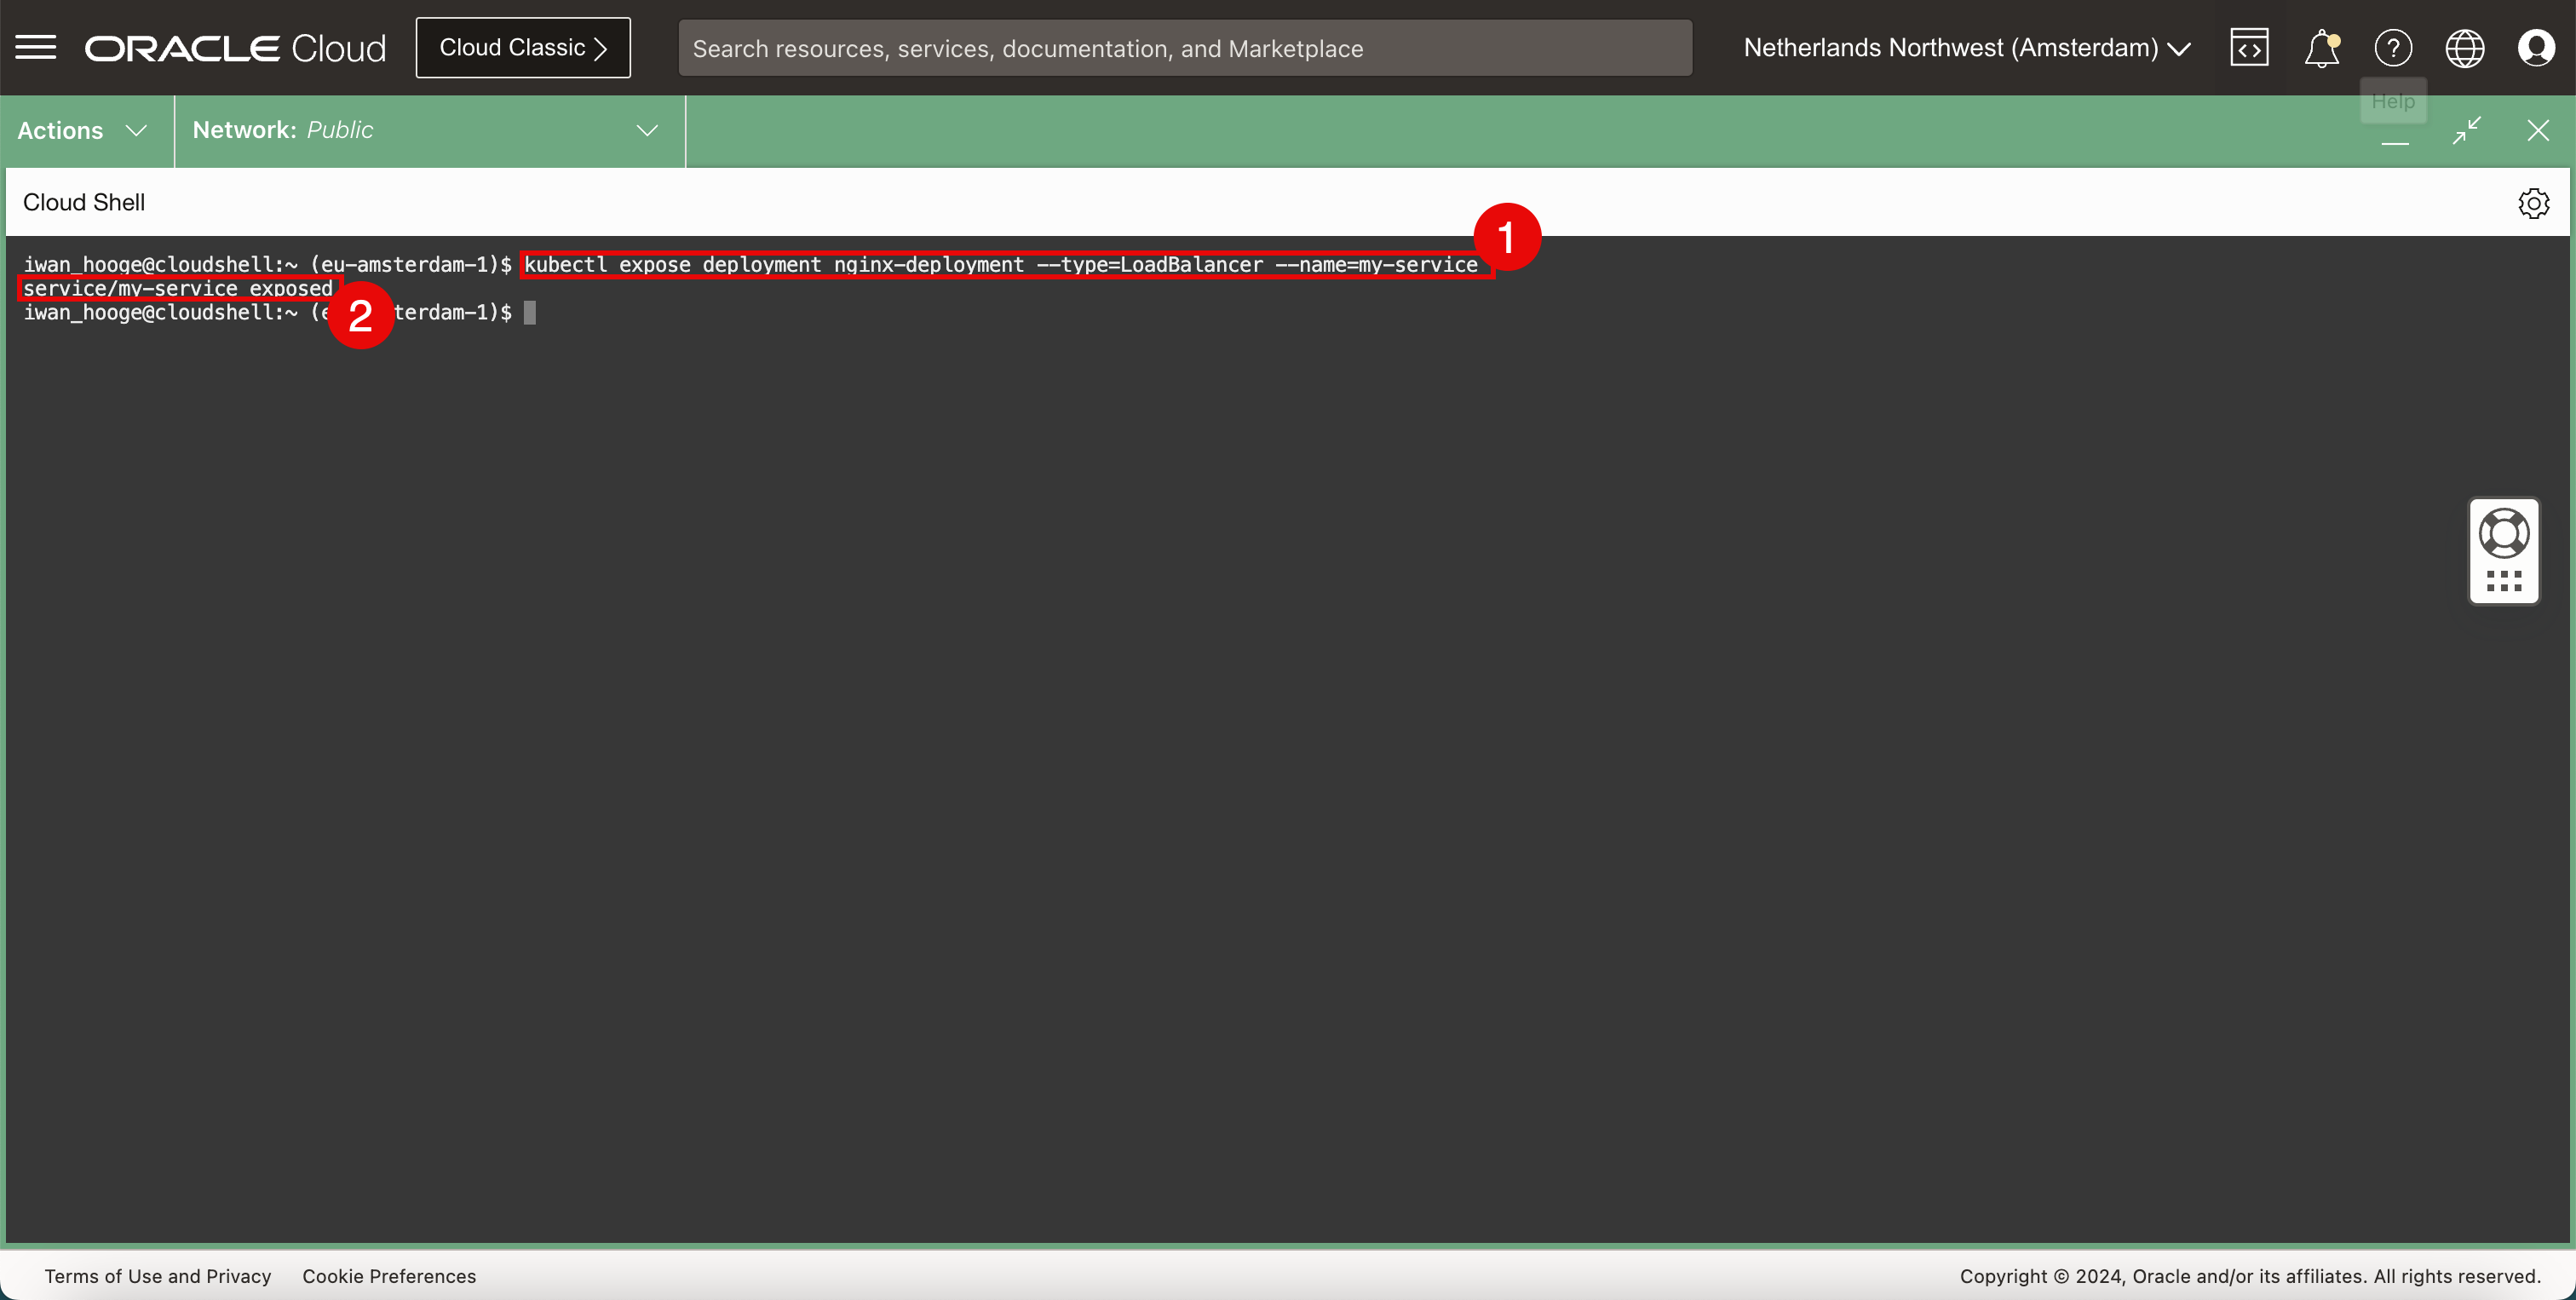
iwan_hooge@cloudshell:~ (eu-amsterdam-1)$ kubectl expose deployment nginx-deployment --type=LoadBalancer --name=my-service service/my-service exposed iwan_hooge@cloudshell:~ (eu-amsterdam-1)$ -
Notice that the service is successfully exposed.
-
-
Check the existing running services in the Kubernetes cluster.
-
Run the following command to review the existing running services in the Kubernetes cluster.
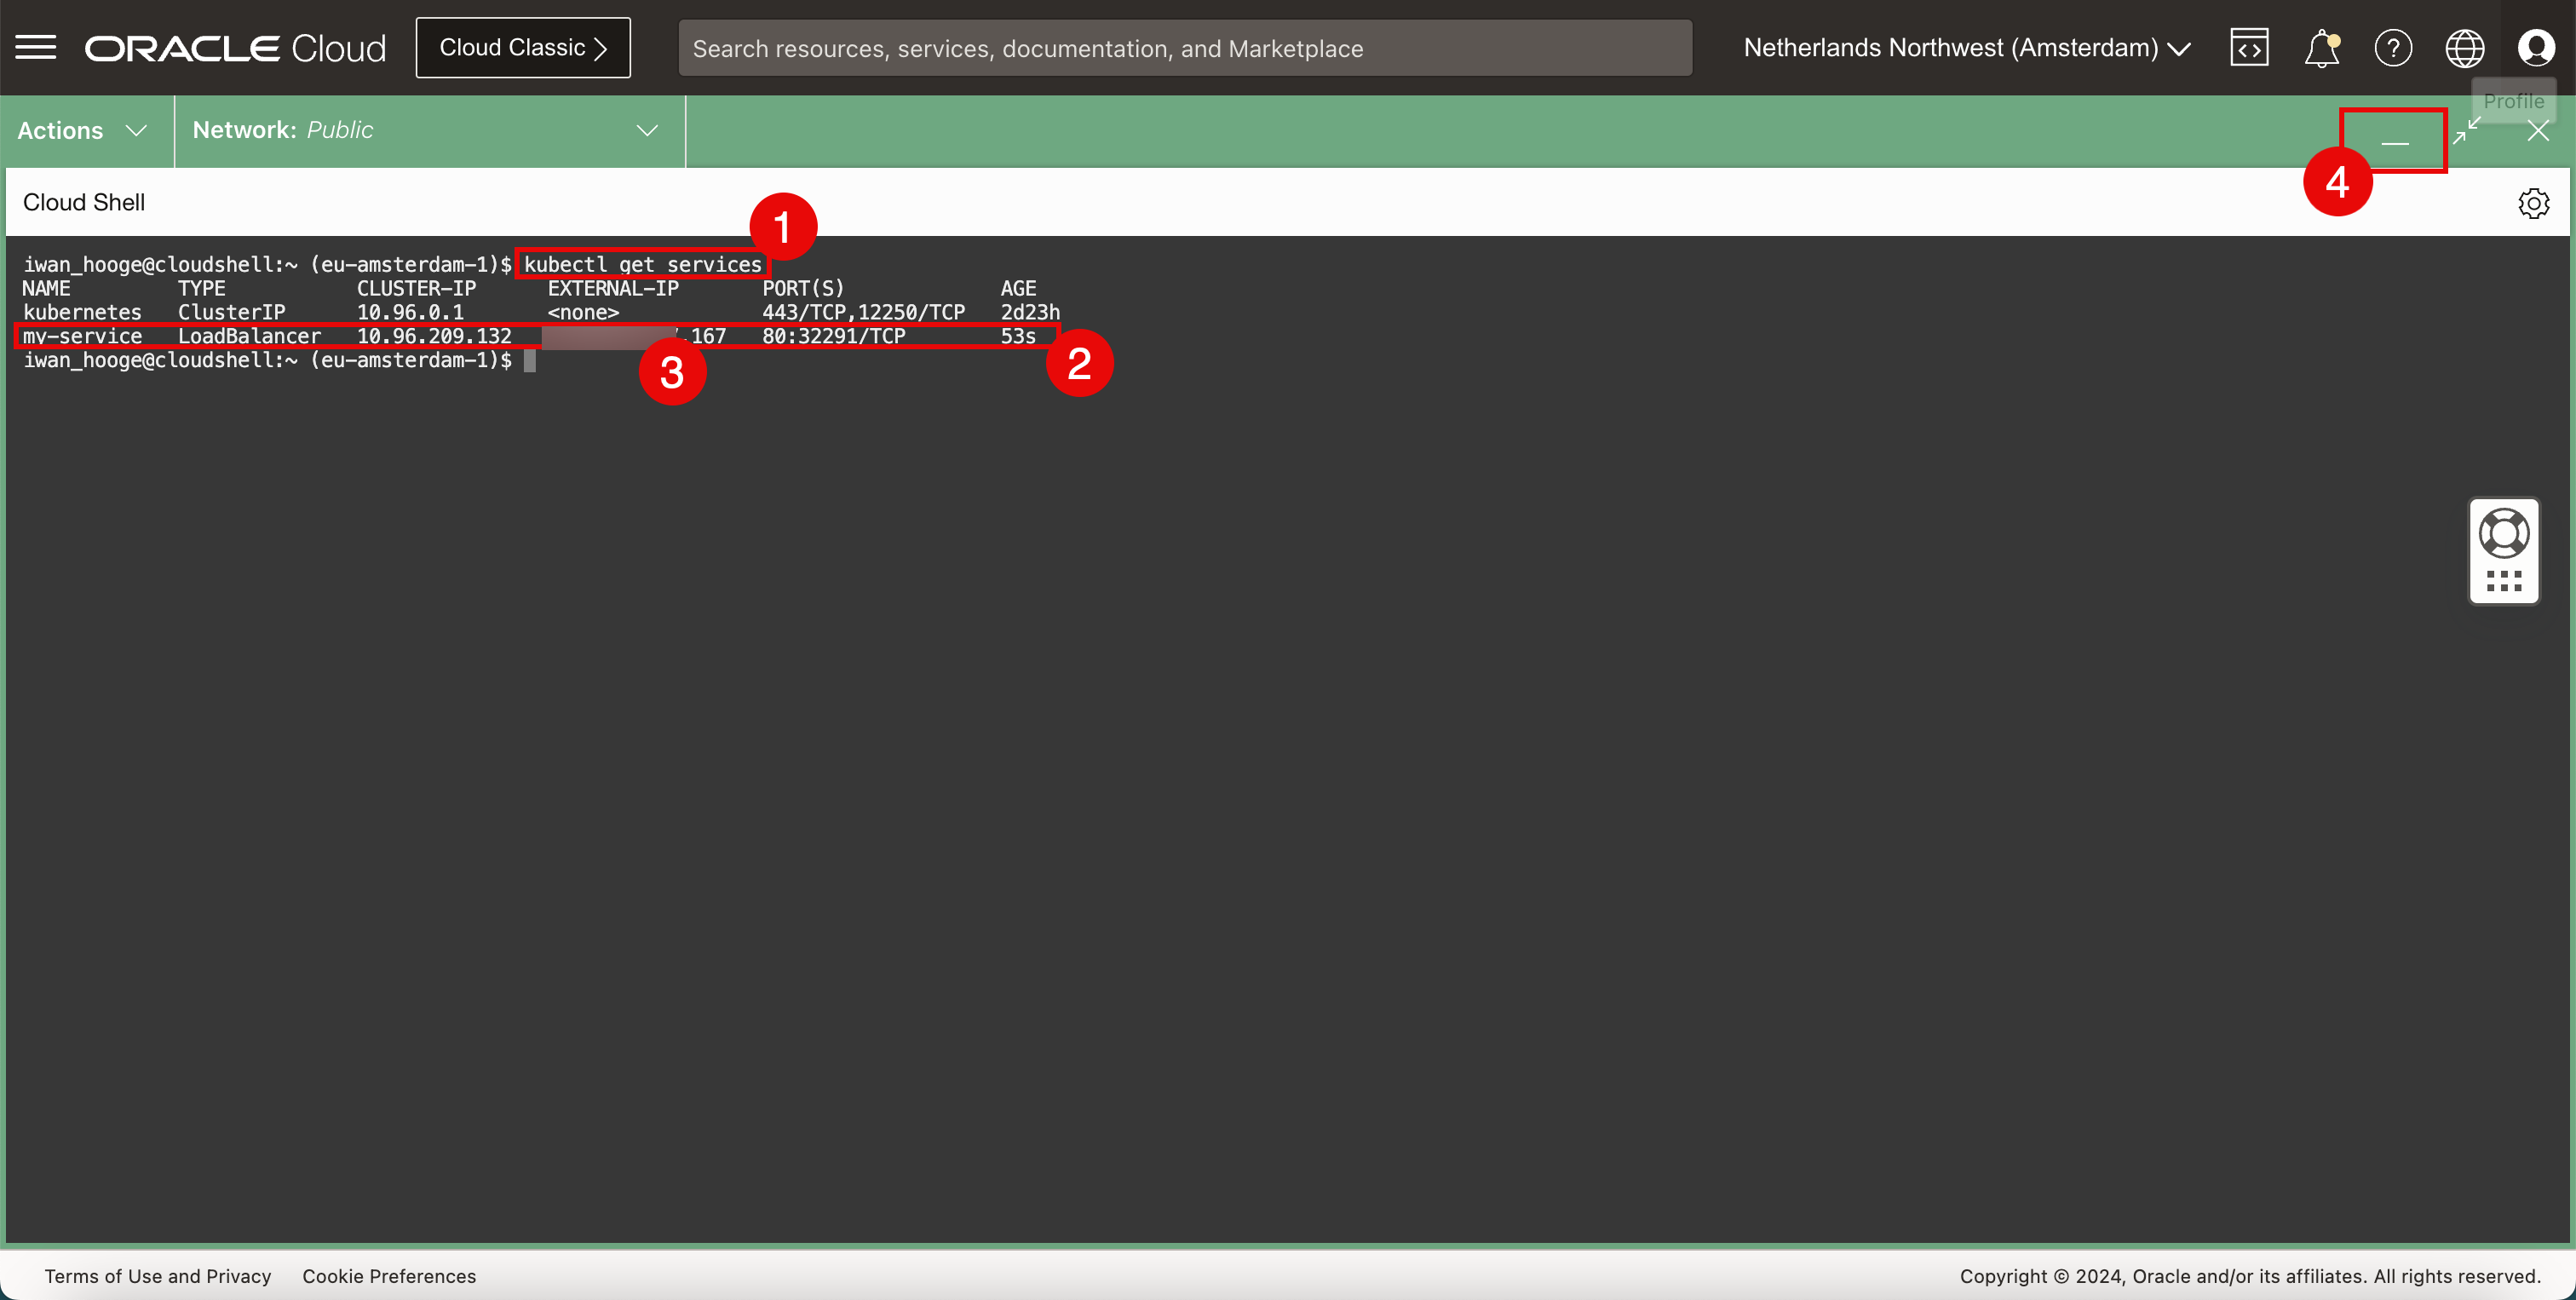
iwan_hooge@cloudshell:~ (eu-amsterdam-1)$ kubectl get services NAME TYPE CLUSTER-IP EXTERNAL-IP PORT(S) AGE kubernetes ClusterIP 10.96.0.1 <none> 443/TCP,12250/TCP 2d23h my-service LoadBalancer 10.96.209.132 xxx.xxx.xxx.167 80:32291/TCP 53s iwan_hooge@cloudshell:~ (eu-amsterdam-1)$ -
Notice that the service we have just configured is now on the list.
-
Notice the
EXTERNAL-IP(public IP address) that has been assigned to the load balancer ending with.167. -
Click the minimize icon to minimize the OCI Cloud Shell.
-
-
Copy the public IP address and paste it into the web browser, we can now access the Nginx web server that is deployed on a container inside Oracle Cloud Infrastructure Container Engine for Kubernetes.

-
We can also take a closer look at what is happening in the background using the OCI Console.
-
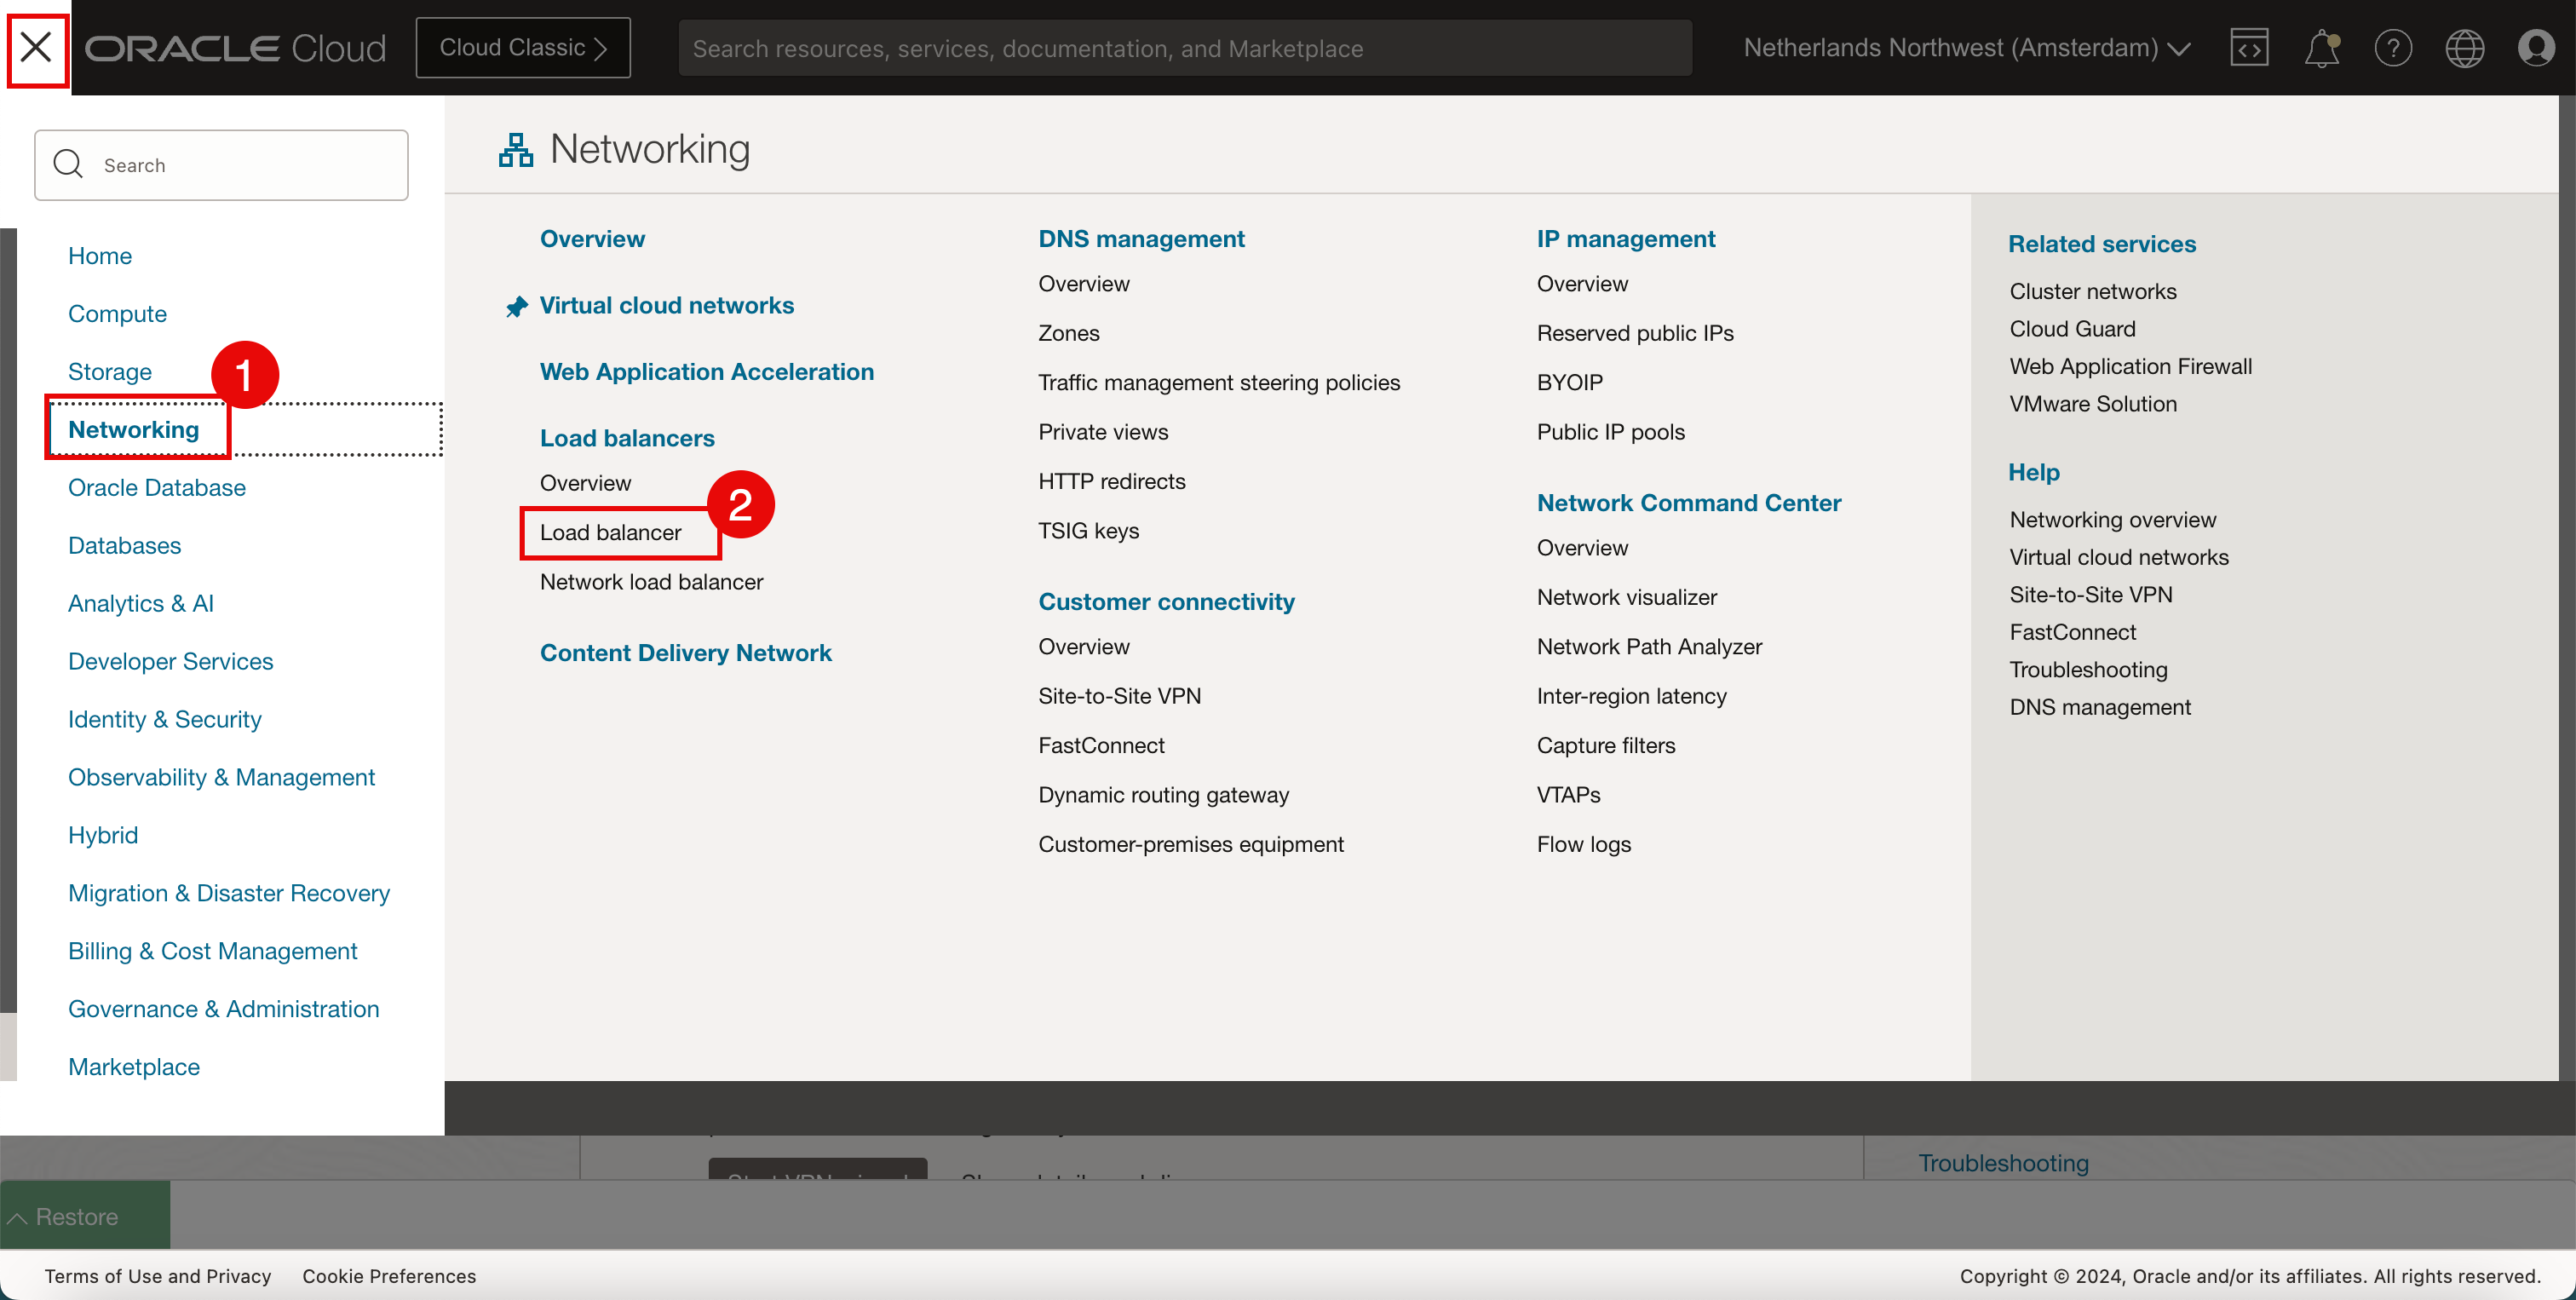
Click Networking.
-
Click Load balancers.
-
-
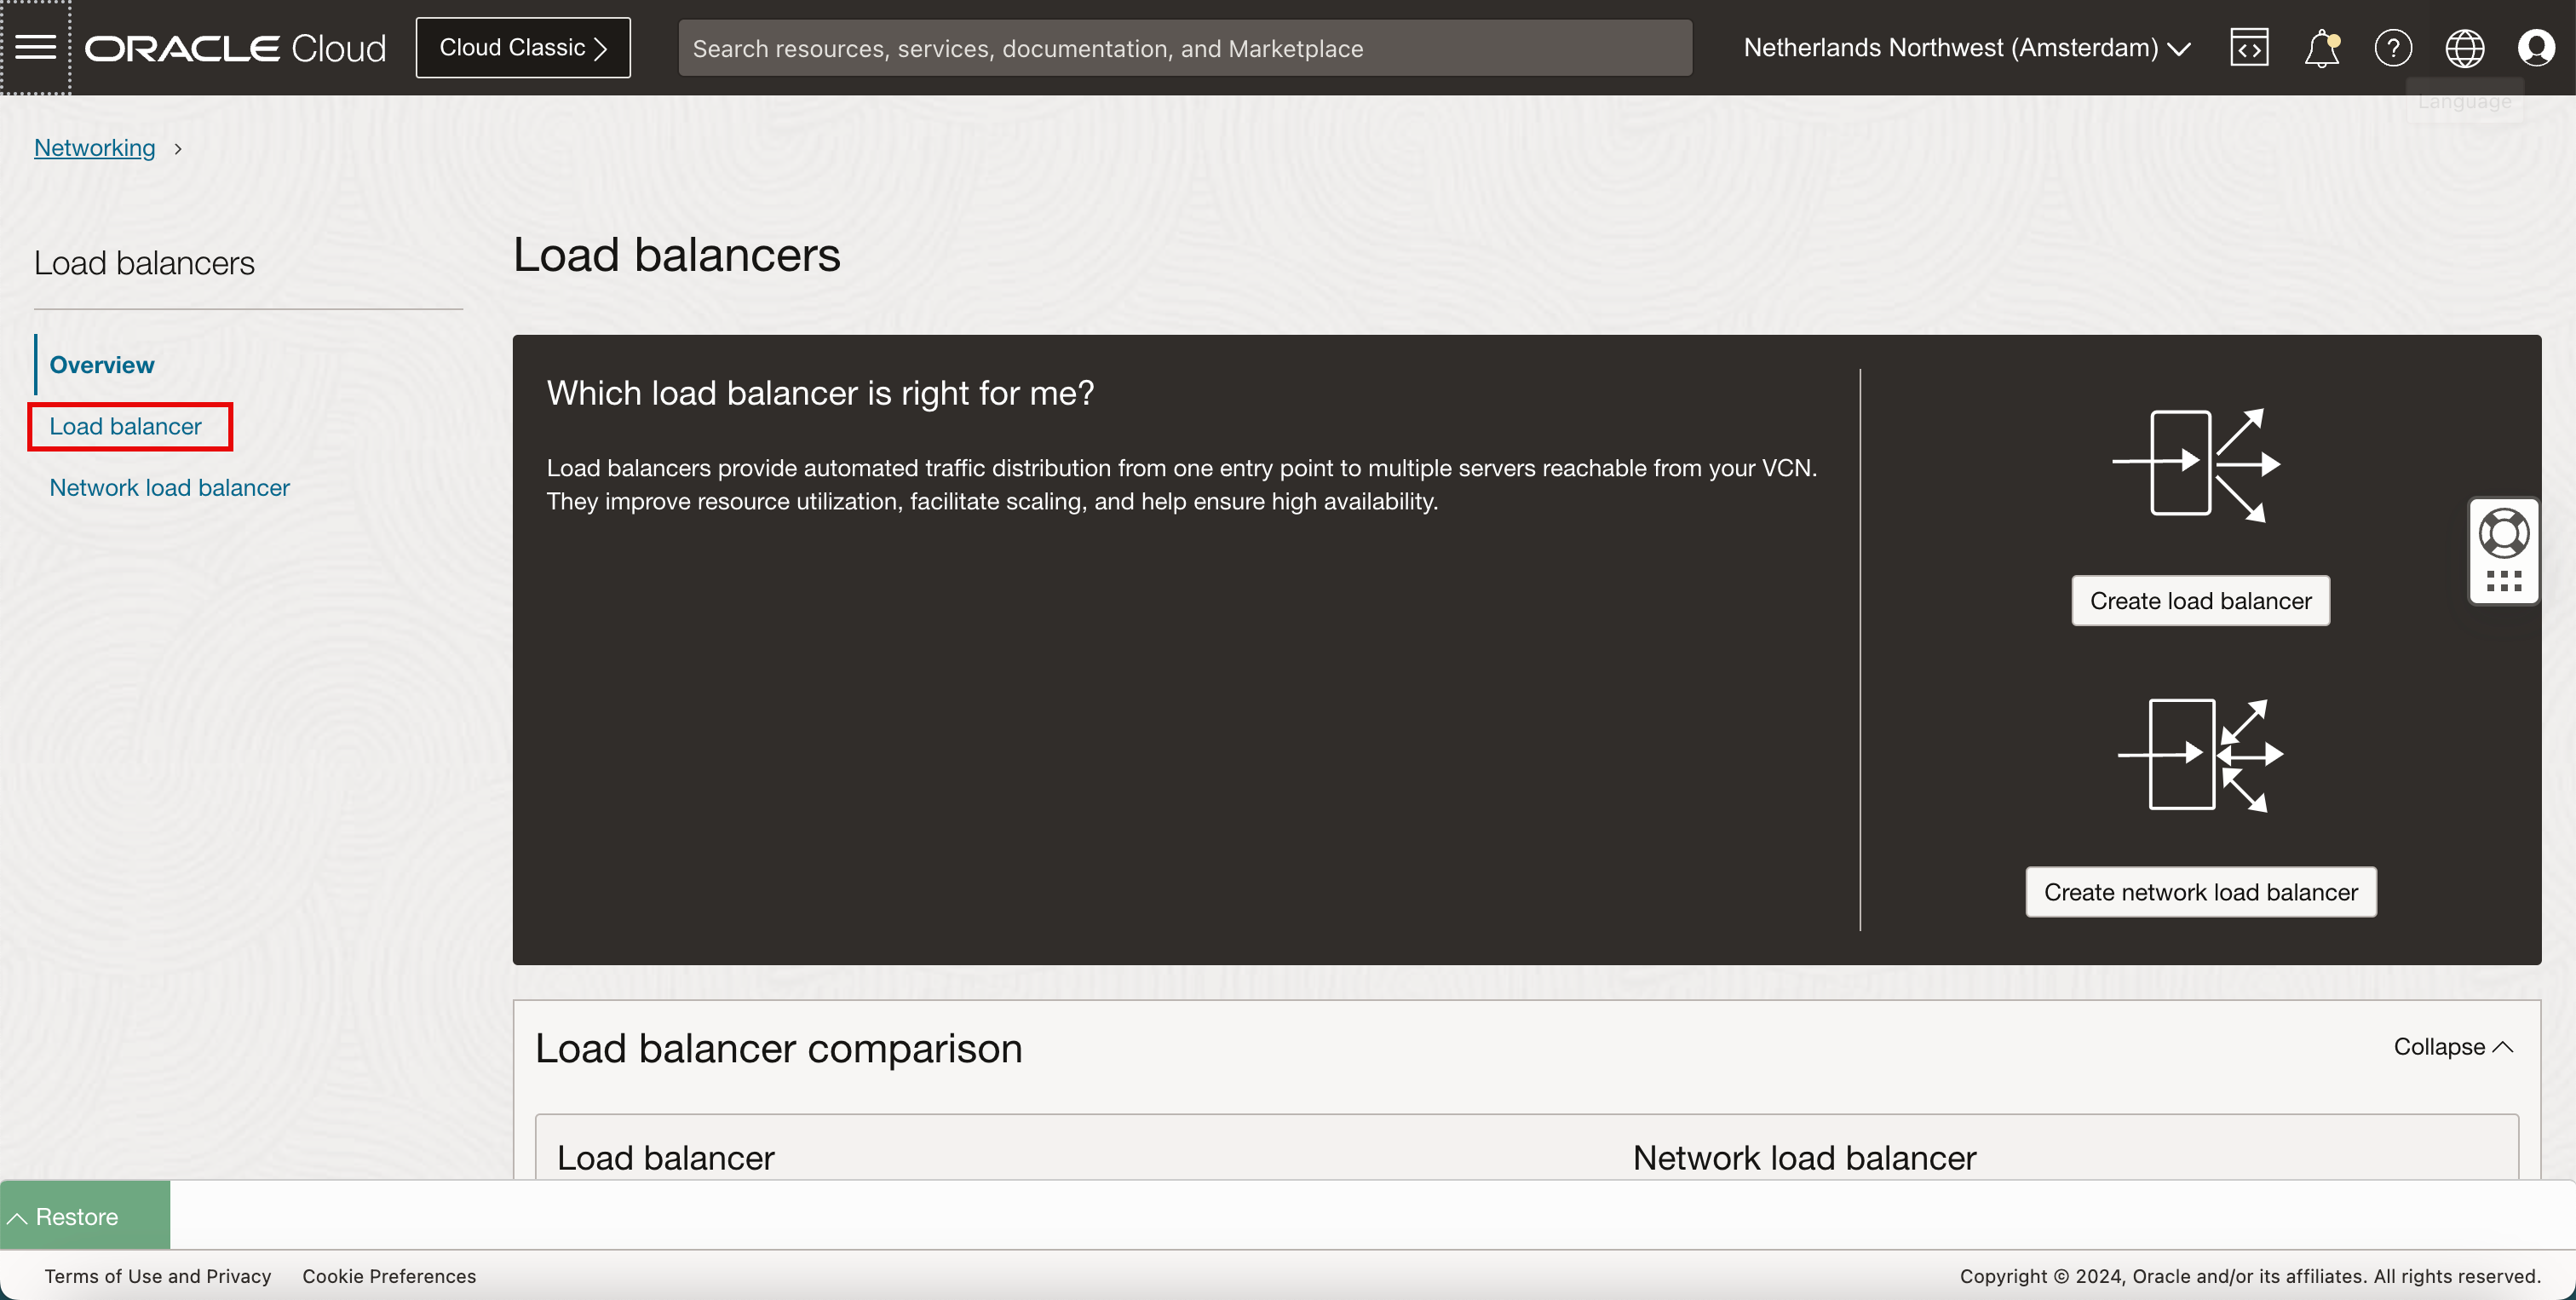
Click Load Balancer.
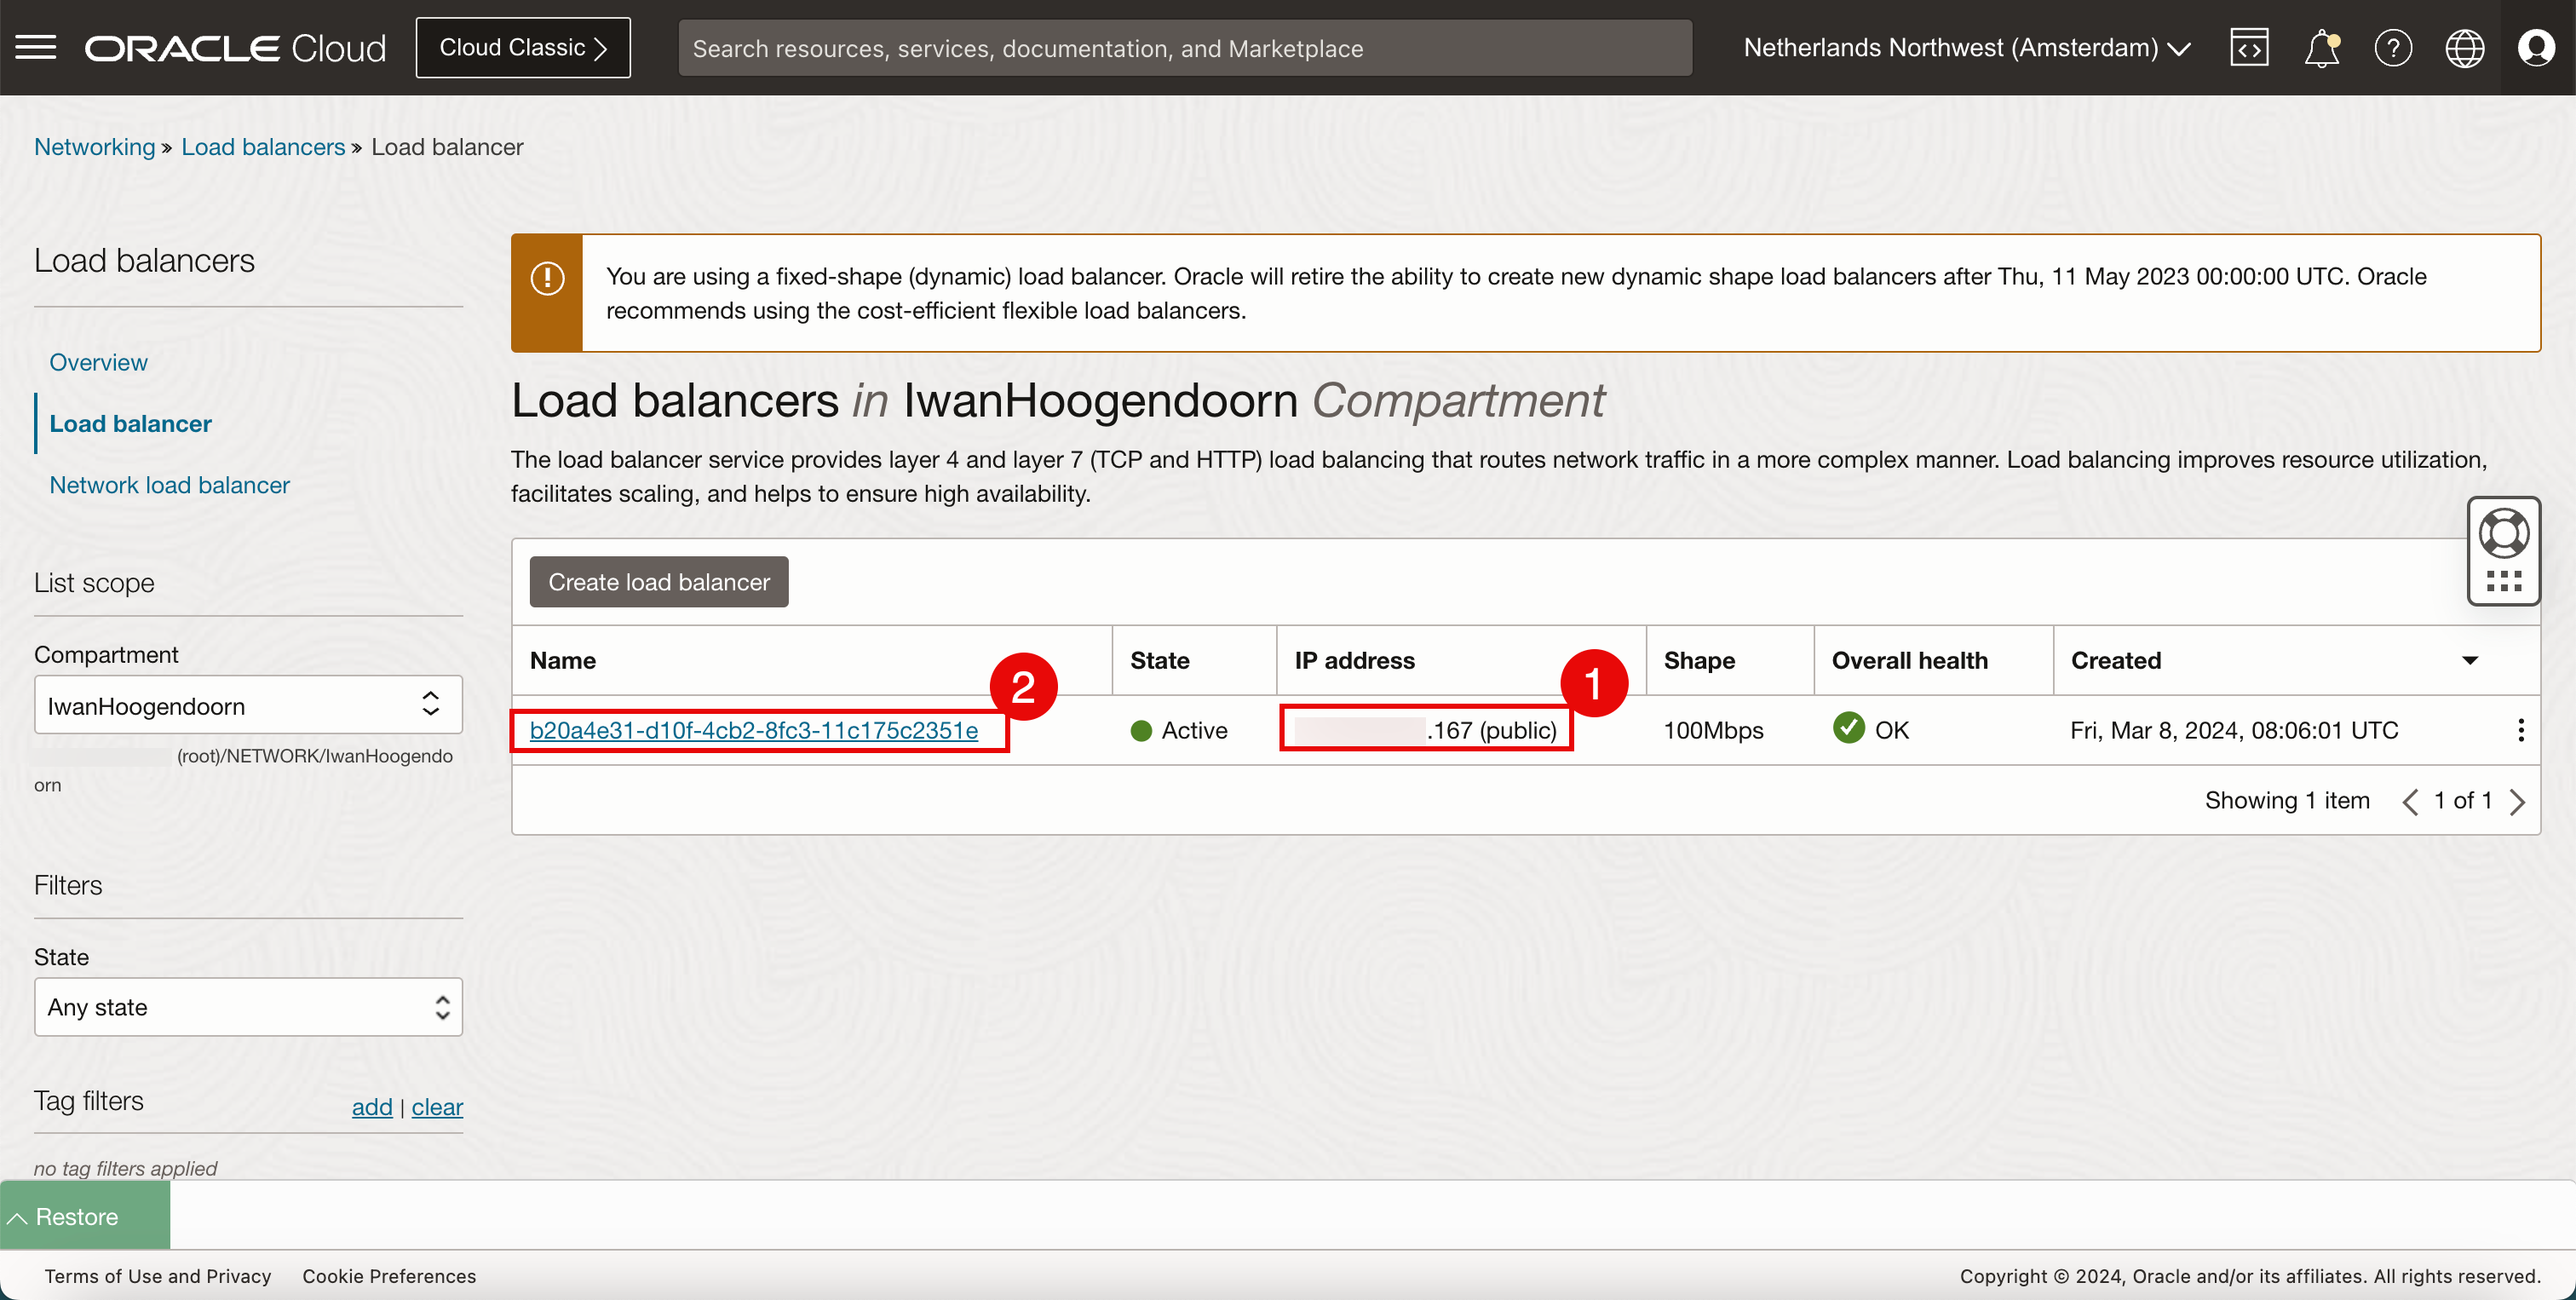
- Notice that there is a new load balancer deployed with the public IP address ending with
.167. - Click the load balancer.
- Notice that the load balancer is ACTIVE.
- Scroll down.
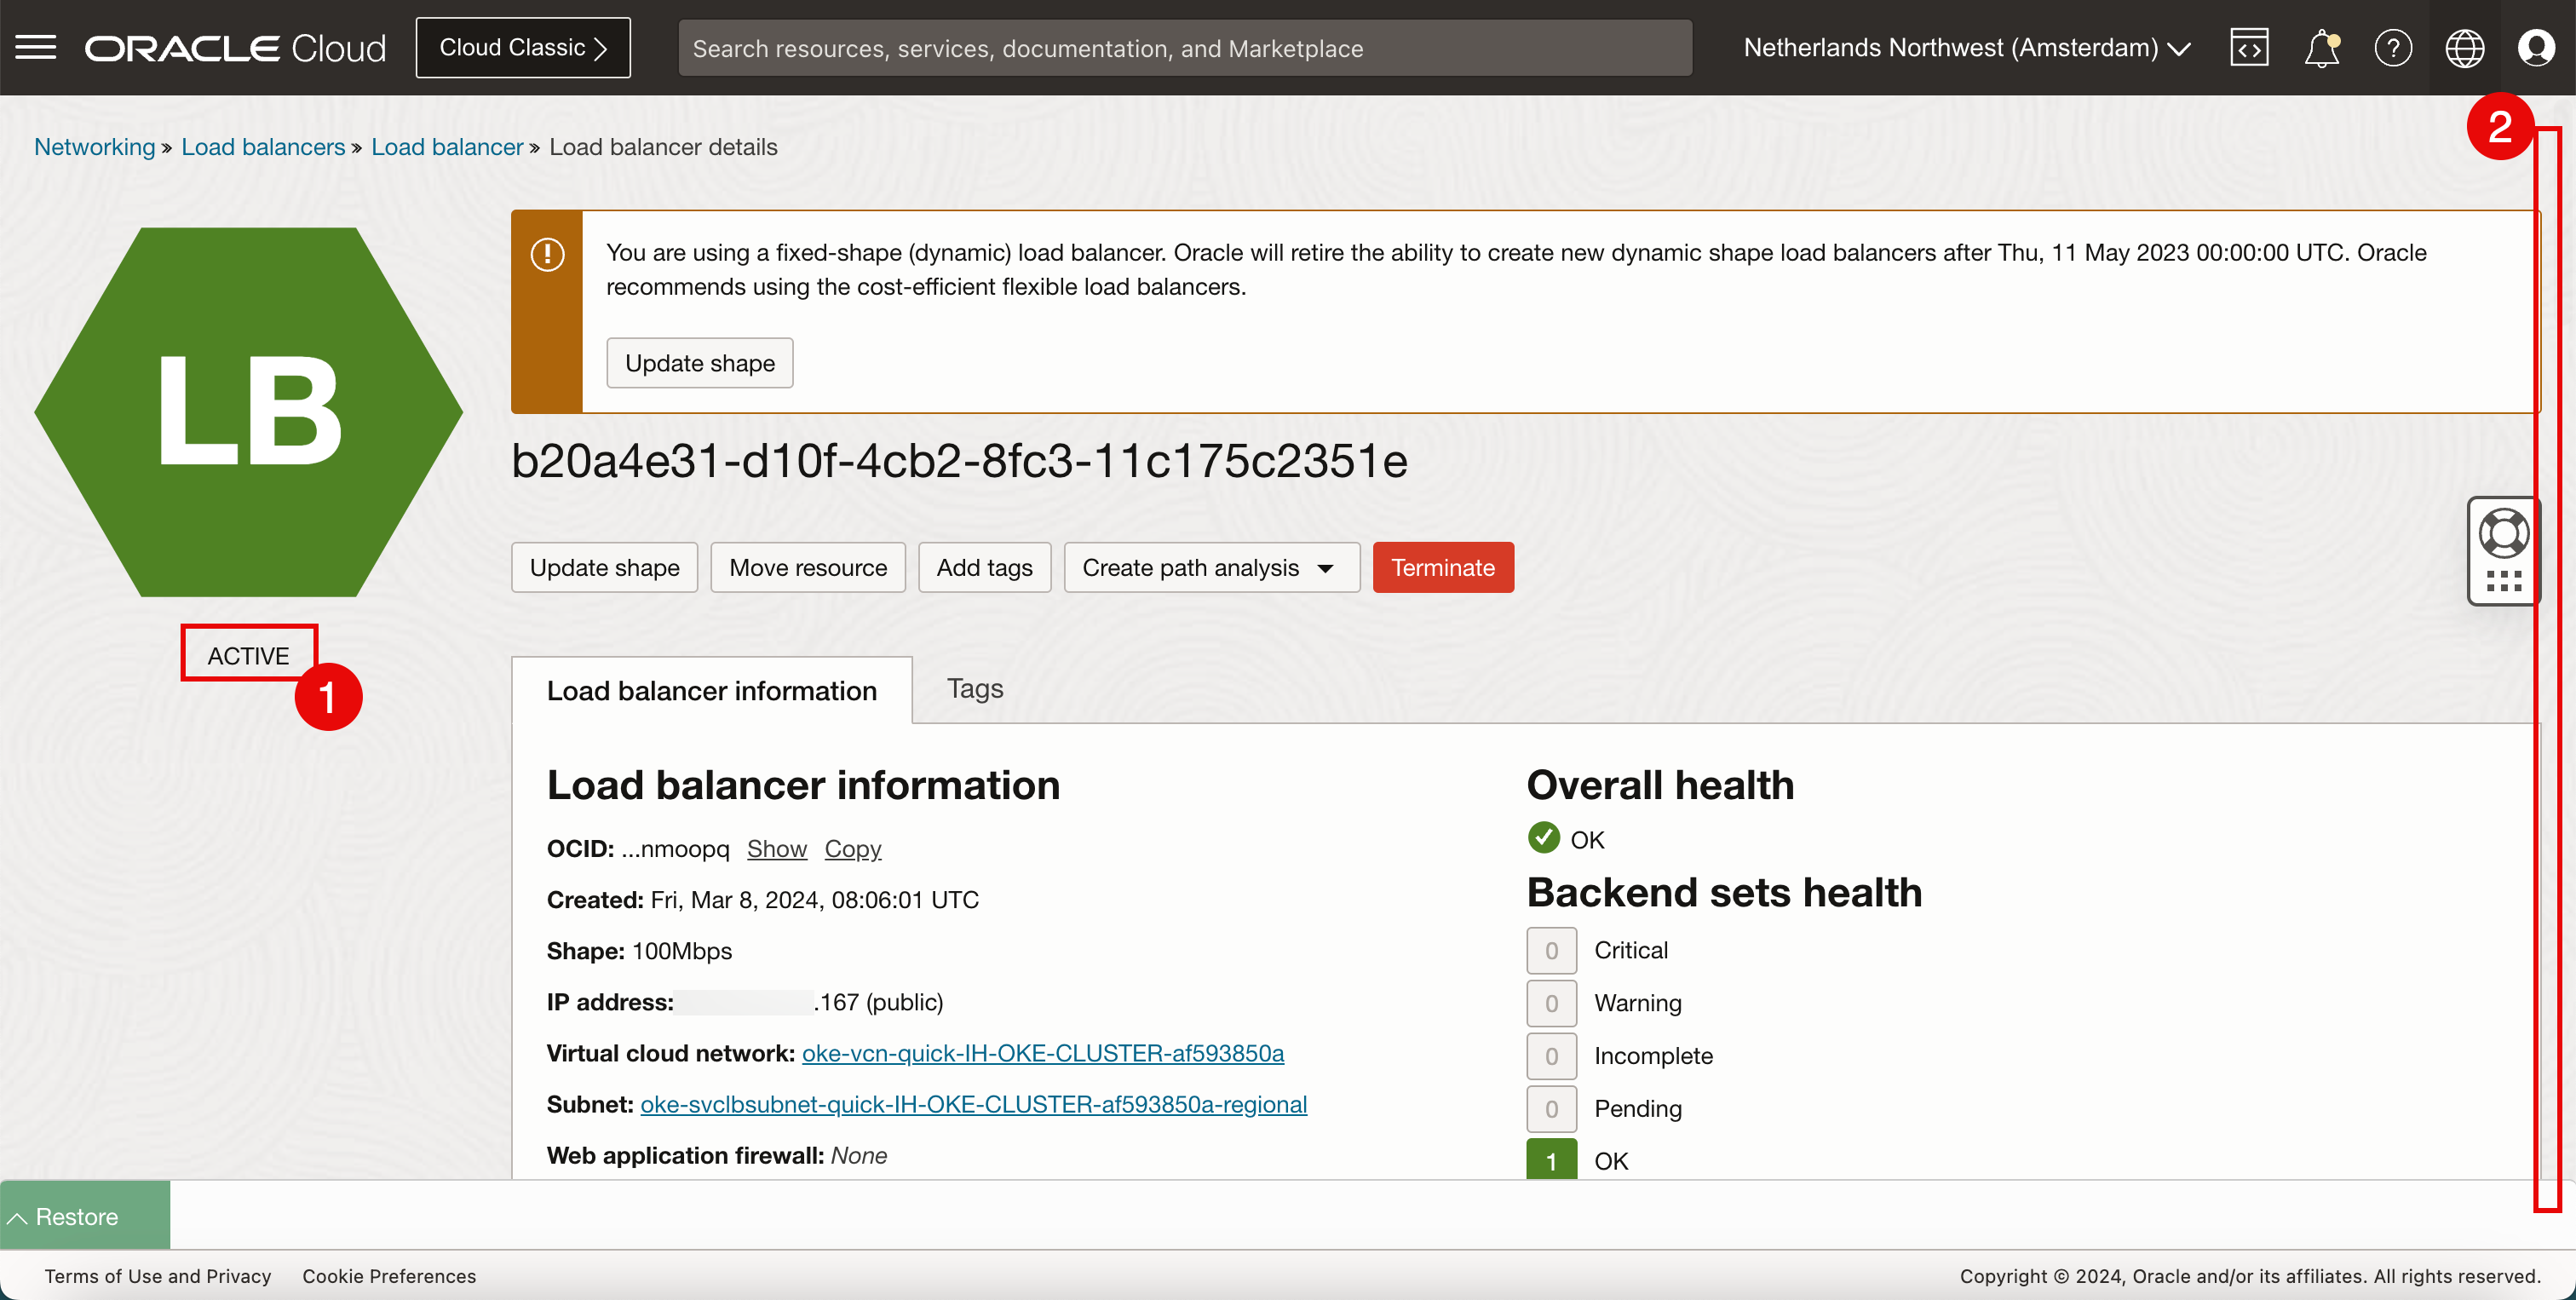
- Review the configuration details of the deployed load balancer.
- Click Restore to restore the OCI Cloud Shell.
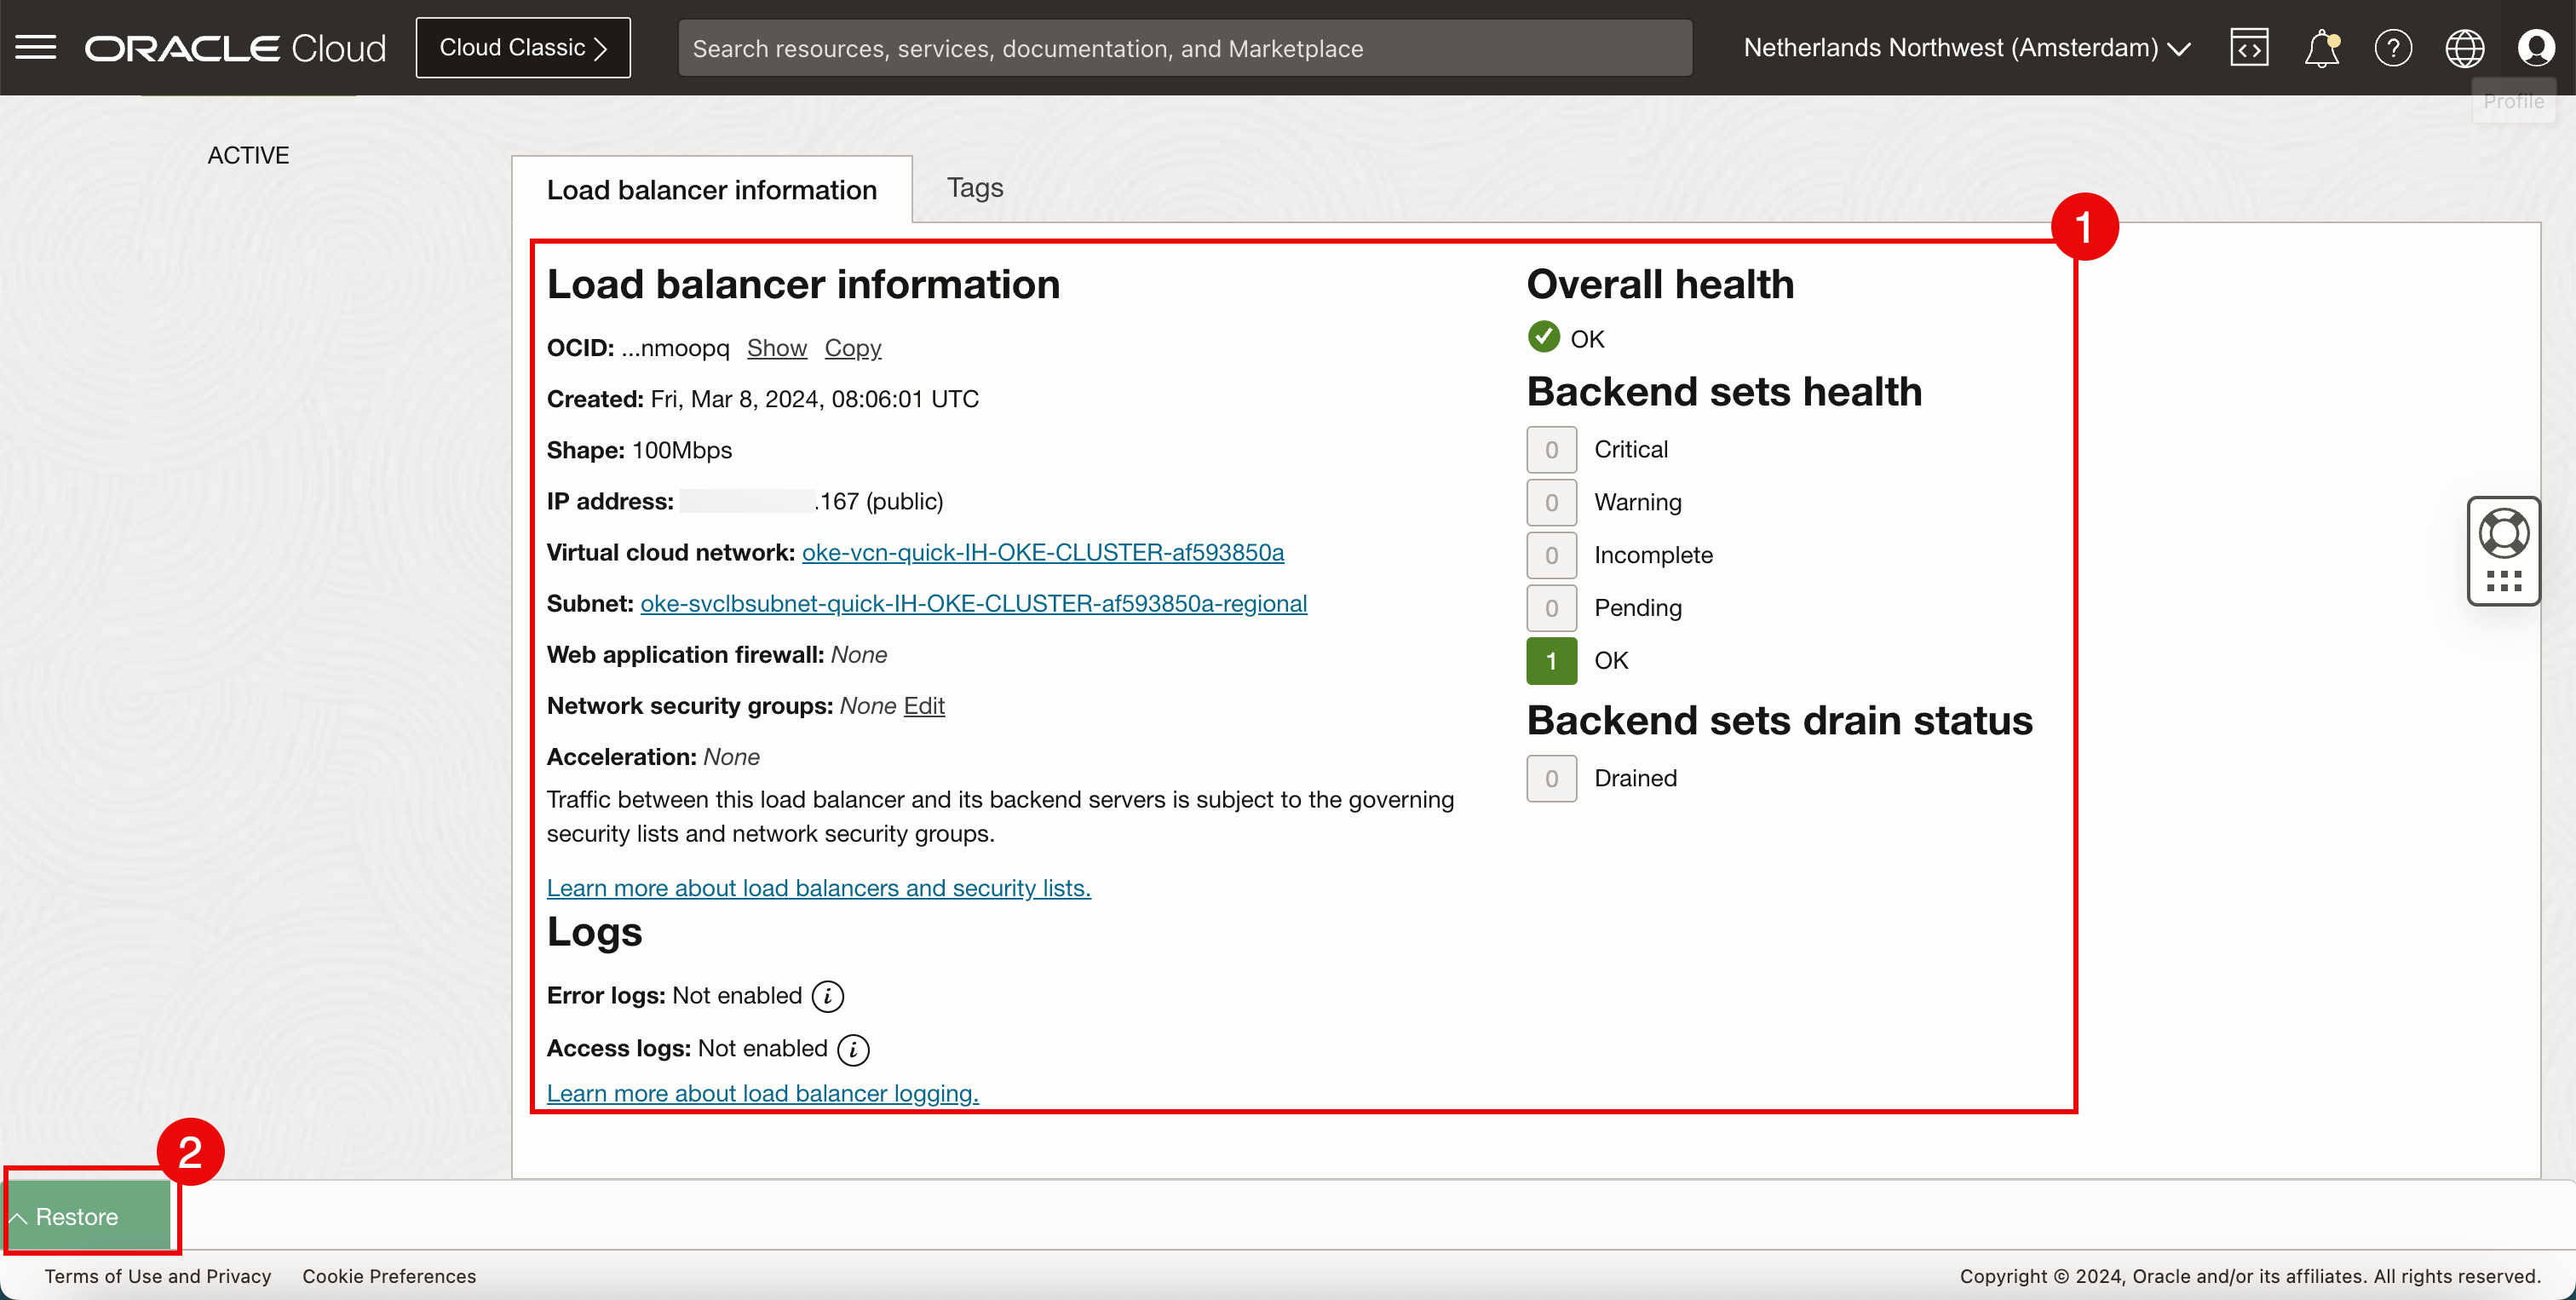
- Notice that there is a new load balancer deployed with the public IP address ending with
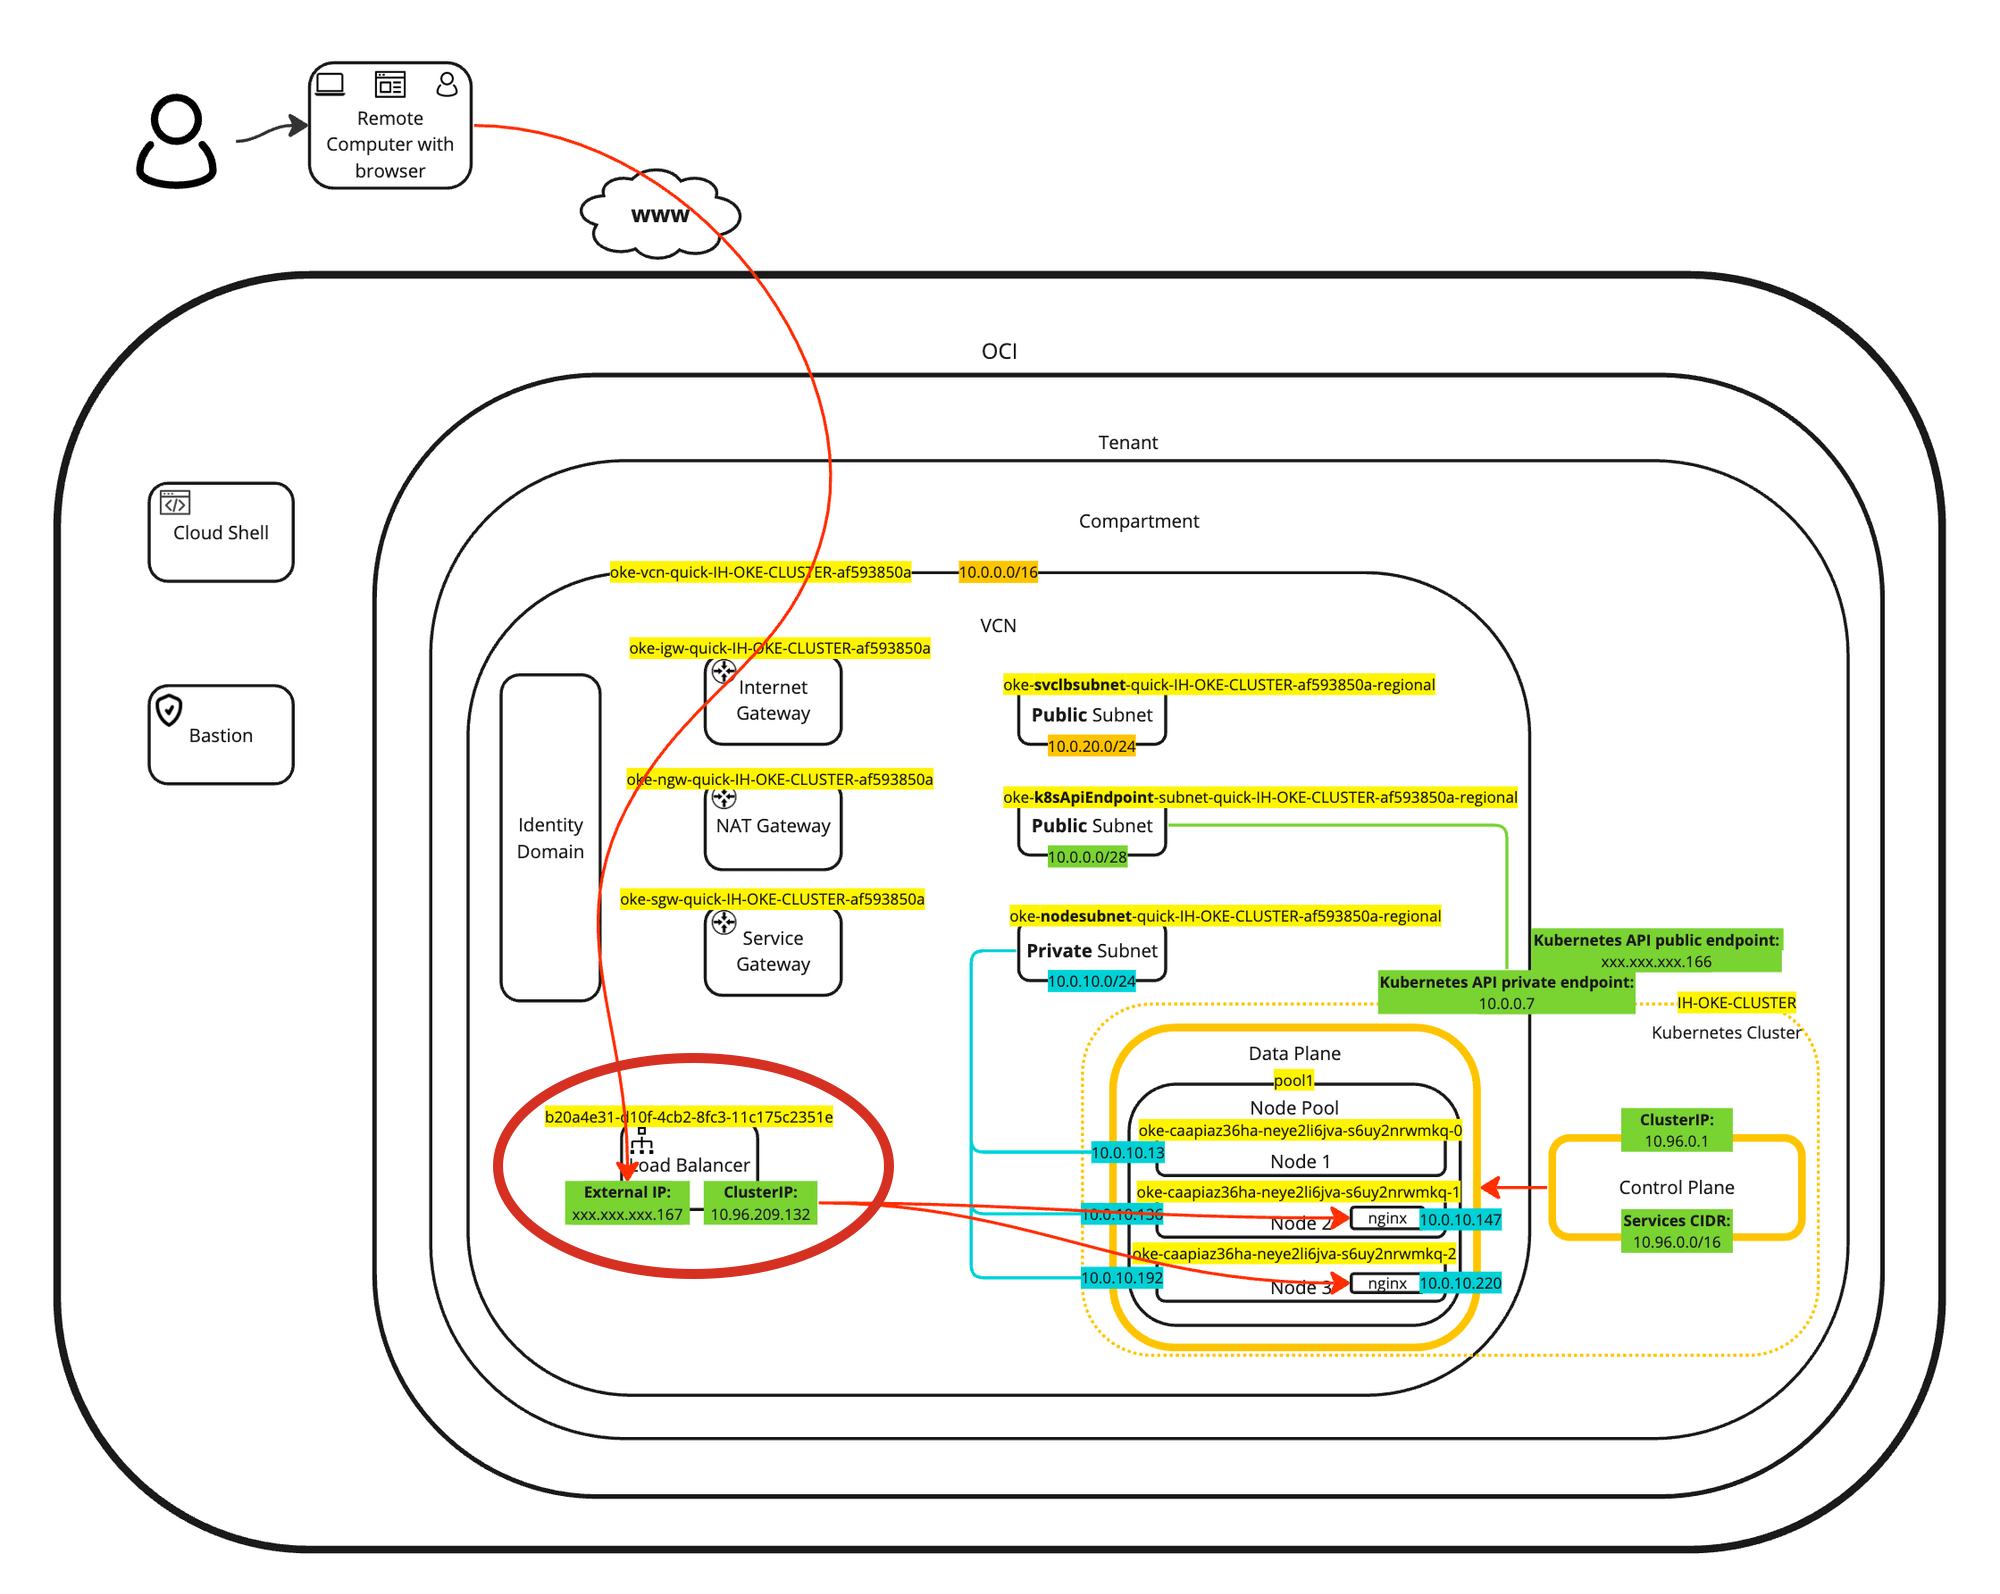
A visual representation of the load balancer deployment can be found in the following diagram. Focus on the load balancer.
Task 5: Remove the Sample application and Kubernetes Services of Load Balancer Type
We have deployed a sample application and created a new Kubernetes network service of load balancer type, it is time to clean up the application and the service.
-
Remove the load balancer service.
-
Run the following command to delete the load balancer service.
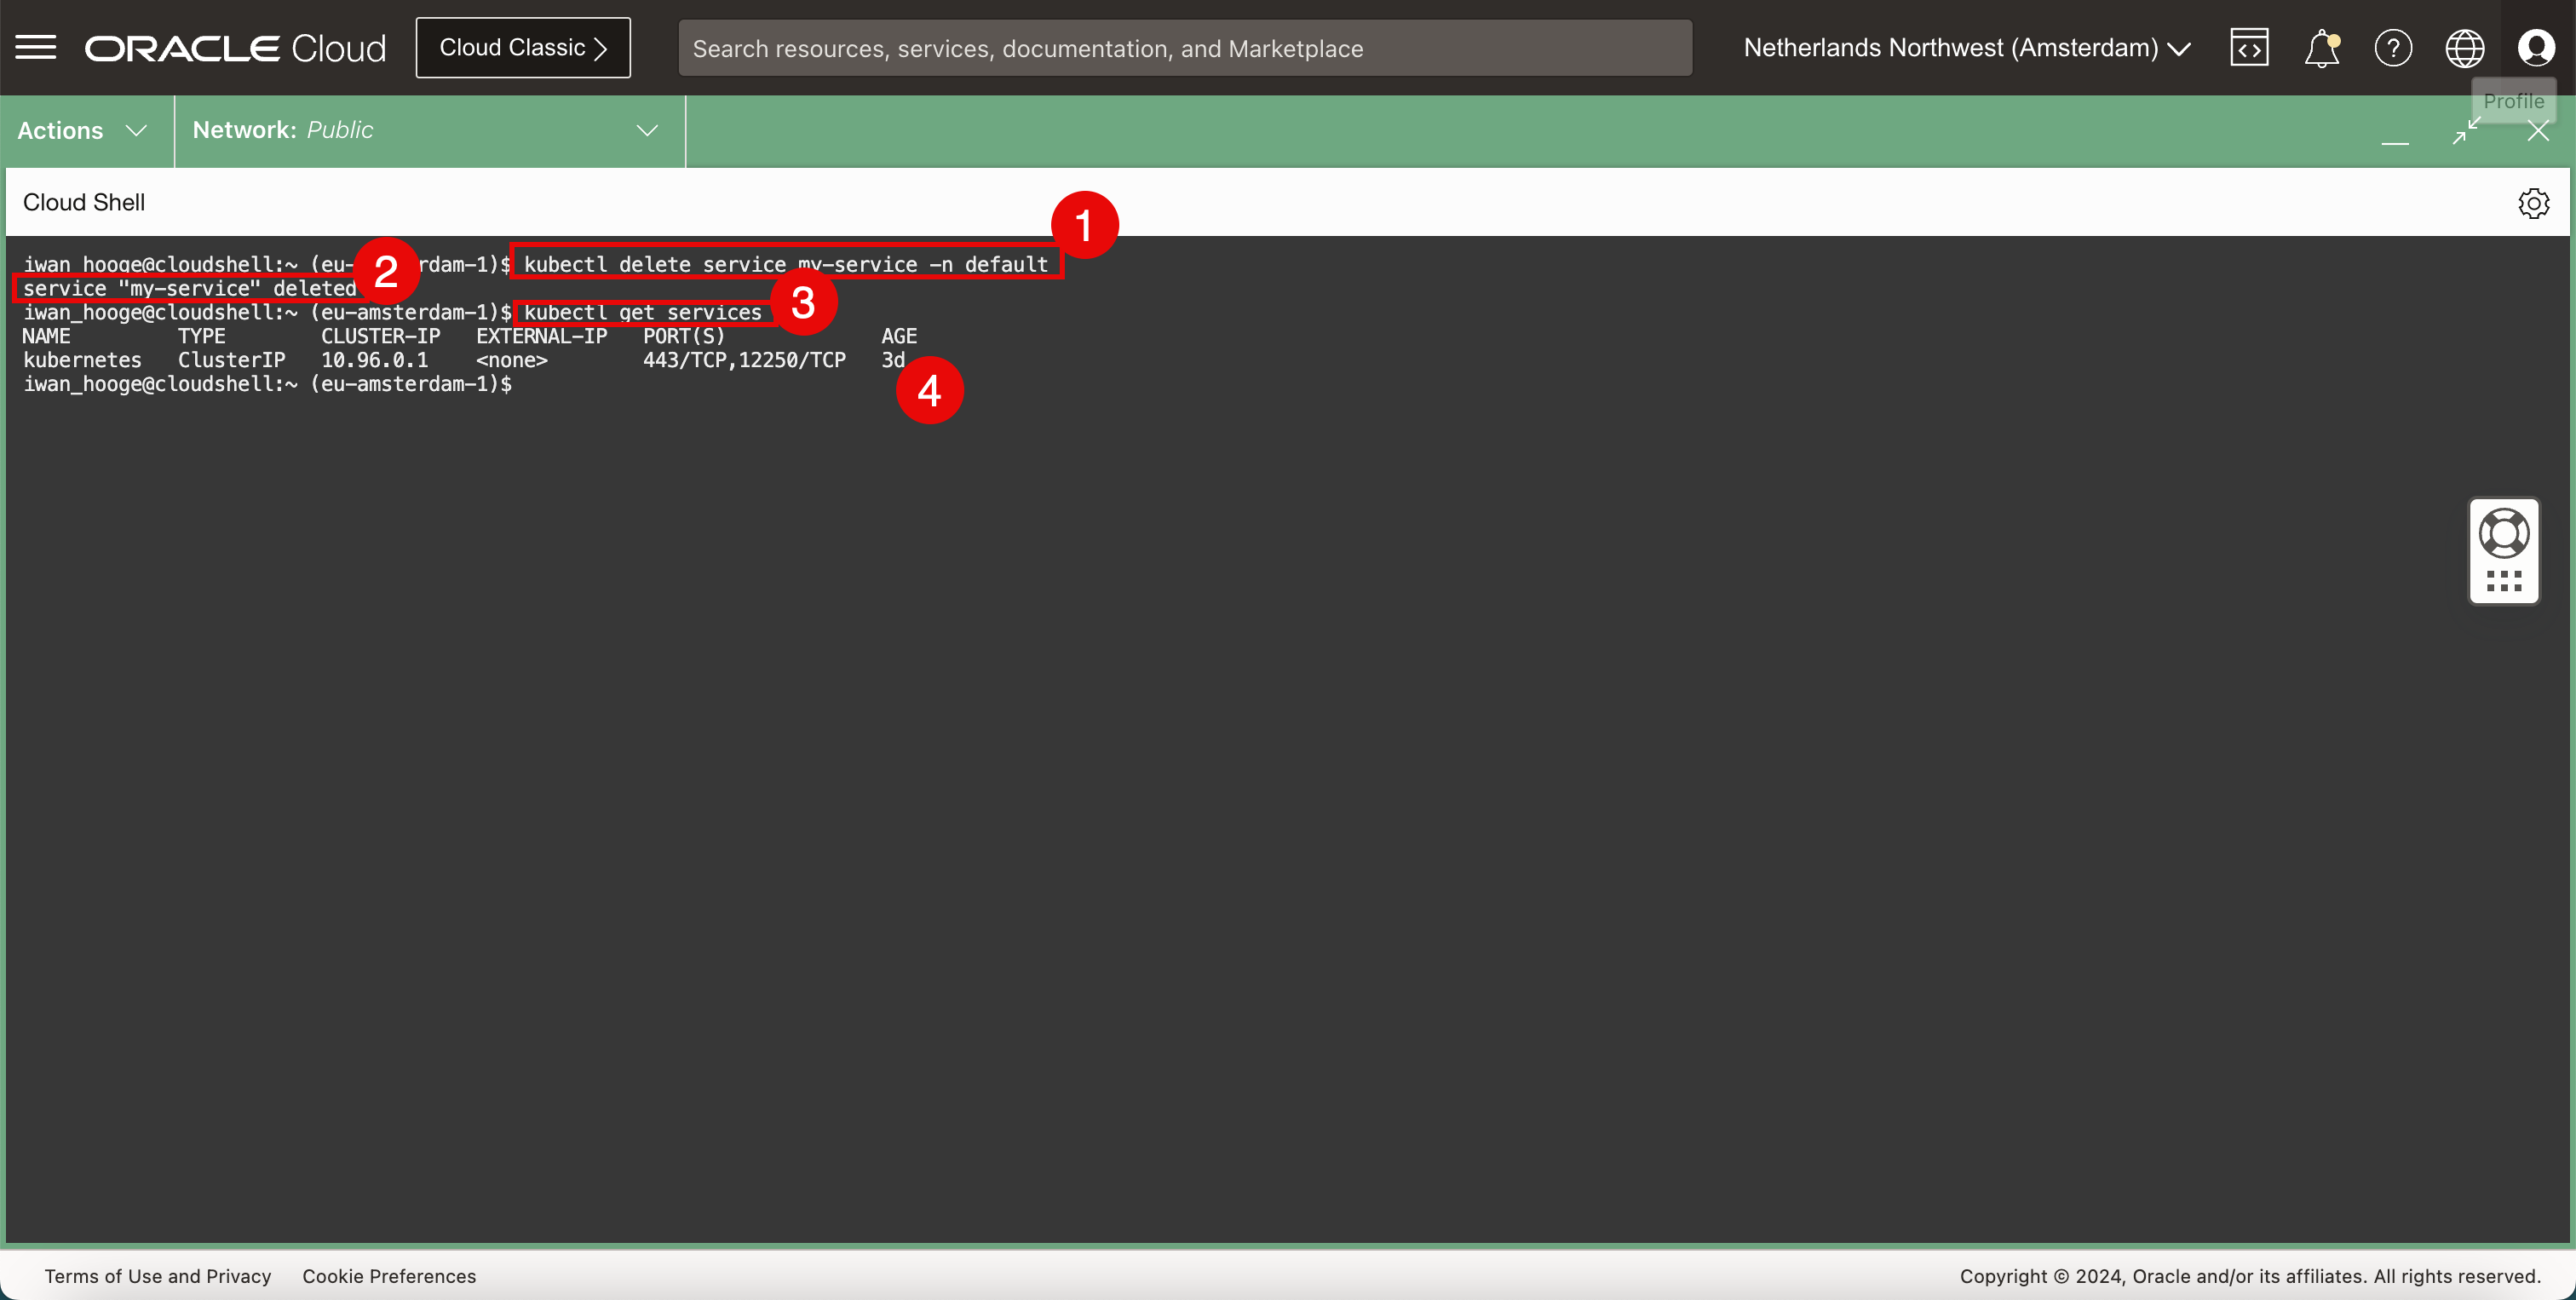
iwan_hooge@cloudshell:~ (eu-amsterdam-1)$ kubectl delete service my-service -n default service "my-service" deleted -
Notice that the load balancer service is successfully deleted.
-
Run the following command to verify the load balancer service is deleted.
iwan_hooge@cloudshell:~ (eu-amsterdam-1)$ kubectl get services NAME TYPE CLUSTER-IP EXTERNAL-IP PORT(S) AGE kubernetes ClusterIP 10.96.0.1 <none> 443/TCP,12250/TCP 2d23h iwan_hooge@cloudshell:~ (eu-amsterdam-1)$ -
Notice that the load balancer service is deleted.
-
-
Remove the sample application.
-
Run the following command to retrieve the existing pods.
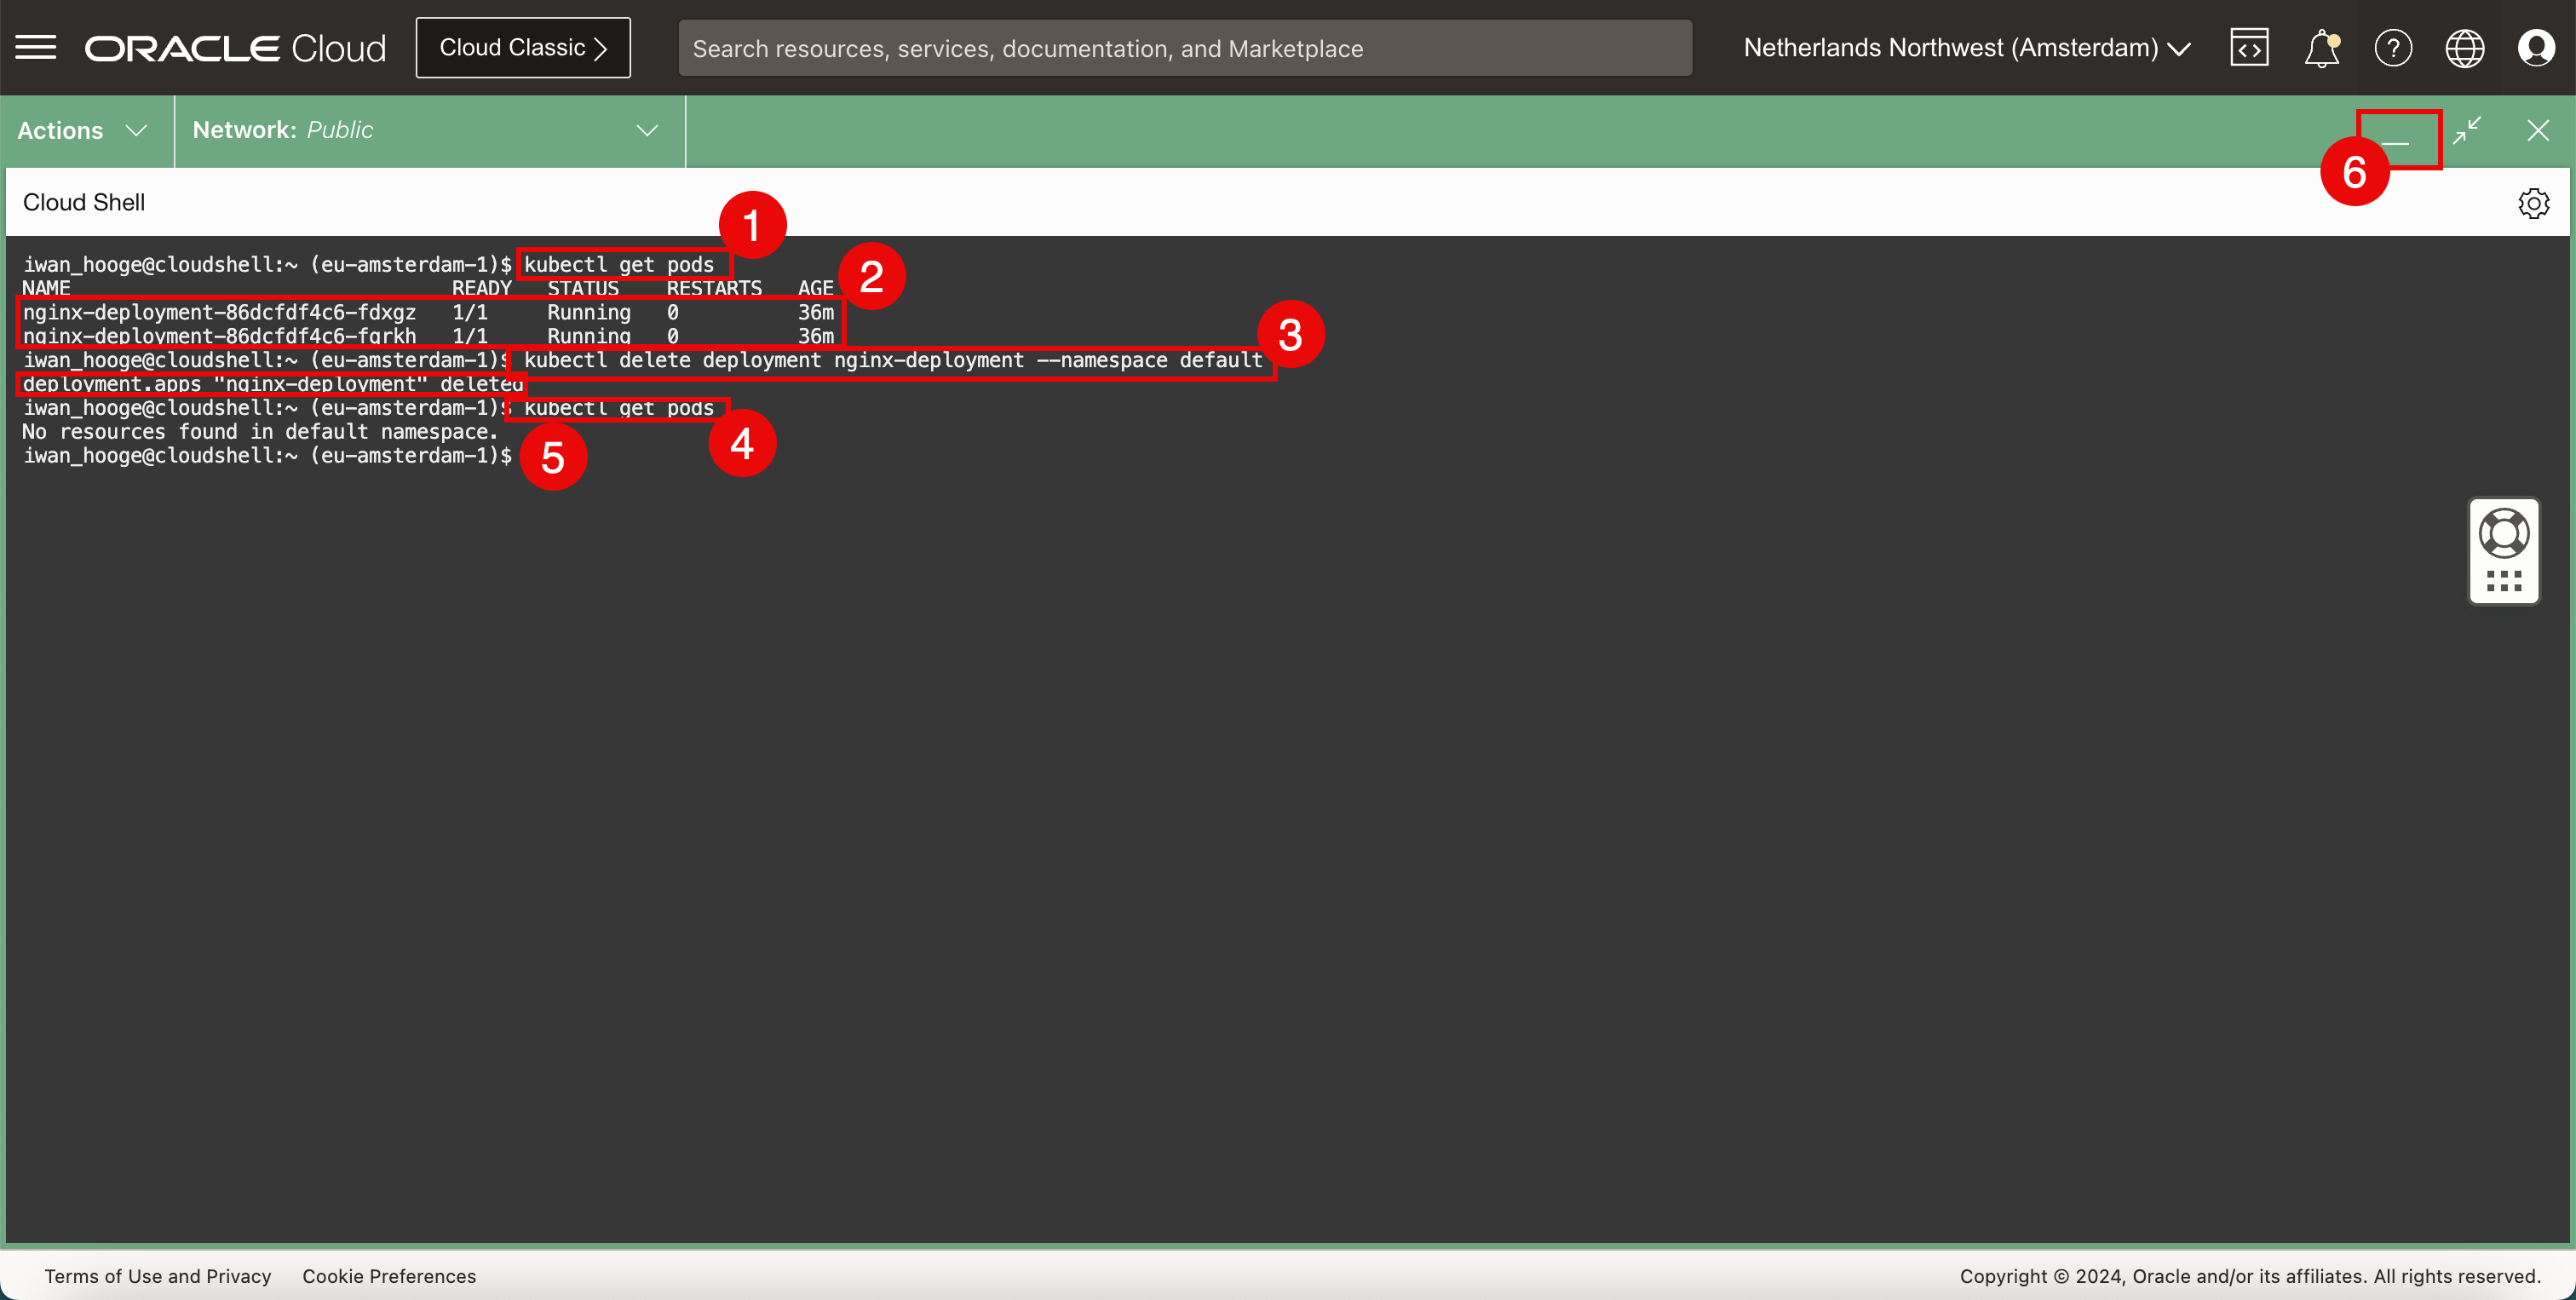
iwan_hooge@cloudshell:~ (eu-amsterdam-1)$ kubectl get pods NAME READY STATUS RESTARTS AGE nginx-deployment-86dcfdf4c6-fdxgz 1/1 Running 0 36m nginx-deployment-86dcfdf4c6-fqrkh 1/1 Running 0 36m -
Notice that the Nginx application is still running.
-
Run the following command to delete the deployment of the Nginx application.
iwan_hooge@cloudshell:~ (eu-amsterdam-1)$ kubectl delete deployment nginx-deployment --namespace default deployment.apps "nginx-deployment" deleted -
Run the following command to retrieve the existing pods again and to verify the deployment is deleted.
iwan_hooge@cloudshell:~ (eu-amsterdam-1)$ kubectl get pods No resources found in default namespace. iwan_hooge@cloudshell:~ (eu-amsterdam-1)$ -
Notice that the Nginx application is deleted.
-
Click the minimize icon to minimize the OCI Cloud Shell.
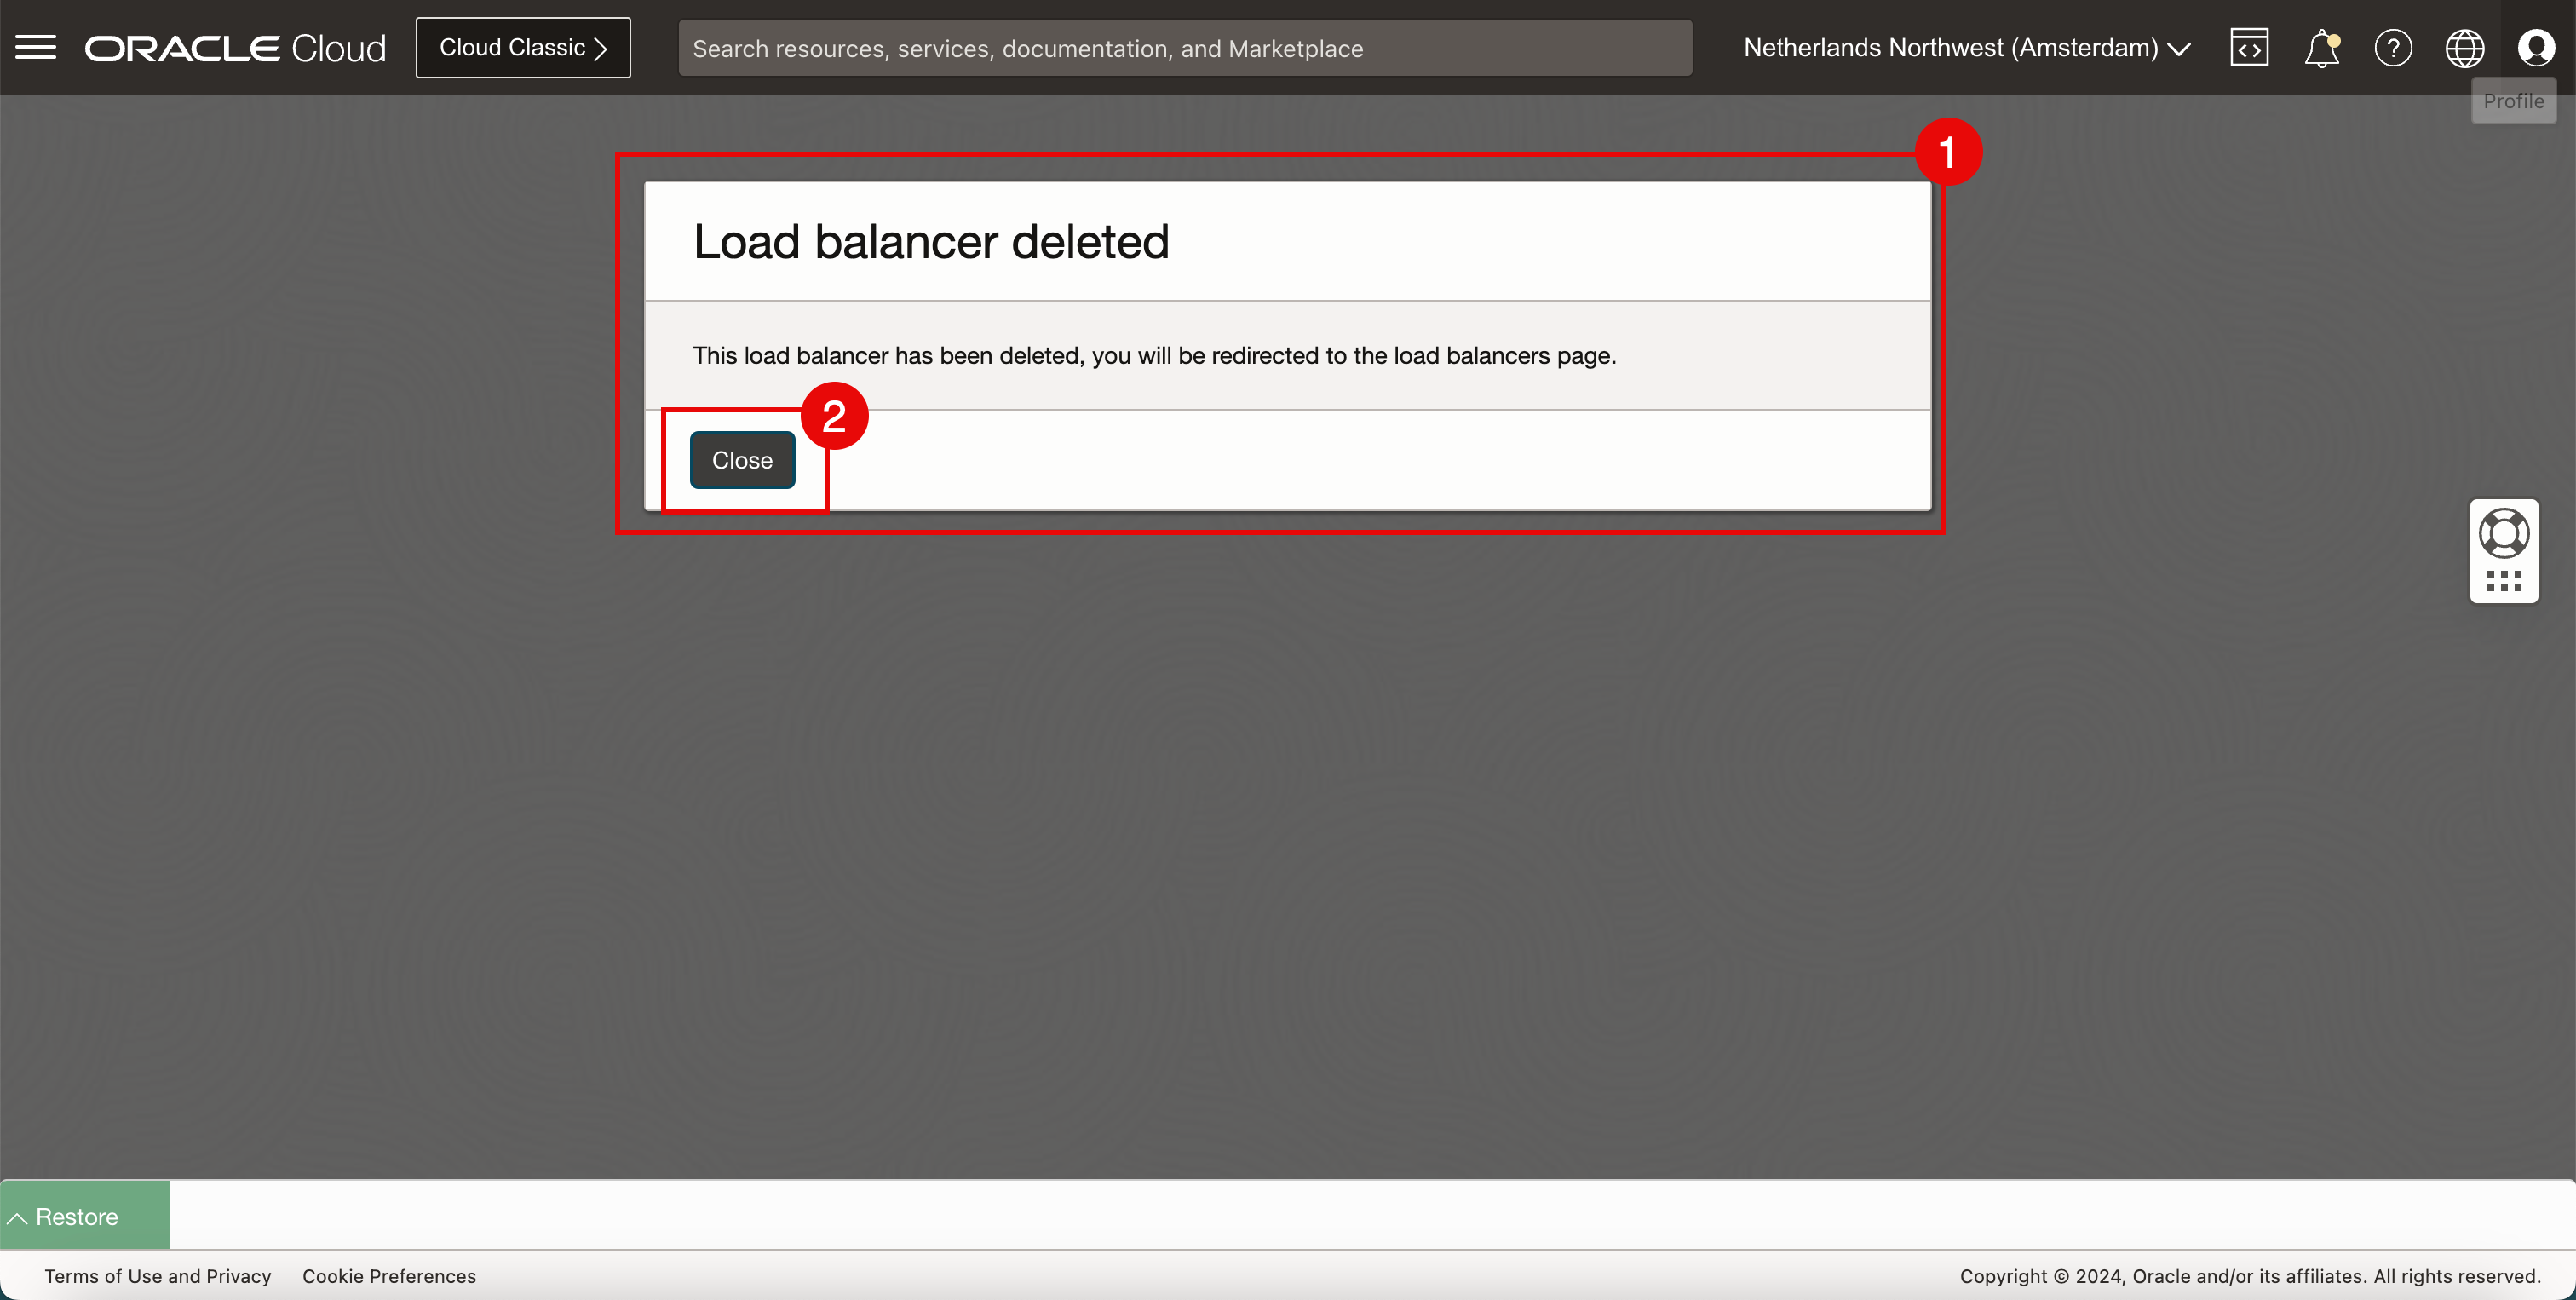
- Notice that the OCI Console will display a message that the load balancer is deleted.
- Click Close.
-
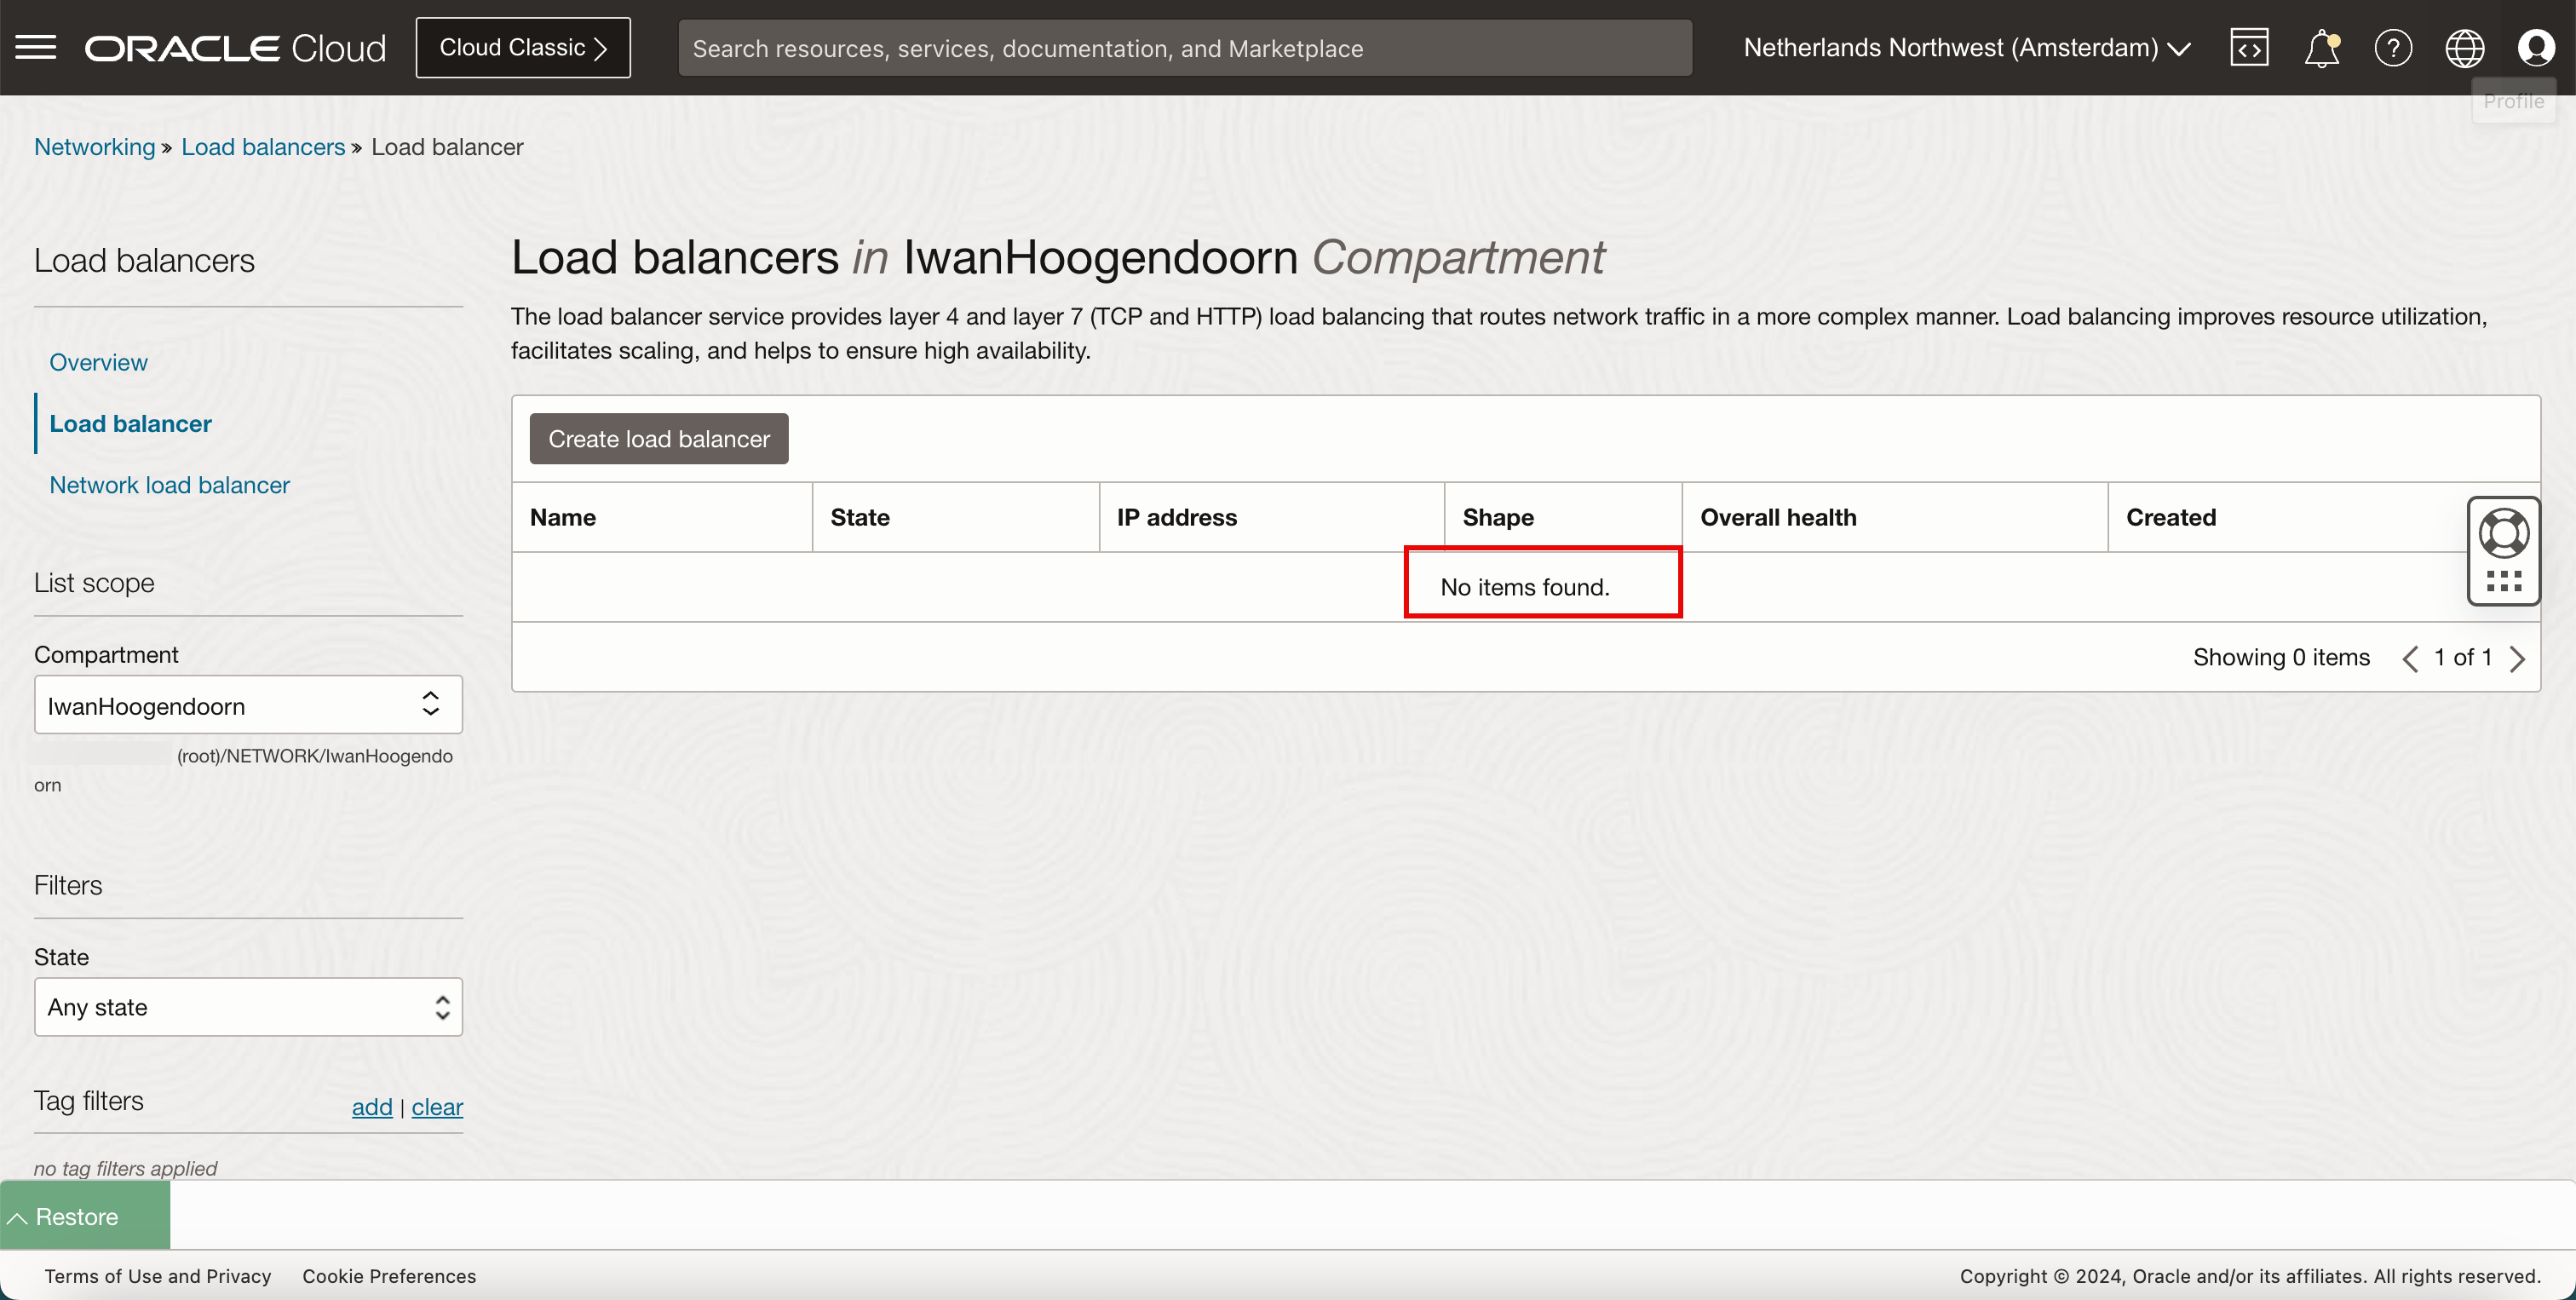
Notice that there is no load balancer deployed anymore.
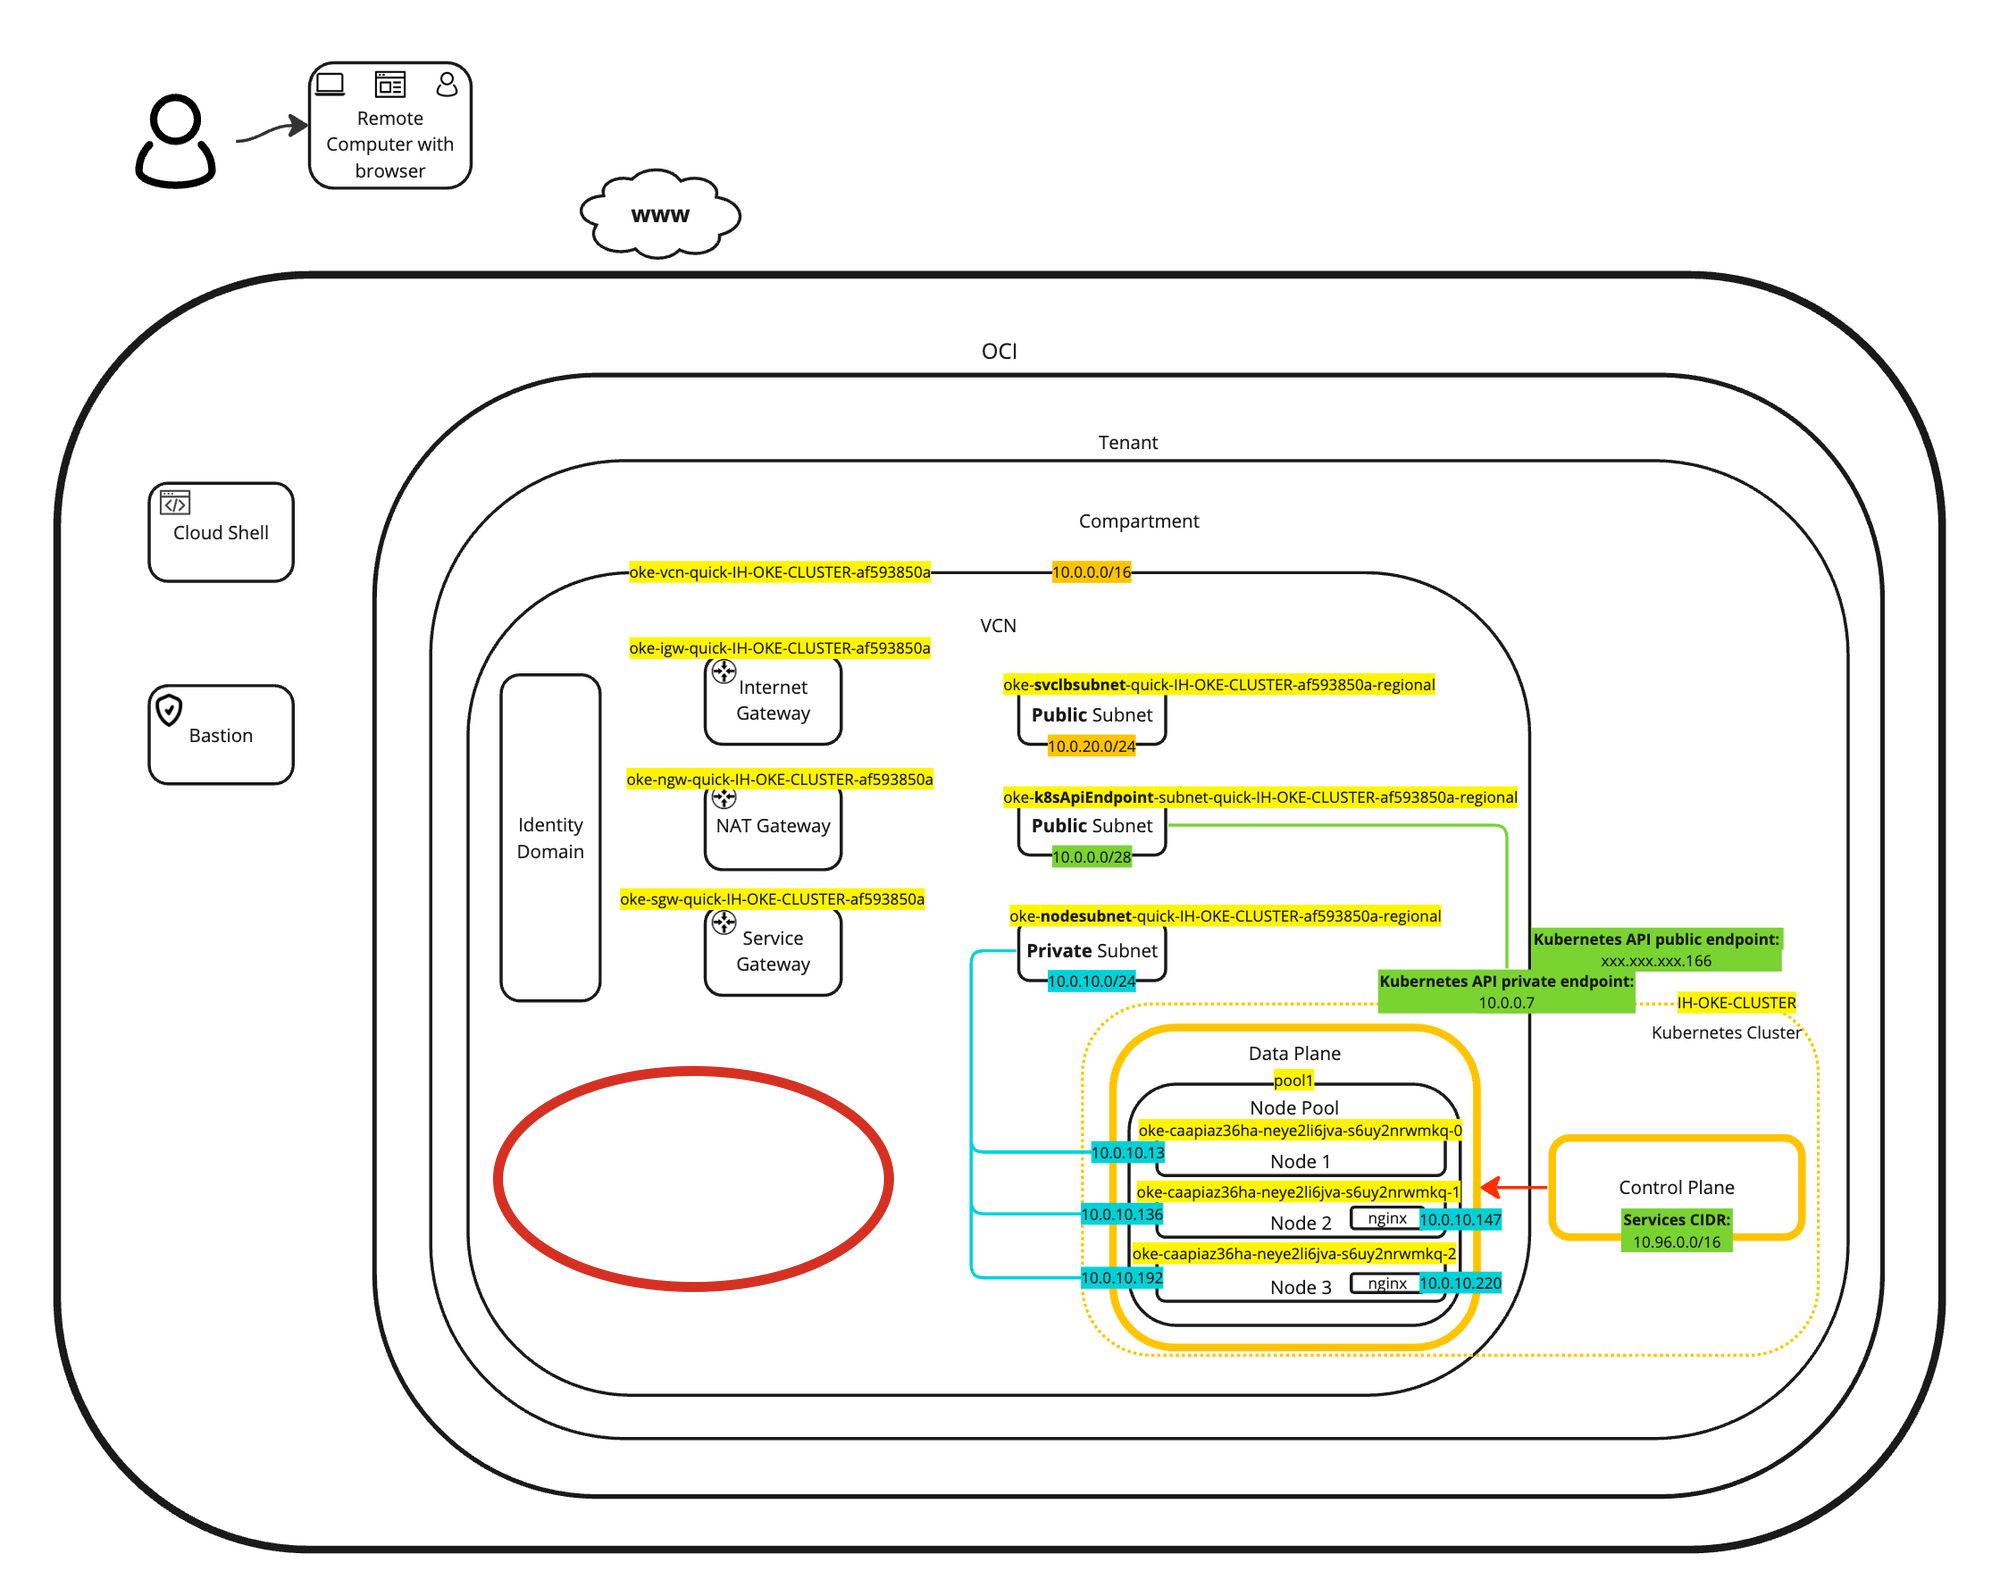
A visual representation of the load balancer deletion can be found in the following diagram. Focus on the part where the load balancer is no longer deployed.
Related Links
Acknowledgments
- Author - Iwan Hoogendoorn (OCI Network Specialist)
More Learning Resources
Explore other labs on docs.oracle.com/learn or access more free learning content on the Oracle Learning YouTube channel. Additionally, visit education.oracle.com/learning-explorer to become an Oracle Learning Explorer.
For product documentation, visit Oracle Help Center.
Use OCI VCN-Native Pods Networking CNI Plugin to Provide Networking Services to Oracle Cloud Infrastructure Container Engine for Kubernetes
F95737-01
March 2024