Note:
- This tutorial requires access to Oracle Cloud. To sign up for a free account, see Get started with Oracle Cloud Infrastructure Free Tier.
- It uses example values for Oracle Cloud Infrastructure credentials, tenancy, and compartments. When completing your lab, substitute these values with ones specific to your cloud environment.
Integrate Oracle Autonomous Database with Microsoft Entra ID
Introduction
Oracle Autonomous Database can be integrated with Microsoft Entra ID (ME-ID - formerly known as Azure Active Directory (Azure AD)). ME-ID users and applications can log in with ME-ID Single Sign On (SSO) credentials to get an ME-ID OAuth2 access token and access the database.
This is done with an ME-ID OAuth2 access token that the user or application first requests from ME-ID. This OAuth2 access token contains the user identity and database access information and is then sent to the database.
Audience
IAM professionals and Administrators.
Objectives
- Configure Autonomous Database to use Microsoft Entra ID OAuth2 access token and allow users to access an Autonomous Database with ME-ID SSO credentials.
Prerequisites
-
Integrating Oracle Autonomous Database with Microsoft Entra ID
-
Autonomous Database provisioned in OCI.
-
OCI IAM Identity Domains tenancy with Administrator privilege.
-
Any Oracle Database tool for testing the Autonomous Database connection, see Connect to Autonomous Database Using Oracle Database Tools. In this tutorial, we are using the SQL*Plus Command Line Interface on the Windows System New Oracle Client Installation.
-
An existing Microsoft Azure account with Administrator privilege.
Task 1: Register Oracle Autonomous Database with Microsoft Azure App Registration
-
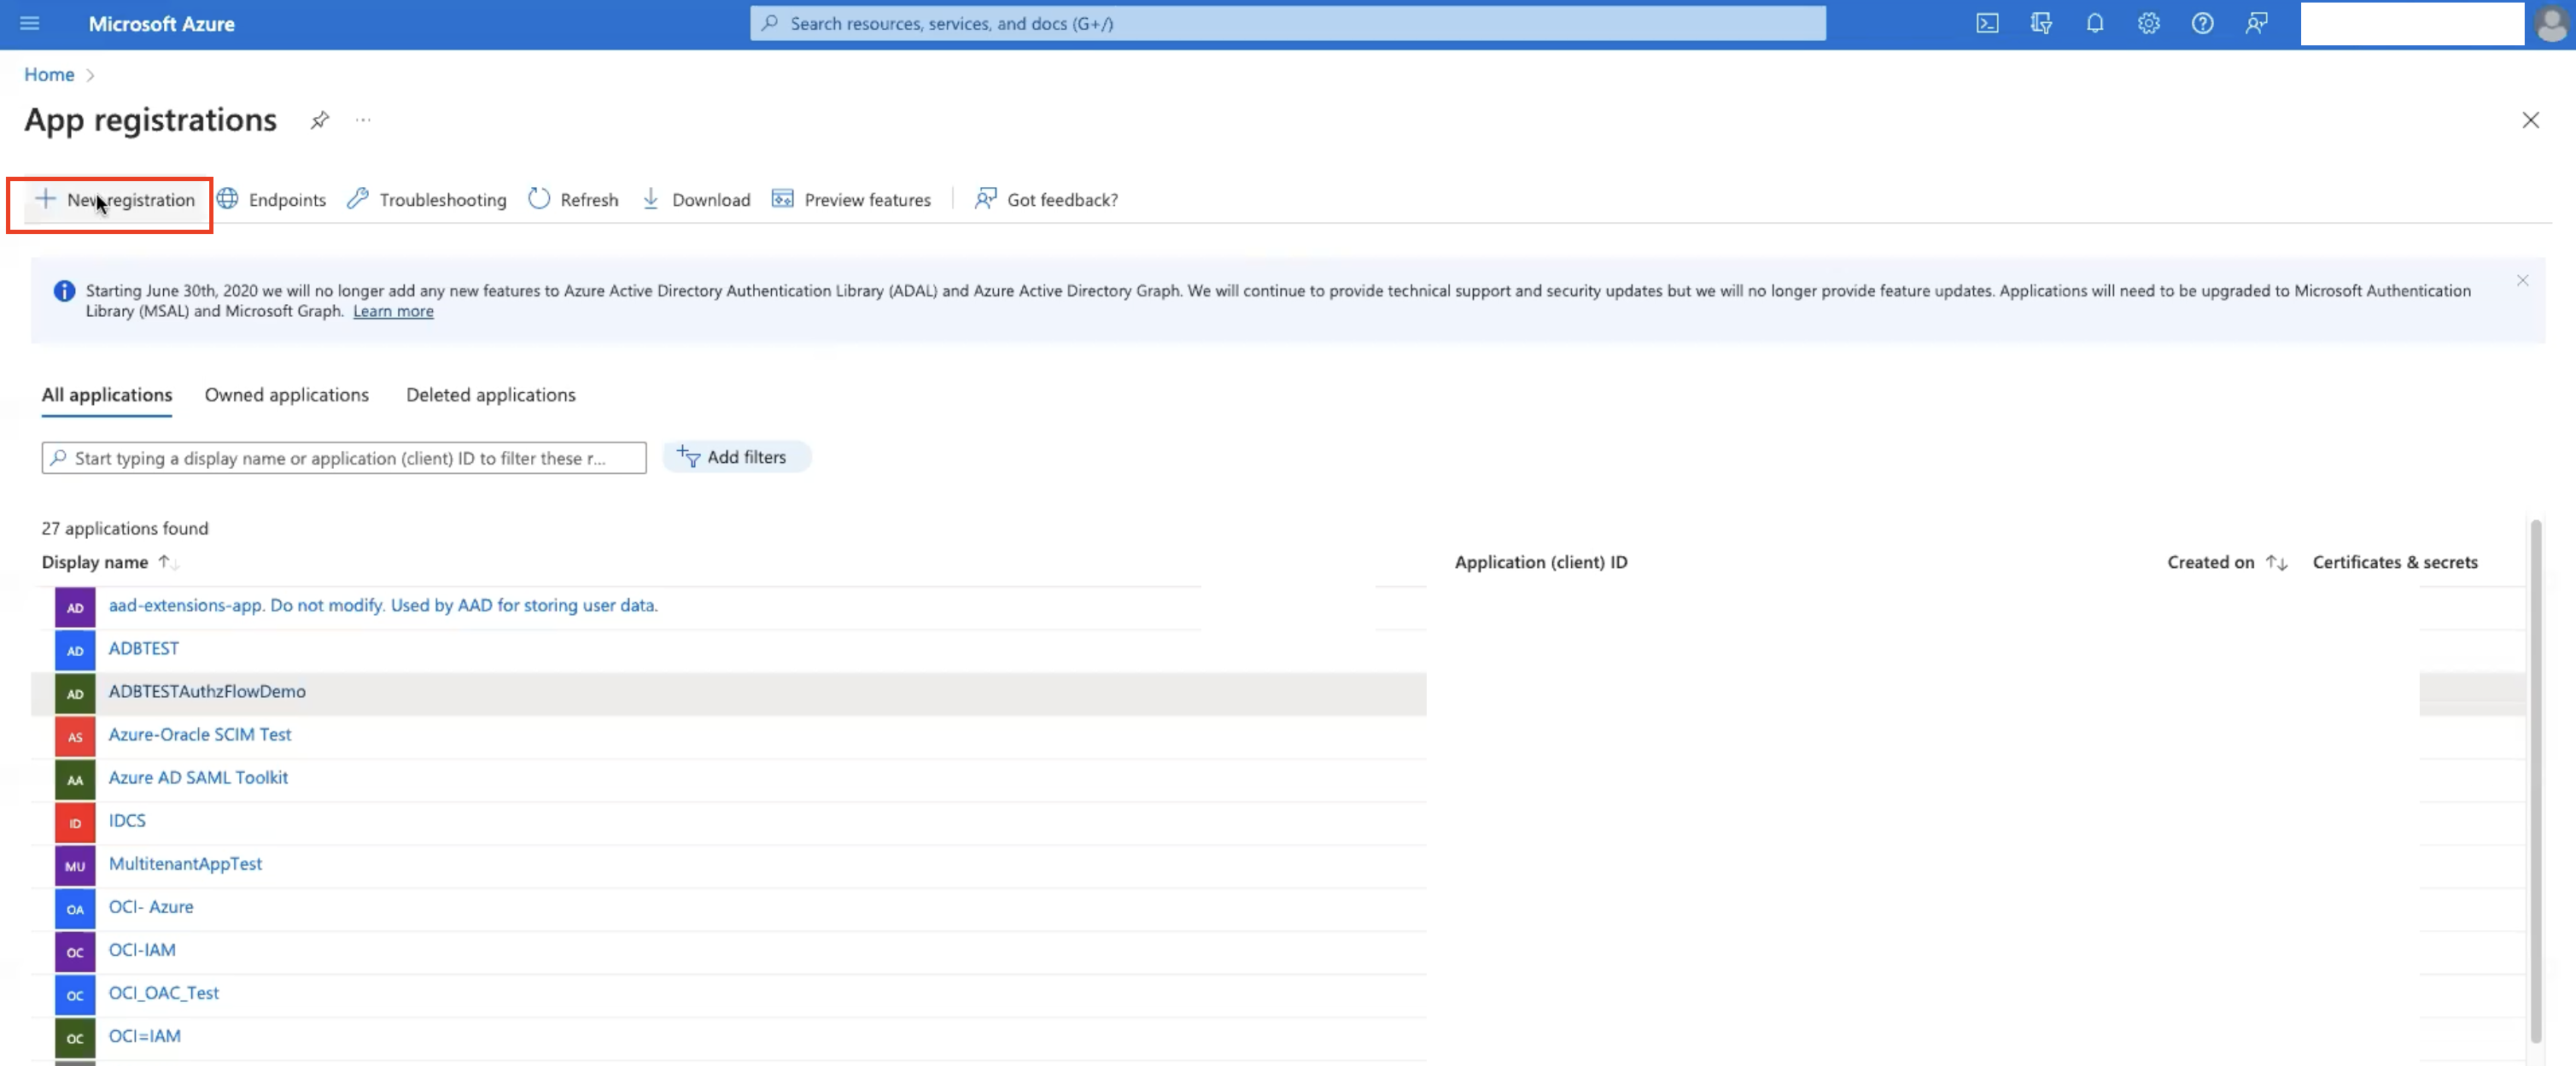
Sign in to the Microsoft Azure portal as at least a Cloud Application Administrator.
-
Browse to Home, Azure Active Directory, App Registrations, and Register an application. Enter Name as
ADB-DB, click Register. The application has been created.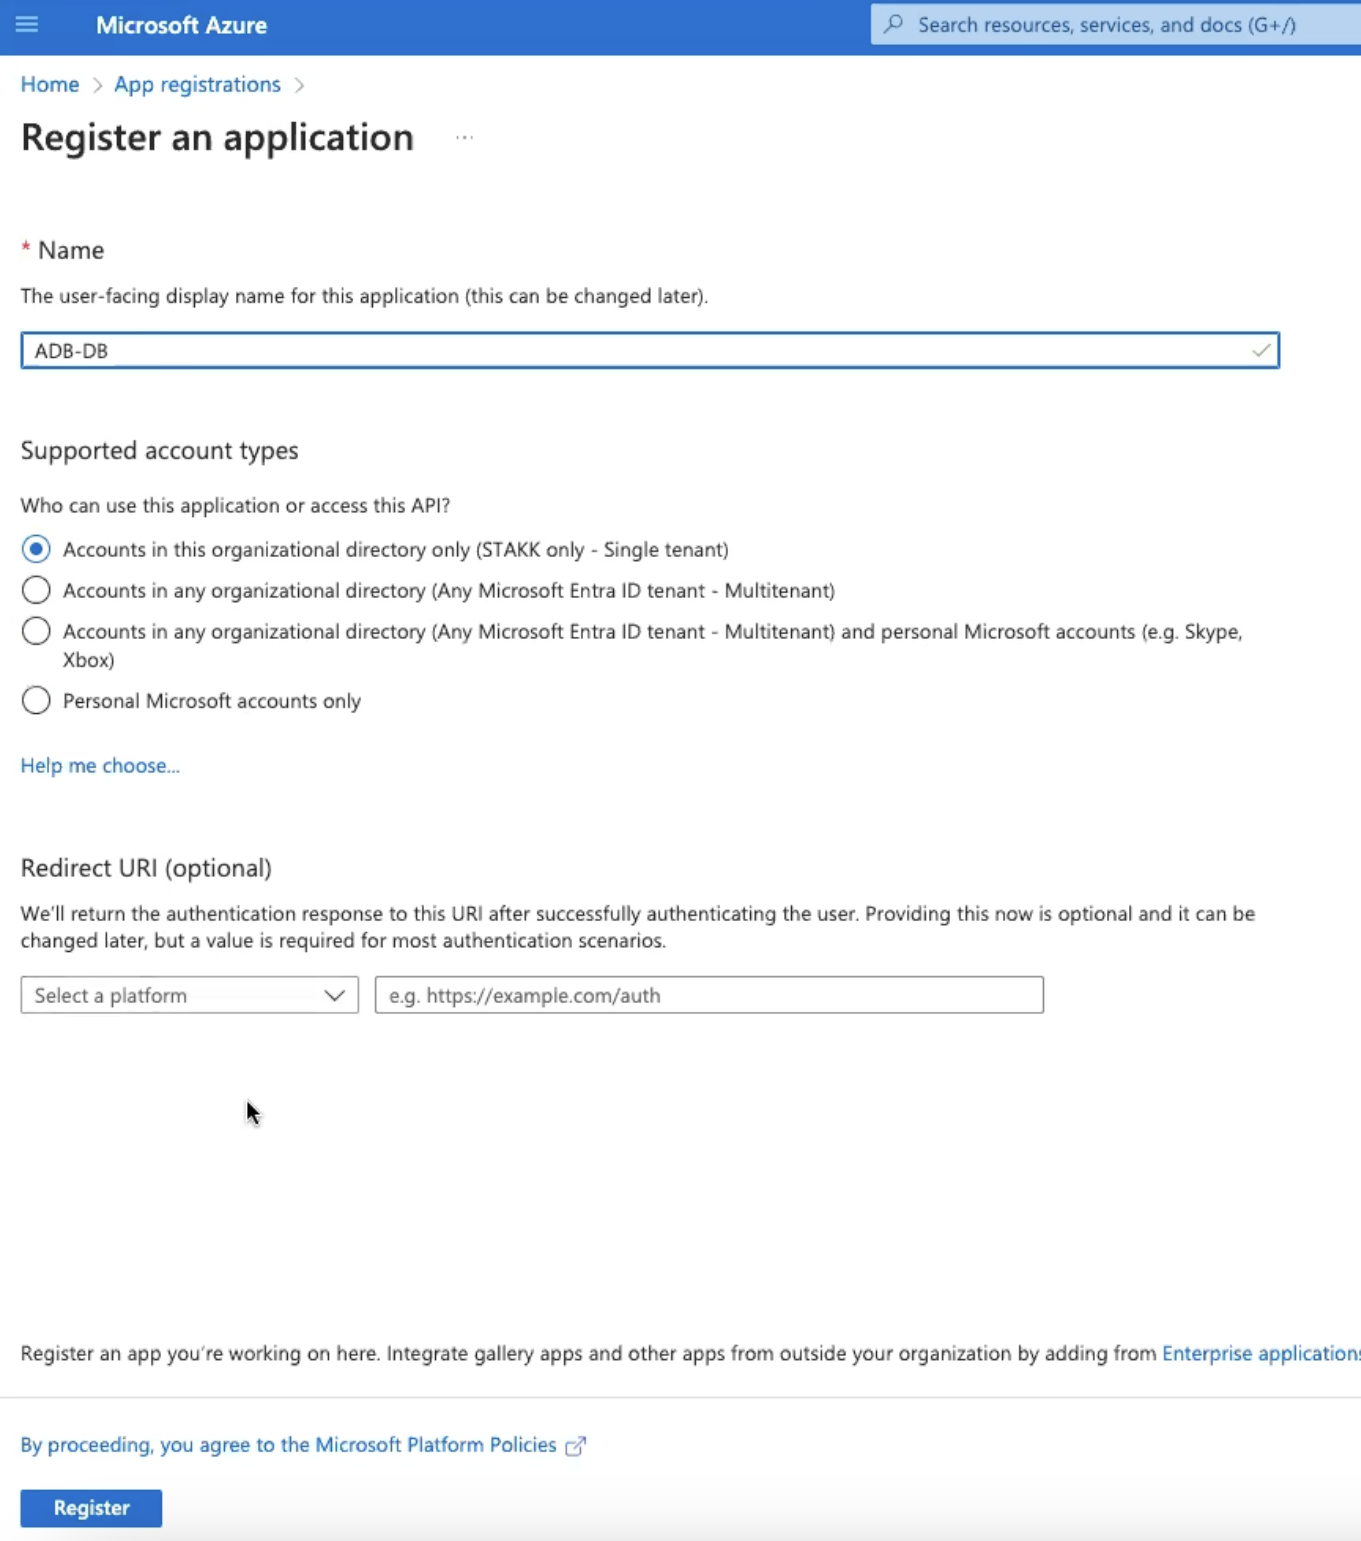
-
Click the Application ID URI: Add, Edit the Application ID URI and replace api: with the tenancy domain name as mentioned, then click Save.
-
Application ID URI:
<tenancy_domain_name>/appid
-
-
Click Add a scope and enter the following details, then click Add scope.
-
Scope name:
session:scope:connect -
Who can consent?:
Admins and users -
Admin consent display name:
connect to database -
Admin consent description:
connect to database -
User content display name:
connect to database -
User content description:
connect to database -
State:
Enabled
-
-
Click Overview, App roles, Create app role, enter the following details, and then click Apply.
-
Display name:
pdb.users -
Allowed member types:
Users/Groups -
Value:
pdb.users -
Description:
all user access -
Do you want to enable this app role?:
Enabled

-
-
Click App roles, Create app role, enter the following details, and then click Apply.
-
Display name:
dba.role -
Allowed member types:
Users/Groups -
Value:
dba.role -
Description:
dba global role -
Do you want to enable this app role?:
Enabled
-
-
Click App roles, Create app role, enter the following details, and then click Apply
-
Display name:
hr.app -
Allowed member types:
Applications -
Value:
hr.app -
Description:
application -
Do you want to enable this app role?:
Enabled
-
-
Navigate to Home, Enterprise applications, ADB-DB, Assign Users and Groups.
-
Under Add Assignment, select Users and select your user. While generating the access token, this assigned user will be used in Single-Sign On.
-
Under Select a role, select pdb.users.
-
Click Select.
-
Click Assign.
-
-
Under Add Assignment, select Users and select your user. While generating the access token, this assigned user will be used in Single-Sign On.
-
Under Select a role, select dba.role.
-
Click Select.
-
Click Assign.
-
Task 2: Create Client Application Registration
-
Navigate to Home, App registrations, Register an application, enter the following details, and then click Register.
-
Name:
ADB-Client. -
Supported Account types:
Accounts in this organizational directory only. -
Redirect URI:
Public client/native - http://localhost.
-
-
Navigate to API Permissions and click Add a permission. Under Request API Permissions, select APIs my organization uses, ADB-DB, Delegated permissions and permission as
session:scope:connect, then click Add permissions.
-
Click Expose an API, Application ID URI: Add, Edit the Application ID URI and replace api: with the tenancy domain name.

Task 3: Connect to SQL Database
-
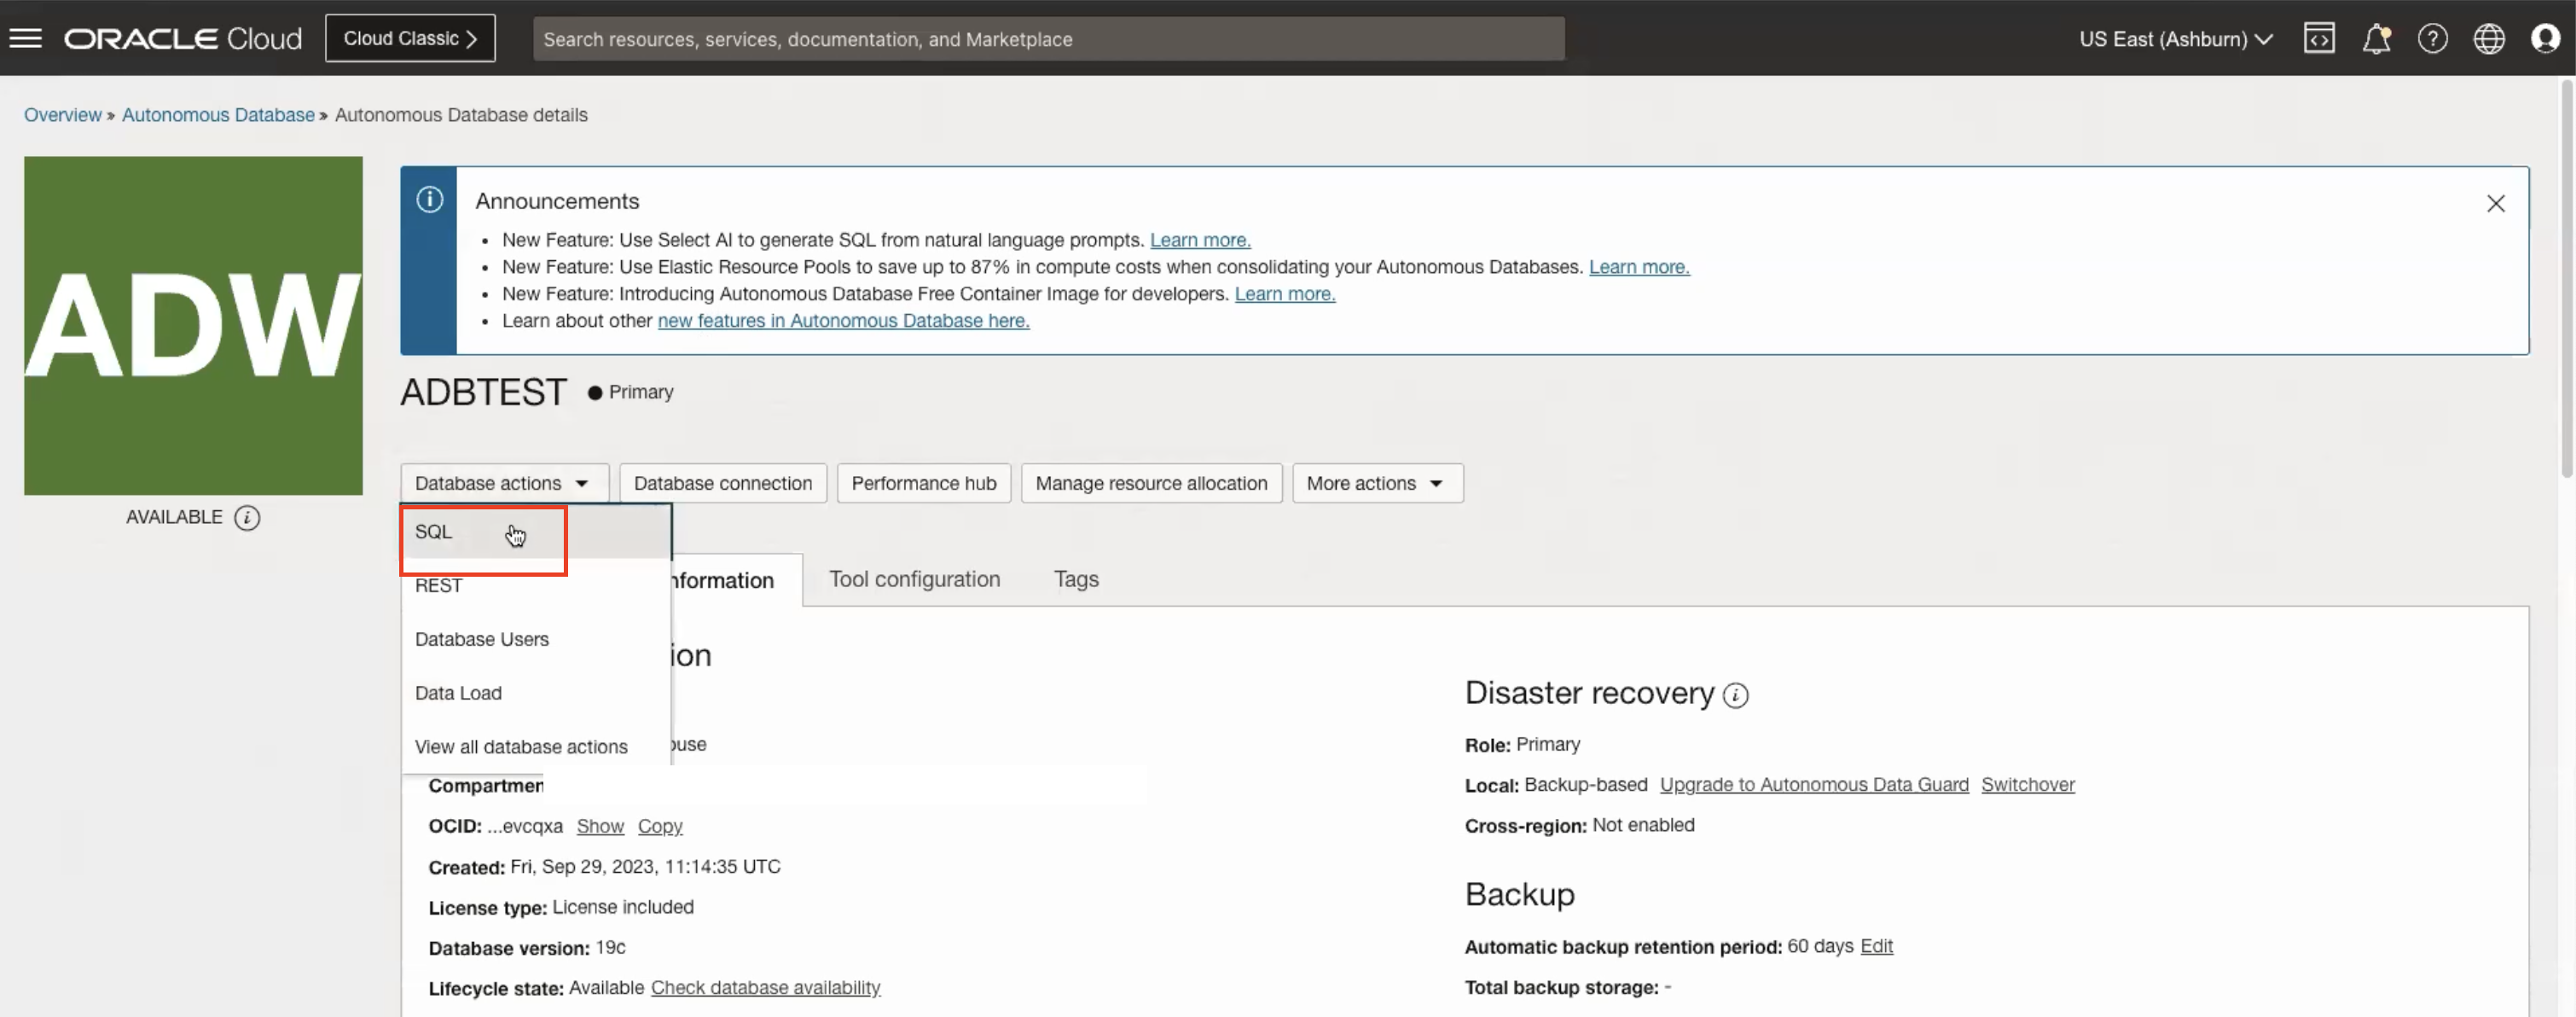
Navigate to Oracle Autonomous Database and click on the Database actions drop-down list, select SQL and enter the following queries.
SELECT NAME, VALUE FROM V$PARAMETER WHERE NAME='identity_provider_type';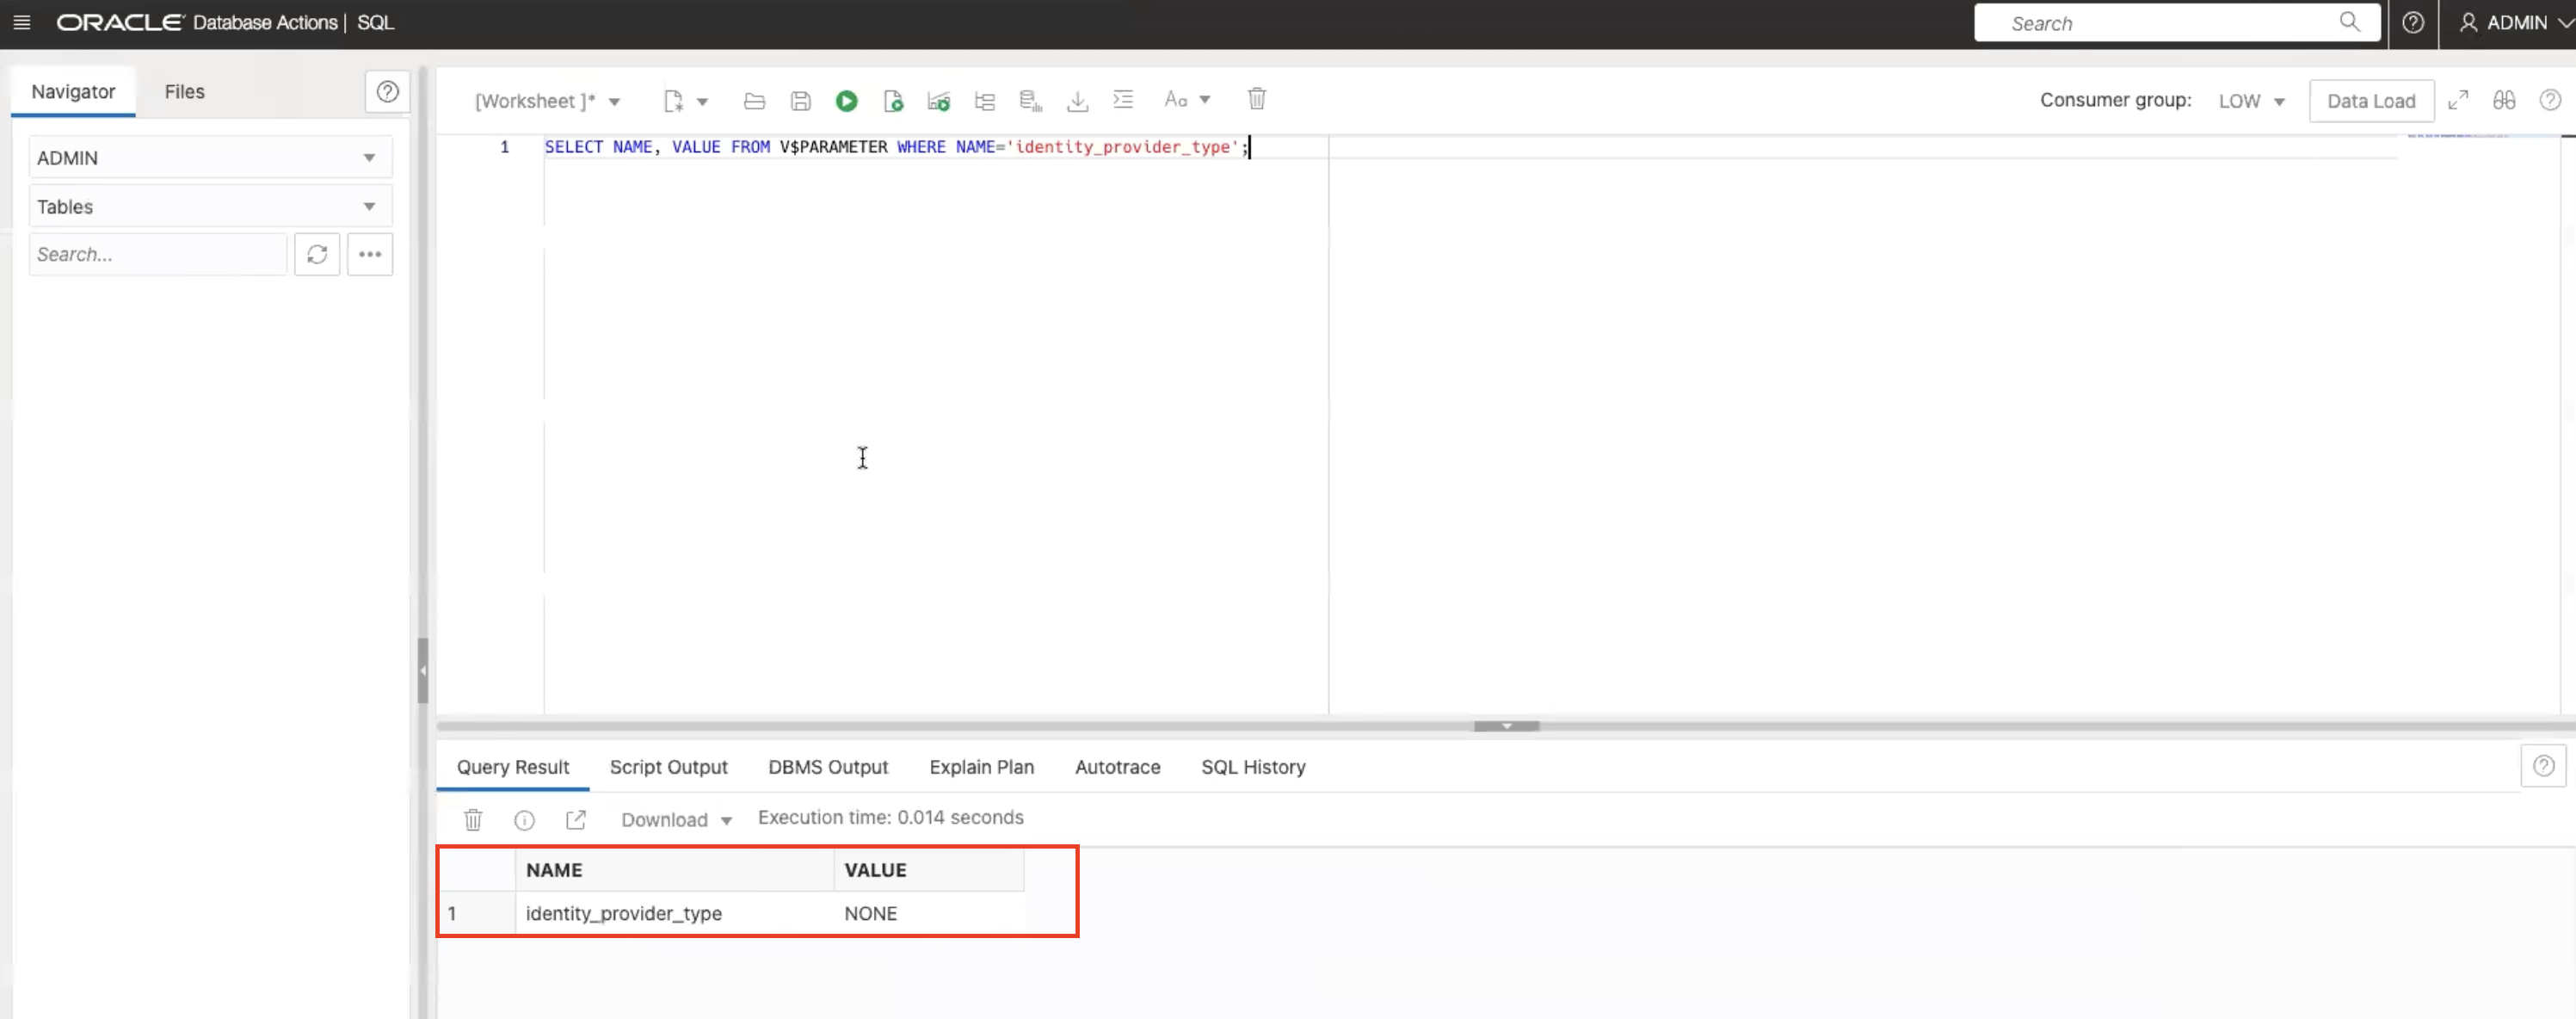
Note:
identity_provider_typeis currently set toNONE. -
Run the Database Procedure to set the identity provider to Azure AD.
BEGIN
DBMS_CLOUD_ADMIN.ENABLE_EXTERNAL_AUTHENTICATION(
type =>'AZURE_AD',
params => JSON_OBJECT('tenant_id' VALUE '<tenant_id>',
'application_id' VALUE '<application_id>',
'application_id_uri' VALUE '<application_id_uri>'),
force => TRUE
);
END;
-
Run the SQL query again to check the identity provider.
SELECT NAME, VALUE FROM V$PARAMETER WHERE NAME='identity_provider_type';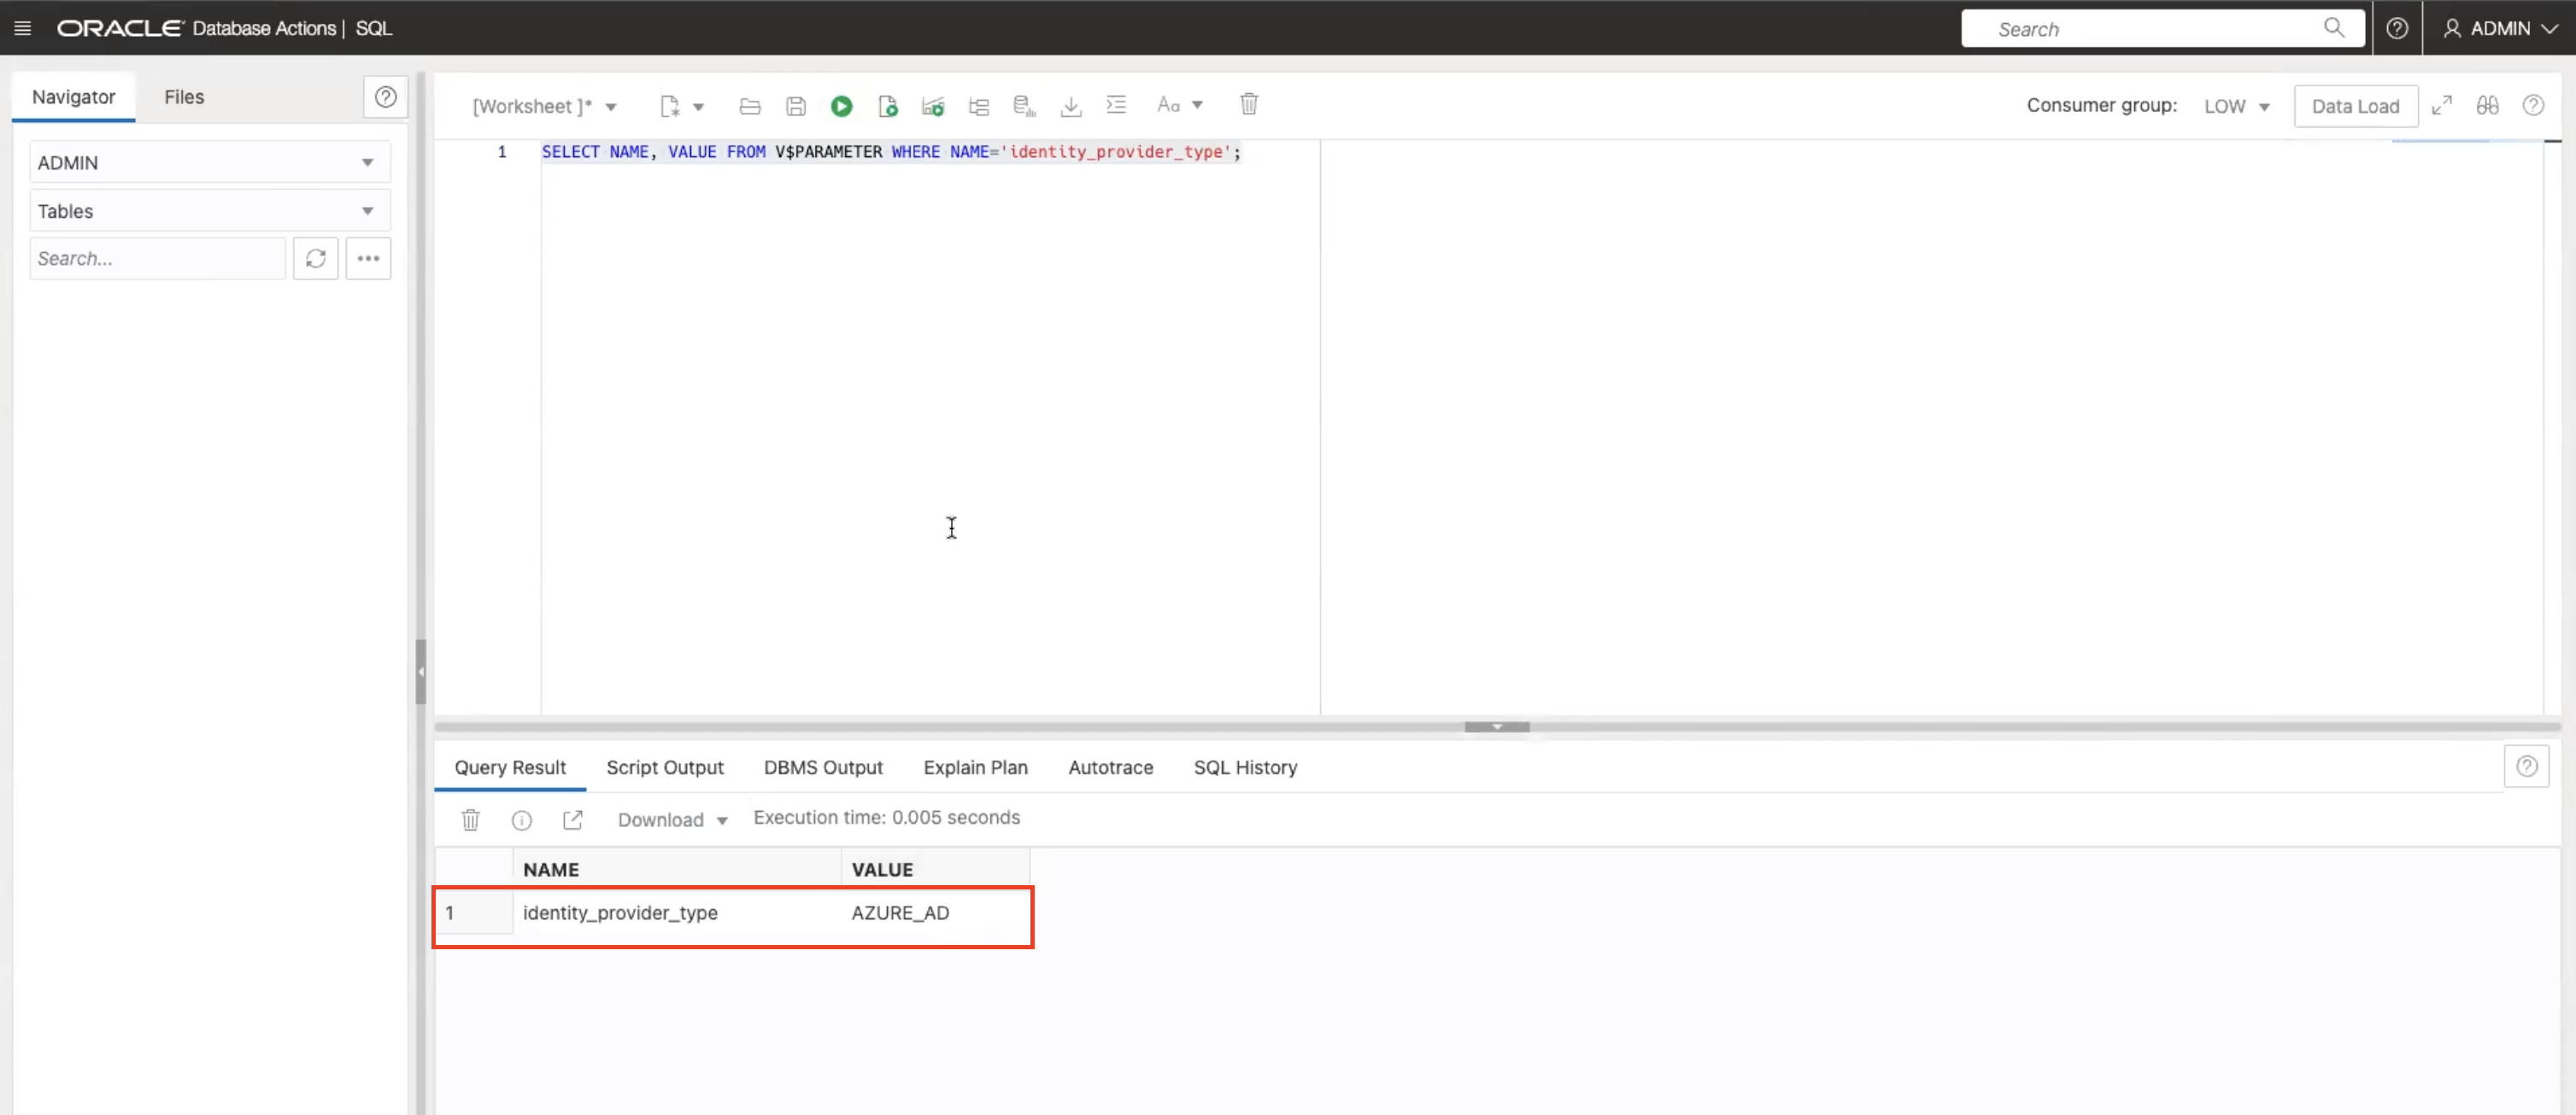
Note:
identity_provider_typeis now toAzure AD. -
Create Users -
allusers,hrappand Role -dba_azure.CREATE USER allusers IDENTIFIED GLOBALLY AS 'AZURE_ROLE=pdb.users'; CREATE USER hrapp IDENTIFIED GLOBALLY AS 'AZURE_ROLE=hr.app'; CREATE ROLE dba_azure IDENTIFIED GLOBALLY AS 'AZURE_ROLE=dba.role'; -
Grant Create Session to -
allusersandhrapp.GRANT CREATE SESSION TO allusers;GRANT CREATE SESSION TO hrapp;GRANT pdb_dba TO dba_azure;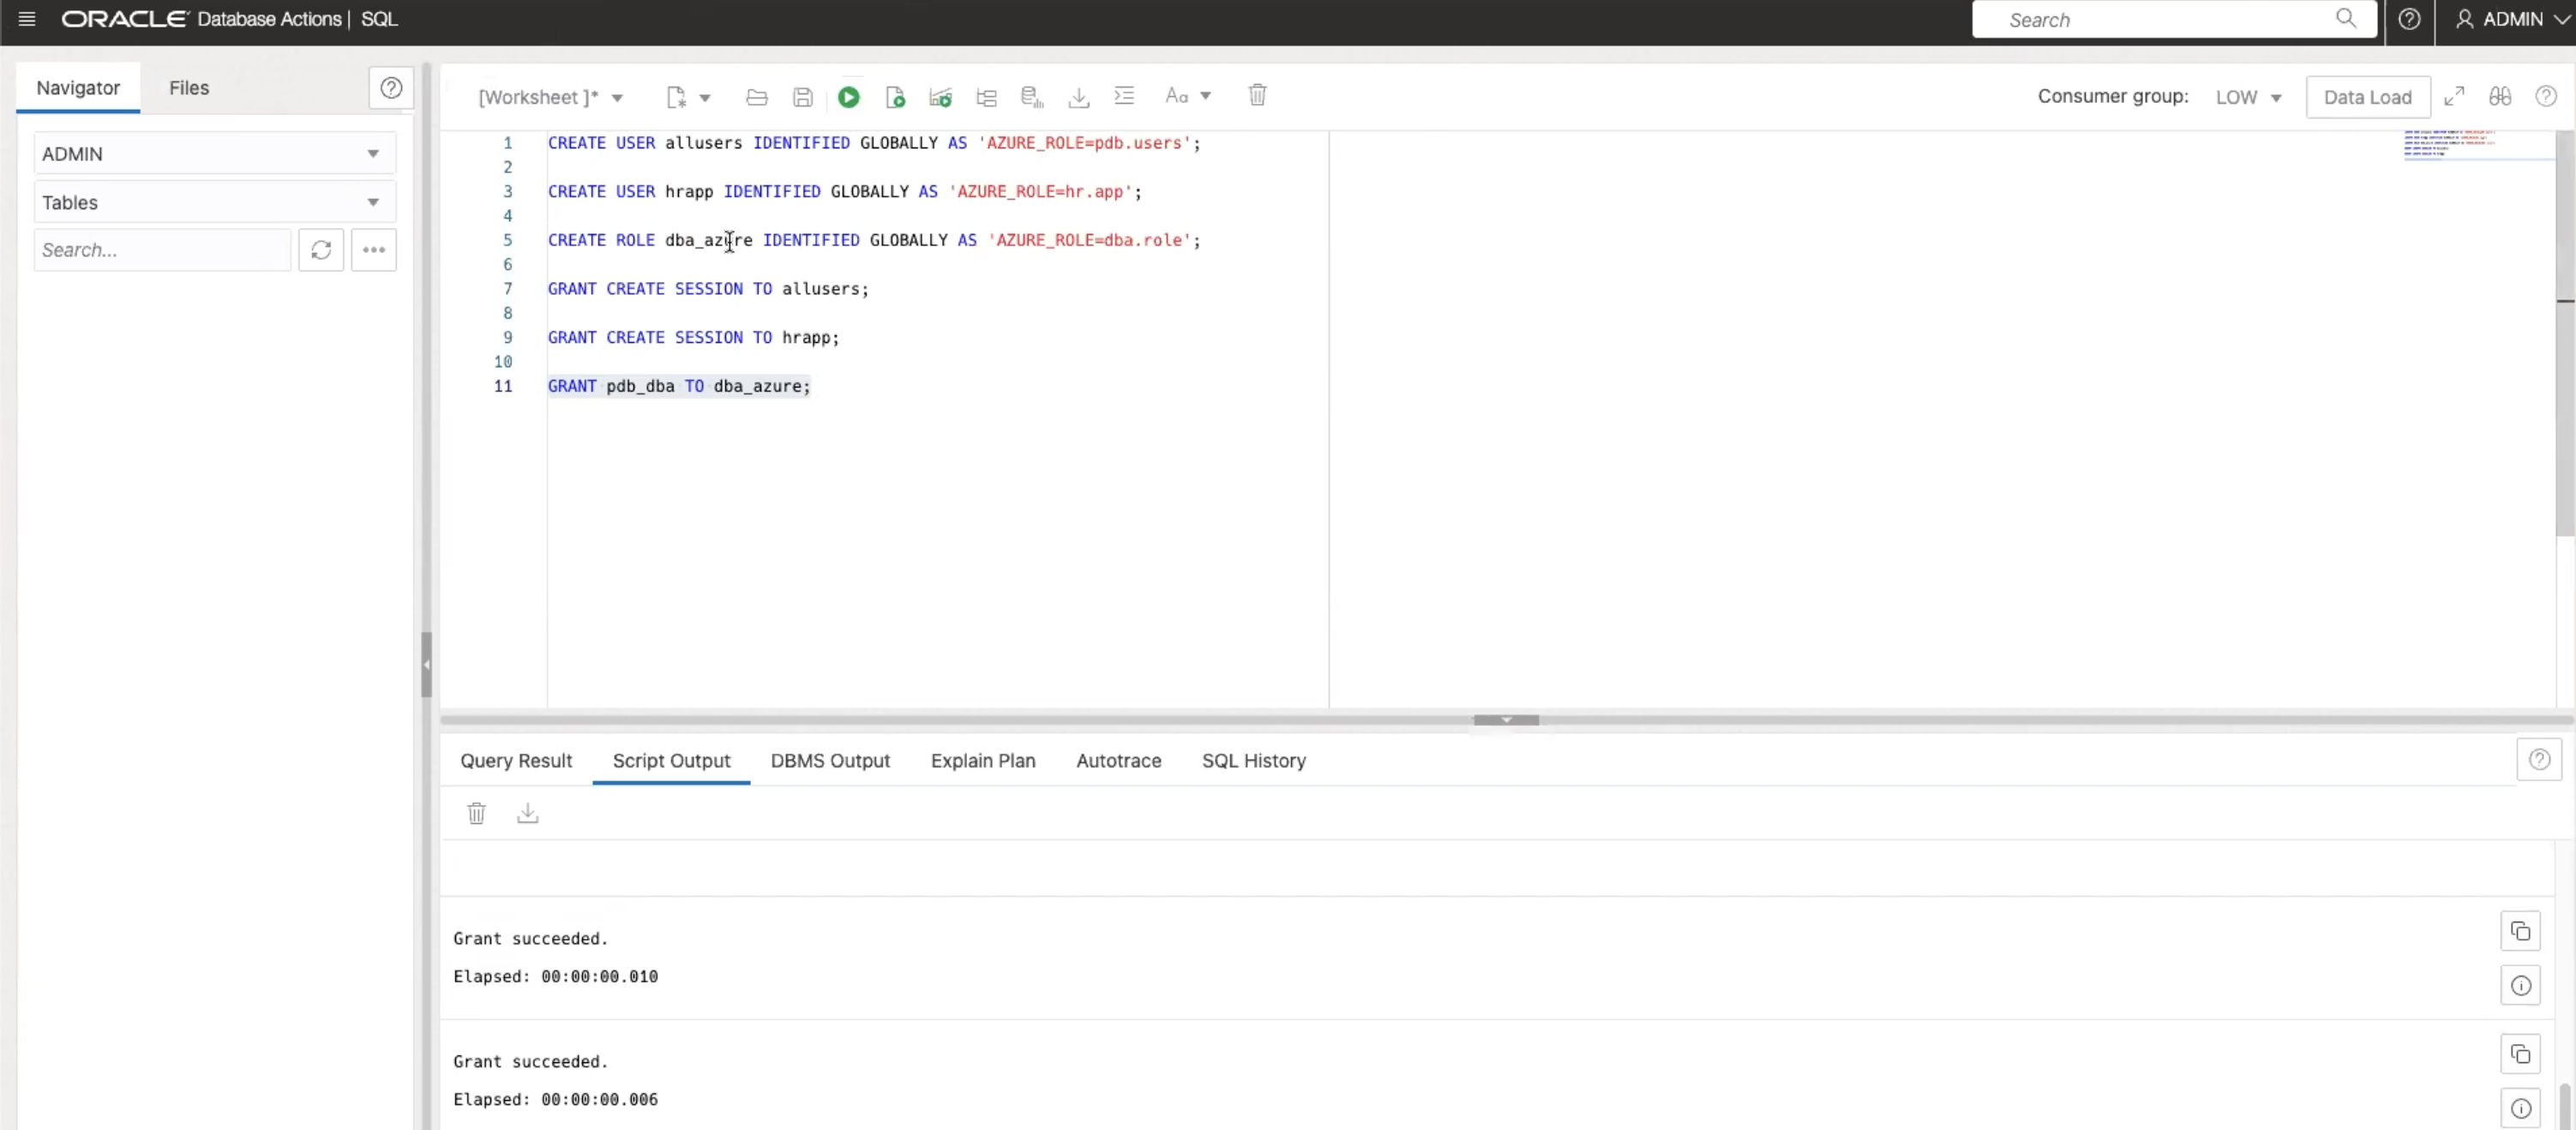
Task 4: Navigate to Azure Portal
-
Open Azure Portal and navigate to Home, App registrations, and ADB-Client. Copy the Application (client) ID and the Directory (tenant) ID.

-
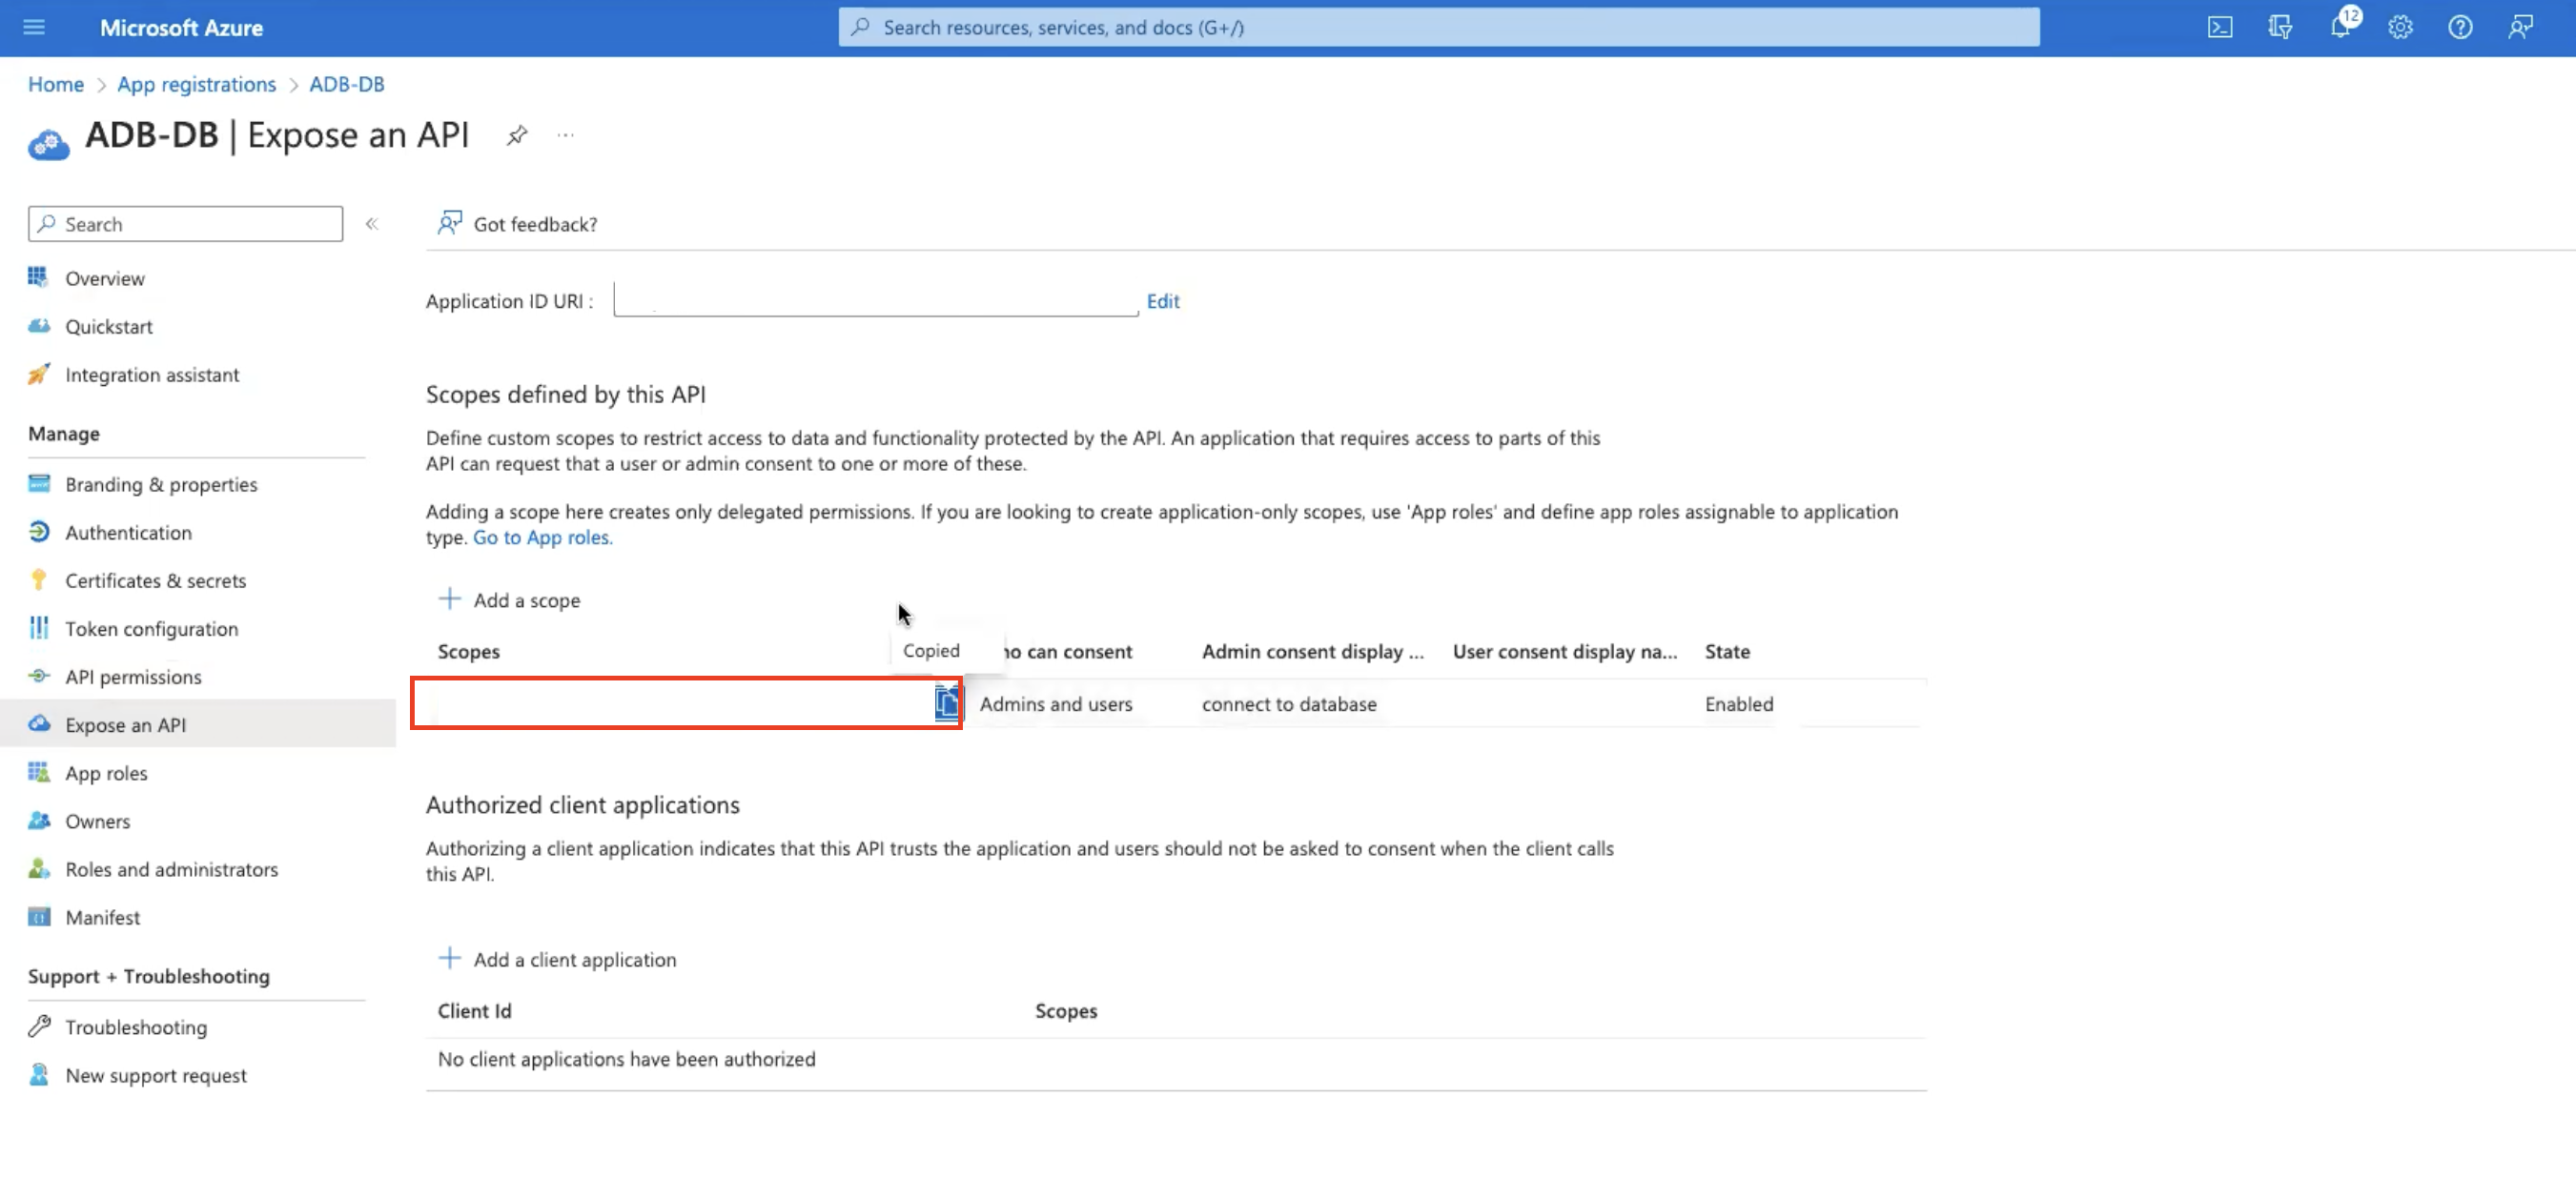
Open Azure portal and navigate to Home, App registrations, and ADB-DB. Copy the Scope.
Task 5: Get Microsoft Access Token by using the MSAL Python library
-
Refer to the Python script to obtain the Access Token using AuthZ flow, see Get Microsoft Entra ID tokens by using the MSAL Python library.
-
Replace
Client_id,Tenant_idandScopein script obtained in Task 4.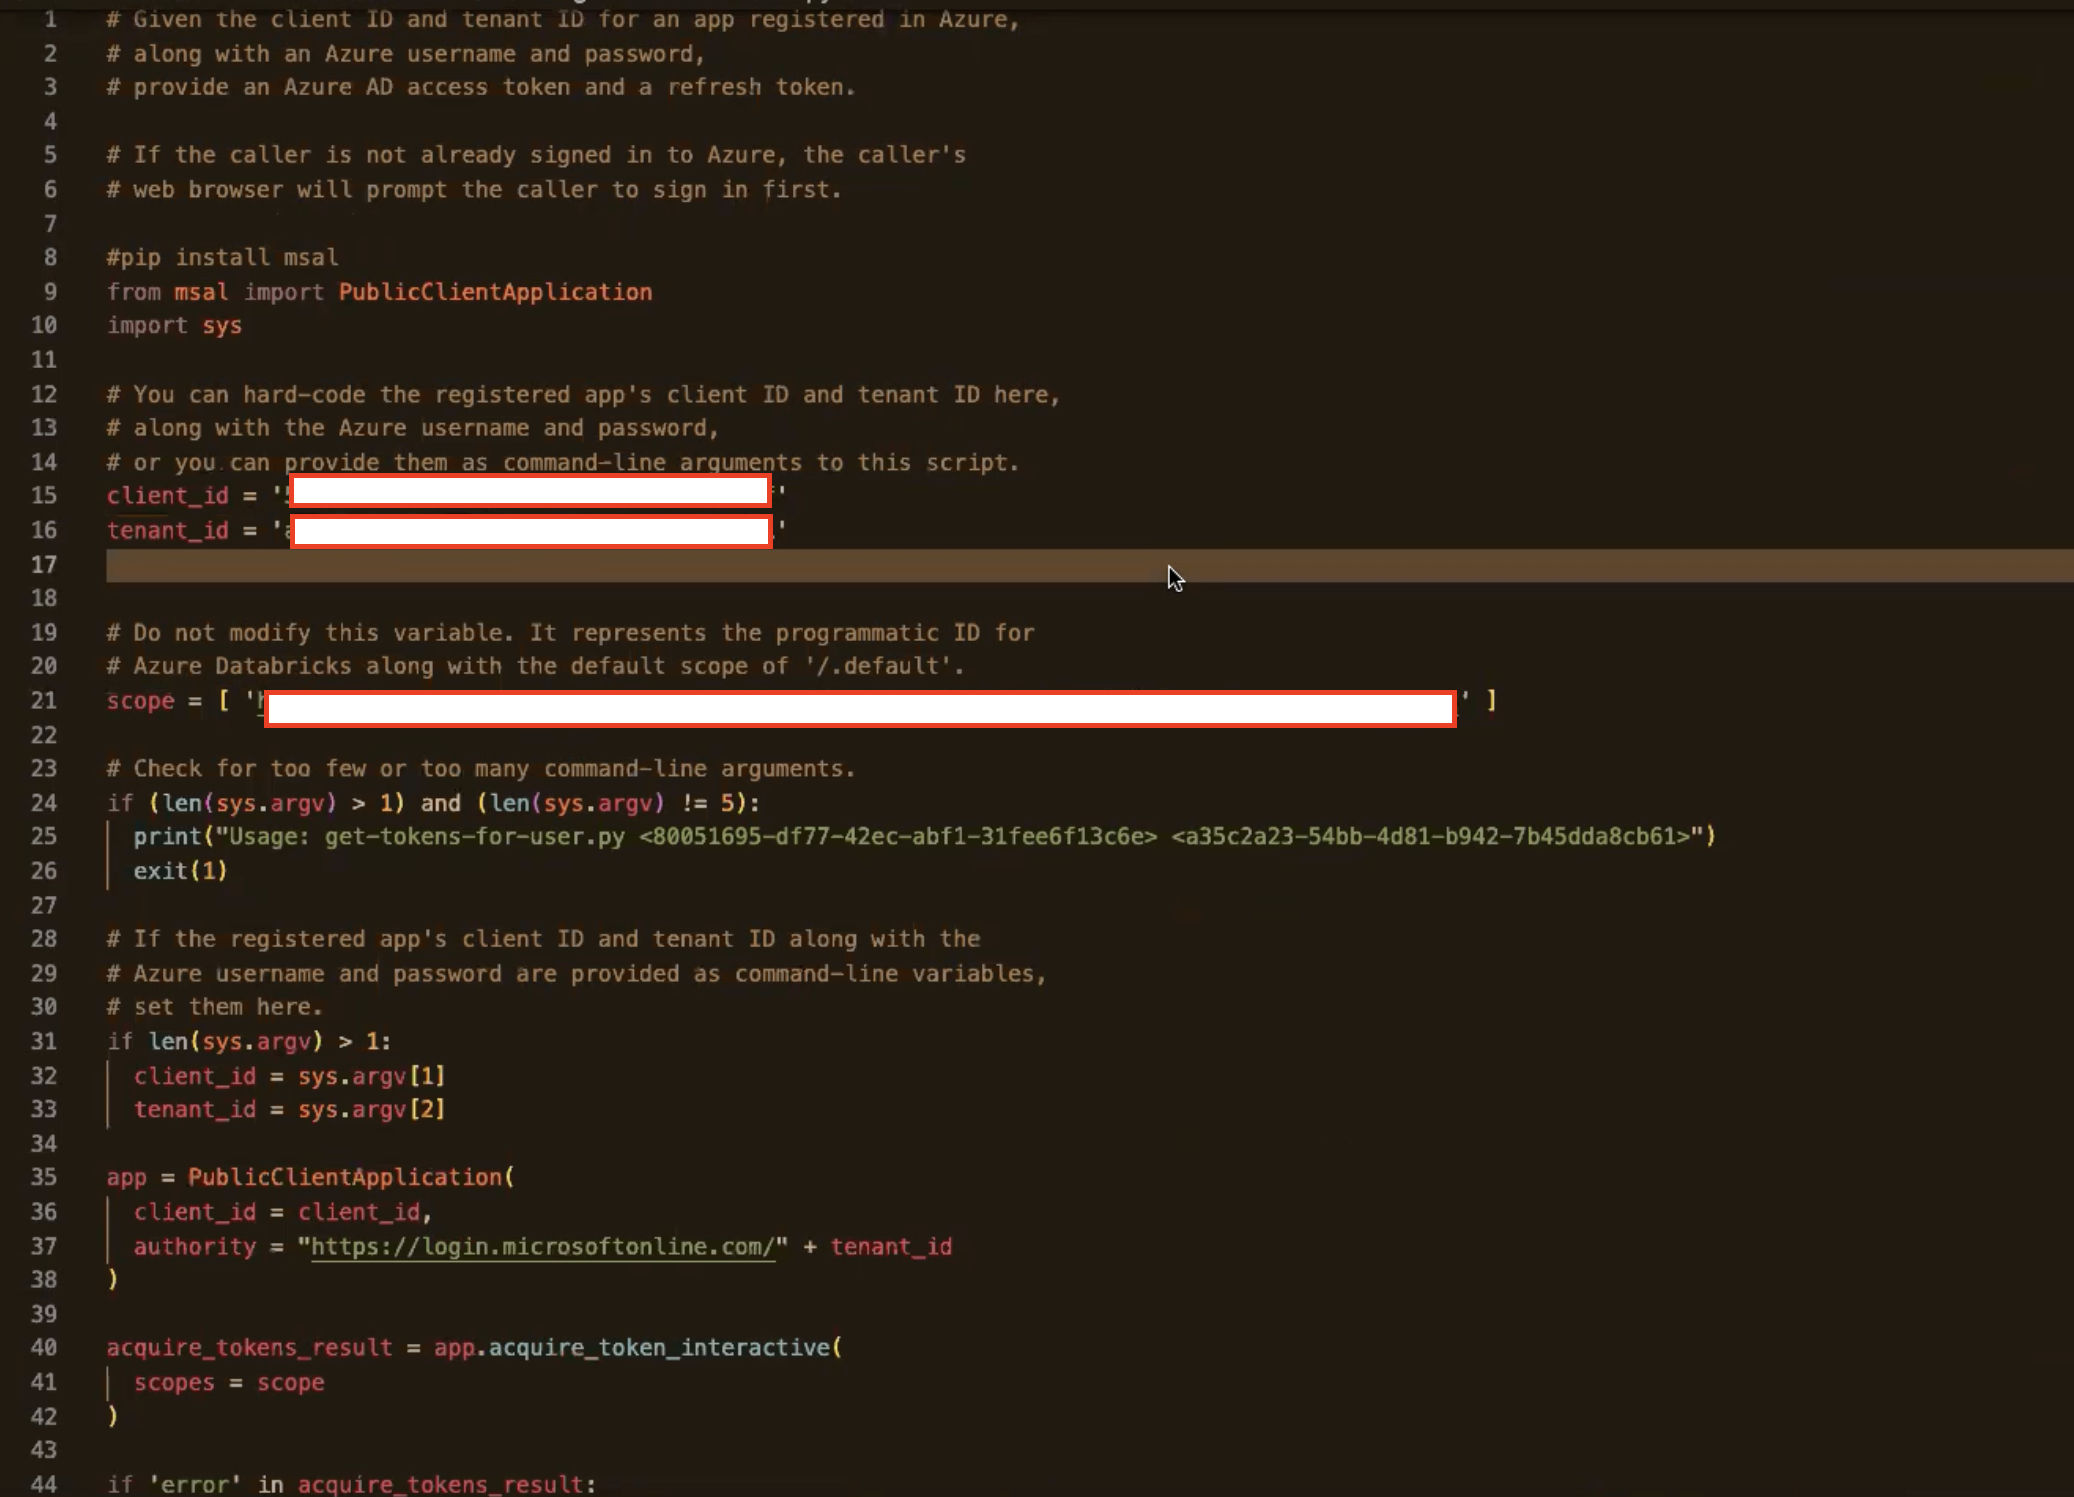
Task 6: Run the Python Script
-
Open PowerShell. Verify the Python version and
pipversion.python --versionpip --version -
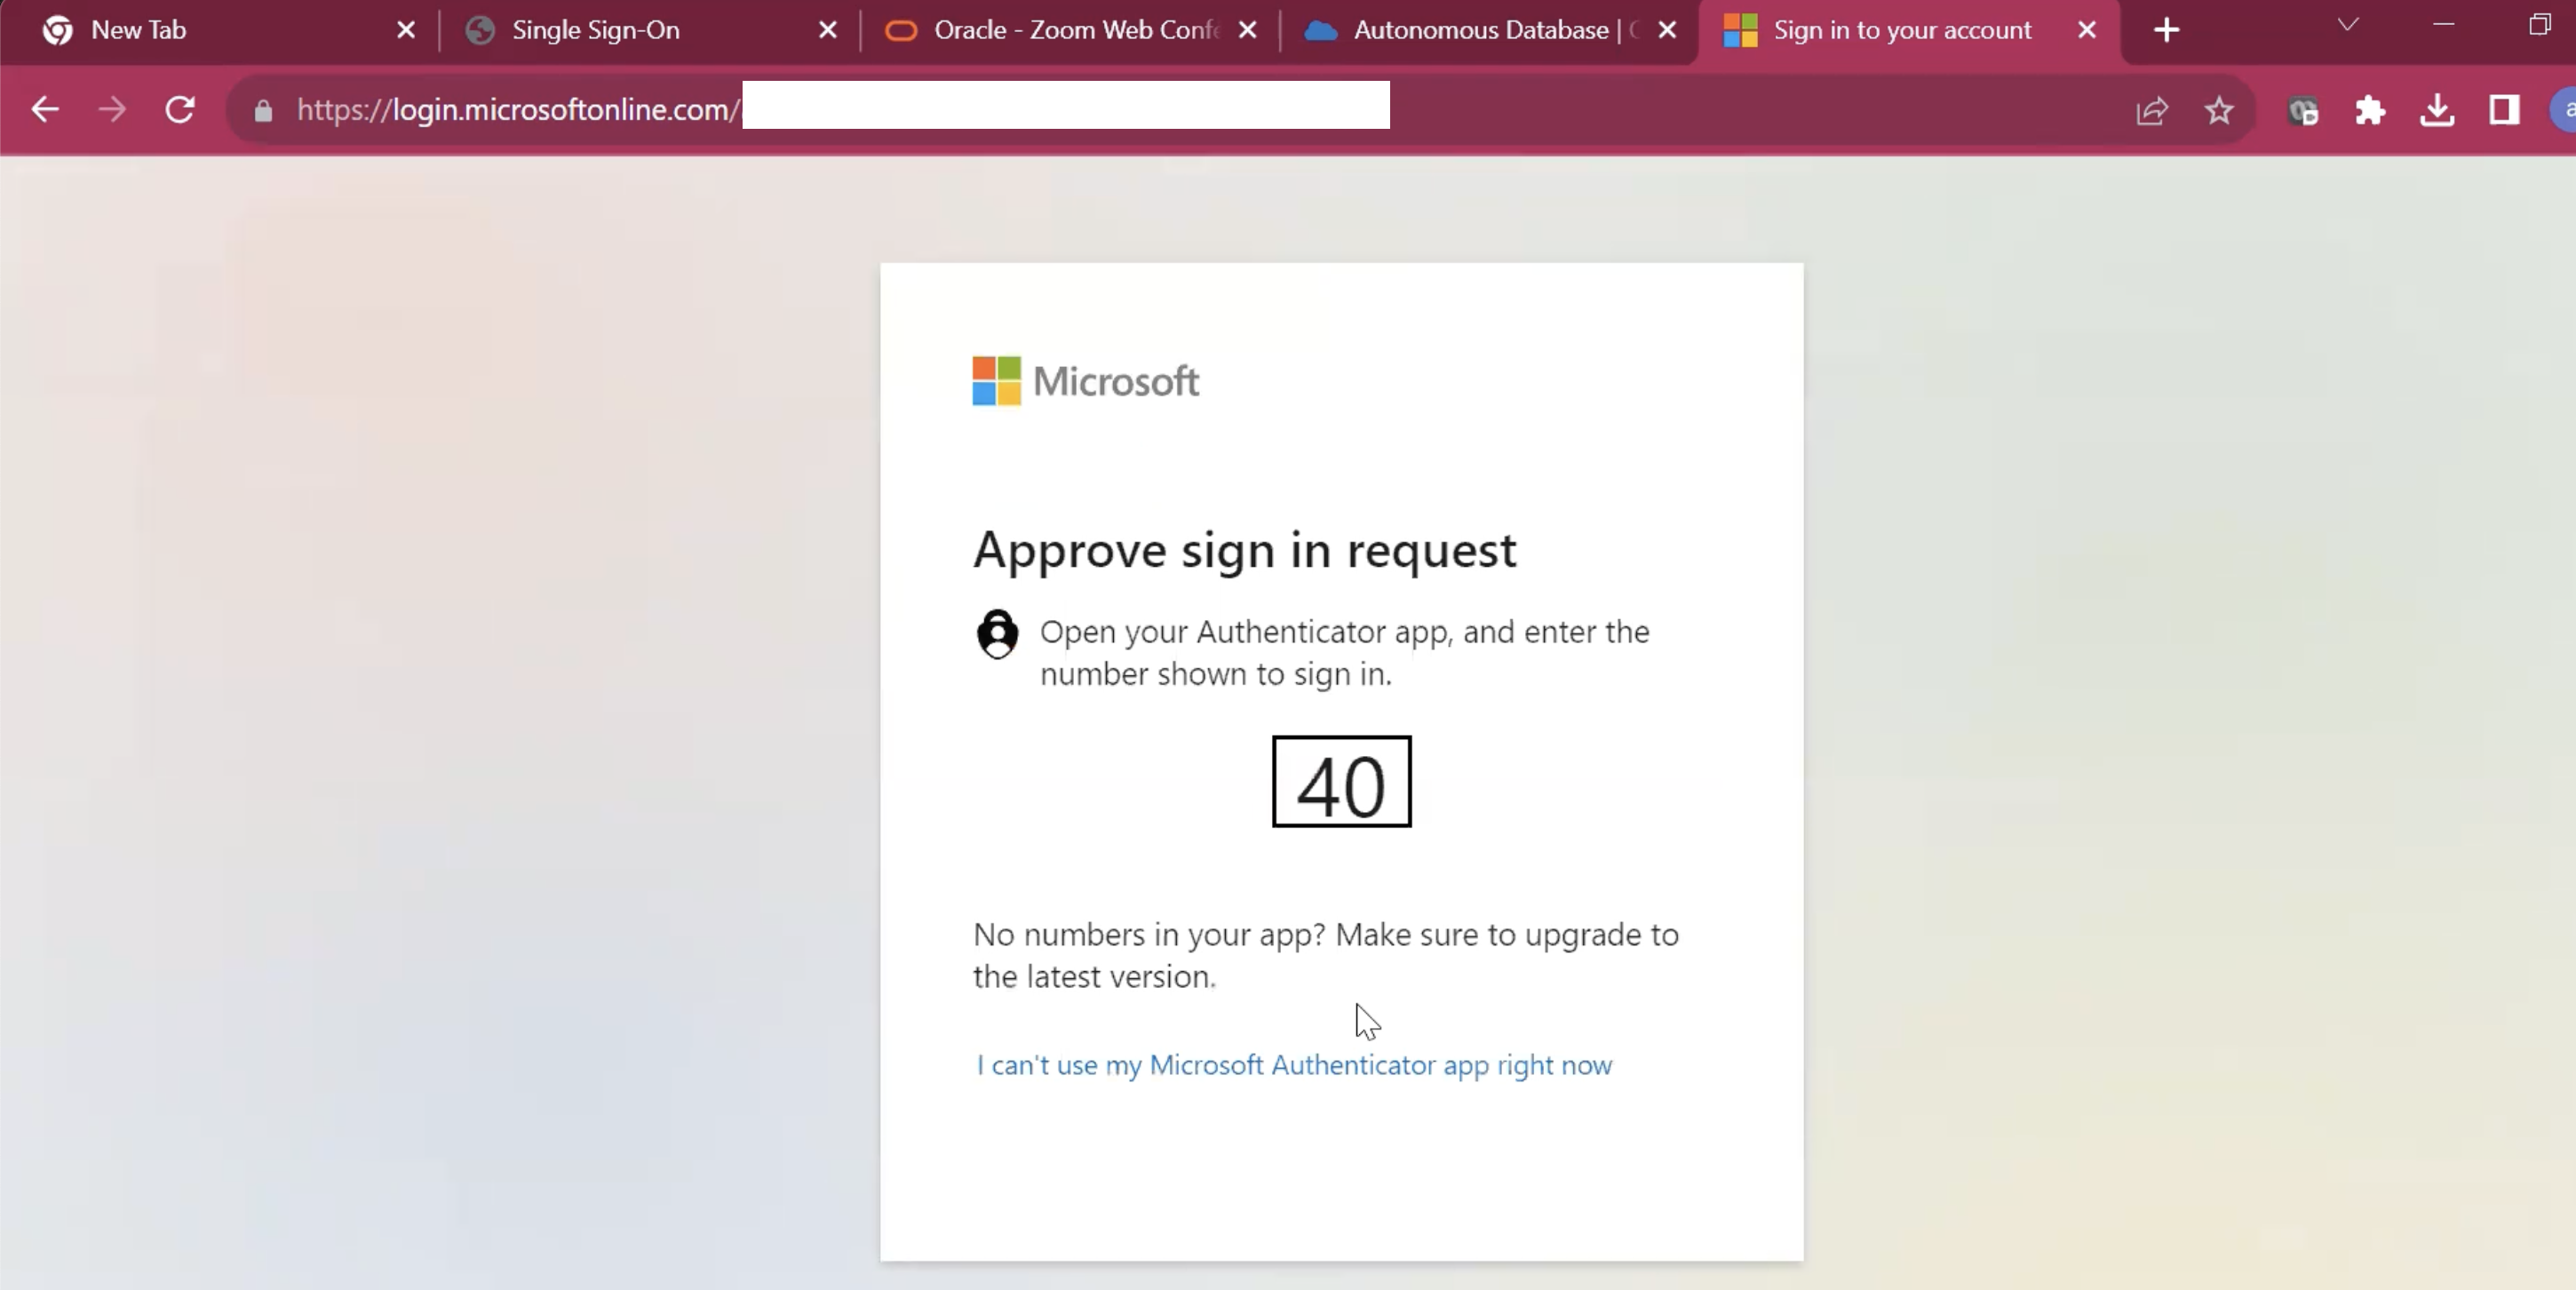
Execute the Python script using the following command. You will be redirected to Microsoft Azure Portal, where you need to authenticate yourself.
python ./get-token-for-user.py
-
Once authentication is complete, you will be redirected to PowerShell and the Access Token is generated.
-
Save the Access Token on your local machine, provide the name as token and save as filetype
All Types.
-
Connect using connect string as per your environment. Replace the hostname and access-token-path as per your
TNS.orain the wallet.conn /@(description= (retry_count-20) (retry_delay=3) (address= (protocol=tcps) (port=1522) (host-adb. us-ashburn-1.oraclecloud. com)) (connect_data=(<hostname>))(security-(ss1_server_dn_match-yes)(TOKEN_AUTH-OAUTH)(TOKEN_LOCATION-"<access-token-path>")))You have now successfully connected to the database.

-
Execute the following SQL queries one by one and observe the output to validate the User and Roles.
sqlplus /nologSELECT SYS_CONTEXT ('USERENV','CURRENT_USER') FROM DUAL;SELECT SYS_CONTEXT ('USERENV','AUTHENTICATED_IDENTITY') FROM DUAL;SELECT SYS_CONTEXT ('USERENV','ENTERPRISE_IDENTITY') FROM DUAL;
SELECT * FROM SESSION_ROLES;exit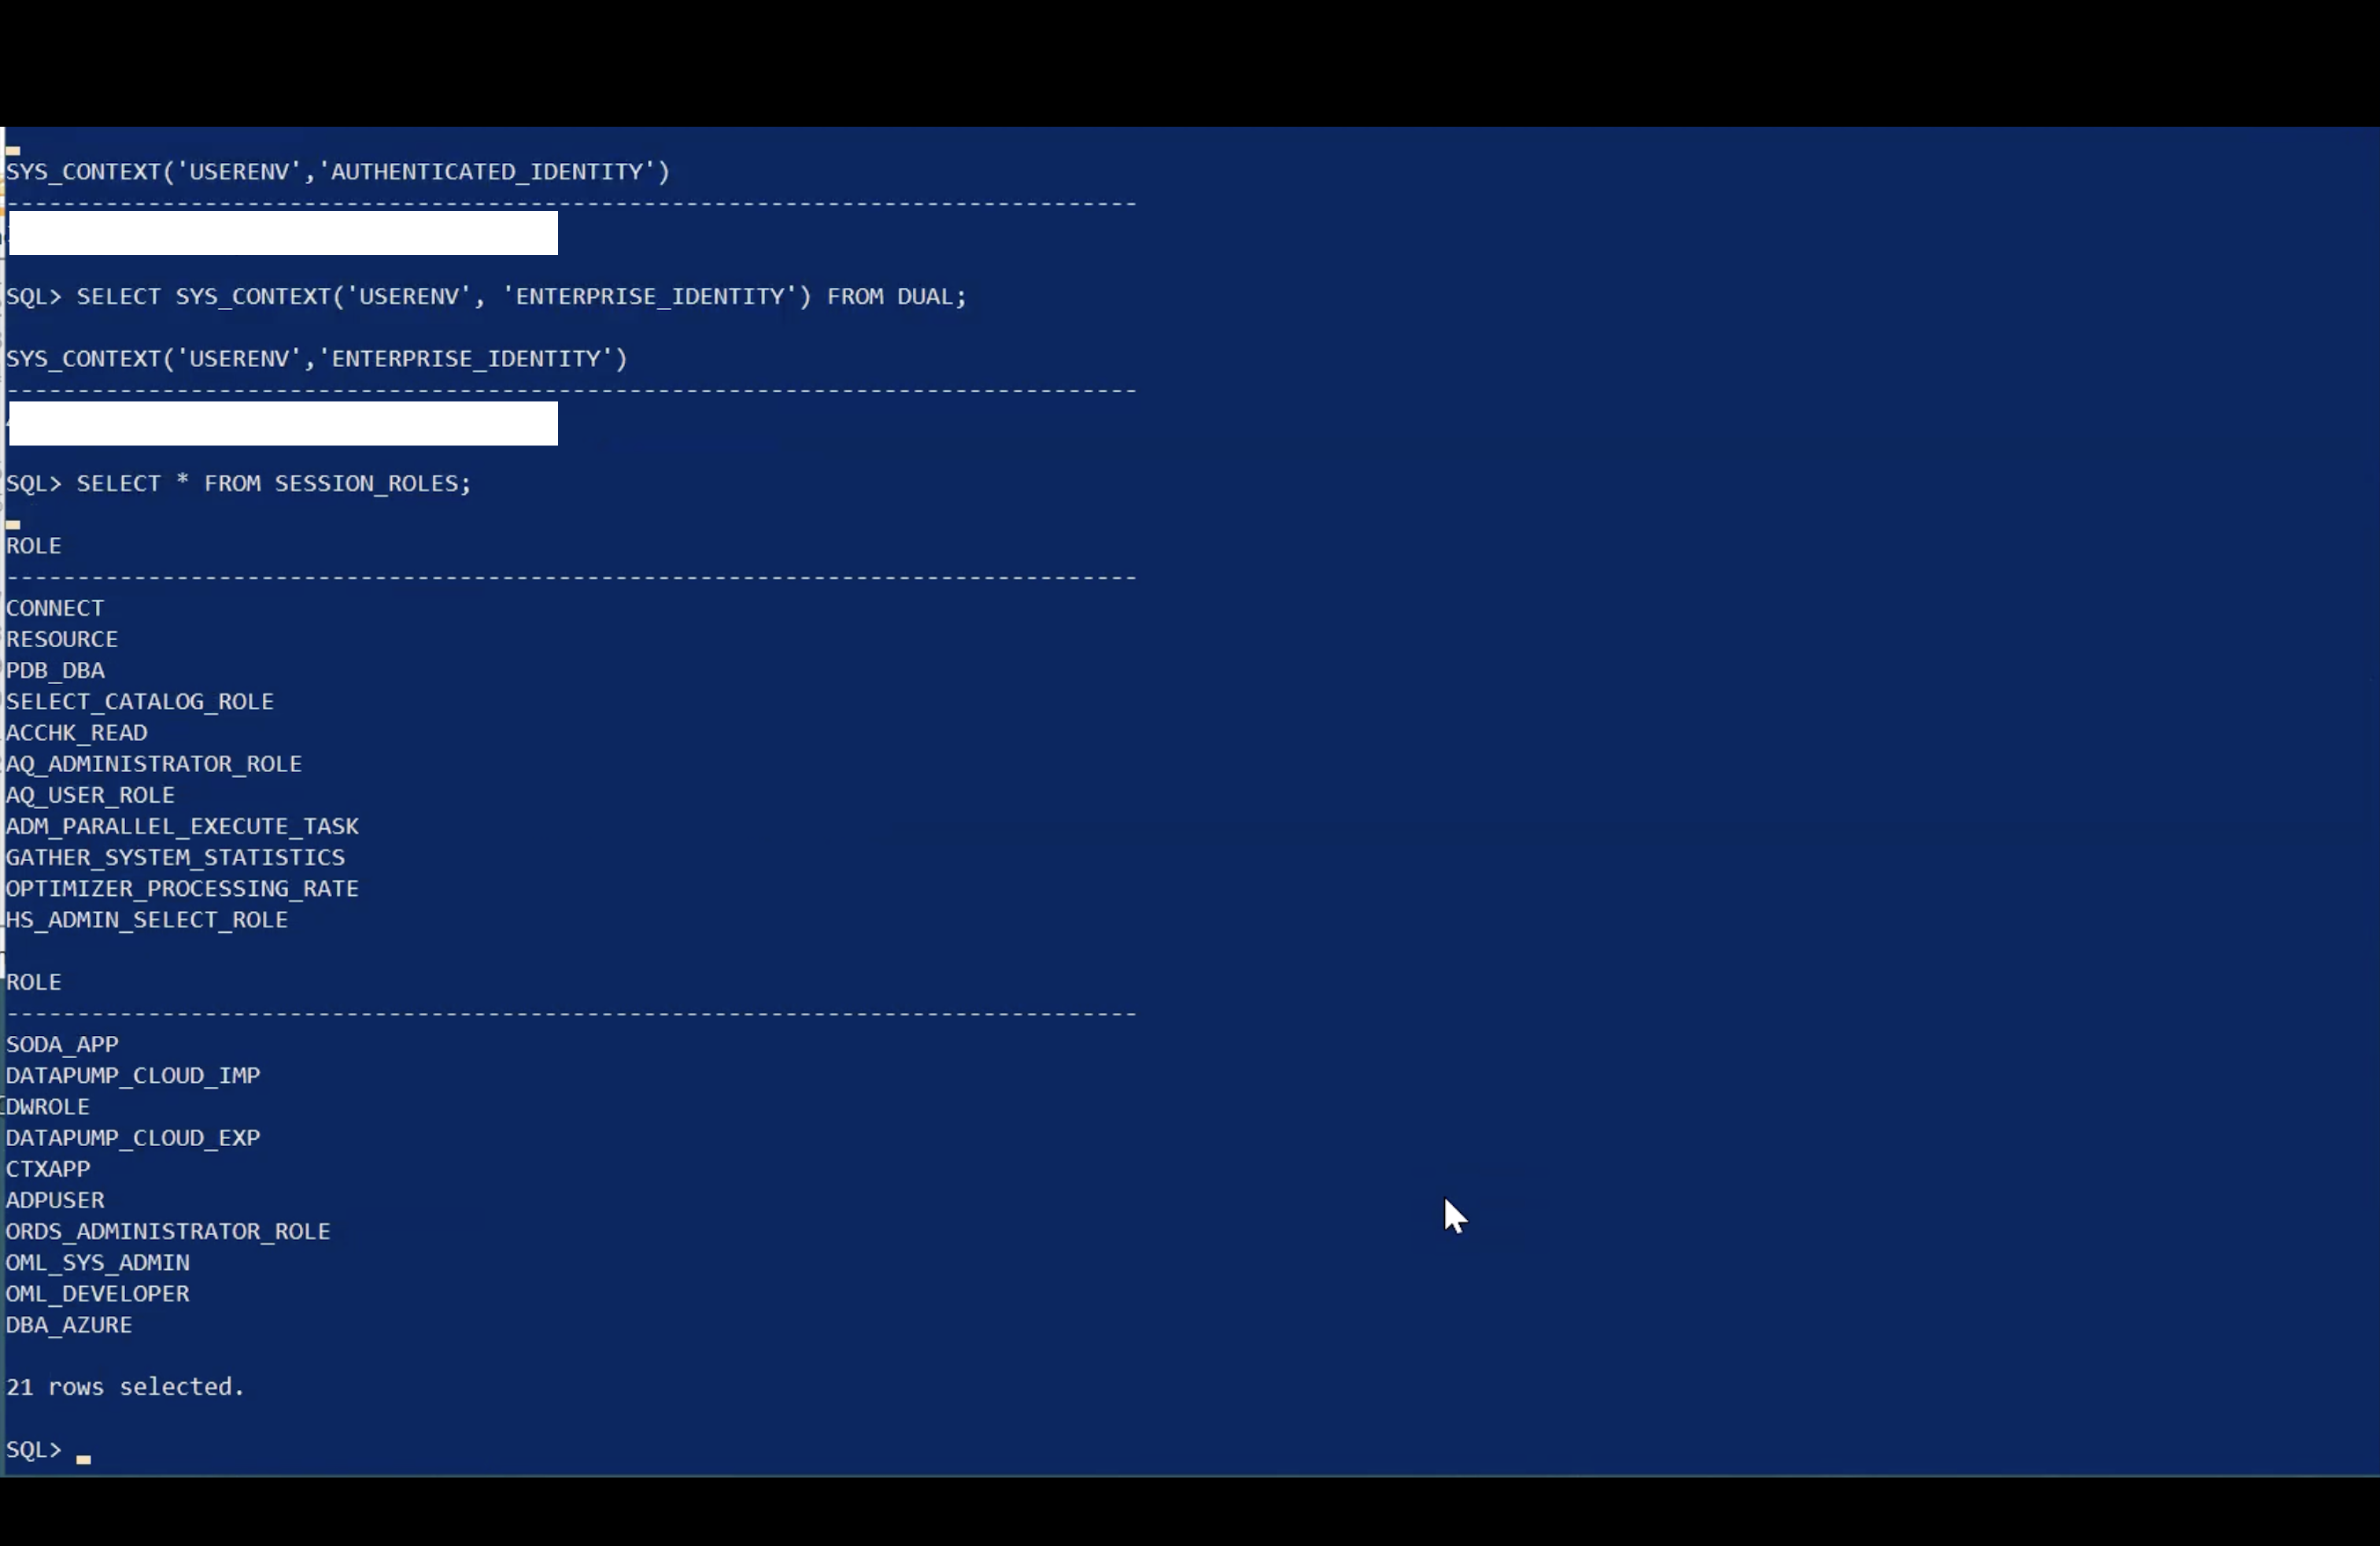
You have successfully tested the connection to the Autonomous Database using OAuth ME-ID Access Token.
Related Links
Acknowledgments
- Authors - Indiradarshni Balasundaram, Alex Kovuru, Anuj Tripathi
More Learning Resources
Explore other labs on docs.oracle.com/learn or access more free learning content on the Oracle Learning YouTube channel. Additionally, visit education.oracle.com/learning-explorer to become an Oracle Learning Explorer.
For product documentation, visit Oracle Help Center.
Integrate Oracle Autonomous Database with Microsoft Entra ID
F90208-01
December 2023
Copyright © 2023, Oracle and/or its affiliates.