Note:
- This tutorial requires access to Oracle Cloud. To sign up for a free account, see Get started with Oracle Cloud Infrastructure Free Tier.
- It uses example values for Oracle Cloud Infrastructure credentials, tenancy, and compartments. When completing your lab, substitute these values with ones specific to your cloud environment.
Use Oracle SQL Firewall with Oracle Data Safe
Introduction
Oracle SQL Firewall provides real-time protection against common database attacks by restricting database access to only authorized SQL statements or connections for a designated user.
The Oracle Data Safe unified console has been extended to manage and monitor the Oracle SQL Firewall for Oracle Database 23ai databases. Administrators can use Oracle Data Safe to collect SQL activities of database accounts, monitor the collection progress, create SQL Firewall policies with allow list rules (allowed contexts and allowed SQL statements) from the collected SQL activities, and enable SQL Firewall policies.
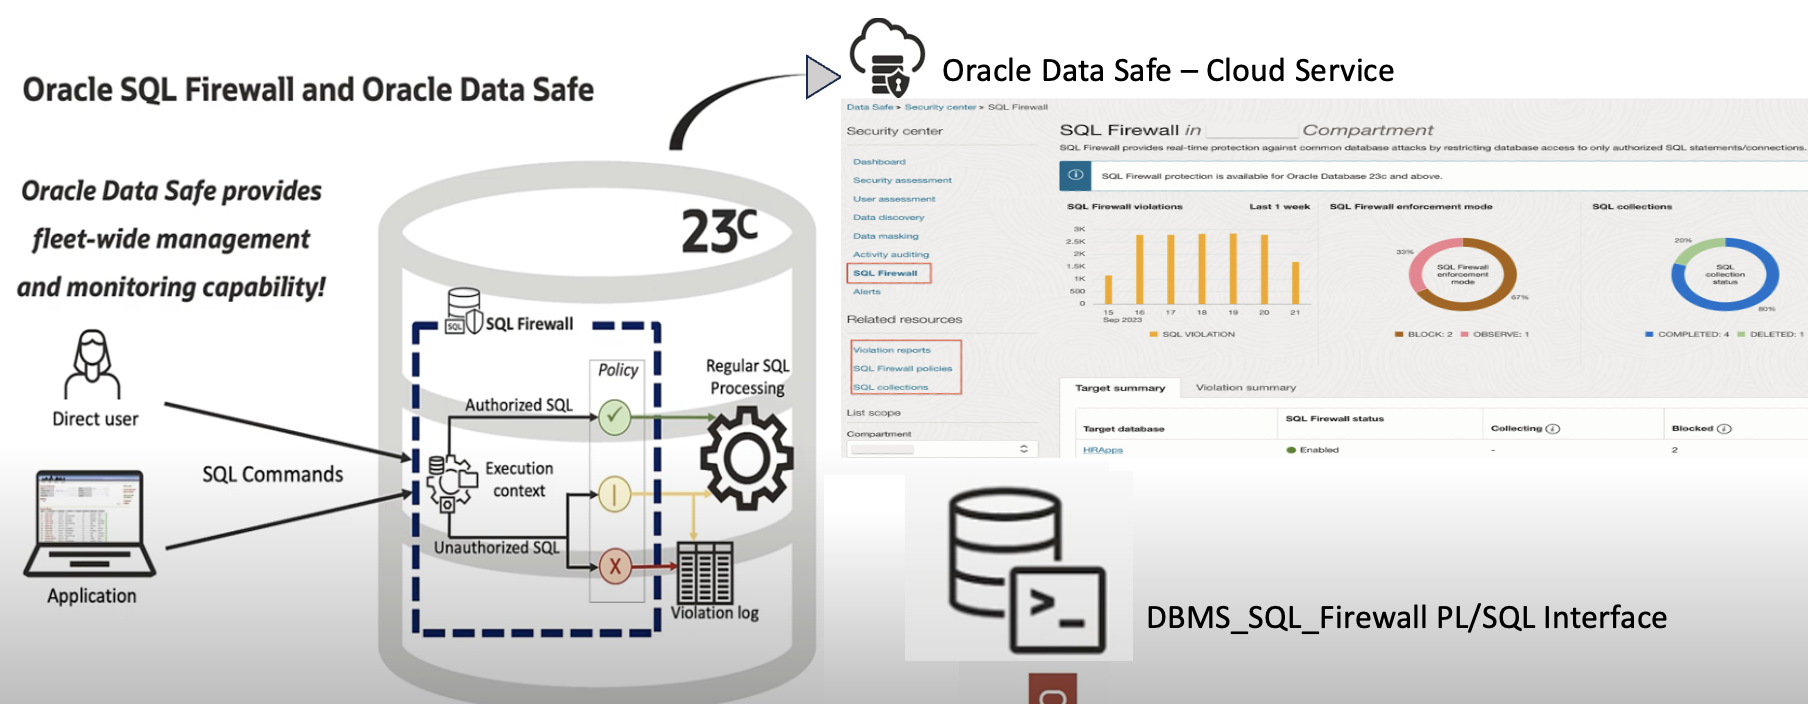
When a firewall policy is enabled, Oracle Data Safe automatically collects the firewall violation logs from the database and stores them in Oracle Data Safe. Those logs are then available for online analysis and reporting across your database fleet.
Audience
Database Administrators and Oracle Cloud Infrastructure (OCI) Security Administrators.
Objective
Understand how to use Oracle SQL Firewall with Oracle Data Safe with a simple use case.
Use case: Authorize the SQL statement “Select on View” and block any other SQL for designated user APP_USER.
APP_OWNER: Owner of the tables and views of the application.APP_USER: Needs to access to the application.
Prerequisites
-
Oracle Database 23ai provisioned in OCI. In this tutorial, we used the database which is created in an OCI Compute instance.
-
Add Oracle Database 23ai pluggable database (PDB) -
FREEPDB1as Target in Oracle Data Safe. In this tutorial, we used the compute instance wizard to register, see Oracle Data Safe - Target Database Registration. -
Any Oracle Database tool for testing the Oracle SQL Firewall. We are using Oracle SQL Developer to run SQL statements. For more information, see Oracle SQL Developer.
Note: Skip Task 1, if you already have Oracle Database 23ai instance.
Task 1: Create Oracle Database 23ai Compute Instance
-
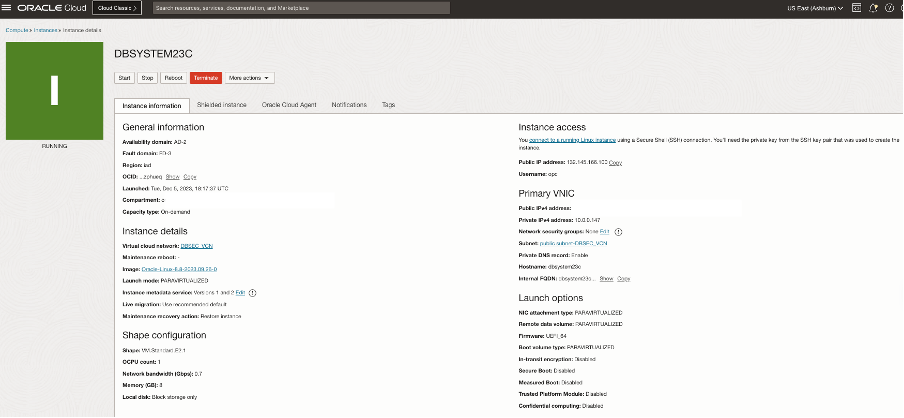
Go to OCI Console, navigate to Compute, Instances, and then click Create Instance. Enter the following details to create an instance.
-
Create Oracle Database 23ai database. Connect to your compute instance using the following command.
ssh -i <private-ssh-key> opc@<publicip-computeinstance> -
Switch to the root user and update the system with the latest software when working on a VM.
sudo su yum update -
Enable the Oracle Linux 8 Developer repository.
yum config-manager --set-enabled ol8_developer -
Download Oracle Database 23ai Free RPM and install it as root.
yum -y install oracle-database-preinstall-23c -
For executing an RPM-based installation, download the
oracle-database-free-23c-1.0-1.el8.x86_64.rpmfile.wget https://download.oracle.com/otn-pub/otn_software/db-free/oracle-database-free-23c-1.0-1.el8.x86_64.rpm -
Install Oracle Database by running the following command.
yum -y install oracle-database-free-23c-1.0-1.el8.x86_64.rpm -
Configure Oracle Database 23ai. The configuration script sets up a container database (FREE) that includes one pluggable database
FREEPDB1and gets the listener ready at the default port1521. Run the service configuration script./etc/init.d/oracle-free-23c configure -
Set environment variables to your
bash_profilewith the following settings.#Oracle Database environment variables export ORACLE_SID=FREE export ORACLE_HOME=/opt/oracle/product/23c/dbhomeFree export ORAENV_ASK=NO export PATH=$ORACLE_HOME/bin:$PATH -
Run the following command for the database to be auto-started when the instance boots.
systemctl enable oracle-free-23c -
Check if the Linux firewall is enabled. Use the following commands to disable it.
systemctl status firewalld
systemctl stop firewalld
systemctl disable firewalld
Task 2: Enable SQL Firewall Status in Target Database through Oracle Data Safe
-
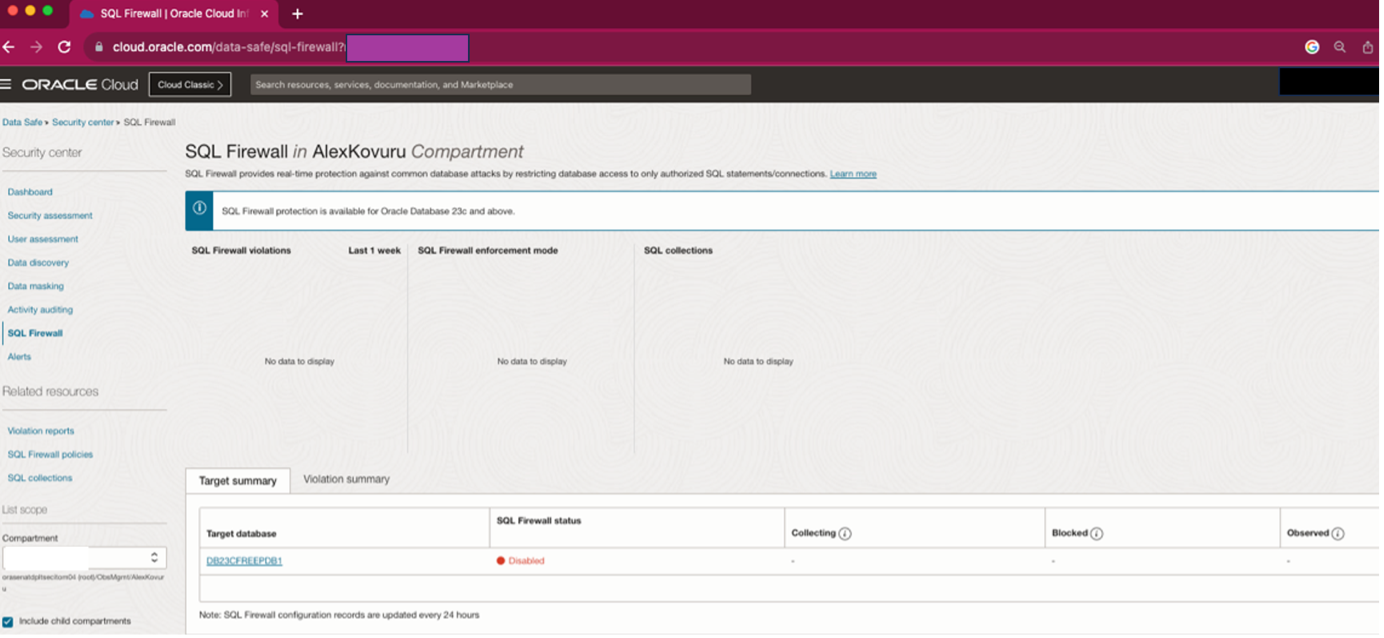
In the breadcrumb at the top of the page, click Oracle Databases, Data Safe, Security center and SQL Firewall.
-
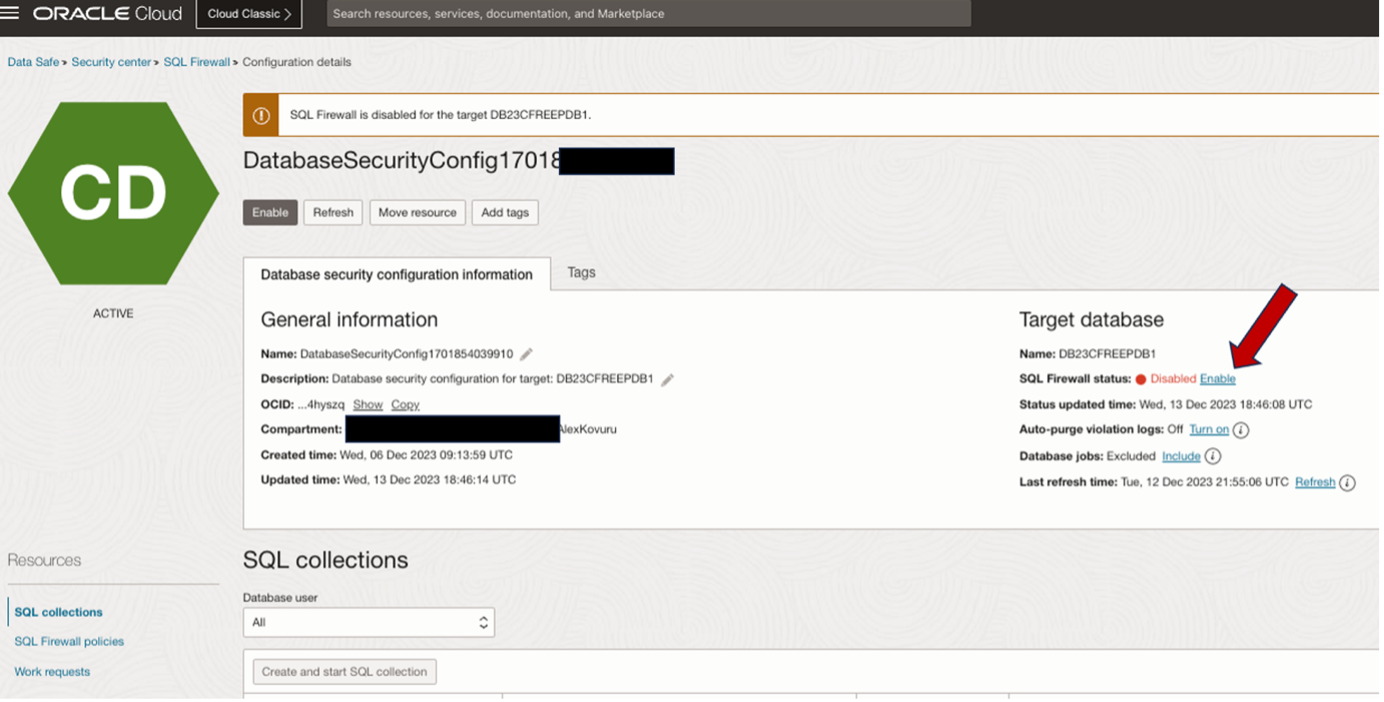
By default, SQL Firewall will be disabled in a new target 23ai database. Click the database and enable it.
Task 3: Create Sample Users and Objects
-
Connect to the
FREEPDB1database with Oracle SQL Developer by sys user as sysdba.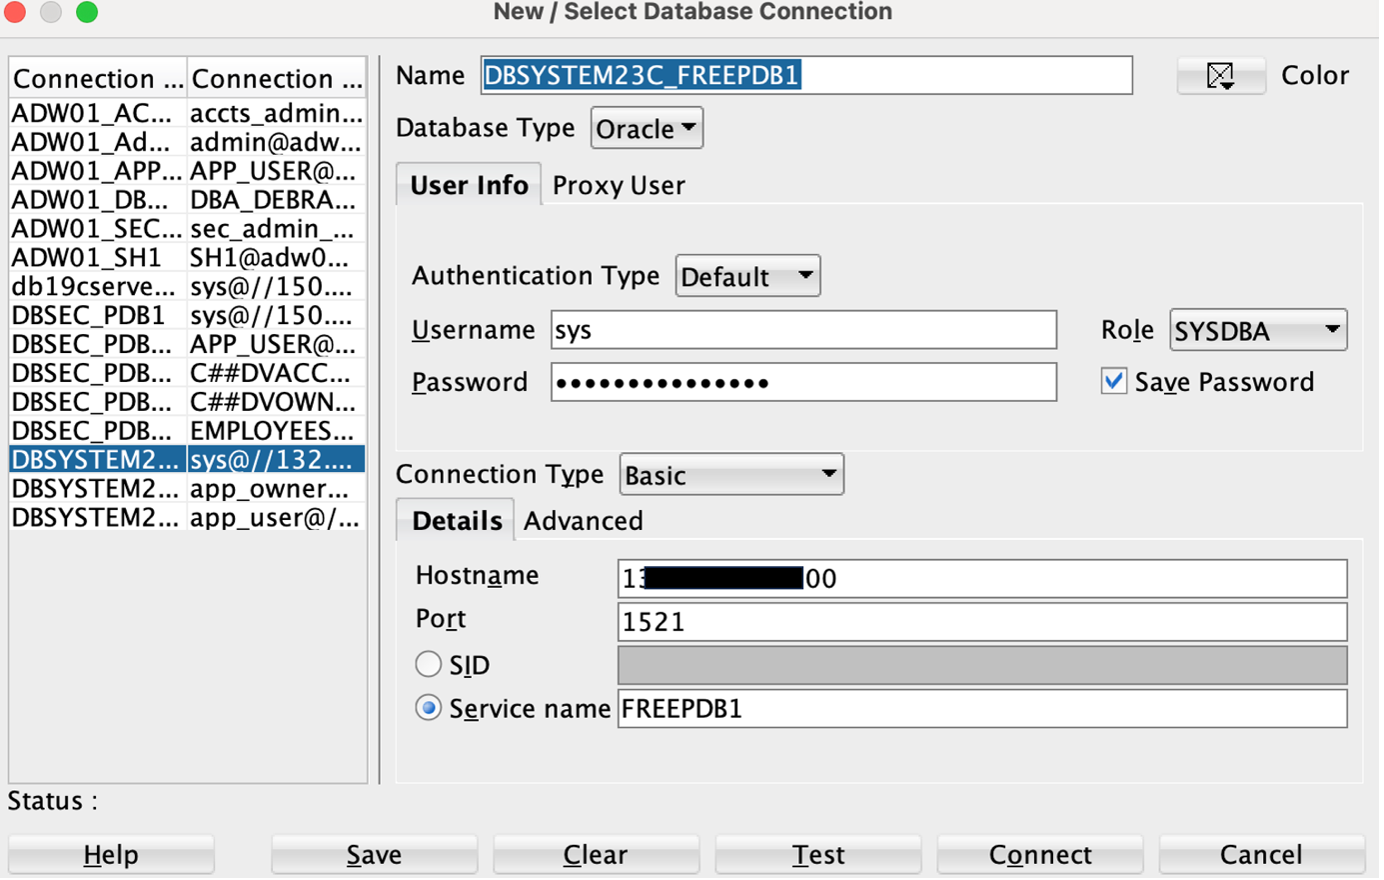
-
Create the sample users and objects.
-- APP_OWNER who is the owner of the tables and views of the application
-- APP_USER who needs to access to the application

Create user app_owner identified by QAZxswedc123##;
Grant connect, resource, unlimited tablespace to app_owner;
Create user app_user identified by QAZxswedc123##;
Grant connect, resource, select any table to app_user;

-- Sample table created in appuser_test schema
CREATE TABLE "APP_OWNER"."DEMO_EMPLOYEES"
   (    "USERID" NUMBER(4,0),
   "FIRSTNAME" VARCHAR2(25 BYTE),
   "LASTNAME" VARCHAR2(35 BYTE),
   "EMAIL" VARCHAR2(35 BYTE)
   ) ;

Insert into APP_OWNER.DEMO_EMPLOYEES (USERID,FIRSTNAME,LASTNAME,EMAIL) values (73,'Craig','Hunt','Craig.Hunt@oracledemo.com');
Insert into APP_OWNER.DEMO_EMPLOYEES (USERID,FIRSTNAME,LASTNAME,EMAIL) values (74,'Fred','Stewart','Fred.Stewart@oracledemo.com');
Insert into APP_OWNER.DEMO_EMPLOYEES (USERID,FIRSTNAME,LASTNAME,EMAIL) values (75,'Julie','Reed','Julie.Reed@oracledemo.com');
Insert into APP_OWNER.DEMO_EMPLOYEES (USERID,FIRSTNAME,LASTNAME,EMAIL) values (76,'Ruby','James','Ruby.James@oracledemo.com');
Insert into APP_OWNER.DEMO_EMPLOYEES (USERID,FIRSTNAME,LASTNAME,EMAIL) values (77,'Alice','Harper','Alice.Harper@oracledemo.com');
Commit;

Create view APP_OWNER.DEMO_EMPLOYEES_VIEW as select * from APP_OWNER.DEMO_EMPLOYEES;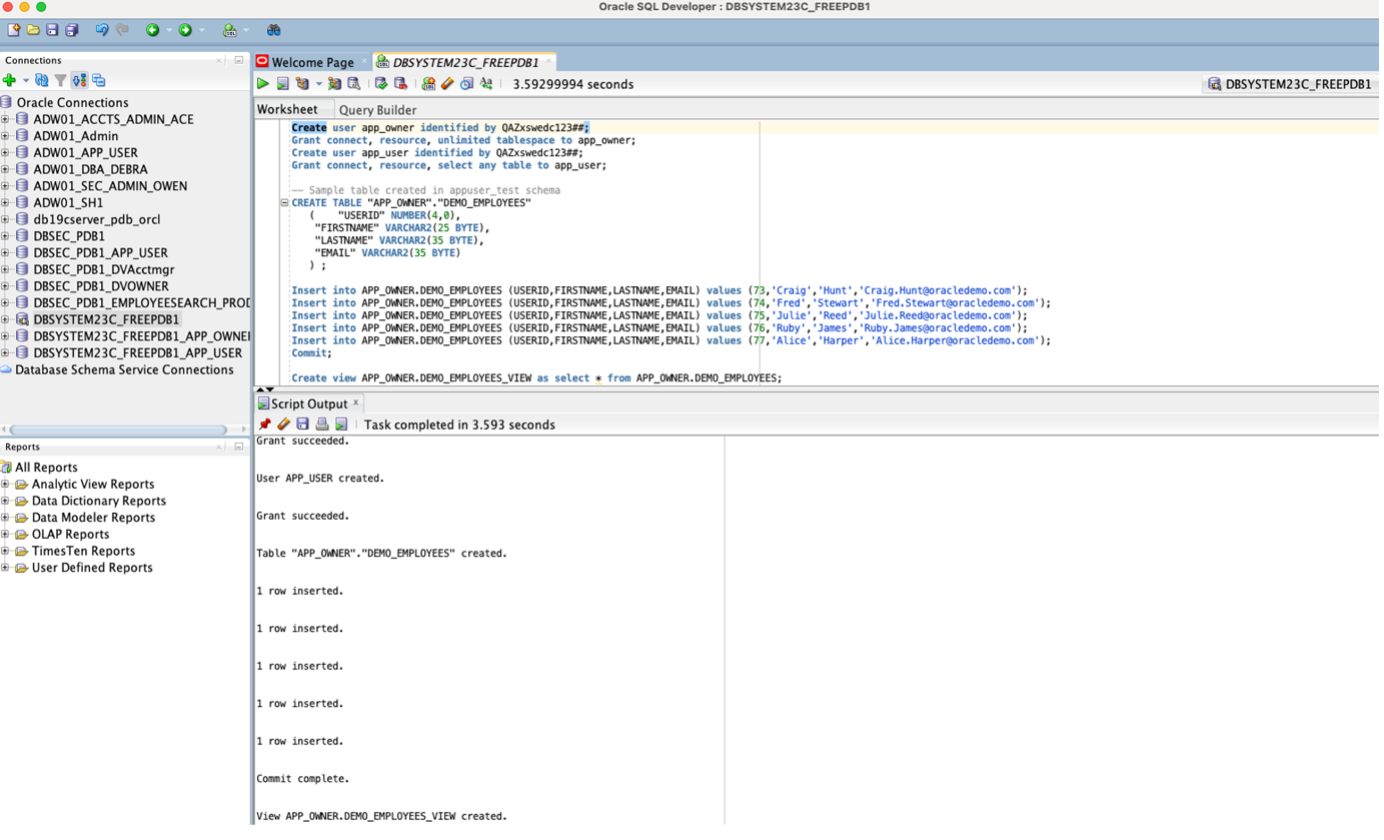
Task 4: Create and Start SQL Collection
-
In the breadcrumb at the top of the page, click Data Safe, Security center, SQL Firewall, Configuration details and click Create and start SQL collection.

-
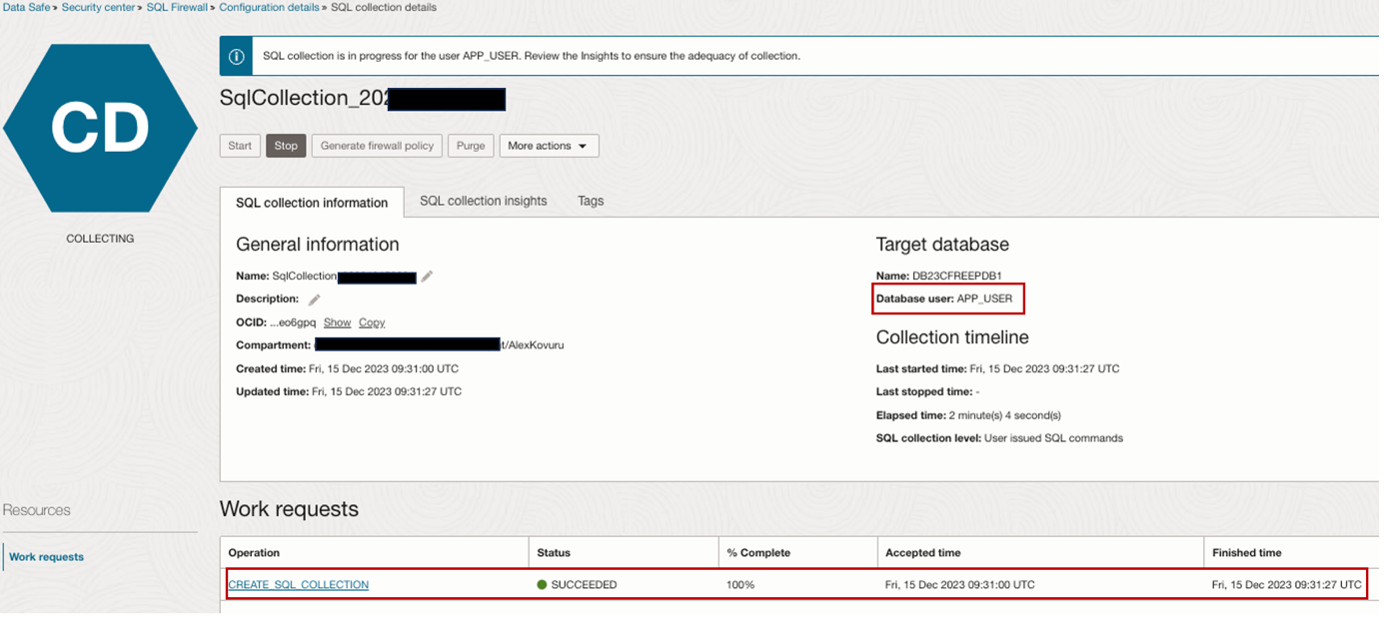
Enter the Database user as
APP_USERand enable the SQL collection level withUser issued SQL commandsand click Create and start SQL collection.
Work request CREATE SQL COLLECTION will start collecting the SQL’s.
Task 5: Run Authorized SQL Statement
-
Connect to the
APP_USER@FREEPDB1with Oracle SQL Developer.
-
Run the authorized SQL statement.
select * from APP_OWNER.DEMO_EMPLOYEES_VIEW;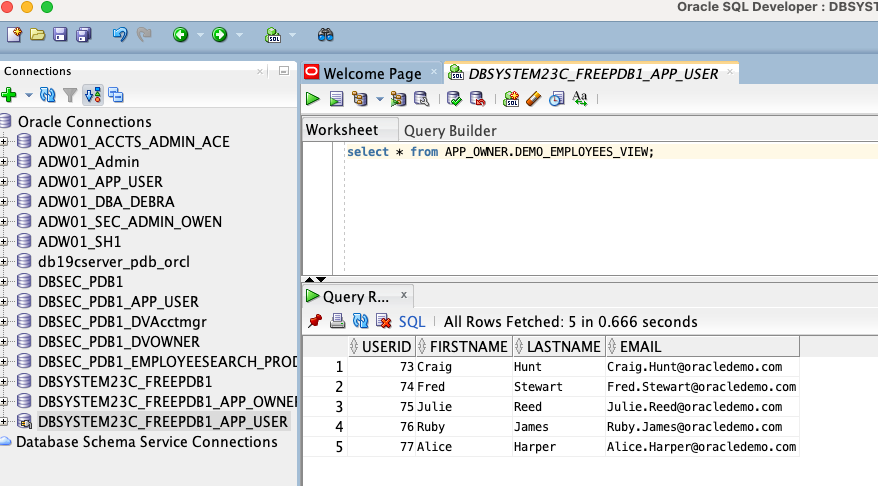
-
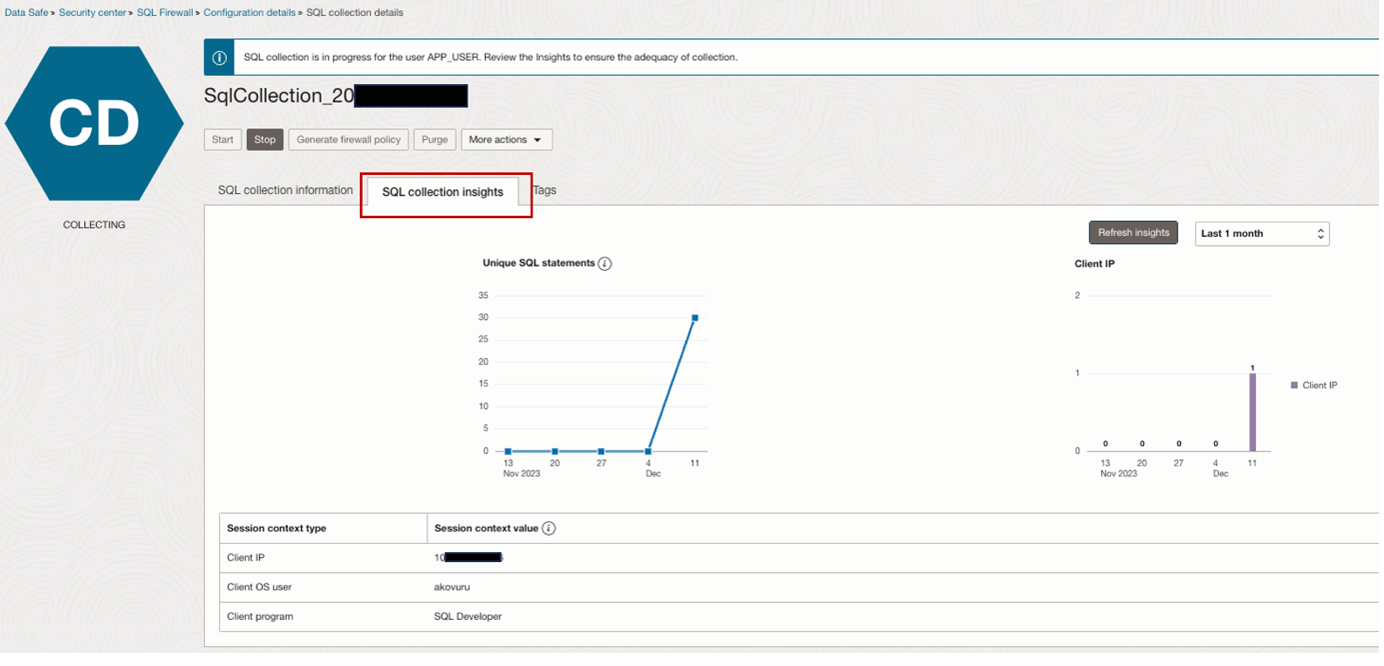
We can view the SQL collection insights from Oracle Data Safe console. In the breadcrumb at the top of the page, click Data Safe, Security center, SQL Firewall, Configuration details, SQL collection details and SQL collection insights.
Task 6: Stop the SQL Collection
-
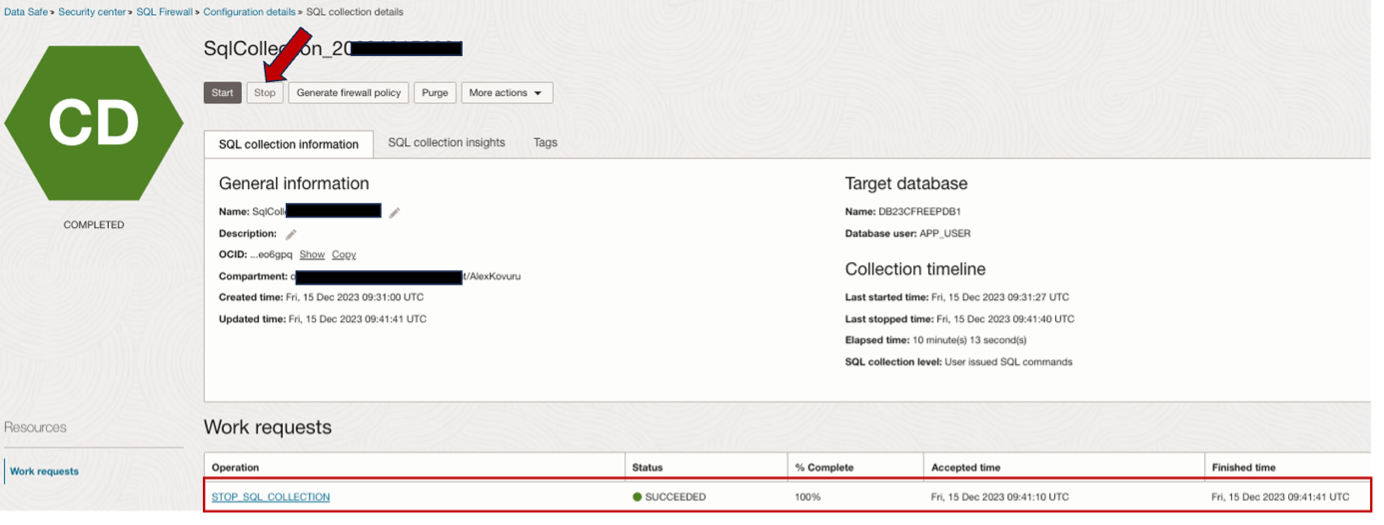
In the breadcrumb at the top of the page, click Data Safe, Security center, SQL Firewall, Configuration details, SQL collection details and STOP.
Task 7: Generate Firewall Policy
-
In the breadcrumb at the top of the page, click Data Safe, Security center, SQL Firewall, Configuration details, SQL collection details and Generate Firewall Policy.
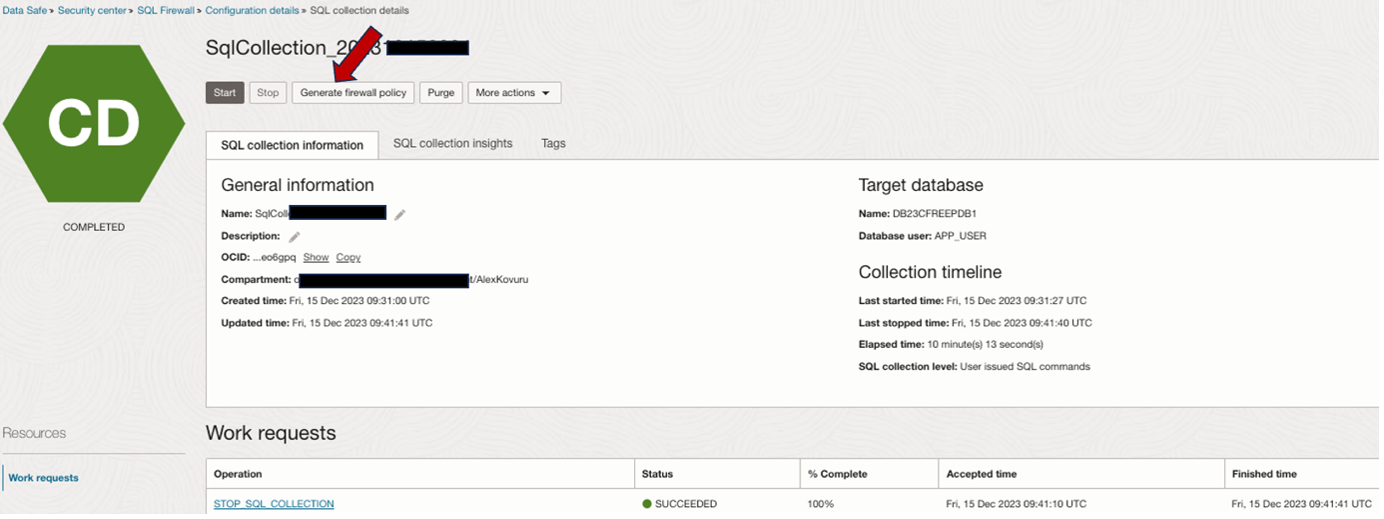
We can view the Unique allowed SQL statements and the policy is in
INACTIVEstate.
Task 8: Deploy and Enforce the Policy
-
In the breadcrumb at the top of the page, click Data Safe, Security center, SQL Firewall, Configuration details, SQL collection details, Firewall Policy details, and Deploy and enforce.

-
Select the following details and click Deploy and enforce.
- Enforcement scope:
All - Action on violations:
Block and log violations - Audit for violations:
On
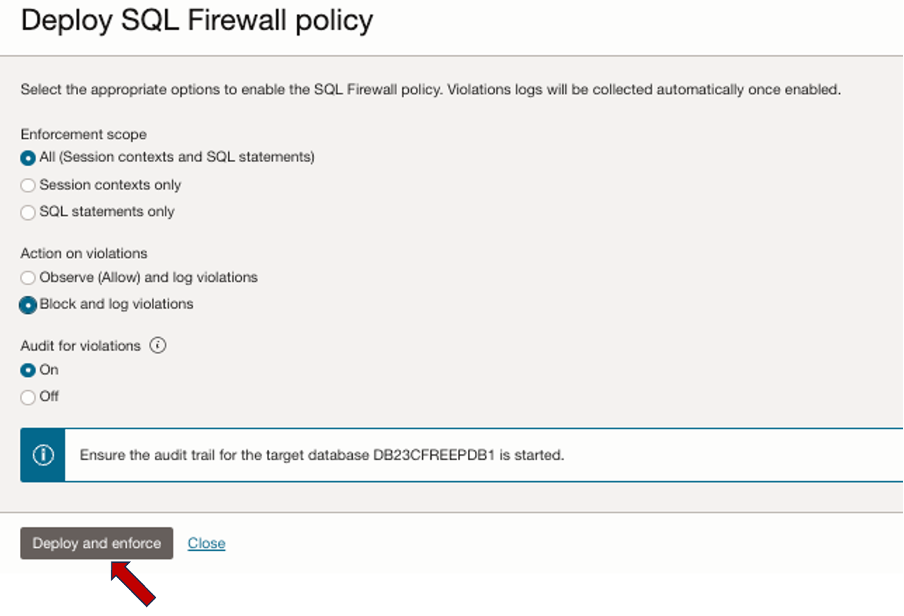
We can view the status of the policy is
ACTIVE.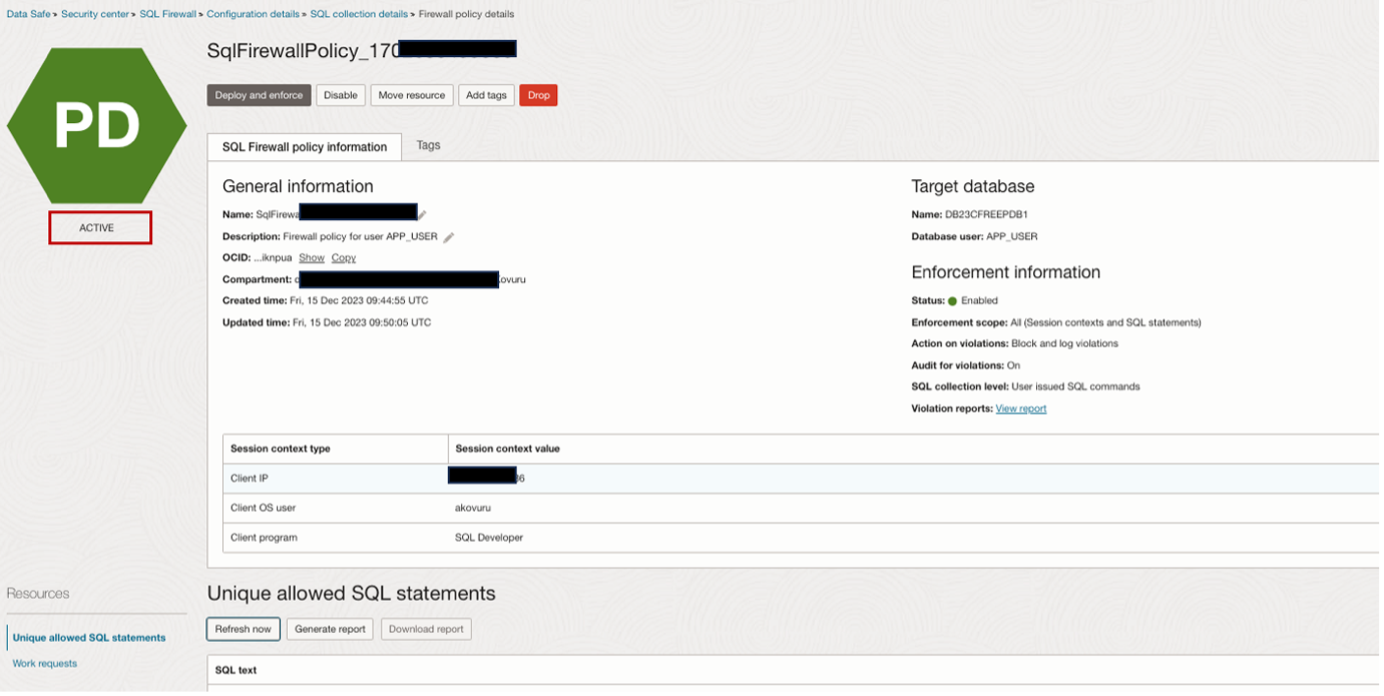
- Enforcement scope:
Task 9: Test the Oracle SQL Firewall
-
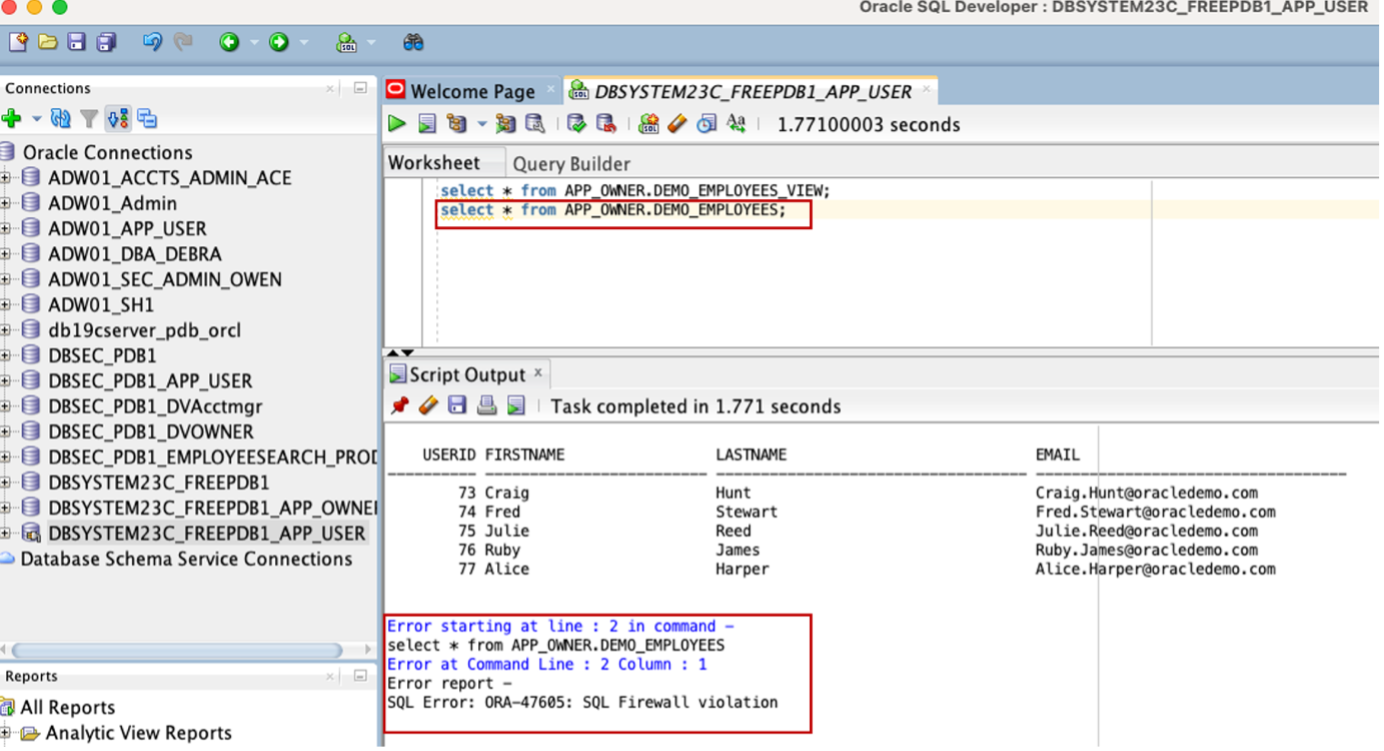
Connect as
APP_USER@FREEPDB1with Oracle SQL Developer.select * from APP_OWNER.DEMO_EMPLOYEES_VIEW; select * from APP_OWNER.DEMO_EMPLOYEES;
-
We can observe the Oracle SQL Firewall violation for the second query which is not in the SQL collection.
Task 10: Verify the Oracle SQL Firewall Dashboard and Violation Reports
-
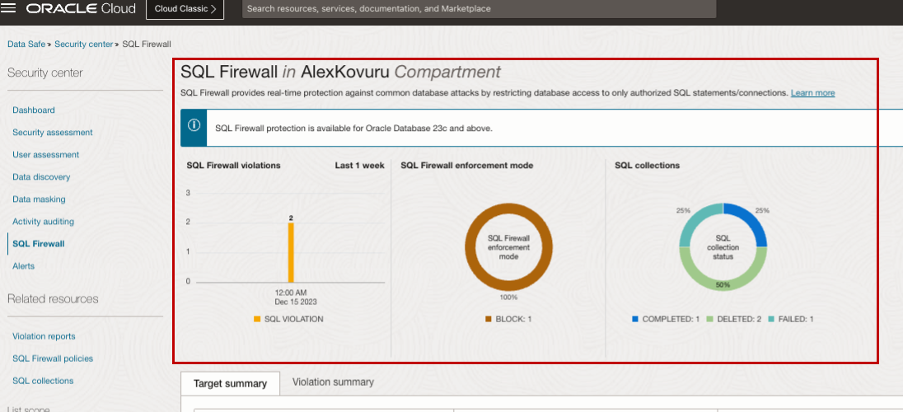
We can see the Oracle SQL Firewall Dashboard for the fleet view of the Oracle SQL Firewall violations and SQL collections. In the breadcrumb at the top of the page, click Data Safe, Security center, SQL Firewall, Configuration details, SQL collection details and Generate Firewall Policy.
-
We can see the violations summary. In the breadcrumb at the top of the page, click Data Safe, Security center, SQL Firewall, Violation reports and All Violations.

Related Links
Acknowledgments
-
Author - Alex Kovuru
-
Contributor - Indira Balasundaram
More Learning Resources
Explore other labs on docs.oracle.com/learn or access more free learning content on the Oracle Learning YouTube channel. Additionally, visit education.oracle.com/learning-explorer to become an Oracle Learning Explorer.
For product documentation, visit Oracle Help Center.
Use Oracle SQL Firewall with Oracle Data Safe
F91533-02
May 2024