Row-Level Security
Oracle Analytics Server enables you to configure data security.
Some data sources apply data security policies to determine what data can be queried by an individual user. Data security is described using various terms such as row-level security, data-level security, or Virtual Private Database (VPD) policies. This document uses the term, row-level security.
Some data sources support connections using a privileged user that can impersonate the end user, who is running a query. Oracle Analytics Server connection pools allow parameterization of connection string information, and on-connection and on-query scripts that run prior to data queries. When Oracle Analytics Server connects to a data source by using a privileged user that can impersonate the actual end user, the data source’s data security policies apply to the end user queries.
In addition to the connection string and query script configuration, the Oracle Business Intelligence connection pools include a Virtual Private Database (VPD) option. If you use Virtual Private Database (VPD), you can prevent sharing of Oracle Analytics Server query cache between users, because each user needs to retrieve only the data they are permitted to query.
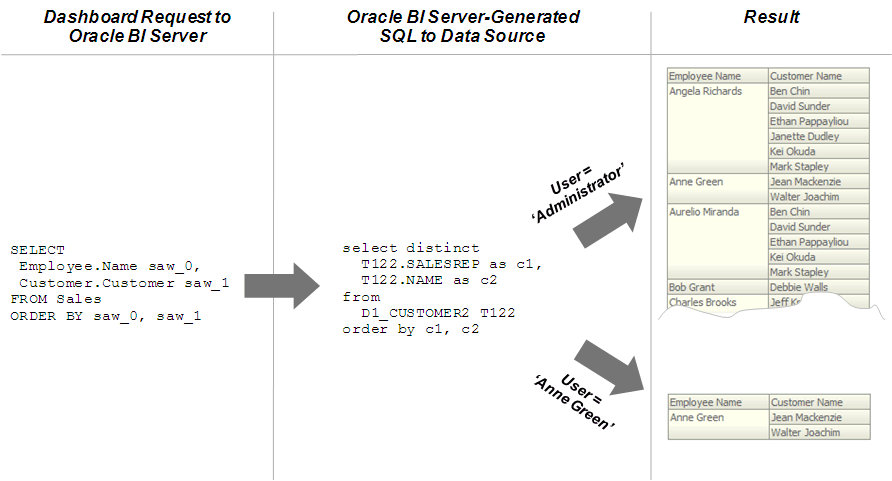
The image shows how row-level security is enforced in the database for queries. The security rules are applied to all incoming clients and can't be breached, even when the Logical SQL query is modified. In this example, the results returned are different depending on the user that generated the query, even though the SQL query generated by the Oracle BI Server is the same. The returned results are based on rules created and enforced in the database.
You must define the users, permissions, and security policies in the database. Refer to your database documentation for more information.
When setting up row-level security consider the following configuration information:
-
Row-level security doesn't work when SSO is used, or for any cases that involve impersonation such as Delivers, because the password for the end user isn't available to the Oracle BI Server.
-
A connection script can be used to achieve the same functionality for Oracle Database data sources.
-
For Essbase or Hyperion Financial Management data sources, the connection pool displays an additional option to implement SSO.
Set Up Row-Level Security
You can choose to set up row-level security in the repository, or in the database.
Implementing row-level security in the repository provides many benefits, including the following:
-
All users share the same database connection pool for better performance
-
All users share cache for better performance
-
You can define and maintain security rules that apply across many federated data sources
Implementing row-level security in the database, in contrast, is good for situations where multiple applications share the same database. When you design and implement row-level security in the database, you should also define and apply object permissions in the repository.
Although it's possible to set up row-level security in both the repository and in the database, you typically don't enforce row-level security in both places unless you've a particular need to do so.
This section contains the following topics:
Data Filters
Use the Administration Tool to define data filters on repository objects for specific application roles.
You typically don't set up data filters if you've implemented row-level security in the database, because in this case, your row-level security policies are being enforced by the database rather than the Oracle BI Server.
You can set data filters for objects in the Business Model and Mapping layer and the Presentation layer. Applying a filter on a logical object impacts all Presentation layer objects that use the object. If you set a filter on a Presentation layer object, it's applied to the object along with any other filters that are set on the underlying logical objects.
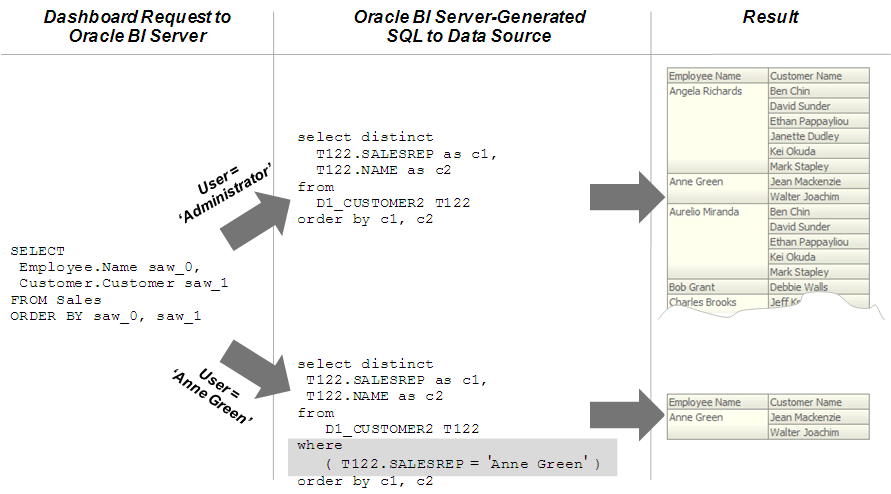
The image shows how data filter rules are enforced in the Oracle BI Server. The security rules are applied to all incoming clients and can't be breached, even when the Logical SQL query is modified.
In this example, a filter has been applied to an application role. When Anne Green, who is a member of that role, sends a request, the return results are limited based on the filter. Because no filters have been applied to the application roles for the Administrator user, all results are returned. The Oracle BI Server-generated SQL takes into account any data filters that have been defined.
Set Up Data Filters in the Repository
Use these steps to assign data filters to enforce row-level security rules in the repository.
You should always set up data filters for a specific application roles rather than for individual users.
To create filters, you first select objects from subject areas on which you want to apply the filters. Then, you provide the filter expression information for the individual objects. For example, you might want to define a filter like "Sample Sales"."D2 Market"."M00 Mkt Key" > 5 to restrict results based on a range of values for another column in the table.
If you're in offline mode, and application roles don't appear in the Identity Manager, see About Applying Data Access Security in Offline Mode.
You can also use repository and session variables in filter definitions. Use Expression Builder to include these variables to ensure the correct syntax.
When a repository object such as a logical fact table is accessed by multiple application roles with different levels of access, create functional groups to prevent application roles from viewing data restricted from view by that specific application role. For example, you want your regional sales associates to see the revenue for a quarter in their assigned region, but you don’t want your regional sales associate to see to total segment sales for all of the regions, to avoid exposing sensitive information, you create functional groups with different levels of access as appropriate for the specific application role to the filter. See Specify a Functional Group for an Application Role.
- In the Administration Tool, open your repository.
- Select Manage, then select Identity.
- In the Identity Manager dialog, double-click an application role.
- In the Application Role dialog, click Permissions.
- In the Application Role Permissions dialog, click the Data Filters tab.
- From the Subject Area list, select a repository object to use in the filter.
- Do one of the following:
- Click Add button to browse to locate the object to use, and then click Select.
- Double-click the Name field in an empty row, then browse to locate the object, and double-click to select the object.
- Select the data filter to define, click the Expression Builder icon.
- In the Expression Builder, define the condition using the repository objects and operators.
- Optional: From the Status list.
- Click OK, then click OK again to return to the Identity Manager.
Specify a Functional Group for an Application Role
Use these steps to specify a functional group for application roles with different data access filters on the same repository object, usually a logical fact table.
When there are no functional groups defined, all the security filters applied to a given table, regardless of the associated role, and are combined using the OR operator. Using the OR operator works in most cases because a user can view a union of all the rows selected by the security filters. For example, consider the following filters:
Role A is assigned the filter, Product = 'Coke'
Role B is assigned the filter, Product = 'Pepsi'
If a user is given Role A and Role B, then the user can view data for both the Coke and Pepsi products.
When the two security filters from the same table are combined in the query, the filter conditions are combined using the OR operator, this is appropriate for most security filters defined on dimension tables, for example:
Product = 'Coke' OR Product = 'Pepsi'
Using functional groups are necessary is when securing a single fact table, using data filters from different dimensions.
In this example, a fact table is secured using the following filters:
Role A is assigned the filter, Product = 'Coke'
Role B is assigned the filter, Product = 'Pepsi'
Role C is assigned the filter, Region = 'Southwest'
If you don't use functional groups, a user with roles A, B, and C would have all three filter conditions combined in the query using the OR operator, for example:
(Product = 'Coke' OR Product = 'Pepsi' OR Region = 'Southwest')
Combining the results of Role A, B, and C doesn't make sense because Product and Region are independent dimensions. Combining data filters from different dimensions using OR operator provides the user access to more data values than the user should view.
In this example, the user can see data for all products within the Southwest region as well as data for all regions within the Pepsi and Coke products.
To get the expected behavior, that is allowing the user to see data only for the Pepsi and Coke products within the Southwest region, you need to change the filter to combine the product filters with the region filter using the AND operator, for example:
(Product = 'Coke' OR Product = 'Pepsi') AND (Region = 'Southwest')
To achieve this using functional groups, assign the security filters to functional groups as follows:
Role A is assigned the filter, Product = 'Coke' with functional group "Product"
Role B is assigned the filter, Product = 'Pepsi' with functional group "Product"
Role C is assigned the filter, Region = 'Southwest' with functional group "Region"
All the filters in the same functional group are combined using the OR operator and all sets of filters in different functional groups are combined using the AND operator. By choosing the functional groups associated with each security filter, you can control how the filters are combined using the OR and AND operators.
To create a data filter, see Set Up Data Filters in the Repository.
- In the Administration Tool, from Manage, select Identity.
- In the Identity Manager, double-click an application role.
- In Application Role, click Permissions.
- In Application Role Permissions, click the Data Filters tab.
- In the Data Filter tab, select the filter to assign to a functional group.
- In the Functional Group column, select an existing group, or typing the name of a new group to use.
- Click OK.
Set Up Row-Level Security in the Database
If multiple applications share the same database, it's good to implement row-level security in the database.
This procedure is applicable for making database queries through RPD queries (Common Enterprise Information Model), if you have configured the database to use the Virtual Private Database (VPD) feature.
After you've set up row-level security for the data the database, you can set up object permissions in the repository for Presentation layer or other objects. You can also set query limits (governors). See Set Up Object Permissions and Set Query Limits.

