Create Filters for Columns
You can create filters for columns.
Topics:
A filter limits the results that are displayed when an analysis is run. Together with the columns that you select for the analysis, filters determine what the results contain. You specify filter criteria to display only the results that you want to show.
Create Inline and Named Filters
In most cases, you create and include a filter "inline" for use in only one analysis. You can also create a named filter to reuse the filter across all analyses and dashboards. Unless you want to reuse the filter, create an inline filter.
For example, as a sales consultant, you can analyze revenue for only those brands for which you’re responsible.
Create an inline filter from the Selected Columns pane on the Criteria tab
-
Open the analysis for editing.
-
On the Selected Columns pane of the Criteria tab, click Options beside the column name and select Filter.
Create an inline filter from the Filters pane on the Criteria tab
-
Open the analysis for editing.
-
On the Filters pane of the Criteria tab, click Create a filter for the current Subject Area.
-
Select a column name from the menu.
Create a named filter from the Home page
-
From the Classic Home page, in the Create pane, click More under Analysis and Interactive Reporting, then click Filter.
-
In the Select Subject Area dialog, select the data source that you want to filter. The New Filters dialog is displayed.
Specify Values for Filters
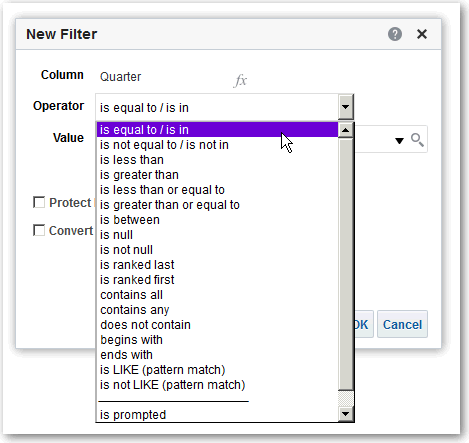
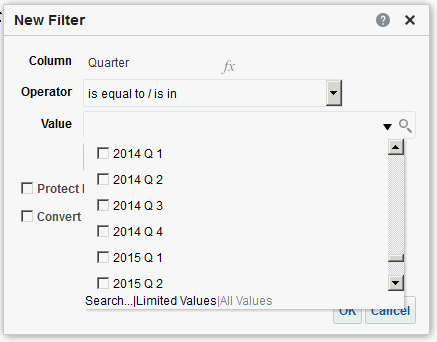
You can specify the values for a filter that displays in an analysis only those values in which you’re interested.
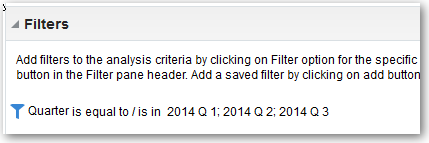
For example, in the Brand Revenue analysis, a filter can limit the analysis results to only the first quarter values in three years. As a result, you can discover how revenue performed year-to-year in these quarters.
- For inline filters, the filter is displayed in the Filters pane on the Criteria tab.
- For named filters, the filter is displayed in the Saved Filters pane.
Embed an EVALUATE_PREDICATE Function in a Filter
You can add an EVALUATE_PREDICATE function as an inline filter clause.
- Open the analysis for editing.
- On the Filters pane of the Criteria tab, click More options and select Add EVALUATE_PREDICATE Function.
- Enter the function’s formula in the New EVALUATE_PREDICATE Function dialog.
- Click OK to add the EVALUATE_PREDICATE function in the Filters pane.
For example, you can add the following filter clause using an EVALUATE_PREDICATE function to exclude values with less than six letters in the Products.P4 Brand column.
SELECT
0 s_0,
"A - Sample Sales"."Products"."P3 LOB s_1,
"A - Sample Sales"."Products"."P4 Brand" s_2,
"A - Sample Sales"."Base Facts"."1- Revenue" s_3
FROM "A - Sample Sales"
Where EVALUATE_PREDICATE('length(%1)>6',"A - Sample Sales"."Products"."P4 Brand").
ORDER BY 1,2,3
Combine and Group Filters
You can combine and group multiple inline filters to create complex filters without using SQL statements.
You group or combine filters to establish the precedence in which data in an analysis is filtered. When you add two or more inline filters to an analysis or named filters, by default, the inline filters are combined using the AND Boolean operator. The AND operator indicates that the criteria specified in all the inline filters must be met to determine the results when an analysis is run.
You use the OR Boolean operator to indicate that the criteria specified in at least one of the filters must be met to determine the results of the analysis. The OR operator helps you to create a group of multiple filters using alternate criteria.
- Open for editing a named filter or an analysis that contains inline filters.
- On the Filters pane of the Criteria tab, confirm that the analysis contains two or more inline filters. Alternatively, on the Saved Filter pane, confirm that the named filter contains two or more inline filters.
- On the Saved Filter pane or in the Filters pane of the Criteria tab, notice how the inline filters are combined using AND or OR operators.
- Click the word AND before an inline filter to change an AND operator to an OR operator. You can toggle between the AND and OR operator in this way.
- Change the AND and OR operators for other inline filters to create the required filter combinations. Alternatively, create more inline filters and change the AND and OR operators.
- Click Save Analysis or Save Filter to save the filter combinations.
Save Inline and Named Filters
You can save inline filters and named filters.
When you create an inline filter in the Filters pane, you can optionally save the inline filter as a named filter. When you save an inline filter as a named filter, other people on your team can use this filter in a new analysis. You can also create a named filter as a standalone object from the global header.
For example, you can save a filter for the Quarter column in a shared folder in the catalog. As a result, your manager has access to that filter. Suppose that you save the filter that limits quarters to 2011 Q1, 2012 Q1, and 2013 Q1. Your manager can use this filter in a Product Revenue analysis to find how products performed only during these quarters.
To save a named filter, simply click Save As on the toolbar, specify folder in the catalog, and click OK.
To save an inline filter as a named filter, do the following:
- On the Filters pane on the Criteria tab, click More options and select Save Filters.
- Specify a folder in the Oracle BI Presentation Catalog.
- Click OK.


