Send Email Reports and Track Deliveries
Send email reports to anyone inside or outside the organization or use agents to send reports to a range of other devices. Keep everyone up-to-date with regular daily or weekly reports.
Send Email Reports Once, Weekly, or Daily
Send Email reports to one or more recipients directly from the catalog. It’s easy to distribute reports this way and quicker than downloading a report and mailing it from your email client. To keep everyone up-to-date, schedule daily or weekly emails.
Track the Reports You Distribute By Email or Through Agents
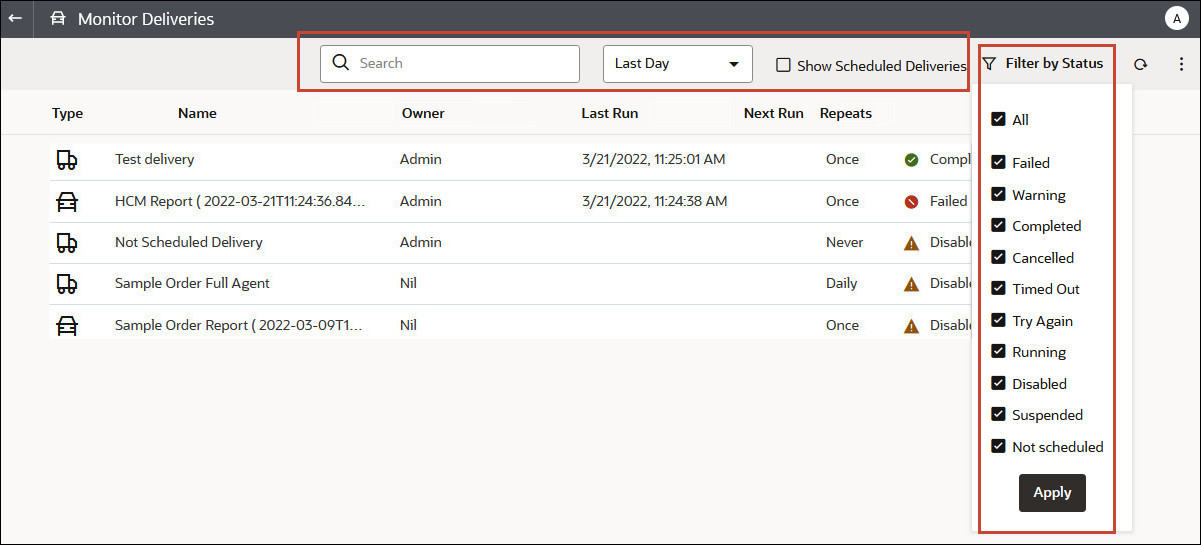
Track the reports you’ve chosen to send to people by email from the Console. Quickly see when reports were sent and which items are pending (scheduled to run in the future). Review, change, or delete your deliveries (scheduled or completed) from the same page.
Any agents that you set up to deliver content are displayed in the Console too. This way, all your delivery information is in one place.
You can filter the deliveries by their status to track deliveries most important to you. The various status messages are explained here.
| Delivery Status | Description |
|---|---|
| Canceled |
Someone canceled the delivery. Users can cancel any delivery that they own. |
| Completed | Delivery ran successfully. |
| Disabled |
Users can temporarily disable any delivery or agent that they own through the catalog. For example, you might stop a job running on its defined schedule if you want to edit the report or change who sees the report. |
| Failed |
Delivery ran as scheduled but it didn't complete successfully. Click Show details... after the error icon ( |
| Not Scheduled |
No one has set up a schedule for the delivery or the scheduled run date is for a date in the past (rather than a future date). |
| Running | Delivery is in progress. |
| Suspended |
Administrators can temporarily suspend deliveries that other users set up. For example, before you migrate from a test environment to a production environment, your administrator might suspend deliveries in the test environment, and resume them in the production environment. |
| Timed Out |
Delivery timed out because it took too long to complete. |
| Try Again |
Something went wrong. Try to run the delivery again. |
| Warning |
Delivery ran as scheduled but it wasn't 100% successful. For example, the delivery specifies 10 recipients but only 9 of them received it because 1 of the email addresses was incorrect. Click Show details... after the warning icon ( |
To track deliveries from the Console:
View and Edit Recipients for Deliveries
You can review and edit the recipients of all your deliveries and agents from the Monitor Deliveries page. If you need to make recipient changes across multiple deliveries, the Monitor Deliveries page offers a convenient way to do it.
Change the Owner or Time Zone for Deliveries
If you're an administrator, you can change the owner or time zone for one or more deliveries. You can make yourself the new owner or select a different user. This is useful when the original owner changes, leaves your organization, or after migration from a different environment. The change time zone option also comes in handy if you need to change the time zone for multiple deliveries, and this is especially useful when you migrate deliveries from a different environment with a different time zone.
For example, you might migrate deliveries from an on-premises Oracle Analytics Server environment where the time zone is correctly set to your local US time to an environment with a different time zone. If you migrate to Oracle Analytics Cloud where the time zone changes to UTC, your deliveries arrive too early. In this scenario, you need an easy way to update the time zone for all your deliveries.
Restore and Enable Delivery Schedules
When you restore content from a snapshot or migrate content from a different environment, delivery schedules defined for agents, analyses, and dashboards in the snapshot aren’t restored or activated right away. When you’re ready to restore deliveries on your system, you can decide whether to enable or disable delivery schedules on your system. This is useful as you might not want to immediately start delivering content.
For example, if you're restoring a production environment, you probably want to restart deliveries as soon as possible. Whereas in a test environment, you might prefer to disable deliveries after restoration and activate them at a later date.
Generate and Download a Deliveries Report (CSV)
If you're an administrator, you can generate a report that contains details about your deliveries and download the report in CSV format for analysis. You can customize the report so it only contains information you want to see. For example, if you're interested in active deliveries, there's an option to exclude deliveries that are disabled or suspended from the report. You can also control the detail that's included and whether to include everyone's deliveries or just your own.
Delivery reports can include the following information:
- Name - Name of the agent delivering the report.
- Agent Path - Location of the agent delivering the report.
- Content Data - Name of the report being delivered.
- Content Type - Type of content in the report.
- Owner - User who created the delivery.
- Repeats - Delivery frequency. For example, once, daily, weekly, and so on.
- Run As User - User running the report.
- User Recipients - Users receiving the report.
- Email Recipients - Email addresses of users receiving the report.
- Application Role Recipients - Application roles receiving the report, that is, users assigned to these application roles receive the report.
- Disabled - Specifies whether the delivery is disabled: TRUE or FALSE
- Suspended - Specifies whether the delivery is suspended: TRUE or FALSE


