Work with Oracle JET VComponent-based Web Components
Oracle JET VComponent-based Web Components are reusable pieces of user interface code that you can embed as custom HTML elements. Web Components can contain Oracle JET components, other Web Components, HTML, JavaScript, and CSS. You can create your own Web Component or add one to your page.
Create Web Components
Oracle JET supports a variety of custom Web Component component types. You can create standalone Web Components or you can create sets of Web Components that you intend to be used together and you can then assemble those in a JET Pack, or pack component type. You can enhance JET Packs by creating resource components when you have re-usable libraries of assets that are themselves not specifically UI components. And, if you need to reference third-party code in a standalone component, you can create reference components to define pointers to that code.
Create Standalone Web Components
Use the Oracle JET command-line interface (CLI) to create an Oracle JET Web Component template that you can populate with content. If you’re not using the CLI, you can add the Web Component files and folders manually to your Oracle JET application.
The procedure below lists the high-level steps to create a Web Component.
Before you begin:
-
Familiarize yourself with the list of reserved names for a Web Component that are not available for use, see valid custom element name
-
Familiarize yourself with the list of existing Web Component properties, events, and methods, see HTMLElement properties, event listeners, and methods
-
Familiarize yourself with the list of global attributes and events, see Global attributes
To create a Web Component:
-
Determine a name for your Web Component. The Web Component specification restricts custom element names as follows:
-
Names must contain a hyphen.
-
Names must start with a lowercase ASCII letter.
-
Names must not contain any uppercase ASCII letters.
-
Names should use a unique prefix to reduce the risk of a naming collision with other components.
A good pattern is to use your organization's name as the first segment of the component name, for example, org-component-name. Names must not start with the prefix
oj-orns-, which correspond to the root of the reservedojandnsnamespaces. -
Names must not be any of the reserved names. Oracle JET also reserves the
ojand thensnamespace and prefixes.
-
-
Determine where to place your Web Component, using one of the following options.
-
Add the Web Component to an existing Oracle JET application that you created with the Oracle JET CLI.
If you use this method, you'll use the CLI to create a Web Component template that contains the folders and files you'll need to store the Web Component's content.
-
Manually add the Web Component to an existing Oracle JET application that doesn't use the Oracle JET CLI.
If you use this method, you'll create the folders and files manually to store the Web Component's content.
-
-
Depending upon the choice you made in the previous step, perform one of the following tasks to create the Web Component.
-
If you used the Oracle JET CLI to create an application, then in the application's top-level directory, enter the following command at a terminal prompt to generate the Web Component template:
ojet create component component-nameFor example, enter
ojet create component doc-hello-worldto create a Web Component nameddoc-hello-world. The command addsdoc-hello-worldto the application'ssrc\componentsfolder with files containing stub content for the Web Component.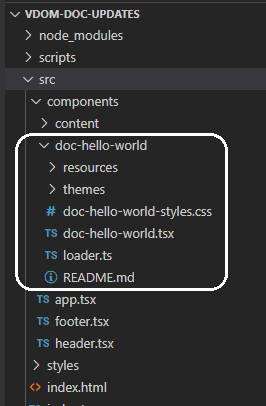
The value of the
componentsproperty in theoracleconfig.jsonfile determines the folder location where the Oracle CLI generates the Web Component. The default value iscomponents, but you can change it to another value. -
If you're not using the Oracle JET CLI, create a folder in your application's
srcfolder, and add folders containing the name of each Web Component you will create.
-
-
If you're not using the Oracle JET CLI, create a
loader.jsRequireJS module and place it in the Web Component's root folder.The
loader.jsmodule defines the Web Component dependencies and registers the component's class name,DocHelloWorldin this example.export { DocHelloWorld } from "./doc-hello-world"; -
Configure any custom styling that your Web Component will use.
-
If you only have a few styles, add them to
web—component-name-styles.cssfile in the Web Component's root folder, creating the file if needed.For example, the
DocHelloWorldWeb Component defines styles for the component's display, width, and height./* This prevents the flash of unstyled content before the Web Component properties have been setup. */ doc-hello-world:not(.oj-complete) { visibility: hidden; } doc-hello-world { min-height: 50px; width: 50px; } -
If you used the Oracle JET tooling to create your application and want to use Sass to generate your CSS:
-
If needed, at a terminal prompt in your application's top level directory, type the following command to add node-sass to your application:
ojet add sass. -
Create
web—component-name-styles.scssand place it in the Web Component's top level folder. -
Edit
web—component-name-styles.scsswith any valid SCSS syntax and save the file.In this example, a variable defines the demo card size:
$doc-hello-world-size: 200px;
/* This prevents the flash of unstyled content before the
   Web Component properties have been setup. */
doc-hello-world:not(.oj-complete) {
    visibility: hidden;&
}

doc-hello-world
  width: $doc-hello-world-size;
    min-height: $doc-hello-world-size;
    }
-
-
-
If you want to add documentation for your Web Component, add content to
README.mdin your Web Component's root folder, creating the file if needed.Your
README.mdfile should include an overview of your component with well-formatted examples. Include any additional information that you want to provide to your component's consumers. The recommended standard forREADMEfile format is markdown.
Create JET Packs
Create JET Packs to simplify project management for consumers who might pick up a component that is related to one or more components. You may require specific versions of the referenced components for individual JET Packs.
Fundamentally, the JET Pack is a library of related Web Components that does not directly include those assets, but is as an index to a particular versioned stripe of components.
Note there is one exception to the pack as a reference mechanism for related components. A pack might include one or more RequireJS bundle files which package up optimized forms of the component set into a small number of physical downloads. This, however, is always in addition to the actual components being available as independent entities in Oracle Component Exchange.
The components referenced by the JET Pack are intended to be used together and their usage is restricted by individual component version. Thus, the JET Pack that you create will tie very specific versions of each component into a relationship with very specific, fixed versions of the other components in the same set. Thus, a JET Pack itself has a "version stripe" which determines the specific components that users import into their apps. Since the version number of individual components may vary, the JET Pack guarantees the consumer associates their app with the version of the pack as a whole, and not with the individual components contained by the pack.
-
Create the JET Pack using the JET tooling from the root folder of your app.
ojet create pack my-packConsider the pack name carefully, as the name will determine the prefix to any components within that pack.
The tooling adds the folder structure with the template files that you will need to modify:
/(working folder) /src /components /my-pack -
Create the components that you want to bundle with the JET Pack by using the JET tooling from the root folder of your app. The component name that you specify must be unique within the pack.
ojet create component my-widget-1 --pack=my-packThe tooling nests the component folder
/my-widget-1under themy-packroot folder and the new component files resemble those created for a standalone Web Component./(working folder) /src /components /my-pack component.json /my-widget-1 | loader.ts | my-widget-1-styles.css | my-widget-1.tsx | README.md +---resources | /---nls | /---root | my-widget-1-strings.ts /---themesloader.tsincludes a one-line entry that exports the VComponent module class of the new component, as in the following example:export { MyWidget1 } from "./my-widget-1"; -
Optionally, for any Resource components that you created, as described in Create Resource Components for JET Packs, add the component's working folder with its own
component.jsonfile to the pack file structure.The tooling nests the component folder
/my-widget-1under themy-packroot folder and the new component files resemble those created for a standalone Web Component./(working folder) /src /components /my-pack component.json /my-widget-1 /resources /nls /root my-widget-1-strings.js component.json loader.ts README.md my-widget-1.tsx my-widget-1-styles.css /my-resource-component-1 component.json /converters file1.js ... /resources /nls /root string-file1.js /validators file1.js ... -
Optionally, generate any required bundled for desired components of the pack. Refer to RequireJS documentation for details at the https://requirejs.org web site.
You can use RequireJS to create optimized bundles of the pack components, so that rather than each component being downloaded separately by the consuming app at runtime, instead a single JavaScript file can be downloaded that contains multiple components. It's a good idea to use this facility if you have sets of components that are almost always used together. A pack can have any number of bundles (or none at all) in order to group the available components as required. Be aware that not every component in the pack has to be included in one of the bundles and that each component can only be part of one bundle. -
Use a text editor to modify the
component.jsonfile in the pack folder root similar to the following sample, to identify pack dependencies and optional bundles. Added components must be associated by their full name and a specific version.{ "name": "my-pack", "version": "1.0.0", "type": "pack", "displayName": "My JET Pack", "description": "An example JET Pack", "dependencies": { "my-pack-my-widget-1":"1.0.0", ... }, "bundles":{ "my-pack/my-bundle":[ "my-pack/my-bundle-file1/loader", ... ] }, "extension": { "catalog": { "coverImage": "coverimage.png" } } } }Your pack component's
component.jsonfile must contain the following unique definitions:-
name is the name of the JET Pack has to be unique, and should be defined with the namespace relevant to your group. This name will be prepended to create the full name of individual components of the pack.
-
version defines the exact version number of the pack, not a SemVer range.
Changes in version number with a given release of a pack should reflect the most significant change in the pack contents. For example, if the pack contained two components and as part of a release one of these had a Patch level change and the other a Major version change then the pack version number change should also be a Major version change. There is no requirement for the actual version number of the pack to match the version number(s) of any of it's referenced components. -
type must be set to
pack. -
displayName is the name of the pack component that you want displayed in in Oracle Component Exchange. Set this to something readable but not too long.
-
description is the description that you want displayed in Oracle Component Exchange. For example, use this to explain how the pack is intended to be used.
-
dependencies defines the set of components that make up the pack, specified by the component full name (a concatenation of pack name and component name). Note that exact version numbers are used here, not SemVer ranges. It's important that you manage revisions of dependency version numbers to reflect changes to the referenced component's version and also to specify part of the path to reach the components within the pack.
If you want to include all components in the JET Pack directory, use a token,
"@dependencies@", as the value fordependenciesrather than defining individual entries for all the components in the pack. The following snippet illustrates how you use this token in yourcomponent.jsonfile:{ "name": "my-pack", "version": "1.0.0", "type": "pack", "displayName": "My JET Pack", "description": "An example JET Pack", "dependencies": "@dependencies@" } -
bundles defines the available bundles (optional) and the contents of each. Note how both the bundle name and the contents of that bundle are defined with the pack name prefix as this is the RequireJS path that is needed to map those artifacts.
-
catalog defines the working metadata for Oracle Component Exchange, including a cover image in this case.
-
-
Optionally, create a readme file in the root of your working folder. This should be defined as a plain text file called
README.txt(orREADME.mdwhen using markdown format). -
Optionally, create a cover image in the root of your working folder to display the component on Oracle Exchange. The file name can be the same as the name attribute in the
component.jsonfile. -
Use the JET tooling to create a zip archive of the JET Pack working folder when you want to upload the component to Oracle Component Exchange, as described in Package Web Components.
-
Support consuming the JET Pack in Oracle Visual Builder projects by uploading the component to Oracle Component Exchange.
Create Resource Components for JET Packs
Create a resource component when you want to reuse assets across web components that you assemble into JET Packs. The resource component can be reused by multiple JET Packs.
When dealing with complex sets of components you may find that it makes sense to share certain assets between multiple components. In such cases, the components can all be included into a single JET Pack and then a resource component can be added to the pack in order to hold the shared assets. There is no constraint on what can be stored in a pack, typically it may expose shared JavaScript, CSS, and JSON files and images. Note that third party libraries should generally be referenced from a reference component and should not be included into a resource component.
You don't need any tools to create the resource component. You will need to create a folder in a convenient location. This folder will ultimately be zipped to create the distributable resource component. Internally this folder can then hold any content in any structure that you desire.
To create a resource component:
-
If you have not already done so, create a JET Pack using the following command from the root folder of your app to contain the resource component(s):
ojet create pack my-resource-pack -
Still in the root folder of your app, create the resource component in the JET Pack:
ojet create component my-resource-comp --type=resource --pack=my-resource-packThe tooling adds the folder structure with a single template
component.jsonfile and an index file./root folder /src /components /my-resource-pack /my-resource-comp component.json -
Populate the created folder (
my-resource-comp, in our example) with the desired content. You can add content in any structure desired, with the exception of NLS content for translation bundles. In the case of NLS content, preserve the typical JET folder structure; this is important if your resource component is going to include such bundles./(my-resource-folder) /converters phoneConverter.js phoneConverterFactory.js /resources /nls /root oj-ext-strings.js /phone countryCodes.json /validators emailValidator.js emailValidatorFactory.js phoneValidator.js phoneValidatorFactory.js urlValidator.js urlValidatorFactory.jsIn this sample notice how the
/resources/nlsfolder structure for translation bundles is preserved according to the folder structured of the app generated by JET tooling. -
Use a text editor to update the
component.jsonfile in the folder root similar to the following sample, which defines the resourcemy-resource-compfor the JET Packmy-resource-pack.{ "name": "my-resource-comp", "pack": "my-resource-pack", "displayName": "Oracle Jet Extended Utilities", "description": "A set of reusable utility classes used by the Oracle JET extended component set and available for general use. Includes various reusable validators", "license": "https://opensource.org/licenses/UPL", "type": "resource", "version": "2.0.2", "jetVersion": ">=8.0.0 <10.1.0", "publicModules": [ "validators/emailValidatorFactory", "validators/urlValidatorFactory" ], "extension":{ "catalog": { "category": "Resources", "coverImage": "cca-resource-folder.svg" } } }Your resource component's
component.jsonfile must contain the following unique definitions:-
name is the name of the resource component has to be unique, and should be defined with the namespace relevant to your group.
-
pack is the name of the JET Pack containing the resource component.
-
displayName is the name of the resource component as displayed in Oracle Component Exchange. Set this to something readable but not too long.
-
description is the description that you want displayed in Oracle Component Exchange. For example, use this to explain the available assets provided by the component.
-
type must be set to
resource. -
version defines the semantic version (SemVer) of the resource component as a whole. It's important that you manage revisions of this version number to inform consumers of the compatibility of a given change.
Changes to the resource component version should roll up all of the changes within the resource component, which might not be restricted to changes only in.jsfiles. A change to a CSS selector defined in a shared.cssfile can trigger a major version change when it forces consumers to make changes to their downstream uses of that selector. -
jetVersion defines the supported Oracle JET version range using SemVer notation. This is optional and depends on the nature of what you include into the resource component. If the component contains JavaScript code and any of that code makes reference to Oracle JET APIs, then you really should include a JET version range in that case.
-
publicModules lists entry points within the resource component that you consider as being public and intend to be consumed by any component that depends on this component. Any API not listed in the array is considered to be pack-private and therefore can only be used by components within the same pack namespace, but may not be used externally.
-
catalog defines the working metadata for Oracle Component Exchange, including a cover image in this case.
-
-
Optionally, create a readme file in the root of your working folder. A readme can be used to document the assets of the resource. This should be defined as a plain text file called
README.txt(orREADME.mdwhen using markdown format).Take care to explain the state of the assets. For example, you might choose to include utility classes in the resource component that are deemed public and can safely be used by external consumers (for example, code outside of the JET Pack that the component belongs to). However, you may want to document other assets as private to the pack itself. -
Optionally, create a change log file in the root of your working folder. The change log can detail significant changes to the pack over time and is strongly recommended. This should be defined as a text file called
CHANGELOG.txt(orCHANGELOG.mdwhen using markdown format). -
Optionally, include a License file in the root of your working folder.
-
Optionally, create a cover image in the root of your working folder to display the component on Oracle Exchange. Using the third party logo can be helpful here to identify the usage. The file name can be the same as the name attribute in the
component.jsonfile. -
Create a zip archive of the working folder when you want to upload the component to Oracle Component Exchange. Oracle recommends using the format
<fullName>-<version>.zipfor the archive file name. For example,my-resource-pack-my-resource-comp-2.0.2.zip.
For information about using the resource component in a JET Pack, see Create JET Packs.
Create Reference Components for Web Components
Create a reference component when you need to obtain a pointer to third-party libraries for use by Web Components.
Sometimes your JET Web Components need to use third party libraries to function and although it is possible to embed such libraries within the component itself, or within a resource component, it generally better to reference a shared copy of the library by defining a reference component.
Create the Reference Component
You don't need any tools to create the reference component. You will need to create a folder in a convenient location where you will define metadata for the reference component in the component.json file. This folder will ultimately be zipped to create the distributable reference component.
Reference components are generally standalone, so the component.json file you create must not be contained within a JET Pack.
To create a reference component:
-
Create the working folder and use a text editor to create a
component.jsonfile in the folder root similar to the following sample, which references the moment.js library.{ "name": "oj-ref-moment", "displayName": "Moment library", "description": "Supplies reference information for moment.js used to parse, validate, manipulate, and display dates and times in JavaScript", "license": "https://opensource.org/licenses/MIT", "type": "reference", "package":"moment", "version": "2.24.0", "paths": { "npm": { "debug": "moment", "min": "min/moment.min" }, "cdn": { "debug": "https://static.oracle.com/cdn/jet/packs/3rdparty/moment/2.24.0/moment.min", "min": "https://static.oracle.com/cdn/jet/packs/3rdparty/moment/2.24.0/moment.min" } }, "extension": { "catalog": { "category": "Third Party", "tags": [ "momentjs" ], "coverImage": "coverImage.png" } } }Your reference component's
component.jsonfile must contain the following unique definitions:- name is the name of the reference component has to be unique, and should be defined with the namespace relevant to your group.
- displayName is the name of the resource component as displayed in Oracle Component Exchange. Set this to something readable but not too long.
- description is the description that you want displayed in Oracle Component Exchange. For example, use this to explain the function of the third party library.
- license comes from the third party library itself and must be specified.
- type must be set to
reference. - package defines the npm package name for the library. This will also be used as the name of the associated RequireJS path that will point to the library and so will be used by components that depend on this reference.
- version should reflect the version of the third party library that this reference component defines. If you need to be able to reference multiple versions of a given library then you will need multiple versions of the reference component in order to map each one.
- paths defines the CDN locations for this library. See below for more information about getting access to the Oracle CDN.
- min points to the optimal version of the library to consume. The debug path can point to a debug version or just the min version as here.
- catalog defines the working metadata for Oracle Component Exchange including a cover image in this case.
-
Optionally, create readme file in the root of your working folder. A readme can be used to point at the third party component web site for reference. This should be defined as a plain text file called
README.txt(orREADME.mdwhen using markdown format). -
Optionally, create a cover image in the root of your working folder to display the component on Oracle Exchange. Using the third party logo can be helpful here to identify the usage. The file name can be the same as the name attribute in the
component.jsonfile. -
Create a zip archive of the working folder when you want to upload the component to Oracle Component Exchange. Oracle recommends using the format
<fullName>-<version>.zipfor the archive file name. For example,oj-ref-moment-2.24.0.zip. -
Support consuming the reference component in Oracle Visual Builder projects by uploading the component to a CDN. See below for more details.
Consume the Reference Component
When your Web Components need access to the third party library defined in one of these reference components, you use the dependency attribute metadata in the component.json to point to either an explicit version of the reference component or you can specify a semantic range. Here's a simple example of a component that consumes two such reference components at specific versions:
{
    "name":"calendar",
    "pack":"oj-sample",
    "displayName": "JET Calendar",
    "description": "FullCalendar wrapper with Accessibility added.",
    "version": "1.0.2",
    "jetVersion": "^9.0.0",
    "dependencies": {
        "oj-ref-moment":"2.24.0",
        "oj-ref-fullcalendar":"3.9.0"
    },

    ...
When the above component is added to an Oracle JET or Oracle Visual Builder project this dependency information will be used to create the correct RequireJS paths for the third party libraries pointed to be the reference component.
Alternatively, when you install a Web Component that depends on a reference component and you use Oracle JET CLI, the tooling will automatically do an npm install for you so that the libraries are local. However, with the same component used in Oracle Visual Builder, a CDN location must be used and therefore the reference component must exist on the CDN in order to be used in Visual Builder.
Add Web Components to Your Page
To use a VComponent-based Web Component, you import the loader module that provides the entry point to the component in the TSX page where you will use the component, unless you import the component from a mono-pack JET Pack.
Those of you who previously built Web Components using the Composite Component Architecture will be familiar with the use of the loader module to import the Web Component. VComponent-based Web Components also use this convention of a loader module serving as the main entry point to the Web Component. It allows the Oracle JET CLI, Visual Builder, and the Component Exchange to work with VComponent-based Web Components.
If you import the Web Component into a VDOM app, you can choose between importing the Web Component through the use of the component class name or the custom element name for the Web Component. If you import the VComponent-based Web Component into an MVVM JET app, you must use the custom element syntax. If importing a component from a JET Pack, you’ll also need to identify the JET Pack in the import statement, but the import statement differs slightly depending on whether you import from a conventional JET Pack or a mono-pack JET Pack. In the case of an import of a component from a mono-pack, you don’t need to include the loader module in the import statement as components created within this type of pack are automatically loaderless.
The following commented example illustrates the syntax to use for each option.
    import { h } from "preact";
    //// Import standalone components.
    //   Import as a custom element.
    import "doc-hello-world/loader"
    //   Import as a component class.
    import { DocHelloWorld } from "doc-hello-world/loader"
    //// Import components from a conventional JET Pack using loader module
    //   Import as a custom element.
    import "my-component-pack/my-widget-1/loader";
    //   Import as a component class.
    import { MyWidget2 } from "my-component-pack/my-widget-2/loader";
    // Import components from a Mono-Pack JET Pack (Note: No reference to loader.ts)
    //   Import as a custom element.
    import "my-mono-pack/my-widget-3";
    //   Import as a component class.
    import { MyWidget4 } from "my-mono-pack/my-widget-4";

    export function Content() {
      return (
        <div class="oj-web-applayout-max-width oj-web-applayout-content">
          {/* Standalone component's custom element */}
          <doc-hello-world></doc-hello-world>
          {/* Standalone component's component class */}
          <DocHelloWorld />
          {/* JET Pack component's custom element */}
          <my-component-pack-my-widget-1></my-component-pack-my-widget-1>
          {/* JET Pack component's component class */}
          <MyWidget2 />
          {/* JET Mono-Pack component's custom element */}
          <my-mono-pack-my-widget-3></my-mono-pack-my-widget-3>
          {/* JET Mono-Pack component's component class */}
          <MyWidget4 />
        </div>
      );
    };
Generate API Documentation for VComponent-based Web Components
The Oracle JET CLI includes a command (ojet add docgen) that you can use to assist with the generation of API documentation for the VComponent-based web components (VComponent) that you develop.
When you run the command from the root of your project, the JSDoc NPM package is installed and an apidoc_template directory is added to the src directory of your project. The apidoc_template directory contains HTML files (footer, header, and main) that you can customize with appropriate titles, subtitles, and footer information, such as copyright information, for the API reference documentation that you'll subsequently generate for your VComponent(s). The command also adds an "enableDocGen": true entry to the oraclejetconfig.json file of the Oracle JET app. When true, API doc is generated. When false, no API doc is generated for the VComponents.
You write comments in the source file of your VComponent, as in the following example:
import { ExtendGlobalProps, registerCustomElement } from "ojs/ojvcomponent";
. . .

type Props = Readonly<{
    message?: string;
    address?: string;
}>;

/**
    *
    * @ojmetadata version "1.0.0"
    * @ojmetadata displayName "A user friendly, translatable name of the component"
    * @ojmetadata description "<p>Write a description here.</p>
                            <p>Use HTML tags to put in new paragraphs</p>
                            <ul>
                                <li>Bullet list item 1</li>
                                <li>Bullet list item 2</li></ul>
            * <p>Everything before the closing quote is rendered</p>
    * "
    *
    */


function StandaloneVcompFuncImpl({ address = "Redwood shores",
                            message = "Hello from  standalone-vcomp-func" }: Props) {
    return (
    <div>
    . . .
    </div>
    );
}
Once you have completed documenting your VComponent’s API in the source file, you run the build command for your component or the JET Pack, if the component is part of a JET pack (ojet build component component-name or ojet build component jet-pack-name) to generate API reference doc in the appRootDir/web/components/component-or-pack-name/vcomponent-version/docs directory.
The following /docs directory listing shows the files that the Oracle JET CLI generates for a standalone VComponent. You can’t generate the API documentation by building the Oracle JET app that contains the component. You have to build the individual VComponent or the JET Pack that contains VComponents. Note too that you can’t generate API doc for CCA-based web components using the Oracle JET CLI ojet add docgen command.
appRootDir/web/components/standalone-vcomp-func/1.0.0/docs

|   index.html
|   jsDocMd.json
|   standalone-vcomp-func.html
|   standalone.StandaloneVcompFunc.html
|
+---scripts
|   |   deprecated.js
|   |
|   \---prettify
|           Apache-License-2.0.txt
|           lang-css.js
|           prettify.js
|
\---styles
    |   jsdoc-default.css
    |   prettify-jsdoc.css
    |   prettify-tomorrow.css
    |
    \---images
            bookmark.png
            linesarrowup.png
            linesarrowup_blue.png
            linesarrowup_hov.png
            linesarrowup_white.png
            oracle_logo_sm.png
One final thing to note is that if you want to include an alternative logo and/or CSS styles to change the appearance of the generated API doc, you update the content in the following directory appRootDir/node_modules/@oracle/oraclejet/dist/jsdoc/static/styles/.
Build Web Components
You can build your Oracle JET Web Component to optimize the files and to generate a minified folder of the component that can be shared with the consumers.
When your Web Component is configured and is ready to be used in different apps, you can build the Web Components of the type: standalone Web Component, JET Pack, and Resource component. Building these components using JET tooling generates a minified content with the optimized component files. This minified version of the component can be easily shared with the consumers for use. For example, you would build the component before publishing it to Oracle Component Exchange. To build the Web Component, use the following command from the root folder of the JET app containing the component:
ojet build component my-web-component-name
For example, if your Web Component name is hello-world, use the following command:
ojet build component hello-world
For a JET Pack, specify the pack name.
ojet build component my-pack-name
Note that the building individual components within the pack is not supported, and the whole pack must be built at once.
This command creates a /min folder in the web/components/hello-world/x.x.x/ directory of your Oracle JET web app, where x.x.x is the version number of the component. The /min folder contains the minified (release) version of your Web Component files.
Reference component do not require minification or bundling and therefore do not need to be built.
When you build Web Components:
-
If your JET app contains more than one component, you can build the containing JET app to build and optimize all components together. The
build componentcommand with the component name provides the capability to build a single component. -
You can optionally use the
--releaseflag with the build command, but it is not necessary since thebuildcommand generates both the debug and minified version of the component. -
You can optionally use the
--optimize=noneflags with thebuildcommand when you want to generate compiled output that is more readable and suitable for debugging. The component'sloader.jsfile will contain the minified app source, but content readability is improved, as line breaks and white space will be preserved from the original source.
Package Web Components
You can create a sharable zip file archive of the minified Oracle JET Web Component from the Command-Line Interface.
When you want to share Web Components with other developers, you can create an archive file of the generated output contained in the components subfolder of the app's /web. After you build a standalone Web Component or a Resource component, you use the JET tooling to run the package command and create a zip file that contains the Web Component compiled and minified source.
ojet package component my-web-component-name
Similarly, in the case of JET packs, you cannot create a zip file directly from the file system. It is necessary to use the JET tooling to package JET packs because the output under the /jet-composites/<packName> subfolder contains nested component folders and the tooling ensures that each component has its own zip file.
ojet package pack my-JET-Pack-name
The package command packages the component's minified source from the /web/components directory and makes it available as a zip file in a /dist folder at the root of the containing app. This zip file will contain both the specified component and a minified version of that component in a /min subfolder.
Reference components do not require minification or bundling and therefore do not need to be built. You can archive the Reference component by creating a simple zip archive of the component's folder.
The zip archive of the packaged component is suitable to share, for example, on Oracle Component Exchange, as described in Publish Web Components to Oracle Component Exchange. To help organize components that you want to publish, the JET tooling appends the value of the version property from the component.json file for the JET pack and the individual components to the generated zip in the dist folder. Assume, for example, that you have a component pack, my-component-pack, that has a version value of 1.0.0 and the indiviudal components (my-widget-1, and so on) within the pack also have version values of 1.0.0, then the zip file names for the generated files will be as follows:
appRootDir/dist/
my-web-component-name_1-0-0.zip
my-component-pack_1-0-0.zip
my-component-pack-my-widget-1_1-0-0.zip
my-component-pack-my-widget-2_1-0-0.zip
my-component-pack-my-widget-3_1-0-0.zip
You can also generate an archive file when you want to upload the component to a CDN. In the CDN case, additional steps are required before you can share the component, as described in Upload and Consume Web Components on a CDN.