Configuring WebLogic to use LDAP
This section consists of pre-requisites and procedure to configure WebLogic.
Prerequisites
Before beginning the configuration process, the following information must be gathered:
-
The type of LDAP server in use. WebLogic provides authenticators for several types of LDAP server, including Microsoft Active Directory, OpenLDAP and Oracle Internet Directory. There is also a generic LDAP authenticator which can be used with servers not supported directly (such as AD-LDS).
-
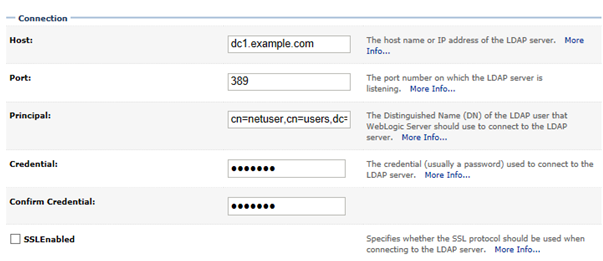
The host name and port of the LDAP server. If your environment contains multiple servers for high availability, you can use more than one host in the configuration. The default LDAP port is 389.
-
The identity and password of an LDAP user which can connect and perform searches. The user identity is normally a full Distinguished Name (DN) but Active Directory also allows shorter forms.
-
The locations in the LDAP tree (base DNs) where users and groups can be found.
-
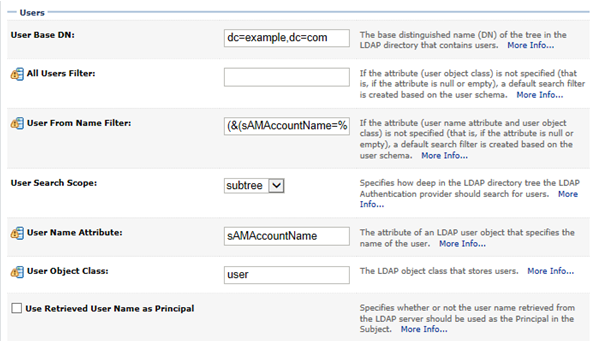
The LDAP attribute on a user record which identifies the user on login. Whilst most LDAP user schemas have standard user name attributes, organizations can choose to use others.
-
The LDAP attribute on a group record that identifies the group. In most installations, this can be the group 'Common Name' (cn).
-
The name of an LDAP group containing all the users that will be working with EDQ. The group is used to filter the list of users presented for EDQ issue assignment, etc. Without this filter, every user in the LDAP server would be presented, and this is generally not recommended.
Integrating with Active Directory
The rest of this section will cover the detailed steps for an integration with Active Directory. The steps are broadly similar for other types of LDAP server. Initial configuration will not use SSL.
In the walkthrough, these settings are used:
-
Active Directory Domain: EXAMPLE.COM
-
Domain Controller (LDAP server): dc1.example.com. The default, non-SSL, port 389 will be used.
-
LDAP user: cn=netuser,cn=users,dc=example,dc=com. Assuming that the AD username for this user is 'netuser' then you can also use netuser@example.com or example\netuser.
-
User base DN: dc=example,dc=com. Here the base is the root of the full LDAP tree. If all the users are contained in a subtree, you could use something like: cn=users,dc=example,dc=com.
-
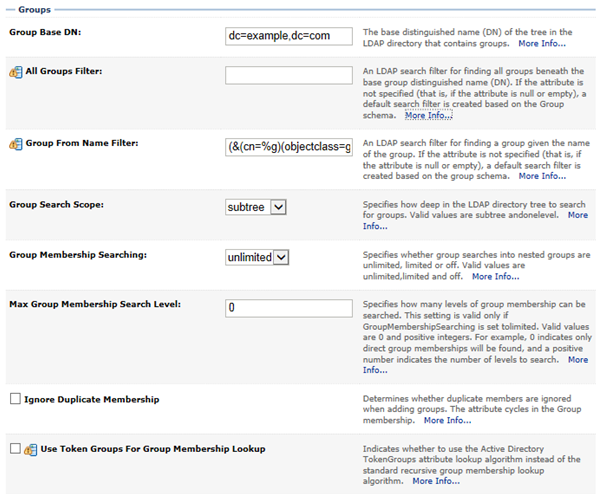
Group base DN: dc=example,dc=com. Again a subtree could be used if suitable.
-
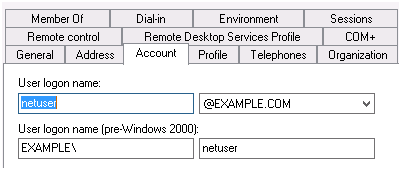
User name attribute: sAMAccountName. This is the standard AD attribute which stores the short login name. In the Active Directory Users and Computers application this is displayed as the pre-Windows 2000 login name:
Figure 4-3 Account Details
-
Group name attribute: cn
-
All EDQ users group: edqusers
WebLogic Configuration
Note:
Ensure that the WebLogic Administration server is running. It is recommended that the EDQ managed server(s) be stopped before beginning the configuration.
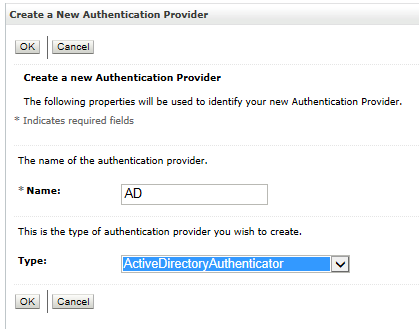
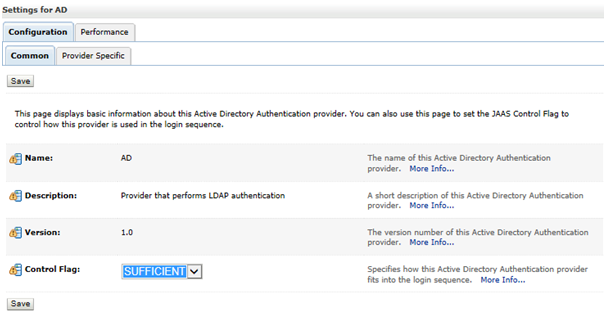
To configure the WebLogic, follow the steps below:
Restart the Administration Server and login again. Navigate to Security Realms/myrealm and click on the Users and Groups tab. You should see users and groups loaded from Active Directory. If these are not present, check the Administration Server logs for errors and recheck the configuration.
If there is an excessive delay displaying the Users and Group tab and a size limit error is present in the logs:
<Administration Console encountered the following error: java.lang.RuntimeException: netscape.ldap.LDAPException: error result (4); Sizelimit exceeded
Then there are too many users in Active Directory to be displayed in the Administration Console. This will not cause problems with EDQ but you can reduce the number by entering an LDAP search filter in the All Users Filter field on the AD Provider Specific tab.
EDQ Configuration
This section provides the procedure to configure EDQ.
User Group
To define the group containing EDQ users, follow the steps below:
-
Logon to the server hosting the EDQ domain and navigate to the EDQ 'local' configuration directory.
This is located at: DOMAIN_HOME/config/fmwconfig/edq/oedq.local.home.
-
Create a local security directory and copy the default login configuration to this directory:
$ mkdir security
$ cp ../oedq.home/security/login.properties security/
-
Edit the new local configuration at security/login.properties and add the line:
opss.prof.defaultusergroup = edqusers
Permissions
The pre-defined group mapping in login.properties maps the external 'Administrators' group to the EDQ 'Administrators' group. This is a valid mapping when using the internal WebLogic user store because the internal Administrators group contains the standard 'weblogic' administration console user.
However the Administrators group in Active Directory contains domain level administrators and it is unlikely that users in this group will use or administer EDQ. To add additional group mappings from external EDQ relevant groups using the EDQ web console, it is necessary to log in to EDQ as an administrator. This will be possible with the default pre-defined group mapping only an Active Directory administrator is available. To allow other users to become EDQ administrators, there are two approaches:
-
Edit the pre-defined mapping:
Edit the local login.properties and change the xgmap line to map a different LDAP group to the EDQ Administrators group. For example if a group named 'edqadmins' has been created in Active Directory to contain EDQ administration users, edit the line to read:
opss.xgmap = edqadmins -> Administrators
-
Enable the 'internal' realm:
Edit the local login.properties and change the realms line to read:
realms = internal, opss
This will enable the EDQ internal user store and you can log in as user 'dnadmin' and setup the necessary external group mappings using the web console. Once the mappings are complete you can disable the internal realm again.
Once these changes are complete you can start the EDQ managed server and login in as an Active Directory user. Note that external group mappings must be complete to grant the necessary permissions before application logins can succeed.
Filtering Groups
LDAP stores in large organizations may include thousands of distinct groups and with no additional filtering, all of these will appear in the external group mapping list on the EDQ web console. To filter the group list to a manageable size, you can add an LDAP group filter to login.properties.
Ensure to make a copy of this in the local configuration area before adding the filter. To add the filter, edit and add the line:
opss.prof.groupfilter = LDAPGROUPFILTER
where LDAPGROUPFILTER is an LDAP-style filter to select groups. The filter uses generic OPSS attribute names instead of LDAP-specific attributes. Use 'name' to refer to the name of the group. The filter must return any groups used in pre-defined mappings.
In the EXAMPLE.COM setup all the groups used with EDQ start with the prefix 'edq' so the filter would be:
opss.prof.groupfilter = (name=edq*)
Using SSL to connect to LDAP
If you wish to secure connections to the LDAP server by using SSL, tick the SSL Enabled check box on the Provider Specific tab for the LDAP provider, and enter the SSL port (normally 636).
Note:
In current versions of WebLogic, if you make changes to the Provider Specific page after initial configuration, you will need to enter the LDAP password again. The original password is obfuscated but unfortunately this version is then saved.
Then to enable successful connections from WebLogic to the LDAP server, so that the list of users and groups can be displayed, and you can login to WebLogic as an LDAP user, you will need to add the LDAP server certificate or root CA to the trust store of the JRE used to run WebLogic. Use the Java keytool command to update the JRE's cacerts file. Documentation for keytool can be found at:
https://docs.oracle.com/javase/8/docs/technotes/tools/unix/keytool.html
Unfortunately the OPSS library used by EDQ for WebLogic authentication does not use the cacerts store. Instead a new keystore must be created. Stop the EDQ managed server but leave the Administration server running. Login to the server running WebLogic and set these environment variables:
JAVA_HOME=java install location
WL_HOME=WLSHOME/wlserver
ORACLE_HOME=WLSHOME
and then execute:
$ WLSHOME/oracle_common/bin/libovdconfig.sh -host HOST -port PORT -userName weblogic -domainPath DOMAIN_HOME -createKeystore
Here WLSHOME is the WebLogic installation directory; HOST is the name of the host running the Administration Server, PORT is the Administration port (typically 7001) and DOMAIN_HOME is the location of the WebLogic domain.
The command will prompt for the password for the weblogic user and then for a password for the new keystore. This can by anything.
On successful completion, a new keystore is created at:
DOMAIN_HOME/config/fmwconfig/ovd/default/keystores/adapters.jks
Use the Java keytool to add the server or CA certificate to the newly created keystore:
$ keytool -import -keystore DOMAIN_HOME/config/fmwconfig/ovd/default/keystores/adapters.jks -alias ALIAS -file CERTFILE
Replace ALIAS with the keystore identifying the certificate and replace CERTFILE with the location of the certificate file.
The command will prompt for the keystore password; enter the password you specified when the keystore was created.
Restart the EDQ managed server and LDAP users should be able to login. Traffic between WebLogic and LDAP will be protected by SSL.
