1 Getting Started with Oracle Cloud Marketplace
Oracle Data Integrator on Oracle Cloud Marketplace is a product offering that enables customers to quickly set up and run Oracle Data Integrator (ODI) on Oracle Cloud and it provides a fully unified solution for building, deploying, and managing complex data warehouses or as part of data- centric architectures in a SOA or business intelligence environment. In addition, it combines all the elements of data integration - data movement, data synchronization, data quality, data management, and data services - to ensure that information is timely, accurate, and consistent across complex systems.
It contains the following sections:
- Launching an Oracle Data Integrator Instance
- OCI Configuration
- Configuring ODI for Autonomous Data Warehouse (Optional)
Note:
Refer to Launching Your First Linux Instance documentation before creating the ODI instance.Launching an Oracle Data Integrator Instance
- After finding Oracle Data Integrator on Oracle Cloud Marketplace, click Get App.
- Select the OCI region in which you wish to install ODI, and click Launch Image.
- Log in to your OCI account.
- Click Launch Instance.
- Select the latest version of the image from the drop-down list.
- Select the compartment where you wish to install Oracle Data Integrator.
- Review and accept the Oracle Terms of Use.
- Click Launch Instance.
OCI Configuration
Configuring ODI for Autonomous Data Warehouse (Optional)
If you aim to use an Autonomous Data Warehouse (ADW) or Autonomous Transaction Processing (ATP) in this tenancy as a part of your ODI transformations, you can use the ADW/ATP Dataserver setup UI to quickly setup this connection in ODI. An ODI Oracle Dataserver is created with all the credentials necessary for the connection. If your instance is newly created, wait for few minutes for the server to start functioning.
When the created ODI instance is fully provisioned and running, you can launch the
Oracle ADW/ATP Dataserver setup UI by accessing the URL
http://<ipaddress>:8080/odi.
In the above URL, IP address refers to the DNS hostname or IP address, if connecting to the instance externally. If connecting to the instance within the Virtual Cloud Network (VCN), you can use the Internal FQDN (fully qualified domain name), which is displayed on the OCI Console once the instance has been provisioned. For such internal connections, you can copy and paste this to your browser window and append or setup to get to the ODI ADW/ATP Dataserver setup page.
- Create a dynamic group to include matching rules for instances in a
specified compartment. For example
ALL {instance.compartment.id = 'ocid1.compartment.oc1..aaaaaaaabgr34tpuanpvq6xfb667nsmy2jz45zj6dexojhxdsv4mjayem3cq'} - Navigate to Identity -> Policies -> Create Policy to create
policy statements as specified below :
If you set policy at:
- ODI compartment level, then all ADW/ATP instances from the
compartment where ODI instance is created are listed.
For example - To List ADW/ATP instances only from the ODI instance compartment, you have to setup the following policy:
Create dynamic group like: ALL {instance.compartment.id = 'ocid1.compartment.oc1..aaaaaaaabgr34tpuanpvq6xfb667nsmy2jz45zj6dexojhxdsv4mjayem3cq'} Allow dynamic-group odi_group to inspect autonomous-database-family in compartment odi Allow dynamic-group odi_group to read autonomous-database-family in compartment odi Allow dynamic-group odi_group to inspect compartments in compartment odi - ODI tenant level, then all ADW/ATP instances from all the
compartments of the tenancy are listed.
For example - To list ADW/ATP instances from all the compartments of tenancy, you have to setup the following policy:
Create dynamic group like: ALL {instance.compartment.id = 'ocid1.compartment.oc1..aaaaaaaabgr34tpuanpvq6xfb667nsmy2jz45zj6dexojhxdsv4mjayem3cq'}
Allow dynamic-group odi_group to inspect autonomous-database-family in tenancy
Allow dynamic-group odi_group to read autonomous-database-family in tenancy
Allow dynamic-group odi_group to inspect compartments in tenancy
- ODI compartment level, then all ADW/ATP instances from the
compartment where ODI instance is created are listed.
- If the policies are not created previously during ODI Instance
creation, then create the policies (as mentioned above) and restart the
jettyodi.servicebefore launching the ADW/ATP Dataserver UI.
Refer to Troubleshooting ODI on OCI, to know how to restart the jettyodi.service.
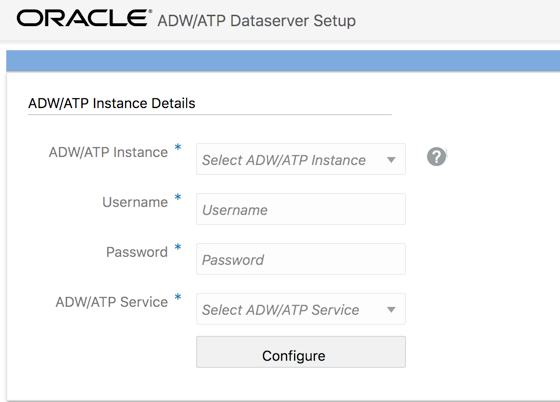
To create an ODI Oracle Dataserver connecting to an ADW/ATP instance,
Provide the following details in the ADW/ATP Instance Details interface:

Description of the illustration adw_dataserver.png
- From the ADW/ATP Instance drop-down list, select the required ADW/ATP instance.
The ADW/ATP instances
<CompartmentName-ADW/ATP
                        InstanceName>
are listed.When you select an instance, in the backend, the ADW/ATP dataserver is created in the formatADW/ATP Instance Name + "-" + RandomNuber. - In the User Name and Password fields, provide the ADW/ATP user credentials.
- From the ADW/ATP Service drop-down list, select the connection details.
- Click Configure.
This creates an Oracle Dataserver for the ADW/ATP instance in the ODI repository.
You can create multiple Dataservers for the same ADW/ATP instance without considering ADW/ATP service profiles (High, Low or Medium).
Note:
Make sure you provide correct ADW user credentials while creating the ADW Dataserver. If you provide wrong user credentials you may not be able to connect to the newly created Dataserver. However, you can update the ADW/ATP user credentials, if needed, from ODI studio once you create the ADW/ATP Dataserver.