2 Integrating with Git
Consider the following points before deciding to configure integrated version control using Git.
- Project and global objects are stored in the file systems, but Software Configuration Management (SCM) operations such as commits, pushes and pull requests are performed manually outside of EDQ.
- The EDQ system must be freshly initialized. The Git configuration must be completed before you start the system for the first time.
Note:
If you have an existing EDQ system with configuration that you want to convert to using Git, you should package all projects on this system and back up its local home. You can then import the projects and any configuration extensions or other needed files in the local home onto a Git-integrated system.
The following sections are included:
2.1 Understanding the Integration Architecture
The EDQ server can be configured to be aware of a Git server as a store of configuration information.
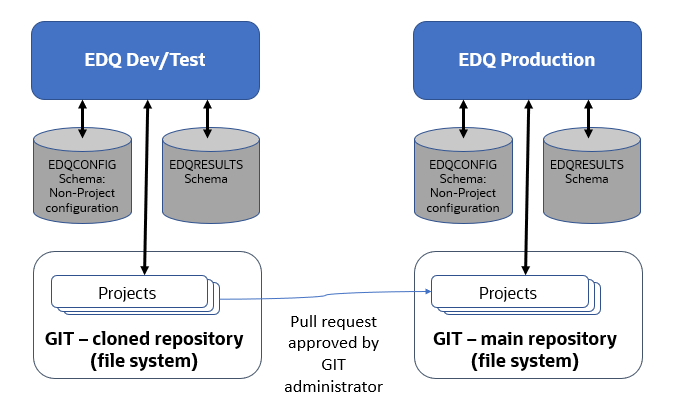
The following figure illustrates a typical setup of two EDQ instances that are integrated with Git. Here the Dev/Test instance is used to make and test changes. The tested changes are then promoted onto a main branch used by a Production instance by a pull request that is approved by a Git administrator. Note that the Dev and Test instances could equally be separate. For example, they may both work on the same fork, but with changes only moving to Test once committed and pushed from Dev.

2.2 Preparing the Git Workspace
The first stage of configuration is to create a workspace directory where the checked out data is stored:
2.3 Configuring EDQ with Git
Git must be integrated with a fresh installation of EDQ. Before you start the EDQ server for the first time, edit director.properties and add these lines:
sccs.workspace = file system path to root directory
sccs.vcs.type  = null
Here, the root directory in the first line is the directory where you created the repository in Preparing the Git Workspace. The second line disables the integrated Subversion support.
After you have edited director.properties, start the EDQ server.
The built-in reference data objects will be created in the root Reference Data folder. Commit these objects to Git and push them to the origin server.
2.4 Using EDQ
After the Git configuration is complete, you can use the EDQ Director client to create and edit global and project objects as normal. The objects are stored in the file system location set by the sccs.workspace property in Configuring EDQ with Git.
$ cd /opt/git/repo/dev
$ git add Projects/test1
$ git commit -m 'Committing a project'
$ git push
After the changes have been pushed to the origin server, other users can clone or pull from the repository to work on the same objects.
git pull command:git pull
remote: Counting objects: 17, done.
remote: Compressing objects: 100% (8/8), done.
remote: Total 13 (delta 3), reused 0 (delta 0)
Unpacking objects: 100% (13/13), done.
...If the local EDQ server is running, rescan the workspace for changes. To do this, use the jshell.jar utility to run the following script:
$ java -jar jshell.jar scripts/sccs/scan.groovy \
          -server host:8090 -user username -pw password
The Project Browser of running EDQ clients reflect the changes that are picked up by the script.
Note that the scan.groovy script may update process and job objects that are open in EDQ clients. However, the Canvas does not reflect these changes. You must close and reload the objects to see the changes. A good practice is to ensure that no clients or jobs are running when a scan is run. After you execute any Git operation that changes the workspace contents, such as switching branches, make sure that you run the scan.groovy script or restart the EDQ server.