Adding a Snapshot

To add a Snapshot of data from a connected data store:

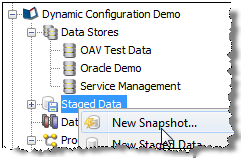
  1. Right-click on Staged Data in the Project Browser, and select New Snapshot:
    Adding a snapshot
  2. Select the data store that you want to create the snapshot from, or add a new data store if the desired data store is not on the list.
  3. Select the table or view to snapshot (or you may specify SQL to snapshot a new view of the data).
  4. Select the columns from the table or view that you want to include in the snapshot, and how to enable sorting and filtering on the snapshot.

    By default, intelligent sort and filter enablement is used. This means that results based on the snapshot may be sorted or filtered using any column(s), provided the snapshot is under a certain size (set by the system administrator). If the snapshot is above that size, results based on it cannot be sorted or filtered by any column, though users will be prompted to enable sorting and filtering on specific columns if they attempt to do it using the Results Browser.

    Alternatively, you can switch off intelligent sort and filter enablement, and manually select the columns that you enable for sorting and filtering.

    The default threshold above which sorting and filtering will be disabled for snapshots when using intelligent sort and filter enablement is 10 million cells - so for example a snapshot with 500,000 rows and 15 columns (7,500,000 cells) would have sorting and filtering enabled, but a snapshot with 500,000 rows and 25 columns (12,500,000 cells) would have sorting and filtering disabled.

    Note:

    It is advisable to select all columns. The columns to work with in a given process can be a subset of these.
  5. Optionally filter the table or view to snapshot a subset of it (or you may write your own SQL WHERE clause).
  6. Optionally sample the selected data (for example, the first n records, the first n records after an offset, or 1 record in every 100).
  7. Optionally perform no data normalization. For more information, see the "No Data Handling" topic in Oracle Enterprise Data Online Help.
  8. Give the snapshot a Name, and choose whether or not to run it immediately.
  9. Click Finish to confirm the addition of the snapshot.

The snapshot is created and visible in the project browser. It is now ready to be run (by Right-click, Run Snapshot), or used in a process and run later. The snapshot may also be 'streamed'; that is, used as a way of selecting the records to be processed from a Data Store directly; that is, without copying them into the repository.