7.3 Configuring Instance-Level Security

Enterprise Manager provides instance-level security flexibility to provide target-level privileges to administrators.

For example, if an Enterprise Manager Plug-In for Oracle GoldenGate is managing three Oracle GoldenGate (OGG) instances (for example, OGG1, OGG2, and OGG3), a user can be granted privileges to any of these instances and their sub-targets (that is, their OGG processes).

To grant target-level access:
  1. Log in as a super admin (for example, sysman).
  2. Select Setup, Security, Administrators to open the Administrators page.
  3. Select the User for whom you need to modify the access.
  4. Ensure that you have the target types Host, Agent, Oracle GoldenGate (in case of a classic instance), and Oracle GoldenGate Service Manager (in case of a Microservices instance)
  5. Click Edit to modify access for an existing user.
  6. Click Create/Create Like to create a new user and to assign the appropriate user roles to display the Properties tab.
  7. Enter the required credentials for the new user, and click Next to open the Create Administrator userName: Roles page.

    This page lets you to assign roles to the named user by moving the role from the Available Roles column to the Selected Roles column.

  8. Select one or more roles from the Available Roles list and click Move to add them to the new user.

    At a minimum, you must select the EM_BASIC_SUPPORT_REP role in addition to the preselected roles. This table shows the different roles.

    RM Role Name Edit/View Parameter View Report View Discard

    EM_ALL_ADMINISTRATOR

    Yes

    No

    No

    EM_ALL_OPERATOR

    Yes

    No

    No

    EM_ALL_VIEWER

    No

    No

    No

    PUBLIC

    No

    No

    No

    EM_PLUGIN_USER

    No

    No

    No

    Do not select any ALL roles in this step, such as EM_ALL_ADMINISTRATOR, EM_ALL_OPERATOR, and so on, else the user role you’re creating will be entitled to all OGG instances.

    Enterprise Manager (EM) supports object-level access control so administrators can be given roles for specific targets only. See Creating Roles for Systems Infrastructure Administration in the Enterprise Manager Cloud Control Administrator’s Guide.

  9. Click Next to open the Target Privileges page.
  10. Select the Target Privileges tab, scroll down to the Target Privileges section and select the Execute Command Anywhere and Monitor Enterprise Manager roles, and then click Add.

    These two roles are required for full functionality and multi-version support.

  11. Scroll below the Privileges Applicable to All Targets table to the Target Privileges section. This section gives the Administrator the right to perform particular actions on targets. Click Add to open the Search and Add: Targets page appears in a new browser window.
  12. Ensure to add the targets Host (in case of classic) or Agent (MA) appropriately based on the the instnaces.
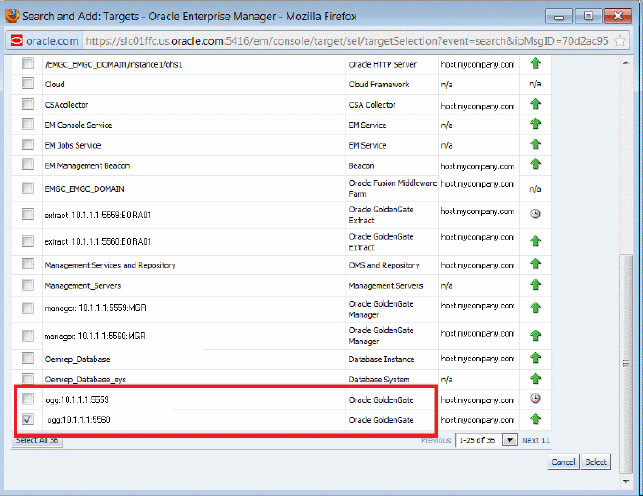
  13. Select the instances you want the user to have access.

    Remember:

    You’re only assigning Oracle GoldenGate instances at this time. You’re not assigning Manager, Extract, or Replicat processes.

    Here is an example of two Oracle GoldenGate instances ( port numbers 5559 and 5560). Access to only one of them (port number 5560) is being assigned to this user.

    Description of inst_sec_select_target.gif follows
    Description of the illustration inst_sec_select_target.gif
  14. Click Select to save the changes.

    You’re returned to the Add Targets page and the Target Privileges list is refreshed to show your selection.

  15. Click the Edit Individual Privileges link under the Manage Target Privilege Grants Column, which is the third-last column from the right, to set the required privileges for the target.

    Select from the following privileges:

    Privilege Name Description

    Full

    Perform all operations on the target, including delete the target.

    View contents of OGG report file

    View content of the report files for OGG targets.

    View contents of OGG discard file

    View content of the discard files for OGG targets.

    Run OGG command

    Run OGG commands (Start, Stop, Kill, and Resume) for OGG targets.

    You can also select these control operations from the Target drop-down list in the Oracle GoldenGate Home page. Select a control operation to display a confirmation dialog box. Once you click Yes in the confirmation dialog box, the action is sent to Oracle GoldenGate Core for execution. The dialog box refreshes automatically to check the progress of the command. An Error or Success of the command is displayed in the same dialog box. When you click OK, the Home page is refreshed with the latest status of the target.

    Edit OGG parameter file

    Edit parameter files for OGG targets.

    Connect Target

    Connect and manage target.

    Don’t select both the Full and Connect Target privileges because Full includes Connect Target .

  16. Click Continue.
  17. Click Review to review your user's privileges, then click Finish.
    The user now has access to the selected instance(s). The priviliges available for all targets are:
    • Edit any OGG Parameter File
    • Run any OGG command
    • View contents of any OGG discard file
    • View contents of any OGG report file

    These privileges are automatically assigned from top to bottom in the hierarchy. For example, if the Run any OGG Command privilege is assigned to an OGG instance, it’s automatically assigned to all its child processes. However, you can also provide process specific privileges. Suppose the Edit any OGG parameter file privilege is assigned to a process, it’s specific to that process and is not assigned to other processes in the instance.

  18. Test the instance-level security to confirm that all edited processes are operating with their assigned privileges:
    1. Log in as the newly created or edited user.
    2. Select Targets, GoldenGate to open the Oracle GoldenGate page.
    3. Confirm that only the OGG instances that you have access to are visible.
    4. Log out and log in again as root.
    5. Select Targets, GoldenGate to open the Oracle GoldenGate page.
    6. You should now see all the managed OGG instances.
For more details, see Security Overview in the Cloud Control Security Guide.

7.3.1 Authorizing Users with Permissions

As an administrator user, you can provide the following permissions to the users: Editing an Oracle GoldenGate parameter file, running an Oracle GoldenGate command, viewing the contents of any Oracle GoldenGate discard file, and viewing contents of any Oracle GoldenGate report file.

To provide permissions to the users:
  1. Log in as a super admin (for example, sysman).
    The super admin user can create Named Credentials for the Monitoring Agent (in case of classic instances) and Monitoring Credentials for Service Manager Agent (in case of MA instances). The super admin user grants permissions to the users. The user, after logging in to the Enterprise Manager Cloud Control with the new user credentials can then set the corresponding credentials based on the type of instances
  2. Select Setup, Security, Administrators to open the Administrators page.
  3. Click Edit to modify access for an existing user.
  4. Click Next to display the Privileges applicable to all Targets page to view all the four permissions.
  5. Select the required permission and click Submit.

Note:

  • The buttons are disabled for the users if they don't have the required permission. For example, if the user doesn't have Edit Parameters permission, then the Edit button in the Configuration tab for all the targets is disabled.

  • If the users are already logged-in and their permissions are changed by the super administrator, then new permissions are reflected in the user interface (UI) once the logged-in user refreshes the page.

  • If you happen to remove permissions for a logged-in user who has the command privileges, then when the user clicks any of the command buttons, such as Start, Stop, Kill, or Resume, then an error message is displayed that says that the user doesn't have sufficient permissions.