 Deploying Oracle Access Management on Oracle Cloud Infrastructure
 Before You Begin
This tutorial shows you how to deploy the Oracle Access Management (OAM) 12.2.1.4.0 application on Oracle Cloud Infrastructure (OCI).
Background
The Oracle Access Management application is available on the Oracle Cloud Infrastructure Marketplace and allows you to quickly deploy an instance of Oracle Access Management.
At present this image can be only be used for testing and development purposes and should only be used with non-sensitive data.
OAM on OCI is deployed in a Kubernetes (K8S) cluster using the Oracle Kubernetes Engine (OKE). Lifecycle operations are performed with the Oracle WebLogic Server Kubernetes Operator.
What Do You Need?
- An Oracle Cloud Infrastructure account.
- A basic understanding of OCI
 Database Prerequisites
Before deploying OAM on OCI MarketPlace the following database prerequisites must be met:
- An Oracle Database instance must exist with connectivity from OCI. If you need to create a database in OCI there are multiple ways you can perform this task. One such way is outlined in Creating Bare Metal and Virtual Machine DB Systems.
The database must be a supported version for OAM as outlined in Oracle Fusion Middleware 12c certifications.
The database must be made publicly accessible and be in the same region where the OAM stack will be installed. - Once the database is provisioned, create an Ingress rule to allow external communication to the database port on 1521. This is a requirement so OAM can create RCU schemas in the database. To create an Ingress rule:
- Access the OCI console, and from the Navigation Menu select Networking > Virtual Cloud Networks.
- Under the Name column click the link that corresponds to your virtual network vcn-xxxx.
- Under Resources, select Security Lists.
- Under Security Lists click the relevant Security List for example: Default Security List vcn-xxxx.
- Under Ingress Rules click Add Ingress Rules.
- In the Add Ingress Rules window accept the default values, but change the following fields:
Name Value SOURCE CIDR 0.0.0.0/0 DESTINATION PORT RANGE 1521 - Click Add Ingress Rules.
- Obtain the public IP address of the database host. In the OCI Console navigate to Oracle Database > Bare Metal, VM and Exadata > DB Systems. Click the link for your DB System, and under the Resources list click Nodes. This public IP address will be used later when configuring the DB connection details during OAM provisioning.
- If using an Oracle database with CDB enabled then you must obtain the connection string for the PDB administration service. To find this connection string follow the section titled: To derive the connection string for a PDB administration service or an application service. This PDB connection string will be used later as the value for the OAM_DB_URL parameter during OAM provisioning. Note: If you are unsure of the name of the PDB administration service see Viewing Information About PDBs.
- Using SQL*Plus or SQL Developer test a connection to the database using the PDB connect string.
 OCI Prerequisites
Before deploying OAM on OCI MarketPlace the following OCI prerequisites must be met:
- OAM requires two (2) or more compute nodes for the Node Pool and three (3) compute nodes for the Bastion in the respective Availability Domain.
To check you have enough compute nodes available:
- Access the OCI console and from the Navigation Menu navigate to Governance & Administration > Limits, Quota and Usage.
- Select the Show deprecated limits checkbox.
- From the SERVICE drop down menu select Compute.
- From the SCOPE menu select the appropriate Availability Domain.
- From the COMPARTMENT menu select the root compartment.
- In the Resource menu select the resource to check.
- Check the Available column and make sure you have sufficient computes available for the Node Shape you wish to deploy.
- OAM requires two (2) Virtual Cloud Network (VCN) resources to be available:
- From the SERVICE drop down menu select Virtual Cloud Network.
- From the SCOPE menu select your tenancy.
- From the RESOURCE menu select Virtual Cloud Networks Count.
- Check the Available column and make sure at least two (2) VCN's are available.
- OAM requires one 100Mbps Load Balancer resource to be available:
- From the SERVICE drop down menu select LbaaS.
- From the SCOPE menu select your tenancy.
- From the RESOURCE menu select 100Mbps Load Balancer Count.
- Check the Available column and make sure at least one (1) Load Balancer is available.
- OAM requires one (1) OKE Cluster resource to be available.
- From the SERVICE drop down menu select Container Engine.
- From the SCOPE menu select your tenancy.
- From the RESOURCE menu select Cluster Count.
- Check the Available column and make sure one (1) or more are available.
- OAM requires one (1) File System resource and one (1) Mount Target resource to be available:
- From the SERVICE drop down menu select File Storage.
- From the SCOPE menu select your Availability Domain.
- Check the Available column and make sure at least one (1) resource is available for both File System Count and Mount Target Count.
 Provision OAM on OCI Marketplace
- Access the OCI Marketplace.
- Search for the listing Oracle Access Management. Select the Oracle Access Management for Enterprise application.
- In the Oracle Access Management listing, check the Version Details show Version: 12.2.1.4.0.
- Launch the installation into your tenancy by selecting Get App.
- Select the OCI region and sign-in to your tenancy.
- In the upper right of the screen select the compartment where the OAM Instance will be deployed. Note: Do not select the default (root) compartment.
- Click Launch Stack.
- In the Stack Information screen, edit the Name as appropriate and add a Description if required and click Next.
- In the Configure Variables screen enter the variables as below:
Name Value REGION The region should be the same as mentioned in the URL of the OCI console NODE_POOL_NODE_SHAPE Choose the shape for the node pool computes, for example VM.Standard.E2.2NUMBER_OF_NODES Two (2) or more. This will be the size of the node pool in the OKE cluster.
As per the OCI Prerequisites section, make sure you check the availability of
the compute resources in the Availability Domain chosen for the
NODE_POOL_NODE_SHAPE. For example if you specify two (2) nodes make
sure two (2) compute resources of the chosen VM Shape are available.
BASTION_SHAPE Choose the shape for the bastion, for example:
VM.Standard2.1As per the OCI Prerequisites section, make sure you check the availability of
the compute resources in the Availability Domain chosen for the bastion node.
Three (3) compute resources of the chosen VM Shape are required.AVAILABILITY DOMAIN The Availability Domain where OAM will be deployed OAM_DB_URL The connection string for host:port/servicename for the database
service. If using a CDB based DB then make sure you use the PDB value
determined earlier in the prerequisite section e.g.
<ipaddress>:1521/pdb1.oimdb.ocik8OAM_DB_SYS_USER Name of the Database Admin User e.g. SYSOAM_DB_SYS_USER_PASSWORD Password of the Database Admin User
OAM_RCU_SCHEMA_PREFIX Schema Prefix for RCU. This can be a value of your choice e.g.
OAMEnsure that this schema name is not already present in the DB.
OAM_RCU_SCHEMA_PASSWORD Choose a complex password for the RCU Schema that meets the password
criteria defined in your database.
OAM_WEBLOGIC_DOMAIN_USER WebLogic Admin User Name e.g. weblogic
OAM_WEBLOGIC_DOMAIN_USER_PASSWORD Weblogic Admin Password Show Advanced Options Select the checkbox to show the advanced options.
If you want to auto-generate the SSH keys then leave the
Auto-generate public ssh checkbox selected, otherwise uncheck it if you want to use your own SSH key pair.SSH_PRIVATE_KEY_PATH This field should only to be updated if Auto-generate public ssh is unchecked.
Enter the key in base64 format:
-----BEGIN OPENSSH PRIVATE KEY-----

b3BlbnNzaC1rZXktdjEAAAAABG5vbmUAAAAEbm9uZQAAAAAAAAABA

AACFwAAAAdzc2gtcnNhAAAAAwEAAQAAAgEAvGcnE/MsJP7rwZG6m

etc..

JkmR/dwfVoEZjhXJrhGIgtaHMKpCyFSeN6wZ1gkDmKiUMU54IJ4Em

-----END OPENSSH PRIVATE KEY-----
SSH PUBLIC KEY This field should only to be updated if Auto-generate public ssh is unchecked.
Select Choose SSH Key Files if you want to either drop the public key file or
upload it from the local machine.
Select Paste SSH Keys to paste in the key. Enter the key in the following format:
ssh-rsa AAAAB3NzaC1yc2EAAAADAQABAA..etc..
The rest of the variables can remain as per their default values but make sure enough resources are available as per the OCI Prerequisites section.
Once the variables are updated as per above, click Next. - In the Review screen verify the configuration variables and select Create. This will trigger a job that will be displayed in the OCI console. The job will show as IN PROGRESS and in the Logs section at the bottom of the screen, details of the deployment progress are displayed. The job will take approximately 45 minutes to complete. Once the job is successful the job status will show SUCCEEDED.
- If the job fails with status FAILED, refer to the Troubleshooting section later in this tutorial.
 Connecting via SSH to the Bastion Host
To connect via SSH to the bastion host:
- Access the OCI console, and from the Navigation Menu select Resource Manager > Stacks.
- Select the relevant compartment from the drop down list. A list of stacks in the compartment will be displayed. Select the stack just created e.g. OAM.
- In the Jobs section click the View State link for the job.
- In the View State window search for the string ‘bastion_ip’ using the browser search (CTRL F). Note down the ipaddress, for example:
bastion_ip": "X.X.X.X".
- If you used your own SSH key pair move to step 7. If you used the auto-generated SSH keys, in the same window search for ‘private_key_path’. Copy the value in between the quotes, and save to a file (e.g
priv.key), for example:-----BEGIN RSA PRIVATE KEY-----\nXXXXXXXXXXXXYYYYYYYYYYYYYYPPPPPPPPPPP++YYYYY
YYYYTTTTTTTTTTT\IIIIIIIIIhhhhjjuuuuuu/VVVuuuuuuuuuuu908888/zdS1UCdLr/Q2q9yd12
etc..................................................................... +Qjl5\nxOByCUtZ8TbRbQMgEA/6G6wzVQ+mjCPy0n0ykxhWaHVj22ytfxKtApNLjwhtlZm
\npD58jI0CgYEAv3GvEcfVPg92KmN8OH+hSrkLzz22bemNqioRvKi2mXBwfk0xu0kK\nvTdjVqwbD
lCeAhISJxXdsT3J83pyeaGm6TrxBwUptJ8SzlZgFptpJffE1acAq8m\nXd7RoF2rBqZ5HHYYYYYkl
kkk90zedjxPoJW6XxC3ljingatsgJzAixIMSc8=\n-----END RSA PRIVATE KEY-----\n - Issue the following command to convert remove the “\n” characters and change the permissions on the file:
Note: Use Git Bash to perform the above command if running on a Windows environment, or edit in a text editor and remove all "\n" characters.$ sed -i 's/\\n/\n/g' priv.key$ chmod 400 priv.key
Note: On Windows do not runchmod 400in GitBash. Change the properties of the file to read-only instead.
Open thepriv.keyfile and validate the “\n” characters are removed.
- Connect to the bastion host using the private key file:
The login should be successful.$ ssh -i priv.key opc@<bastion_ip>
 Validating the OAM Setup
In this section you confirm everything is running and can access the OAM consoles.
- Run the following commands in the bastion host to check everything in the OAM stack is running correctly:
$ kubectl get nodes
If the cluster is up and running, the output should look similar to the following:
NAME          STATUS      ROLES      AGE     VERSION
10.0.10.2     Ready       node       23m     v1.18.10
10.0.10.3     Ready       node       24m     v1.18.10
To check the pods are running:
The output should look similar to the following:$ kubectl get pods -n accessns
Note: It may take 5-10 minutes for all the pods to appear as above and be in READY 1/1 state. By default the AdminServer, two oam servers (NAME READY STATUS RESTARTS AGE oamcluster-adminserver 1/1 Running 0 15m
oamcluster-create-oam-infra-domain-job-nctlq 0/1 Completed 0 18m
oamcluster-oam-policy-mgr1 1/1 Running 0 8m42s
oamcluster-oam-server1 1/1 Running 0 8m42s
oamcluster-oam-server2 1/1 Running 0 8m42s
rcu 1/1 Running 0 23moam-server1andoam-server2) and one policy manager server (oam_policy_mgr) are started.
To check the load balancer status:
The output should look similar to the following:$ kubectl --namespace ingress get services ingress-nginx-controller
Make note of the EXTERNAL-IP of the load balancer. This public IP address is used to connect to Oracle Access Management and its associated consoles.NAME TYPE CLUSTER-IP EXTERNAL-IP PORT(S) AGE ingress-nginx-controller LoadBalancer 10.X.X.X 193.X.X.X 80:31686/TCP,443:30080/TCP 9m21s
Note: You can also find the public IP address of the load balancer by navigating to Networking > Load Balancers in the OCI console. - Launch a browser, access the following URL’s and log in with the associated username and passwords:
Console URL Login Details WebLogic Console https://<external-ip>/consoleweblogic/<password>Oracle Enterprise Manager Console* https://<external-ip>/emweblogic/<password>Oracle Access Management Console* https://<external-ip>/oamconsoleweblogic/<password>
* Note: WebLogic Console and Oracle Enterprise Manager Console should only be used to monitor the servers in the OAM install. To control the AdminServer and OAM Managed Servers (start/stop) you must usekubectlcommands. For more details see the tutorial Starting and Stopping OAM using kubectl.
Post Install Tasks
In this section you perform post install tasks by running the oamconfig_modify.sh script.
- Run the following commands on the bastion host:
$ cd /home/opc/idmcli/oam-kubernetes-operator/kubernetes/samples/scripts/create-access-domain/domain-home-on-pv/common
$ ./oamconfig_modify.sh weblogic:<password>
The output should look similar to the following:
LBR_PROTOCOL: https domainUID: oamcluster OAM_SERVER: oamcluster-oam-server OAM_NAMESPACE: accessns INGRESS: nginx INGRESS_NAME: INGRESS_NAMESPACE: ingress ING_TYPE : LoadBalancer PORT is 443 LBR_HOST: 193.X.X.X LBR_PORT: 443 Started Executing Command % Total % Received % Xferd Average Speed Time Time Time Current Dload Upload Total Spent Left Speed 100 745k 0 745k 0 0 112k 0 --:--:-- 0:00:06 --:--:-- 168k new_cluster_id: 6fcc6-bastion service/oamoap-service created oamoap-service NodePort 10.X.X.X5575:30540/TCP 3s HTTP/2 201 date: Fri, 29 Jan 2021 04:02:12 GMT content-type: text/plain content-length: 66 x-oracle-dms-ecid: 9b6822e8-aef2-48ae-b4ec-cbfc307273b6-00003d98 x-oracle-dms-rid: 0 set-cookie: JSESSIONID=wNRMTjhY4fpzwAskhAsVqCdx2oGnQLQoajzRXhspY6bknP9qmKLN!1288925967; path=/; HttpOnly set-cookie: _WL_AUTHCOOKIE_JSESSIONID=WVK6UbKsQvbUuBHdCkXo; path=/; secure; HttpOnly strict-transport-security: max-age=15724800; includeSubDomains https://193.X.X.X:443/iam/admin/config/api/v1/config?path=%2F /home/opc/idmcli/oam-kubernetes-operator/kubernetes/samples/scripts/create-access-domain/domain-home-on-pv/common/output/oamconfig_modify.xml executed successfully --------------------------------------------------------------------------- Initializing WebLogic Scripting Tool (WLST) ... Welcome to WebLogic Server Administration Scripting Shell Type help() for help on available commands Connecting to t3://oamcluster-adminserver:7001 with userid weblogic ... Successfully connected to Admin Server "AdminServer" that belongs to domain "oamcluster". Warning: An insecure protocol was used to connect to the server. To ensure on-the-wire security, the SSL port or Admin port should be used instead. Location changed to domainRuntime tree. This is a read-only tree with DomainMBean as the root MBean. For more help, use help('domainRuntime') Exiting WebLogic Scripting Tool. Please wait for some time for the server to restart pod "oamcluster-oam-server1" deleted pod "oamcluster-oam-server2" deleted Waiting continuously at an interval of 10 secs for servers to start.. Waiting continuously at an interval of 10 secs for servers to start.. Waiting continuously at an interval of 10 secs for servers to start.. .. Waiting continuously at an interval of 10 secs for servers to start.. Waiting continuously at an interval of 10 secs for servers to start.. Waiting continuously at an interval of 10 secs for servers to start.. oamcluster-oam-server1 1/1 Running 0 6m35s oamcluster-oam-server2 1/1 Running 0 6m39s OAM servers started successfully
 Layout of Resources Created in OCI for the OAM Stack
This section provides details on how you can view the resources created in OCI for the OAM Stack.
- To see the list of resources created in OCI for the OAM stack, access the OCI console and from the Navigation Menu select Developer Services > Resource Manager > Stacks > Stack_Name >Stack Details > Job_Name > Job Details > Associated Resources.
- To see the Virtual Machines created while using the OAM stack, from the Navigation Menu select Compute > Instances.
- The following table shows the mapping of OCI resources to VCN and Subnets:
Input VM Shapes
Resources
VCN
Subnets
NODE_POOL_NODE_SHAPE
2 Kubernetes worker nodes(VM)
tfVcnForClusters
tfRegionalSubnetForNodePool
BASTION_SHAPE
1 monitoringnode(VM)
1 oke-bastion(VM)oke-oke vcn
oke-bastion
1 mountnode
(This is where the FS is mounted) (VM)tfVcnForClusters
tflbRegionalSubNet
N/A
1 Load Balancer (Default 100 MBPS)*
tfVcnForClusters
tflbRegionalSubNet
The Resource, VCN, and Subnets names assume the default values were not changed during the OAM provisioning configuration.
The following diagram outlines the OAM OCI Resources: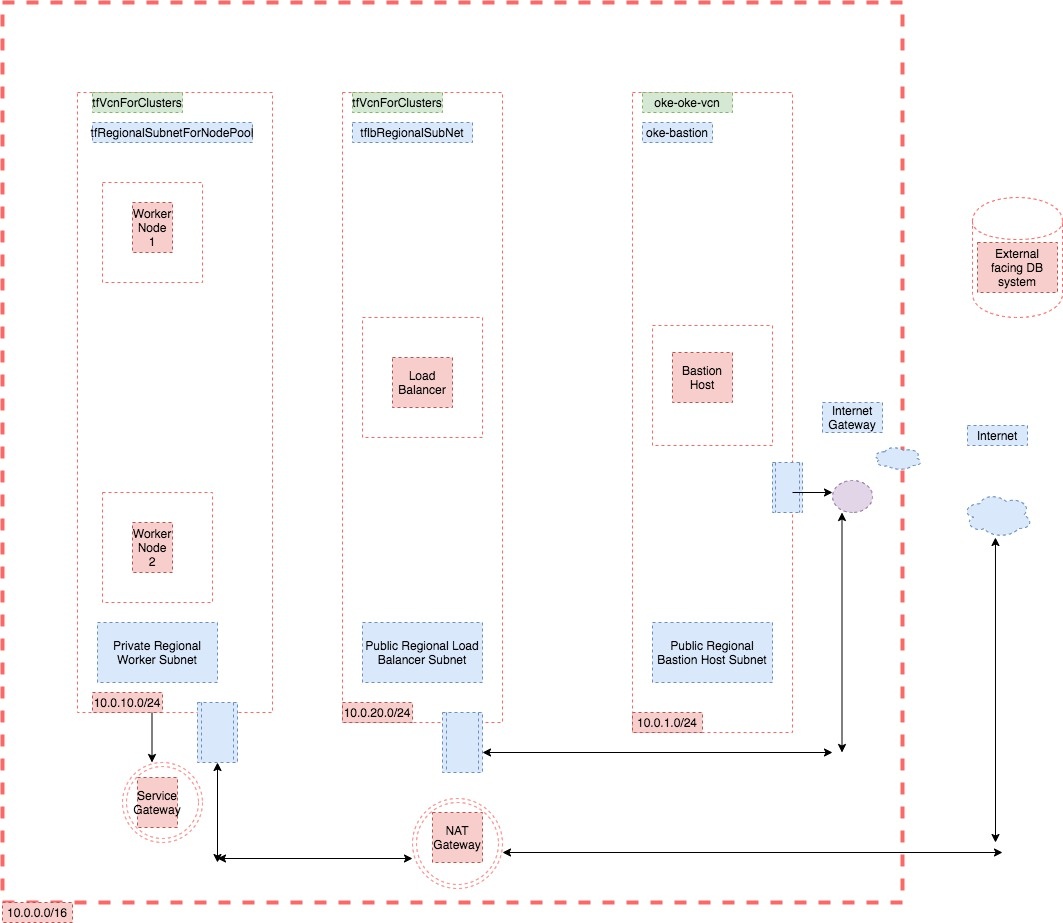
Description of the illustration layout.jpg
 Troubleshooting
To troubleshoot a failed OAM deployment:
- Revisit the Database Prerequisites section and make sure all prerequisites have been followed. Test that a connection to the database can be made via the PDB connect string in SQL*Plus or similar client tool.
- Revisit the OCI Prerequisites section and make sure all steps have been followed and enough resources are available.
- Delete the failed deployment by following the section Deleting the OAM Stack.
- Retry the deployment by following the section Provision OAM on OCI Marketplace.
- In case further debugging is required check the following:
Note: Some of the steps below may not be possible depending at what stage the deployment failed.
- In the Job that failed, view the Logs section at the bottom of the screen.
- Connect to the bastion host as per the section Connecting via SSH to the Bastion Host and in
$HOMEview theidmcli.log. - To view logs for an individual pod, run the following on the bastion host to list the pods:
Run the following command to view the log for the desired pod:kubectl get pods -n accessnskubectl logs <pod> -n accessns - To view the OAM Domain logs run the following on the bastion host:
This will take you into a bash shell inside thekubectl -n accessns exec -it oamcluster-adminserver bashoamcluster-adminserverpod. From here you can navigate to the logs directory and look at the OAM server logs:[oracle@oamcluster-adminserver oamcluster]$ cd /u01/oracle/user_projects/domains/logs/oamcluster [oracle@oamcluster-adminserver oamcluster]$ ls *.log *.out
AdminServer.log introspector_nodemanager.out oam_server1.log oam_server2.out
AdminServer.out oam_policy_mgr1.log oam_server1.out oam_server2_nodemanager.log
AdminServer_nodemanager.log oam_policy_mgr1.out oam_server1_nodemanager.log oam_server2_nodemanager.out
AdminServer_nodemanager.out oam_policy_mgr1_nodemanager.log oam_server1_nodemanager.out oamcluster.log
introspector_nodemanager.log oam_policy_mgr1_nodemanager.out oam_server2.log
[oracle@oamcluster-adminserver oamcluster]$
 Deleting the OAM Stack
If you need to delete the OAM stack, or if you need to clean up from a failed deployment, perform the following operations:
Note: If cleaning up a failed deployment step 1 and 2 may not be possible if the deployment failed before creating the bastion host. If this is the case, go direct to step 3.
- Connect via SSH to the bastion host as per the section Connecting via SSH to the Bastion Host.
- Run the following command to delete the OAM OCI components:
The output will look similar to the following:$ ./idmcli_unix install oam oamk8s --config config/idmcli.yaml -dUsing config file: config/idmcli.yaml Running Task ➡ Prereq Validations.. ⠋ Printing :version v3.2.4 Printing :version 3.2.4 Task ➡ Prereq Validations: ✅ Task ➡ Delete Nginx Ingress: ✅ Task ➡ Delete Nginx Chart: ✅ Running Task ➡ Delete Nginx Namespace.. ⠇ Task ➡ Delete Nginx Namespace: ✅ Task ➡ Delete Domain Dir: ❌ Task ➡ Delete Domain Credentials: ❌ Task ➡ Delete Domain CRD: ✅ Task ➡ Delete Operator Chart: ✅ Task ➡ Delete PV: ✅ Task ➡ Delete Operator Namespace: ✅ Task ➡ Delete Domain Namespace: ✅
Note: This will also delete the RCU Schema from the database. - Access the OCI console and from the Navigation Menu select Developer Services > Resource Manager > Stacks. Click the OAM stack to delete.
- In the OAM stack page select Destroy. A Destroy job will be created and run.
- Once the job has completed successfully select More Actions > Delete Stack.
- Ensure that clusters are deleted by navigating to Developer Services > Kubernetes Clusters (OKE). If not, manually delete the clusters.
- When the clusters are terminated, the instances should also be automatically terminated. Navigate to Compute > Instances and check the instances are deleted. If not deleted, terminate those manually.
- Check the load balancer and file storage by navigating to Networking > Load Balancers. If resources still exist, manually terminate them.
- Check the VCN’s are destroyed by clicking on the Virtual Cloud Network link on the same page. If not destroyed, then manually terminate the VCNs. If there are problems terminating the VCN’s then follow the Troubleshooting section Subnet or VCN Deletion.
- Check if the Identity Policies are removed by navigating to Identity & Security> Policies. If not destroyed then delete manually.
- On the same page click the Dynamic Groups link and check the Dynamic Groups are removed. If not destroyed then delete manually.
- When the above steps are completed, wait a few minutes to ensure all resources are cleaned up. Then check the limits to ensure those resources are now free by navigating to Governance & Administration> Limits, Quota and Usage.
 Next Tutorial
 Want to Learn More?
 Feedback
To provide feedback on this tutorial, please contact Identity Management User Assistance.