2 Creating an Application by Using the Connector

Learn about onboarding applications using the connector and the prerequisites for doing so.

2.1 Process Flow for Creating an Application By Using the Connector

From Oracle Identity Governance release 12.2.1.3.0 onward, connector deployment is handled using the application onboarding capability of Identity Self Service.

Figure 2-1 is a flowchart depicting high-level steps for creating an application in Oracle Identity Governance by using the connector installation package.

Figure 2-1 Overall Flow of the Process for Creating an Application By Using the Connector
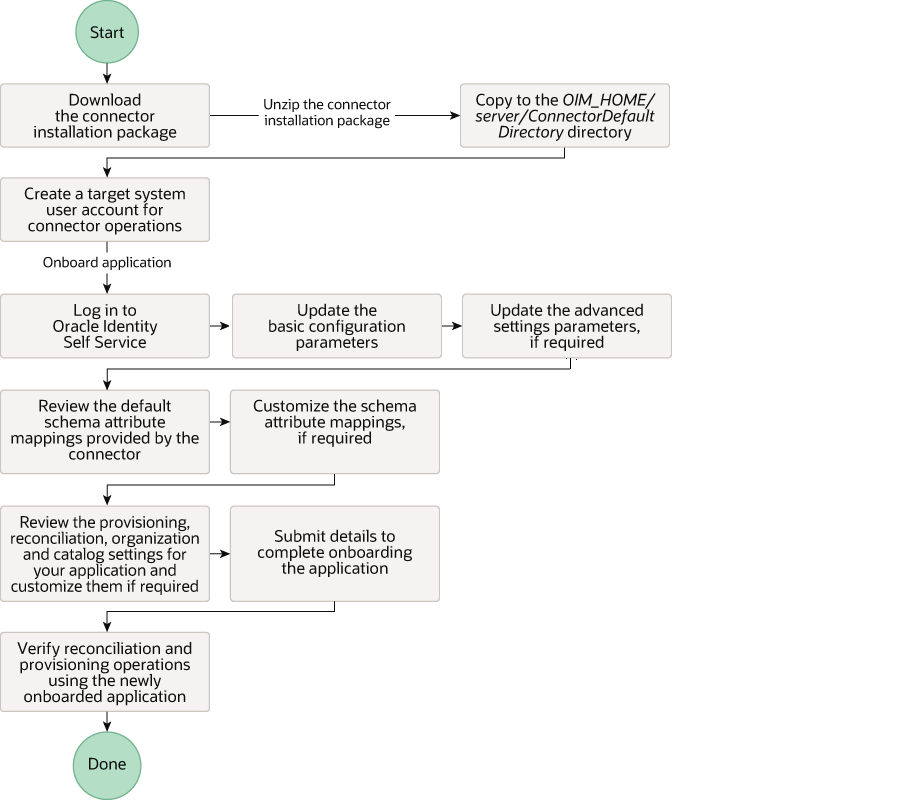
This image is a flowchart that is depicting the overall flow of the process for creating an application using the connector.

2.2 Downloading the Connector Installation Package

You can obtain the installation package for your connector on the Oracle Technology Network (OTN) website.

To download the connector installation package:
  1. Navigate to the OTN website at http://www.oracle.com/technetwork/middleware/id-mgmt/downloads/connectors-101674.html.
  2. Click OTN License Agreement and read the license agreement.
  3. Select the Accept License Agreement option.
    You must accept the license agreement before you can download the installation package.
  4. Download and save the installation package to any directory on the computer hosting Oracle Identity Governance.
  5. Extract the contents of the installation package to any directory on the computer hosting Oracle Identity Governance. This creates a directory named CONNECTOR_NAME-RELEASE_NUMBER.
  6. Copy the CONNECTOR_NAME-RELEASE_NUMBER directory to the OIG_HOME/server/ConnectorDefaultDirectory directory.

2.3 Downloading and Copying Third-Party Jar Libraries

You can either use third-party jars from the AmazonWebServices-12.2.1.3.0 /lib folder shipped with the connector package or download any latest, stable, and secure version. Please follow the below procedure to include third-party jars:

  1. Create a directory named AmazonWebservices-RELEASE_NUMBER under the OIM_ORACLE_HOME/server/ConnectorDefaultDirectory/targetsystems-lib/ directory.
  2. Copy the third-party library jars for the Amazon Web Services Apps connector to the computer hosting Oracle Identity Governance present in OIM_ORACLE_HOME/server/ConnectorDefaultDirectory/targetsystems-lib/AmazonWebServices-RELEASE_NUMBER directory.

    For example, if you are using release 12.2.1.3.0 version of this connector, then create a directory named AmazonWebServices-12.2.1.3.0 in the OIM_ORACLE_HOME/server/ConnectorDefaultDirectory/targetsystems-lib/ directory.

Note:

If you are using Connector Server, copy Amazon Web Services Apps third-party libraries to the CONNECTOR_SERVER_HOME/lib directory.

If you are looking for latest third party jar libraries, use the following link to download them:

Table 2-1 Third-Party Jars

Jar Name Download Link
auth-[Version].jar https://mvnrepository.com/artifact/software.amazon.awssdk/auth/
iam-[Version].jar https://mvnrepository.com/artifact/software.amazon.awssdk/iam/
aws-core-[Version].jar https://mvnrepository.com/artifact/software.amazon.awssdk/aws-core/
sdk-core-[Version].jar https://mvnrepository.com/artifact/software.amazon.awssdk/sdk-core
regions-[Version].jar https://mvnrepository.com/artifact/software.amazon.awssdk/regions/
profiles-[Version].jar https://mvnrepository.com/artifact/software.amazon.awssdk/profiles
utils-[Version].jar https://mvnrepository.com/artifact/software.amazon.awssdk/utils
organizations-[Version].jar https://mvnrepository.com/artifact/software.amazon.awssdk/organizations/
sts-[Version].jar https://mvnrepository.com/artifact/software.amazon.awssdk/sts/
cloudtrail-[Version].jar https://mvnrepository.com/artifact/software.amazon.awssdk/cloudtrail/
apache-client-[Version].jar https://mvnrepository.com/artifact/software.amazon.awssdk/apache-client/
http-client-spi-[Version].jar https://mvnrepository.com/artifact/software.amazon.awssdk/http-client-spi/
aws-json-protocol-[Version].jar https://mvnrepository.com/artifact/software.amazon.awssdk/aws-json-protocol/
aws-query-protocol-[Version].jar https://mvnrepository.com/artifact/software.amazon.awssdk/aws-query-protocol/
metrics-spi-[Version].jar https://mvnrepository.com/artifact/software.amazon.awssdk/metrics-spi/
protocol-core-[Version].jar https://mvnrepository.com/artifact/software.amazon.awssdk/protocol-core/

2.4 Creating an Application By Using the Amazon Webservice Connector

You can onboard an application into Oracle Identity Governance from the connector package by creating a Target application. To do so, you must log in to Identity Self Service and then choose the Applications box on the Manage tab.

The following is the high-level procedure to create an application by using the connector:

Note:

For detailed information on each of the steps in this procedure, see Creating Applications of Oracle Fusion Middleware Performing Self Service Tasks with Oracle Identity Governance.

  1. Create an application in Identity Self Service. The high-level steps are as follows:
    1. Log in to Identity Self Service either by using the System Administration account or an account with the ApplicationInstanceAdministrator admin role.
    2. Ensure that the Connector Package option is selected when creating an application.
    3. Update the basic configuration parameters to include connectivity-related information.
    4. If required, update the advanced setting parameters to update configuration entries related to connector operations.
    5. Review the default user account attribute mappings. If required, add new attributes or you can edit or delete existing attributes.
    6. Review the provisioning, reconciliation, organization, and catalog settings for your application and customize them if required. For example, you can customize the default correlation rules for your application if required.
    7. Review the details of the application and click Finish to submit the application details.
      The application is created in Oracle Identity Governance.
    8. When you are prompted whether you want to create a default request form, click Yes or No.
      If you click Yes, then the default form is automatically created and is attached with the newly created application. The default form is created with the same name as the application. The default form cannot be modified later. Therefore, if you want to customize it, click No to manually create a new form and attach it with your application.
  2. Verify reconciliation and provisioning operations on the newly created application.

See Also:

  • Configuring the Connector for details on basic configuration and advanced settings parameters, default user account attribute mappings, default correlation rules, and reconciliation jobs that are predefined for this connector

  • Configuring Oracle Identity Governance for details on creating a new form and associating it with your application, if you chose not to create the default form

2.5 Creating a Target System User Account for the AWS Target

The following topics describe the procedures to create a target system user account for the AWS target:

2.5.1 Signing in with Root User Credentials

To sign in to an AWS account as the root user, perform the following steps:

Note:

To sign in to an AWS account as a root user, ensure you know the email address used to create the AWS account and the password for the root user.
  1. Open https://console.aws.amazon.com/.
  2. If you have not signed in previously using this browser, select Root user, enter the email address associated with your account, click Next, enter the password and choose Sign in.
  3. If you have signed in as a root user previously using this browser, your browser might remember the email address for the AWS account. If so, you just need to enter password and select Sign in.

2.5.2 Creating an IAM user in the AWS account

To create an IAM user in the AWS account, perform the following steps:

  1. If you are already signed in, under Services, search for IAM.
  2. From the left navigation pane, under Access Management, select Users, and click Add user.
    Create a simple user without any permissions.
  3. Perform the following steps to add a user in the Add User page:
    1. In the Set user details section, enter the user name (sign-in name for AWS).
    2. In the Select AWS access type section, under Access type, select Programmatic access and AWS Management Console access checkboxes.
    3. To manually enter the user password, under Console Password, select Custom password.
    4. Select the Require password reset checkbox and then select Next: Permissions.
  4. From the Add User page, select Set Permissions and click Next: Tags without making any change.
  5. From the Add tags (optional) page, click Next: Review and review all details used for creating the user and then click on Create user. You will receive a success message on the screen after you creating the user.
  6. Click Close.

2.5.3 Adding Inline Policy to an IAM User

To add inline policies to IAM users, perform the following steps:

  1. Using the search field, select the previosly created user from the User name list.
  2. From the Summary page, select the Permissions tab and then select Permissions policies.
  3. Click Add inline policy. You will be redirected to the Create Policy page.
  4. Expand Service to define Actions and Resources for IAM, Organizations, CloudTrail and STS Services.
  5. Click Choose a service and search for IAM.
  6. Expand Actions, and then expand Access level to assign various access levels.

    From the List access level section, select the following checkboxes:

    • GetLoginProfile
    • ListGroupPolicies
    • ListUserPolicies
    • ListAccessKeys
    • ListGroups
    • ListUsers
    • ListAttachedGroupPolicies
    • ListGroupForUser
    • ListUserTags
    • ListAttachedUserPolicies
    • ListPolicies

    From the Read access level section, select the following checkboxes:

    • GetAccountAuthorizationDetails
    • GetGroup
    • GetPolicy
    • GetUser

    From the Tagging access level section, select the following checkboxes:

    • TagUser
    • UntagUser

    From the Write access level section, select the following checkboxes:

    • AddUserToGroup
    • DeleteLoginProfile
    • UpdateAccessKey
    • CraeteLoginProfile
    • DeleteUser
    • UpdateLoginProfile
    • CreateUser
    • RemoveUserFromGroup
    • UpdateUser

    From the Permissions Management access level section, select the following checkboxes:

    • AttachUserPolicy
    • DeleteUserPolicy
    • DetachUserPolicy
    • DetachGroupPolicy
  7. From the Resources section, select All resources, and click Review policy.
    In the Review Policy page, ensure to enter a name for your policy and click the Create policy button. The policy will be added to the user in permission tab.
  8. To define Actions and Resources for Organizations, repeat steps 1 to 5 of this section with a minor change. While choosing a service in step 5, select Organisations instead of IAM.
  9. Expand Actions, and then expand Access level to assign various access levels. Select the following checkboxes List and Read access level sections:
    • List access level section: ListPoliciesForTarget
    • Read access level section: DescribeAccount checkbox
  10. From the Resources section, select All resources, and click Review policy.
    In the Review Policy page, ensure to enter a name for your policy and click the Create policy button. The policy will be added to the user in permission tab.
  11. To define Actions and Resources for CloudTrial, repeat steps 1 to 5 of this section with a minor change. While choosing a service in step 5, select CloudTrial instead of IAM.
  12. Expand Actions, and then expand Access level to assign the access level. From the Read access level section, select the Lookup Events chekbox.
  13. From the Resources section, select All resources, and click Review policy.
    In the Review Policy page, ensure to enter a name for your policy and click the Create policy button. The policy will be added to the user in permission tab.
  14. To define Actions and Resources for STS, repeat steps 1 to 5 of this section with a minor change. While choosing a service in step 5, select STS instead of IAM.
  15. Expand Actions, and then expand Access level to assign the access level. From the Read access level section, select the GetCallerIdentity chekbox.
With this, you have successfully created an IAM user with four inline policies for each service. The same IAM user can be used as a communication user in Oracle Identity Governance to perform all the connector operations.