7 Extending the Functionality of the Oracle E-Business Suite HRMS Connectors
You can extend the functionality of the connectors to address your specific business requirements.
This chapter contains the following sections:
Understanding Connector Schema Extension
Extending the connector schema requires you to understand the following concepts:
-
Attribute initialization
The following initialization statement reserves an internal array that holds attribute definitions of the connector schema:
attr.extend(NUM);Here, NUM defines the size of the array that is to be initialized. The size of the array must always be greater than or equal to the number of attributes defined. For example, the initialization statement
attr.extend(20);reserves an internal array of 20 attributes for initialization. -
Attribute definition
After initialization, you define the information for each attribute by adding a statement in the following format:
attr (ORD_NO) := attributeinfo(ATTR_NAME,ATTR_TYPE,CREATE_FLAG,UPDATE_FLAG,REQUIRED_FLAG,READ_FLAG);
In this format:
-
ORD_NO is the order of the attribute in the array. This is mandatory.
-
ATTR_NAME is the name of the child or single-valued attribute.
-
ATTR_TYPE is the SQL datatype of the child or single-valued attribute.
-
CREATE_FLAG is a flag to represent whether the attribute is required during a create provisioning operation.
-
UPDATE_FLAG is a flag to represent whether the attribute can be updated.
-
REQUIRED_FLAG is a flag to represent whether the attribute is mandatory.
-
READ_FLAG is flag to represent whether the attribute can be read.
A value of
1or0for each flag denotes True or False, respectively. For example, a value1, 0, 1, 0for the flags means that the attribute is a mandatory attribute and must be considered during create provisioning operations. -
-
Attribute array extension
You can increase the array size post initialization by including the following statement:
attr.extend;Each inclusion of this statement increments the array size by 1.
Adding New Attributes to an Authoritative Application
By default, the attributes listed on the Schema page at the time of application creation are mapped for reconciliation between Oracle Identity Governance and the target system. If required, you can map additional attributes to you authoritative application for trusted source reconciliation.
The following sections describe the procedures to be performed for adding new attributes:
Adding New Attributes on the Schema Page for an Authoritative Application
While creating an Authoritative application, you can view the default attribute mappings between Oracle Identity Governance attributes and target system columns on the Schema page. If required, you can add new attributes.
Updating the DB Wrapper Package
You must extend the connector schema by updating the DB wrapper package to include the new attribute for your application.
-
Open any SQL client. For example, SQL Developer.
-
Open the body of the OIM_EMPLOYEE_WRAPPER.pck wrapper package.
-
Select the get_schema() stored procedure. The list of attributes defined in the stored procedure is displayed.
-
If the number of attributes defined exceeds the number of attributes initialized, then:
-
Add the following attribute initialization statement:
attr.extend; -
Enter the definition for the new attribute that you want to add in the following format:
attr (ORD_NO) := attributeinfo(ATTR_NAME,ATTR_TYPE,CREATE_FLAG,UPDATE_FLAG,REQUIRED_FLAG,READ_FLAG);
For example, if you are adding a new attribute to hold the blood type for a user account, then include the following statements:
attr.extend;
attr (28) := attributeinfo('BLOOD_TYPE','varchar2',1,1,0,1);
In this example, a value of
1,1,0,1for the flags means that the BLOOD_TYPE attribute is required during create provisioning operations, it can be updated and read.See Also:
Understanding Connector Schema Extension for more information about format in which you must add the new attribute definition
-
-
If the number of attributes defined does not exceed the number of attributes initialized then add only the definition for the new attribute. For example,
attr (28) := attributeinfo('BLOOD_TYPE','varchar2',1,1,0,1); -
Re-compile the wrapper package.
Updating the search.properties File for an Authoritative Application
You must update the search.properties to include the newly added attribute in the corresponding SQL query.
- Extract the contents of the org.identityconnectors.ebs-12.3.0.jar file (located in the /bundle directory of the connector installation package) into a directory of your choice.
- In a text editor, open the search.properties located in the configuration directory.
- Search for the SQL query that must include the column name corresponding to the newly created attribute. For example, search for the HRMS_CURRENT_EMPLOYEE_RECON_QUERY query.
- If the SQL query already contains the column name corresponding to the newly added attribute, then you can skip the rest of the steps mentioned in this section.
- If the SQL query does not include information about the newly added column name, then modify it to include this information. For example, modify the HRMS_CURRENT_EMPLOYEE_RECON_QUERY query (search op) to include
PAPF.BLOOD_TYPE AS blood_type.The Blood Type attribute is present in the PER_ALL_PEOPLE_F table and PAPF is the table alias. - Repeat Steps 3 through 5 to update the remaining SQL queries such as HRMS_CURRENT_FUTURE_EMPLOYEE_RECON_QUERY (for both search and sync ops), and HRMS_CURRENT_EMPLOYEE_RECON_QUERY (sync op), if applicable. For example, update the HRMS_CURRENT_EMPLOYEE_RECON_QUERY and HRMS_CURRENT_FUTURE_EMPLOYEE_RECON_QUERY queries with the SQL queries listed in Sample SQL Queries for the EBS ER Connector.
- Save the changes and close the file.
- Verify the updated queries.
Adding New Attributes to an Target Application
By default, the attributes listed on the Schema page at the time of application creation are mapped for reconciliation between Oracle Identity Governance and the target system. If required, you can map additional attributes to your Target application for target resource reconciliation and provisioning operations.
The following sections describe the procedures to be performed for adding new attributes:
Adding New Attributes on the Schema Page for a Target Application
While creating a Target application, you can view the default attribute mappings between Oracle Identity Governance attributes and target system columns on the Schema page. If required, you can add new attributes.
Updating the DB Wrapper Package
You must extend the connector schema by updating the DB wrapper package to include the new attribute for your application.
-
Open any SQL client. For example, SQL Developer.
-
Open the body of the OIM_EMPLOYEE_WRAPPER.pck wrapper package.
-
Select the get_schema() stored procedure. The list of attributes defined in the stored procedure is displayed.
-
If the number of attributes defined exceeds the number of attributes initialized, then:
-
Add the following attribute initialization statement:
attr.extend; -
Enter the definition for the new attribute that you want to add in the following format:
attr (ORD_NO) := attributeinfo(ATTR_NAME,ATTR_TYPE,CREATE_FLAG,UPDATE_FLAG,REQUIRED_FLAG,READ_FLAG);
For example, if you are adding a new attribute to hold the blood type for a user account, then include the following statements:
attr.extend;
attr (28) := attributeinfo('BLOOD_TYPE','varchar2',1,1,0,1);
In this example, a value of
1,1,0,1for the flags means that the BLOOD_TYPE attribute is required during create provisioning operations, it can be updated and read.See Also:
Understanding Connector Schema Extension for more information about format in which you must add the new attribute definition
-
-
If the number of attributes defined does not exceed the number of attributes initialized then add only the definition for the new attribute. For example,
attr (28) := attributeinfo('BLOOD_TYPE','varchar2',1,1,0,1); -
Re-compile the wrapper package.
Updating the search.properties File
You must update the search.properties file to include the newly added attribute in the corresponding SQL query.
Updating the Connector Bundle
You must update the connector bundle (org.identityconnectors.ebs-12.3.0.jar) to include all the updates made to the Schema page, DB wrapper package, and the properties file.
Updating the Procedures.properties File for a Target Application
In order to support the newly added attribute during create and update provisioning operations, you must update the stored procedure that is invoked in the Procedures.properties file.
-
In a text editor, open the Procedures.properties file for editing.
-
Search for and determine the names of wrapper packages and stored procedures used for invoking the create person and update person provisioning operations. For example, OIM_EMPLOYEE_WRAPPER.CREATE_PERSON_API and OIM_EMPLOYEE_WRAPPER.UPDATE_PERSON_API are the wrapper packages and stored procedures used for the create person and update person provisioning operations.
-
Update the stored procedures determined in the earlier step as follows:
-
Open any SQL client. For example, SQL Developer.
-
Open the wrapper package and add the newly added attribute (for example, Blood Type) to the create person and update person stored procedures. For example, open the OIM_EMPLOYEE_WRAPPER package and add the newly added attribute to the CREATE_PERSON_API and UPDATE_PERSON_API stored procedures.
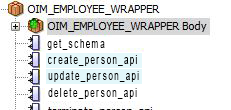
Figure 7-1 highlights the stored procedures that must be updated in the OIM_EMPLOYEE_WRAPPER package to include the newly added attribute.
Figure 7-1 Stored Procedures To Be Updated in OIM_EMPLOYEE_WRAPPER Package

Description of "Figure 7-1 Stored Procedures To Be Updated in OIM_EMPLOYEE_WRAPPER Package" -
Select the CREATE_PERSON_API stored procedure and update the input parameters to include the newly added attribute.
Figure 7-2 highlights the newly added attribute in both the CREATE_PERSON_API and UPDATE_PERSON_API stored procedures.
Figure 7-2 Stored Procedures with the Newly Added Attribute

Description of "Figure 7-2 Stored Procedures with the Newly Added Attribute" -
Open OIM_EMPLOYEE_WRAPPER Body and select the CREATE_PERSON_API stored procedure.
-
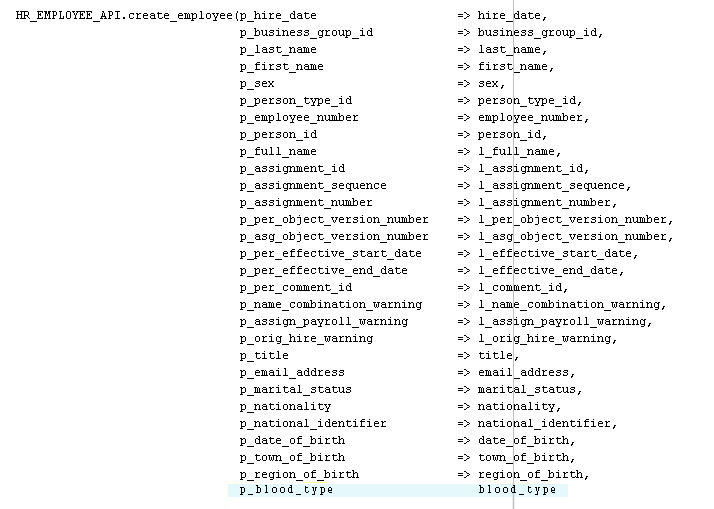
Update the HR_EMPLOYEE_API.create_employee API call in the procedure with the newly added attribute.
Figure 7-3 shows the updated HR_EMPLOYEE_API.create_employee API.
Figure 7-3 HR_EMPLOYEE_API.create_employee API with the Newly Added Attribute

Description of "Figure 7-3 HR_EMPLOYEE_API.create_employee API with the Newly Added Attribute" -
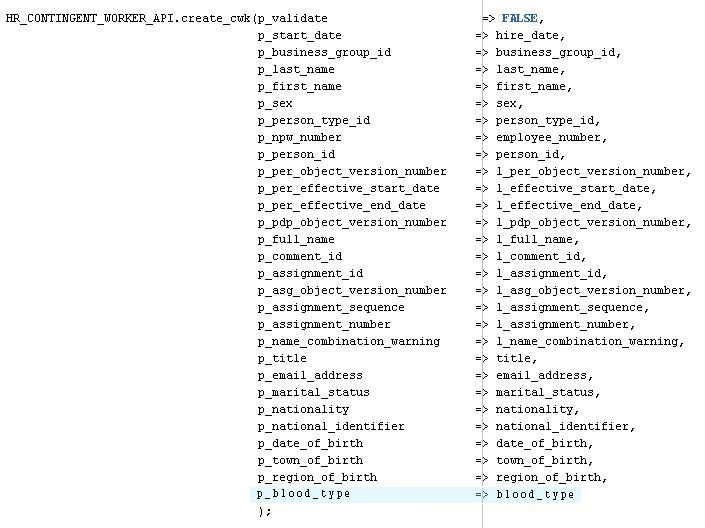
Update the HR_CONTINGENT_WORKER_API.create_cwk API call in the procedure with the newly added attribute.
Figure 7-4 shows the updated HR_CONTINGENT_WORKER_API.create_cwk API.
Figure 7-4 HR_CONTINGENT_WORKER_API.create_cwk API with the Newly Added Attribute

Description of "Figure 7-4 HR_CONTINGENT_WORKER_API.create_cwk API with the Newly Added Attribute" -
Repeat Steps 3.c through 3.f to update the UPDATE_PERSON_API stored procedure to include the newly added attribute.
-
Re-compile the wrapper package.
-
Adding New Multivalued Attributes to a Target Application
You can map new multivalued attributes between Oracle Identity Governance and target system for target resource reconciliation and provisioning.
By default, the attributes listed in Attribute Mapping for the EBS HRMS Connector are mapped for reconciliation and provisioning between Oracle Identity Governance and the target system. If required, you can map additional multivalued attributes to a Target application for target resource reconciliation and provisioning. See Adding New Multivalued Attributes for Reconciliation and Provisioning in Oracle Identity Governance Configuring the Oracle E-Business Suite User Management Application.
Configuring Transformation and Validation of Data
Configure transformation and validation of user account data by writing Groovy script logic while creating your application.
You can configure transformation of reconciled single-valued user data according to your requirements. For example, you can use First Name and Last Name values to create a value for the Full Name field in Oracle Identity Governance.
Similarly, you can configure validation of reconciled and provisioned single-valued data according to your requirements. For example, you can validate data fetched from the First Name attribute to ensure that it does not contain the number sign (#). In addition, you can validate data entered in the First Name field on the process form so that the number sign (#) is not sent to the target system during provisioning operations.
To configure transformation or validation of user account data, you must write Groovy scripts while creating your application. For more information about writing Groovy script-based validation and transformation logic, see Validation and Transformation of Provisioning and Reconciliation Attributes of Oracle Fusion Middleware Performing Self Service Tasks with Oracle Identity Governance.
Configuring Action Scripts
You can configure Action Scripts by writing your own Groovy scripts while creating your application.
For information on adding or editing action scripts, see Updating the Provisioning Configuration in Oracle Fusion Middleware Performing Self Service Tasks with Oracle Identity Governance.
Configuring the Connector for Multiple Installations of the Target System
You must create copies of configurations of your base application to configure it for multiple installations of the target system.
The London and New York offices of Example Multinational Inc. have their own installations of the target system, including independent schema for each. The company has recently installed Oracle Identity Governance, and they want to configure it to link all the installations of the target system.