6 Extending the Functionality of the Microsoft Exchange Connector

You can extend the functionality of the connector to address your specific business requirements.

6.1 Adding New Multivalued Fields

You can add multivalued fields for user reconciliation and provisioning between Oracle Identity Governance and the target system.

By default, the multivalued fields listed on the Schema page for your application in Identity Self Server are mapped for provisioning and reconciliation between Oracle Identity Governance and the target system. If required, you can add new multivalued fields for provisioning and reconciliation.

To add new multivalued fields for reconciling users from a target application (or target resource reconciliation):
  1. Log in to Oracle Identity System Administration and create a lookup that can hold the list of values for the multivalued field that you want to add.
  2. Create a child form and add attributes as follows:
    1. Log in to Identity Self Service.
    2. Search for and open the application you created for your target system for editing.
    3. On the Schema page, add a new child form and its attributes.

      For example, enter the following values:

      • Display Name: Proxy Address

      • Target Attribute: EmailAddresses

      • Ensure that the Recon Field option is selected.

      Note:

      • When you add attributes to the child form, from the Advanced Settings option, ensure to mark the newly added attribute as a Lookup.

      • In the List of values field, enter the name of the lookup created in Step 1.

    4. Apply your changes.
  3. Log in to Identity System Administration, create a new form and associate it with your application.

See Also:

  • Creating a Lookup Type in Oracle Fusion Middleware Administering Oracle Identity Governance for details about create lookups for your multivalued fields

  • Adding Child Forms in Oracle Fusion Middleware Performing Self Service Tasks with Oracle Identity Governance for information about creating a child form and adding attributes

  • Configuring Oracle Identity Governance for information about creating a new form and associating it with your application

6.2 Configuring Transformation and Validation of Data

Configure transformation and validation of user account data by writing Groovy script logic while creating your application.

You can configure transformation of reconciled single-valued user data according to your requirements. For example, you can use First Name and Last Name values to create a value for the Full Name field in Oracle Identity Governance.

Similarly, you can configure validation of reconciled and provisioned single-valued data according to your requirements. For example, you can validate data fetched from the First Name attribute to ensure that it does not contain the number sign (#). In addition, you can validate data entered in the First Name field on the process form so that the number sign (#) is not sent to the target system during provisioning operations.

To configure transformation or validation of user account data, you must write Groovy scripts while creating your application. For more information about writing Groovy script-based validation and transformation logic, see Validation and Transformation of Provisioning and Reconciliation Attributes of Oracle Fusion Middleware Performing Self Service Tasks with Oracle Identity Governance.

6.3 Configuring Action Scripts

Actions are scripts that you can configure to run before or after any provisioning operation. For example, you can run custom PowerShell scripts before or after creating, updating, or deleting a mailbox.

The following are topics pertaining to action scripts:

6.3.1 About Configuring Action Scripts

You can configure Action Scripts by writing your own PowerShell scripts while creating your application.

These scripts can be configured to run before or after the create, update, or delete an account provisioning operations. For example, you can configure a script to run before every mailbox creation operation.

For information on adding or editing action scripts, see Updating the Provisioning Configuration in Oracle Fusion Middleware Performing Self Service Tasks with Oracle Identity Governance.

Note:

The scripting language used is PowerShell.
The following are some important points pertaining to Action Scripts:
  • On the computer hosting the connector server, create the custom PowerShell script in a directory. This script should be self-sufficient, that is, it should be able to create, maintain, and delete sessions with the target Exchange server and complete all actions against it.

    The batch file runs custom PowerShell script using the Powershell.exe program. For more information on Powershell.exe, see http://technet.microsoft.com/en-us/library/hh847736.aspx.

  • During various operations, there is a difference in terms of what data is available:
    • During create operations, all attributes part of the process form are available to the script.

    • During update operations, only the attribute that is being updated is available to the script.

      If other attributes are also required, then you must create and use a new adapter calling ICProvisioningManager# updateAttributeValues(String objectType, String[] labels). During adapter mapping in process task, add the form field labels of the dependent attributes.

    • During delete operations, only the __UID__ (GUID) attribute is available to the script.

6.3.2 Running a Custom PowerShell Script

As an example, the following procedure describes the steps to run a custom PowerShell script before a create operation:

  1. Select an application of your choice after creating it or while updating it.
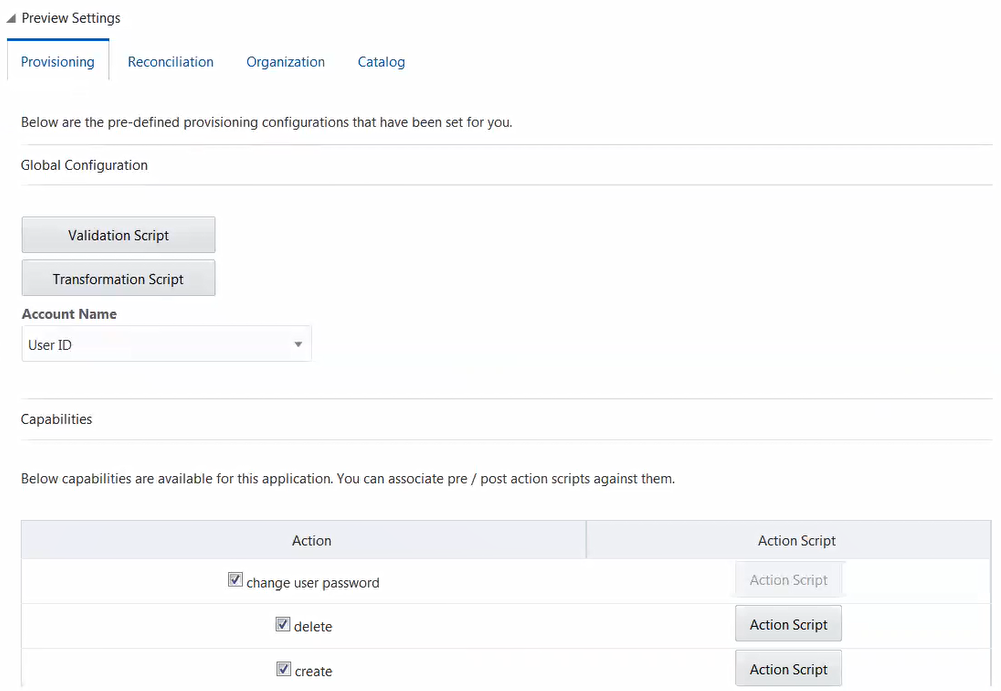
  2. Select the Settings tab, User, and then Provisioning. All available action scripts are displayed.

    Figure 6-1 Preview Settings for Action Scripts

    Description of Figure 6-1 follows
    Description of "Figure 6-1 Preview Settings for Action Scripts"
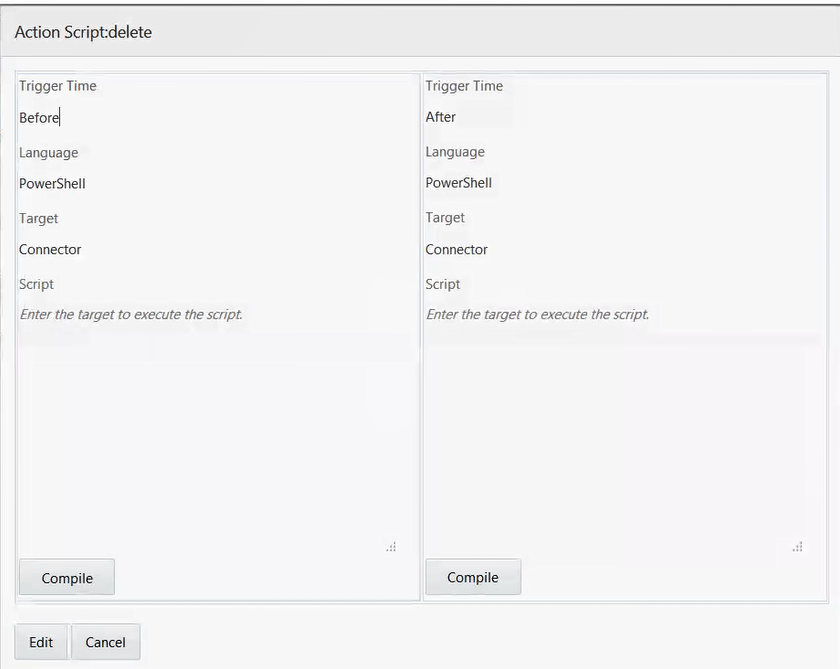
  3. To view its contents, click any of the enabled action scripts.
  4. Click Edit, and then enter the following content in the Script field:
    Powershell.exe -File NAME_AND_FULL_LOCATION_OF_THE_CUSTOM_SCRIPT %Alias% -SimpleDisplayName %DisplayName%
    Exit
    

    Sample value:

    Powershell.exe -File C:\PSScript\CustomCreateScript.ps1 %Alias% -SimpleDisplayName %DisplayName%
    Exit
    
  5. Click Compile to check if the script is valid, and then click Save.
  6. Log in to the computer running the connector server and create the custom script (in this example the customScript.ps1 script, located in the C:\PSScript directory) file with the following content:

    Note:

    Before running this script using the connector or Oracle Identity Governance, verify the following on the computer running the connector server:

    • Connect manually to Exchange server with the values specified in the script using the PowerShell window without any issues.

    • Run the Set-Mailbox command against any existing mailbox and verify if it runs without any issues.

    • From a command prompt, navigate to the directory containing the batch file. Then, run the batch file with appropriate parameters and ensure that the PowerShell script runs on Exchange server without any issues.

    If there are any issues, update the batch file or the script appropriately.

    Provide appropriate values for username, password, and Exchange server in the following sample script. In the following script:

    • Update the value of the $pw variable with the actual password. The value Welcome1 is specified as a sample value.

    • Update the value of the $cred variable with the actual username. The value Connectorse1\oim_exch_service has been specified as a sample value.

    • Update the value of the $Session variable with the actual Exchange server. The value http://example.com/PowerShell/ has been specified as a sample value.

    <#  
    .SYNOPSIS
        Updates a mailbox property
     
    .DESCRIPTION
        This script assumes the first parameter as the identity value, second paramater as a the property name to be updated and thrid parameter as the new  
    value.
    .NOTES
        File Name      : CustomCreateScript.ps1
     
    #>
    
    #Accept parameters
    $Identity = $args[0]
    $ParameterName = $args[1]
    $ParameterValue = $args[2]
    
    #Remove "[" and "]"
    $Identity = $Identity.Replace("[","")
    $Identity = $Identity.Replace("]","")
    
    #Replace "[" with "-" and remove "]"
    $ParameterName = $ParameterName.Replace("[","-")
    $ParameterName = $ParameterName.Replace("]","")
    
    #Remove "[" and "]"
    $ParameterValue = $ParameterValue.Replace("[","")
    $ParameterValue = $ParameterValue.Replace("]","")
    
    
    #Create password
    $pw = convertto-securestring -AsPlainText -Force -String Welcome1
    
    #Create credential
    $cred = new-object -typename System.Management.Automation.PSCredential -argumentlist "Connectorse1\oim_exch_service",$pw
    
    #Create session
    $Session = New-PSSession -ConfigurationName Microsoft.Exchange -ConnectionUri http://example.com/PowerShell/ -Authentication Kerberos -Credential $cred
    
    #Import session
    Import-PSSession $session
    
    #Create command variable
    $Command = "Set-Mailbox -Identity $Identity $ParameterName $ParameterValue"
    
    #Just to check if proper command is created, dump it to a file.
    $Command >> "c:\command.txt"
    
    #Invoke it
    Invoke-Expression $Command
    
    #Remove session
    Remove-PSSession -Session $Session
    

    This script runs after every create operation. It updates the SimpleDisplayName property of the newly created mailbox with its DisplayName property value.