7 Extending the Functionality of the Oracle Internet Directory Connector

You can extend the functionality of the connector to address your specific business requirements.

This chapter discusses the following sections:

7.1 Adding New Multivalued Fields for Target Resource Reconciliation

You can add new multivalued fields for target resource reconciliation of users, groups, organizational units, and roles.

7.1.1 Adding New Multivalued Fields for Reconciling Users from a Target Application

By default, the multivalued fields listed on the Schema page for your application in Identity Self Server are mapped for reconciliation between Oracle Identity Governance and the target system. If required, you can add new multivalued fields for target resource reconciliation.

To add new multivalued fields for reconciling users from a target application (or target resource reconciliation):
  1. Log in to Oracle Identity System Administration and create a lookup that can hold the list of values for the multivalued field that you want to add.
  2. Create a child form and add attributes as follows:
    1. Log in to Identity Self Service.
    2. Search for and open the application you created for your target system for editing.
    3. On the Schema page, add a new child form and its attributes.

      For example, enter the following values:

      • Display Name: Car License

      • Target Attribute: carLicense

      • Ensure that the Recon Field option is selected.

      Note:

      • When you add attributes to the child form, from the Advanced Settings option, ensure to mark the newly added attribute as a Lookup.

      • In the List of values field, enter the name of the lookup created in Step 1.

    4. Apply your changes.
  3. Log in to Identity System Administration, create a new form and associate it with your application.

See Also:

  • Creating a Lookup Type in Oracle Fusion Middleware Administering Oracle Identity Governance for details about create lookups for your multivalued fields

  • Adding Child Forms in Oracle Fusion Middleware Performing Self Service Tasks with Oracle Identity Governance for information about creating a child form and adding attributes

  • Configuring Oracle Identity Governance for information about creating a new form and associating it with your application

7.1.2 Adding New Multivalued Fields for Target Resource Reconciliation of Groups, Organizational Units, and Roles

By default, the multivalued fields listed in the respective lookup definitions are mapped for reconciliation between Oracle Identity Governance and the target system. If required, you can add new multivalued fields for target resource reconciliation of groups, organizational units, and roles.

Note:

  • This section describes an optional procedure. Perform this procedure only if you want to add multivalued fields for target resource reconciliation.

  • You can apply this procedure to add group, organizational unit, or role fields.

  • You must ensure that new fields you add for reconciliation contain only string-format data. Binary fields must not be brought into Oracle Identity Governance natively.

To add a new multivalued field for target resource reconciliation, perform the following procedures:

7.1.2.1 Creating a Form for the Multivalued Field
To create a form for the multivalued field:
  1. Log in to Oracle Identity Manager Design Console.
  2. Expand Development Tools and double-click Form Designer.
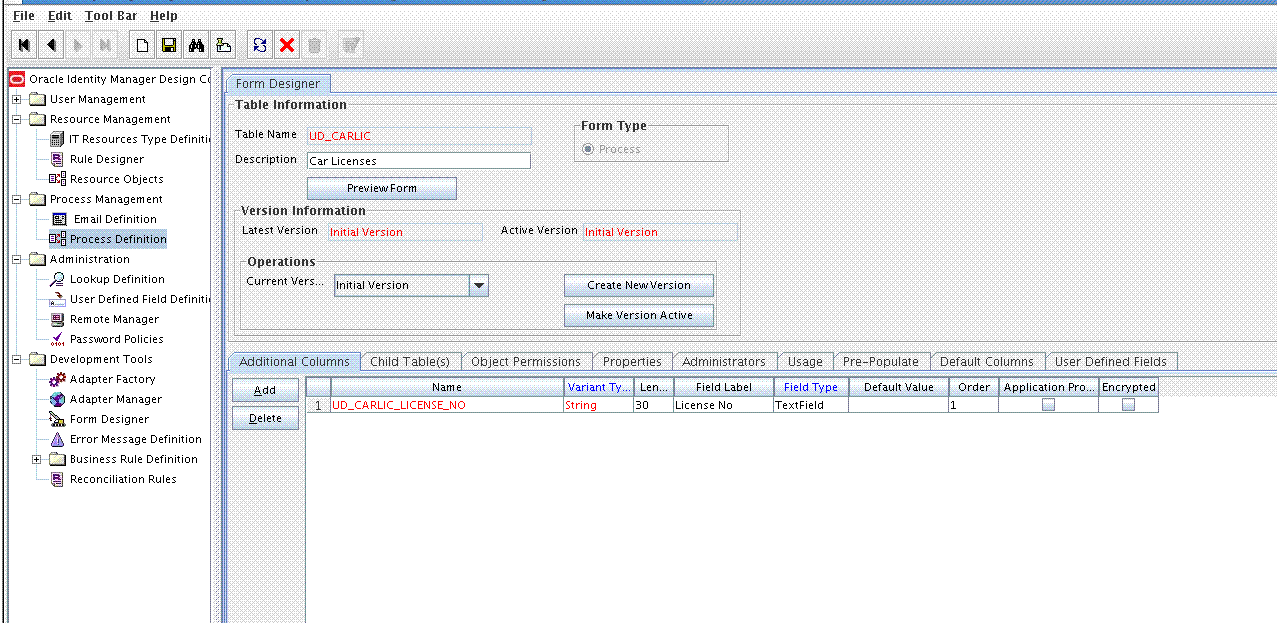
  3. Create a form by specifying a table name and description, and then click Save.
  4. Click Add and enter the details of the field.
  5. Click Save and then click Make Version Active. For example:
7.1.2.2 Adding the Form as a Child Form of the Process Form

Add the form created for the multivalued field as a child form of the process form.

  1. Search for and open one of the following process forms:
    • For groups: UD_LDAP_GR or UD_OID_GR
    • For organizational units: UD_LDAP_OU or UD_OID_OU
    • For roles: UD_LDAP_RL
  2. Click Create New Version.
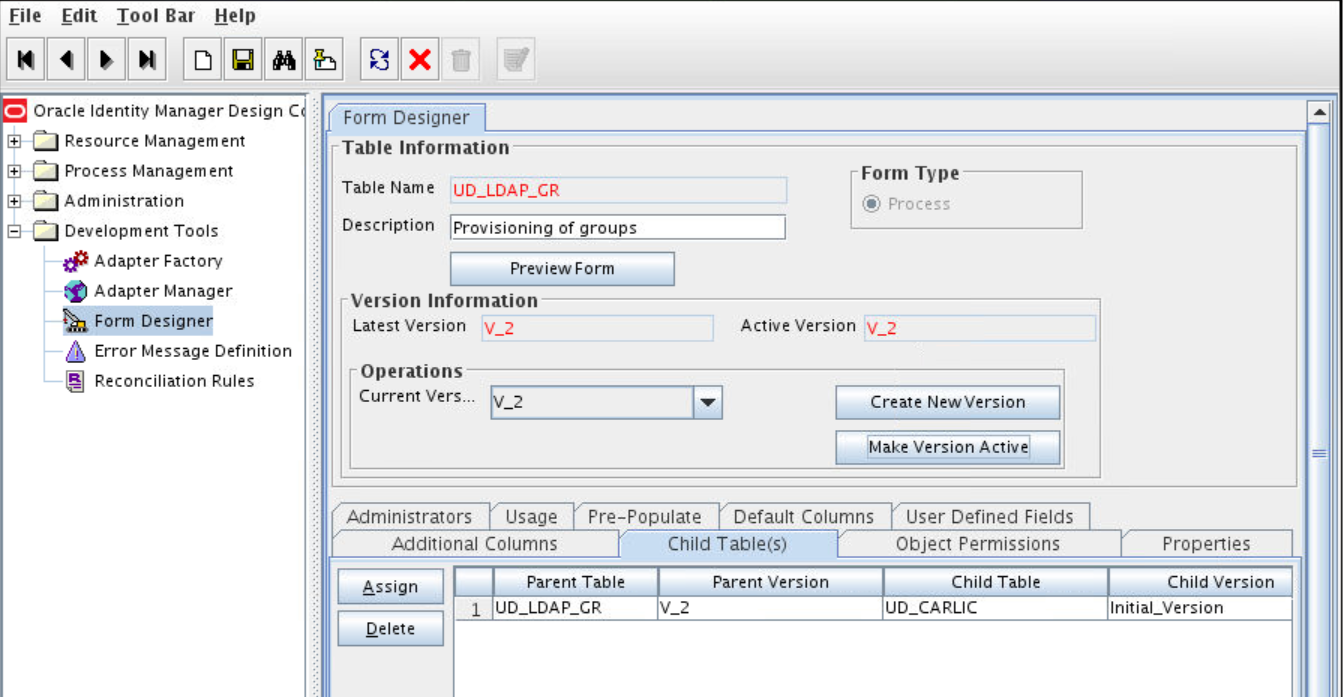
  3. Click the Child Table(s) tab.
  4. Click Assign.
  5. In the Assign Child Tables dialog box, select the newly created child form, click the right arrow, and then click OK.
  6. Click Save and then click Make Version Active. For example:
7.1.2.3 Associating a New Form With the Application Instance

If you are using Oracle Identity Manager release 11.1.2.x or later, then all changes made to the Form Designer of the Design Console must be done in a new UI form.

To do so:
  1. Log in to Oracle Identity System Administration.
  2. Create and active a sandbox.
  3. Create a new UI form to view the newly added field along with the rest of the fields.
  4. Associate the newly created UI form with the application instance of your target system. To do so, open the existing application instance for your resource, from the Form field, select the form (created in Step 4.c), and then save the application instance.
  5. Publish the sandbox.

See Also:

7.1.2.4 Adding the New Multivalued Field to the Resource Object Reconciliation Fields

Add the new multivalued field to the list of reconciliation fields in the resource object.

  1. Expand Resource Management and then double-click Resource Objects.
  2. Search for and open one of the following resource objects:
    • For groups: LDAP Group or OID Group
    • For organizational units: LDAP Organizational Unit or OID Organizational Unit
    • For roles: LDAP Role
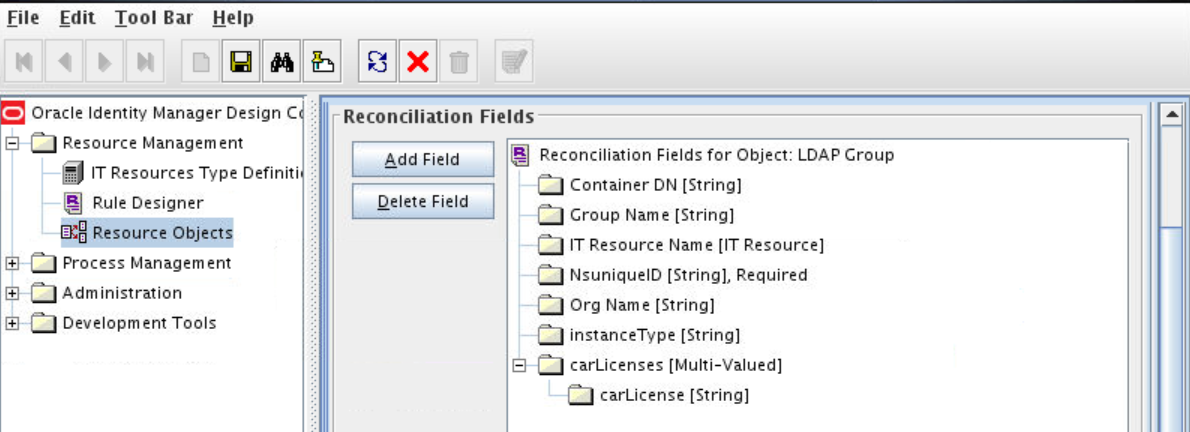
  3. On the Object Reconciliation tab, click Add Field.
  4. In the Add Reconciliation Fields dialog box, enter the details of the field.

    For example, enter carlicenses in the Field Name field and select Multi-Valued Attribute from the Field Type list.

  5. Click Save and then close the dialog box.
  6. Right-click the newly created field and select Define Property Fields.
  7. In the Add Reconciliation Fields dialog box, enter the details of the newly created field.

    For example, enter carlicense in the Field Name field and select String from the Field Type list.

  8. Click Save, and then close the dialog box.
  9. Click Create Reconciliation Profile. This copies changes made to the resource object into the MDS.
7.1.2.5 Creating an Entry for the Field in the Lookup Definition for Reconciliation

Create an entry for the newly added field in the lookup definition for reconciliation.

To do so:
  1. Expand Administration and then double-click Lookup Definition.
  2. Search for and open one of the following lookup definitions:
    • For groups: Lookup.LDAP.Group.ReconAttrMap or Lookup.OID.Group.ReconAttrMap
    • For organizational units: Lookup.LDAP.OU.ReconAttrMap or Lookup.OID.OU.ReconAttrMap
    • For roles: Lookup.LDAP.Role.ReconAttrMap

    Note:

    For the target system fields, you must use the same case (uppercase or lowercase) as given on the target system. This is because the field names are case-sensitive.

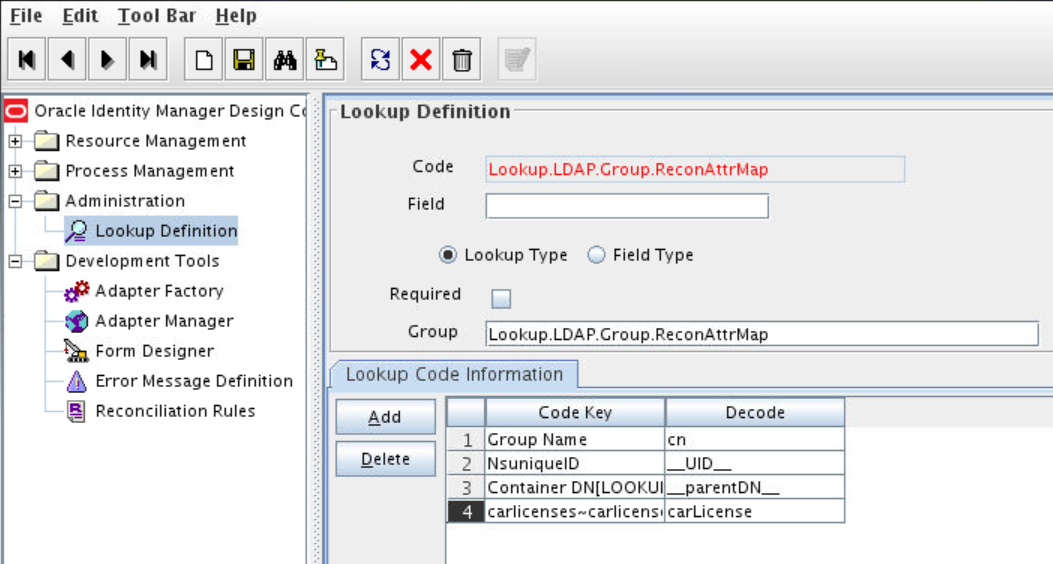
  3. Click Add and enter the Code Key and Decode values for the field, and then Click Save. The Code Key and Decode values must be in the following format:

    Code Key: MULTIVALUED_FIELD_NAME~CHILD_RESOURCE_OBJECT_FIELD_NAME

    Decode: Corresponding target system attribute.

    For example, enter carlicenses~carlicense in the Code Key field and then enter carlicense in the Decode field.

7.1.2.6 Creating a Reconciliation Field Mapping for the New Field

Create a reconciliation field mapping for the newly added field.

To do so:
  1. Expand Process Management and double-click Process Definition.
  2. Search for and open one of the following process definitions:
    • For groups: LDAP Group or OID Group
    • For organizational units: LDAP Organizational Unit or OID Organizational Unit
    • For roles: LDAP Role
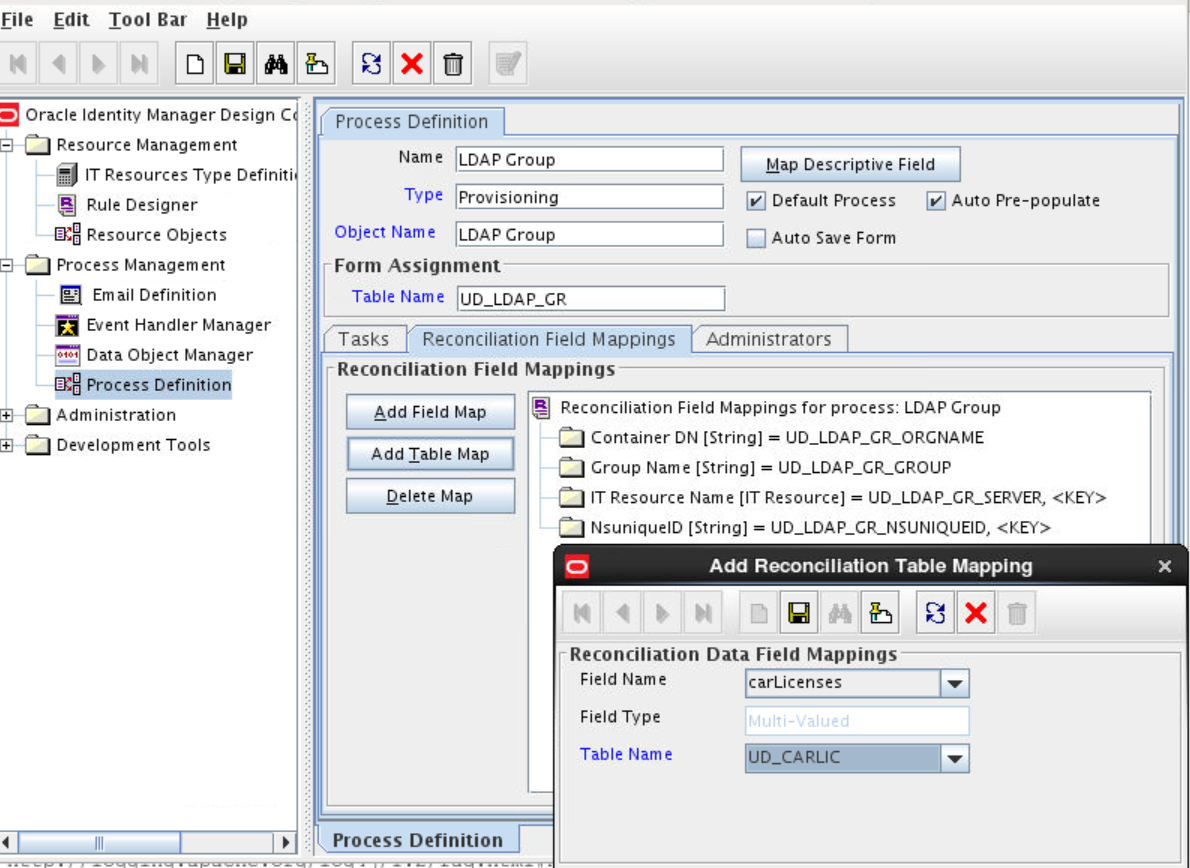
  3. On the Reconciliation Field Mappings tab of one of the following process definitions, click Add Table Map:
    • For groups: LDAP Group or OID Group
    • For organizational units: LDAP Organizational Unit or OID Organizational Unit
    • For roles: LDAP Role
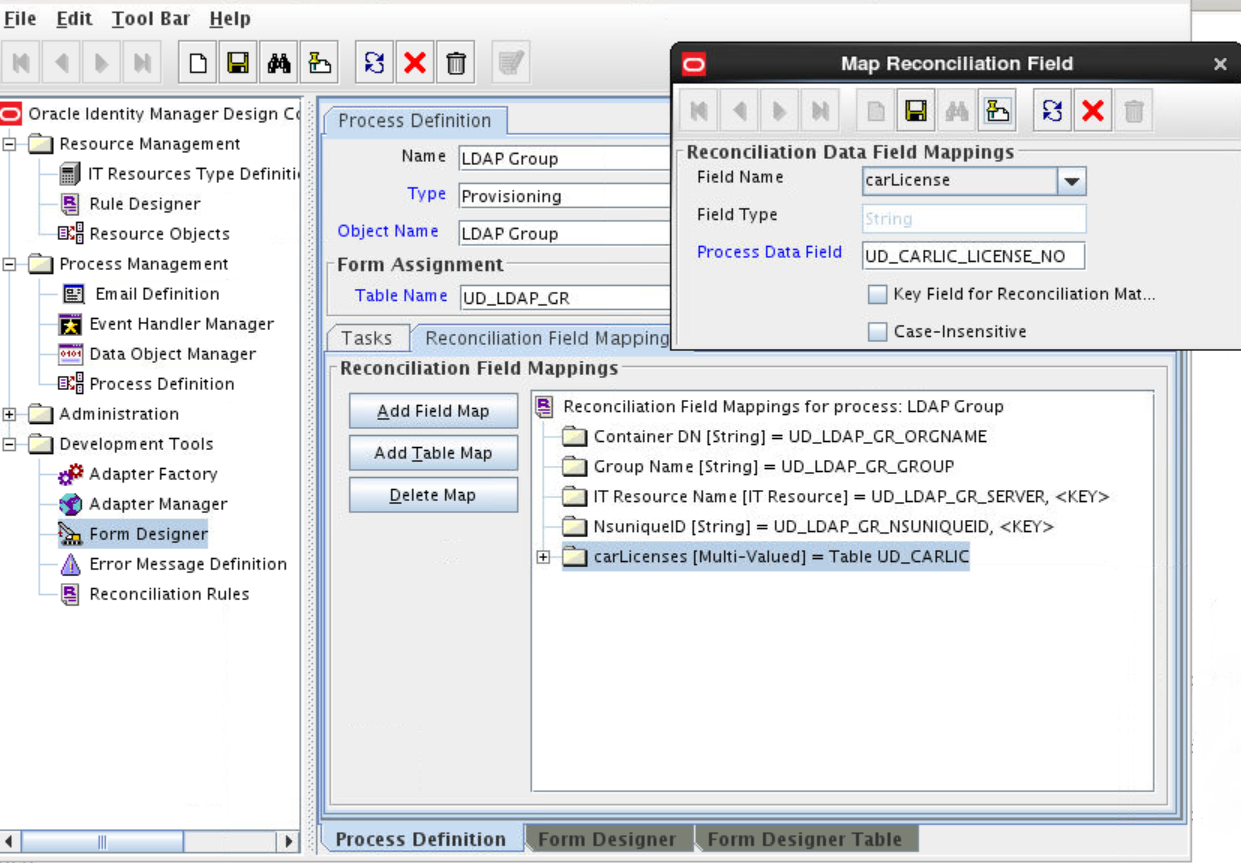
  4. In the Add Reconciliation Table Mapping dialog box, select the field name and table name from the list, click Save, and then close the dialog box. For example:
  5. Right-click the newly created field, and select Define Property Field Map.
  6. In the Field Name field, select the value for the field that you want to add.
  7. Double-click the Process Data Field field, and then select UD_CARLICEN.
  8. Select Key Field for Reconciliation Field Matching and click Save.

7.2 Adding New Multivalued Fields for Provisioning

You can add new multivalued fields for provisioning of users, groups, organizational units, and roles.

7.2.1 Adding New Multivalued Fields for User Provisioning

By default, the multivalued fields listed on the Schema page for your application in Identity Self Server are mapped for provisioning between Oracle Identity Governance and the target system. If required, you can add new multivalued fields for provisioning.

To add new multivalued fields for User provisioning:
  1. Log in to Oracle Identity System Administration and create a lookup that can hold the list of values for the multivalued field that you want to add.
  2. Create a child form and add attributes as follows:
    1. Log in to Identity Self Service.
    2. Search for and open the application you created for your target system for editing.
    3. On the Schema page, add a new child form and its attributes.

      For example, enter the following values:

      • Display Name: Car License

      • Target Attribute: carLicense

      • Ensure that the Recon Field option is selected.

      Note:

      • When you add attributes to the child form, from the Advanced Settings option, ensure to mark the newly added attribute as a Lookup.

      • In the List of values field, enter the name of the lookup created in Step 1.

    4. Apply your changes.
  3. Log in to Identity System Administration, create a new form and associate it with your application.

See Also:

  • Creating a Lookup Type in Oracle Fusion Middleware Administering Oracle Identity Governance for details about create lookups for your multivalued fields

  • Adding Child Forms in Oracle Fusion Middleware Performing Self Service Tasks with Oracle Identity Governance for information about creating a child form and adding attributes

  • Configuring Oracle Identity Governance for information about creating a new form and associating it with your application

7.2.2 Adding New Multivalued Fields for Groups, Organizational Units, and Roles Provisioning

By default, the multivalued fields listed in the respective lookup definitions are mapped for provisioning between Oracle Identity Governance and the target system. If required, you can add new multivalued fields for provisioning of groups, organizational units, and roles.

Note:

This section describes an optional procedure. Perform this procedure only if you want to add multivalued fields for provisioning of Groups, Organizational Units, or Roles.

Before starting the following procedure, perform the procedures described in Creating a Form for the Multivalued Field through Associating a New Form With the Application Instance. If these steps have been performed while adding new multivalued fields for target resource reconciliation, then you need not repeat the steps.

To add new multivalued fields for provisioning, perform the following procedures:

Note:

7.2.2.1 Creating an Entry for the Field in the Lookup Definition for Provisioning

Create an entry for the field in the lookup definition for provisioning as follows:

  1. Log in to Oracle Identity Manager Design Console.
  2. Expand Administration and double-click Lookup Definition.
  3. Search for and open one of the lookup definitions, depending on your target system:
    • For a group field, open Lookup.LDAP.Group.ProvAttrMap or Lookup.OID.Group.ProvAttrMap

    • For a organizational unit field, open Lookup.LDAP.OU.ProvAttrMap or Lookup.OID.OU.ProvAttrMap

    • For a role field, open Lookup.LDAP.Role.ProvAttrMap

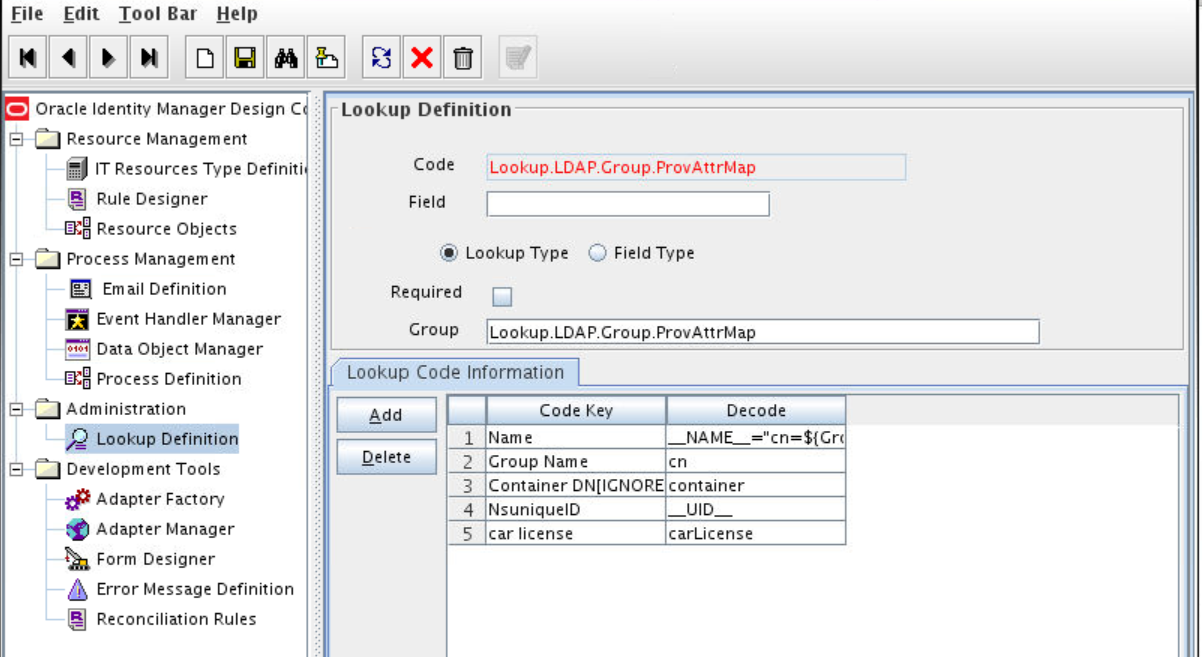
  4. Click Add and then enter the Code Key and Decode values for the field. The Code Key and Decode values must be in the following format:

    Code Key: CHILD_FORM_NAME~CHILD_FIELD_LABEL

    In this format, CHILD_FORM_NAME specifies the name of the child form. CHILD_FIELD_NAME specifies the name of the field on the OIM User child form in the Administrative and User Console.

    Decode: Corresponding target system attribute

    Note:

    For the target system fields, you must use the same case (uppercase or lowercase) as given on the target system. This is because the field names are case-sensitive.

    For example, enter UD_CARLICEN~Car License in the Code Key field and then enter carLicense in the Decode field.

7.2.2.2 Adding the Task for Provisioning Multivalued Attributes in the Process Definition

To add the task for provisioning multivalued attributes in the process definition, perform the following procedures:

7.2.2.2.1 Updating the Process Definition

In the process definition, add the task for provisioning multivalued attributes as follows:

  1. Expand Process Management.
  2. Double-click Process Definition.
  3. Search for and open one of the following process definitions:
    • For groups: LDAP Group or OID Group
    • For organizational units: LDAP Organizational Unit or OID Organizational Unit
    • For roles: LDAP Role
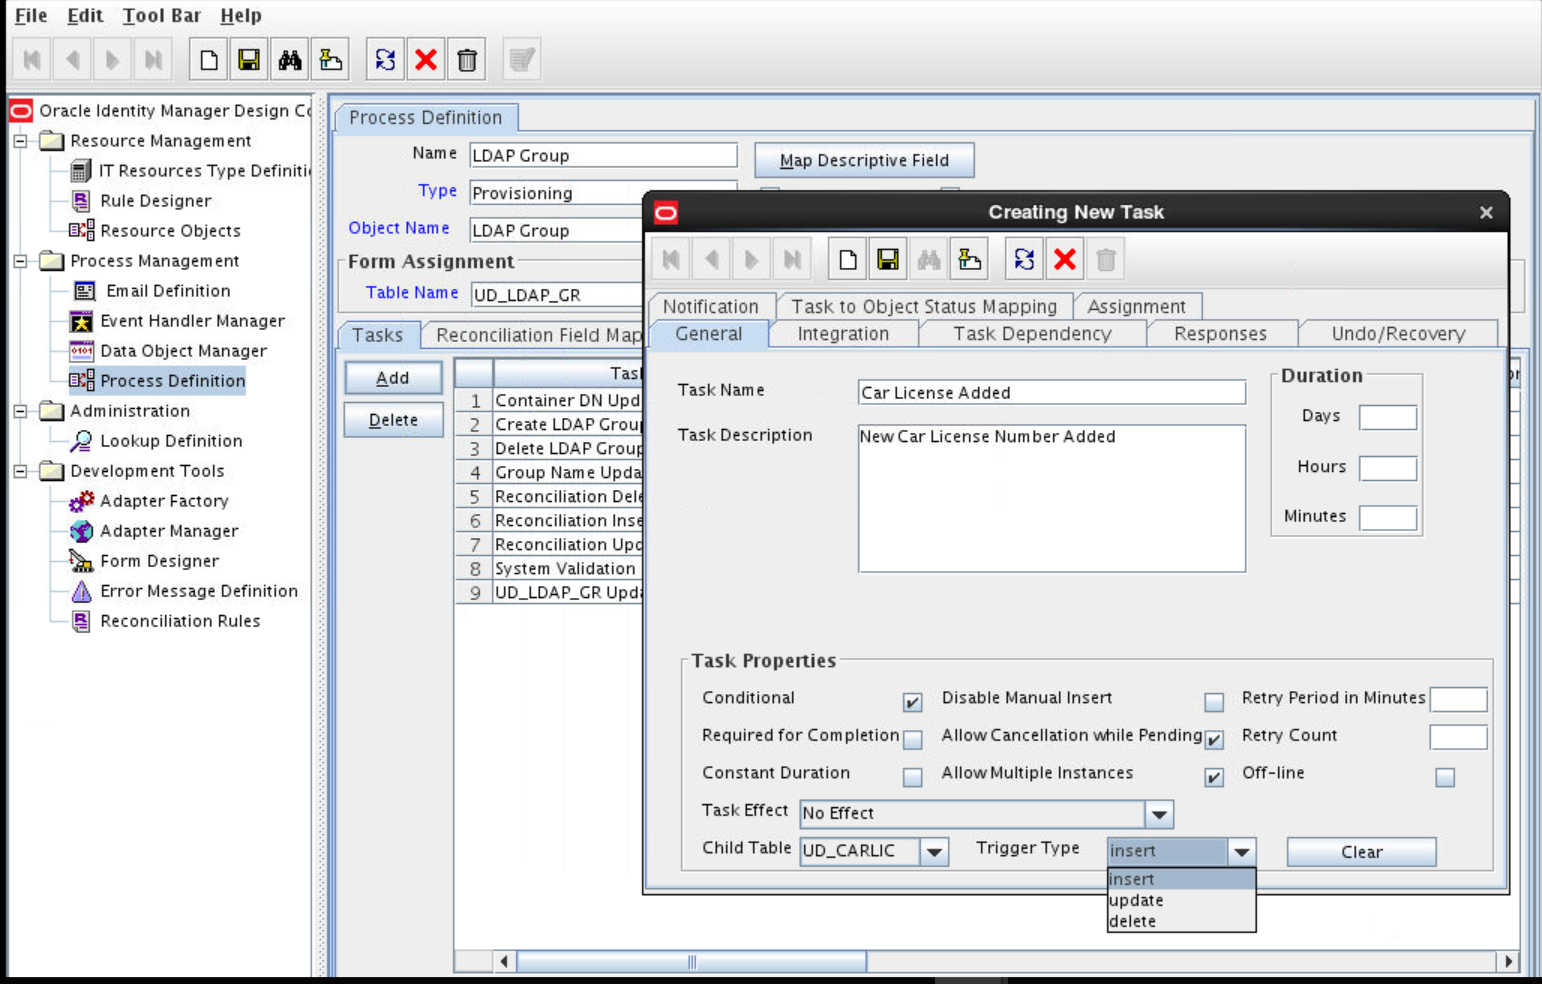
  4. Click Add and enter the task name and description. For example, enter Car License Added as the task name and task description.
  5. In the Task Properties section, select the following:
  6. Click Save.
7.2.2.2.2 Selecting the Adapter

Select the adapter as follows:

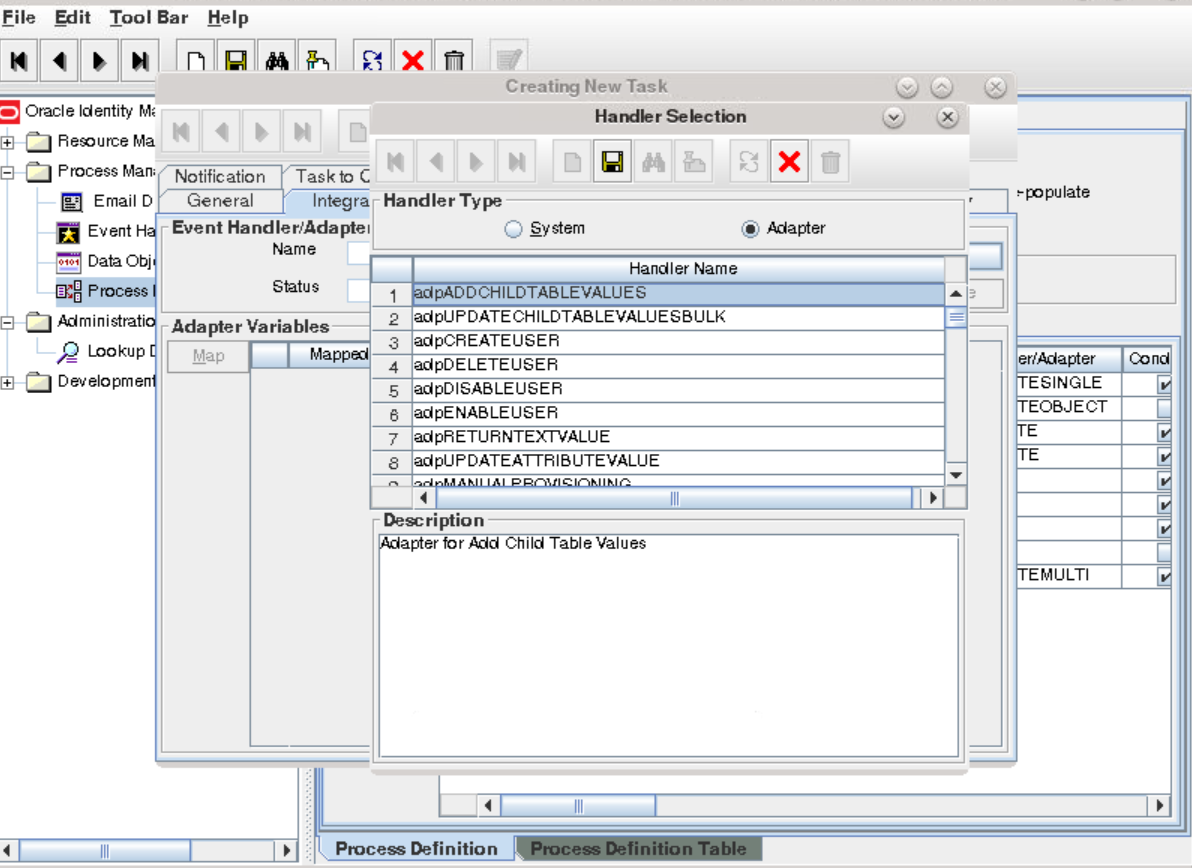
  1. On the Integration tab in the one of the following provisioning processes, click Add and then select Adapter:
    • For groups: LDAP Group or OID Group
    • For organizational units: LDAP Organizational Unit or OID Organizational Unit

    From the list of adapters, select adpLDAPADDCHILDTABLEVALUE or adpOIDADDCHILDTABLEVALUE.

  2. Click Save and then close the dialog box.
7.2.2.2.3 Creating the Adapter Variables Mapping
Create the adapter variables mapping as follows:
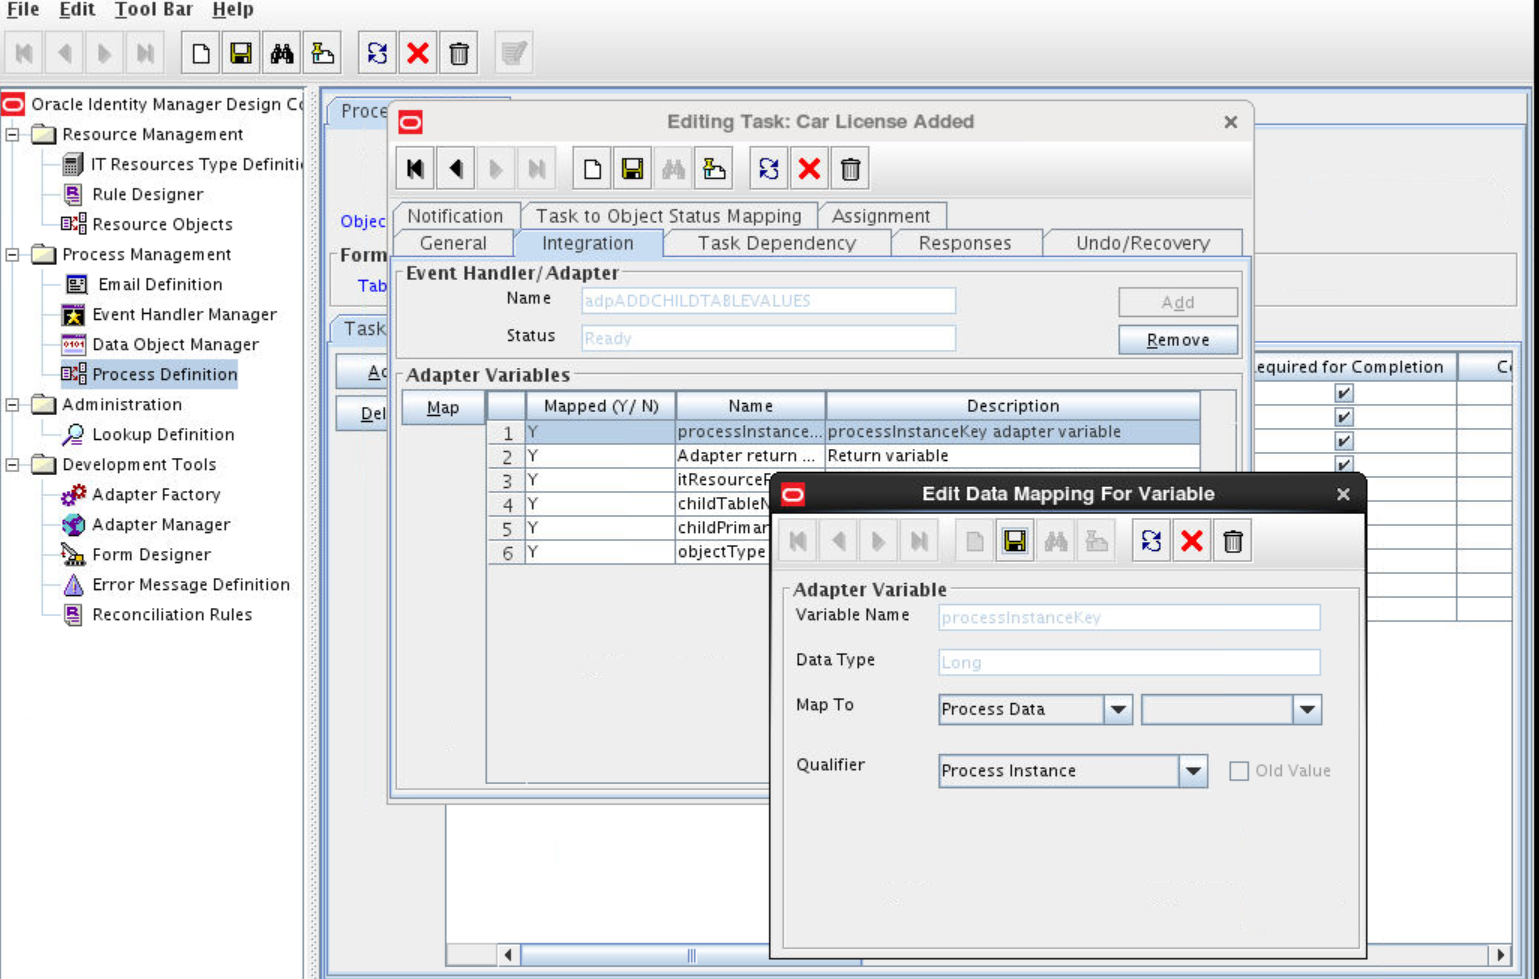
  1. In the Adapter Variables region, click the procInstanceKey variable.
  2. In the dialog box that is displayed, create the following mapping:
    • Variable Name: procInstanceKey

    • Map To: Process Data

    • Qualifier: Process Instance

    For example:

  3. Click Save and close the dialog box.
  4. Perform one of the following steps:

    For groups:

    Repeat Steps 1 through 3 for all the variables listed in the following table. This table lists values that you must select from the Map To, Qualifier, and Literal Value lists for each variable:

    Variable Map To Qualifier Literal Value

    procInstanceKey

    Process Data

    Process Instance

    NA

    Adapter Return Variable

    Response Code

    NA

    NA

    itResourceName

    Literal

    String

    UD_LDAP_USR_SERVER, UD_OID_USR_SERVER, or UD_EDIR_USR_SERVER

    childTableName

    Literal

    String

    UD_CHILD_PROCESS_FORM_NAME

    objectType

    Literal

    String

    Group

    childPrimarykey

    Process Data (Child Table

    description)

    Child Primary Key

    NA

    For organizational units:

    Repeat Steps 1 through 3 for all the variables listed in the following table. This table lists values that you must select from the Map To, Qualifier, and Literal Value lists for each variable:

    Variable Map To Qualifier Literal Value

    procInstanceKey

    Process Data

    Process Instance

    NA

    Adapter Return Variable

    Response Code

    NA

    NA

    itResourceName

    Literal

    String

    UD_LDAP_USR_SERVER, UD_OID_USR_SERVER, or UD_EDIR_USR_SERVER

    childTableName

    Literal

    String

    UD_CHILD_PROCESS_FORM_NAME

    objectType

    Literal

    String

    OU

    childPrimarykey

    Process Data (Child Table

    description)

    Child Primary Key

    NA

  5. On the Responses tab, click Add to add at least the SUCCESS response code, with Status C. This ensures that if the custom task is successfully run, then the status of the task is displayed as Completed.
  6. Click the Save icon, close the dialog box, and then save the process definition.
7.2.2.2.4 Updating the Process Tasks

Update the process tasks as follows:

  1. Add the Car License Update process task by performing the procedures described in Updating the Process Definition through Creating the Adapter Variables Mapping with the following difference:
    • While performing Step 5 of Updating the Process Definition, instead of selecting UD_CARLICEN from the Child Table list, select UD_CARLICN. Similarly, instead of selecting Insert from the Trigger Type list, select Update.

    • While performing Step 4 of Creating the Adapter Variables Mapping, the childPrimarykey variable will not appear. Instead, map the following variable with its respective values in addition to the other variables:

      Variable Map To Qualifier Literal Value

      taskInstanceKey

      Task Information

      Task Instance Key

      NA

  2. Add the Car License Delete process task by performing the procedures described in Updating the Process Definition through Creating the Adapter Variables Mapping with the following difference:
    • While performing Step 5 of Updating the Process Definition, instead of selecting UD_CARLICEN from the Child Table list, select UD_CARLICN. Similarly, instead of selecting Insert from the Trigger Type list, select Delete.

    • While performing Step 4 of Creating the Adapter Variables Mapping, the childPrimarykey variable will not appear. Instead, map the following variable with its respective values in addition to the other variables:

      Variable Map To Qualifier Literal Value

      taskInstanceKey

      Task Information

      Task Instance Key

      NA

  3. Click Save on Process Task.

    Note:

    During a provisioning operation, you can either add or remove values of multivalued fields. You cannot update these values.

7.2.2.3 Updating the Request Dataset

Update the request dataset.

Note:

Perform the steps in this section and Running the PurgeCache Utility and Importing the Request Dataset Definition to MDS only if you enabled request-based provisioning.

When you add an attribute on the process form, you also update the XML file containing the request dataset definitions. To update a request dataset:

  1. In a text editor, open the XML file located in the OIM_HOME/DataSet/file directory for editing.
  2. Add the AttributeReference element and specify values for the mandatory attributes of this element.

    For example, if you added Car License as an attribute on the process form, then enter the following line:

    <AttributeReference
    name = "Car License"
    attr-ref = "Car License"
    type = "String"
    widget = "text"
    length = "50"
    available-in-bulk = "false"/>
    

    In this AttributeReference element:

    • For the name attribute, enter the value in the Name column of the process form without the tablename prefix.

      For example, if UD_CAR_LICENSE is the value in the Name column of the process form, then you must specify Car License as the value of the name attribute in the AttributeReference element.

    • For the attr-ref attribute, enter the value that you entered in the Field Label column of the process form.

    • For the type attribute, enter the value that you entered in the Variant Type column of the process form.

    • For the widget attribute, enter the value that you entered in the Field Type column of the process form.

    • For the length attribute, enter the value that you entered in the Length column of the process form.

    • For the available-in-bulk attribute, specify true if the attribute must be available during bulk request creation or modification. Otherwise, specify false.

    If you add more than one attribute on the process form, then repeat this step for each attribute added.

  3. Save and close the XML file.
7.2.2.4 Running the PurgeCache Utility and Importing the Request Dataset Definition to MDS

Run the PurgeCache utility to clear content related to request datasets from the server cache.

See Purging Cache in Oracle Fusion Middleware Administering Oracle Identity Governance for more information about the PurgeCache utility.

Import into MDS the request dataset definitions in XML format.

7.3 Configuring Transformation and Validation of Data

Configure transformation and validation of user account data by writing Groovy script logic while creating your application.

You can configure transformation of reconciled single-valued user data according to your requirements. For example, you can use First Name and Last Name values to create a value for the Full Name field in Oracle Identity Governance.

Similarly, you can configure validation of reconciled and provisioned single-valued data according to your requirements. For example, you can validate data fetched from the First Name attribute to ensure that it does not contain the number sign (#). In addition, you can validate data entered in the First Name field on the process form so that the number sign (#) is not sent to the target system during provisioning operations.

To configure transformation or validation of user account data, you must write Groovy scripts while creating your application. For more information about writing Groovy script-based validation and transformation logic, see Validation and Transformation of Provisioning and Reconciliation Attributes of Oracle Fusion Middleware Performing Self Service Tasks with Oracle Identity Governance.

7.4 Configuring the Connector for User-Defined Object Classes

By default, depending on the target system that you are using, the connector supports the Users, Groups, Organizational Units, or Roles object class. You can configure the connector for user-defined or custom object classes for connector operations.

Note:

This section describes an optional procedure. Perform this procedure only if you want to configure the connector for user-defined object classes.

To configure the connector for user-defined object classes:

  1. Create the object class and assign mandatory and optional attributes to the object class.

    Refer to the target system documentation for information about creating the object class.

    Note:

    Assign the user object class as the parent of the object class that you create.

  2. Refresh the schema.
  3. Add the mandatory and optional attributes of the object class for provisioning by performing the procedure described in Providing Schema Information for Target Application or Providing Schema Information for Authoritative Application of Oracle Fusion Middleware Performing Self Service Tasks with Oracle Identity Governance.
  4. In the Advanced Settings section for your application,.
    • Update the values for the objectClassesToSynchronize and accountObjectClasses parameters to include the new object class name.

    • Set the value of the readSchema parameter to true.

7.5 Configuring the Connector for Multiple Trusted Source Reconciliation

You can configure this connector for multiple installations of the target system by cloning applications which copies all configurations of the base application into the cloned application or by creating instance applications which shares the configurations as the base application.

For more information about these configurations, see Cloning Applications and Creating Instance Applications in Oracle Fusion Middleware Performing Self Service Tasks with Oracle Identity Governance.

Note:

Perform this procedure only if you want to configure the connector for multiple trusted source reconciliation.

The following are examples of scenarios in which there is more than one trusted source for user data in an organization:

  • One of the target systems is a trusted source for data about employees. The second target system is a trusted source for data about contractors. The third target system is a trusted source for data about interns.

  • One target system holds the data of some of the identity fields that constitute an OIG User. Two other systems hold data for the remaining identity fields. In other words, to create an OIM User, data from all three systems would need to be reconciled.

If the operating environment of your organization is similar to that described in either one of these scenarios, then this connector enables you to use the target system as one of the trusted sources of user data in your organization.

7.6 Configuring the Connector to Support POSIX Groups and Accounts

You can configure the connector to support POSIX groups (posixGroups) and POSIX accounts (posixAccounts).

Note:

You can perform this procedure only for a Target application.

After you complete this configuration:

  • The connector will support POSIX groups.

  • The sync reconciliation operation will not return the POSIX group membership changes. You must use the full search reconciliation task to get these changes.

To configure the connector to support POSIX groups and accounts:

  1. Log in to Identity Self Service.

  2. Search for and open the application you created for the connector for editing.

  3. In the Advanced Settings section for your application:

    1. Set the value of the maintainPosixGroupMembership parameter to true.

    2. Update the accountObjectClasses parameter to include "posixGroup","posixAccount".

    3. Update the objectClassesToSynchronize parameter to include "posixGroup","posixAccount".

    4. Set the value of the readSchema parameter to true.

  4. On the Schema page, update the table under the UserGroup section as follows:

    1. In the Target Attribute column, replace the ldapGroups value with posixGroups.

    2. Update the table to include the following values:

      Display Name Target Attribute Data Type Mandatory Provisioning Property? Recon Field? Key Field? Case Insensitive?

      GID NUMBER

      gidNumber

      String

      Yes

      Yes

      No

      No

      UID NUMBER

      uidNumber

      String

      Yes

      Yes

      No

      No

      HOME DIRECTORY

      homedirectory

      String

      Yes

      Yes

      No

      No

    3. Save your changes.

  5. Log in to Oracle Identity Design Console.

  6. In the Lookup.LDAP.Group.ProvAttrMap and Lookup.LDAP.Group.ReconAttrMap lookup definitions, add the following mapping as a String:

    GID NUMBER to gidNumber

    For OID, update the Lookup.OID.Group.ProvAttrMap and Lookup.OID.Group.ReconAttrMap lookup definitions.

  7. In the LDAP Group, OID Group, or eDirectory Group resource object, add the GID NUMBER field as follows:

    Select the group (LDAP Group, OID Group), Object Reconciliation, Add Field, and then add GID NUMBER.

  8. In the LDAP Group, OID Group, process form, add the GID NUMBER field.

  9. In the LDAP Group, OID Group, process definition, add the mapping as a String for GID Number.

  10. After you are finished, click Create Reconciliation Profile.
7.7 Using the Enable or Disable User Accounts Feature with OpenLDAP

Perform these steps in OpenLDAP to use the enable or disable user accounts feature with OpenLDAP.

  1. Ensure you have the following entries in /etc/openldap/slapd.conf:
    include         /etc/openldap/schema/ppolicy.schema
    modulepath /usr/lib64/openldap
    moduleload ppolicy.la
    overlay ppolicy
    ppolicy_default "cn=default,ou=Password 
    Policies,dc=example,dc=com"
    ppolicy_use_lockout
    
  2. Restart OpenLDAP.

    /etc/rc.d/init.d/ldap restart

  3. Create new file named /tmp/policy.ldif with the following content and modify it as needed:
    # add default policy to DIT
    # attributes preceded with # indicate the defaults and
    # can be omitted
    # passwords must be reset every 30 days,
    # have a minimum length of 6 and users will
    # get a expiry warning starting 1 hour before
    # expiry, when the consecutive fail attempts exceed 5
    # the count will be locked and can only be reset by an
    # administrator, users do not need to supply the old
    # password when changing
    dn: cn=default,ou=Password Policies,dc=example,dc=com
    objectclass: top
    objectclass: person
    objectClass: pwdPolicy
    cn: default
    pwdMaxAge: 2592000
    #pwdExpireWarning: 3600
    #pwdInHistory: 0
    #pwdCheckQuality: 0
    pwdMaxFailure: 5
    pwdLockout: TRUE
    #pwdLockoutDuration: 0
    #pwdGraceAuthNLimit: 0
    #pwdFailureCountInterval: 0
    pwdMustChange: TRUE
    pwdMinLength: 6
    #pwdAllowUserChange: TRUE
    pwdSafeModify: FALSE
    pwdAttribute: userPassword
    sn: default
    
  4. Import the policy to OpenLDAP. For example:
    ldapmodify -D cn=admin,dc=example,dc=com -W -a -f /tmp/policy.ldif
    
  5. Set the following advanced settings configuration values:
    enabledAttribute=pwdAccountLockedTime
    enabledValue=dummy
    disabledValue=000001010000Z
    enabledWhenNoAttribute=true
    allowOtherValuesForEnabledAttribute=true
    enabledWhenOtherValue=false
    

    Note:

    Enabling or disabling a user account might be server-specific. If you are using another LDAPv3-compliant directory server, check how this feature is implemented for that server.

    The connector behavior can be configured using the advanced settings parameters that are mentioned in Step 5, such as enabledAttribute, enabledValue, disabledValue, enabledWhenNoAttribute, allowOtherValuesForEnabledAttribute, and enabledWhenOtherValue.