4 Performing the Postconfiguration Tasks for the Google Apps Connector

These are the tasks that you can perform after creating an application in Oracle Identity Governance.

4.1 Configuring Oracle Identity Governance

During application creation, if you did not choose to create a default form, then you must create a UI form for the application that you created by using the connector.

Note:

Perform the procedures described in this section only if you did not choose to create the default form during creating the application.

The following topics describe the procedures to configure Oracle Identity Governance:

4.1.1 Creating and Activating a Sandbox

You must create and activate a sandbox to begin using the customization and form management features. You can then publish the sandbox to make the customizations available to other users.

See Creating a Sandbox and Activating a Sandbox in Oracle Fusion Middleware Developing and Customizing Applications for Oracle Identity Governance.

4.1.2 Creating a New UI Form

You can use Form Designer in Oracle Identity System Administration to create and manage application instance forms.

See Creating Forms By Using the Form Designer in Oracle Fusion Middleware Administering Oracle Identity Governance.

While creating the UI form, ensure that you select the resource object corresponding to the newly created application that you want to associate the form with. In addition, select the Generate Entitlement Forms check box.

4.1.3 Publishing a Sandbox

Before publishing a sandbox, perform this procedure as a best practice to validate all sandbox changes made till this stage as it is difficult to revert the changes after a sandbox is published.

  1. In Identity System Administration, deactivate the sandbox.

  2. Log out of Identity System Administration.

  3. Log in to Identity Self Service using the xelsysadm user credentials and then activate the sandbox that you deactivated in Step 1.

  4. In the Catalog, ensure that the application instance form for your resource appears with correct fields.

  5. Publish the sandbox. See Publishing a Sandbox in Oracle Fusion Middleware Developing and Customizing Applications for Oracle Identity Governance.

4.1.4 Updating an Existing Application Instance with a New Form

For any changes that you do in the schema of your application in Identity Self Service, you must create a new UI form and update the changes in an application instance.

To update an existing application instance with a new form:

  1. Create and activate a sandbox.

  2. Create a new UI form for the resource.

  3. Open the existing application instance.

  4. In the Form field, select the new UI form that you created.

  5. Save the application instance.

  6. Publish the sandbox.

See Also:

4.2 Harvesting Entitlements and Sync Catalog

You can populate Entitlement schema from child process form table, and harvest roles, application instances, and entitlements into catalog. You can also load catalog metadata.

To harvest entitlements and sync catalog:

  1. Run the scheduled jobs for lookup field synchronization listed in .
  2. Run the Entitlement List scheduled job to populate Entitlement Assignment schema from child process form table.
  3. Run the Catalog Synchronization Job scheduled job. See for more information about this scheduled job.

See Also:

  • Reconciliation Jobs for a list of jobs for entitlements (lookup field synchronization)

  • Predefined Scheduled Tasks in Oracle Fusion Middleware Administering Oracle Identity Governance for information about the Entitlement List and Catalog Synchronization Job scheduled jobs

4.3 Managing Logging

Oracle Identity Governance uses Oracle Java Diagnostic Logging (OJDL) for recording all types of events pertaining to the connector. OJDL is based on java.util.logger.

The following topics provide detailed information about logging:

4.3.1 Understanding Log Levels

When you enable logging, Oracle Identity Governance automatically stores in a log file information about events that occur during the course of provisioning and reconciliation operations.

ODL is the principle logging service used by Oracle Identity Governance and is based on java.util.logger. To specify the type of event for which you want logging to take place, you can set the log level to one of the following:

  • SEVERE.intValue()+100

    This level enables logging of information about fatal errors.

  • SEVERE

    This level enables logging of information about errors that might allow Oracle Identity Governance to continue running.

  • WARNING

    This level enables logging of information about potentially harmful situations.

  • INFO

    This level enables logging of messages that highlight the progress of the application.

  • CONFIG

    This level enables logging of information about fine-grained events that are useful for debugging.

  • FINE, FINER, FINEST

    These levels enable logging of information about fine-grained events, where FINEST logs information about all events.

These message types are mapped to ODL message type and level combinations as shown in Table 4-2.

Table 4-1 Log Levels and ODL Message Type:Level Combinations

Java Level ODL Message Type:Level

SEVERE.intValue()+100

INCIDENT_ERROR:1

SEVERE

ERROR:1

WARNING

WARNING:1

INFO

NOTIFICATION:1

CONFIG

NOTIFICATION:16

FINE

TRACE:1

FINER

TRACE:16

Table 4-2 Log Levels and ODL Message Type:Level Combinations

Java Level ODL Message Type:Level

SEVERE.intValue()+100

INCIDENT_ERROR:1

SEVERE

ERROR:1

WARNING

WARNING:1

INFO

NOTIFICATION:1

CONFIG

NOTIFICATION:16

FINE

TRACE:1

FINER

TRACE:16

FINEST

TRACE:32

The configuration file for OJDL is logging.xml, which is located at the following path:

DOMAIN_HOME/config/fmwconfig/servers/OIM_SERVER/logging.xml

Here, DOMAIN_HOME and OIM_SERVER are the domain name and server name specified during the installation of Oracle Identity Governance.

4.3.2 Enabling Logging

Perform this procedure to enable logging in Oracle WebLogic Server.

  1. Edit the logging.xml file as follows:
    1. Add the following blocks in the file:
      <log_handler name='googleapps-handler' level='[LOG_LEVEL]' class='oracle.core.ojdl.logging.ODLHandlerFactory'>
      <property name='logreader:' value='off'/>
           <property name='path' value='[FILE_NAME]'/>
           <property name='format' value='ODL-Text'/>
           <property name='useThreadName' value='true'/>
           <property name='locale' value='en'/>
           <property name='maxFileSize' value='5242880'/>
           <property name='maxLogSize' value='52428800'/>
           <property name='encoding' value='UTF-8'/>
         </log_handler>
      
      <logger name="ORG.IDENTITYCONNECTORS.GOOGLEAPPS" level="[LOG_LEVEL]" useParentHandlers="false">
           <handler name="googleapps-handler"/>
           <handler name="console-handler"/>
         </logger>
      
    2. Replace both occurrences of [LOG_LEVEL] with the ODL message type and level combination that you require.Table 4-2 lists the supported message type and level combinations.

      Similarly, replace [FILE_NAME] with the full path and name of the log file in which you want log messages to be recorded.

      The following blocks show sample values for [LOG_LEVEL] and [FILE_NAME]:

      <log_handler name='googleapps-handler' level='NOTIFICATION:1' class='oracle.core.ojdl.logging.ODLHandlerFactory'>
      <property name='logreader:' value='off'/>
           <property name='path' value='F:\MyMachine\middleware\user_projects\domains\base_domain1\servers\oim_server1\logs\oim_server1-diagnostic-1.log'/>
           <property name='format' value='ODL-Text'/>
           <property name='useThreadName' value='true'/>
           <property name='locale' value='en'/>
           <property name='maxFileSize' value='5242880'/>
           <property name='maxLogSize' value='52428800'/>
           <property name='encoding' value='UTF-8'/>
         </log_handler>
      
      <logger name="ORG.IDENTITYCONNECTORS.GOOGLEAPPS" level="NOTIFICATION:1" useParentHandlers="false">
           <handler name="googleapps-handler"/>
           <handler name="console-handler"/>
         </logger>
      

      With these sample values, when you use Oracle Identity Manager, all messages generated for this connector that are of a log level equal to or higher than the NOTIFICATION:1 level are recorded in the specified file.

  2. Save and close the file.
  3. Set the following environment variable to redirect the server logs to a file:
    • For Microsoft Windows:

      set WLS_REDIRECT_LOG=FILENAME
      
    • For UNIX:

      export WLS_REDIRECT_LOG=FILENAME
      

    Replace FILENAME with the location and name of the file to which you want to redirect the output.

  4. Restart the application server.

4.4 Creating the IT Resource for the Connector Server

Perform the procedure described in this section only if you have deployed the connector bundle remotely in a Connector Server.

To create the IT resource for the Connector Server:
  1. Log in to Identity System Administration, and then in the left pane, under Configuration, click IT Resource.
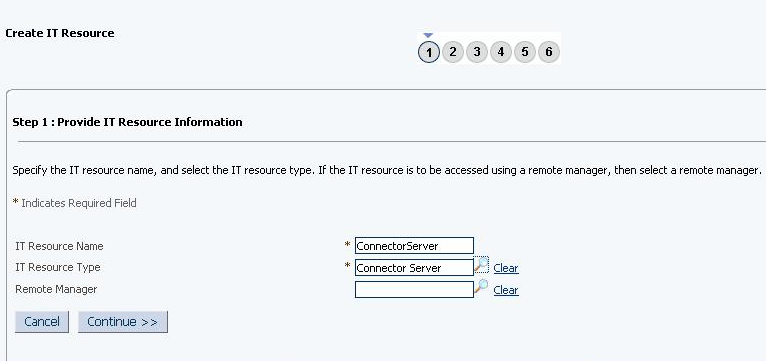
  2. On the Step 1: Provide IT Resource Information page, perform the following steps:
    • IT Resource Name: Enter a name for the IT resource.

    • IT Resource Type: Select Connector Server from the IT Resource Type list.

    • Remote Manager: Do not enter a value in this field.

  3. Click Continue. Figure 4-1 shows the IT resource values added on the Create IT Resource page.

    Figure 4-1 Step 1: Provide IT Resource Information

    Description of Figure 4-1 follows
    Description of "Figure 4-1 Step 1: Provide IT Resource Information"
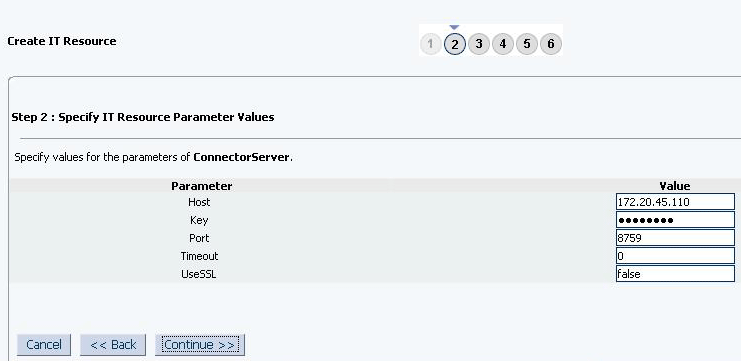
  4. On the Step 2: Specify IT Resource Parameter Values page, specify values for the parameters of the IT resource and then click Continue. Figure 4-2 shows the Step 2: Specify IT Resource Parameter Values page.

    Figure 4-2 Step 2: Specify IT Resource Parameter Values

    Description of Figure 4-2 follows
    Description of "Figure 4-2 Step 2: Specify IT Resource Parameter Values"

    Table 4-3 provides information about the parameters of the IT resource.

    Table 4-3 Parameters of the IT Resource for the Connector Server

    Parameter Description

    Host

    Enter the host name or IP address of the computer hosting the connector server.

    Sample value: RManager

    Key

    Enter the key for the Java connector server.

    Port

    Enter the number of the port at which the connector server is listening.

    Default value: 8759

    Timeout

    Enter an integer value which specifies the number of milliseconds after which the connection between the connector server and Oracle Identity Manager times out.

    Sample value: 300

    UseSSL

    Enter true to specify that you will configure SSL between Oracle Identity Manager and the Connector Server. Otherwise, enter false.

    Default value: false

    Note: It is recommended that you configure SSL to secure communication with the connector server. To configure SSL, see Configuring SSL for Java Connector Server in Oracle Fusion Middleware Developing and Customizing Applications for Oracle Identity Governance.

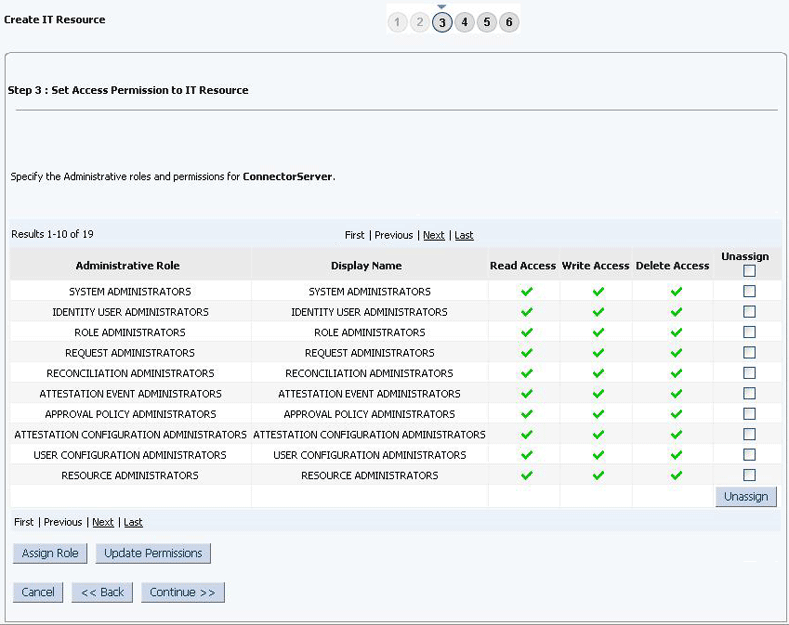
  5. On the Step 3: Set Access Permission to IT Resource page, the SYSTEM ADMINISTRATORS group is displayed by default in the list of groups that have Read, Write, and Delete permissions on the IT resource that you are creating.

    Note:

    This step is optional.

    If you want to assign groups to the IT resource and set access permissions for the groups, then:

    1. Click Assign Group.
    2. For the groups that you want to assign to the IT resource, select Assign and the access permissions that you want to set. For example, if you want to assign the ALL USERS group and set the Read and Write permissions to this group, then you must select the respective check boxes in the row, as well as the Assign check box, for this group.
    3. Click Assign.
  6. On the Step 3: Set Access Permission to IT Resource page, if you want to modify the access permissions of groups assigned to the IT resource, then:

    Note:

    • This step is optional.

    • You cannot modify the access permissions of the SYSTEM ADMINISTRATORS group. You can modify the access permissions of only other groups that you assign to the IT resource.

    1. Click Update Permissions.
    2. Depending on whether you want to set or remove specific access permissions for groups displayed on this page, select or deselect the corresponding check boxes.
    3. Click Update.
  7. On the Step 3: Set Access Permission to IT Resource page, if you want to unassign a group from the IT resource, then:

    Note:

    • This step is optional.

    • You cannot unassign the SYSTEM ADMINISTRATORS group. You can unassign only other groups that you assign to the IT resource.

    1. Select the Unassign check box for the group that you want to unassign.
    2. Click Unassign.
  8. Click Continue. Figure 4-3 shows the Step 3: Set Access Permission to IT Resource page.

    Figure 4-3 Step 3: Set Access Permission to IT Resource

    Description of Figure 4-3 follows
    Description of "Figure 4-3 Step 3: Set Access Permission to IT Resource"
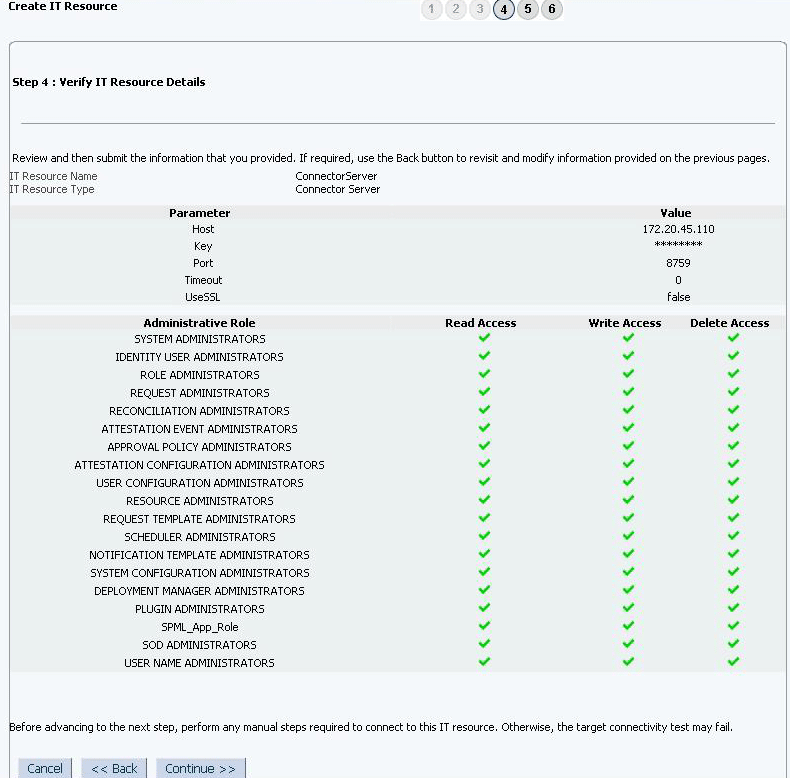
  9. On the Step 4: Verify IT Resource Details page, review the information that you provided on the first, second, and third pages. If you want to make changes in the data entered on any page, click Back to revisit the page and then make the required changes.
  10. To proceed with the creation of the IT resource, click Continue. Figure 4-4 shows Step 4: Verify IT Resource Details page.

    Figure 4-4 Step 4: Verify IT Resource Details

    Description of Figure 4-4 follows
    Description of "Figure 4-4 Step 4: Verify IT Resource Details"
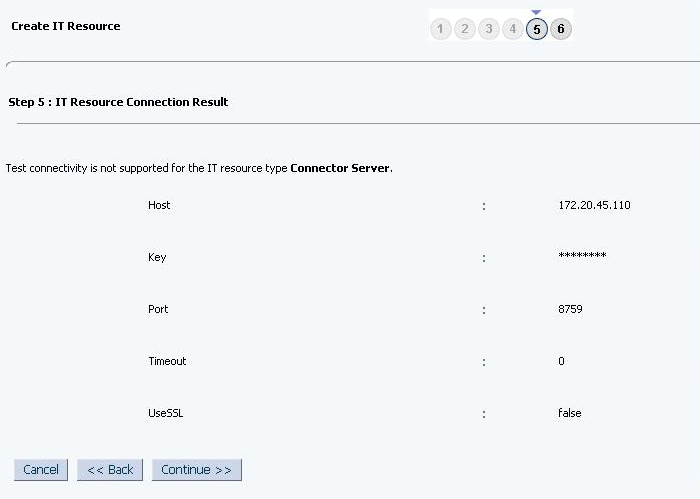
  11. The Step 5: IT Resource Connection Result page displays the results of a connectivity test that is run using the IT resource information. If the test is successful, then click Continue. If the test fails, then you can perform one of the following steps:
    • Click Back to revisit the previous pages and then make corrections in the IT resource creation information.

    • Click Cancel to stop the procedure, and then begin from the first step onward.

    Figure 4-5 shows the Step 5: IT Resource Connection Result page.

    Figure 4-5 Step 5: IT Resource Connection Result

    Description of Figure 4-5 follows
    Description of "Figure 4-5 Step 5: IT Resource Connection Result"
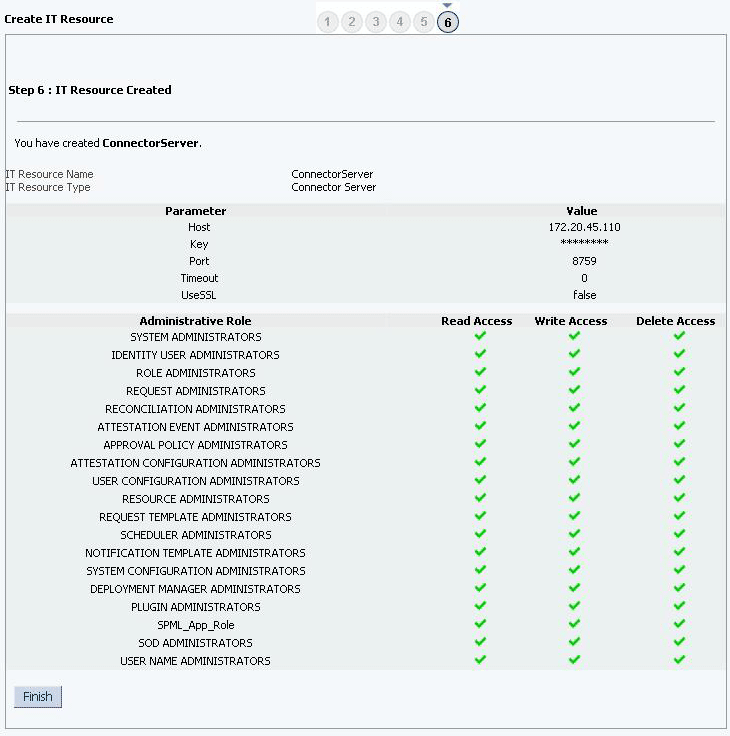
  12. Click Finish. Figure 4-6 shows the IT Resource Created Page.

    Figure 4-6 Step 6: IT Resource Created

    Description of Figure 4-6 follows
    Description of "Figure 4-6 Step 6: IT Resource Created"

4.5 Localizing Field Labels in UI Forms

You can localize UI form field labels by using the resource bundle corresponding to the language you want to use. The resource bundles are available in the connector installation media.

To localize field label that you add to in UI forms:
  1. Log in to Oracle Enterprise Manager.
  2. In the left pane, expand Application Deployments and then select oracle.iam.console.identity.sysadmin.ear.
  3. In the right pane, from the Application Deployment list, select MDS Configuration.
  4. On the MDS Configuration page, click Export and save the archive (oracle.iam.console.identity.sysadmin.ear_V2.0_metadata.zip) to the local computer.
  5. Extract the contents of the archive, and open one of the following files in a text editor if you are using Oracle Identity Manager 11g Release 2 PS3 (11.1.2.3.0) and later:

    SAVED_LOCATION\xliffBundles\oracle\iam\ui\runtime\BizEditorBundle_en.xlf

  6. Edit the BizEditorBundle.xlf file in the following manner:
    1. Search for the following text:
      <file source-language="en"  
      original="/xliffBundles/oracle/iam/ui/runtime/BizEditorBundle.xlf"
      datatype="x-oracle-adf">
      
    2. Replace with the following text:
      <file source-language="en" target-language="LANG_CODE"
      original="/xliffBundles/oracle/iam/ui/runtime/BizEditorBundle.xlf"
      datatype="x-oracle-adf">
      

      In this text, replace LANG_CODE with the code of the language that you want to localize the form field labels. The following is a sample value for localizing the form field labels in Japanese:

      <file source-language="en" target-language="ja"
      original="/xliffBundles/oracle/iam/ui/runtime/BizEditorBundle.xlf"
      datatype="x-oracle-adf">
      
    3. Search for the application instance code. This procedure shows a sample edit for Oracle Database application instance. The original code is:
      <trans-unit id="${adfBundle['oracle.adf.businesseditor.model.util.BaseRuntimeResourceBundle']['persdef.sessiondef.oracle.iam.ui.runtime.form.model.user.entity.userEO.UD_AD_USERNAME__c_description']}">
      <source>Username</source>
      </target>
      </trans-unit>
      <trans-unit id="sessiondef.oracle.iam.ui.runtime.form.model.googleapps.entity.googleappsEO.UD_GA_USR_ACCOUNT_NAME__c">
      <source>Username</source>
      </target>
      </trans-unit>
      
    4. Open the resource file from the connector package, for example GoogleApps_ja.properties, and get the value of the attribute from the file, for example, global.udf.UD_GA_USR_ACCOUNT_NAME=\u30A2\u30AB\u30A6\u30F3\u30C8\u540D.
    5. Replace the original code shown in Step 6.c with the following:
      <trans-unit id="${adfBundle['oracle.adf.businesseditor.model.util.BaseRuntimeResourceBundle']['persdef.sessiondef.oracle.iam.ui.runtime.form.model.user.entity.userEO.UD_GA_USR_ACCOUNT_NAME__c_description']}">
      <source>Account Name</source>
      <target>u30A2\u30AB\u30A6\u30F3\u30C8\u540D</target>
      </trans-unit>
      <trans-unit id="sessiondef.oracle.iam.ui.runtime.form.model.googleapps.entity.googleappsEO.UD_GA_USR_ACCOUNT_NAME__c_LABEL">
      <source>Account Name</source>
      <target>\u30A2\u30AB\u30A6\u30F3\u30C8\u540D</target>
      </trans-unit>
      
    6. Repeat steps 6.a through 6.d. for all attributes of the process form.
    7. Save the file as BizEditorBundle_LANG_CODE.xlf. In this file name, replace LANG_CODE with the code of the language to which you are localizing.

      Sample file name: BizEditorBundle_ja.xlf.

  7. Repackage the ZIP file and import it into MDS.

    See Also:

    Deploying and Undeploying Customizations in Oracle Fusion Middleware Developing and Customizing Applications for Oracle Identity Governance for more information about exporting and importing metadata files

  8. Log out of and log in to Oracle Identity Governance.