14 Managing Lookups

You can manage lookups from the Identity System Administration. However, lookup queries are not supported. Managing lookups include searching lookup type, creating lookup type, and modifying lookup type.

This chapter describes how to manage lookups in Oracle Identity Manager by using the Form Designer in the Oracle Identity System Administration.

The Form Designer in the Oracle Identity System Administration enables you to perform the following:

14.1 Searching a Lookup Type

Use the Search and Select: Lookup Type Window to search for lookup types.

To search for a lookup type:

  1. Login to Oracle Identity System Administration.
  2. In the left pane, under System Configuration, click Lookups. The Search and Select: Lookup Type window is displayed.
  3. Select any one of the following options:
    • All: On selecting this option, the search is performed with the AND condition. This means that the search operation is successful only when all the search criteria specified are matched.

    • Any: On selecting this option, the search is performed with the OR condition. This means that the search operation is successful when any search criterion specified is matched.

  4. In the Meaning field, enter the humanly readable description of the lookup value you want to search.

    Note:

    Meaning is the decoded value, and Code is the encoded value. The value in the Meaning field is a humanly readable description of the field. The value in the Code field is the actual code value that is used for provisioning. For example, decoded value can be a LDAP group name, and encoded value is the LDAP group GUID.

  5. In the Code value, enter the Code value of the lookup type that you want to search.

    Note:

    To specify the search criteria, you can use the percent (%) wildcard character.

  6. In the Description field, you can enter a description of the lookup type.
  7. Click Search. The lookup types that match your search criteria are displayed in a tabular format.
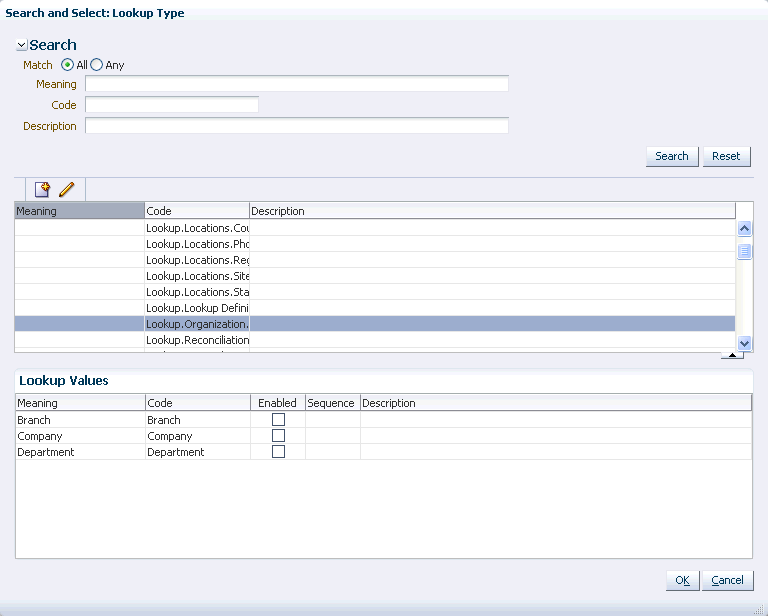
  8. Select a row in the search results table. The details of the selected lookup type is displayed in the Lookup Values section, as shown in Figure 14-1:

    Figure 14-1 The Search and Select: Lookup Type Window

    Description of Figure 14-1 follows
    Description of "Figure 14-1 The Search and Select: Lookup Type Window"
  9. The lookup values are enabled by default. You can deselect the checkboxes in the Enabled column for each lookup value to disable the lookup value.

    Note:

    There are multiple ways in which lookups are used. One way is to populate some form with data via the lookup icon on some process form to provision to a target system. Many lookups, such as lookups for most connectors, contain some configuration information. These lookups do not honor the checkbox in the Disabled column and assume that all configuration settings are valid.

    Task triggering based on lookup.usr_process_triggers, does not take into account or depend upon enabling and disabling of lookup value. If an entry is made into the lookup and the corresponding task is defined, then the task is triggered.

    To workaround this, either change the task name at process definition or change the value in the lookup definition level for task name. Oracle recommends changing the value in the lookup definition level for task name as a better approach.

  10. When finished, click OK.

14.2 Creating a Lookup Type

Use the Create Lookup Type dialog box to create a new lookup type.

To create a lookup type:

  1. Open the Search and Select: Lookup Type window.

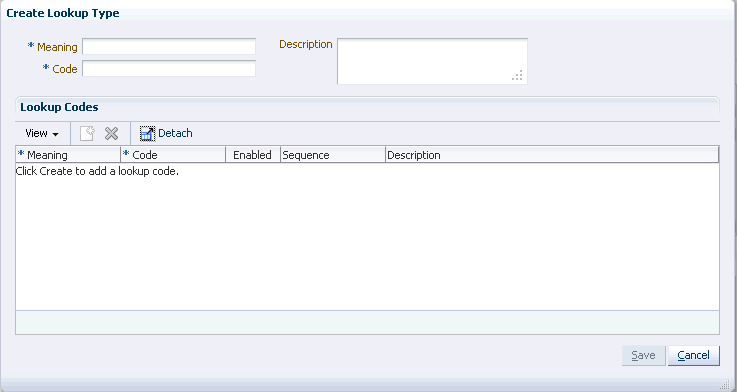
  2. Click the Create Lookup Type icon on the toolbar. The Create Lookup Type dialog box is displayed, as shown in Figure 14-2:

    Figure 14-2 The Create Lookup Type Dialog Box
    Description of Figure 14-2 follows
    Description of "Figure 14-2 The Create Lookup Type Dialog Box"
  3. Enter values in the Meaning and Code fields. These are mandatory fields. For a description of the Meaning and Code fields, see step 4 in Searching a Lookup Type.

    Note:

    In a clustered Oracle Identity Governance setup, when you try to create a new lookup type by entering a value in the Meaning field, the following error is displayed:

    "IAM-0120030:A system error #1528299731519 has occurred. Please contact System Administrator."

    The log file also shows the following:

    oracle.jbo.AttrSetValException: JBO-27020: The set method for attribute "Meaning" in LookupTypes cannot be resolved.
    at oracle.jbo.server.EntityImpl.setAttribute(EntityImpl.java:2230)
    at oracle.jbo.server.ViewRowStorage.setAttributeValue(ViewRowStorage.java:2554)
    at oracle.jbo.server.ViewRowStorage.setAttributeInternal(ViewRowStorage.java:2354)
    at oracle.jbo.server.ViewRowImpl.setAttributeInternal(ViewRowImpl.java:1691)
    .....
    Caused By: java.lang.NullPointerException
    at oracle.jbo.server.DBTransactionImpl.addPendingEvent(DBTransactionImpl.java:6030)
    at oracle.jbo.server.EntityCache.deliverEntityEvent(EntityCache.java:1737)

    To resolve this issue, perform the following steps:

    1. Stop all SOA Managed servers and OIM Managed servers.

    2. On each OIM Managed server, add the java option -Doracle.adfm.useSharedTransactionForFrame=false in the $DOMAIN_HOME/bin/setDomainEnv.sh file, as shown:

      if [ "${SERVER_NAME}" = "<OIM_SERVER_NAME>" ] ; then
      JAVA_OPTIONS="${JAVA_OPTIONS}
      -Doracle.adfm.useSharedTransactionForFrame=false"
      export JAVA_OPTIONS
      fi
    3. Restart the SOA Managed servers, and then restart the OIM Managed servers.

  4. In the Description field, optionally enter a description of the lookup type.

  5. Create one or more lookup codes for the lookup type. To do so:

    1. In the Lookup Codes section, click the Create Lookup Code icon. A row is added to the Lookup Codes section in which you can specify values for the attributes of the lookup code.

    2. Enter values for the Meaning, Code, and Description attributes.

    3. Select the checkbox in the Enabled column if you want to enable the lookup code.

    4. Repeat steps a to cto create as many lookup codes you want. To remove a lookup code, you can select the row for the code, and click the Remove Lookup Code icon.

  6. Click Save. The lookup type is created.

14.3 Modifying a Lookup Type

Use the Edit Lookup Type dialog box to edit an existing lookup type.

To modify a lookup type:

  1. Open the Search and Select: Lookup Type window.
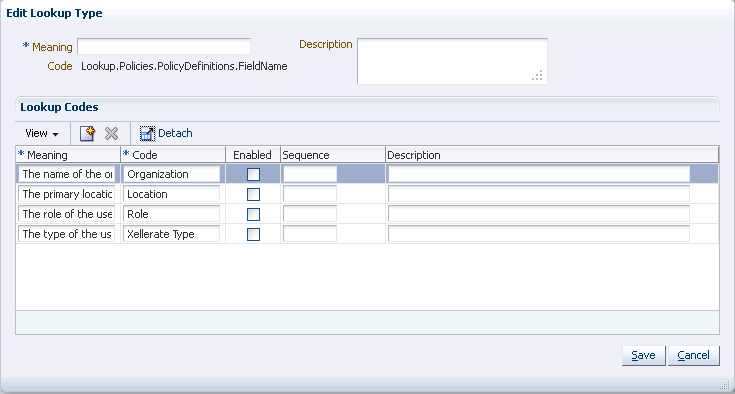
  2. Click the Edit Lookup Type icon on the toolbar. The Edit Lookup Type dialog box is displayed, as shown in Figure 14-3:

    Figure 14-3 The Edit Lookup Type Dialog Box

    Description of Figure 14-3 follows
    Description of "Figure 14-3 The Edit Lookup Type Dialog Box"
  3. To modify the values of the Meaning and Description attributes, specify values in the respective fields. The Code field is a read-only field.
  4. To modify lookup codes, select a row for the lookup code, and change the attribute values.
  5. Add or remove lookup values by clicking the Create Lookup Code and Remove Lookup Code icons respectively. For more information, see step 5 of Creating a Lookup Type.
  6. Click Save. The Lookup Type is modified.

Note:

PurgeCache utility must be run after updating lookup definition, without which you must re-save lookup UDF in a sandbox before the new lookup values can be used. This is also applicable to predefined fields and their lookup definitions. Therefore, PurgeCache utility must be run to purge cache for all categories.

See Purging the Cache in Performance and Tuning Guide for information about purging the cache.